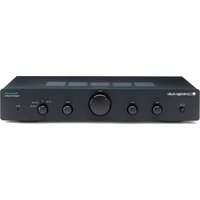
Topaz AM5 - Receiver CAMBRIDGE - Free user manual and instructions
Find the device manual for free Topaz AM5 CAMBRIDGE in PDF.


| Product Type | Stereo Receiver |
| Brand | Cambridge Audio |
| Model | Topaz AM5 |
| Power Output | 50W per channel into 8 ohms (RMS) |
| Frequency Response | 20 Hz - 20 kHz (±0.5 dB) |
| Total Harmonic Distortion | < 0.02% |
| Input Sensitivity (Line) | 200 mV |
| Signal-to-Noise Ratio | > 80 dB |
| Audio Inputs | 4x Line, 1x Phono (MM), 1x Tape |
| Audio Outputs | 2x Speaker (A/B), 1x Headphone (6.3mm), 1x Tape Rec, 1x Pre-out |
| Tuner | FM/AM with presets |
| Remote Control | Included (RC-AM5) |
| Dimensions (W x H x D) | 430 x 100 x 350 mm |
| Weight | 7.8 kg |
| Power Supply | AC 230V, 50/60Hz |
| Power Consumption | 300W maximum, < 1W standby |
| Cleaning and Maintenance | Wipe with a soft, dry cloth. Do not use solvents. |
| Safety Warnings | Do not expose to water or moisture. Avoid placing near heat sources. Use only specified voltage. |
| Spare Parts and Repairability | Contact Cambridge Audio service center for genuine spare parts. |
| Warranty | 2 years (depending on region) |
Frequently Asked Questions - Topaz AM5 CAMBRIDGE
User questions about Topaz AM5 CAMBRIDGE
0 question about this device. Answer the ones you know or ask your own.
Ask a new question about this device
Download the instructions for your Receiver in PDF format for free! Find your manual Topaz AM5 - CAMBRIDGE and take your electronic device back in hand. On this page are published all the documents necessary for the use of your device. Topaz AM5 by CAMBRIDGE.
USER MANUAL Topaz AM5 CAMBRIDGE
Topaz
AM1/AM5

Cambridge Audio
Your music + our passion
Cambridge Audio
Contents Introduction
Introduction 2
Important safety instructions ....3
Limited warranty....4
Rear panel connections....5
Front panel controls....5
Connections....6
Technical specifications....7
Troubleshooting....7
Thank you for purchasing this Cambridge Audio Topaz AM1 or AM5 Stereo Amplifier. We are confident that you will enjoy many years of listening pleasure from it. Like all Cambridge Audio products, the AM1 and AM5 adhere to our three core principles – stunning performance, ease of use and incredible value.
The unit can support a wide range of sources with the Topaz AM5 having a front panel MP3/Portable Media Player input that allows use with the headphone or line-level outputs of most portable players.
Part of our new Topaz range this product also features a new casework design with braced front panel, rigid wrap-over lid assembly and carefully designed mechanicals for resonance control.
Your amplifier can only be as good as the system it is connected to.
Please do not compromise on the quality of your source equipment, speakers or cabling. Naturally, we particularly recommend source and speaker models from the Cambridge Audio range, which have been designed to the same exacting standards as this product. Your dealer can also supply excellent quality Cambridge Audio interconnects to ensure your system realises its full potential.
Thank you for taking the time to read this manual; we recommend you keep it for future reference.
Matthew Bramble
Cambridge Audio Technical Director
and the AM1/5 design team
Make sure you register your purchase.
Visit: www.cambridge-audio.com/sts
By registering, you'll be the first to know about:
● Future product releases
● Software upgrades
● News, events and exclusive offers plus competitions!
This guide is designed to make installing and using this product as easy as possible. Information in this document has been carefully checked for accuracy at the time of printing; however, Cambridge Audio's policy is one of continuous improvement, therefore design and specifications are subject to change without prior notice.
This document contains proprietary information protected by copyright. All rights are reserved. No part of this manual may be reproduced by any mechanical, electronic or other means, in any form, without prior written permission of the manufacturer. All trademarks and registered trademarks are the property of their respective owners.
© Copyright Cambridge Audio Ltd 2009
Important safety instructions
For your own safety please read the following important safety instructions carefully before attempting to connect this unit to the mains power supply. They will also enable you to get the best performance from and prolong the life of the unit:
-
Read these instructions.
-
Keep these instructions.
-
Heed all warnings.
-
Follow all instructions.
-
Do not use this apparatus near water.
-
Clean only with a dry cloth.
-
Do not block any ventilation openings. Install in accordance with the manufacturer's instructions.
-
Do not install near any heat sources such as radiators, heat registers, stoves, or other apparatus (including amplifiers) that produce heat.
-
Do not defeat the safety purpose of the polarized or grounding-type plug. A polarized plug has two blades with one wider than the other. A grounding-type plug has two blades and a third grounding prong. The wide blade or the third prong are provided for your safety. If the provided plug does not fit into your outlet, consult an electrician for replacement of the obsolete outlet.
-
Protect the power cord from being walked on or pinched, particularly at plugs, convenience receptacles and the point where they exit from the apparatus.
-
Only use attachments/accessories specified by the manufacturer.
-
Use with only the cart, stand, tripod, bracket, or table specified by the manufacturer, or sold with the apparatus. When a cart is used, use caution when moving the cart/ apparatus combination to avoid injury from tip-over.

-
Unplug this apparatus during lightning storms or when unused for long periods of time.
-
Refer all servicing to qualified service personnel. Servicing is required when the apparatus has been damaged in any way, such as the power-supply cord or plug having been damaged, liquid has been spilled or objects have fallen into the apparatus, the apparatus has been exposed to rain or moisture, does not operate normally, or has been dropped.
WARNING
- To reduce the risk of fire or electric shock, do not expose this unit to rain or moisture.
- Batteries (battery pack or batteries installed) shall not be exposed to excessive heat such as sunshine, fire or the like.
The unit must be installed in a manner that makes disconnection of the mains plug from the mains socket outlet (or appliance connector from the rear of the unit) possible. Where the mains plug is used as the disconnect device, the disconnect device shall remain readily operable. Only use the mains cord supplied with this unit.
Please ensure there is ample ventilation (at least 10cm clearance all round). Do not put any objects on top of this unit. Do not situate it on a rug or other soft surface and do not obstruct any air inlets or outlet grilles. Do not cover the ventilation grilles with items such as newspapers, tablecloths, curtains, etc.
This unit must not be used near water or exposed to dripping or splashing water or other liquids. No objects filled with liquid, such as vases, shall be placed on the unit.

The lightning flash with the arrowhead symbol within an equilateral triangle is intended to alert the user to the presence of un-insulated 'dangerous voltage' within the product's enclosure that may be of sufficient magnitude to constitute a risk of electric shock to persons.
The exclamation point within an equilateral triangle is intended to alert the user to the presence of important operating and maintenance instructions in the service literature relevant to this appliance.

The symbol on this product indicates that it is of CLASS II (double insulated) construction.

WEEE symbol
The crossed-out wheeled bin is the European Union symbol for indicating separate collection for electrical and electronic equipment. This product contains electrical and electronic equipment which should be reused, recycled or recovered and
should not be disposed of with unsorted regular waste. Please return the unit or contact the authorised dealer from whom you purchased this product for more information.

CE mark
This product complies with European Low Voltage (2006/95/EC), Electromagnetic Compatibility (2004/108/EC) and Environmentally-friendly design of Energy-using Products (2005/32/EC). Directives when used and installed according to this instruction manual. For continued compliance only Cambridge Audio accessories should be used with this product and servicing must be referred to qualified service personnel.

C-Tick mark
This product meets the Australian Communications Authority's Radio communications and EMC requirements.

Ross Test Stamp
This product meets Russian electronic safety approvals.
FCC regulations
NOTE: THE MANUFACTURER IS NOT RESPONSIBLE FOR ANY RADIO OR TV INTERFERENCE CAUSED BY UNAUTHORIZED MODIFICATIONS TO THIS EQUIPMENT. SUCH MODIFICATIONS COULD VOID THE USER AUTHORITY TO OPERATE THE EQUIPMENT.

This equipment has been tested and found to comply with the limits for a Class B digital device, pursuant to Part 15 of the FCC Rules. These limits are designed to provide reasonable
protection against harmful interference in a residential installation. This equipment generates, uses and can radiate radio frequency energy and, if not installed and used in accordance with the instructions, may cause harmful interference to radio communications. However, there is no guarantee that interference will not occur in a particular installation.
If this equipment does cause harmful interference to radio or television reception, which can be determined by turning the equipment off and on, the user is encouraged to try to correct the interference by one or more of the following measures:
- Re-orient or relocate the receiving antenna.
- Increase the separation between the equipment and receiver.
- Connect the equipment into an outlet on a circuit different from that to which the receiver is connected.
- Consult the dealer or an experienced radio/TV technician for help.
Ventilation
IMPORTANT - The unit will become hot when in use. Do not stack multiple units on top of each other. Do not place in an enclosed area such as a bookcase or in a cabinet without sufficient ventilation.
Ensure that small objects do not fall through any ventilation grille. If this happens, switch off immediately, disconnect from the mains supply and contact your dealer for advice.
Positioning
Choose the installation location carefully. Avoid placing it in direct sunlight or close to a source of heat. No naked flame sources, such as lighted candles, should be placed on the unit. Also avoid locations subject to vibration and excessive dust, cold or moisture. The unit can be used in a moderate climate.
This unit must be installed on a sturdy, level surface. Do not place in a sealed area such as a bookcase or in a cabinet. Do not place the unit on an unstable surface or shelf. The unit may fall, causing serious injury to a child or adult as well as serious damage to the product. Do not place other equipment on top of the unit.
Due to stray magnetic fields turntables or CRT TVs should not be located nearby due to possible interference.
Electronic audio components have a running in period of around a week (if used several hours per day). This will allow the new components to settle down, the sonic properties will improve over this time.
Power sources
The unit should be operated only from the type of power source indicated on the marking label. If you are not sure of the type of power-supply to your home, consult your product dealer or local power company.
To turn the unit off, switch off at the front panel. If you do not intend to use this unit for a long period of time, unplug it from the mains socket.
Overloading
Do not overload wall outlets or extension cord as this can result in a risk of fire or electric shock. Overloaded AC outlets, extension cords, frayed power cords, damaged or cracked wire insulation, and broken plugs are dangerous. They may result in a shock or fire hazard.
Be sure to insert each power cord securely. To prevent hum and noise, do not bundle the interconnect leads with the power cord or speaker leads.
Cleaning
To clean the unit, wipe its case with a dry, lint-free cloth. Do not use any cleaning fluids containing alcohol, ammonia or abrasives. Do not spray an aerosol at or near the unit.
Battery disposal
Please dispose of any discharged batteries according to local environmental/electronic waste disposal guidelines.
Loudspeakers
Before making any connections to loudspeakers, make sure all power is turned off and only use suitable interconnects.
Servicing
These units are not user serviceable, never attempt to repair, disassemble or reconstruct the unit if there seems to be a problem. A serious electric shock could result if this precautionary measure is ignored. In the event of a problem or failure, please contact your dealer.
Limited warranty
Cambridge Audio warrants this product to be free from defects in materials and workmanship (subject to the terms set forth below). Cambridge Audio will repair or replace (at Cambridge Audio's option) this product or any defective parts in this product. Warranty periods may vary from country to country. If in doubt consult your dealer and ensure that you retain proof of purchase.
To obtain warranty service, please contact the Cambridge Audio authorised dealer from which you purchased this product. If your dealer is not equipped to perform the repair of your Cambridge Audio product, it can be returned by your dealer to Cambridge Audio or an authorised Cambridge Audio service agent. You will need to ship this product in either its original packaging or packaging affording an equal degree of protection.
Proof of purchase in the form of a bill of sale or receipted invoice, which is evidence that this product is within the warranty period, must be presented to obtain warranty service.
This Warranty is invalid if (a) the factory-applied serial number has been altered or removed from this product or (b) this product was not purchased from a Cambridge Audio authorised dealer. You may call Cambridge Audio or your local country Cambridge Audio distributor to confirm that you have an unaltered serial number and/or you purchased from a Cambridge Audio authorised dealer.
This Warranty does not cover cosmetic damage or damage due to acts of God, accident, misuse, abuse, negligence, commercial use, or modification of, or to any part of, the product. This Warranty does not cover damage due to improper operation, maintenance or installation, or attempted repair by anyone other than Cambridge Audio or a Cambridge Audio dealer, or authorised service agent which is authorised to do Cambridge Audio warranty work. Any unauthorised repairs will void this Warranty. This Warranty does not cover products sold AS IS or WITH ALL FAULTS.
REPAIRS OR REPLACEMENTS AS PROVIDED UNDER THIS WARRANTY ARE THE EXCLUSIVE REMEDY OF THE CONSUMER. CAMBRIDGE AUDIO SHALL NOT BE LIABLE FOR ANY INCIDENTAL OR CONSEQUENTIAL DAMAGES FOR BREACH OF ANY EXPRESS OR IMPLIED WARRANTY IN THIS PRODUCT. EXCEPT TO THE EXTENT PROHIBITED BY LAW, THIS WARRANTY IS EXCLUSIVE AND IN LIEU OF ALL OTHER EXPRESS AND IMPLIED WARRANTIES WHATSOEVER INCLUDING, BUT NOT LIMITED TO, THE WARRANTY OF MERCHANTABILITY AND FITNESS FOR A PRACTICAL PURPOSE.
Some countries and US states do not allow the exclusion or limitation of incidental or consequential damages or implied warranties so the above exclusions may not apply to you. This Warranty gives you specific legal rights, and you may have other statutory rights, which vary from state to state or country to country.
For any service, in or out of warranty, please contact your dealer.
Plug Fitting Instructions (UK Only)
The cord supplied with this appliance is factory fitted with a UK mains plug fitted with a 3 amp fuse inside. If it is necessary to change the fuse, it is important that a 3 amp one is used. If the plug needs to be changed because it is not suitable for your socket, or becomes damaged, it should be cut off and an appropriate plug fitted following the wiring instructions below. The plug must then be disposed of safely, as insertion into a mains socket is likely to cause an electrical hazard. Should it be necessary to fit a 3-pin BS mains plug to the power cord the wires should be fitted as shown in this diagram. The colours of the wires in the mains lead of this appliance may not correspond with the coloured markings identifying the terminals in your plug. Connect them as follows:
The wire which is coloured BLUE must be connected to the terminal which is marked with the letter 'N' or coloured BLACK.
The wire which is coloured BROWN must be connected to the terminal which is marked with the letter 'L' or coloured RED.
The wire which is coloured GREEN/YELLOW must be connected to the terminal which is marked with the letter 'E' or coloured GREEN.

If a 13 amp (BS 1363) plug is used, a 3 amp fuse must be fitted, or if any other type of plug is used a 3 amp fuse must be fitted, either in the plug or adaptor, or on the distribution board.
Rear panel connections

① Audio inputs
These inputs are suitable for any 'line level' source equipment such as the audio outputs of CD players, BD/DVD players, etc.
② Rec Out
Connect to a tape deck or to the analogue Record In sockets of a MiniDisc or CD recorder etc.
③ Loudspeaker terminals
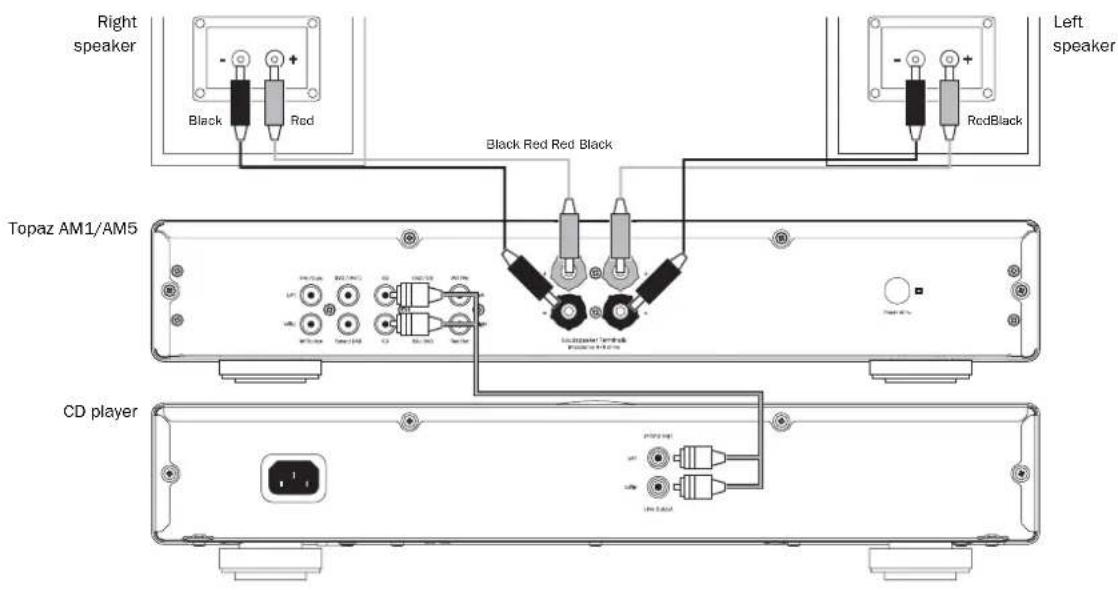
Connect the wires from your left channel loudspeaker to the Left positive and negative terminals, and the wires from the right channel loudspeaker to the Right positive and negative terminals. In each case, the red terminal is the positive output and the black terminal is the negative output.
Care should be taken to ensure no stray strands of wire are shorting the speaker outputs together. Please ensure that the loudspeaker terminals have been tightened adequately to provide a good electrical connection. It is possible for the sound quality to be affected if the screw terminals are loose.
④ AC power cable
Once all connections are complete, plug the captive AC power cable into an appropriate mains socket and turn the unit on.
Front panel controls

① On/Off
Switches the unit on and off.
② Bass and Treble (AM5 only)
These controls allow subtle adjustments to the tonal balance of the sound. In the central position these controls have no effect. They only modify the sound through your loudspeakers, and do not affect the signals sent through the Rec Out connections. If the musical recording is of poor quality or other factors are affecting the sound quality, it may be necessary to adjust the tone controls to compensate.
③ Volume
Use to increase or decrease the level of the sound from the outputs of the amplifier. This control affects the level of the loudspeaker output, it does not affect the Rec Out connections. It is advisable to turn the Volume control fully anti-clockwise before switching the amplifier on.
④ Balance
This control allows you to adjust the relative output levels of the left and right channels. In the central position the output from each channel is equal. This control only modifies the sound through your loudspeakers – it does not affect the signals sent through the Rec Out connections.
⑤ Source selector switch (BD/DVD, CD, Tuner/DAB, MP3/Aux)
Select the appropriate input source component that you wish to listen to. The signal selected is also fed to the Rec Out sockets so that it may be recorded. The input should not be changed whilst recording.
⑥ MP3 Input (AM5 only)
This source allows you to connect a portable audio device such as an MP3 player directly into the front of the unit using a 3.5mm stereo-jack. Once plugged in, this input is selected when the source selector switch is set to 'MP3/Aux'.
Note: If the MP3/Aux input on the rear panel is required, remove the jack from the front of the unit to enable the MP3/Aux input.
Cambridge Audio
Connections
Loudspeakers
Check the impedance of your speakers. You can use types with an impedance of between 4 and 8 Ohms.
The red coloured speaker terminals are positive (+) and the black speaker terminals are negative (-). Make sure correct polarity is maintained at each speaker connector or the sound can become weak and "phasey" with little bass.
Using bare wire connections
Prepare the speaker cords for connection by stripping off approximately 10mm (3/8") or less of the outer insulation. More than 10mm could cause a short circuit. Twist the wires tightly together so there are no loose ends. Unscrew the speaker terminal, insert the speaker cable, tighten the terminal and secure the cable.

Note: All connections are made using standard loudspeaker cable.
The diagram below shows the basic connection of your amplifier to a CD player and a pair of loudspeakers.
Technical specifications
AM1
Power output 20 watts (into 8Ω)
THD (unweighted) <0.02% @ 1kHz, 80% of rated power <0.15% 20Hz - 20kHz, 80% of rated power <0.1% 20Hz - 20kHz @ 10W
Frequency response (-3dB) 10Hz - 30kHz
S/N ratio (ref 1W) >82dB (unweighted)
Input impedances 32k ohms
Power Amp damping factor >100
Max. power consumption 150W
Dimensions 80 x 430 x 340mm (3.1 x 16.9 x 13.4")
Weight 5.1kg (11.2lbs)
AM5
Power output 25 watts (into 8Ω)
THD (unweighted) <0.015% @ 1kHz, 80% of rated power <0.15% 20Hz - 20kHz, 80% of rated power <0.1% 20Hz - 20kHz @ 10W
Frequency response (-3dB) 10Hz - 30kHz
S/N ratio (ref 1W) >82dB (unweighted)
Input impedances 32k ohms
Power Amp damping factor >100
Max. power consumption 180W
Bass/Treble controls Shelving, ultimate boost/cut +/- 5.5dB @ 20Hz and 20kHz
Dimensions 80 x 430 x 340mm (3.1x 16.9 x 13.4")
Weight 5.1kg (11.2lbs)
Troubleshooting
There is no power
Ensure the AC power cord is connected securely.
Ensure the plug is fully inserted into the wall socket and is switched on.
Check fuse in the mains plug or adaptor.
Check the power button is on at the front of the unit.
There is no sound
Check the correct input is selected.
Check that the speakers are connected correctly.
The sound is distorted
Check speaker connections.
There is a hum coming from the speaker
Ensure that all cable connections are secure.
There is unwanted background noise and interference
Move the unit away from other electrical equipment that is likely to cause interference.
Ensure that all cable connections are secure.
In the event that the above solutions do not remedy your problem, please consult our frequently asked questions (FAQ) section on our website: www.cambridge-audio.com/sts/faqs
For all servicing, in or out of warranty, please contact your dealer.
Cambridge Audio is a brand of Audio Partnership Plc Registered Office: Gallery Court, Hankey Place, London, SE1 4BB, United Kingdom Registered in England No. 2953313
www.cambridge-audio.com

natural_image
Technical line drawing of a mechanical component with three circular ports and a triangular base (no text or symbols)
- Topaz
- Cambridge Audio
- Contents Introduction
- Important safety instructions
- WARNING
- WEEE symbol
- CE mark
- C-Tick mark
- Ross Test Stamp
- FCC regulations
- Ventilation
- Positioning
- Power sources
- Overloading
- Cleaning
- Battery disposal
- Loudspeakers
- Servicing
- Limited warranty
- Plug Fitting Instructions (UK Only)
- Rear panel connections
- ① Audio inputs
- ② Rec Out
- ③ Loudspeaker terminals
- ④ AC power cable
- Front panel controls
- ① On/Off
- ② Bass and Treble (AM5 only)
- ③ Volume
- ④ Balance
- ⑤ Source selector switch (BD/DVD, CD, Tuner/DAB, MP3/Aux)
- ⑥ MP3 Input (AM5 only)
- Connections
- Using bare wire connections
- Technical specifications
- AM1
- AM5
- Troubleshooting
- There is no power
- There is no sound
- The sound is distorted
- There is a hum coming from the speaker
- There is unwanted background noise and interference
Brand : CAMBRIDGE
Model : Topaz AM5
Category : Receiver