Saxo 30 - Speakers System Audio - Free user manual and instructions
Find the device manual for free Saxo 30 System Audio in PDF.


| Product Type | Bookshelf Speaker |
| Brand | System Audio |
| Model | Saxo 30 |
| Dimensions (H x W x D) | 260 x 160 x 200 mm |
| Weight | 4.2 kg per speaker |
| Impedance | 8 ohms |
| Sensitivity | 88 dB (2.83V/1m) |
| Frequency Response | 55 Hz - 25 kHz |
| Power Handling (RMS) | 60 W |
| Recommended Amplifier Power | 20 - 100 W per channel |
| Drivers | 1" soft dome tweeter, 5" fiberglass woofer |
| Cabinet Type | Bass reflex with front port |
| Finish | Black or white satin lacquer |
| Grille | Removable magnetic grille |
| Connections | Single binding posts (gold-plated) |
| Recommended Placement | On stands or bookshelf, at least 20 cm from rear wall |
| Cleaning & Maintenance | Wipe with a dry, soft cloth; do not use solvents |
| Safety Precautions | Do not expose to moisture or extreme temperatures; keep away from magnets |
| Spare Parts & Repairability | Contact authorized service center; driver and crossover replacements available |
| Warranty | 5 years (limited) |
Frequently Asked Questions - Saxo 30 System Audio
User questions about Saxo 30 System Audio
0 question about this device. Answer the ones you know or ask your own.
Ask a new question about this device
Download the instructions for your Speakers in PDF format for free! Find your manual Saxo 30 - System Audio and take your electronic device back in hand. On this page are published all the documents necessary for the use of your device. Saxo 30 by System Audio.
USER MANUAL Saxo 30 System Audio
Welcome. Thank you for choosing SA.
The mission of System Audio A/S is to enthral people with the best possible sound.
A pair of SA loudspeakers will create a feeling of being close to the performers. The SA home theatre will drag the audience deeper into the action.
To achieve the best performance we recommend that you carefully read through this guide before setting up your new SA loudspeakers.
More information is available on www.system-audio.com

Important
Check the serial number
The serial number is on a sticker on the speaker's backside. You may wish to note the serial number down on your invoice and file it along with your insurance policy. Please contact your dealer if there is no serial number on the speaker.
Warranty
System Audio A/S provides a two-year warranty against production defects and a five-year warranty on speaker units and crossover network. The warranty does not cover misuse. Repairs and service are done by the dealer or associated workshop. Any changes made to the construction will annul the warranty.
Contents of the package
SA saxo 1: SA saxo 10:
2 x SA saxo 1 1 x SA saxo 10
2 x front grill 1 x front grill – vertical
1 x front grill - horizontal
4 x rubber feet
SA saxo 8
2 x SA saxo 8, 2 x SA saxo 30:
2 x front grill, 2 x SA saxo 30
8 x rubber feet, 2 x front grill
4 x reflex port plugs, 8 x 6mm rubber feet
SA saxo sub 8, SA saxo sub 10:
1 x SA saxo sub 8, 1 x SA saxo sub 10
1 x front grill, 1 x front grill
1 x power cord, 1 x power cord
! important
Accessories are placed in holes in the Styrofoam. Make sure you remove all parts before putting away the packing materials. If any part is missing please contact your dealer as soon as possible.
Running in new loudspeakers
All new high quality loudspeakers need a certain period of running-in time. As SA uses long-stroke bass drivers with natural rubber surrounds, our loudspeakers need at least 50 - 100 hours of actual music playing at a decent sound level. You will notice a gradual improvement in sound quality. No particular precautions need to be taken during those hours.

Unpacking
1 Place the carton bottom-up. Cut the tape with a knife - not deeper than 5 mm!

2 Turn the carton around and lift off

3 pull off the protecting Styrofoam
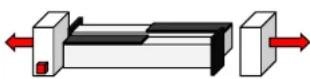
4 remove all accessories from the carton
! Important
- Always let the product reach room temperature before plugging it in. Condensation may arise in the electronic circuitry when moving the speaker from cold to warm surroundings. Such moisture may damage the speaker's components.
- Never use the product in damp settings.
- Avoid touching the speaker elements.
- Foreign bodies must not be inserted into the bass reflex ports of the speaker.
- Refrain from playing the speakers at a higher level than the music is still being reproduced clear and undistorted. Distortion may damage the drivers and electronic components. Damages caused by overloading the loudspeakers are not covered by the warranty.
Set up - floor standing loudspeakers
The SA saxo 30 are designed to stand on the floor. The speakers can, and should, be placed 20 – 40 cm away from a solid wall. The distance may be increased or decreased depending on the
acoustics of the room and the sound you want. After the 50-hour run-in period and appropriate adjustments, the speakers should be mounted on rubber feet or spikes.
Rubber feet. If the speaker is positioned on a solid underlay, e.g. a wooden floor, we recommend that you use the rubber feet. They break the link with the floor, which often causes vibrations.
Spikes. (bought separately) If the speakers are placed on a soft underlay, e.g. a carpet, we recommend that you use spikes. It is important that the speakers are completely vertically upright and do not move from side to side. If necessary, spend plenty of time adjusting spikes and locknuts to make sure the speaker rests evenly on all 4 spikes. Once you have finished adjusting them, tighten the nuts.
To make positioning easier, you might want to wait with the mounting of rubber feet or spikes until after the right position for the speakers is found.
Set up - compact loudspeakers
The SA saxo 1 and 10 are designed to be mounted on the table stand TS1. For the SA saxo, a dedicated wall mount is also available (see page 4). SA saxo 1 and 10 can also be placed directly on bookshelves. For optimal performance, there must be free air passage to the reflex port on the rear. Allow 10 cm behind the speaker and on one side of the speaker. We recommend using the included rubber feet underneath the speakers to give them a firm stand that improves dynamics and precision.
Set up - centre channel speaker
The SA saxo 10 is also ideal as a centre speaker. The speaker can be placed horizontally over or underneath the TV screen on the included rubber feet, or on the TS1 stand. Included is also a dedicated front grill for horizontal use.
Set up - on-wall speaker
The SA saxo 8 is designed for mounting directly on a wall or standing on a bookshelf.
Mount the speakers on a solid wall by using screws and rawlplugs (not included). Allow a 2 mm distance between the screw heads and the wall. Mount 2x2 rubber feet on top of each other in the lowest back corners.
Drill two 6 mm holes in a solid wall (one for each speaker) and mount rawlplugs and screws.
2x2 rubber feet on top of each other in the lowest back corners.

Included in the packing are 4 reflex plugs for tuning the bass response. Insert one or two plugs into the reflex ports behind the front grill to adjust the amount of bass to your liking after mounting the speakers.
Set up - subwoofer
As the subwoofer manages the deepest frequencies in the audio spectrum, the performance is most likely to be affected by the room acoustics. On that background, we recommend that you try the subwoofer in different positions in the room.
Please note:
- The amount of bass is higher when the subwoofer is placed close to a wall. A corner position will increase the amount of bass even more.
Integration of the sound from all speakers in the system is important. If possible, we recommend placing the subwoofer between the main speakers and at the same distance from the listening position.
Example of set-up
The sound from speakers depends very much on the room and on the way they are set up. You may wish to ask your dealer for advice on how to get the best sound with SA loudspeakers in your home.
Here is some general advice about experimenting with the set-up.

A: the distance between the rear of the speakers and the wall behind them
Start with a distance of 30 cm for SA saxo 30 and 20 cm for SA saxo 1 & 10. The distance should be precisely identical for both speakers. Try with music you know and find the distance that gives the best performance.
Greater distance = weaker but more precise bass, better imaging, and bigger sound stage.
Shorter distance = more but softer bass, smaller sound stage.
B: the distance from the side walls to the speakers
Preferably greater than the distance to the back wall.
A short distance to the side walls increases the amount of bass in the same way as A.
C, D: distance between speakers and listener
The ideal distance between the speakers is 2.5 – 3 metres. Distances C & D should preferably be the same. The speakers should be pointing inwards at an angle of approx. 15°.
Connection
The SA saxo-series are quality speakers which can be used for any Hi-fi stereo or surround system. The speakers do not need a particularly strong electrical current from the amplifier, e.g. 2 x 30 W will often run a set of SA saxo-series speakers, with an acceptable result, provided the quality of the amplifier and connected equipment is sufficiently high.
! important.
The amplifier must be turned off while the connection is being made
![graph TD A["Right speaker"] --> B["Black arrow"] C["Left speaker"] --> D["Black arrow"] B --> E["Red arrow"] D --> F["Red arrow"] E --> G["Black arrow"] F --> H["Black arrow"]](/content/2026/06/1258988/images/ca6ece78c014229c32282030e08de567873c50e3a95759f1ee1d12a29a73dd89.jpg)
connection - double check
Check that the cables are properly mounted. Make sure the electrical phase is correctly attached to the speaker connections. This means that cables attached to plus (+) or minus (-) on the amplifier/receiver must also be attached to plus (+) or minus (-) on the speakers.
On SA speakers the positive connection is indicated by a red socket or a plus (+).
Follow the speaker cables to make sure that the right and left channels (and the centre and rear channels where appropriate) are attached correctly.
connection SA saxo sub 8 and saxo sub 10


! important
Amplifier/receiver and the subwoofer must be turned off while the connection is being made.

System Audio A/S
maintenance
Clean the surface of the speaker with firmly wrung damp clothes.

Important
Do not use detergent. It may discolour the finish.
The fabric front is easily removed by a slight movement away from the speaker and is best cleaned by a vacuum cleaner with a brush-head attached.

important
Do not use a vacuum cleaner to remove dust from the speaker elements. Brush it away gently with a soft brush.
Accessories
SA saxo 1 and saxo 10
TS1
The TS1 table stand can be adjusted to support any compact loudspeaker with the right listening angle. An absolute must for low or high placed centre channel speakers.


Operating SA saxo sub 8 and saxo sub 10 On/Off switch (A) Select "ON" or "AUTO".
Auto is most energy efficient as the subwoofer only powers up when a signal is detected from the amplifier. Phase shifter (B) As a result of room acoustics and distances between listening position, speakers and subwoofer, there's no rule for which option is the best. Choose by listening to both options - 0° and 180°
Crossover (C) sets the maximum frequency as to how high the subwoofer will go. The larger the speakers are in the system, the lower the crossover can be set. If a surround amplifier in the system has adjustable subwoofer frequency, the frequencies should be set to the same level. Start e.g. at 80 Hz.
Volume (D) regulates the sound pressure from the subwoofer. Start e.g. with the control in the middle position.
Main circuit breaker (E). Power connection (F)

Please notice:
- The better your equipment, the better the speaker will sound. • Good cables improve the sound.
- Spend time experimenting with the position of the speakers.
- The closer the speaker is to a wall, the more bass. Move them further from walls for less bass. A corner will significantly increase the amount of bass and can make the sound "rumbling" and "massive".
- Avoid the use of iron stands underneath compact loudspeakers. Magnetic interference on the crossover will alter the sound.
- Never turn the volume up to a level where the sound is no longer good.
- Remove the front grille for the best possible sound. • See www.system-audio.com for more good advice and ideas.
Accessories
SA saxo 1
WB2
Wall bracket with tilt and swivel adjustment. Fits the pre-drilled holes on SA saxo1.
Accessories
SA saxo series
Front grilles
Change from the original black front grille to off-white front grille. Available for all models.
Recommended 5.1 home theatre combination with the SA saxo series
Front: SA saxo 30 - Rear: SA saxo 1 - Centre: SA saxo 10 - Subwoofer: SA saxo sub 10
Discover more stereo and home theatre combinations on www.system-audio.com


- IMPORTANT
- CHECK THE SERIAL NUMBER
- WARRANTY
- CONTENTS OF THE PACKAGE
- SA SAXO
- SA SAXO SUB 8, SA SAXO SUB
- RUNNING IN NEW LOUDSPEAKERS
- UNPACKING
- SET UP - FLOOR STANDING LOUDSPEAKERS
- SET UP - COMPACT LOUDSPEAKERS
- SET UP - CENTRE CHANNEL SPEAKER
- SET UP - ON-WALL SPEAKER
- SET UP - SUBWOOFER
- PLEASE NOTE
- EXAMPLE OF SET-UP
- A: THE DISTANCE BETWEEN THE REAR OF THE SPEAKERS AND THE WALL BEHIND THEM
- B: THE DISTANCE FROM THE SIDE WALLS TO THE SPEAKERS
- C, D: DISTANCE BETWEEN SPEAKERS AND LISTENER
- CONNECTION
- CONNECTION - DOUBLE CHECK
- SYSTEM AUDIO A/S
- MAINTENANCE
- ACCESSORIES
- PLEASE NOTICE
Brand : System Audio
Model : Saxo 30
Category : Speakers