
BDS 400 - Home Theater System HARMAN KARDON - Free user manual and instructions
Find the device manual for free BDS 400 HARMAN KARDON in PDF.


| Product Type | Home Theater System |
| Brand | Harman Kardon |
| Model | BDS 400 |
| Amplifier Power (Total) | 500 W RMS |
| Number of Channels | 5.1 |
| Supported Audio Formats | Dolby Digital, DTS, PCM |
| HDMI Inputs | 3 |
| HDMI Output | 1 (with ARC) |
| Optical Input | 1 |
| Coaxial Input | 1 |
| USB Port | 1 (for service only) |
| Wireless Connectivity | Bluetooth |
| Speaker Configuration | Passive speakers (sold separately) |
| Subwoofer Output | 1 (RCA) |
| Remote Control | Included (infrared) |
| Dimensions (Receiver) | 17.3 x 6.5 x 14.2 in (440 x 165 x 360 mm) |
| Weight (Receiver) | 18.7 lbs (8.5 kg) |
| Power Consumption | 250 W (standby <0.5 W) |
| Power Supply | AC 120V/60Hz or 230V/50Hz (selectable) |
| Cleaning | Wipe with a dry, soft cloth. Do not use solvents. |
| Safety | Ventilation slots must not be obstructed. Use only specified power source. |
Frequently Asked Questions - BDS 400 HARMAN KARDON
Alternatively, use optical or coaxial audio output from the TV.
Test with a different source to isolate the issue.
Pair by pressing the Bluetooth button on the remote or front panel.
Release the button; the receiver will restart with default settings.
If the problem persists, contact support.
Use the auto-calibration microphone (if included) or manual setup in the menu.
If the issue persists, contact technical support.
User questions about BDS 400 HARMAN KARDON
0 question about this device. Answer the ones you know or ask your own.
Ask a new question about this device
Download the instructions for your Home Theater System in PDF format for free! Find your manual BDS 400 - HARMAN KARDON and take your electronic device back in hand. On this page are published all the documents necessary for the use of your device. BDS 400 by HARMAN KARDON.
USER MANUAL BDS 400 HARMAN KARDON
Integrated home theater system
Owner's Manual

natural_image
Exterior view of a modern entertainment device with black speakers and a blue logo (no readable text or symbols beyond branding)harman/kardon®
by HARMAN
VERIFY LINE VOLTAGE BEFORE USING 3
UNPACKING 3
INSTALLATION LOCATION 3
CLEANING 3
MOVING THE RECEIVER 3
INTRODUCTION 3
SYSTEM COMPONENTS 4
SUPPLIED ACCESSORIES 4
RECEIVER FRONT-PANEL CONTROLS 5
RECEIVER REAR-PANEL CONNECTIONS 6
SUBWOOFER CONTROLS AND CONNECTIONS 7
REMOTE CONTROL FUNCTIONS 8
(BDS 800, BDS 700, BDS 400 AND BDS 300 SYSTEMS) 10
PLACING THE SPEAKERS (BDS 600 SYSTEM) 11
MOUNTING OPTIONS FOR SATELLITE AND CENTER SPEAKERS 11
CONNECTIONS 14
PREPARING THE REMOTE CONTROL 18
SETTING UP THE RECEIVER 19
USING THE RECEIVER 22
USING THE DISC PLAYER 23
LISTENING TO YOUR iPod/iPhone 25
USING THE RADIO 26
LISTENING TO AUDIO SOURCES 26
PLAYING FILES FROM USB DEVICES AND CD DATA DISCS 26
USING PLAYLISTS 28
TROUBLESHOOTING 29
AUX COMPONENT REMOTE-CONTROL CODE LIST 30
SPECIFICATIONS 35
Introduction
Please register your product on our Web site at www.harmankardon.com.
Note: You'll need the product's serial number. At the same time, you can choose to be notified about our new products and/or special promotions.
Thank You for Choosing harman kardon® Products!
In the years since harman kardon engineers invented the high-fidelity receiver, we have taken to heart this philosophy: Bringing the joy of home entertainment to as many people as possible, adding performance and ease-of-use features that enhance the experience. The BDS series of home entertainment systems offers a complete home entertainment solution with a wealth of listening and viewing options in one sleek receiver. Each BDS series system also includes a 5.1-channel, 2.1-channel or soundbar loudspeaker system, a system remote control and all the cables and accessories you need to enjoy movies and music in your own home, when you use them with your television or video display.
To get the maximum enjoyment from your new BDS system, we urge you to read this manual thoroughly and refer back to it as you become more familiar with your new system's features and their operation.
If you have any questions about this product, its installation or its operation, please contact your retailer or custom installer, or visit our Web site at www.harmankardon.com.
Verify Line Voltage Before Using
Your BDS receiver has been designed for use with 110 – 240-volt, 50Hz/60Hz AC current. Your subwoofer has been designed for use with either 120-volt, 60Hz or 220 – 240-volt, 50/60Hz AC current, depending on where your system was sold. The receiver includes a detachable IEC power cable designed for use in the region where the system is sold.
Connection to a line voltage other than that for which the units are intended can create a safety and fire hazard and may damage the units. If you have any questions about the voltage requirements for your specific model or about the line voltage in your area, contact your dealer before plugging the unit into a wall outlet.
Unpacking
The carton and shipping materials used to protect your new player during shipment were specially designed to cushion it from shock and vibration. We suggest that you save the carton and packing materials for use in shipping if you move or if the unit ever needs repair.
To minimize the size of the carton in storage, you may wish to flatten it. You can do it by carefully slitting the tape seams on the carton's bottom and collapsing it. You can store cardboard inserts in the same manner. Packing materials that cannot be collapsed should be saved along with the carton in a plastic bag.
If you do not wish to save the packaging materials, please note that the carton and other sections of the shipping-protection materials are recyclable. Please respect the environment and discard those materials at a local recycling center.
Remove the protective plastic film from the front-panel lens. Leaving the film in place will affect the performance of your remote control.
Installation Location
- To ensure proper operation and to avoid the potential for safety hazards, place the unit on a firm and level surface. When placing the unit on a shelf, be certain that the shelf and any mounting hardware can support the weight of the product.
- Provide proper space both above and below the unit for ventilation. If this product will be installed in a cabinet or other enclosed area, make certain that there is sufficient air movement within the area. Under some circumstances, a fan may be required.
Do not place the unit directly on a carpeted surface.
- Avoid installation in extremely hot or cold locations or in an area that is exposed to direct sunlight or heating equipment.
Avoid moist or humid locations. • - Do not obstruct the fan vents on the rear panel or the ventilation slots on the top and sides of the unit or place objects directly over or next to them.
- Do not place the receiver directly on top of a product that generates excessive heat.
- Due to the heat generated by the receiver and other components in your system, there is the remote possibility that the rubber padding on the bottom of the unit's feet may leave marks on certain wood or wood-veneer materials. Use caution when placing the unit on soft woods or other materials that heat or heavy objects may damage. Some surface finishes may be particularly sensitive to absorbing such marks, due to a variety of factors beyond harman kardon control, including the nature of the finish, cleaning materials used, normal heat and vibration caused by the use of the product, or other factors. Your warranty will not cover this type of damage to furniture, so exercise caution in choosing an installation location for the component and in performing normal maintenance practices.
Your new harman kardon®-Blu-ray Disc™ player requires a broadband Internet connection for BD-Live™ interactivity.
Cleaning
Receiver
When the receiver gets dirty, wipe it with a clean, soft, dry cloth. If necessary, and only after unplugging the AC power cord, wipe it with a soft cloth dampened with mild soapy water, then a fresh cloth with clean water. Wipe it dry immediately with a dry cloth. NEVER use benzene, aerosol cleaners, thinner, alcohol or any other volatile cleaning agent. Do not use abrasive cleaners, as they may damage the finish of metal parts. Avoid spraying insecticide near the unit.
Speakers and Subwoofer
When needed, use a soft cloth to remove any fingerprints or dust from the enclosures or grilles. NOTE: Do not use any cleaning products or polishes on the enclosures or grilles.
Moving the Receiver
Before moving the receiver, disconnect any interconnection cords to other components, and disconnect the unit from its AC outlet.
NOTE: The built-in Blu-ray Disc/DVD player in your BDS receiver is designed and manufactured for compatibility with region management information that is encoded on most Blu-ray Disc recordings and DVD recordings:
- BDS receivers sold in the USA are designed only for playback of discs with Blu-Ray Disc Region Code A and DVD Region Code 1 information, or for discs that do not contain any region code information.


- BDS receivers sold in Europe are designed only for playback of discs with Blu-ray Disc Region Code B and DVD Region Code 2 information, or for discs that do not contain region code information.
If there is a region code on a disc other than the one your BDS player is designed for, it will not play in your BDS receiver.
System Components
Your BDS system includes the following components:
BDS 800 System
1 x BDS 5 5.1-channel Blu-ray Disc receiver
4 x SAT-TS60 satellite speakers
1 x SAT-TS60 center speaker
1 x HKTS200SUB powered subwoofer
BDS 700 System
1 x BDS 5 5.1-channel Blu-ray Disc receiver
4 x SAT-TS7 satellite speakers
1 x CEN-TS7 center speaker
1 x HKTS200SUB powered subwoofer
BDS 600 System
1 x BDS 5 5.1-channel Blu-ray Disc receiver
1 x SB10 soundbar speaker
1 x HKTS210SUB powered subwoofer
BDS 400 System
1 x BDS 2 2.1-channel Blu-ray Disc receiver
2 x SAT-TS60 satellite speakers
1 x HKTS200SUB powered subwoofer
BDS 300 System
1 x BDS 2 2.1-channel Blu-ray Disc receiver
2 x SAT-TS11 satellite speakers
1 x HKTS200SUB powered subwoofer
Supplied Accessories
If any of these items are missing, please contact harman kardon Customer Service via www.harmankardon.com.
BDS 800, BDS 400 Systems

One mono RCA audio cable for connection to the subwoofer – purple connectors

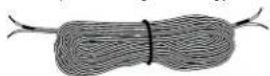
Two 10-meter (32.8-foot) speaker cables for rear satellites – gray and blue color bands (BDS 800 system only)

BDS 700, BDS 300 Systems
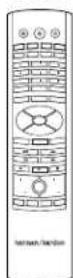
System remote control


Satellite speaker wall-mount brackets and hardware (four with BDS 700 system, two with BDS 300 system)

One 4-meter (13.1-foot) speaker cable for center speaker – green color band (BDS 700 system only)

One center speaker wall-mount bracket (BDS 700 system only)

One mono RCA audio cable for connection to the subwoofer – purple connectors

Two 10-meter (32.8-foot) speaker cables for rear satellites – gray and blue color bands (BDS 700 system only)
BDS 600 System
System remote control
Two soundbar wall-mount brackets

Two rubber feet


Three speaker cables

One mono RCA audio cable for connection to the subwoofer – purple connectors

Receiver Front-Panel Controls
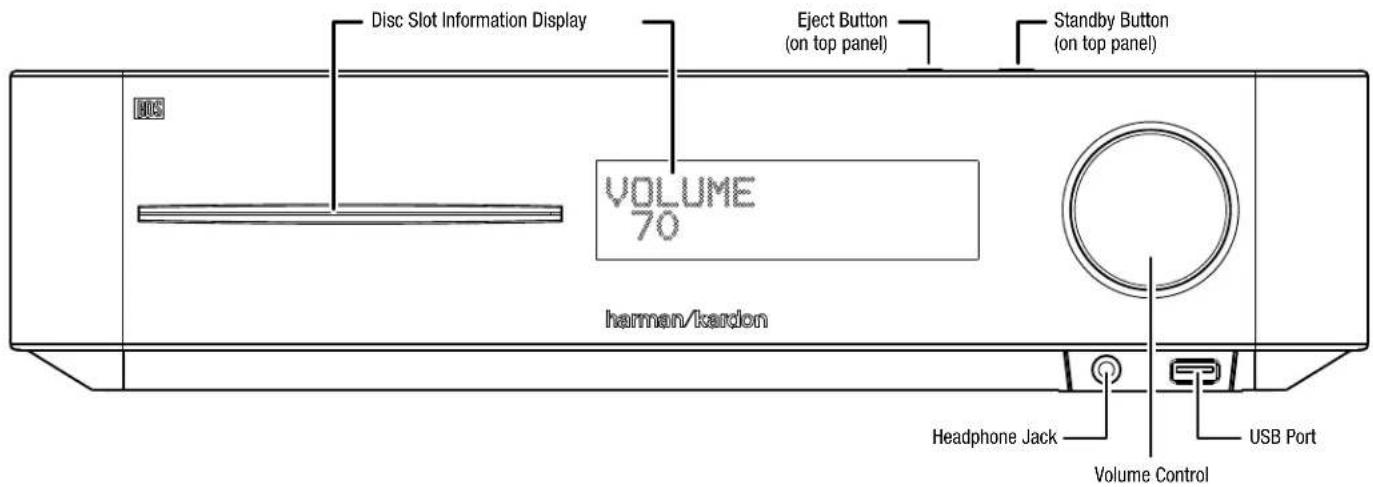
Disc Slot: Insert a compatible disc into the slot. The BDS receiver's disc player will accept 5-inch (12cm) and 3-inch (8cm) discs.
Information Display: Various messages appear on this display in response to commands and to show the audio/video that is playing, the settings or other aspects of the BDS receiver's status as described throughout this manual.
Eject Button (on top of unit): Press this button to eject a disc from the BDS receiver's built-in disc player. Before pressing this button, make sure no objects are blocking the disc-slot opening. NOTE: If you do not remove the ejected disc within 90 seconds, it will automatically re-load back into the disc player for protection.
Standby Button (on top of unit): This button toggles the receiver between the On and Standby modes.
Power Indicator: This LED surrounds the Standby button. When the BDS receiver is plugged into AC power, the LED turns amber to indicate that the receiver is in Standby mode (ready to be turned on). When you turn the BDS receiver on (by the Standby button or the remote control's Power button), the LED turns white.
Headphone Jack: Insert the 3.5mm stereo mini connector from a set of headphones
into this jack. NOTE: When a plug is inserted into the Headphone jack, the BDS receiver's speaker outputs automatically mute; the HDMI audio output remains active.
Volume Control: Rotate the disc clockwise to raise the volume; rotate counterclockwise to lower the volume. The volume level will appear on the Information Display and on the on-screen menu.
IMPORTANT: Do not turn the receiver's Volume control up to or past the point where the audio from the speakers becomes distorted. Doing so can damage the speakers.
USB 2.0 Port: Gently insert a flash drive or HDD disk drive with a USB Standard-A cable to this port.
IMPORTANT: Do not connect a PC or other USB host/controller to this port, or you may damage both the BDS receiver and the other device.
Orient the device's plug so it fits all the way into the BDS receiver's USB connector. You may insert or remove the device at any time – there is no installation or ejection procedure.
Receiver Rear-Panel Connections

NOTE: See the Connections section, on page 14, for detailed information about making connections.
AC Power Connector: After you have made and verified all other connections, plug the supplied AC power cord into this input and into an unswitched AC outlet.
Main Power Switch: This mechanical switch turns the BDS receiver's power supply on or off. After you have made and verified all connections (see the Connections section, on page 14), set this switch in the On position. During normal use you will usually leave this switch set to On; it cannot be turned on or off using the remote control. To conserve energy when you're not going to be using the receiver for an extended period of time, set this switch to Off.
Speaker Connectors: Use the speaker wires supplied with the speakers to connect the satellite and center speakers to the proper terminals.
- The BDS 5 receiver (shown) has connections for five speakers: front left, front right, surround left, surround right and center.
- The BDS 2 receiver (not shown) has connections for two speakers: front left and front right.
See Connections, on page 14, for more information.
Subwoofer Output: Use the supplied mono RCA audio cable (with the purple connectors) to connect this jack to the subwoofer's Line-Level In LFE jack. See Connecting the Subwoofer, on page 16, for more details about making connections.
BD-Live Connector: To be able to use the BD-Live feature, connect this port to your local area network (LAN) using a Cat. 5/Cat. 5e/RJ-45 network cable. See BD-Live Interactivity, on page 25, for details.
Optical Digital Inputs: Connect the optical digital output of an audio-only source component here. The signal may be a Dolby® Digital bitstream, a DTS® bitstream or a standard PCM digital-audio bitstream.
NOTE: Use only one type of digital connection for each source component.
Coaxial Digital Input: Connect the coaxial digital output of an audio-only source component here. The signal may be a Dolby Digital bitstream, a DTS bitstream or a standard PCM digital-audio bitstream.
NOTE: Use only one type of digital connection for each source component.
HDMI Output (HDMI ver. 1.3a): Connect the BDS receiver's HDMI output to your TV's HDMI input. Since the HDMI cable transmits both video and audio to the TV, we recommend that you set the receiver's HDMI audio output to Off in the receiver's Audio menu to take full advantage of your BDS system's superior audio performance. See Audio Settings, on page 21, for more information.
IMPORTANT: Your BDS receiver is in compliance with HDCP (High-Definition Copy Protection). Your TV must also be HDCP-compliant to be used with the BDS receiver's HDMI output. For best results, we do not recommend HDMI connections in excess of ten feet (about 3 meters) without a repeater. If your TV has a DVI input, you may use an optional HDMI-to-DVI cable or adapter for the video connection to the TV. (The DVI connection is video-only.)
Analog Audio Inputs 1 and 2: Use these inputs to connect to an audio-only source component (such as a tape deck). Do not connect a turntable to these jacks without a phono preamp.
The Bridge IIIP Connector: Connect The Bridge IIIP iPod/iPhone dock (available separately) to this terminal.
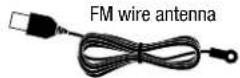
FM Antenna Connector: Connect the supplied FM antenna to this terminal.
Subwoofer Controls and Connections

Phase Switch: This switch determines whether the subwoofer driver's piston-like action moves in and out in phase with the satellite speakers. If the subwoofer were to play out of phase with the satellite speakers, the sound waves produced by the subwoofer could be cancelled out, reducing bass performance and sonic impact. This phenomenon depends in part on the relative placement of all the speakers in the room.
Although in most cases the Phase switch should be left in the "Normal" position, there is no absolutely correct setting for it. When the subwoofer is properly in phase with the satellite speakers, the sound will be clearer and have maximum impact. It will make percussive sounds like drums, piano and plucked strings sound more lifelike. The best way to set the Phase switch is to listen to music that you are familiar with and set the switch in the position that gives drums and other percussive sounds maximum impact.
Bass-Boost Switch: Set this switch to "On" to enhance the subwoofer's low-frequency performance. Set this switch to "Off" for normal low-frequency performance.
Power-On Mode Switch: When this switch is set in the "Auto" position and when the Power switch is set to "On," the subwoofer will automatically turn itself on when it receives an audio signal. It will enter the Standby mode if it receives no audio signal for 20 minutes. When the Power-On Mode switch is set in the "On" position, the subwoofer will remain on whether or not it is receiving an audio signal.
An LED on the subwoofer's top panel indicates whether the subwoofer is in the On or Standby mode:
- When the LED glows blue, the subwoofer is turned on.
- When the LED is not lit up, the subwoofer is in Standby mode.
When the Main Power Switch is set to Off, the LED will not light up, no matter what setting the Power-On Mode switch is in.
Subwoofer Level Control: Use this control to adjust the subwoofer's volume. Turn clockwise to increase the volume; turn counterclockwise to decrease the volume.
External Trigger Input Connector: NOTE: This connector is NOT used with the BDS receiver. If you connect the subwoofer to a different component that has a voltage trigger output connection, connect the External Trigger Input to the trigger output of the other compatible component. Whenever the subwoofer detects a trigger signal between 3V and 30V (AC or DC), the subwoofer's amplifier will turn on. The subwoofer's amplifier will turn off after the trigger signal ceases, even when the Power-On Mode switch is in the "Auto" position.
Line-Level In LFE Connector: Use the supplied mono RCA audio cable (with the purple connectors) to connect the Line-Level In LFE connector to the BDS receiver's Subwoofer output.
Line-Level In L/R Connectors: NOTE: These connectors are NOT used with the BDS receiver. If you connect the subwoofer to a different receiver that does not have a dedicated, low-pass-filtered subwoofer output, use these connectors.
- If the receiver has a separate subwoofer output, use the supplied mono RCA audio cable to connect the receiver or preamp/processor's subwoofer output to either one of the subwoofer's Line-Level In L/R connectors.
- If your receiver or preamp/processor does not have a separate subwoofer output, use two Y-adapters (not supplied). Connect one adapter's single end to the unit's preamp output for that channel. Connect one of this adapter's dual ends to the main amp input for that channel, and connect the adapter's other dual end to one of the subwoofer's Line-Level In L/R connectors. Repeat this process with the other Y-adapter, preamp channel, main amp input and subwoofer's Line-Level In L/R connector.
Main Power Switch: Set this switch in the On position to turn the subwoofer on. The subwoofer will then either be on or in Standby mode, depending on the setting of the subwoofer's Power-On Mode switch.
Power Cord: After you have made and verified all subwoofer and speaker connections described in this manual, plug the Power cord into an active, unswitched electrical outlet for proper operation of the subwoofer. DO NOT plug this cord into the accessory outlets found in some audio components.
Remote Control Functions

Eject Button: Press this button to eject a disc from the BDS receiver's built-in disc player. Before pressing this button, make sure no objects are blocking the disc slot opening.
Power Button: Pressing this button toggles the BDS receiver between the On and Standby modes.
TV Power Button: After you program the remote control, pressing this button turns the TV's power on and off. See Programming the Remote, on page 18.
Disc Button: Pressing this button selects the BDS receiver's built-in disc player as the system's active audio and video source and plays a disc that has been inserted into the player. Pressing this button also puts the remote control into the disc player control mode. See Using the Disc Player, on page 23, for details. NOTE: Pressing this button when the BDS receiver is in the Standby mode will switch it on.
Radio Button: Pressing this button selects the BDS receiver's built-in FM radio as the system's active audio source. Pressing this button also puts the remote control into the control mode for the radio. See Using the Radio, on page 26, for details. NOTE: Pressing this button when the BDS receiver is in the Standby mode will switch it on.
iPod Button: Pressing this button selects an iPod inserted in a connected The Bridge IIIP dock (available separately) as the system's active audio source. Pressing this button also puts the remote control into the control mode for the iPod. See Listening to Your iPod/iPhone, on page 25, for details. NOTE: Pressing this button when the BDS receiver is in the Standby mode will switch it on.
Aux Button: Pressing this button selects the receiver's active rear-panel audio input as the system's active audio source. Repeatedly pressing the button cycles through all of the rear-panel audio inputs. See Listening to Audio Sources, on page 26, for details.
Pressing this button also places the remote into the auxiliary-component control mode, enabling the remote to use any pre-programmed and/or learned functions. See Listening to Audio Sources, on page 26, for details. NOTE: Pressing this button when the BDS receiver is in the Standby mode will switch it on.
Settings Button: Pressing this button displays the BDS receiver's Settings menu. See Settings Menus, on page 20, for details.
Repeat Button: When the BDS is playing a Blu-ray Disc recording or DVD, pressing this button cycles through the following repeat modes: Chapter, Title, All, Off. When the BDS is playing a CD or listening to media stored on an iPod or USB device, this button cycles through the following repeat modes: Track, All, Off.
A-B Button: Pressing this button activates the A-B repeat mode. The first press sets the "A" repeat point; the second press sets the "B" repeat point and begins repeating the section of the program between the two points. Pressing the A-B button while the A-B repeat mode is active cancels the A-B repeat mode. This feature works both for the built-in disc player and for content from a USB device. Note: This feature is disc-dependent. Some discs do not allow A-B repeat.
Display Button: When playing Blu-ray Disc and DVD recordings, pressing this button activates a bar display containing information about the currently-playing disc or program. The button does not function when the BDS is playing material from an iPod, a USB device, an auxiliary source or the radio.
Numeric Buttons: Use these buttons to enter numbers for various items.
Clear Button: This button clears an incorrect entry made using the Numeric buttons.
Find Button: Pressing this button during disc playback activates the search function, allowing you to jump to a specific location on the disc. You can find a location by title, chapter or time. Note: This feature is disc-dependent. Some discs do not allow finding locations by title.
Home Button: Pressing this button returns the on-screen display to the Home screen from whatever screen is active when the button is pressed.
Surround Button: Pressing this button cycles through all of the surround-sound modes that are available for the active program. Each press of the Surround button will change to the next mode in line. A pop-up display will appear, showing the modes as you cycle through them. NOTE: Not all surround modes will be available for all programs. See Surround-Sound Modes, on page 23, for more information.
Options Button: Pressing this button displays any available options for the item that is active at the time the button is pressed. When listening to an Aux source, pressing the Options button lets you adjust the audio delay to eliminate "lip sync" errors between the sound and picture when watching video programs with sound playing through one of the receiver's rear-panel audio inputs. See Listening to Audio Sources, on page 26, for details.
Cursor Controls: Use these buttons to navigate through items on the on-screen menu.
OK Button: Press this button to select the highlighted item on the on-screen menu.
Exit Button: Pressing this button exits the current on-screen menu and displays the previous screen.
Top Menu Button: Displays the top menu of the Blu-ray Disc recording or DVD that is playing. NOTE: This feature is disc-dependent. Not all DVDs have top menus. If the DVD has no top menu, pressing the Top Menu button may display the disc menu, depending on how the disc's menu system was authored. See Using the Disc Player, on page 23, for details.
Pop-Up Button: Pressing this button while playing a Blu-ray Disc recording or DVD displays its disc menu. NOTE: This feature is disc-dependent. Not all DVDs have pop-up menus. If the DVD has no pop-up menu, pressing the Pop-Up button may display the disc menu, depending on how the disc's menu system was authored.
Previous/Step Button: Press this button once to skip to the beginning of a track or, when viewing photos, to the previous photo. Press the button twice to skip to the beginning of the previous track. Press the button repeatedly to go back through the previous chapters or tracks. When video content is playing on Blu-ray Disc recordings and DVDs, press the Pause button first; afterwards, each subsequent press of the Previous/Step button reverses the video one frame.
Next/Step Button: Press this button once to skip to the beginning of the next track or, when viewing photos, to the next photo. Press the button repeatedly to advance through the next chapters or tracks. When video content is playing, press the Pause button first; afterwards, each subsequent press of the Next/Step button advances the video one frame.
Search/Slow Reverse Button: Press this button to reverse through a disc track. For Blu-ray Disc recordings and DVDs, each press cycles through 2x, 4x, 8x, 16x and 32x reverse speed. Pressing the button while a Blu-ray Disc recording or DVD is paused will reverse through the chapter in slow motion. Each press cycles through 1/2, 1/4, 1/8 and 1/16 normal speed.
Search/Slow Forward Button: Press this button to fast-forward through the current disc track. For Blu-ray Disc recordings and DVDs, each press cycles through 2x, 4x, 8x, 16x and 32x normal speed. Pressing the button while a Blu-ray Disc recording or DVD is paused will play through the chapter in slow motion. Each press cycles through 1/2, 1/4, 1/8 and 1/16 normal speed.
Stop Button: Press this button to stop playback at the current point. (Pressing the Play button will resume playback from this point.) Press the Stop button twice to stop playback fully. NOTE: Some settings and functions will be available only when the player is fully stopped.
Play Button: Press this button to play a disc that has been loaded into the player's disc drawer or a music file that has been highlighted on the on-screen menu. Pressing this button when viewing photos begins a slide show of all photos in the current folder.
Pause Button: Press this button to pause a disc or music file that is playing. Pressing the button while a Blu-ray Disc recording or DVD is playing will freeze-frame on the current video frame. Pressing the button while the disc is paused will resume play. Pressing this button while viewing photos freezes the current photo on the screen.
Volume +/- Buttons: Press these buttons to increase or decrease the volume of the BDS receiver's speaker outputs. NOTE: The Volume +/- buttons do not change the volume of the HDMI audio outputs.
IMPORTANT: Do not turn the Volume buttons up to or past the point where the audio from the speakers becomes distorted. Doing so can damage the speakers.
Mute Button: Press this button to mute the sound from the BDS receiver's speaker outputs. Press the button again to un-mute the sound. NOTE: The Mute button does not mute the HDMI audio outputs.
Channel +/- Buttons: When Radio is the source selected on the remote control, the Channel +/- buttons select the next higher or lower preset station.
Bookmark (Green) Button: Press this button to activate the Bookmark function. See Bookmark Function, on page 24, for more information.
Thumbnail (Yellow) Button: Press this button while playing a photo slide show to display thumbnail images of all photos in the slide show.
Program (Red) Button: Press this button to create a programmed playback list for the currently-playing disc. See Programmed Play, on page 25, for more information.
Zoom (Blue) Button: Press the Zoom button to zoom in on or recede from a video image or slide. Use the Navigation buttons to zoom in on different sections of the image. NOTE: This function is disc-dependent for Blu-ray Disc recordings and DVDs. Not all discs can be zoomed in on.
Red, Green, Yellow and Blue Buttons: When the BDS is playing a Blu-ray Disc recording, these buttons can activate features and menus that may vary from disc to disc. Refer to the menu instructions for each particular disc for more information. NOTE: These Blu-ray Disc functions may override the Bookmark, Thumbnail, Program and Zoom functions.
Placing the Speakers (BDS 800, BDS 700, BDS 400 and BDS 300 Systems)
Placing the Front Left and Front Right Speakers

flowchart
graph TD
    A["Front Left Speaker"] --> C["Central Object"]
    B["Front Right Speaker"] --> C["Central Object"]
    C --> D["Output"]
Place the front speakers the same distance from each other as they are from the listening position. Place them at about the same height from the floor as the listener's ears will be. You can also angle them toward the listener.
Placing the Center Speaker (BDS 800 and BDS 700 systems only)

Place the center speaker directly above or below the center of the TV screen. Its center should be no more than 2 feet (61cm) above or below the tweeters of the front left and front right speakers. If you have a CRT television, it may be convenient to set the center speaker on top of the television set.
Placing the Subwoofer
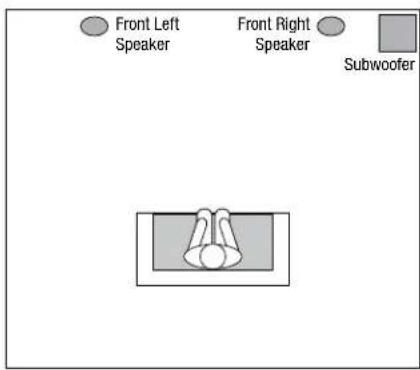
Since our ears do not hear directional sound at the low frequencies where the subwoofer operates, it will perform well from just about any location in your room. However, the best bass reproduction is likely to be heard if you place the subwoofer in a corner along the same wall as the front left and right speakers.
You can experiment with subwoofer placement by temporarily placing the subwoofer in the listening position and playing music with strong bass content. Move around to various locations in the room while the system is playing, and listen until you find the location where the bass performance is best. Place the subwoofer in that location.
Placing the Center Speaker (BDS 800 and BDS 700 systems only)

You should place the two surround speakers slightly behind the listening position, facing each other, 5 – 6 feet (1.5m – 1.8m) from the floor. An alternate location would be on a wall behind the listening position, facing forward. The surround speakers should not call attention to themselves while they're playing. Experiment with their placement until you hear a diffuse, ambient sound from the front left, front right and center speakers.
Placing the Speakers (BDS 600 System)
Placing the Front Left and Front Right Speakers
If your TV is placed on a table, you can place the soundbar on the table directly in front of the TV, centered with the TV screen. Attach the supplied rubber feet to the soundbar as shown in the illustration.
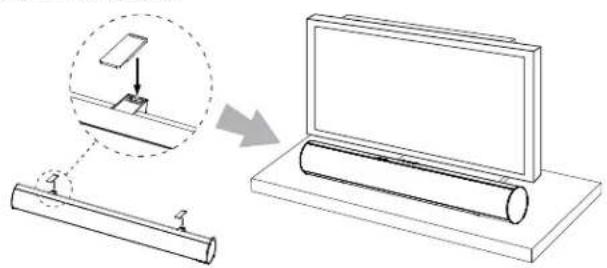
If your TV is located in an entertainment or media center, you can mount the soundbar in a space directly above or below the TV.
WARNING: Do NOT place the soundbar directly on top of a TV or at the front edge of a table or cabinet. It could roll forward and injure someone.
Wall-Mounting the Soundbar
If your TV is attached to a wall, you can use the included wall-mount brackets to mount the soundbar on the wall directly below the TV screen.
Determine the location for the soundbar on the wall. Make sure that the top of the 1. soundbar will not block your view of the TV screen when it is mounted on the wall.
Mark the locations of the soundbar wall-mount bracket holes on the wall. The holes 2. for the left and right brackets are spaced 600mm apart. The top and bottom holes for each bracket are spaced 25mm apart. See the illustration below.

NOTE: To insure that the soundbar will be level, use a carpenter's level, a laser sight or another device to insure that the two sets of holes are at exactly the same height.
Attach the two wall-mount brackets to the wall at the locations you marked, using 3. hardware that is appropriate for the wall's construction and materials. Note that the soundbar weighs 8.1 lb (3.67kg). Be sure to use hardware that can support this weight.


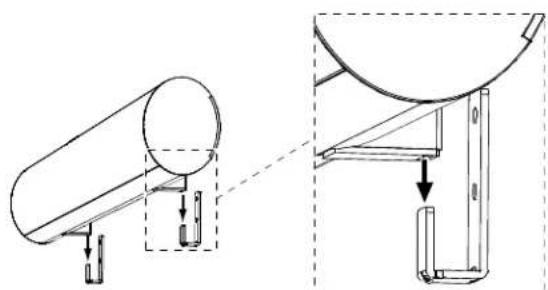
After making all of the connections described in the 4. Connections section, on page 14, attach the soundbar to the brackets by sliding the slots in its rubber bumpers onto the brackets' vertical tabs.
natural_image
Technical line drawing of a mechanical assembly with two views: one showing a cylindrical component and the other showing a bracket or bracket (no text or symbols present)Slide Slots in Rubber Bumpers onto Tabs on Brackets
Placing the Subwoofer
Follow the subwoofer placement directions in Placing the Speakers (BDS 800, BDS 700, BDS 400 and BDS 300 Systems), on page 10.
Mounting Options for Satellite and Center Speakers
Shelf Placement
You can place the satellite and center speakers on shelves. BDS 800 and BDS 400 satellite speakers have built-in bases for shelf placement. If you want, you can remove a base by pulling it straight off its speaker. Apply even pressure to both sides of the base and smoothly slide it off the speaker.

Wall-Mounting the BDS 800 and BDS 400 Satellite Speakers
IMPORTANT: Read the Connections section, on page 14, before wall-mounting the satellite speakers. You will need to insert the speaker wires through the wall-mount brackets and connect the wires to the speakers during the process of installing the brackets.
NOTE: If you are using your own speaker wire, it must be no thicker than the wire supplied with the speakers. Thicker wire will prevent the wall-mount bracket from sliding onto the speaker.
- Decide on the location for the speaker (see Placing the Speakers (BDS 800, BDS 700, BDS 400 and BDS 300 Systems), on page 10).
- Remove the speaker's base as explained in Shelf Placement, on this page.
- Disassemble the wall-mount bracket by pulling the two sections apart.

- Attach the wall portion of the wall-mount bracket onto the wall using hardware that is appropriate for the wall's construction and materials. We recommend first anchoring the bracket using its keyhole, then attaching it with another anchor through its top opening, as shown in the illustration. The satellite speakers weigh 3.3 lb (1.5kg). Be sure to use hardware that can support this weight.

NOTE: If you're running the speaker wire through the wall, you can bring it out directly behind the bracket location and insert it through the bottom opening in the wall portion of the bracket, as shown in the illustration. This move will keep the wire completely hidden from view once the installation is complete.

- If you're not running the speaker wire through the wall, insert it through the wall portion of the wall-mount bracket as shown in the illustration.
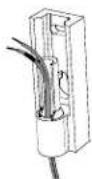
- Pass the speaker wire through the speaker portion of the wall-mount bracket as shown in the illustration.

- If you have not already removed the speaker's base, do so by pulling it straight off the speaker, as shown in the illustration. Applying even pressure to both sides of the base will allow it to slide off smoothly.

CAUTION: Before making speaker connections, be sure that the BDS receiver is turned OFF and, preferably, its AC cord is unplugged from the AC outlet.
- Connect the speaker wire to the speaker terminals as shown in the illustration:
A. Push Down on Cap to Open Hole

B. Insert Bare Wire into Open Hole

C. Release Cap to Secure Wire

Colored Band to Red Terminal
IMPORTANT: Make sure the (+) and (−) bare wires do not touch each other or the other terminal. Touching wires can cause a short circuit that can damage your receiver or amplifier.
- Slide the speaker portion of the wall-mount bracket onto the speaker as shown in the illustration below. Fit the grooves on the bracket onto the rails in the speaker, and apply even pressure on both sides of the bracket so it slides straight onto the speaker.
Push the bracket all the way onto the speaker until it snaps into place.
- Pull any slack speaker wire back through the bracket as you slide the bracket onto the speaker.

Push Down Evenly on Both Sides of Bracket

- Slide the speaker onto the bracket's wall section as shown in the illustration. Pull any slack speaker wire back through the bracket's wall section.

- Fit the metal stop plate into the recess on the bottom of the bracket with the pad facing the bracket, and fasten it to the bracket using two of the supplied screws. Fastening it will prevent the speaker from detaching from the bracket and will hold the speaker's position as you rotate it on the mount.

Wall-Mounting the BDS 800 Center Speaker
- Decide on the location for the speaker (see Placing the Speakers (BDS 800, BDS 700, BDS 400 and BDS 300 Systems), on page 10).
- Attach the center-speaker wall-mount bracket to the wall using hardware that is appropriate for the wall's construction and materials. Attach the anchors through the holes shown in the illustration.
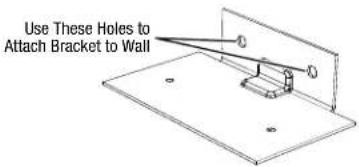
NOTE: The center speaker weighs 3.2 lb (1.45kg). Be sure to use hardware that can support this weight.
CAUTION: Before making speaker connections, be sure that your receiver or amplifier is turned OFF and, preferably, its AC cord is unplugged from the AC power source.
- Connect the speaker wire to the speaker terminals.


- Using two of the supplied screws, attach the center speaker to the wall-mount bracket, as shown in the illustration.

Wall-Mounting the BDS 700 and BDS 300 Satellite Speakers
- Remove the black shelf stand from the bottom of the speaker by unscrewing the bolt. Store the shelf stand and bolt in a safe place in case you need them in the future.

-
Determine the locations for the speakers. (See Placing the Speakers (BDS 800, BDS 700, BDS 400 and BDS 300), on page 10, for more information.) If possible, position the speakers so that the mounting screws (not included; use size #8) can be installed directly into a wall stud. If that is not possible, use optional wall anchors that are rated to support at least 25 lb (11.3kg) and are appropriate for the construction and materials of your wall. The customer is responsible for the proper selection and use of mounting hardware, available through hardware stores, to wall-mount the speakers properly and safely.
-
Bring the speaker cable through the wall-bracket attachment plate, and mount the attachment plate on the wall in the desired location.

- Thread the speaker cable through the arc-shaped opening on the top of the mounting bracket, not the screw hole.

- Attach the mounting bracket to the wall plate by inserting the tab at the top of the attachment plate into the slot on top of the bracket and snapping the bracket onto the attachment plate.

- Fit the terminal cover onto the bracket as shown in the illustration below, then connect the speaker leads to the terminals on the underside of the speaker. Remember to observe the correct polarity. See Connecting the Satellite and Center Speakers (BDS 700 and BDS 300 systems), on page 15, for more information.

- Fit the terminal cover into the opening on the underside of the speaker so that it is flush against the speaker and covers the terminals. Insert the supplied long bracket bolt up through the bottom of the bracket and terminal cover, and screw it into the threaded insert on the underside of the speaker. The bolt should be snug but not so tight as to prevent the speaker from pivoting on the bracket.

You can pivot the wall-mounted speaker from side to side; however, attempting to tilt it up or down will damage the bracket and possibly the wall, which would not be covered by your warranty.
Wall-Mounting the BDS 700 Center Speaker
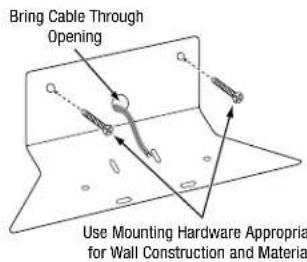
- Determine the location for the speaker (see Placing the Speakers (BDS 800, BDS 700, BDS 400 and BDS 300 Systems), on page 10, for more information). If possible, position the speaker so that one of the mounting screws (not included; use size #10) can be installed directly into a wall stud. If that is not possible, use optional wall anchors that are rated to support at least 25 lb (11.3kg) and are appropriate for the construction and materials of your wall. The customer is responsible for the proper selection and use of mounting hardware, available through hardware stores, to wall-mount the speaker properly and safely.
- Bring the speaker cable through the wall-bracket attachment plate as shown, and mount the attachment plate on the wall in the desired location.
- Remove the rubber pads from the foot rests on the bottom of the center speaker and connect the speaker leads to the terminals on the underside of the speaker. Remember to observe the correct polarity. See Connecting the Speaker Terminals (BDS 700 and BDS 300 systems), on page 15, for more information.
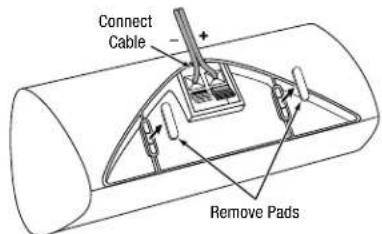
- Use the supplied screws to attach the speaker to the wall-mount bracket. The screws thread into the center foot-rest openings that were exposed when you removed the rubber pads in the previous step.

Connections
CAUTION: Before making any connections to the BDS receiver, ensure that the receiver's AC cord is unplugged from the receiver and the AC outlet. Making speaker connections with the receiver plugged in and turned on could damage the speakers.
Speakers and receivers/amplifiers have corresponding (+) and (−) connection terminals. Your system's satellite speakers use red to denote the (+) terminal and black for the (−) terminal.
- The BDS 2 receiver uses white to denote the left channel (+) terminal and red for the right channel (+) terminal. Black is used to denote the (−) terminal of both channels.
- The BDS 5 receiver uses the following colors to denote the (+) terminals of the various channels:
Front Left (+): White Surround Left (+): Blue
Front Right (+): Red Surround Right (+): Gray
Center (+): Green
Black is used to denote the (−) terminals of all channels on the BDS 5 receiver.
The speaker wires included with your system have colored bands at both ends of the (+) conductor; the colors correspond to the receiver's (+) terminal colors. This system helps you connect each speaker to the correct receiver or amplifier terminals. In addition to the colored bands at each end, each speaker wire's (+) terminal has ribs molded into its insulation to help identify it.
Be sure to connect each speaker identically: (+) on the speaker to (+) on the receiver or amplifier, and (−) on the speaker to (−) on the receiver or amplifier. Miswiring one or more speakers results in thin sound, weak bass and a poor stereo image.
CAUTION: Make sure the (+) and (−) bare wires do not touch each other or the other terminal. Touching wires can cause a short circuit that can damage your receiver or amplifier.
Connecting the Satellite and Center Speakers (BDS 800 and BDS 400 systems)

Connecting the Satellite and Center Speakers (BDS 700 and BDS 300 systems)

* Speakers included only in BDS 700 system
Connecting the Satellite and Center Speakers (BDS 600 system)

Connecting the Speaker Terminals (BDS 800 and BDS 400 systems)

Connecting the Speaker Terminals (BDS 700 and BDS 300 systems)
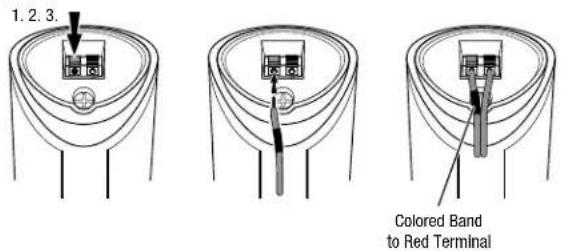
Connecting the Speaker Terminals (BDS 600 system)
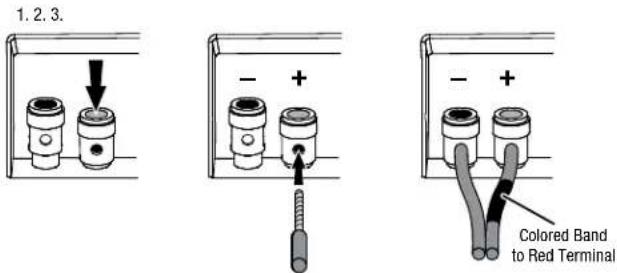
Connecting the Receiver Terminals (all systems)

natural_image
Three-step diagram showing a cylindrical connector being twisted with a cable, no text or symbols presentA. Unscrew Cap B. Insert Bare Wire C. Tighten Cap
Connecting the Subwoofer (all systems)
Use the supplied mono RCA audio cable (purple connectors) to connect the subwoofer's Line-Level LFE In connector to the BDS receiver's Subwoofer output.
BDS Receiver (BDS 2 shown)

IMPORTANT: Do not plug the subwoofer's AC power cord into an AC outlet at this time.
Connecting the Radio Antenna
Connect the supplied antenna to the Radio Antenna connection, as shown in the illustration below. Fully extend the antenna wire and move it to different positions until you get the best reception of your favorite stations.

Connecting a TV or Video Display
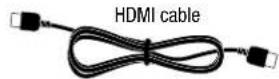
Use the supplied HDMI cable to connect the BDS receiver's HDMI output to your TV/video display's HDMI input. The BDS receiver is HDMI version 1.3a.

NOTE: The HDMI connection will deliver both video and audio to your TV or video display. We suggest disabling your TV or video display's audio system to take full advantage of your BDS system's superior audio reproduction.
Connecting Audio Sources

flowchart
graph TD
    A["TV"] --> B["Tape Deck"]
    B --> C["Cable/Satellite Tuner"]
    C --> D["Digital Audio Source"]
    B --> E["To Optical Output"]
    B --> F["To Play Output"]
    B --> G["To Audio Output"]
    B --> H["To Coaxial Output"]
    style A fill:#f9f,stroke:#333
    style D fill:#ccf,stroke:#333
    style C fill:#cfc,stroke:#333
    style B fill:#fcc,stroke:#333
    style E fill:#cff,stroke:#333
    style F fill:#ffc,stroke:#333
    style G fill:#cfc,stroke:#333
    style H fill:#fcc,stroke:#333
Analog Audio Inputs 1 and 2: If you have an audio-only analog source component (such as a tape deck), connect its left and right analog outputs to the Analog Audio Input 1 or Analog Audio Input 2 jacks as shown in the illustration.
NOTE: To hear a TV show through your BDS system, you need to connect the audio output of your TV to the BDS receiver. If your TV has a digital-audio output, you can connect it to one of the BDS receiver's digital inputs (see below). If your TV does not have a digital-audio output, you will need to connect the TV's analog-audio output to the BDS receiver's Analog Audio Input 1 or Analog Audio Input 2 jacks.
Coaxial In and Optical 1/Optical 2 In: If you have an audio-only digital source component (such as a CD changer or video game), you can connect it to one of these inputs, as shown in the illustration. When using the Optical 1 and Optical 2 digital connections, gently push the cable connector through the panel connector's built-in shutter until it is firmly seated in the connector.
NOTE: Use only one type of digital connection for each source component.
Connecting to a Local Area Network (LAN)
Use a CAT. 5/RJ45 network cable (not supplied) to connect the BDS receiver's BD-Live connector directly to a network router, a network switch, a network modem or an Ethernet network wall jack that has Internet access.
NOTE: The BDS receiver can not access content on other networked devices. The Network connection enables only the receiver's BD-Live features. See BD-Live Interactivity, on page 25, for details.

flowchart
graph TD
    A["Global Network"] -->|To Internet| B["Network Modem"]
    B --> C["Cat. 5/5E"]
    C --> D["Analog Devices"]
    D --> E["Analog Devices"]
    E --> F["Analog Devices"]
    style A fill:#f9f,stroke:#333
    style B fill:#ccf,stroke:#333
    style C fill:#cfc,stroke:#333
    style D fill:#fcc,stroke:#333
    style E fill:#cff,stroke:#333
    style F fill:#ffc,stroke:#333
Connecting the AC Power
The BDS receiver comes with a detachable AC power cord. This type of cord makes it easier for you to install and connect all other system wiring to the receiver's rear panel. The subwoofer has a non-detachable power cord.
NOTES:
- The power requirement for the BDS receiver is 110V - 240V AC, 50/60Hz, 110W (BDS 5 receiver) or 70W (BDS 2 receiver). The power requirement for the subwoofer is 110V - 120V AC, 60Hz, 200W (USA) or 220V - 240V AC, 50/60Hz, 200W (EU). Connecting to a power source other than the ones listed may damage the receiver or subwoofer, or cause abnormal operation.
- Before connecting the AC power cords to wall outlets, confirm that you have correctly made all of the speaker connections, video connections and audio-component connections.
Connect the female end of the receiver's detachable power cord to the receiver's AC Power Input connector. Plug the other end into a working, unswitched AC outlet. Plug the subwoofer's power cord into a working, unswitched AC outlet as well.

Set the receiver's and subwoofer's Main Power switches in the "On" position. The receiver's Power indicator will turn amber, indicating that the receiver is in the Standby mode.
- The subwoofer's LED will not light up until it receives a turn-on signal. See Subwoofer Controls and Connections, on page 7, for details.
Preparing the Remote Control
Installing the Batteries
Your BDS system remote control uses three AAA batteries (supplied). Insert the batteries as shown in the illustration, making sure to observe the correct polarity.
1.2.3.
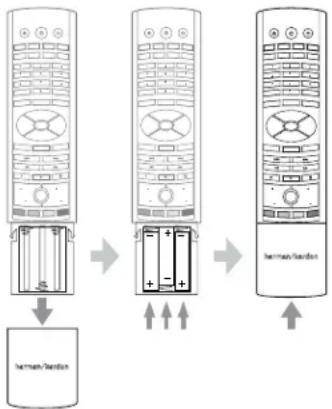
flowchart
graph TD
    A["Barman's Connection"] --> B["Battery charging"]
    B --> C["Power transmission"]
    C --> D["Barman's Connection"]
Using the Remote
When using the remote, remember to aim it toward the receiver's front panel. Make sure that no objects, such as furniture, block the remote's view of the receiver. Bright lights, fluorescent lights, and plasma-video displays may interfere with the function of the remote.
- The remote has a range of about 20 feet (6.1m), depending on the lighting conditions.
You can use the remote at an angle of up to 30^ to either side of the BDS receiver. If the remote seems to operate intermittently, or if pressing a button on the remote does not cause one of the buttons to light up, make sure that the batteries are inserted correctly. If the remote still operates intermittently, replace all three batteries with new ones.
Programming the Remote
In addition to controlling the BDS receiver, you can program the remote to control one auxiliary (Aux) component. The remote is also capable of learning codes directly from other remotes. This ability allows you to combine learned commands with programmed codes, making the remote capable of controlling more than one Aux component. Typical Aux components would be your TV, a satellite receiver or a cable receiver.
The remote will control the Aux component(s) only when the Aux source button has been pressed. Pressing any other source button will put the remote back into the BDS receiver control mode.
To program the remote to control an Aux component:
Look up the codes for the product type (e.g. TV, cable TV box) and the brand name of 1. your source in the Aux Component Remote-Control Code List, on page 30.
Turn your auxiliary component on.2.
Press and hold the Aux button for three seconds as it turns red, goes dark and turns 3. red again. Then release the button.
NOTE: The remote will remain in the programming mode for 20 seconds. You must perform Step 4 within 20 seconds.
Aim the remote toward the component you just turned on and enter a code number 4. from Step 1, above. If the component turns off, check that its own remote-control buttons control the component as expected. If they do, press the Aux button again to save the code. The button will flash three times and the remote will exit the programming mode.
If any of the buttons do not work as expected, or if the device does not turn off when 5. you enter the code number, repeat Step 4 with another code number from the list for that manufacturer.
If you run out of codes, you can search through all of the codes in the remote's 6. library for that product type.
a) Press and hold the Aux button for three seconds. The button will turn red, go dark and turn red again. Then release the button.
b) For a conventional US TV, enter "0999"; for a conventional EU TV, enter "1999"; for an HDTV, enter "2999"; for a US cable box, enter "3999"; for an EU cable box, enter "4999"; for a US satellite tuner, enter "5999"; for an EU satellite tuner, enter "6999."
c) Aim the remote control toward the component and press the remote's Cursor Up button. Each press of the button sends the "Power" signal for one setup code number. Holding down the Cursor Up button quickly scans through all of the setup code numbers.
d) Release the Cursor Up button as soon as the component turns off. If you pass the correct setup code number, you can return to it by pressing the Cursor Down button, one setup code number at a time, until the component turns back on.
e) Check that the other remote-control buttons control the component as expected. If they do, press the Aux source selector button again to save the code. The button will flash three times, and the remote will exit the programming mode.
f) If the remote does not operate as expected, repeat Steps c - e. Note that some components may not respond to all of the above commands and may support only some of the commands listed.
To teach individual button codes to the remote:
You can teach codes from other component remotes onto the BDS receiver remote buttons shown shaded in the following illustration:

- Place the BDS remote and the remote from which you want it to learn codes head-to-head about 1 inch (2.5cm) apart, with their IR transmitter windows facing each other.
- Press and hold the Settings button on the BDS receiver remote for more than three seconds. The remote's Aux button will light up.
- Press the button on the BDS receiver remote to which you want to teach the command. The Learn mode will remain active for 20 seconds after the button is pushed.
- Press the button on the other remote that you want to "teach" to the BDS receiver remote. When the IR code has been received and stored, the Aux button's LED will flash three times, and the BDS receiver remote will remain in the learning mode, ready to learn another code. If no IR code is received within 20 seconds, the Aux LED will flash rapidly several times, and the remote will exit the learning mode. To resume programming, return to Step 2.
- Repeat Step 3 and Step 4 for each command you want to teach the BDS receiver remote. NOTE: If the Aux button's LED goes out at any time, you will need to begin again from Step 2.
Programming Remote Control "Punch-Through" Commands
After programming the remote to control an auxiliary (Aux) component, you can also program it so it will control the Aux component's channel up/down and transport functions (Play, Pause, etc.) even when the remote is not in the Aux-control mode. For example, if the remote is programmed to operate your TV in the Aux control mode, you can also have the TV's channel +/- functions "punch through" and operate even when the remote is in the Disc, Radio or iPod control modes.
- Press and hold the button for the main device the remote will be operating. The button will light up, go dark and then light up again. Release the button.
- Select the type of punch-through programming.
a) For "punch-through" channel control, press the Channel Up button.
b) For "punch-through" transport control, press the Play button.
3. Press the Aux button. The original source button will flash to confirm.
You can repeat Step 1 – Step 3 for any of the remote's source-selector buttons (Aux, Radio etc.). NOTE: "Punch-through" channel and transport commands will override the existing commands for those buttons in the source modes you program.
To undo “punch-through” programming, follow the same steps as above, but press the same source selector button in Step 1 and Step 3.
Using the Remote After it is Programmed
Pressing the remote's Aux source-selector button will put the remote into the auxiliary-control mode, and it will control the auxiliary component(s) via the codes you have programmed into it.
To switch the remote back to the BDS receiver-control mode from the auxiliary-control mode, press any one of these buttons: Disc, Radio, iPod or Home.
Setting Up the Receiver
NOTE: The menu screens shown in this manual are for illustrative purposes and may differ somewhat from the actual displays.
To set up your BDS system, you will use the remote to navigate through all of the on-screen menus and to make selections from them.
- Use the Cursor Up/Down buttons to navigate through the menu list. When an item is highlighted, a white border will appear around it.
- To select a highlighted item, press the OK button. The screen will change depending on your selection.
To return to the previous screen, press the Exit button.
Setup Wizard
When you turn your BDS receiver on for the first time, the on-screen menu will display the Setup Wizard.

Before you can use your BDS system, you need to set the language and make a few basic settings so that the BDS receiver's video output will work properly with your TV. Press the OK button and the Wizard's language screen will appear.

After setting the language you want the on-screen menus to appear in, press the OK button and the Wizard's TV-resolution screen will appear.

After selecting your TV's highest resolution, press the OK button, and the Wizard's aspect-ratio screen will appear. Note: If you are unsure of your display's highest resolution, select "Auto" and BDS will select the optimal resolution for you.
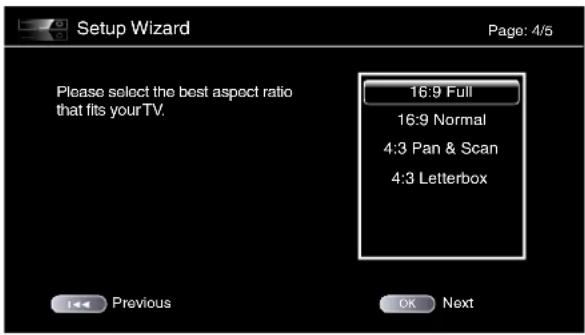
After selecting the aspect ratio that best fits your TV, press the OK button to save your setting, then press it again to exit the Setup Wizard.
Settings Menus
Pressing the remote's Settings button displays the receiver's settings menus, which allow you to configure the receiver's various functions. Use the remote's Cursor Left/Right buttons to change from one menu to another, use the Cursor Up/Down buttons to navigate through the lists that appear on the various screens, and use the OK button to select highlighted items. Press the Exit button at any time to return to the previous screen.
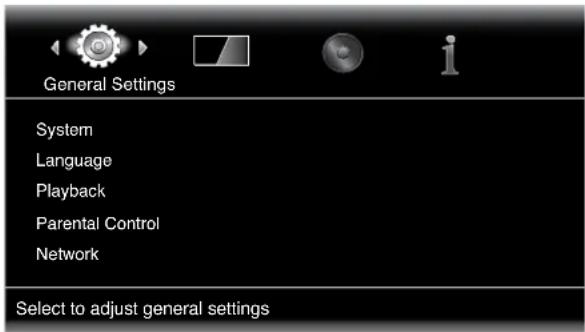
General Settings
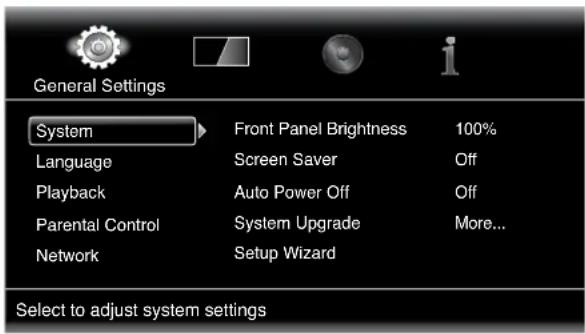
System: The System option allows you to set the following system features:
Front Panel Brightness: This option sets the brightness of the BDS receiver's information display.
Screen Saver: To prevent image burn-in, we recommended activating the Screen Saver when using the BDS receiver with a CRT or plasma TV.
Auto Power Off: This option sets the amount of time the BDS receiver remains on while idle until it automatically enters the Standby mode.
System Upgrade: Select this option when you want to install a BDS firmware upgrade for your BDS receiver that you've downloaded from a harman kardon Web site or other harman kardon source.
Setup Wizard: This option activates the receiver's Setup Wizard (see Setup Wizard, on page 19).
BD-Live Storage: This option lets you set up how the BDS receiver will handle stored BD-Live content. You can choose to store the content either in the receiver's internal memory or on a USB memory device via the receiver's USB port. See BD-Live Interactivity, on page 25, for details.
Restore Defaults: This option restores the receiver to its factory-default setting values. Note: This procedure deletes all preset FM stations and restores the parental-control password back to the factory default of 0000.
Language: This setting lets you set the language for the disc player and the disc menus, the preferred audio language and the preferred subtitle language.
NOTE: If the selected language is not available on the particular disc being played, use the disc's menu to set the language from those available on the disc.
Playback: The Playback option allows you to set the following disc playback features:
Show Angle Icon: This option lets you select whether or not the angle icon will automatically be displayed when a disc with multiple camera angles is played.
Auto Play: This option lets you select whether discs will automatically begin playing when they are inserted into the BDS receiver's disc player.
Show PIP Icon: This option lets you select whether or not the picture-in-picture (PIP) icon will automatically be displayed when a Blu-ray Disc recording with PIP content is played.
Show Secondary Audio Icon: This option lets you select whether or not the Secondary Audio Icon will automatically be displayed when a Blu-ray Disc recording with secondary audio content is played.
Disc Resume: This option lets you select whether or not a disc that has been ejected while playing will resume play from that location when it is re-inserted into the receiver's disc player.
DivX® VOD DRM: This option displays your receiver's DivX registration information.
Parental Control: This option lets you set the receiver's parental-control password and the level of parental control you want active. NOTE: The default password is 0000.
Network: This option allows you to set the following network features:
Information: This displays your network's IP, Subnet Mask, Gateway and DNS addresses.
Test Connection: This option tests for a proper network connection to the BDS receiver. IP Configuration: This option lets you enter your network settings, either automatically or manually. Unless your network administrator instructs you otherwise, you should use the Auto option.
BD-Live Connection: This option lets you set the receiver's BD-Live connection preferences. "Always Allow" allows downloading of BD-Live content whenever a disc with BD-Live content is played. "Limit" allows downloading only if the disc is officially BD-Live certified. "Prohibited" does not allow any BD-Live access.
Proxy Setting: "Enabled" allows you to select and set the proxy host and proxy port if your network requires a proxy setting. "Disabled" bypasses any Proxy Host and Proxy Port settings and prevents their selection. This option is for advanced users only and in most cases should be left set to "Disabled."
Display Settings

TV: This option allows you to set the following display parameters:
Aspect Ratio: This option lets you select how you want 4:3 programs displayed on a 16:9 TV, or 16:9 programs displayed on a 4:3 TV. "16:9 Full" stretches 4:3 material to fill a 16:9 TV screen. "16:9 Normal" displays 4:3 material on a 16:9 TV with black boxes on either side of the picture, preserving the program's original visual composition without distortion. "4:3 Pan & Scan" zooms in on widescreen material to fill a 4:3 screen. "4:3 Letterbox" displays 16:9 material with black bars above and below the picture, preserving the program's original visual composition without distortion.
Resolution: This option lets you select your TV's highest resolution. "Auto" automatically selects the best resolution for your TV.
Film Mode: If your TV can handle a 1080p 24Hz signal (if it is 1080p resolution and has a video-refresh rate that is a whole-number multiple of 24), set Film Mode to "On" to get maximum resolution from Blu-ray Disc content mastered at 24 frames per second. If your display cannot handle a 1080p/24Hz signal, set this option to "Off," and the BDS receiver will upconvert 24-frame-per-second film material to the standard video 30Hz refresh rate.
HDMI Deep Color: This option allows you to adjust the resolution of color output to your TV. If your TV accepts Deep Color, this option allows your TV to display an enhanced color palette.
- On: The BDS receiver outputs 36-bit Deep Color if your TV supports it. If your TV does not, the receiver will output 30-bit color.
- Off: The BDS receiver does not output Deep Color (color resolution remains at 24 bits).
Video Processing: This option allows you to set the BDS receiver's internal video processing.
Video Mode: This setting lets you select a preset video-processing option to optimize the picture for the current program by adjusting the brightness, contrast, color and sharpness:
Standard: Neutral control settings •
Vivid: For video games •
Cinema: For movies and many television broadcasts.
- Custom: This option lets you adjust the picture settings manually. The Brightness, Saturation (color saturation), Hue, Contrast, Sharpness and CTI settings appear as sliders. The default setting for each adjustment is 0. Use the Cursor Left/Right buttons to change each setting's value.
Audio Settings
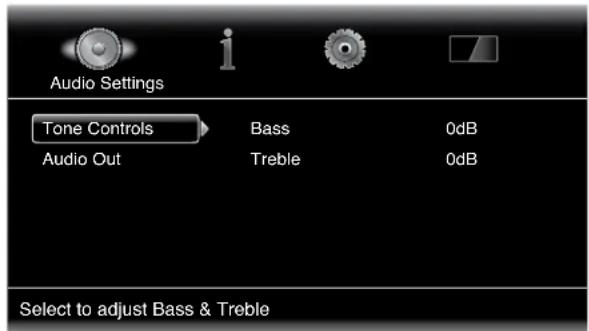
Tone Controls: This option lets you increase or decrease the amount of bass (low frequencies) and treble (high frequencies) in the sound. The adjustment ranges from -10dB to +10dB, in 1dB increments.
Audio Output: This option lets you set the following items:
HDMI Audio Out: In addition to digital video signals, the BDS receiver's HDMI connection also carries digital audio signals. Four options are available:
- Auto: This option causes the receiver's HDMI output to output the digital-audio format that best matches the surround-sound decoding capabilities of the component it's connected to.
- Bitstream Native: This option outputs the program in its native audio format via the HDMI output.
- PCM: This option outputs a two-channel downmix derived from the program's native audio format via the HDMI output.
- Off: This option turns the receiver's HDMI audio output off. We recommend setting this option to "Off," so you can take full advantage of the superior audio capability of your BDS system's receiver and speakers.
Dynamic Range Control: This setting makes the loud and quiet parts of a movie or music closer to the same volume (a process known as compression). Compression lets you turn up the volume so you can hear the quiet parts without the loud parts disturbing others. NOTE: This feature works only with Dolby Digital programs that have been specially encoded. Three settings are available:
- Off: Never applies compression. Use this setting when the volume may be as loud as you desire.
- On: Always applies compression. Use this setting when you want the volume to be as quiet as possible without making it difficult to hear spoken dialogue.
- Auto: Applies compression based on information encoded in the Dolby Digital bitstream. The receiver will selectively apply compression only during the most dynamic parts of the soundtrack.
Speaker Settings: This setting allows you to set up the receiver to work properly with the speakers included in your BDS system. The available configurations are:
- 2.0: This configuration consists of left and right main speakers but no subwoofer. Selecting this configuration sends all of the bass to the left and right speakers, so be sure that they are full-range and can handle deep bass.
- 2.1: This configuration consists of left and right main speakers, plus a subwoofer. BDS 400 and BDS 300 systems are factory-set to this configuration.
- 3.1: This configuration consists of front left, center and front right speakers, plus a subwoofer. You must manually select this configuration for the BDS 600 system.
- 5.1: This configuration consists of front left, front right, center, surround left and surround right speakers, plus a subwoofer. BDS 700 and BDS 800 systems are factory-set to this configuration.
After you select your system's configuration, the speaker setup screen will appear (BDS 800 and BDS 700 5.1-channel system screen shown):
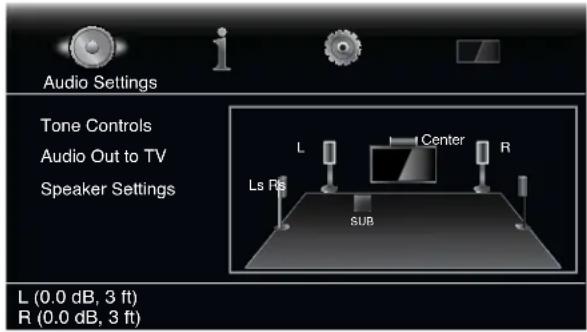
Setting the speaker distances:
The front left and front right speakers will be highlighted. Press the OK button. The 1. Level and Distance selection screen will appear.

Press the Cursor Down button to highlight Distance, and press the OK button. The 2. Distance adjustment bars will appear.

Measure the distance from the listening position to each of your system's speakers, 3. including the subwoofer. Write down the distances.
Use the left and right arrow buttons to adjust the "L" bar until it shows the distance 4. you measured to the front left speaker (the arrowheads indicate which speaker is being adjusted).
Press the Exit button twice to return to the speaker setup screen (the front left and 5. front right speakers will still be highlighted).
Press the Cursor Down button. The subwoofer will be highlighted. Press the OK 6. button. The Level and Distance screen will appear.
Repeat Steps 2 – 6 for the subwoofer. If you have a BDS 800, BDS 700 or BDS 600 7. system, repeat Steps 2 – 6 again for the center speaker, and if you have a BDS 800 or BDS 700 system, repeat Steps 2 – 6 again for the surround left and surround right speakers.
When you have entered the distances to all of your system's speakers, press the Exit 8. button repeatedly until the harman kardon logo screen appears.
NOTE: Leave all the speaker levels set at "0" for now. You will be able to adjust the individual speaker levels once your system is set up and you're playing music or films. See Adjusting Individual Speaker Volumes, on this page.
Information Menu
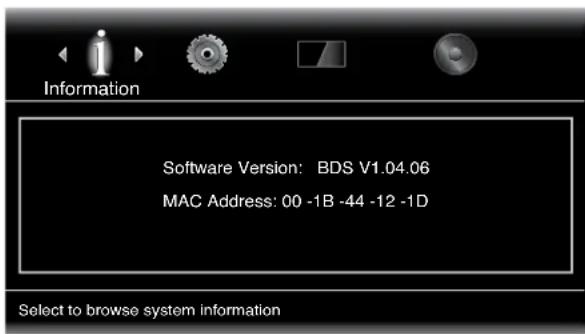
The Information menu will display the receiver's software/firmware version number and the receiver's factory-assigned network MAC address. This screen is for information only and has no user adjustments.
Using the Receiver
NOTE: Before using your new BDS system, be sure to set the speaker distances, as explained in Audio Settings: Speaker Settings, on page 21.
Home Menu
Press the Home button to display the Home Menu screen:
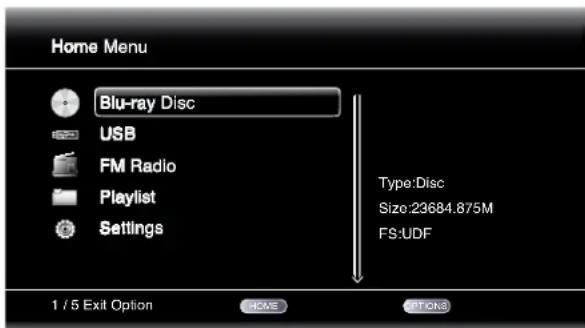
The available sources are listed on the left.
If a disc has been inserted into the receiver's built-in disc slot, it will appear on the list as either "CDDA" (CD), "DVD Video" (DVD) or "Blu-ray Disc."
NOTE: Audio sources connected to the receiver's rear-panel digital and line inputs will not appear on the list.
To select a source from the list, use the remote control's Cursor Up/Down buttons to highlight the desired source, then press the OK button to select it. To use the Playlist function, see Using Playlists, on page 28.
You can also select a source directly by pressing its button (Radio, Aux, etc).
Adjusting Individual Speaker Volumes
You can adjust the volumes of the system's individual speakers while you're listening to music or watching films.
- Press the Settings button. The Settings menu will appear.
- Select the Audio option. The Audio menu will appear.
- Select Speaker Settings, then select Configuration, and then select your system's speaker configuration. After you select your system's configuration, the speaker setup screen will appear (BDS 800 5.1 system screen shown).

- The front left and front right speakers will be highlighted. To adjust either of them, press the OK button. To adjust a different speaker, use the cursor buttons to highlight it and press the OK button. The Level and Distance selection screen will appear.
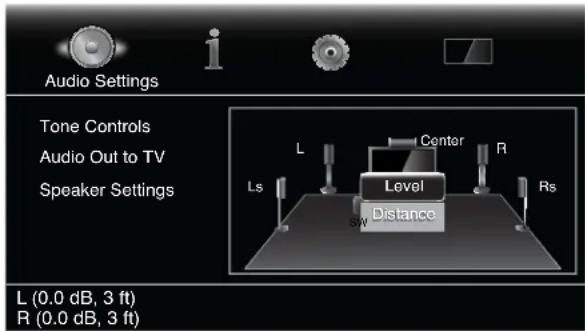
- Make sure that Level is highlighted, and press the OK button. The Volume adjustment bars will appear.

- Select the speaker you want to adjust, and use the left and right arrow buttons to adjust its volume. You can vary the volume from +10dB to -10dB, in 1dB increments.
- Press the Exit button twice to return to the speaker setup screen (the front left and front right speakers will still be highlighted). To adjust the volume of a different speaker, use the cursor buttons to highlight it and press the OK button. Repeat Steps 5 – 6 for that speaker.
- When you are finished adjusting the volumes of all of your system's speakers, press the Exit button repeatedly until the harman kardon logo screen appears.
Notes on Setting Speaker Volumes in 5.1-Channel Systems:
While setting your system's individual speaker volume levels is ultimately up to your personal taste, here are some ideas you may find helpful:
- For films and video-music programs, your overall goal should be to create an enveloping, realistic sound field that draws you into the film or music program without drawing your attention away from the action on the screen.
- For multichannel music recordings, some music producers will create a sound field that places the musicians all around you; others will create a sound field that places the musicians in front of you, with more subtle ambience in the surround speakers (as you would experience in a concert hall).
- In most 5.1-channel films, the surround channels are not intended to be as loud or as active as the front channels. Adjusting the surround speakers so they are always as loud as the front channels could make dialogue difficult to understand and will make some sound effects sound unrealistically loud.
Notes on Setting Subwoofer Volume:
- Sometimes the ideal subwoofer volume setting for music is too loud for films, while the ideal setting for films is too quiet for music. When setting the subwoofer volume, listen to both music and films with strong bass content and find a "middle ground" volume level that works for both.
- If your subwoofer always seems too loud or too quiet, you may want to place it in a different location. Placing the subwoofer in a corner will always tend to increase its bass output, while placing it away from any walls or corners will always tend to lessen its bass output.
IMPORTANT: Do not turn the receiver's volume up to or past the point where the audio from the speakers becomes distorted. Doing so can damage the speakers.
Surround-Sound Modes
Your BDS receiver can decode and play audio programs in these native audio formats:
Dolby Digital •
Dolby Digital Plus •
Dolby TrueHD •
DTS Digital •
DTS-HD High Resolution Audio •
DTS-HD Master Audio™
PCM •
WMA (DRM-free version only): WMA9, CBR @192kbps, VBR @ 355kbps •
- MP3: 32kbps – 320kbps bitrates, including variable bitrate encoding
The audio formats available for any particular program depend on the program and on how you have configured your BDS receiver in the Audio Settings menu:
Available Audio Formats
| 2.0- and 2.1- Channel Setup Configuration | 3.1-Channel Setup Configuration | 5.1-Channel Setup Configuration | |
| 2.1-Channel Programs | Dolby Virtual Speaker Wide (default)/Dolby Virtual Speaker Reference/Stereo | Dolby PLII Movie (default)/Dolby PLII Music/Dolby Virtual Speaker Wide/Dolby Virtual Speaker Reference/Stereo | Original (default)/ Dolby PLII Movie/ Dolby PLII Music/ Dolby Virtual Speaker Wide/Dolby Virtual Speaker Reference/Stereo |
| 3.1-Channel Programs | Dolby Virtual Speaker Wide (default)/Dolby Virtual Speaker Reference/Stereo | Original (default)/ Dolby Virtual Speaker Wide/Dolby Virtual Speaker Reference | Original (default)/ Dolby PLII Movie/ Dolby PLII Music/ Dolby Virtual Speaker Wide/Dolby Virtual Speaker Reference/Stereo |
| 4.1-/5.1-/6.1- Channel Programs | Dolby Virtual Speaker Wide (default)/Dolby Virtual Speaker Reference/Stereo | Dolby Virtual Speaker Wide (default)/Dolby Virtual Speaker Reference/Stereo | Original (default)/ Dolby Virtual Speaker Wide/ Dolby Virtual Speaker Reference |
To switch between the available surround-sound modes for the program currently playing, press the Surround button. Each press of the Surround button will change to the next available mode in line. A pop-up display will appear on the TV, showing the modes as you cycle through them.
Listening Through Headphones
Your BDS receiver's headphone connection accepts a standard 3.5mm stereo headphone plug. When you insert the headphone plug into the connector, the receiver's speaker outputs will mute; the HDMI audio output will not mute.
When headphones are connected to the receiver's Headphone connector, pressing the remote's Surround button cycles between these two modes:
- HARMAN Headphone, which virtualizes a multichannel surround soundtrack down to two channels. This mode retains the soundtrack's original directional cues, allowing you to enjoy an enveloping surround-sound experience on any ordinary pair of stereo headphones.
- Headphone Bypass, which downmixes surround-sound programs into normal stereo. This mode does not retain any multichannel directional cues that may be in the original surround-sound program.
Using the Disc Player
Disc Handling Precautions
- To keep the disc clean, handle the disc by its edge. Do not touch the surface.

- Do not stick paper or tape on the disc. If there is glue (or a similar substance) on the disc, remove the substance completely before using the disc.
- Do not expose the disc to direct sunlight or heat sources such as hot air ducts, or leave it in a car parked in direct sunlight as there can be a considerable rise in temperature inside the car.
After playing, store the disc in its case. - Do not write on the label side with a ball-point pen or other sharp writing utensils.
- Be careful not to drop or bend the disc.
Disc Cleaning Precautions
- Before playing, clean the disc with a cleaning cloth. Wipe the disc from the center out.
- Do not use solvents such as benzine, thinner, commercially available cleaners or anti-static spray intended for vinyl LPs.
Regional Coding
BDS receivers sold in the USA are designed only for playback of discs with Blu-Ray Disc region code A and DVD Region Code 1 information, or for discs that do not contain any region code information. BDS receivers sold in Europe are designed only for playback of discs with Blu-ray Disc region code B and DVD Region Code 2 information, or for discs that do not contain region code information.
If there is a region code on a disc other than the one your BDS receiver is designed for, it will not play in the receiver's disc player.
Copyright
Audio-visual material may consist of copyrighted works that must not be recorded without the permission of the owner of the copyright. Please refer to relevant laws covering copyright protection.
Copy Protection
Your BDS receiver is in compliance with HDCP (High-Definition Copy Protection), and a video display connected via the HDMI output must also be HDCP-compliant.
The BDS receiver supports Macrovision copy protection. On Blu-ray Disc recordings and DVD discs that include a copy-protection code, if the contents of the disc are copied using a VCR, the copy-protection code prevents the videotape copy from playing normally.
Supported Disc Formats
The BDS receiver can play the following types of discs (5"/12cm, and 3"/8cm size):
BD-Video (single-layer or double-layer) •
DVD-Video •
DVD+R/+RW •
DVD-R/-RW •
CDDA (CD digital audio) •
CD-R/RW •
NOTE: The compatibility and performance of dual-layer discs is not guaranteed.
Supported Media Codecs
The BDS receiver can play media recorded in the following audio/video codecs:
MPEG 1, Layer 1 •
MPEG 2, Layer 2 •
MPEG 2, Layer 3 •
H.264 •
VC-1
MP3 (from CD-R/RW, DVD+R/+RW, BD-R/RE and USB) •
JPEG (from CD-R/RW, DVD+R/+RW, BD-R/RE and USB) •
• DivX 3.x/4.x/5.x (from CD-R/RW, DVD+R/+RW and USB)
• WMA (WMA9, CBR at 192kbps, VBR at 355kbps, DRM-free)
NOTE: Due to differences in the formats of certain discs, some discs may include a mix of features, some of which are not compatible with the disc player. Similarly, although Blu-ray Disc recordings and DVDs are capable of a wide range of features, not every disc includes every capability of its system. For example, although the BDS receiver is compatible with multi-angle discs, the multi-angle feature is possible only when the disc is specially encoded for multiple-angle play. To make certain that a specific feature or soundtrack option is available, please check the options noted on the disc jacket.
The playback capability of recordable discs may vary due to variations in the quality of the disc and the recorder used to create the disc.
Loading and Playing a Disc
Hold the disc horizontally when loading it, and insert it gently into the Disc slot. The disc loading mechanism will take the disc and slide it into the unit.
- Do not load more than one disc into the Disc slot.
Do not load the disc upside down.
After loading a disc into the player, press the Play button to begin playback.
Use the Play, Pause, Stop, Prev/Step, Next/Step, Search Down/Slow and Search Up/Slow buttons to control disc playback. See Remote Control Functions, on page 8, for more information about the functions of these buttons.
Playback Features
Repeat: When you are playing a Blu-ray Disc recording or DVD, pressing the Repeat button cycles through the following repeat modes: Chapter, Title, All, Off. When you are playing a CD, this button cycles through the following repeat modes: Track, All, Off.
A-B: When playing a Blu-ray Disc recording, DVD or music CD, pressing the A-B button places the player into the A-B repeat mode. The first press sets the "A" repeat point; the second press sets the "B" repeat point and begins repeating the section of the disc between the two points. Pressing the A-B button while the player is in the A-B repeat mode takes the player out of that mode. Note: This feature is disc-dependent. Not all Blu-ray Disc recordings support A-B repeat.
Find: Pressing the Find button during disc playback activates the search function, allowing you to jump to a specific location on the disc. You can find a location by title, chapter or time. See Top Menu Button (below) for more information. NOTE: Not all discs allow searching by title. On these discs, use the disc menu to change titles.
Options: Pressing the Options button displays any available options for the currently-playing disc. Blu-ray Disc options include title, chapter, time display, audio options, angle options and subtitle options. DVD options include title, chapter, time display, playback modes, audio options and angle options. Audio CD options include track selection, time display, playback modes, bitrate, instant search and instant replay.
Display Button: When playing Blu-ray Disc recordings and DVDs, pressing the Display button toggles the information bar on and off.

Top Menu Button: Pressing this button displays the top menu for the Blu-ray Disc recording or DVD that is currently playing. NOTE: This feature is disc-dependent. Not all DVDs have top menus. If the DVD has no top menu, pressing the Top Menu button may display the disc menu, depending on how the disc's menu system was authored.
Pop-Up Button: Pressing this button while playing a Blu-ray Disc recording displays the pop-up menu. (DVDs will display the disc menu.) Note: If the Blu-ray Disc recording does not support a pop-up menu, the disc menu will be displayed.
Bookmark Function: The bookmark function lets you mark up to 12 locations on the disc currently playing. Press the Bookmark button to mark the current location on the disc. To play the disc from one of your selected bookmark locations, hold the Bookmark button to display the bookmark list. Use the Navigation left/right buttons to select the desired bookmark, and press the OK button to play the disc from that location. NOTE: The bookmark function is disc-dependent. Not all discs allow bookmark operation.
Programmed Play: This option lets you create a programmed playlist for a disc. The program function works for CDs, DVDs and some Blu-ray Disc recordings (not all Blu-ray Disc recordings allow programmed play).
- Press the Program button. The Program screen will appear.

- Press the OK button and use the Navigation Up/Down buttons to select the title on the disc (Blu-ray Disc/DVD) or track (CD) for your first program entry.
- Press the right Navigation button and use the Navigation Up/Down buttons to select the chapter for your first program entry (Blu-ray Disc/DVD only).
- Repeat Steps 2 - 3 for every entry in your programmed list.
- When you're finished programming your list, press the Play button to play the list.
The programmed list will remain active until the list has completed playing. Pressing the Stop button twice or ejecting the disc deletes the programmed list.
BD-Live Interactivity
BD-Live interactivity is available on select Blu-ray Disc recordings. When you select the BD-Live features from a disc's menu, you may be able to download additional content or other information via the Internet (through the Network connection).
If you have difficulty accessing the Internet while using a BD-Live disc, press the Settings button and navigate to the Network Setup menu. Select "Test Connection." If the BDS receiver is able to access the Internet, then the computer server the BD-Live disc is trying to access may be at fault. Check the disc jacket for more information or contact the content provider. If the "Test Connection" function fails, contact your Internet service provider (ISP) to obtain the correct settings for the BDS receiver's IP Configuration menu. If the problem persists, contact your ISP for further assistance.
Playing Music CDs
When the BDS is playing a music CD, the top bar shows the current playback-mode icon, the type of disc, the track currently playing, the number of total tracks on the disc and the time display.

Listening to Your iPod/iPhone
Playing iPod Content
Insert your iPod or iPhone into The Bridge IIIP dock and press the BDS remote control's iPod button. If the Home screen is displayed, highlight iPod and press the OK button. The iPod Now Playing screen will appear on the TV.

NOTE: The BDS receiver will not play video content stored on the iPod or iPhone.
In addition to playing the iPod through the system, pressing the iPod button places the remote in the iPod control mode. Use the following remote control buttons to browse and select content on your iPod and to control your iPod during playback:
Cursor and OK Buttons: Use these buttons to navigate and select items from the iPod menus.
Exit Button: Pressing this button while playing content displays the iPod menu. Pressing this button while a menu is displayed exits that menu and displays the previous screen.
Previous/Step Button: Press this button once to skip to the beginning of the current track. Press the button twice to skip to the beginning of the previous track.
Next/Step Button: Press this button to skip to the beginning of the next track.
Search/Slow Reverse Button: Press this button to search backward through the current track.
Search/Slow Forward Button: Press this button to search forward through the current track.
Stop Button: Press this button to stop playback.
Play Button: Press this button to play the item appearing on the receiver's display.
Pause Button: Press this button to pause the item that is playing. Pressing this button while the iPod is paused will resume play.
Channel +/- Buttons: Pressing the Channel + button moves up ten items in the open menu. Pressing the Channel - button moves down ten items in the active menu. Use these buttons to navigate through long menu lists quickly.
Home Button: Pressing the Home button will switch the display to the Home screen while you continue to hear the iPod content through the BDS system. To display the iPod Now Playing screen again, press the Exit or Cursor Left button.
Red Button: Pressing the red button will toggle between the following modes: Random play (albums), Random play (songs), Random off.
Repeat Button: Pressing the Repeat button will cycle the iPod between Repeat Song, Repeat All, Repeat Off.
Receiver Information Display
When songs are playing, the display's top line will scroll "Artist
Using the Radio
Press the Radio button on the remote control, or if the Home screen is displayed on the TV, highlight Radio and press the OK button. The Radio Now Playing screen will appear on the TV.
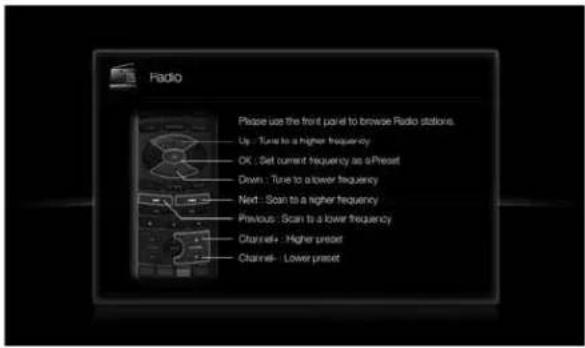
The top line of the receiver's information display will show the currently tuned-in FM frequency; the bottom line of the display will show the RDS information for the currently-tuned station (if available).
In addition to playing the radio through the system, pressing the Radio button places the remote in the radio-control mode. Use the following remote-control buttons to control the receiver's FM radio:
Cursor Up/Down Buttons: Pressing these buttons increases or decreases the tuned frequency by 0.05MHz.
OK Button: Pressing this button sets the currently tuned-in frequency as a preset station. See Setting and Recalling Preset Stations, on page 26, for details.
Previous/Step Button and Next/Step Button: Pressing these buttons scans to the next higher or lower receivable radio station.
Search/Slow Reverse Button and Search/Slow Forward Button: Pressing these buttons scans to the next higher or lower receivable radio station.
Channel +/- Buttons: Pressing these buttons changes to the next higher or lower preset station.
Number Buttons: Pressing a number button or a combination of number buttons will change to the corresponding preset station. See Setting and Recalling Preset Stations, below, for details.
Home Button: Pressing the Home button will switch the TV to the Home screen while the radio continues to be heard through the BDS system. To display the Radio Now Playing screen again, press the Exit or Cursor Left button.
Setting and Recalling Preset Stations
You can set up to 30 preset stations for easy recall.
To set the currently tuned-in station as a preset:
- Press and hold the OK button for three seconds. The bottom line of the receiver's information display will read "Set Preset __," with the "____" characters flashing.
- Use the number buttons to enter the preset number you want the current station saved to. If you do not enter a number within ten seconds, the display line will revert back to the RDS text readout for the current station.
To listen to a preset station:
Press the Channel + or Channel - button. The radio will tune to the next higher or lower preset station.
- OR -
Use the number buttons to enter the preset number.
For presets 1 – 9, press the corresponding 1 – 9 button.
- For presets 10 and higher, press the "0" button, then use the number buttons to enter the preset number.
Listening to Audio Sources
Press the Aux button on the remote control. The receiver will switch to the audio input that was selected last. Subsequent presses of the Aux button will advance through the audio inputs in the following order: Coaxial Digital, Optical Digital 1, Optical Digital 2, Analog L/R 1 and Analog L/R 2.
The Aux Input Now Playing screen will appear on the TV.

In addition to playing the Aux source through the system, pressing the Aux button places the remote in the Aux-control mode. If you programmed the remote to control auxiliary components (either by entering in a code number or teaching commands to the remote), the remote will now operate according to that programming.
Lip Sync Delay: When playing an Aux source, audio and video processing circuitry may create a slight delay between the picture and sound. Pressing the Options button lets you adjust the audio delay to eliminate "lip sync" errors that may occur between the sound and picture in video programs with sound playing through one of the receiver's rear-panel audio inputs. Use the Cursor Up/Down buttons to increase or decrease the audio delay until the perceived lip-sync errors disappear and the sound and picture are properly synchronized.
Playing Files from USB Devices and CD Data Discs
Your BDS receiver can play MP3 (up to 320kbps bitrate) audio files, display JPEG photos and show MPEG 1 (layer 1), MPEG 2 (layers 2 and 3), and DivX home theater profile audio/video files stored on a USB device or a CD data disc.
IMPORTANT: Only media in the FAT32 file system are compatible with your BDS receiver.
To access files on a device inserted into the receiver's USB port, press the Home button and select USB from the source list on the screen.

Regardless of the device's file structure, the screen will first show three individual folders named "Photo," "Music" and "Video." Select the type of media you want to play from these three folders.

The screen will then show the device's file structure. Selecting a folder will show all files of the selected type of media in the folder. If there are files of the selected type in the device's root directory, they will also be shown.
To move up one directory level, press the Cursor Left button or select the arrow folder.
Viewing Photos
In the top directory, select "Photo." Select a folder containing photo files and highlight a photo file in the folder. A thumbnail of the highlighted photo will appear on the right of the screen.

Use these remote buttons while viewing photos:
Play Button: Press this button to begin a slide show that displays the photos in the current folder or directory level (starting with the highlighted JPEG) for 15 seconds in the order they appear in the folder.
Pause Button: Press this button to freeze the current photo on the screen. Press the Play button to resume the slide show.
Stop Button: Press to end the slide show and return to the directory.
Next/Step and Previous/Step Buttons: Press these buttons to skip to the next or previous photo file in the slide show or directory.
Cursor Up Button: Pressing this button while a photo is displayed rotates the photo 180°. Pressing this button while the directory list is displayed highlights the previous item in the directory.
Cursor Down Button: Pressing this button while a photo is displayed shows a mirror-image reflection of the photo. Pressing this button while the directory list is displayed highlights the next item in the directory.
Cursor Left Button: Pressing this button while a photo is displayed rotates the photo 90° counterclockwise. Pressing this button while the directory list is displayed jumps to the next higher directory level.
Cursor Right Button: Pressing this button while a photo is displayed rotates the photo 90° clockwise.
Options Button: Pressing this button while a photo is displayed shows the Options menu, which gives you the following options:
File: Select a file to view.
- Play Mode: View files in their normal order, in random order (until you press the Stop button) or in shuffle order (displays each image in the folder one time in random order, then returns to the directory).
- Slide Show: Select fast (displays each image for five seconds), middle (displays each image for 15 seconds) or slow (displays each image for 30 seconds) slide-show speed.
• Transition: Select from various types of image-to-image transitions (fade, wipe, etc).
Pressing the Options button when a directory is displayed shows the Playlist Options box. See Using Playlists, on page 28, for more information.
Thumbnail (Yellow) Button: Pressing this button while playing a slide show displays thumbnail images of all photos in the slide show. Use the Cursor and OK buttons to highlight and select images to view.
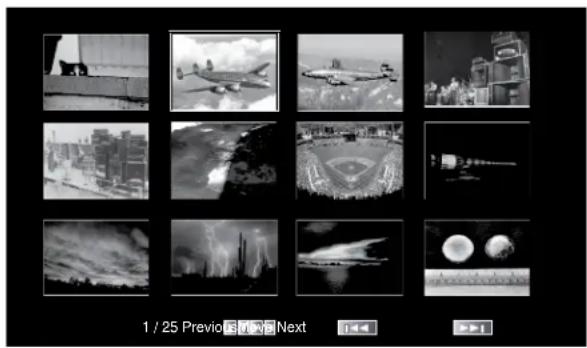
natural_image
Grid of grayscale images showing various urban and natural scenes including aircraft, buildings, and landscapes (no text or symbols)Zoom (Blue) Button: Pressing this button during a slide show freezes an image and zooms in 2x size. Additional presses of the button change the zoom to 3x, 4x, 1/2x, 1/3x and 1/4x size.
Playing Music Files
In the top directory, select "Music." Select a folder containing music files and highlight a music file in the folder. Information about the highlighted file will appear on the right of the screen.

Selecting a music file plays the file. If there are other music files in the folder that follow the selected file, the receiver will play them in the order they appear on the on-screen display. The following screen will appear while music files play:

If a selected MP3 file has an album cover-art ID3 tag, the art will be displayed on the screen.
Use the Play, Pause, Stop, Prev/Step, Next/Step, Search Down/Slow and Search Up/Slow buttons to control music-file playback. See Remote Control Functions, on page 8, for more information about the functions of these buttons.
When the BDS is playing music files from a USB device or CD data disc, the Repeat and Options functions are slightly different than they are when playing Blu-ray Disc recordings, DVDs and music CDs:
Repeat Button: Pressing this button cycles through the following repeat modes: 1 (song), All (folder), Off. The active repeat mode is indicated in the screen's top bar.
Options Button: Pressing this button displays any available options for the song currently playing:
File: Select a song to play. •
- Time: Display the track's elapsed time or the track's time remaining.
- Play Mode: Plays songs in their normal order, in random order (until you press the Stop button) or in shuffle order (plays each song in the folder one time in random order, then returns to the directory).
Bitrate: Shows the bitrate of the song currently playing.
Advance: Performs a rapid audible search forward through the song.
- Replay: Each press of the OK button jumps back ten seconds during play.
• Transition: Select from various types of image-to-image transitions (fade, wipe, etc).
While playing music files from a USB device or data CD, you can also view photos that are on the same media. Press the Home button while the music file is playing, navigate to a folder containing photo files, and select a photo file to begin a slide show.
Playing Videos
In the top directory, select "Video." Select a folder containing video files and highlight a video file in the active folder.
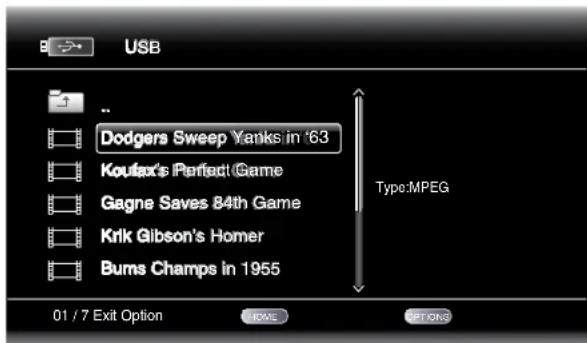
The video will automatically play. If there are other video files in the folder, the BDS receiver will play each one in the order they appear on the on-screen menu.
Use the Play, Pause, Stop, Prev/Step, Next/Step, Search Down/Slow and Search Up/Slow buttons to control music file playback. See Remote Control Functions, on page 8, for more information about the functions of these buttons.
When the BDS is playing video files from a USB device or CD data disc, the Repeat and Options functions are slightly different from playing Blu-ray Disc recordings and DVDs:
Repeat Button: Pressing this button cycles through the following repeat modes: 1 (current video), All (folder), Off.
Options Button: Pressing this button displays any available options for the song currently playing:
File: Select a file to play.
• Title: Select a title to play (if available).
• Chapter: Select a chapter to play (if available).
• Time: Display the elapsed time or the time remaining.
- Play Mode: Plays videos in their normal order, in random order (until you press the Stop button) or in shuffle order (plays each video in the folder one time in random order, then returns to the directory).
• Audio: Select audio options (if available).
Using Playlists
Because USB devices and CD data discs can contain large numbers of playable files, you can create a playlist for each that will make it easier for you to access selected files.
To Create a Playlist:
NOTE: The procedure is the same for a CD data disc playlist and a USB playlist.
- Press the Home button. The Home menu will appear.
- Select CD data disc or USB. The Photo, Music and Video folders will appear.
- Select the type of file you want to create the playlist for. You can create a playlist for each type of file.
- As you search through the directory structure, when you see a file you want to include in the playlist for that file type, highlight it and press the Options button. The playlist options box will appear.
- To add the item to the playlist, select "Add to playlist."
- Repeat Steps 4 - 5 for all items you want to add to the playlist.
To create a playlist for a different file type, repeat Steps 1 - 6, but in Step 3, select a different file type.
To Play a Playlist:
- Press the Home button. The Home menu will appear.
- Select Playlist. The Photo/Music/Video screen will appear.
- Select the file type of the playlist you want to play. The playlist will open.
- Select the first item in the playlist and press the Play button. The playlist will play.
To repeat the playlist, press the Repeat button. You can repeat one item ("1") or the entire playlist ("All").
Troubleshooting
If your BDS system isn't performing the way you think it should, check to see if the problem is covered in this section before calling your dealer or contacting a harman kardon representative.
Problem Solution
| The receiver won't power up (the Power indicator is not lit): | Check that the receiver's Power cord is properly plugged into the receiver's AC Power Input connector.Check that the Power cord is plugged into a working AC outlet. If the outlet is controlled by a switch, make sure the switch is set in the "On" position.Check that the receiver's Main Power switch (located on the rear panel) is in the "On" position. |
| Sound plays through the BDS system speakers, but there is no TV picture: | Check the HDMI connection between the receiver and the TV.Check that the TV is turned on and is set to the proper input source. Unplug the HDMI cable from the TV and plug it back in again. |
| There is no sound coming from just the subwoofer: | Check that the subwoofer's Power cord is plugged into a working AC outlet.Check that the subwoofer's Power switch is in the "On" position. Check that the Subwoofer Level control is not turned all the way down (fully counterclockwise).Check that the audio connection between the receiver and the subwoofer has been properly made.Check the receiver's Settings: Configuration menu to make sure that the subwoofer volume has not been set at -10dB. |
| There is a constant hum in the sound: | Check that all input cables are plugged all the way into their connectors.Check that all cables are at least 10 ft (3.3m) from fluorescent lights.Check that all cable connectors are clean. If necessary, wipe them with a cloth slightly moistened with alcohol.Set the subwoofer's Power switch to "Off." If the hum goes away, there is a ground loop between the subwoofer and the receiver. Plugging the subwoofer's Power cord into the same AC outlet that the receiver is plugged into should eliminate the ground loop. |
| The disc does not play: | Check that the disc is inserted correctly (label side up).Check that the disc is the correct type: BD-Video (single-layer or double-layer), DVD-Video, DVD+R/+RW, DVD-R/-RW, CDDA (CD digital audio), CD-R/RW. Other disc types will not play.Check that the disc surface is clean and not scratched. |
| There is noise or other interference in the picture while playing a Blu-ray Disc recording or DVD: | Check that the disc surface is clean and not scratched. |
| The sound and picture are out of sync when listening to an Aux source: | Press the Options button and perform the Lip Sync adjustment to bring the sound and picture into synchronization. |
| Cannot tune in radio stations: | Check that the FM antenna is correctly connected.Adjust the antenna's position. If necessary, use a powered FM antenna or an outdoor FM antenna. |
| The receiver does not respond to remote-control commands: | Replace all three remote-control batteries with fresh ones, and make sure that they are installed with the correct polarity.Hold the remote closer to the receiver.Check that the receiver's remote sensor is in the line of sight of the remote control. |
| The remote does not control programmed components (TV or video): | Check that you have pressed the remote's Aux button before trying to operate the component.Re-program and/or re-teach the component's commands into the remote. |
| The ∅ symbol appears on the screen when you press a remote-control button: | The selected function is not permitted at the time the button is pressed. |
| The receiver does not respond to commands, or it behaves in an erratic way: | Unplug the receiver's Power cord from the AC outlet, wait 30 seconds, then plug it back in. |
You can find additional troubleshooting information in the FAQs link on the Support page at www.harmankardon.com.
Aux Component Remote-Control Code List
TV/DVR
| Manufacturer Code Numbers | |
| ADMIRAL 0192 0123 1088 1105 | |
| AIWA 1110 | |
| AKAI 1011 1020 1022 1042 1053 | |
| 1056 1089 1093 | |
| ALBA 1020 1040 | |
| ANAM 0122 0112 0109 0106 0045 | |
| AOC 0128 0123 0122 0037 | |
| APEX 2014 2016 | |
| ARC EN CIEL 1017 1019 1024 1056 1059 | |
| ARCAM 1017 | |
| ARISTONA 1022 1023 1025 1033 1047 | |
| 1048 1060 1086 | |
| ASA 1012 1023 1088 1096 1201 | |
| AUDIOVOX 0012 | |
| AUTOVOX 1025 1044 1088 | |
| BANG & OLUFSEN 1088 | |
| BARCO 1202 | |
| BASICLINE 1020 | |
| BAUR 1075 1076 1077 1102 | |
| BEKO 1022 | |
| BLAUPUNKT 0084 1011 1075 1076 1077 | |
| BRANDT ELECTRONIQUE 1017 1019 1024 1056 1059 | |
| BRION VEGA 1023 1088 1203 | |
| BROCKSONIC 0206 0205 | |
| BUSH 1010 1020 1040 1043 1092 | |
| BUSH (UK) 1044 | |
| CENTURY 1023 1088 | |
| CITIZEN 0132 0128 0123 0045 | |
| COMTEL 1032 | |
| CONTEC 0045 | |
| CONTINENTAL EDISON 1017 1019 1024 1056 1059 | |
| CRAIG 0159 0158 0157 0045 | |
| CROSLEY 1023 1088 | |
| CROWN 0132 0045 | |
| CURTIS MATHES 0128 0123 0132 |
| Manufacturer | Code Numbers | |
| DAEWOO | 0132 0128 0127 0119 0116 | |
| 0114 0111 0108 0106 0105 | ||
| 0102 0087 1022 | ||
| DANSAI 1022 | ||
| DAYTRON | 0132 | 0128 |
| DECCA | 1091 1032 | |
| DECCA (UK) | 1038 | |
| DEGRAAF | 1015 | |
| DISH NETWORK | 2012 | |
| DIXI | 1022 | |
| DUMONT | 1201 1199 1096 1088 1023 | |
| DUMONT-FINLUX | 1044 1012 | |
| DYNATECH | 0063 | |
| DYNATRON | 1022 1020 | |
| DYNEX | 0014 | |
| ELECTROHOME | 0132 | 0115 |
| EMERSON | 0205 0162 0159 0158 0157 | |
| 0139 0132 0128 0123 0045 | ||
| 1195 1088 | ||
| FUJITSU | 0041 | 0042 |
| FUNAI | 0045 | |
| FUTURETECH | 0045 | |
| GE | 0163 0159 0145 0133 0128 | |
| 0123 0121 0087 0029 | ||
| GRUNDIG | 0193 | |
| HALL MARK | 0128 | |
| harman kardon | 0201 | |
| HITACHI | 0147 0144 0132 0128 0123 | |
| HYTEK | 0016 | |
| INKEL | 0120 | |
| JCPENNEY 0145 0132 | 0128 0123 0115 | |
| JENSEN | 0019 | |
| JVC | 0134 | 0087 0079 |
| KEC | 0045 | |
| KLH | 0006 | |
| KTV | 0162 0132 0123 0045 | |
TV/DVR
Manufacturer Code Numbers
| LG (GOLDSTAR) 0132 0128 0122 0110 0101 0002 | |||
| 0013 2004 | |||
| LLOYTRON | 0173 | 0172 | |
| LODGENET | 0069 | ||
| LXI | 0148 | 0145 | 0077 |
| MAGNAVOX 0148 0145 0132 0128 0123 0030 | |||
| 0040 2007 2008 2009 201 2011 | |||
| MARANTZ | 0148 | 0123 | 0115 |
| MEMOREX | 0128 | 0069 | |
| METZ | 0084 | ||
| MGA | 0128 | 0123 | 0115 |
| MITSUBISHI 0168 0167 0160 0128 0123 0115 | |||
| 0077 | |||
| MTC | 0176 | 0175 | |
| MOTOROLA 2005 | |||
| NATIONAL | 0182 0181 0180 0179 0177 0148 | ||
| NEC | 0125 0123 0121 0115 0010 | ||
| OLEVIA | 0007 | ||
| OPTONICA | 0077 | ||
| ORION | 0211 0210 0209 0208 0207 | ||
| PANASONIC | 0169 | 0148 | 0087 |
| PHILCO | 0148 0132 0128 0123 0115 0045 | ||
| PHILIPS | 0148 0145 0132 0128 0123 0036 | ||
| 0035 0034 0033 | |||
| PIONEER | 0128 0123 0024 | ||
| POLAROID | 0003 0004 0005 0006 0043 | ||
| PORTLAND | 0132 | 0128 | |
| PROSCAN | 0133 | ||
| PROTON | 0165 0132 0128 0122 0059 0008 | ||
| QUASAR | 0087 | 0032 | |
| RADIO SHACK | 0197 0196 0180 0132 0128 0045 | ||
| RCA | 0163 0161 0145 0133 0128 0123 | ||
| 0115 0021 2001 2012 | |||
| REALISTIC | 0196 | 0167 | 0045 |
| RUNCO | 0153 0152 0044 0046 | ||
| SAMPO | 0128 | 0123 | 0059 |
Manufacturer Code Numbers
| SAMSUNG | 0145 0132 0128 0124 | 0022 | 0020 | |||
| 2003 | ||||||
| SANYO | 0054 | 0026 | ||||
| SCOTT | 0132 | 0128 | 0045 | |||
| SEARS | 0145 | 0132 | 0128 | |||
| SHARP | 0132 | 0128 | 0077 | |||
| SIEMENS | 0084 | |||||
| SIGNATURE | 0069 | |||||
| SONY | 0212 | 0194 | 0136 | 0130 | 0117 | 0031 |
| 0028 | ||||||
| SOUNDESIGN | 0128 | 0045 | ||||
| SYLVANIA | 0148 | 0145 | 0128 | 0123 | 0025 | |
| SYMPHONIC | 0184 | |||||
| TANDY | 0077 | |||||
| TATUNG | 0063 | 2018 | ||||
| TECHNICS | 0181 | |||||
| TECHWOOD | 0128 | |||||
| TEKNIKA | 0132 | 0128 0123 0115 | 0069 0045 | |||
| TELERENT | 0069 | |||||
| TERA | 0156 | |||||
| THOMSON | 0191 | 0190 | ||||
| TIVO | 0051 | 0052 | 2020 | 2021 | ||
| TMK | 0128 | |||||
| TOSHIBA | 0202 | 0129 | 0063 | |||
| TOTEVISION | 0132 | |||||
| VIDEO CONCEPTS | 0160 | |||||
| VIDTECH | 0128 | |||||
| VIEWSONIC | 0011 | 0038 | 0039 | 0047 | ||
| VIZIO | 0001 | 0002 | ||||
| WARDS | 0148 | 0132 | 0128 | 0069 | ||
| WESTINGHOUSE | 0017 | 0018 | 0023 | |||
| YAMAHA | 0128 | 0123 | ||||
| YORK | 0128 | |||||
| ZENITH | 0090 | 0069 2002 2008 | 2019 | |||
Cable Tuners
Manufacturer Code Numbers
| ABC | 3011 | 3001 | ||||
| ALLEGRO | 3111 | |||||
| AMERICAST | 3212 | |||||
| ARCHER | 3112 | |||||
| BELCOR | 3113 | |||||
| BT CABLE 4007 | ||||||
| CABLE | STAR | 3113 | 3033 | |||
| CABLETIME 4008 | 4011 | 4012 | 4016 | |||
| CITIZEN | 3111 | |||||
| CLYDE | 4017 | |||||
| CABLEVISION | ||||||
| COMCAST | 3007 | 4014 | ||||
| DESCAT CANAL | 4010 | |||||
| DIGI | LINK | 3114 | ||||
| EAGLE | 3186 | |||||
| EASTERN | 3070 | 3066 | ||||
| EMERSON | 3112 | |||||
| FILMNET | 4018 | 4020 | ||||
| FOXTEL | 4019 | |||||
| FRANCE TELECOM | 4013 | 4021 | ||||
| G.I. | 3097 | 3096 | 3017 | 3011 | 3001 | |
| GC | ELECTRONICS | 3113 | ||||
| GEC | 4017 | |||||
| GEMINI | 3060 | 3032 | ||||
| GENERAL | 3210 | |||||
| GENERAL INSTRUMENT | 3210 | |||||
| HANLIN | 3208 | 3175 | 3117 | 3101 | 3100 | 3099 |
| 3056 | ||||||
| HITACHI | 3188 | 3001 | ||||
| JASCO | 3111 | |||||
| JERROLD | 3210 | 3188 | 3162 | 3097 | 3096 | 3073 |
| 3017 | 3011 | 3002 | 3001 | 4001 | 4022 | |
| LINSAY | 3118 | |||||
| MACOM | 3191 | |||||
| MAGNAVOX | 3068 | 3019 | 3017 | |||
| MOVIE | TIME | 3039 | 3035 | |||
| NSC | 3190 | 3035 | ||||
Manufacturer Code Numbers
| OAK | 3220 | 3197 | ||||
| PACE | 3179 | |||||
| PANASONIC | 3214 | 3189 | 3177 | 3176 | 3053 | |
| PANTHER | 3114 | |||||
| PHILIPS | 3090 | 3085 | 3020 | 3019 | 3013 | 4023 |
| PIONEER | 3216 | 3215 | 3209 | 3171 | 3119 | 3041 |
| 3001 | 4002 | |||||
| RADIO SHACK | 3213 | 3112 | 3111 | |||
| RCA | 3214 | 3053 | ||||
| RECOTON | 3116 | |||||
| REGAL | 3208 | 3101 | 3100 | 3099 | 3056 | |
| REMBRANT | 3032 | |||||
| SAGEM | 4028 | |||||
| SAMSUNG | 3003 | 3186 | 3072 | 4002 | 4003 | 4024 |
| SATBOX 4004 | ||||||
| SCIENTIFIC ATLANTA | 3222 | 3221 | 3203 | 3183 | 4005 | 4006 |
| 4025 | 4026 | |||||
| SEAM | 3121 | |||||
| SIGNATURE | 3188 | 3001 | ||||
| SPRUCER | 3189 | 3177 | 3081 | 3053 | ||
| STARCOM | 3163 | 3011 | 3002 | |||
| STARGATE | 3120 | |||||
| TANDY | 3024 | |||||
| TELECAPATION | 3028 | |||||
| TELESERVICE | 4011 | |||||
| TEXSCAN | 3036 | |||||
| TFC | 3122 | |||||
| TIVO | 3029 | 3030 | 4029 | 4030 | ||
| TOCOM | 3205 | 3170 | ||||
| TUDI | 4027 | |||||
| UNITED CABLE | 3011 | 4001 | ||||
| UNIVERSAL | 3113 | 3042 | 3039 | 3034 | 3033 | |
| VIDEOWAY | 3211 | 3124 | ||||
| VIEWSTAR | 3190 | 3089 | 3086 | 3053 | 3025 | 3019 |
| VISIOPASS 4009 | ||||||
| WESTMINSTER CABLE | 4007 | |||||
| ZENITH | 3219 | 3211 | 3125 | 3065 |
Satellite Tuners
Manufacturer Code Numbers
| A | I | W | A | 6 | 0 | 4 |
| AKAI 6033 | ||||||
| ALBA 6001 6011 | ||||||
| AMSTRAD 6032 | ||||||
| ANKARO 6021 | ||||||
| ASTRO 6076 6077 6078 6079 6080 6081 | ||||||
| 6082 6083 | ||||||
| BARCOM 6021 | ||||||
| BIRDVIEW 5025 | ||||||
| BLAUPUNKT 6038 6090 | ||||||
| BUSH | 6006 6048 | |||||
| BUSH (UK) 6053 | ||||||
| CANAL 6013 | ||||||
| CANAL DIGITAL | 6013 | |||||
| CANAL PLUS(CANAL +) | 6013 | |||||
| CHANNELMASTER | 5061 | 5025 | 5021 | 5020 | ||
| CHAPARRAL | 5051 | 5016 | 5015 | |||
| CITOH | 5060 | |||||
| DIRECTV | 5009 5010 5014 6002 | 6003 6005 | ||||
| DISH | NETWORK | 5064 | ||||
| DRAKE | 5081 5013 5018 5017 5013 | |||||
| DX ANTENNA | 5083 5079 5052 5031 | |||||
| ECHOSTAR | 5085 5084 5078 5077 5063 5053 | |||||
| 5052 5097 5095 5064 6047 | ||||||
| ELECTRO | HOME | 5092 | ||||
| FERGUSON | 6006 6011 6024 6045 6048 6052 | |||||
| FINLUX 6009 6010 | ||||||
| FOXTEL | 6016 | |||||
| FTE | 6080 | |||||
| FUBA | 6014 6021 6047 | |||||
| FUJITSU | 5034 | 5029 | 5024 | |||
| GENERALINSTRUMENT | 5074 5068 5054 5003 5065 5023 | |||||
| 2011 5003 | ||||||
| GOODMANS | 6011 | |||||
| GRUNDIG 6015 6038 6053 6067 6090 | ||||||
Manufacturer Code Numbers
| HITACHI | 5055 5004 | 6006 | 6011 | |||
| HOUSTON TRACKER | 5063 | |||||
| HUGHES | 5089 | 5037 | 5005 | 5006 | ||
| HUMAX | 6007 | |||||
| ITT | 6067 | |||||
| ITT-NOKIA | 6067 | |||||
| JANIEL | 5066 | |||||
| JERROLD | 5084 | 5068 | 5054 | |||
| KATHREIN 6001 | 6033 | 6080 | 6090 | |||
| KOSMOS 6080 | ||||||
| KYOTO GMI ATLANTA | 6043 | |||||
| LEGEND | 5053 | |||||
| LEMON | 6074 | |||||
| LOEWE 6075 | ||||||
| LORENZEN | 6061 | 6063 | 6064 | 6065 | 6074 | |
| MACOM | 5071 | 5070 | 5069 | 5065 | 5017 | |
| MAGNAVOX | 5073 | 5061 | ||||
| MARANTZ | 6033 | |||||
| MASPRO | 6006 | 6053 | ||||
| MEMOREX | 5053 | |||||
| METZ | 6090 | |||||
| MINERVA | 6090 | |||||
| MITSUBISHI | 5007 | 6090 | ||||
| MOTOROLA | 5012 | 5019 | ||||
| MULTISTAR | 6080 | |||||
| NEC | 6030 | 6036 | 6046 | 6073 | ||
| NETA P562 | 6040 | |||||
| NEXTWAVE | 5023 | |||||
| NOKIA | 6067 | |||||
| NORSAT | 5073 | 6046 | ||||
| OPTIMUS | 5066 | |||||
| OTTO VERSAND | 6090 | |||||
| PACE | 5087 | 5028 | 6024 | 6048 | 6053 | 6063 |
| 6064 | 6067 | |||||
| PACE MSS SERIES | 6067 |
Satellite Tuners
Manufacturer Code Numbers
| PANASONIC 5069 5066 5057 5053 6024 6031 | ||||||
| PANSAT 5020 | ||||||
| PERSONAL CABLE | 5018 | |||||
| PHILIPS 5075 6019 6021 6024 6032 6033 | ||||||
| 6053 | ||||||
| P | I | C | O | 5 | 0 | 0 |
| PREMIERE 6008 | ||||||
| PRESIDENT | 5004 | 5081 | ||||
| QUADRAL 6066 6067 6068 6069 6070 6071 | ||||||
| QUELLE 6090 | ||||||
| RADIOLA 6053 | ||||||
| RADIX | 6047 | |||||
| RCA | 5090 5065 5039 5001 5058 5058 | |||||
| REALISTIC | 5080 | 5049 | ||||
| SAMSUNG 5042 5022 5026 6027 6032 6080 | ||||||
| SAT | 6027 | |||||
| SATELLITE SERVICE | 5088 | 5035 | ||||
| SCIENTIFIC ATLANTA | 5039 | 5056 | ||||
| SCHNEIDER 6053 | ||||||
| SIEMENS | 6038 6090 | |||||
Manufacturer Code Numbers
| SKY | 6006 | ||
| SKY MASTER | 6033 | ||
| SKYLAB 6021 | |||
| SONY | 5005 | 5062 | |
| STAR CHOICE DBS | 5059 | ||
| STARCAST | 5047 | ||
| SUPER | GUIDE | 5023 | 5027 |
| TECHNISAT | 6047 | ||
| TEECOM | 5009 | 5093 | 5091 5090 5033 5030 |
| TELECOM | 6041 | ||
| TELEFUNKEN | 6083 | ||
| THORN-FERGUSON | 6023 | 6045 | 6048 6052 6053 6063 |
| TOPPFIELD | 6011 | ||
| TOSHIBA | 5070 | 5062 | 5061 5060 5026 5002 |
| UNIDEN 5080 | 5079 | 5066 | 5003 5089 5083 |
| 5054 | 5051 5050 5049 5048 5032 | ||
| VIASAT | 6012 | ||
| VORTEC 6032 | 6042 | ||
| WISI | 6004 | 6022 | 6026 6027 6047 |
| ZEHNDER | 6027 | 6080 | |
| ZENITH | 5088 | 5019 | 5094 5087 5085 5084 |
Specifications
BDS 5 receiver (BDS 800, BDS 700, BDS 600 systems)
BDS 2 receiver (BDS 400, BDS 300 systems)
Audio Section
| Continuous average power, stereo mode (BDS 5, BDS 2): | 65 watts per channel, 20Hz – 20kHz, @ <0.1% THD, both channels driven into 6 ohms |
| Multichannel power (BDS 5 only): 65 watts per channel, 20Hz – 20kHz, @ <0.1% THD, into 6 ohms | |
| Input sensitivity/impedance (line inputs): 250mV/46k ohms | |
| Signal-to-noise ratio (IHF-A): -90dB | |
| Frequency response @ 1W (±0.5dB): 20Hz – 20kHz | |
| Slew rate: 40V/μsec |
FM Tuner Section
| Frequency range: 87.5MHz – 108.0MHz (US and EU) |
| Usable sensitivity IHF: >14dBf |
| Signal-to-noise ratio (mono/stereo): -60dB/-55dB |
| Distortion (mono/stereo): 0.3%/0.5% |
| Stereo separation: -45dB @ 1kHz |
| Image rejection: -70dB |
| IF rejection: -80dB |
Disc Player Section
| Supported disc formats: 5-inch (12cm) or 3-inch (8cm) BD-Video (single-layer or double-layer), DVD-Video, DVD+R/+RW, DVD-R/-RW, CDDA (CD digital audio), CD-R/RW discs | |
| Region code (BD/DVD): | A/1 (USA); B/2 (EU) |
| Audio formats: | Dolby Digital, Dolby Digital Plus, Dolby TrueHD, DTS Digital, DTS-HD High Resolution Audio, DTS-HD Master Audio, PCM, WMA (DRM-free version only): WMA9, CBR @ 192kbps, VBR @ 355kbps; MP3: 32kbps – 320kbps bitrates, including variable-bitrate encoding |
| Still-image format: | JPEG |
| Video signal system: | NTSC (USA) or PAL (EU) |
| Frequency response: | 20Hz – 20kHz ±0.5dB |
| Signal-to-noise ratio: | -90dB (A-weighted) |
| Dynamic range: | 90dB (16-bit) |
| THD @ 1kHz (DVD/CD): | 0.1% |
| Wow & flutter: | Below measurable limits |
Video Section
| Television format: | NTSC or PAL (selectable) |
| HDMI version: | 1.3a, with 30/36-bit Deep Color |
General
| Power requirement: | 110 – 240V AC, 50/60Hz |
| Power consumption: | 110W maximum (BDS 5), 70W maximum (BDS 2); <1W standby |
| Dimensions (H x W x D): | 4" x 15-25/32" x 10-1/4" (102mm x 401mm x 260mm) |
| Weight: | 14.3 lb (6.5kg) (BDS 5); 14 lb (6.4kg) (BDS 2) |
Depth measurement does not include terminal connections. Height measurement includes feet and chassis.
SAT-TS60 Satellites (BDS 800 and CEN-TS60 Center (BDS 800 system) BDS 400 systems)
| Midrange transducer: | Two x 3" (75mm) flat-panel drivers, video-shielded | Two x 3" (75mm) flat-panel drivers, video-shielded |
| High-frequency transducer: 1" (25mm) CMMD | ^a Lite dome, video-shielded 1" (25mm) CMMD Lite dome, video-shielded | |
| Recommended power: 10 – 120 watts 10 – 150 watts | ||
| Impedance: 8 ohms 8 ohms | ||
| Sensitivity: 86dB (2.83V/1m) 83dB (2.83V/1m) | ||
| Connector type: Push-spring terminal Push-spring terminal | ||
| Enclosure type: Sealed Sealed | ||
| Dimensions (H x W x D): 11-25/32" x 4-11/32" x 3-15/32"(299mm x 110mm x 88mm)(Height measurement includes removable stands.) | 4-11/32" x 10-11/16" x 3-15/32"(110mm x 272mm x 88mm) | |
| Weight: | 3.3 lb (1.5kg) | 3.3 lb (1.5kg) |
SAT-TS11 Satellites (BDS 700 system) CEN-TS11 Center (BDS 700 system) SAT-TS7 Satellites (BDS 300 system)
| Midrange transducer: | Two x 3" (75mm) cones, video-shielded | Two x 3" (75mm) cones, video-shielded | 3" (75mm) cone, video-shielded |
| High-frequency transducer: | 1/2" (13mm) dome, video-shielded | 1/2" (13mm) dome, video-shielded | 1/2" (13mm) dome, video-shielded |
| Recommended power: 10 – 120 watts 10 – 80 watts | 10 – 80 watts | ||
| Impedance: 8 ohms 8 ohms 8 ohms | |||
| Sensitivity: 86dB (2.83V/1m) 86dB (2.83V/1m) 86dB (2.83V/1m) | |||
| Connector type: Push-spring terminal Push-spring terminal Push-spring terminal | |||
| Enclosure type: Sealed Sealed Sealed | |||
| Dimensions (H x W x D): 9-9/16" x 3-15/16" x 3-5/8"(243mm x 100mm x 92mm) | 4" x 9-1/2" x 3-5/8"(102mm x 241mm x 92mm) | 6-5/8" x 3-15/16" x 3-5/8"(167mm x 100mm x 92mm) | |
| Weight: | 2.2 lb (1.0kg) | 2.2 lb (1.0kg) | 1.3 lb (0.6kg) |
SB 10 Soundbar (BDS 600 system)
| Low-frequency transducer | |
| Left: | 3" (76mm) paper cone, video-shielded |
| Right: | 3" (76mm) paper cone, video-shielded |
| Center: | Two 3" (76mm) paper cones, video-shielded |
| High-frequency transducer | |
| Left: | 3/4" (19mm) silk dome, video-shielded |
| Right: | 3/4" (19mm) silk dome, video-shielded |
| Center: | 3/4" (19mm) silk dome, video-shielded |
| Recommended power | |
| Left and Right: | 60 watts (each) |
| Center: | 100 watts |
| Impedance: 8 ohms | |
| Sensitivity: 84dB (2.83V/1m) (each channel) | |
| Connector type: Push-spring terminal | |
| Enclosure type: Sealed | |
| Dimensions (H x W x D): 4-5/16" x 36-1/4" x 3-1/2"(110mm x 920mm x 89mm) | |
| Weight: | 8.1 lb (3.67kg) |
HKTS200SUB and HKTS210SUB Subwoofer (all systems)
| Low-frequency transducer: | 8" (200mm) down-firing cone |
| Amplifier power: | 200 watts |
| Frequency response: | 45Hz – 200Hz (-6dB) |
| Controls: | Volume, phase, bass boost |
| Connections: | LFE input, left and right RCA line-level inputs |
| Enclosure type: Sealed | |
| Power requirement: | 120V, 60Hz (USA)220V – 240V, 50/60Hz (EU) |
| Power consumption: | <1W (standby); 200W (maximum) |
| Dimensions (H x W x D): 13-29/32" x 10-1/2" x 10-1/2"(353mm x 267mm x 267mm)(Height measurement includes feet.) | |
| Weight: | 19.8 lb (9kg) |

HARMAN
HARMAN Consumer, Inc.
8500 Balboa Boulevard, Northridge, CA 91329 USA
516.255.4545 (USA only)
Made in P.R.C.
© 2010 HARMAN International Industries, Incorporated. All rights reserved.
harman kardon and CMMD (patent nos. 6,327,372 and 6,404,897) are trademarks of HARMAN International Industries, Incorporated, registered in the United States and/or other countries. Blu-ray Disc and BD-Live are trademarks of the Blu-ray Disc Association. DivX ^ , DivX Certified ^ and associated logos are registered trademarks of DivX, Inc., and are used under license. ABOUT DIVX VIDEO: DivX ^ is a digital-video format created by DivX, Inc. This is an official DivX Certified device that plays DivX video. Visit www.divx.com for more information and software tools to convert your files into DivX video. ABOUT DIVX VIDEO-ON-DEMAND: This DivX Certified ^ device must be registered in order to play DivX Video-on-Demand (VOD) content. To generate the registration code, locate the DivX VOD section in the device setup menu. Go to vod.divx.com with this code to complete the registration process and learn more about DivX VOD. Manufactured under license from Dolby Laboratories. Dolby is a trademark of Dolby Laboratories. Manufactured under license under U.S. Patent #'s: 5,451,942; 5,956,674; 5,974,380; 5,978,762; 6,487,535 & other U.S. and worldwide patents issued & pending. DTS and the Symbol are registered trademarks, and DTS-HD, DTS Digital Surround and the DTS logos are trademarks, of DTS, Inc. Product includes software. © DTS, Inc. All rights reserved. HDMI, the HDMI logo, and High-Definition Multimedia Interface are trademarks or registered trademarks of HDMI Licensing LLC in the United States and other countries. iPhone and iPod are trademarks of Apple Inc., registered in the U.S. and other countries. iPod and iPhone not included. Java, Java Powered and the Java Steaming Coffee Cup logo are trademarks or registered trademarks of Sun Microsystems, Inc., or its subsidiaries In the United States and other countries. Microsoft, Windows and Windows Media are registered trademarks of Microsoft Corporation in the United States and/or other countries. WMA (Windows Media Audio) is a proprietary file format developed by Microsoft. This item incorporates copy-protection technology that is protected by U.S. patents and other intellectual-property rights of Rovi Corporation. Reverse engineering and disassembly are prohibited.
Features, specifications and appearance are subject to change without notice.
Part No. 950-0321-001

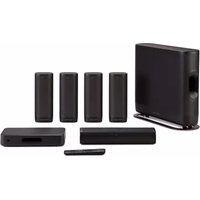
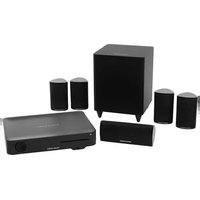
- VERIFY LINE VOLTAGE BEFORE USING 3
- Introduction
- Thank You for Choosing harman kardon® Products!
- Verify Line Voltage Before Using
- Unpacking
- Installation Location
- Cleaning
- Receiver
- Speakers and Subwoofer
- Moving the Receiver
- System Components
- BDS 800 System
- BDS 700 System
- BDS 600 System
- BDS 400 System
- BDS 300 System
- Supplied Accessories
- Subwoofer Controls and Connections
- Placing the Speakers (BDS 800, BDS 700, BDS 400 and BDS 300 Systems)
- Placing the Speakers (BDS 600 System)
- Placing the Front Left and Front Right Speakers
- Wall-Mounting the Soundbar
- Placing the Subwoofer
- Mounting Options for Satellite and Center Speakers
- Shelf Placement
- Wall-Mounting the BDS 800 and BDS 400 Satellite Speakers
- Wall-Mounting the BDS 800 Center Speaker
- Wall-Mounting the BDS 700 and BDS 300 Satellite Speakers
- Wall-Mounting the BDS 700 Center Speaker
- Connections
- Connecting the Subwoofer (all systems)
- Connecting the Radio Antenna
- Connecting a TV or Video Display
- Connecting to a Local Area Network (LAN)
- Connecting the AC Power
- NOTES:
- Preparing the Remote Control
- Installing the Batteries
- Using the Remote
- Programming the Remote
- To program the remote to control an Aux component:
- To teach individual button codes to the remote:
- Programming Remote Control "Punch-Through" Commands
- Using the Remote After it is Programmed
- Setting Up the Receiver
- Setup Wizard
- Settings Menus
- Using the Receiver
- Home Menu
- Adjusting Individual Speaker Volumes
- Notes on Setting Speaker Volumes in 5.1-Channel Systems:
- Notes on Setting Subwoofer Volume:
- IMPORTANT: Do not turn the receiver's volume up to or past the point where the audio from the speakers becomes distorted. Doing so can damage the speakers.
- Surround-Sound Modes
- Listening Through Headphones
- Using the Disc Player
- Disc Handling Precautions
- Disc Cleaning Precautions
- Regional Coding
- Copyright
- Copy Protection
- Supported Disc Formats
- Supported Media Codecs
- Loading and Playing a Disc
- Playback Features
- BD-Live Interactivity
- Playing Music CDs
- Listening to Your iPod/iPhone
- Playing iPod Content
- Receiver Information Display
- Using the Radio
- Setting and Recalling Preset Stations
- To set the currently tuned-in station as a preset:
- To listen to a preset station:
- Listening to Audio Sources
- Playing Files from USB Devices and CD Data Discs
- Viewing Photos
- Playing Music Files
- Playing Videos
- Using Playlists
- To Create a Playlist:
- To Play a Playlist:
- Troubleshooting
- Aux Component Remote-Control Code List
- Specifications
- HARMAN
Brand : HARMAN KARDON
Model : BDS 400
Category : Home Theater System