
NXA-WAP1000 - Access Point AMX - Free user manual and instructions
Find the device manual for free NXA-WAP1000 AMX in PDF.


| Product Type | Wireless Access Point |
| Brand | AMX |
| Model | NXA-WAP1000 |
| Dimensions (W x D x H) | 200 mm x 200 mm x 40 mm |
| Weight | 0.8 kg |
| Power Supply | Power over Ethernet (PoE+) or 12V DC |
| Wireless Standards | IEEE 802.11a/b/g/n/ac |
| Frequency Bands | 2.4 GHz and 5 GHz |
| Maximum Data Rate | Up to 1200 Mbps (2.4 GHz: 300 Mbps, 5 GHz: 867 Mbps) |
| Antennas | 2 internal dual-band antennas |
| Ethernet Ports | 1 x 10/100/1000 Mbps (PoE in) |
| Management | Web interface, SNMP, CLI |
| Security | WPA2-PSK, WPA2-Enterprise, MAC filtering, VLAN support |
| Mounting | Wall or ceiling mountable (bracket included) |
| Operating Temperature | 0°C to 40°C |
| Humidity | 10% to 90% non-condensing |
| Maintenance | Clean with a soft, dry cloth; avoid liquids |
| Spare Parts | Power adapter (optional), mounting bracket |
| Repairability | No user-serviceable parts; contact qualified service |
Frequently Asked Questions - NXA-WAP1000 AMX
User questions about NXA-WAP1000 AMX
0 question about this device. Answer the ones you know or ask your own.
Ask a new question about this device
Download the instructions for your Access Point in PDF format for free! Find your manual NXA-WAP1000 - AMX and take your electronic device back in hand. On this page are published all the documents necessary for the use of your device. NXA-WAP1000 by AMX.
USER MANUAL NXA-WAP1000 AMX
Operation/Reference Guide
NXA-WAP1000
Smart Wireless Access Point
natural_image
White wireless router device with ventilation slots and indicator lights (no visible text or symbols on body)AMX Limited Warranty and Disclaimer
This Limited Warranty and Disclaimer extends only to products purchased directly from AMX or an AMX Authorized Partner which include AMX Dealers, Distributors, VIP's or other AMX authorized entity.
AMX warrants its products to be free of defects in material and workmanship under normal use for three (3) years from the date of purchase, with the following exceptions:
- Electroluminescent and LCD Control Panels are warranted for three (3) years, except for the display and touch overlay components are warranted for a period of one (1) year.
• Disk drive mechanisms, pan/tilt heads, power supplies, and MX Series products are warranted for a period of one (1) year. - AMX lighting products are guaranteed to switch on and off any load that is properly connected to our lighting products, as long as the AMX lighting products are under warranty. AMX also guarantees the control of dimmable loads that are properly connected to our lighting products. The dimming performance or quality there of is not guaranteed, impart due to the random combinations of dimmers, lamps and ballasts or transformers.
- AMX software is warranted for a period of ninety (90) days.
- Batteries and incandescent lamps are not covered under the warranty.
- AMX AutoPatch Epica, Modula, Modula Series4, Modula CatPro Series and 8Y-3000 product models will be free of defects in materials and manufacture at the time of sale and will remain in good working order for a period of three (3) years following the date of the original sales invoice from AMX. The three-year warranty period will be extended to the life of the product (Limited Lifetime Warranty) if the warranty card is filled out by the dealer and/or end user and returned to AMX so that AMX receives it within thirty (30) days of the installation of equipment but no later than six (6) months from original AMX sales invoice date. The life of the product extends until five (5) years after AMX ceases manufacturing the product model. The Limited Lifetime Warranty applies to products in their original installation only. If a product is moved to a different installation, the Limited Lifetime Warranty will no longer apply, and the product warranty will instead be the three (3) year Limited Warranty.
All products returned to AMX require a Return Material Authorization (RMA) number. The RMA number is obtained from the AMX RMA Department. The RMA number must be clearly marked on the outside of each box. The RMA is valid for a 30-day period. After the 30-day period the RMA will be cancelled. Any shipments received not consistent with the RMA, or after the RMA is cancelled, will be refused. AMX is not responsible for products returned without a valid RMA number.
AMX is not liable for any damages caused by its products or for the failure of its products to perform. This includes any lost profits, lost savings, incidental damages, or consequential damages. AMX is not liable for any claim made by a third party or by an AMX Authorized Partner for a third party.
This Limited Warranty does not apply to (a) any AMX product that has been modified, altered or repaired by an unauthorized agent or improperly transported, stored, installed, used, or maintained; (b) damage caused by acts of nature, including flood, erosion, or earthquake; (c) damage caused by a sustained low or high voltage situation or by a low or high voltage disturbance, including brownouts, sags, spikes, or power outages; or (d) damage caused by war, vandalism, theft, depletion, or obsolescence.
This limitation of liability applies whether damages are sought, or a claim is made, under this warranty or as a tort claim (including negligence and strict product liability), a contract claim, or any other claim. This limitation of liability cannot be waived or amended by any person. This limitation of liability will be effective even if AMX or an authorized representative of AMX has been advised of the possibility of any such damages. This limitation of liability, however, will not apply to claims for personal injury.
Some states do not allow a limitation of how long an implied warranty last. Some states do not allow the limitation or exclusion of incidental or consequential damages for consumer products. In such states, the limitation or exclusion of the Limited Warranty may not apply. This Limited Warranty gives the owner specific legal rights. The owner may also have other rights that vary from state to state. The owner is advised to consult applicable state laws for full determination of rights.
EXCEPT AS EXPRESSLY SET FORTH IN THIS WARRANTY, AMX MAKES NO OTHER WARRANTIES, EXPRESSED OR IMPLIED, INCLUDING ANY IMPLIED WARRANTIES OF MERCHANTABILITY OR FITNESS FOR A PARTICULAR PURPOSE. AMX EXPRESSLY DISCLAIMS ALL WARRANTIES NOT STATED IN THIS LIMITED WARRANTY. ANY IMPLIED WARRANTIES THAT MAY BE IMPOSED BY LAW ARE LIMITED TO THE TERMS OF THIS LIMITED WARRANTY. EXCEPT AS OTHERWISE LIMITED BY APPLICABLE LAW, AMX RESERVES THE RIGHT TO MODIFY OR DISCONTINUE DESIGNS, SPECIFICATIONS, WARRANTIES, PRICES, AND POLICIES WITHOUT NOTICE.
AMX Software License and Warranty Agreement
- LICENSE GRANT. AMX grants to Licensee the non-exclusive right to use the AMX Software in the manner described in this License. The AMX Software is licensed, not sold. This license does not grant Licensee the right to create derivative works of the AMX Software. The AMX Software consists of generally available programming and development software, product documentation, sample applications, tools and utilities, and miscellaneous technical information. Please refer to the README.TXT file on the compact disc or download for further information regarding the components of the AMX Software. The AMX Software is subject to restrictions on distribution described in this License Agreement. AMX Dealer, Distributor, VIP or other AMX authorized entity shall not, and shall not permit any other person to, disclose, display, loan, publish, transfer (whether by sale, assignment, exchange, gift, operation of law or otherwise), license, sublicense, copy, or otherwise disseminate the AMX Software. Licensee may not reverse engineer, decompile, or disassemble the AMX Software.
- ACKNOWLEDGEMENT. You hereby acknowledge that you are an authorized AMX dealer, distributor, VIP or other AMX authorized entity in good standing and have the right to enter into and be bound by the terms of this Agreement.
- INTELLECTUAL PROPERTY. The AMX Software is owned by AMX and is protected by United States copyright laws, patent laws, international treaty provisions, and/or state of Texas trade secret laws. Licensee may make copies of the AMX Software solely for backup or archival purposes. Licensee may not copy the written materials accompanying the AMX Software.
• TERMINATION. AMX RESERVES THE RIGHT, IN ITS SOLE DISCRETION, TO TERMINATE THIS LICENSE FOR ANY REASON UPON WRITTEN NOTICE TO LICENSEE. In the event that AMX terminates this License, the Licensee shall return or destroy all originals and copies of the AMX Software to AMX and certify in writing that all originals and copies have been returned or destroyed. - PRE-RELEASE CODE. Portions of the AMX Software may, from time to time, as identified in the AMX Software, include PRE-RELEASE CODE and such code may not be at the level of performance, compatibility and functionality of the GA code. The PRE-RELEASE CODE may not operate correctly and may be substantially modified prior to final release or certain features may not be generally released. AMX is not obligated to make or support any PRE-RELEASE CODE. ALL PRE-RELEASE CODE IS PROVIDED "AS IS" WITH NO WARRANTIES.
- LIMITED WARRANTY. AMX warrants that the AMX Software (other than pre-release code) will perform substantially in accordance with the accompanying written materials for a period of ninety (90) days from the date of receipt. AMX DISCLAIMS ALL OTHER WARRANTIES, EITHER EXPRESS OR IMPLIED, INCLUDING, BUT NOT LIMITED TO IMPLIED WARRANTIES OF MERCHANTABILITY AND FITNESS FOR A PARTICULAR PURPOSE, WITH REGARD TO THE AMX SOFTWARE. THIS LIMITED WARRANTY GIVES LICENSEE SPECIFIC LEGAL RIGHTS. Any supplements or updates to the AMX SOFTWARE, including without limitation, any (if any) service packs or hot fixes provided to Licensee after the expiration of the ninety (90) day Limited Warranty period are not covered by any warranty or condition, express, implied or statutory.
- LICENSEE REMEDIES. AMX's entire liability and Licensee's exclusive remedy shall be repair or replacement of the AMX Software that does not meet AMX's Limited Warranty and which is returned to AMX in accordance with AMX's current return policy. This Limited Warranty is void if failure of the AMX Software has resulted from accident, abuse, or misapplication. Any replacement AMX Software will be warranted for the remainder of the original warranty period or thirty (30) days, whichever is longer. Outside the United States, these remedies may not available. NO LIABILITY FOR CONSEQUENTIAL DAMAGES. IN NO EVENT SHALL AMX BE LIABLE FOR ANY DAMAGES WHATSOEVER (INCLUDING, WITHOUT LIMITATION, DAMAGES FOR LOSS OF BUSINESS PROFITS, BUSINESS INTERRUPTION, LOSS OF BUSINESS INFORMATION, OR ANY OTHER PECUNIARY LOSS) ARISING OUT OF THE USE OF OR INABILITY TO USE THIS AMX SOFTWARE, EVEN IF AMX HAS BEEN ADVISED OF THE POSSIBILITY OF SUCH DAMAGES. BECAUSE SOME STATES/COUNTRIES DO NOT ALLOW THE EXCLUSION OR LIMITATION OF LIABILITY FOR CONSEQUENTIAL OR INCIDENTAL DAMAGES, THE ABOVE LIMITATION MAY NOT APPLY TO LICENSEE.
- U.S. GOVERNMENT RESTRICTED RIGHTS. The AMX Software is provided with RESTRICTED RIGHTS. Use, duplication, or disclosure by the Government is subject to restrictions as set forth in subparagraph ©(1)(ii) of The Rights in Technical Data and Computer Software clause at DFARS 252.227-7013 or subparagraphs ©(1) and (2) of the Commercial Computer Software Restricted Rights at 48 CFR 52.227-19, as applicable.
- SOFTWARE AND OTHER MATERIALS FROM AMX.COM MAY BE SUBJECT TO EXPORT CONTROL. The United States Export Control laws prohibit the export of certain technical data and software to certain territories. No software from this Site may be downloaded or exported (i) into (or to a national or resident of) Cuba, Iraq, Libya, North Korea, Iran, Syria, or any other country to which the United States has embargoed goods; or (ii) anyone on the United States Treasury Department's list of Specially Designated Nationals or the U.S. Commerce Department's Table of Deny Orders. AMX does not authorize the downloading or exporting of any software or technical data from this site to any jurisdiction prohibited by the United States Export Laws.
This Agreement replaces and supersedes all previous AMX Software License Agreements and is governed by the laws of the State of Texas, and all disputes will be resolved in the courts in Collin County, Texas, USA. For any questions concerning this Agreement, or to contact AMX for any reason, please write: AMX License and Warranty Department, 3000 Research Drive, Richardson, TX 75082.
Table of Contents
NXA-WAPZD1000 Smart Wireless Access Point ....1
Overview 1
Product Specifications 2
Power 3
Ethernet Ports 3
Reset Button.... 4
NXA-WAPZD1000 Installation 5
Before You Begin.... 5
Prepare the Required Hardware and Tools.... 5
Perform a Site Survey 5
Determine the Optimal Mounting Location and Orientation .... 5
Preconfiguring the NXA-WAP1000 8
Configuring for Management by NXA-WAPZD1000....8
What You Will Need.... 8
-
Connect the AP to a Power Source 8
-
Connect the AP to the Same Subnet as the NXA-WAPZD1000 9
Configuring for Standalone Operation 10
What You Will Need.... 10
-
Prepare the Administrative Computer 10
-
Connect the NXA-WAP1000 to the Administrative Computer.... 11
-
Log Into the AP's Web Interface 11
-
Configure the Wireless Settings.... 12
Configure Common Wireless Settings.... 13
Configure Wireless # Settings.... 13
-
Disconnect the AP from the Administrative Computer 13
-
Restore the Administrative Computer's Network Settings 14
Verify NXA-WAP1000 Operation.... 15
Connect the NXA-WAP1000 to the Network 15
Check the LEDs 15
Associate a Wireless Client with the AP 15
Disconnect the AP from the Network 15
Deploy the Access Point 16
-
Choose a Location for the AP.... 16
-
Connect the AP to a Power Source and the Network 16
Troubleshooting Installation 17
Browser-Based Configuration Pages 19
Logging into the Configuration Pages.... 19
Status.... 21
Device 21
Internet 22
Renewing or Releasing DHCP 22
Radio 2.4G 23
Radio 5G 25
Viewing Associated Wireless Clients 26
Configuration.... 27
Device 27
Changing the Administrative Login Settings 27
Internet 28
Radio 2.4G 29
Radio 5G 32
VLAN 34
Setting Threshold Options 35
Configuring WLAN Settings 36
Using WEP 37
Using WPA 39
Customizing 802.1X Settings 40
Rate Limiting 41
Controlling Access to the Wireless Network.... 42
Changing the Access Controls for a WLAN 42
Disabling WLAN Access Restrictions 44
Allowing Only Stations Explicitly Listed in the Access Controls Table.... 44
Denying Only Stations Explicitly Listed in the Access Controls Table 44
Removing MAC Addresses from the List 44
Maintenance 45
Upgrade 45
Upgrading Manually via the Web 46
Upgrading Manually via FTP or TFTP 47
Scheduling an Automatic Upgrade.... 47
Reboot / Reset 49
Rebooting the AP 49
Resetting the AP to Factory Defaults 49
Support Info 50
Saving a Copy of the Current Log to Your Computer 50
Administration 51
Management 51
Diagnostics 53
Log 54
NXA-WAPZD1000 Smart Wireless Access Point
Overview
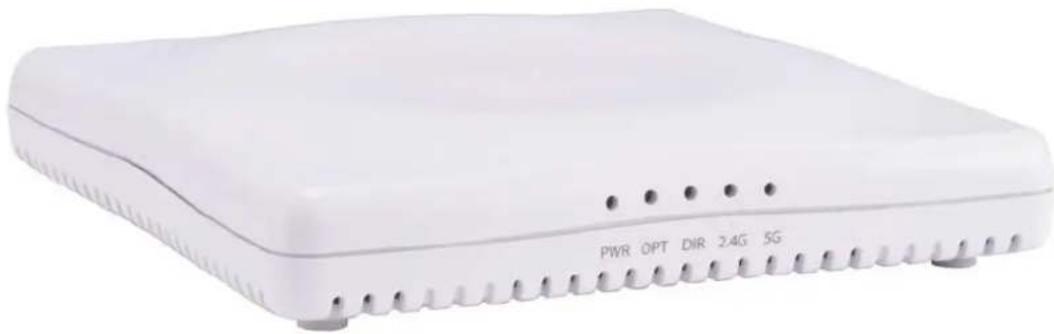
The NXA-WAP1000 (US operation: FG2255-51; Operation outside the US: FG2255-53), powered by Ruckus™, is a high-performance 802.11a/b/g/n smart Wi-Fi access point for homes and businesses that utilizes industry acclaimed Ruckus Wireless Technology. The NXA-WAP1000 can be deployed as a standalone access point or as part of a centrally-controlled Smart Wireless LAN when combined with the AMX NXA-WAPZD1000 Wireless LAN Zone Director. With a sleek modern design, small form factor, and Power over Ethernet (PoE), the NXA-WAP1000 can be mounted on the ceiling to maximize performance without disturbing aesthetics. The NXA-WAP1000 may be powered via PoE, or via the optional NXA-WAP1000 Power Supply (FG2255-61).

FIG. 1 NXA-WAP1000 - Front
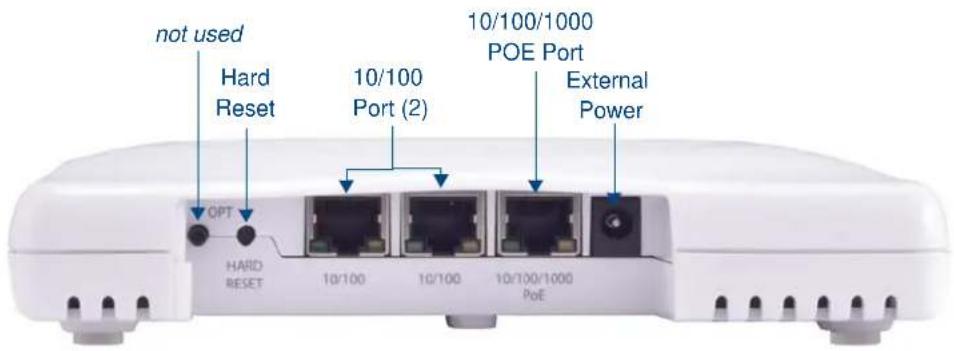
FIG. 2 NXA-WAP1000 - Back
Product Specifications
| NXA-WAP1000 (FG2255-51/53) Specifications | |
| Dimensions (HWD): 1 3/8" x 7" x 7" (36 mm x 178 mm x 178 mm) | |
| Weight: 0.88 lbs (397 g) | |
| Power: • External power supply (not included)• Input: 110-240V AC• Output: 12V DC, 1.5A• Power over Ethernet Class 0 | |
| Ethernet Ports: • 2 auto MDX, auto-sensing 10/100 Mbps, RJ-45 ports• 1 auto MDX, auto-sensing10/100/1000 Mbps, RJ-45, POE port | |
| Antenna: Internal software-configurable antenna that provides over 300 unique patterns. | |
| Operating Frequency • IEEE 802.11n: 2.4 – 2.484 GHz and 5.15 – 5.85 GHz• IEEE 802.11a: 5.15 – 5.85 GHz• IEEE 802.11b: 2.4 – 2.484 GHz | |
| Wireless Output Power • 26 dBm for 2.4GHz• 24 dBm for 5GHz• Country-specific power settings are configurable | |
| Supported Data Rates: • 802.11n: 6.5Mbps – 130Mbps (20MHz) 6.5Mbps – 300Mbps (40MHz)• 802.11a: 54, 48, 36, 24, 18, 12, 9 and 6Mbps• 802.11b: 11, 5.5, 2 and 1 Mbps• 802.11g: 54, 48, 36, 24, 18, 12, 9 and 6 Mbps | |
| Power Source: • None: device uses Power Over Ethernet (PoE) via POE Injector or PoESwitch for necessary power. | |
| Front LED Indicators: | |
| PWR: • Off: Off. | • Red: Boot up in process.• Green: On |
| OPT: • Not active at this time. | |
| DIR: | • Off: The NXA-WAP1000 is not being managed by an NXA-WAPZD1000 (standalone mode).• Green: The NXA-WAP1000 is being managed by an NXA-WAPZD1000.• Slow flashing green (one flash every two seconds): The NXA-WAP1000 is being managed by an NXA-WAPZD1000, but is currently unable to communicate with it.• Fast flashing green (two flashes every second): The NXA-WAP1000 is being managed by an NXA-WAPZD1000 and is currently receiving configuration settings (provisioning) or a firmware update. |
| 2.4G: | • Off: The WLAN service is down.• Amber: The WLAN service is up and no wireless clients are associated.• Green: The WLAN service is up and at least one wireless client is associated.• Flashing green (two flashes every second): The WLAN service is up and no wireless clients are associated. |
| NXA-WAP1000 (FG2255-51/53) Specifications (Cont.) | |
| Front LED Indicators (Cont.) | |
| 5G: • Off: The WLAN service is down. | • Amber: The WLAN service (or mesh network) is up and at least one wireless client is associated, but RSSI is low. If mesh networking is enabled, at least one downlink MAP is connected.• Green: The wireless WLAN service (or mesh network) is up and at least one wireless client is associated. If mesh networking is enabled, at least one downlink MAP is connected.• Fast flashing green (two flashes every second): The WLAN service (or mesh network) is up, but no wireless clients or downlink MAPs are currently associated.• Slow flashing green (one flash every two seconds): The WLAN service is up, no wireless clients are currently associated, mesh networking is enabled and at least one downlink MAP is connected. |
| Rear Components: | |
| OPT: • Not active at this time. | |
| Hard Reset: • Pressing, and then quickly releasing this internal button reboots the NXA-WAP1000.• Pressing and holding it for six seconds resets the NXA-WAP1000 to factory default settings. | |
| 10/100 Ports (2): • Two RJ-45 ports for 10/100Mbps connections. | |
| 10/100/1000 PoE Port: • One RJ-45 port for a 10/100/1000 PoE (Power over Ethernet, 802.3af) connection. | |
| External Power Port: | • Connects a power supply (12 VDC/1.25A) to this port. Power may also be supplied via the 10/100/1000 PoE (802.3af) port. |
| Operating Temperature: • Operating: 0 to 40 °C (32 to 104 °F)• Storage: -20 to 70 °C (32 to 158 °F) | |
| Operating Humidity: 15% to 95% (non-condensing) | |
| Certifications: • FCC | • IC• CE• C - T i c k• R o H S |
| Included Accessories: • Category 5 (CAT5e) network cable• NXA-WAP1000 Installation Guide (93-2255-51)• Mounting Template (93-2255-55)• #4 sheet metal mounting screws (2) with molly bolts (2) for wall installation | |
| Other AMX Equipment: | • NXA-WAP1000 Power Supply (FG2255-61)• NXA-ENET8POE PoE Switch (FG2178-62)• NXA-WAPZD1000 Wireless LAN Zone Director (FG2255-52) |
Power
The AP does not have a power switch. It utilizes Power Over Ethernet (PoE), which draws power from its Ethernet connection. An optional power supply (FG2255-61) may also be used in circumstances where PoE is not available, via the External Power port (FIG. 2).
Ethernet Ports
The access point has two 10BASE-T/100BASE-TX RJ-45 ports and one 10/100/1000 RJ-45 port that can be attached directly to 10BASE-T/100BASE-TX LAN segments. These segments must conform to the IEEE 802.3-2005 specifications.
These ports supports automatic MDI/MDI-X operation, so you can use straight-through cables for all network connections to PCs, switches, or hubs.
Reset Button
The Hard Reset button (FIG. 2) is used to restart the NXA-WAP1000 or to restore the factory default configuration. If you hold down the button for less than 10 seconds, the AP will perform a hardware reset. If you hold down the button for 10 seconds or more, any configuration changes you may have made are removed, and the factory default configuration is restored to the AP.

Resetting the NXA-WAP1000 to factory default settings will erase all previously configured settings.
NXA-WAPZD1000 Installation
Before You Begin
Before starting with the installation, make sure that you have the required items for the installation ready. In addition, verify that the wireless stations on the network have the required components for wireless communication with the AP. This section describes the pre-installation tasks that you need to perform.
Prepare the Required Hardware and Tools
You must supply the following tools and equipment:
- A notebook computer running Windows (2000/XP/Vista/7) with one wireless 802.11a/b/g/n network card and one Ethernet card installed
- A modem (DSL or cable), E1/T1 router, or other device provided by your Internet Service Provider, that brings Internet access to your site
- A network switch or a DSL/Internet gateway device (optional).

NOTE
If the AP is deployed with an NXA-WAPZD1000, connect the AP to your Ethernet network via the ZoneDirector.
Perform a Site Survey
Before installing the AP, perform a site survey to determine the optimal AP placement for maximum range, coverage, and network performance. When performing a site survey, consider the following factors:
- Data rates: Range is generally inversely proportional to data rates. The maximum radio range is achieved at the lowest workable data rate. Higher data rates will generally be achieved at closer distances.
- Antenna type and placement: Proper antenna configuration is a critical factor in maximizing radio range. As a general rule, radio range is increased by mounting the antennas higher off of the ground.
- Physical environment: Clear or open areas provide better radio range than closed or filled areas. The less cluttered the operating environment, the greater the wireless range.
- Obstructions, building materials, and sources of interference: Physical obstructions, such as concrete pillars, steel beams, and filing cabinets, can block or hinder wireless communication. Avoid installing the AP in a location where there is an obstruction between sending and receiving devices. A number of machines and electronic devices that emit radio waves, such as cranes, wireless phones, microwave ovens, and satellite dishes, interfere with and block wireless signals. Building materials used in construction also influence radio signal penetration. For example, drywall construction permits greater range than concrete blocks.
Determine the Optimal Mounting Location and Orientation
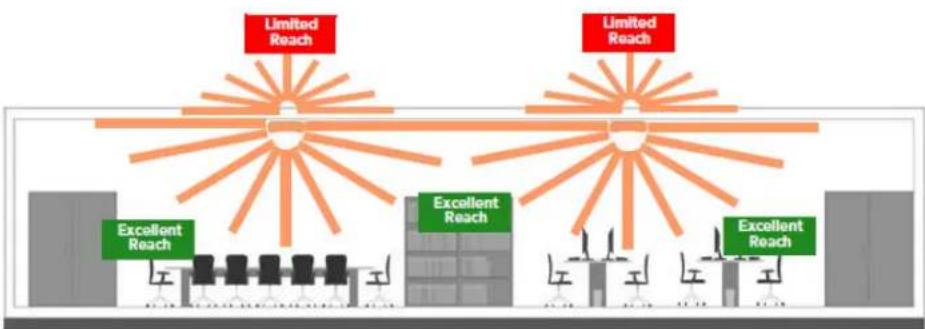
The location and orientation that you choose for the AP play a critical role in the performance of your wireless network. Installing the AP away from obstructions and sources of interference and ensuring that the top of the AP is pointing in the general direction of its wireless clients is highly recommended (FIG. 1).

NOTE
When wall mounted, NXA-WAP1000 devices should be staggered to maximize coverage.
flowchart
graph TD
    A["Outstanding Room"] --> B["Excellent Reach"]
    A --> C["Outstanding Room"]
    D["Outstanding Room"] --> E["Excellent Reach"]
    D --> F["Outstanding Room"]
    G["Outstanding Room"] --> H["Excellent Reach"]
    G --> I["Outstanding Room"]
    style A fill:#f9f,stroke:#333
    style D fill:#f9f,stroke:#333
    style G fill:#f9f,stroke:#333
    style B fill:#ccf,stroke:#333
    style E fill:#ccf,stroke:#333
    style F fill:#ccf,stroke:#333
    style H fill:#ccf,stroke:#333
    style I fill:#ccf,stroke:#333
FIG. 1 Recommended ceiling mounting installation
Care should be taken to consider vertical placement as well as horizontal placement to maximize coverage (FIG. 2).

FIG. 2 Recommended wall mounting installation

flowchart
graph TD
    A["Block 1"] --> B["Red Arrow: Limited Reach"]
    A --> C["Green Arrow: Excellent Reach"]
    D["Block 2"] --> E["Red Arrow: Limited Reach"]
    D --> F["Green Arrow: Excellent Reach"]
    G["Block 3"] --> H["Red Arrow: Limited Reach"]
    G --> I["Green Arrow: Excellent Reach"]
    J["Block 4"] --> K["Red Arrow: Limited Reach"]
    J --> L["Green Arrow: Excellent Reach"]
FIG. 3 Recommended wall mounting in a corridor (top view)
Preconfiguring the NXA-WAP1000
The procedure for completing the NXA-WAP1000's essential configuration depends on whether you want it to be managed by an NXA-WAPZD1000 ZoneDirector or to operate as a standalone AP.
Configuring for Management by NXA-WAPZD1000
If an NXA-WAPZD1000 is installed on the network, you can configure the AP for management by the ZoneDirector. Simply connect the AP to same Layer 2 subnet as the ZoneDirector. When the NXA-WAP1000 starts up, it will discover and register with ZoneDirector automatically.

If you use this method, make sure that you do not change the IP address of the NXA-WAPZD1000 after the AP discovers and registers with it. If you change the ZoneDirector IP address, the AP will no longer be able to communicate with it and will be unable to rediscover it.

If you configure an NXA-WAP1000 for management by an NXA-WAPZD1000 and later decide that you want it to be a standalone AP, you will need to factory reset the AP.
Before starting this procedure, check the label on the back panel of the AP, and write down the MAC address of the AP. You will need the MAC address to identify the AP on the NXA-WAPZD1000's Browser-Based Configuration Pages (page 19).

For more information on the NXA-WAPZD1000, please refer to the NXA-WAPZD1000 Operation Reference Guide, available at www.amx.com.
What You Will Need
Before starting with the configuration task, make sure that you have the following items or applications ready:
- A computer from which you can access the NXA-WAPZD1000 Browser-Based Configuration Pages.
- Mozilla Firefox 2.0 (or later) or Microsoft Internet Explorer 6.0 (or later) installed on the administrative computer.
- One Ethernet cable.
● The NXA-WAP1000.
● The optional power supply, if needed.
1. Connect the AP to a Power Source
The NXA-WAP1000 is designed to be powered via Power Over Ethernet (PoE), thus removing the need for a standard power connection. However, certain circumstances may require use of the optional power supply. To supply the NXA-WAP1000 with power via the power supply:
- Connect the jack on the power supply to the power connector on the rear panel of the NXA-WAP1000 (FIG. 2).
- Connect the power supply to a power source.
- Verify that the power LED on the AP is green.
To supply the NXA-WAP1000 with power via PoE:
- Connect the Ethernet cable to a suitable connection, such as an NXA-WAPZD1000.
- Connect the other end of the cable to the NXA-WAP1000's 10/100/1000 Ethernet port (FIG. 2).
2. Connect the AP to the Same Subnet as the NXA-WAPZD1000
- If the NXA-WAP1000 is not receiving power via a PoE connection, connect one end of an Ethernet cable to a LAN (RJ-45) port on the rear panel of the AP.
- Connect the other end of the Ethernet cable to the same Layer 2 subnet as the NXA-WAPZD1000. The same Layer 2 subnet means that there should not be any router between the AP and the ZoneDirector.
- Log into the NXA-WAPZD1000's Browser-Based Configuration Pages, and then go to the Monitor > Access Points page.
- Look for the MAC address of the AP, and then check its Status column.
- If automatic approval is enabled, the Status column should show Connected.
- If automatic approval is disabled, click the Allow link that is on the same row as the AP's MAC address. This allows the AP to register with the NXA-WAPZD1000.
When the Status column shows Connected, this indicates that the AP has successfully registered with the NXA-WAPZD1000 and that it can now be moved to its destination Layer 2 or Layer 3 network.
Configuring for Standalone Operation
This section describes the steps you need to complete to set up the NXA-WAP1000 in standalone mode.
What You Will Need
Before starting with the configuration task, make sure that you have the following items and applications ready:
- An administrative computer (notebook computer) running Microsoft Windows (2000/XP/Vista/7).
- Mozilla Firefox 2.0 (or later) or Microsoft Internet Explorer 6.0 (or later) installed on the administrative computer.

NOTE
Make sure that any popup blockers on the browser are disabled.
● One Cat5e Ethernet cable.
1. Prepare the Administrative Computer

NOTE
The following procedure is applicable if the administrative computer is running Windows XP or Windows 2000. If you are using a different operating system, refer to the documentation that was shipped with your operating system for information on how to modify the computer's IP address settings.
-
On your Windows XP or Windows 2000 computer, open the Network Connections (or Network and Dial-up Connections) control panel according to how the Start menu is set up:
-
On Windows XP, click Start > Control Panel > Network Connections.
-
On Windows 2000, click Start > Settings > Network Connections.
-
When the Network Connections window appears, right-click the icon for Local Area Connection, and then click Properties.

NOTE
Make sure that you configure the Local Area Connection properties, not the Wireless Network Connection properties.
- When the Local Area Connection Properties dialog box appears, select Internet Protocol (TCP/IP) from the scrolling list, and then click Properties. The Internet Protocol (TCP/IP) Properties dialog box appears.
-
Write down all of the currently active network settings. You will need this information later when you restore your computer to its current network configuration.
-
Click Use the following IP address, and then configure the IP address settings (FIG. 4).

FIG. 4 Sample configuration in the Internet Protocol (TCP/IP) Properties dialog box
| IP Address Settings | |
| IP Address: | 192.168.0.22 (or any address in the 192.168.0.x network, with the exception of 192.168.0.1, which is the default IP address assigned to the NXA-WAP1000) |
| Subnet Mask: 255.255.2 | 55.0 |
| Default Gateway: 192.168.0.1 | |
| Preferred DNS Server: 1 | 92.168.0.1 |
You can leave the Alternate DNS server box blank.
- Click OK to save your changes and close the TCP/IP Properties dialog box.
- Click OK again to close the Local Area Connection Properties dialog box. Windows saves the IP address settings that you have configured.
2. Connect the NXA-WAP1000 to the Administrative Computer
Connect one end of an Ethernet cable to an Ethernet port on the NXA-WAP1000, and then connect the other end to the administrative computer's Ethernet port. After a minute, the power LED on the AP will turn solid green. You have completed connecting the AP to the administrative computer.
3. Log Into the AP's Web Interface
- On the administrative computer, open a Web browser window.
- In the address or location bar, type the following address: https://192.168.0.1
-
Press Enter on the keyboard to connect to the NXA-WAP1000's Browser-Based Configuration Pages. A security alert message appears.
-
Click Yes or OK (depending on the browser) to continue. The AP's login page appears (FIG. 5).
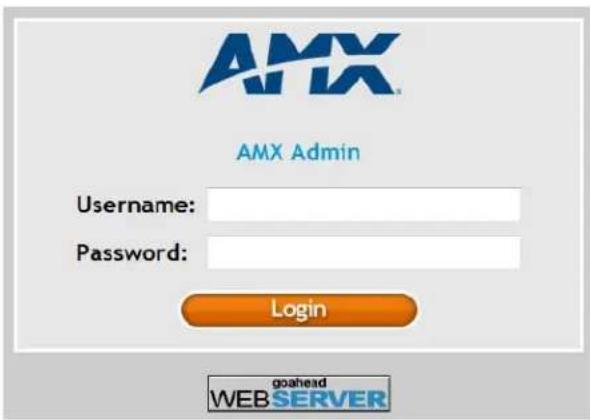
FIG. 5 Browser-Based Configuration Pages Login
5. In User Name, type "admin".
6. In Password, type "1988".
7. Click Log In. The Browser-Based Configuration page appears, displaying the Device page.
4. Configure the Wireless Settings
To complete this step, you will need to configure the settings on the Common tab and at least one Wireless # tab. These are the essential wireless settings that will enable wireless devices on the network to associate with the AP.
| Default Wireless Settings | |
| SSID (network name): Wireless 1 to Wireless 8 (8 WLANs) | |
| Encryption (security): Disabled on all WLANs | |
| Default management IP address: 192.168.0.1 |
Configure Common Wireless Settings
- On the left menu of the Browser-Based Configuration Pages, click Configuration > Wireless. The Common page appears.

The two radio frequencies (2.4GHz and 5GHz) need to be configured separately in the Browser-Based Configuration Pages. To configure the common wireless settings, click Configuration > Radio 2.4G or Radio 5G.
- Verify that the common wireless settings are configured as listed in the table below.
| Common Wireless Configuration | |
| Setting Recommended Value | |
| Wireless Mode: Auto-select | |
| Channel: SmartSelect | |
| Country Code: • If you purchased the AP in the United States, this value is fixed to United States at the factory and is not user configurable.• If you purchased the AP outside the United States, verify that the value is set to your country or region. Selecting the correct country code ensures that the AP uses only the radio channels allowed in your country or region.Note for dual band AP users: The two radios on dual band APs are always configured with the same country code setting. If you change the country code for Radio 1, for example, the same change will be applied automatically to Radio 2. | |
- If you made any changes to the Common tab, click Update Settings
Configure Wireless # Settings
To configure any of the settings for a particular AP:
- Click one of the Wireless # tabs.
- In Wireless Availability, click Enabled.
-
In Broadcast SSID, click Enabled.
-
Clear the SSID box, and then type a unique and descriptive name that you want to use for this wireless network. For example, you can type "AMX Wireless AP". This SSID is the name that will help users identify this wireless network in their wireless network connection application.

You may also configure other wireless settings on this and other Wireless # tabs (in addition to the settings described above), although it is not necessary for completing the AP installation.
- Click Update Settings. You have completed configuring the basic wireless settings of the AP.
5. Disconnect the AP from the Administrative Computer
To disconnect the NXA-WAP1000 from its administrative computer:
- Disconnect the AP from the power source.
- Verify that the power LED on the AP is off.
- Disconnect the Ethernet cable from the administrative computer's Ethernet port.
6. Restore the Administrative Computer's Network Settings
To restore your administrative computer's original network settings:
-
On your Windows XP or Windows 2000 computer, open the Network Connections (or Network and Dial-up Connections) control panel according to how the Start menu is set up:
-
On Windows XP, click Start > Control Panel > Network Connections.
-
On Windows 2000, click Start > Settings > Network Connections.
-
When the Network Connections window appears, right-click the icon for Local Area Connection, and then click Properties.
- When the Local Area Connection Properties dialog box appears, select Internet Protocol (TCP/IP) from the scrolling list, and then click Properties. The TCP/IP Properties dialog box appears.
- Restore the computer's network settings by typing the original IP address settings in the TCP/IP Properties dialog box.
- On the TCP/IP Properties dialog box, click OK to close it.
- Click OK again to close the Local Area Connection Properties dialog box.
You are now ready to connect the AP to your network.
Verify NXA-WAP1000 Operation
Before deploying the AP to your environment, verifying that the NXA-WAP1000 is operating correctly is highly recommended. To do this, you will need to connect the AP to your live network temporarily and make sure that the network connection works and that wireless clients are able to associate with the AP and connect to your network and the Internet.

The network and power connections that you will be making in this step are temporary. For outdoor APs, you can perform these verification tasks indoors.
Connect the NXA-WAP1000 to the Network
To connect the NXA-WAP1000 to a network:
- Connect the Ethernet cable from a LAN (RJ-45) port on the AP to your network's router or switch.
- If not wanting to use PoE exclusively, reconnect the AP to a power source.
Check the LEDs
Perform a spot-check using the LEDs to verify that the AP is operating normally.
If the AP is operating normally and your wireless client was able to associate with it:
● The 2.4G or 5G LED is green.
- If you do not have an NXA-WAPZD1000 on the network, the DIR LED is off. This indicates that the AP is operating in standalone mode. If a ZoneDirector is on the network, the DIR LED is green.
Associate a Wireless Client with the AP
On the administrative computer, verify that the wireless interface is enabled. In Windows XP, click All Programs > Connect To > Wireless Network Connection to enable the wireless interface.
- In the system tray, right-click the Wireless Network Connection icon, and then click View Available Wireless Networks.
- In the list of available wireless networks, click the network with the same SSID as you configured in the Configure Wireless # Settings section on page 13. For example, if you set the SSID to Wireless AP, click the wireless network named Wireless AP.
- Click Connect.
Your wireless client connects to the wireless network. After the wireless client makes a successful connection to the wireless network, the wireless client icon in the system tray changes.
Disconnect the AP from the Network
- Disconnect the AP from the power source.
- Disconnect the Ethernet cable that runs to the AP's RJ45 port from your network's router or switch. You are now ready to deploy the AP to its permanent mounting location.
Deploy the Access Point
In this step, you will place the AP in a suitable location on the network and connect it to a power source and to your network environment.
1. Choose a Location for the AP
You can install the AP on a flat surface (for example, on a desktop or tabletop) or mount it on a wall or ceiling. When choosing a location for the AP, ensure that the location:
- Allows easy viewing of the LEDs and access to the connectors, if necessary.
- Is centrally located to the wireless clients that will be connecting to the AP. A suitable location might be on top of a cabinet or similar furniture to optimize wireless connections to clients in both horizontal and vertical directions, allowing wider coverage.
When positioning your AP, ensure that:
- It is out of direct sunlight and away from sources of heat.
- Cabling is away from power lines, fluorescent lighting fixtures, and sources of electrical noise such as radios, transmitters and broadband amplifiers.
- There are no thick walls or metal shielding between the AP and the wireless stations.
● Water or moisture cannot enter the case of the device.
● Air flow around the unit and through the vents in the side of the case is not restricted.
Review the recommendations in Determine the Optimal Mounting Location and Orientation section on page 5 for help in choosing a suitable location for the AP.
2. Connect the AP to a Power Source and the Network
Once you have placed the AP at its installation location, you are ready to connect it to a power source and the network.

NOTE
The NXA-WAP1000 has the option of receiving power from a standard power supply, and it can also receive power from a PoE switch or injector. For information on how to make the PoE connections, refer to the documentation that was shipped with the PoE switch or injector.

CAUTION
If you will be using PoE, you must use a Cat-5e or better Ethernet cable for the PoE connection.
- If you are not using PoE, connect the power jack to the power connector on the rear panel of the NXA-WAP1000 and connect the power supply to a power source.
- Obtain an Ethernet cable that is long enough to connect the AP to your network's router, switch, or hub.
- Connect one end to a LAN port on the AP (using the 10/100/1000 port for PoE), and then connect the other end to your network's router, switch, or hub.
- Verify that the power LED on the AP is green.
Troubleshooting Installation
If the startup sequence does not work, verify that the network name (SSID) and security settings (if you enabled them) on the AP match the settings on your wireless device.
- Disconnect the AP from the power source, wait 5 seconds, reconnect it, and then wait 60 seconds before attempting a reconnection.
- Disconnect and reconnect the AP and the PC.
- Replace the Ethernet cable with a new one if the relevant LAN port LED is not illuminated. (LEDs in each port light up during a successful connection.)
- If all else fails, you can reset the AP to the factory defaults (and start over). Press and hold the Hard Reset button (FIG. 2) for at least eight (8) seconds.
You can now reconnect your computer directly to the AP and then start over with installation, using the default network settings.
Preconfiguring the NXA-WAP1000
Browser-Based Configuration Pages
Logging into the Configuration Pages
All setup and management of the NXA-WAP1000 is done through its Browser-Based Configuration Pages. If your wireless network will be managed by an NXA-WAPZD1000 ZoneDirector, you can manage APs through the ZoneDirector rather than logging into each AP's Web interface individually.

NOTE
The following procedure assumes that you know the static IP address of the AP (now in use), or you have some means of determining the dynamic IP address in use by the AP, such as checking the router. The PC you use for AP administration should be on the management VLAN.
To log into the Configuration Pages:
- On your PC, open a Web browser window.
-
In the address or location bar, type the IP address of the AP. Be sure to enter it in the correct format: https://
-
Press
to connect. -
If a Windows security alert dialog box appears, click OK/Yes to proceed. The login page appears (FIG. 6):
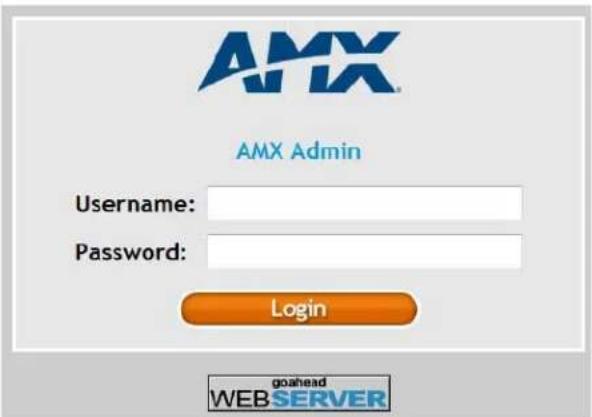
FIG. 6 NXA-WAP1000 Login Page
• In Username, type admin.
- In Password, type 1988.
- Click Login.
The NXA-WAP1000 Browser-Based Configuration Page interface appears (FIG. 7).

FIG. 7 NXA-WAP1000 Browser-Based Configuration Page interface
| Interface Specifications | |
| Menu: Under each category (Status, Configuration, etc.) are options that, when clicked, open the related workspace in the area to the right. | |
| Logout Button: Click this button to log out of the NXA-WAP1000. | |
| Help button: | Click this button to open a help window with information related specifically to the options currently displayed in the workspace. |
| Workspace: This large area displays features, options and indicators relevant to your menu bar choices. | |

If the NXA-WAP1000 is connected to an NXA-WAPZD1000 ZoneDirector, the interface appearance will be dictated by the ZoneDirector. The Status: Device page will also display a link to the ZoneDirector in question.
Status
The Status section of the Menu displays the current status and availability of the NXA-WAP1000.
Device
The Device page displays a general overview of the AP's current status, including device name, serial number, MAC address, current software version, etc.
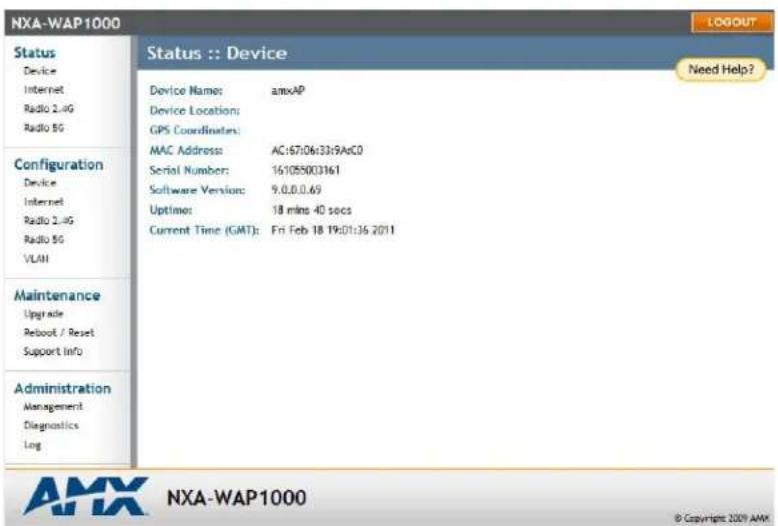
FIG. 8 Status - Device page
| Device | |
| Device Name: The current name of the device. The device name identifies the AP among other devices on the network. | |
| Device Location: The address or location where the device is deployed. | |
| GPS Coordinates: The latitudinal and longitudinal coordinates of the device location. | |
| MAC Address: The MAC address for the NXA-WAP1000. | |
| Serial Number: The serial number for the NXA-WAP1000. | |
| Software Version: The current software version being used by the NXA-WAP1000. | |
| Uptime: The current amount of time (in days, hours, minutes, and seconds) in which the NXA-WAP1000 has been online. | |
| Current Time: | The current time of the latest refreshing of the Device page. |
| Ruckus ZoneDirector IP Address: | If the NXA-WAP1000 is connected to an NXA-WAPZD1000 ZoneDirector, this field displays the ZoneDirector's IP address. |
| Ruckus ZoneDirector MAC Address: | If the NXA-WAP1000 is connected to an NXA-WAPZD1000 ZoneDirector, this field displays the ZoneDirector's MAC address. |
Internet
The Internet page (FIG. 9) displays information on the AP's network settings; i.e., the settings that allow the AP to communicate with your local network and the Internet. Information includes IP address, gateway, DNS server, NTP server and connection type (method of obtaining an IP address -- DHCP or static IP).

FIG. 9 Status - Internet page
| Internet | |
| Enable/Disable Auto-update: | Click this button to allow or disable the ability for the NXA-WAP1000 to automatically update its settings and firmware. |
| Gateway: The gateway address for the NXA-WAP1000. | |
| Primary DNS Server: The primary DNS server address for the NXA-WAP1000. | |
| Secondary DNS Server: The secondary DNS server address for the NXA-WAP1000. | |
| Connection Status: | The current connection status. This may be Up or Down. |
| Connection Type: The current connection type being used by the NXA-WAP1000. This may be either Static or DHCP. | |
| MAC Address The MAC address for the NXA-WAP1000. | |
| IP Address: The IP address for the NXA-WAP1000. | |
| Subnet Mask: The subnet mask address for the NXA-WAP1000. | |
Renewing or Releasing DHCP
This task should be performed only if you have access to the DHCP server or have some way to determine what IP address has been assigned to the AP. It serves as a troubleshooting technique when IP addresses to one or more networked devices prove to be unusable or in conflict with others, or when the AP loses its DHCP assigned IP address for some reason.
To renew or release DHCP:
- Go to Status > Internet.
- Review the current settings.
- If the current Connection Type is DHCP, you will be able to see the currently assigned IP address and subnet mask listed below.
- If the IP address is 192.168.0.1, the AP is not receiving an IP address from the DHCP server.
- To force the DHCP server to renew the IP address assigned to this AP, click Renew DHCP. If the AP is listed in the DHCP server's address table, it will attempt to reassign the previous address to the AP (unless the address is already in use).
- To force the DHCP server to assign a new IP address, click Release DHCP, then Renew DHCP. Your changes take place immediately.
Radio 2.4G
The Radio 2.4G page displays information on connections to wireless LANs using the 2.4G radio in the NXA-WAP1000.
![NXA-WAP1000 Status :: Radio 2.4G Enable Auto-update Common Wireless 1 Wireless 2 Wireless 3 Wireless 4 Wireless 5 Wireless 6 Wireless 7 Need Help? Wireless Mode: 11ng -- Operates with 802.11n, 802.11g and 802.11b devices in 2.4 Ghz spectrum only Channels Channel 11 [SmartSelect] Channel Width: 20 Nhz Country Code: US AeroScout RFID AeroScout RFID tag detection: Disabled AeroScout Engine communication daemon: Down Maintenance Upgrade Reboot / Reset Support Info Administration Management Diagnostics Log AMX NXA-WAP1000 © Copyright 2009 AMX](/content/2026/06/1256934/images/d2815274d5c60b53fa0d621f21c089eb922fc213da7f1176af09d0136f5d3d13.jpg)
FIG. 10 Status - Radio 2.4G - Common page
| Radio 2.4G - Common | |
| Enable/Disable Auto-update: | Click this button to allow or disable the ability for the NXA-WAP1000 to automatically update its settings and firmware. |
| Tabs: These tabs access pages | for common status settings within a network and within individual WLANs. |
| Channel: Shows the wireless channel that the AP is currently using. If you set the wireless channel to SmartSelect, this field will show the value Channel # [SmartSelect]. | |
| Channel Width: Displays whether the channel width is set to 20MHz or 40MHz. | |
| Country Code: Shows the country code that the AP has been set to use.CAUTION: Verify that the AP is using the correct country code to make sure it uses only the allowed radio channels in your region. Selecting the incorrect country code may result in violation of regulatory laws. | |
| AeroScout RFID Detection: | Shows Enabled if you enabled AeroScout RFID tag detection. The default setting is Disabled. |
| AeroScout Engine Communication Daemon: | Shows Up if the communication agent on the AP is able to relay location data from AeroScout Tags to the AeroScout Engine. If the communication agent is unable to relay data or AeroScout tag detection is disabled, this field will show Down. |
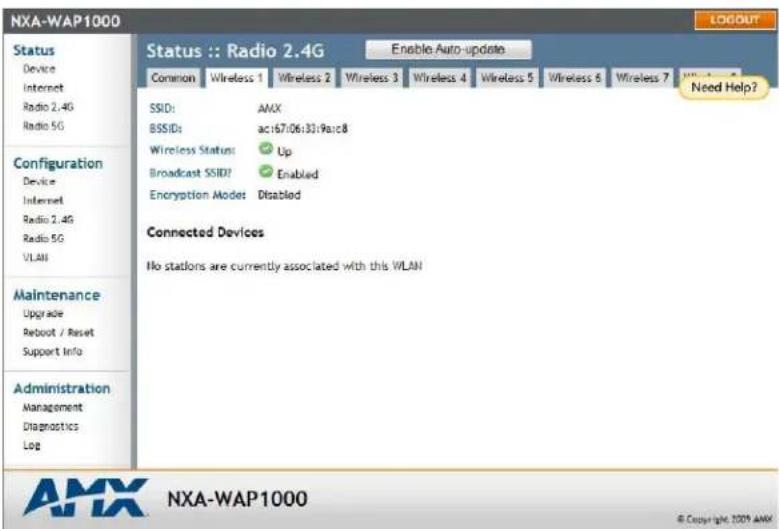
FIG. 11 Status - Radio 2.4G - WLAN page
| Radio 2.4G - WLAN | |
| Enable/Disable Auto-update: | Click this button to allow or disable the ability for the NXA-WAP1000 to automatically update its settings and firmware. |
| Tabs: These tabs access pages | for common status settings within a network and within individual WLANs. |
| SSID: The name of the accessed network. | |
| BSSID: The broadcast SSID name. | |
| Wireless Status: | The current wireless connection status. This may be Up or Down. |
| Broadcast SSID: | This option controls whether or not the WLAN SSID is visible to anyone looking for wireless networks. Disabling (hiding) the SSID requires that the user be told the correct SSID before they can connect to your network. |
| Connected Devices: | |
| MAC Address: The MAC address of the currently connected device. | |
| SSID: The SSID name of the currently connected device. | |
Radio 5G
The Radio 2.4G page displays information on connections to wireless LANs using the 5G radio in the NXA-WAP1000

FIG. 12 Status - Radio 5G - Common page
| Radio 5G - Common | |
| Enable/Disable Auto-update: | Click this button to allow or disable the ability for the NXA-WAP1000 to automatically update its settings and firmware. |
| Tabs: These tabs access pages for common status settings within a network and within individual WLANs. | |
| Channel: Shows the wireless channel that the AP is currently using. If you set the wireless channel toSmartSelect, this field will show the value Channel # [SmartSelect]. | |
| Channel Width: Displays whether the channel width is set to 20MHz or 40MHz. | |
| Country Code: Shows the country code that the AP has been set to use.CAUTION: Verify that the AP is using the correct country code to make sure it uses only the allowed radio channels in your region. Selecting the incorrect country code may result in violation of regulatory laws. | |
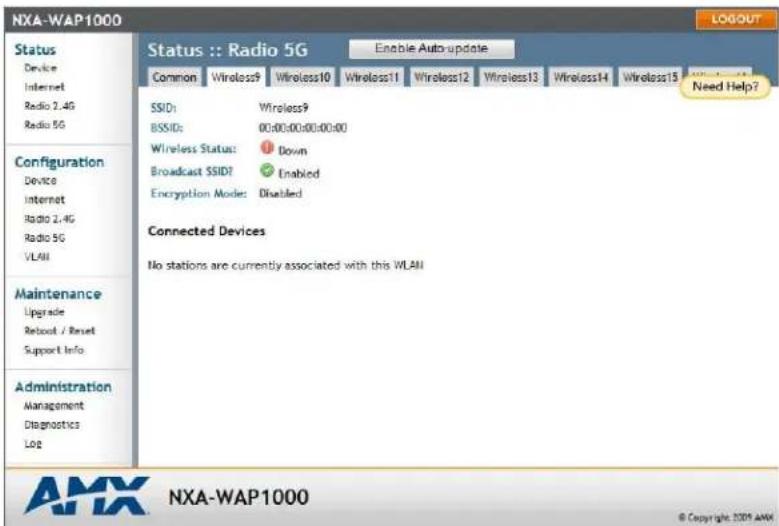
FIG. 13 Status - Radio 5G - Wireless page
| Status - Radio 5G - Wireless Page | |
| Enable/Disable Auto-update: | Click this button to allow or disable the ability for the NXA-WAP1000 to automatically update its settings and firmware. |
| Tabs: These tabs access pages | for common status settings within a network and within individual WLANs. |
| SSID: The name of the accessed network. | |
| BSSID: The broadcast SSID name. | |
| Wireless Status: | The current wireless connection status. This may be Up or Down. |
| Broadcast SSID: | This option controls whether or not the WLAN SSID is visible to anyone looking for wireless networks. Disabling (hiding) the SSID requires that the user be told the correct SSID before they can connect to your network. |
| Connected Devices: | |
| MAC Address: The MAC address of the currently connected device. | |
| SSID: The SSID name of the currently connected device. | |
Viewing Associated Wireless Clients
A usage-monitoring capability has been built into the AP to help you monitor wireless clients that are associated with your wireless network.
To view associated wireless clients:
- Go to Status > Radio 2.4G or Status > Radio 5G.
- Click any of the Wireless tabs. Wireless clients that are associated with this particular wireless network appear under Connected Devices.
Configuration
The Configuration section contains pages for initial configuration of the NXA-WAP1000. For more information on initial configuration, please refer to the Preconfiguring the NXA-WAP1000 section on page 8.

If the NXA-WAP1000 is already configured, or if it is being managed by an NXA-WAPZD1000 ZoneDirector, this section will not be visible in the Browser-Based Configuration Pages. This section will be accessible again only if the device is reset to its factory defaults.
Device

FIG. 14 Configuration - Device page
| Configuration - Device | |
| Device Name: | Type a new name for the device or leave as is to accept the default device name (amxAP). The device name identifies the AP among other devices on the network. |
| Device Locations: Type the address or location where the device is deployed. | |
| GPS Coordinates: | Type the latitudinal and longitudinal coordinates of the device location. |
| Service Provider Login: | |
| Username: Type the name that you want to use for logging into the Browser-Based Configuration Pages. The default user name is admin. | |
| Current Password: | Type the current administrative password. The default administrative password is 1988. |
| New Password: Type the new password that you want to use. The password must consist of six to 32 alphanumeric characters only. | |
| Confirm New Password: Retype the new password to confirm. | |
| Update Settings: Click this button to save and apply your changes. | |
Changing the Administrative Login Settings
The default user name is admin and the default password is 1988. To prevent unauthorized users from logging in to the Browser-Based Configuration Pages using these default administrator login settings, changing the default Web interface password immediately after your first login is highly recommended.
To change the default administrator login settings:
- Go to Configuration > Device. The Device page appears.
-
Under Service Provider Login, change the default administrator login settings.
-
In Username, type a new user name that you will use to log in to the Browser-Based Configuration Pages. The default user name is admin.
- In Password, type a new password to replace the default password 1988. The password must consist of six to 32 alphanumeric characters only.
- In Password Confirmation, retype the new password.
3. Click Update Settings. The message Your parameters were saved appears.
Internet
The Internet page allows you to review and modify the network configuration.

FIG. 15 Configuration - Internet page
| Configuration - Internet | |
| Primary DNS Server: The IP address of the primary Domain Name System (DNS) server. | |
| Secondary DNS Server: The IP address of the secondary Domain Name System (DNS) server. | |
| NTP Server: Hostname of the Network Time Protocol (NTP) server. | |
| Connection Type: | Select between DHCP and Static. Selecting Static allows the other fields to be edited. |
| Update Settings: Click this button to save and apply your changes. | |
Radio 2.4G
The Radio 2.4G page allows you to configure the wireless settings for 2.4G WLANs.

FIG. 16 Configuration - Radio 2.4G - Common page
| Configuration - Radio 2.4G - Common Page | |
| Radio Network: Allows you to change the name of the 2.4GHz radio (default:"Radio 2.4G"). | |
| Wireless Mode: The wireless mode options include the following:Auto-Select: Allows both 802.11g- and 802.11b-compliant devices to connect to the network. This is the default setting.2.4GHz 54 Mbps (For faster 802.11g devices only): Allows only 802.11g-compliant devices to join the network.2.4GHz 11Mbps (For slower 802.11b devices only): Allows only 802.11b-compliant devices to join the network. | |
| Channel: This option lets you select the channel used by the network. You can chooseSmartSelect, or choose one of a specific number of channels. If you choose SmartSelect, the AP automatically selects the best channel (encountering the least interference) to transmit the signal. | |
| Channel Width: On 802.11n APs, the option to choose 40MHz channel width provides (theoretically) double the data capacity of the channel. However, wider channel width means fewer channels available, and more interference with other wireless signals. | |
| Country Code: This option, if enabled, lets you select your country or region code.CAUTION: Verify that the AP is using the correct country code to make sure it uses only the allowed radio channels in your region. Selecting the incorrect country code may result in violation of regulatory laws. | |
| Advanced Settings: | |
| Transmit Power: | The default setting is Full. Select the level of transmit power from the drop-down menu. This option sets the maximum transmit power level relative to the predefined power (this value differs according to the current country code). |
| Configuration - Radio 2.4G - Common Page (Cont.) | |
| Protection Mode: | (Inactive by default.) If you activate protection, you control how 802.11 devices know when they should communicate with another device. This is important in a mixed environment of both 802.11b and 802.11g clients.WARNING: Activating this option (and configuring the settings) boosts the interoperability of 802.11b and 802.11g devices but will severely decrease performance.CTS-only: Choose this option to force all destination devices to acknowledge their ability to receive data when a transmission is initiated. Use this option for compliance with the Wi-Fi Alliance certification.RTS/CTS: Choose this option to force both sending and receiving devices to confirm a data exchange on both ends before proceeding. |
| AeroScout RFID Tag Detection: | Click the Enable option to enable the AP to relay AeroScout RFID tag data. |
| AeroScout Engine communication daemon: | Click the Up option to enable the AP to communicate with your AeroScout Engine server. |
| Update Settings: Click this button to save and apply your changes. | |

Selecting the incorrect country or region may result in violation of applicable laws. If you purchased the NXA-WAP1000 in the United States, you do not need to manually set the country code. NXA-WAP1000s that are sold in the US are preconfigured with the correct country code and this setting cannot be changed.

FIG. 17 Configuration - Radio 2.4G - Wireless 1 page
| Configuration - Radio 2.4G - Wireless Page | |
| Wireless Network: Enter a name for the WLAN. This name is only displayed in the Browser-Based Configuration Pages. You can use the same name as the SSID or a different name. | |
| Wireless Availability?: | This option controls whether or not the wireless network is available to users (Off or On). |
| Broadcast SSID: | This option controls whether or not the WLAN SSID is visible to anyone looking for wireless networks. Disabling (hiding) the SSID requires that the user be told the correct SSID before they can connect to your network. |
| SSID: This is the publicly-broadcast “name” of your wireless network.A default SSID is present (which you ideally replaced in the installation process). If the default SSID is still active, it is strongly recommended that you change it. The SSID identifies the WLAN in the user’s wireless connection software. The SSID can be up to 32 characters in length, contain letters and numbers, and is case-sensitive. | |
| Dynamic VLAN?: Dynamic VLAN can be used to assign VLAN IDs to wireless clients based on RADIUS attributes, when a RADIUS authentication server is used. Enable this feature to allow RADIUS to designate VLAN IDs for each wireless client. | |
| Threshold Settings: | This button opens a page where you can configure the Protection Mode you activated. If Protection Mode is not active, ignore this option. |
| Rate Limiting: | This button opens a page where you can configure upload and download limits per station. |
| Access Control: This button opens a page where you can configure access controls for the WLAN. | |
| Encryption Method: | By default, all data exchanges on your wireless network are not encrypted, but you can pick an encryption method in this option, and use the extra workspace features that appear to fine-tune the encryption settings.Using WPA encryption is highly recommended, as WEP has been proven to be easily circumvented. |
| Update Settings: Click this button to save and apply your changes | |
Radio 5G
The Radio 5G page allows you to configure the wireless settings for 5G WLANs.

FIG. 18 Configuration - Radio 5G - Common
| Configuration - Radio 5G - Common Page | |
| Radio Network: Allows you to change the name of the 5GHz radio (default:"Radio 5G"). | |
| Wireless Mode: The wireless mode options include the following:Auto-Select: Allows both 802.11g- and 802.11b-compliant devices to connect to the network. This is the default setting.5GHz 54 Mbps (For faster 802.11g devices only): Allows only 802.11g-compliant devices to join the network.5GHz 11Mbps (For slower 802.11b devices only): Allows only 802.11b-compliant devices to join the network. | |
| Channel: This option lets you select the channel used by the network. You can chooseSmartSelect, or choose one of a specific number of channels. If you chooseSmartSelect, the AP automatically selects the best channel (encountering the least interference) to transmit the signal. | |
| Channel Width: On 802.11n APs, the option to choose 40MHz channel width provides (theoretically) double the data capacity of the channel. However, wider channel width means fewer channels available, and more interference with other wireless signals. | |
| Country Code: This option, if enabled, lets you select your country or region code. | |
| Advanced Settings: | |
| Transmit Power: | The default setting is Full. Select the level of transmit power from the drop-down menu. This option sets the maximum transmit power level relative to the predefined power (this value differs according to the current country code). |
| Protection Mode: | (Inactive by default.) If you activate protection, you control how 802.11 devices know when they should communicate with another device. This is important in a mixed environment of both 802.11b and 802.11g clients.WARNING: Activating this option (and configuring the settings) boosts the interoperability of 802.11b and 802.11g devices but will severely decrease performance.CTS-only: Choose this option to force all destination devices to acknowledge their ability to receive data when a transmission is initiated. Use this option for compliance with the Wi-Fi Alliance certification.RTS/CTS: Choose this option to force both sending and receiving devices to confirm a data exchange on both ends before proceeding. |
| AeroScout RFID Tag Detection: | Click the Enable option to enable the AP to relay AeroScout RFID tag data. |
Configuration - Radio 5G - Common Page (Cont.)
Update Settings: Click this button to save and apply your changes.

FIG. 19 Configuration - Radio 5G - Wireless page
| Configuration - Radio 5G - Wireless Page | |
| Wireless Network: Enter a name for the WLAN. This name is only displayed in the Browser-Based Configuration Pages. You can use the same name as the SSID or a different name. | |
| Wireless Availability?: | This option controls whether or not the wireless network is available to users (Off or On). |
| Broadcast SSID: | This option controls whether or not the WLAN SSID is visible to anyone looking for wireless networks. Disabling (hiding) the SSID requires that the user be told the correct SSID before they can connect to your network. |
| SSID: This is the publicly-broadcast “name” of your wireless network.A default SSID is present (which you ideally replaced in the installation process). If the default SSID is still active, it is strongly recommended that you change it. The SSID identifies the WLAN in the user’s wireless connection software. The SSID can be up to 32 characters in length, contain letters and numbers, and is case-sensitive. | |
| Threshold Settings: | This button opens a page where you can configure the Protection Mode you activated. If Protection Mode is not active, ignore this option. |
| Rate Limiting: | This button opens a page where you can configure upload and download limits per station. |
| Access Control: This button opens a page where you can configure access controls for the WLAN. | |
| Encryption Method: | By default, all data exchanges on your wireless network are not encrypted, but you can pick an encryption method in this option, and use the extra workspace features that appear to fine-tune the encryption settings.Using WPA encryption is highly recommended, as WEP has been proven to be easily circumvented. |
| Update Settings: Click this button to save and apply your changes | |
VLAN
The VLAN page (FIG. 20) is used to configure the virtual LAN (VLAN) parameters of the AP. Traffic never uses VLAN tags over wireless links, but traffic originating on or destined for WLAN stations can be differentiated by a VLAN identifier as it travels over other links, such as Ethernet, DSL or Cable Internet, etc., thus given the appropriate segmentation as it traverses the LAN or the Internet.

FIG. 20 Configuration - VLAN page
| Configuration - VLAN | |
| Name: The name appearing in | the first cell of each column identifies each “network.”Here the term refers to a single broadcast domain. There is also a “Management” network, referring to communications directly to the AP/Router. |
| VLAN ID: If the VLAN ID field is | blank or empty, no VLAN tagging will occur for that network. The state is shown by one of three images.NOTE:If two rows (two networks) are assigned the same VLAN ID, then they are considered to be the same network. |
| VLAN Tagging: Each RJ45 port can be configured to use VLAN tagging. By default, no RJ45 port is tagged. When the icon contains a white “tag,” that port is tagged; otherwise it is un-tagged. Clicking on the icon switches between tagged and un-tagged modes. | |
| RJ45 Port State Images: | The AP may be connected to the same or different Ethernet “uplinks” using the RJ45-type connectors on the back of the AP. The images of RJ45 connectors represent those RJ45 connectors on the AP. Each image includes the label of the RJ45 port which it represents. Clicking an icon switches between “tagged” and “un-tagged” modes. When the icon contains a white “tag,” that port is tagged; otherwise it is un-tagged. If desired, wireless traffic can be segmented into different VLAN IDs, which you configure using this page. |
| VLAN Port State Icons: A “Member VLAN port” allows the network’s traffic to flow through its associated RJ45 connector. If that port is configured for VLAN tagging, then the “tagged member VLAN port” icon will be displayed. A “nonmember VLAN port” does not allow network traffic to flow through the RJ45 connector.Clicking an icon toggles that VLAN port between “member” and “non-member” status. The port may automatically be marked as “tagged” where appropriate. | |
| Show me an example: | Clicking the button labeled Show me an example opens a few sample configurations, with an explanation of what each shows. |
| Configuration - VLAN (Cont.) | |
| Update Settings: | When you click Update Settings, if any configuration settings have changed, a connectivity test will be run. If the browser and the AP/Router can communicate using the new VLAN settings, then they will remain set. If connectivity fails, the device will revert to the previous VLAN settings and a warning message will appear to tell you the test failed and the settings were reverted to their original values.CAUTION: When changing VLAN settings, you must ensure that your management device (admin computer) is a member of the same VLAN that you configure. |
Setting Threshold Options
The following options allow you to fine-tune the "Protection Mode" behavior. After activating a Protection Mode, you can open each Wireless tab and customize the threshold settings, which determine what is put in effect and when.

Do not customize these options unless you are an experienced network administrator or are under the guidance of an IT/support professional.
To customize Protection Mode (Threshold) settings
- In the Browser-Based Configuration Pages, go to Configuration > Radio 2.4G or Configuration > Radio 5G.
- Click the tab for the Wireless # (WLAN) that you want to configure. The Configuration :: xx :: Advanced :: Wireless [#] page appears.
- Look for Threshold Settings, and then click Edit Settings. The Configuration :: Wireless :: Advanced :: Wireless [#] page appears (FIG. 21).

FIG. 21 Configuration - Radio 2.4G - Advanced - Wireless page
- Click Update Settings to save and apply the changes. A confirmation message appears at the top of the page.
- To reopen the previous page, click the Go back to Wireless Configuration link.
Configuring WLAN Settings
This section describes how to configure WLAN-specific settings, such as wireless availability, SS1D, encryption, and authentication.
To configure WLAN settings:
- Go to Configuration > 2.4G or Configuration > 5G. The Configuration :: xx :: Common page appears.
- Click one of the eight Wireless (#) tabs. The Configuration :: 2.4G :: Wireless (#) page appears (FIG. 17). You can configure up to 8 SSIDs per radio (16 on dual radio APs).
- Review the WLAN options, and then make changes as required.
- When you are finished, click Update Settings to save and apply the changes. A confirmation message appears at the top of this page.
- Click Go back to Wireless Configuration to reopen the previous page.
Using WEP

WEP encryption has been proven to be easily circumvented. Using WPA whenever possible is highly recommended. Only use WEP if your client devices do not support WPA.
To configure WLAN-specific WEP encryption settings:
- Go to Configuration > 2.4G or Configuration > 5G. The Configuration :: xx :: Common page appears.
- Click one of the eight Wireless (#) tabs. The Configuration :: xx:: Wireless (#) page appears (FIG. 17). You can configure up to 8 SSIDs per radio (16 on dual radio APs).
- Click the Encryption Method menu, and then click WEP. An additional set of WEP-specific encryption options appears (FIG. 22).
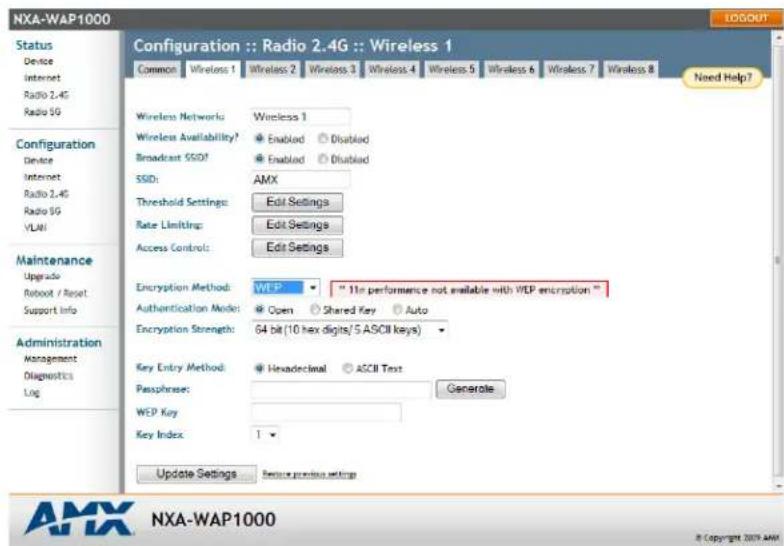
FIG. 22 WEP Encryption Options
| WEP Encryption Options | |
| Authentication Mode: | Open: No security measure is enforced.Shared Key: The selected Default Shared Key is used.Auto: Automatically-selected authentication mode. |
| Encryption Strength: | 64 bit: Specify the key with 10 hexadecimal digits or 5 ASCII characters.128 bit: Specify the key with 26 hexadecimal digits or 13 ASCII characters.The 128-bit cryptography is stronger privacy protection for your network and is recommended if you use WEP. |
| Key Entry Method: | Hexadecimal: The encryption key only accepts hexadecimal characters (0-9, A-F).ASCII Text: The encryption key accepts ASCII characters. |
| Passphrase: When using WEP | this passphrase can be used as a seed for automatic random key generation. Enter some text and click the Generate button. The system will generate the WEP key automatically. You may specify a passphrase up to 32 characters.Please note that the algorithm used for key generation may vary from system to system. Checking the WEP keys used between wireless stations and the AP is recommended. |
| WEP Key: | Enter the key manually according to the Key Entry Method and Encryption Strength settings. |
| Key Index: Choose the index, | from "1" to "4", that the WEP key is to be stored in. |
WEP Encryption Options
Update Settings: Click this button to save and apply your changes
- Review the encryption settings, and then make changes as required.
- Click Update Settings to save and apply the changes. A confirmation message appears at the top of the page.
- Click Go back to Wireless Configuration to reopen the previous page.
Using WPA
Use of WPA (Wi-Fi Protected Access) or WPA2 provides enhanced security over WEP, and allows client authentication based on either a pre-shared key (PSK), for home or small office networks, or an external authentication server such as a RADIUS server, for corporate networks.
To configure WPA security settings:
- Go to Configuration > Radio > 2.4G or Configuration > Radio 5G.
- Click the Wireless # tab that you want to configure. The Configuration :: Wireless[#] page appears (FIG. 17).
- Select WPA from the Encryption Method drop-down menu. An additional set of WPA-specific encryption options appears (FIG. 23).

FIG. 23 WPA Encryption options
| WPA Encryption Options | |
| WPA Version: Your options are | WPA, WPA2 or WPA Auto.WPA is the recommended default for best compatibility. WPA-capable PDAs and other devices are usually limited to WPA + TKIP.WPA2 is an advanced option that provides enhanced security, but may not be compatible with older wireless devices. WPA2 support on Windows XP requires a Microsoft patch and is only available on recent operating systems, including Windows XP Service Pack 2 and later.WPA-Auto allows the client to decide whether to use WPA or WPA2 based on the client's capabilities. |
| WPA Authentication: | PSK mode is suitable for home or small office networks.802.1X mode uses a RADIUS server to verify user identity.Auto mode allows the client to authenticate based on either a passphrase or its RADIUS credentials. |
| WPA Algorithm: | TKIP: This algorithm provides greater compatibility with older client devices, but is not supported by the 802.11n standard. Therefore, if you select TKIP encryption, 11n devices will be limited to 11g transfer rates.AES: This algorithm provides enhanced security over TKIP, and is the only encryption algorithm supported by the 802.11i standard.Auto: Automatically selects TKIP or AES based on the client's capabilities. |
| Passphrase: Enter a new passphrase between 8 and 32 characters long, using any combination of printable characters (letters, numbers, hyphens and underscores). | |
- Click Update Settings to save and apply the changes. A confirmation message appears at the top of the page.
- Click Go back to Wireless Configuration to reopen the previous page.
Customizing 802.1X Settings
If you choose "WPA" as the encryption method, you have the option to set up the AP to act as an 802.1X proxy, utilizing external authentication sources such as a RADIUS server. This provides a higher level of security, when compared to the static security process in a WEP configuration.
To configure WLAN-specific 802.1X authentication settings:
- Go to Configuration > Radio 2.4G or Configuration > Radio 5G. The Configuration :: xx :: Common page appears.
- Click a Wireless # tab to configure. The Configuration :: xx :: Wireless[#] page appears (FIG. 17).
- Select WPA from the Encryption Method drop-down menu. The basic set of WPA-specific encryption options appear on the page.
- Select 802.1X as the WPA Authentication mode. Additional options appear (FIG. 24).


NXA-WAP1000
FIG. 24 WPA - 802.1X Settings
- Configure the following settings to customize your 802.1X authentication.
● RADIUS NAS-ID: Enter the network ID assigned to your RADIUS server.
- Authentication Server [-Required-]: Enter the information needed to establish a connection between the AP and the RADIUS server. The default port for RADIUS authentication is 1812.
- Accounting Server [-Optional-]: Enter the information needed to establish this connection. The default port for RADIUS accounting is 1813.
- Click Update Settings to save and apply the changes. A confirmation message appears at the top of this page.
- Click Go back to Wireless Configuration to reopen the previous page.
Rate Limiting
Rate Limiting allows you to cap the data transfer rates per client for a specific WLAN.
To enable per station rate limits:
- Go to Configuration > 2.4G or Configuration > 5G.
- Select the WLAN that you want to configure from the tabs at the top of the page.
- Click the Edit Settings button next to Rate Limiting.
- The Rate Limiting page appears (FIG. 25).
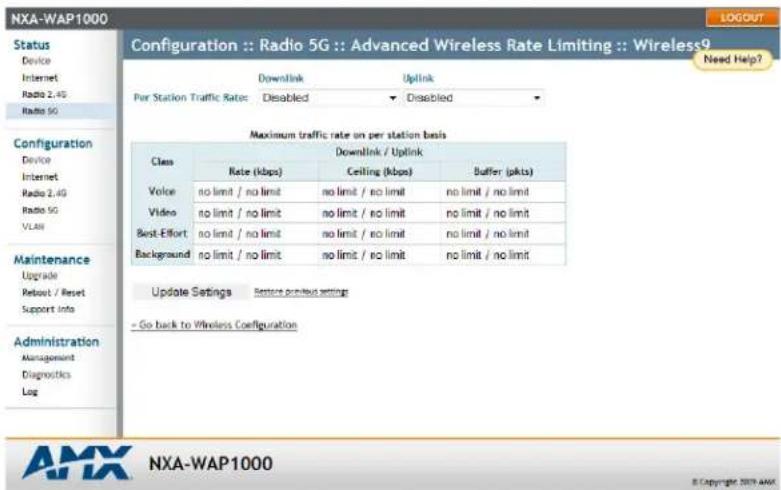
FIG. 25 Rate Limiting
- Set the maximum Downlink and Uplink rate per station, or leave disabled if you do not want to limit traffic rate per station in that direction.
- The table below updates to show the maximum transfer rates for each traffic type.
- Click Update Settings to save your changes.
Controlling Access to the Wireless Network
Access Controls give you control over which stations are allowed to join (associate with) your WLAN networks. There are “tab” entries for each available WLAN.
Changing the Access Controls for a WLAN
- Go to Configuration > Radio 2.4G or Configuration > Radio 5G.
- Click the Wireless # tab for the device for which you want to configure the access control settings.
- Click the Edit Settings button after Access Control. The Configuration :: Wireless :: Access Control :: Wireless # page appears (FIG. 26).
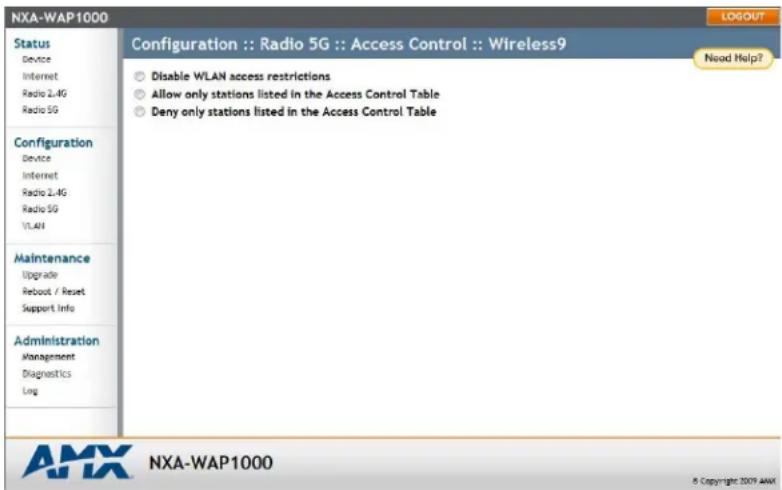
FIG. 26 Configuration - Radio 5G - Access Control
- Select the radio button for the desired access control. The Access Controls Table appears (FIG. 27).
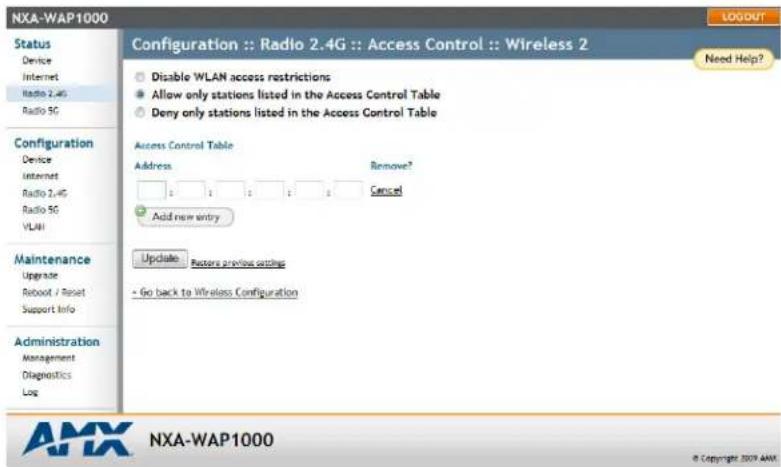
FIG. 27 Access Control Table
| Access Controls Table | |
| Address: Six text boxes appear in which you enter the desired MAC address, in hexadecimal digit form, two characters in each box. You can specify a full 12-hex-digit MAC address or enter "wildcard" characters for "don't care" digits.Allowable hex-digit characters are 0-9, a-f, and A-F. Most address-tags and software where you find MAC addresses listed include colons or dashes to separate the address-pairs; that is provided for you on the web page, so do not enter the colons or dashes.Supported wildcard characters include "x", "X" and blank (space character). Wildcards are useful when you want to specify all MAC addresses from a given manufacturer. For example, by specifying only the Organizationally Unique Identifier (the first six hexadecimal digits of any MAC address from that manufacturer is its OUI) saves you having to enter all 24 million of them (the table size is limited in the AP/Router to 128 entries). Some manufacturers produce devices using more than one OUI, in which case you may need to enter each applicable one. | |
| Remove: Check the Remove box for any rows that you no longer want used. |
- Click Add new entry to add a MAC address to the table.
- Type the MAC address in the spaces provided.
- Click Update to save your changes. Assuming all parameters you entered are acceptable, that row will be added to the table.
You have completed adding an entry to the MAC address table. If you have additional MAC addresses you want included, click Add new entry, and then repeat these steps until you have entered all the stations you want, to a maximum of 128 rows.
Disabling WLAN Access Restrictions
If you select Disable WLAN access restrictions, then MAC-address-based restrictions on which stations can join the WLAN are disabled; thus, any station can join. If the WLAN uses encryption, then the station must still supply the correct encryption passphrase. The Access Controls table is hidden if the current mode is Disable WLAN access restrictions.
Allowing Only Stations Explicitly Listed in the Access Controls Table
If you select Allow only stations listed in the Access Controls Table, then stations entered into the Access Controls Table are allowed but all others are disallowed.
Denying Only Stations Explicitly Listed in the Access Controls Table
If you select Deny only stations listed in the Access Controls Table, then stations entered into the Access Controls Table are disallowed but all others are allowed.
Removing MAC Addresses from the List
Simply check the box under the Remove column for the MAC address entry you want to remove from the table, and then click Update. The page refreshes and the MAC address that you removed disappears from the list.
Maintenance
The Maintenance section controls not only the ability to upgrade firmware and the ability for remote resetting or rebooting of an NXA-WAP1000, but also to send log information to a particular site for analysis.
Upgrade
You can use the Browser-Based Configuration Pages to check for software updates/upgrades for the firmware built into the AP. You can then apply these updates to the device in one of two ways: (1) manual updating on an as-needed basis or (2) automating a regularly scheduled update.
Before starting, decide which option you want to take:
● Automate a regularly scheduled update
● Run a one-time manual update right now
By default, the automatic upgrade option is active, and will check the Ruckus Wireless update server every 12 hours.
To get started with upgrading the firmware, go to Maintenance > Upgrade. When the Maintenance > Upgrade options appear (FIG. 28), decide which upgrade method to use. Each of the three upgrade options listed on the Upgrade page are discussed in the succeeding sections.

FIG. 28 Maintenance - Upgrade page
Upgrading Manually via the Web
To access a particular download Web site:
- In the Upgrade Method options, click Web. This opens the Web options (FIG. 29).

FIG. 29 Maintenance - Upgrade - Web page
- Click the Web Options URL field, and then type the URL of the download Web site. Remember to start the URL with "http://".
-
Change the Image Control File filename extension as noted here:
-
Replace any file names ending in .rcks with the .html extension
- Replace any file names ending in .f17 with the .html extension

Do not change the Username or Password entries.
- Click Perform Upgrade. A status bar appears during the upgrade process.
- After the upgrade is completed, you must manually reboot the NXA-WAP1000.
Upgrading Manually via FTP or TFTP
- In the Upgrade Method options, click FTP or TFTP. This opens either the FTP (FIG. 30) or TFTP options.

FIG. 30 Maintenance - Upgrade - FTP page

FIG. 31 Maintenance - Upgrade - TFTP page
- Click the host name field and then type the URL of the server, or click the IP address field and then type the IP address of the server. Remember to start the URL with ftp://.

Do not change any of the Image Control File, Username, or Password entries.
- Click Perform Upgrade. A status bar appears during the upgrade process.
- After the upgrade is completed, you must manually reboot the AP.
Scheduling an Automatic Upgrade
- In the Upgrade Method options, click the button for your preferred choice.
- Enter the appropriate information in the Host name field or IP address field.

Do not change any of the Image Control File, Username, or Password entries.
- Verify that the Auto Upgrade: Enabled option is checked (active).
- Toggle the Interval to Check for Software Upgrade drop-down list to select your preferred interval.
-
You have two options at this point:
-
Click Perform Upgrade, which will start the process and the clock. The next upgrade will occur at the selected interval.
-
Click Save parameters only. The clock starts right away, and the actual upgrade will occur at the first effective interval.
-
After you click one of these two options, a status bar appears during the upgrade process.
-
When the upgrade is complete, the AP will reboot automatically.
Reboot / Reset
You can use the Browser-Based Configuration Pages to prompt the NXA-WAP1000 to reboot, which simply restarts the AP without changing any of the current settings. Please note that rebooting the AP will disrupt network communications in any currently active WLANs.

FIG. 32 Maintenance - Reboot / Reset
| Reboot / Reset | |
| Reboot with current settings?: | Click this button to reboot while saving the currently saved settings. |
| Reset to factory settings?: | Click this link to return the NXA-WAP1000 to its original factory settings. |
Rebooting the AP
- Go to Maintenance > Reboot/Reset. The Maintenance :: Reboot/Reset page appears (FIG. 32).
- Click Reboot Now. After a brief pause, you will be automatically logged out of the AP.
After approximately one minute, you should be able to log back into the AP, which verifies that the reboot was successful. You can also check the LEDs on the AP to verify the status of the device.
Resetting the AP to Factory Defaults

WARNING
DO NOT reset the AP to factory defaults unless you are directed to do so by AMX or Ruckus Wireless support staff or by a network administrator. Do this only if you are able to immediately reconnect the restored AP to your computer, in order to reconfigure it for Wi-Fi network use
You can use the Web User interface to restore an inoperative AP to its factory default settings, which will completely erase the configuration currently active in the device. Note, too, that this will disrupt all wireless network communications through this device.
To reset the AP to factory defaults:
- Go to Maintenance > Reboot/Reset. The Maintenance :: Reboot/Reset page appears.
- Click Reset Now (next to Restore to factory settings?).
- After a brief pause, you will be automatically logged out of the AP. You must now disconnect the AP from the switch (and the network) and reconnect it to your computer. At this time, you can restore the network settings, then replace it in your site for full network use.
Support Info
The Support Info log consists of the configuration and run-time status of the AP and can be useful for troubleshooting. You have three options for sending a copy of the current log file to Ruckus Wireless Support:
- Save a copy to your local PC, then attach it to an e-mail message and send it to Support
- Set up a connection to an FTP site
- Set up a connection to a TFTP site
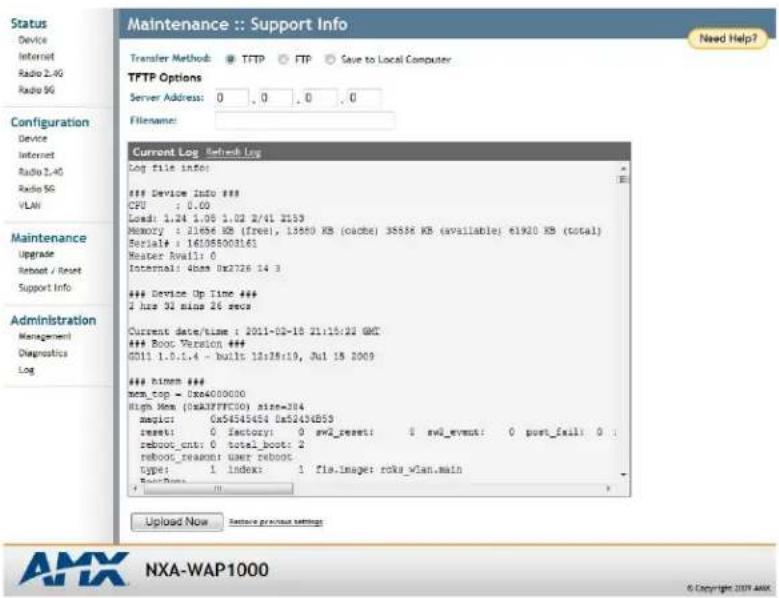
FIG. 33 Maintenance - Support Info page
| Support Info | |
| Transfer Method: To upload a copy of the support info file to an FTP or TFTP server, click the TFTP or FTP option. Clicking the FTP option prompts you to enter a User ID and Password. | |
| Server Address: Enter the IP address for the TFTP or FTP server. | |
| Filename: Enter the filename for the log.NOTE: Remember to add a .TXT file extension to the file name, especially if you are using Internet Explorer as your Web Admin “host.” | |
| Current Log: This field displays the current log. Click Refresh Log to include information gathered since its last update. | |
| Upload Now button: Click this button to upload the log file to a remote server or to a local computer. |
Saving a Copy of the Current Log to Your Computer
You can also save a copy of the current log to your own computer, if needed. This should be done if copies of the current log need to be E-mailed to AMX Technical Support.
- Go to Maintenance > Support Info. The Maintenance :: Support Info workspace appears.
- Review the Upload Method options.
- Click the Save to local computer option. Two links appear next to Download (supportinfo.txt and tr069info.txt).
- Click the supportinfo.txt link. A new window (or tab) opens with the content of the log file displayed.
- Choose Save As or Save Page As from your browser's File menu.
- When the "Save as..." dialog box appears, find a convenient location on your local computer to save the file, and change the file extension from html to txt.
- Click Save to save the file to your computer.
Administration
The Administration section contains tools for assisting with diagnosis of NXA-WAP1000 issues.
Management
In addition to managing the AP via a Web browser through HTTPS, several other management access options are available on the AP. These options include management access via HTTP, Telnet, and SSH.

FIG. 34 Administration - Management page
| Administration - Management page | |
| Telnet access: By default, this option is disabled (inactive). | |
| Telnet port: This field lists the default Telnet port of 23 — only if Telnet is active. You can manually change this port number, if required. | |
| SSH access: By default, this option is enabled (active). | |
| SSH port: This field lists the default SSH port of 22 - only if SSH is active. You can manually change this port number if required. | |
| HTTP access: This option is disabled by default. | |
| HTTP port: | This field lists the default HTTP port of 80, if HTTP has been activated. You can manually change this port number if required. |
| HTTPS access: By default, this option is enabled. This connection mode requires a security certificate, a copy of which has been preinstalled in the device. | |
| HTTPS port: This field lists the default HTTPS port of 443 - only if HTTPS has been activated. You can manually change this port number if required. | |
| Certification Verification: | This notes whether the security certificate linked to the HTTPS settings has been passed or not. |
| Administration - Management page (Cont.) | |
| TR069 / SNMP Management Choice: | |
| Auto: Enables the NXA-WAP | 1000 device to connect to either an SNMP server, anNXA-WAPZD1000 ZoneDirector, or a Ruckus Wireless FlexMaster. |
| SNMP only: Only allow SNMP management. | |
| FlexMaster only: Only allow FlexMaster management. | |
| DHCP Discovery: URL of server providing DHCP. | |
| FlexMaster Server URL: URL of the FlexMaster server. | |
| Digest-authenticationUsername/Digestauthentication password | This information is automatically generated by the AP and used for authentication with FlexMaster. Change this value only if you want the AP to connect to another access control server (ACS). |
| Contact FlexMaster every: Interval at which the device should attempt to contact FlexMaster. | |
| Associated-ClientsMonitoring Mode | When enabled, the AP monitors the association and disassociation activities of wireless clients and sends this information to FlexMaster. Available options include:Disable (default): Select to turn off client association monitoring. When this option is selected, the AP will not send client association information to FlexMaster; Flexmaster will need to retrieve this information from the AP.Passive: Select to enable client association monitoring and send related information to FlexMaster at the next inform interval.Active: Select to enable client association monitoring and define the monitor interval (Interval). The AP will check for client association based on the defined Interval (in seconds), and then send related information to FlexMaster as soon as an association event is detected. |
| TR069 Status: The current status of the Flexmaster connection. | |
| Update Settings: Click this button to save your changes. | |
To enable other management access options:
- Go to Administration > Management. The Management page appears (FIG. 34).
- Review the access options, and then make changes as needed.
- Click Update Settings to save your changes. A confirmation message appears at the top of the page.
Diagnostics
Two network connection diagnostic tools – PING and traceroute – have been built into the NXA-WAP1000 to help you check network connections from the Browser-Based Configuration Pages (FIG. 35).

FIG. 35 Administration - Diagnostics page
| Diagnostics | |
| Ping: Type the network address of a site to which you wish to connect. | |
| Ping Results: This field displays a text file of the results of the connection. | |
| Traceroute: Type the network address of a site to which you wish to connect. | |
| Traceroute Results: This field displays a text file of the results of the connection. |
To run diagnostics for network troubleshooting:
-
Go to Administration > Diagnostics. The Administration :: Diagnostics page appears. Two options are available:
-
Ping
-
Traceroute
-
Click the text field by the option you want to activate, and type the network address of a site to which you wish to connect.
- Click Run Test. The results appear in the text field below each option.
Log
If you have a syslog server on the network, you can configure the NXA-WAP1000 to send the device logs to the server. You will need to enable logging (logging is disabled by default), and then configure the Access Point to send logs to the syslog server via the Administration :: Log page (FIG. 36).
![NXA-WAP1000 Log Status: Enabled Disabled Syslog Server Address: 0 0 0 0 Syslog Server Port: 514 Administration :: Log Current Log Refresh Jan 27 21:21:06 smxAF user.vear kernel: 10 2657g 36 0 0 0 N - Jan 27 21:21:06 smxAF user.vear kernel: 0 0 0 N OnaO Jan 27 21:21:06 smxAF user.vear kernel: 11 2662n 36 HT40 0 0 1 N Jan 27 21:21:06 smxAF user.vear kernel: 11 2663n 36 HT30 1 0 0 N Jan 27 21:21:06 smxAF user.vear kernel: 11 2664n 36 8 0 0 N Jan 27 21:21:06 smxAF user.vear kernel: 11 2665n 36 8 0 0 N Jan 27 21:21:06 smxAF user.vear kernel: 11 2666n 36 8 0 0 N Jan 27 21:21:06 smxAF user.vear kernel: 11 2667n 36 8 0 0 N Jan 27 21:21:06 smxAF user.vear kernel: wfi9: lbb rates: LMbps 2Mbps 5.5Mbps 11Mbps Jan 27 21:21:06 smxAF user.vear kernel: wifi9: llg rates: LMbps 2Mbps 5.5Mbps 11Mbps Jan 27 21:21:06 smxAF user.vear kernel: wifi9: llng rates: LMbps 2Mbps 5.5Mbps 11Mbps Jan 27 21:21:06 smxAF user.vear kernel: wifi9: llng MCS: 0,1,3,3,4,5,6,7,8,9,10,11 Jan 27 21:21:06 smxAF user.vear kernel: wifi9: mec i38,2 phy i3.0 radio i2.0 Jan 27 21:21:06 smxAF user.vear kernel: wifi9: Use hw queue 0 for WNE_AC_VI traffic Jan 27 21:21:06 smxAF user.vear kernel: wifi9: Use hw queue 1 for WNE_AC_VI traffic Jan 27 21:21:06 smxAF user.vear kernel: wifi9: Use hw queue 2 for WNE_AC_VI traffic Jan 27 21:21:06 smxAF user.vear kernel: wifi9: Use hw queue 3 for WNE_AC_VI traffic Jan 27 21:21:06 smxAF user.vear kernel: wifi9: Use hw queue 0 for CAB traffic Jan 27 21:21:06 smxAF user.vear kernel: wifi9: Use hw queue 9 for beacon Jan 27 21:21:06 smxAF user.info kernel: wifi9b Achieve 250r mm=Qx000000, irq=48 Jan 27 21:21:06 smxAF user.vear kernel: PCI: Enabling device 000+qx1.0 (5000 ->) Jan 27 21:21:06 smxAF user. debug kernels PCI: Enabling bus mastering for device $000 Jan 27 21:21:06 smxAF user.info kernel: macroversion mini, macrov-2 Pylever AS Jan 27 21:21:06 smxAF user.info kernel: ar54&dbattach*?^T-#NS is enabled [ ] [ ] [ ] [ ] [ ] [ ] [ ] [ ] [ ] [ ] [ ] [ ] [ ] [ ] [ ] [ ] [ ] [ ] [ ] [ ] [ ] [ ] [ ] [ ] [ ] [ ] [ ] [ ] [ ] [ ] [ ] [ ] [ ] [ ] [ ] [ ] [ ] [ ] [ ] [ ] [ ] [ ] [ ] [ ] [ ] [ ] [ ] [ ] [ ] [ ] [ ][ ] [ ] [ ] [ ] [ ] [ ] [ ] [ ] [ ] [ ] [ ] [ ] [ ] [ ] [ ] [ ] [ ] [ ] [ ] [ ] [ ] [ ] [ ] [ ] [ ] [ ] [ ] [ ] [ ] [ ] [ ] [ ] [ ] [ ] [ ] [ ] [ ] [ ] [ ] [ ] [ ] [ ] [ ] [ ] [ ] [ ] [ ] [ ] [ ] [ ] Update Settings Update request settings AMX NXA-WAP1000 © Copyright ©EIN AMX](/content/2026/06/1256934/images/e0231eed01659e30873038fea5f684b46bb4b659e55b30425de57acba0397b3f.jpg)
FIG. 36 Administration - Log page
| Log | |
| Log Status: By default, this status is disabled. | |
| Syslog Server Address: | To enable the AP to send messages to a syslog server as they appear, enter the IP address of the syslog server. |
| Syslog Server Port: | By default, the syslog port number is 514. If the syslog server is using a different port, enter that port number in this field. |
| Current Log: The text of the current log. | |
| Update Settings: Click this button to save and apply your changes. | |
To enable logging:
- Go to Administration > Log. The Administration :: Log page appears.
- Look for Log Status, and then click Enabled.
- After enabling logging, configure the appropriate options:
- Click Update Settings to save and apply your changes.
Browser-Based Configuration Pages
AMX UNIVERSITY
Increase Your Revenue through education + knowledge
In the ever-changing AV industry, continual education is key to success. AMX University is dedicated to ensuring that you have the opportunity to gather the information and experience you need to deliver strong AMX solutions. Plus, AMX courses also help you earn CEDIA, NSCA, InfoComm, and AMX continuing education units (CEUs).
Visit AMX University online for 24/7/365 access to:
- Schedules and registration for any AMX University course
- Travel and hotel information
- Your individual certification requirements and progress
- Operation/Reference Guide
- NXA-WAP1000
- Smart Wireless Access Point
- AMX Limited Warranty and Disclaimer
- AMX Software License and Warranty Agreement
- Table of Contents
- NXA-WAPZD1000 Smart Wireless Access Point ....1
- NXA-WAPZD1000 Installation 5
- Preconfiguring the NXA-WAP1000 8
- Browser-Based Configuration Pages 19
- Status.... 21
- Configuration.... 27
- Controlling Access to the Wireless Network.... 42
- Maintenance 45
- Administration 51
- NXA-WAPZD1000 Smart Wireless Access Point
- Overview
- Power
- Ethernet Ports
- Reset Button
- NXA-WAPZD1000 Installation
- Before You Begin
- Prepare the Required Hardware and Tools
- Perform a Site Survey
- Determine the Optimal Mounting Location and Orientation
- Preconfiguring the NXA-WAP1000
- Configuring for Management by NXA-WAPZD1000
- What You Will Need
- Connect the AP to a Power Source
- Connect the AP to the Same Subnet as the NXA-WAPZD1000
- Configuring for Standalone Operation
- Prepare the Administrative Computer
- Connect the NXA-WAP1000 to the Administrative Computer
- Log Into the AP's Web Interface
- Configure the Wireless Settings
- Configure Common Wireless Settings
- Configure Wireless # Settings
- Disconnect the AP from the Administrative Computer
- Restore the Administrative Computer's Network Settings
- Verify NXA-WAP1000 Operation
- Connect the NXA-WAP1000 to the Network
- Check the LEDs
- Associate a Wireless Client with the AP
- Disconnect the AP from the Network
- Deploy the Access Point
- Choose a Location for the AP
- Connect the AP to a Power Source and the Network
- Troubleshooting Installation
- Browser-Based Configuration Pages
- Logging into the Configuration Pages
- Status
- Device
- Internet
- Renewing or Releasing DHCP
- Radio 2.4G
- Radio 5G
- Viewing Associated Wireless Clients
- Configuration
- Changing the Administrative Login Settings
- Click Update Settings. The message Your parameters were saved appears.
- Configuration - Radio 5G - Common Page (Cont.)
- VLAN
- Setting Threshold Options
- Configuring WLAN Settings
- Using WEP
- WEP Encryption Options
- Using WPA
- Customizing 802.1X Settings
- Rate Limiting
- Controlling Access to the Wireless Network
- Changing the Access Controls for a WLAN
- Disabling WLAN Access Restrictions
- Allowing Only Stations Explicitly Listed in the Access Controls Table
- Denying Only Stations Explicitly Listed in the Access Controls Table
- Removing MAC Addresses from the List
- Maintenance
- Upgrade
- Upgrading Manually via the Web
- Upgrading Manually via FTP or TFTP
- Scheduling an Automatic Upgrade
- Reboot / Reset
- Rebooting the AP
- Resetting the AP to Factory Defaults
- Support Info
- Saving a Copy of the Current Log to Your Computer
- Administration
- Management
- Diagnostics
- Log
- To enable logging:
- AMX UNIVERSITY
- Increase Your Revenue through education + knowledge
Brand : AMX
Model : NXA-WAP1000
Category : Access Point