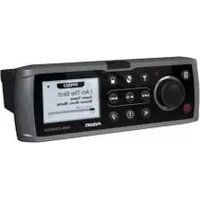
MS-CD600 - Car radio Fusion - Free user manual and instructions
Find the device manual for free MS-CD600 Fusion in PDF.


| Product type | Car stereo with CD player |
| Brand | Fusion |
| Model | MS-CD600 |
| Dimensions | 1 DIN (approx. 180 x 50 x 160 mm) |
| Weight | 1.5 kg |
| Power supply | 12 V DC (negative ground) |
| Maximum power output | 4 x 50 W |
| RMS power output | 4 x 22 W |
| Display | LCD with white backlight |
| Audio formats supported | CD, CD-R, CD-RW, MP3, WMA |
| Radio tuner | FM/AM with RDS |
| Preset stations | 30 (18 FM + 12 AM) |
| Input ports | USB, AUX (3.5 mm) |
| Output ports | Preamp outputs (2 pairs) |
| Bluetooth | Yes, for hands-free calling and audio streaming |
| Remote control | Included (wired or wireless?) |
| Equalizer | 7-band graphic equalizer |
| Detachable faceplate | Yes, for theft protection |
| Clock | Built-in with 12/24 hour format |
| Security | Flip-down detachable face with key |
| Operating temperature | -20°C to +60°C |
| Accessories included | Mounting kit, wiring harness, remote control, user manual |
| Certifications | CE, RoHS |
Frequently Asked Questions - MS-CD600 Fusion
User questions about MS-CD600 Fusion
0 question about this device. Answer the ones you know or ask your own.
Ask a new question about this device
Download the instructions for your Car radio in PDF format for free! Find your manual MS-CD600 - Fusion and take your electronic device back in hand. On this page are published all the documents necessary for the use of your device. MS-CD600 by Fusion.
USER MANUAL MS-CD600 Fusion
FUSION Electronics New Zealand, Ph: +64 9 260 2900
FUSION Electrocics Australia, Pte +\$1 130m 726 p+2
FUSION ELECTRONICS Australia (UK) 102 1956, 76-82
FUSON ELECTRONICS Europe Pte. 144 1288 68950
FUSION Electronics USA Pre +1 623 580 9000


PRECAUTIONS
Do not attempt to open the units chassis. There are no user serviceable parts or adjustment's inside.
This unit has been tested with all compatible authentic iPod modes under normal expected operating conditions, free from any pre-existing defects in either the unit or the iPod.
No responsibility can be taken for use of the unit other than under normally expected operating conditions in conjunction with fully functional and uncarnaged iPod units which have been manufactured and authorised by Apple Inc.
BEFORE INSERTING IPOD (MS-IP600)
Please ensure iPod dock connector is clean, dry & free from carriage. Check that the units iPod dock is free from obstructions. Insert correct sleeve combination to match your iPod (never insert ifod without a correct sleeve.)
Ensure iPod is inserted with display facing upwards. Never force your iPod into the clock. If the iPod does not move with reasonable ease, the sleeve@ iPod combination is most likely incorrect.
Always remove your iPad from the unit when not in use & do not leave to your vessel, this in turn prevents risk of theft or damage as vessel cehirs can reach extreme temperatures.
Do not remove Pnd or use storage in a distractive manner whilst operating the vessel check and obey all marine laws in association with use.
Take care when removing iPod from unit as surfaces may be warm.
HANDLING COMPACT DISCS (CD/CD-R/CD-RW)
- Avoid touching the surface of the disc
» Avoid exposing the disc to direct sunlight
- Ensure the dist is clean
» Ensure the disc is not scratched or damaged
PLAYBACK OF CD-R/CD-RW
- If your CD-R/CD RW will not pay, beware that the last recording session was closed or finalized.
FCC COMPLIANCE STATEMENT
This device complies with part 15 of the FCC rules. Operation is subject to the following two conditions:
- This device may not cause harmful interference, and
- This device must accept any interference received, including interference that may cause undesired operation.
RECORD YOUR PRODUCT DETAILS HERE:
Hocel Number
Date Of Purchase
A5x Receipt Here

021 WHS & LIDHS
SPECIFICATIONS AND LICENSING
SPECIFICATIONS
CHASSIS DIMENSIONS Depth 168mm - 6-5/8"
Width 180mm - 7-1/8"
Height 52mm - 2-1/16"
FACE PLATE DIMENSIONS Depth 35mm - 1-3/8"
Width 217mm - 8-9'16"
Height 79mm - 3-1/8"
OPERATING VOLTAGE: 10.2 - 16VDC Negative ground
FUSE RATING: 15 A=ρ
OUTPUT POWER: 70 Watts x 4 (Hex)
26 Watts RNS @ 4 Ohms
43 Watts RMS @ 2 Ohms
SPEAKER IMPEDANCE: 2 - 4 Ohms per channel
PRE-OUTPUT VOLTAGE: 3V
TUNING RANGE
Europe and Australasia:
HH Radio Frequency Range: 87.5 – 108 MHz Frequency step: 100 kHz AH Radio Frequency Range: 522 – 1620 MHz Frequency step: 9 kHz
USA
TH Radio AM Radio Frequency Range: 87.5 - 107.9 MHz Frequency Range: 530 - 1710 MHz Frequency steps: 200 kHz Frequency steps: 10 kHz
CD PLAYER
Laser power Class 1
SUPPORTED MEDIA
× Only use discs with the following logo's on the label.


If you use discs without the above logo's, correct performance
Larmat de gitaristsen.
× You can play audio discs recorded on DVD +R -R
CD-R (Recordable), or CD-RW (Se Writable) media
× HP3 formatted audio files can also be played on DVD-R-R, CD-R
and CD-RW containing these files.
COMPATIBLE WITH THE FOLLOWING iPod MODELS:
× iPod classic, 805B 120GB 160GB (2007, 2009);
× iPod with video, 30GB 60GB 80GB;
» iPod touch; iPod touch (2nd Gen);
» iPod nano (3rd Cen); iPod nano (4th Cen);
× iPod nano (5th Gen)
For latest news on supported iPod models visit
www.fusionelectronics.com
LICENSING

Apple, the Apple logo, iPod and iTunes are trademarks of Apple Computer, Inc., registered in the U.S. and other countries.
SIRIUS 2207 S11US Satellite Radio Inc. "S11US" and the S11 US dog logo
READY: 212 MELONICS OF 2012S 58/37 Radio MHz (RESERVED)

FUNDATE OF IEEE U.S. DNA, UNI 1.0 (Cronon: 2734 by IEEE Electronics Limited, All rights reserved. Specifications and designs are subject to change in head ratio v; z
The following table provides the results of the 2017 and 2018 annual estimates, including estimates for the years ended March 31, 2017, and March 31, 2018.
0
CONTENTS
BUTTON DESCRIPTION 2
INSTALLATION 4
CONNECTIONS 5
WIRING DIAGRAM 6
GENERAL OPERATION 7
RADIO OPERATION 8
SIRIUS SATELLITE RADIO (USA ONLY) 9
CD/MP3 OPERATION 10
AUX OPERATION 11
iPod OPERATION 12
DVD OPERATION 14
MS-AV600 IR REMOTE OPERATION 15
ZONE OPERATION 16
MENU STRUCTURE 17
TROUBLESHOOTING 18
FUSION MARINE ACCESSORIES 19
SPECIFICATIONS AND LICENSING 20
BUTTON DESCRIPTION
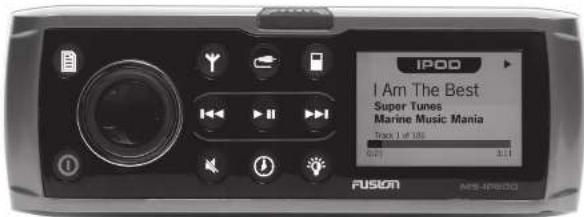
45-P300 mode sheet

ROTARY ENCODER
Tum
To adjust volume, move up or down a menu
structure, or adjust a specific setting item.
Press
To select a highlighted option confirm a setting
Press to step through each zone for volume
adjustment
Press and Hold
For quich access to subwcole level adjustment.

CATCH RELEASE BUTTON
Press down to open front panel

EJECT (NS-C600 and MS-AV500 only)
Press to eject (10/34) (located inside front panel)

POWER

Press to turn the unit ON/OFF.
NEKU
Press to enter Menu System. Press to return to previous screen.
FUSION MARINE ACCESSORIES
iPod EXTERNAL DOCK
MS-IPDOCK / MS-IPDOCK62

Connect this external iPod clock to the Marine CD Stereo (NS-CD600) or the Marine IPv3 Stereo (MS-4V500) to provide the additional benefit of an integrated housing for your iPod. The bulkhead mount clock complies with IPv3 Waterproof
Standards, protecting your kind from the harsh manne environment.
The Pod marine external cock can be flush mounted or wall mounted.
iPod CONNECTION CABLE (1.5m)
NS-IP15L2

Enables the connection of your iPod to the Marine CD Stereo (MS-CD600) or the Marine DVD Stereo (MS-AM500).
MARINE WIRED REMOTE
MS-WR500
The Marine Wind Remote Control extends the capabilities of the Stereo by encoding local control of the audio in each zone of your vessel. Up to three remote's can be linked to the Stereo, sit a C4ibus network, providing true system flexibility.
MARINE ZONE AMPLIFIER
NS-AN702
The Marine 2x70 Wall D Class Zone Amplifier is designed to support the multi-zone technology of the Marine Stereo. The Zone Amplifier is small, enabling discrete installation and
when combined with the Marine Stereo provides the platform for a True multi-zone audio system.
TROUBLESHOOTING
RESET BUTTON
Press the Reset button in the event of a malfunction to reset the unit, where normal operation is not automatically restored within 1 minute.


RADIO
Press to access the radio source AW - PA - SRLN

(1) (50600 w/k)
Press to access the CD/MP3 source.
DVD (HS-AV600 cm)
Press to access the DNA/CMP3 source

AUX (HS-FEOC cnb)
press to access auxiliary source.

iPod
Press to access the iPod source.
Press again to access Auxiliary source (MS-C600
\$15-6500

BACK/PREVIOUS
Short Press
JMCDDVHP3/ iPod - Select the previous track.
AVPH/Sinus - Start tuning down the frequency
spectrum. (Auto/Manual tuning mode) or previous
preset (Preset mode)
Press and Hold
MAYONHEAF - Bowing the current track.
AVPH/Sirius Enter Manual Tuning mode

FORWARD/NEXT
Short Press
(###)P3/POd - Select the next track
ANUWA/Siplus - Start turing up the frequency
spectrum. (Auto/Musual Turing mode) or next
preset (Preset mode)
Press and Hold
DVD/CD/WP3/ iPod - Forward the current track
AN/TH/Srius - Order Manual Tuning mode.

PLAY/PAUSE
DVD/CD/MP3/ iPod - Pause / resume the current track.
AN/PM/Sirius. Switch between Auto/Preset turps
mpce
Press and Hold
ANHADAS - Store the current station as a Preset

NUTE
Notes all sound in all zones.

CLOCK
Displays the clock

DISPLAY
Press to enter the display settings screen.
Adjustment can be made to the Contrast and
Brightness.
INSTALLATION
IF ANY MODIFICATION TO THE VESSEL IS REQUIRED, SUCH AS DRILLING HOLES ETC FUSION RECOMMENDS CONSULTATION WITH YOUR BOAT DEALER OR MANUFACTURER BEFOREHAND.
- Remove the Sun Cover from the unit
x. Fit mounting gasvet
x Insert the unit into the mounting hole - Pull down the iron, face to expose the mounting screw locations.

Note: in some circumstances a back strap or brace may be required at the rear of the Unit (Back Strap / brace is not included).
Appropriate mounting is very important to ensure correct operation. Select a location that allows both fraslopent airflow around rear of chassis, whilst minimizing exposure to moisture. Allow adequate room at the rear of the unit for the cable rooms (approx 2·5").
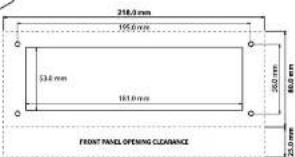
ELECTRICAL WIRING
Caution: The MS P500, MS CD500 and MS AM500 are designed for vessels within a 224 DC Negative ground electrical system
MENU STRUCTURE
ROOT MENU
![graph TD A["TANKR"] --> B["MP3"] A --> C["CD"] A --> D["SETUP"] B --> E["MP3"] B --> F["CD"] C --> G["MD"] C --> H["PCD"] D --> I["SETUP"] I --> J["MD"] I --> K["PCD"] style A fill:#f9f,stroke:#333 style B fill:#ccf,stroke:#333 style C fill:#cfc,stroke:#333 style D fill:#fcc,stroke:#333 style E fill…](/content/2026/06/1254889/images/76becac9bdf9a30d685465d5cf5c8d3aa92f707852ffa147cd951b81e433fb99.jpg)
ZONE OPERATION
The FUSEN Marine Stereo makes it possible to have 3 'ones', that have independent volume control.
Zone 1 and 2 are powered and can be linked. Zone 3 requires a FUSDA Marine Amplifier. All Zones have adjustable volume limits
Note: If the Zone is selected as '011' The features are not available.
ZONE SETUP
Press the 'Menu' button and select 'Zones'. Select the zone you wish to setup.
ZONE ON/OFF
Select 'On' if /ones are present on the vessel
Note: (a) cannot be turned at
VOLUME LIMIT
Select volume limit to set the desired maximum output volume for each individual zone.
LINK ZONE 1 + 2
Allows the volume control to operate Zones 1 - 2 as a combined pair. The Zone set up for Zone 1 and 2 can be configured separately when in this mode.
Press the 'Menu' button and select 'Zones'. Select: 'Zone 1' then 'Link Zone 1 + 2'. Select 'On' to activate this feature.
LINEOUT
Lineout gives you the ability to connect a FUSION Narine Amplifier.
Note: the circuit ran independently be assigned to zone 1, 2 or 3
Press the 'Menu' button and select 'Zones'. Select 'Lineout'. Select: the 'zone you are assigning to the Lineout.
SUBWOOFER
Change the assigned zone of the subwoofer. Also adjust the sub
level and tile
SUBOUT ZONE
Press the 'Menu' button and select 'Zones'. Select 'Subwoofer' then 'Subout Zone'. Select the desired subwoofer zone.
Note: The subconverter can independently be assigned to zone 1, 2 or 3.
SUB FILTER
Press the 'Menu' button and select 'Zones'. Select 'Subcolor' then 'Sub Filter'. Select the desired frequency.
SUB UNIT
Press the 'Men.I button and select Zones'. Select 'Subcoater' then 'Sub Limit'. Select the desired maximum subcoater output, volume
Note: Press and Hold the Rotary Encoder for quick access to subcofor level adjustment
CONNECTIONS
DESCRIPTION COLOUR
Golley +12VDC Yellow
Accessory +22V switched Red
Negative Ground Stock
Sample Ampifier Turn On Blue/White
with 12 Ming Genet in the time (25.5)
Note: The +12V switched and +12V battery can be joined or some installation requirements.
ANTENNA CONNECTION
Connect an AN/TM marine antenna.
AUX INPUT
Connect an Auxiliary source to the left and right ROA (While - L. Red - R).
iPod CONNECTION (MS-C0600 and NS-AVECO only)
Connect the 1.5m Pod accessories load HS-P1SL (not included), or connect the HS-POCK (not included)
SIRUS SATELLITE RADIO (For use in USA only)
Connect to SirtusConnect™ tuner (not included)
WIRED REMOTE (NS-WB600)
Connect a marine wired remote to the UNbus system connector. Up to 3 remotes can be connected to the system.
VIDEO CONNECTION (45 AV600)
Connect the composite video or the S-Video output to a TV / LCD monitor.
ZONE CONNECTIONS
Zone 1 White = Speaker Left Positive
White / Black = Social Left Negative
Grey - Speaker Right Positive
Brey/ Black - Speaker Right Negative
Zone 2 Green = Speaker Left Positive
Note: Speaker connection (2 Ohm Steran minimum), 2 pairs of 4 Ohm speakers per channel can be connected in parallel to achieve 2 Ohm configuration.
Zone 3/Lineout Low level cutout
(for connection to external amplifier)
White BC4= Left Output
Red PCA = Right Output
Orange RDA= Subwoofer output
Note: One Outlook. / Sub can both be independently assigned to Zone 1, Zone 2 or as a unique Zone 3.
WIRING DIAGRAM

DVD OPERATION
NS-A9600 only
PRECAUTIONS
Never insert foreign objects into the disc slot. If the disc does not insert easily, there may already be another disc inserted. Some disc formats may not be readable if the format is not compatible.
PLAYING A DVD/CD/MP3
Press the DVD button to select DVD / CD / NPS source. Playback of the disc will start automatically. The disc loading time will vary. Note: The disc will resume from the start.
DVD/CD/MP3 NAVIGATION
Navigation is controlled by the supplied Infrared Remote Control, and is presented on external screen. (See NS-AVECO-IR Remote Operation)
DVD FUNCTIONS

Press to access the DVD/CD/WF3 source

PLAY/PAUSE Play or Pause the back

BACK/PREVIOUS Short Press: Selects previous track/chapter

ss and Hold: Rewind

NEXT/FORWARD Short Press selects next chapter
Press and Hold: Fast-forward.
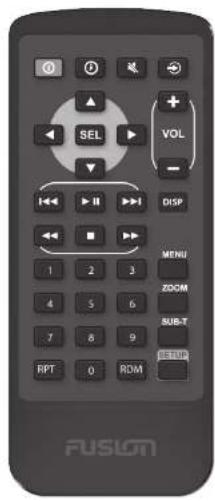
GENERAL OPERATION
POWER
Press the Power button to turn the unit ON/OFF
SELECTING A SOURCE
Press the desired source button:

ANTH-Sirius (Sirius - US Crlg)

DVD CXP3 (VS-C0600) / IVD (VS-AV600)

AUX Press for Pod

is twice for AUX (NS CD600 and NS AVECC)

AUX (MS-IP500)
ADJUSTING THE VOLUME
Turn the Rotary Encoder to adjust the volume.
ZONE VOLUME
Press the Rotary Encoder' to step through zones.

Note: the last adjusted zone, becomes the start of the above zone selection cycle
SETUP
Press the 'New' button and select 'setup'. Select the desired function. Turn the 'Botary Incade' to adjust or press to switch selection (if available). Press New' to return
Note: Remember, whilst in the Setup system the 'Vonu' button acts as a boot/return to the previous screen.
TONE
Adjust the treble and bass settings. Press the 'Rotary Encode' to switch between bass and treble selection.
BALANCE
Adjust the route balance from left to right.
CLOCK ADJUST
Adjust the clock time, 12/24 hour. Turn the 'lntary fronder' to adjust the Hour Press to confirm, repeat to adjust the minutes. Press to confirm.
REGIONS
Select Europe for the following lower frequency stepping
DN Radio AN Radio
Frequency Range: 87.5 - 108 MHz Frequency Range: 522 - 1620 MHz Frequency step: 50 kHz Frequency step: 9 kHz
Select USA for the following two frequency stopping
EN Radio AN Radio
Frequency Range: 87.5 - 107.9 MHz Frequency Range: 530 - 1/10 MHz Frequency step: 100 kHz Frequency step: 10 kHz
Note: Select Europe for Australasia later frequency stepping
LANGUAGE
Select the desired language for the on-screen display.
POWER SAVE
OFF Backlight on constantly
ON Badlight display goes all after one minute of non operation
Note: The MS-C0600, MS-IP500 and MS-AV600 feature clock
battery back up and CPROH technology. This allows the unit to be completely disconnected from the constant +12V voltage supply (Battery switch) with no settings being lost.
RADIO OPERATION
SETUP
REGION SELECTION
Press the 'Menu' button and select 'Setup'. Select 'Turner Region' and select your tuner region.
OPERATION
BAND SELECTION
Press the Radio button to select band. EN - 4M - 5RUS (USA only)
AUTOMATIC SEEK TUNING
Press the Previous' or Next button to scan to the next station.
MANUAL SEEK TUNING
Press and hold the 'Previous' or 'Next' button for 3 seconds to enter manual mode. The manual tuning icon will flash or screen. Press the 'Previous' or 'Next' button to step up and down the spectrum. Note: After remaining idle for six seconds, the tuning mode will revert to automatic.
PRESETS
You can manually store radio frequencies in the preset memory, or automatically in TV band. There are 15 presses available per band.
STORING A STATION AS A PRESET
When listening to a frequency, press and hold the 'Play' button to store press... Alternatively: Press the 'Home' button and select 'Freshsets'. Select 'Save Current,' to store station.
AUTONATIC SEARCH AND STORE PRESETS (FN only)
Press the 'Menu' button and select 'Search Stations' to automatically search and store stations.
Note: Automatic search mode will erase all other presets already stored, and will automatically store the stations into the preset menu in numerical order.
RECALLING A PRESET STATION
To listen to a radio frequency store in the preset menu, select the required band. FM - AM Status Press the Page button to enter Presets' mode. Press the "Previous" or "Next" button to select previous or next preset.
Alternately: Select the required band. FM - AM Status. Press Menu and select Presets'. Select the desired preset...
DELETING A STORED PRESET
Press 'Mero' and select 'Presets'. Select 'Remove Presets'. Select the desired preset, or 'All.
F.A.S.T
FUSION ALPHA SEARCH TECHNOLOGY
If your Pod contains more than 50 Artists, Songs or Albums you can use F.A.S.T to quickly navigate by letter or number. Example: Press the 'New' button and select 'Artists'. Select: 'D' and the first 'Artist' beginning with it will automatically highlight. Using the 'leditary Encoder' you can then scroll up or down from this selection.
F.A.S.T THRESHOLD
The threshold (number of items) at which point the Alexa Search screen appears for iPod menus can be changed. To change the threshold, navigate us follows - press the 'Menu' button and select 'Sets', then 'Swatching'. Select your desired item number threshold.

NO iPod CONNECTED
If this appears on the display possible courses are • Ensure the Pac is correctly connected
- Ensure the cable is not excessively bent (HS-CDECC, HS-AVECC) - The Poys battery remains low (refer to PoF manual and charge the battery)
iPod OPERATION
PRECAUTIONS FOR iPod
(NS-IP600 only) Before inserting your iPod into the NS-IP600 you must first insert the correct sleeves to match iPod model.
x. For the illd nano (3rd gen), the illd must be placed inside the adapter sleeve, and then placed inside. Each sleeve combination A
- Before inserting iPod,
Please ensure iPod dock connector is clean, dry & free from damage.
Check that unit iPod dock is free from obstructions.
Insert correct sleeve combination to match your iPod
Never insert iPod without a correct sleeve.
- Ensure iPod is inserted with display facing upwards. Never force your iPod into the dock, if the iPod does not make with reasonable ease the sleek/ iPod combination is most likely correct.
SELECTING THE CORRECT IPOD SLEEVE
(HS-PS00 only) A different set of sleeves is used for each iPod model. The different sleeve combinations are outlined in the chart below:
iPod TOP SLEEVE BOTTOM SLEEVE
IRed with video 30GB A A
Iled with video 60GB 80GB A B
Pod classic, 8065 B A
red class, 16005 (2007) B E Red class, 17003 P A
Rod classic, 12005 D A Rod classic, 16068 (2007)
iPod touch, D
iPod touch, 2nd year D O
iPod touch, 2nd gen (2009) D A
nano, 3rd son A. A + adaptor
nanc, 4th ben E E
Other
。
Note: To check your iPod model, go to www.apple.com/support and enter the serial number found on the back of the iPod.
LISTENING TO AN iPod
Press the 'Fod' button. Playback of the iPod will start automatically.
iPod NAVIGATION
Press the 'Wend' button to enter the iPod menu. The rotary encoder operates similar to the click wheel on your iPod. Turn to navigate and press to enter.
Note: Press the 'Henu' button to return to the previous menu screen.

Press to access the iPod source

Play or Pause the track

Short Press: Selects previous track

Press and Hold Round track

Short Press: Selects next track

Press and Hold fast-forward track
REPEAT / SHUFFLE
Press the 'Menu' button and select 'Repeat/Shuffle' Select 'Repeat Track', 'Shuffle Track or Shuffle Album', Select ON/OFF. Default setting is OFF.
SIRIUS SATELLITE RADIO
USA only - SIBUS TUNER NOT INCLUDED
ACTIVATING YOUR SIRIUS TUNER
You must sell sale the SHLS Times before you are begin to receive the SHLS Satellite Radio Service
in order to activate your radio subscription, you will read the SIMS II (50) which uniquely identifies your tumor. The 12 digit 50 is displayed on the LCD or illumination. MS-CLM, MS-P500 and MS-AV500 will display the 50 on Channel 0.
Power on your system and make sure that you are reterring good sign you are able to hear audio on the SIRUS Preview channel (Ch-184)
Note: New your credit card ready, and contact STATUS on the internet of https://activate.STATUSradio.com/ and follow the prompts to activate your subscription. You can also call STATUS toll-free at 1-888-530-330 (1-888-530-747). Once activated, you will be able to begin enjoying STATUS Satellite Radio's digital entertainment and can tune to other channels.
SIRIUS OPERATION
Press 'Radio to select Sirius source radio
SIRIUS NAVIGATION
Press the Hero' button and navigate the functions.
CHANNELS
Select the desire channel (listed in channel order) and music preference
CATEGORY
Select the desired genre type. (The unit will only play the selected option)
FAVOURITES
And your favourite channel to your favourites list by selecting 'Old Favourite' (Maximum 15 channels). Remove channels by selecting 'Remove Favourite'. Select All or the individual channel. Just by pressing the New' button.
Alternatively: Press and hold the 'Play' button to store favourite.
PARENTAL MODE
ENABLE ON/OFF
Select to enable channels to be locked/unked
PIN #
Turn the Rotary Incoter to select number and press to enter, repeat to enter the a digit mode. (Factory setting is 0000)
Note: must be entered before the following items are operational.
LOCK / UNLOCK
Select the channel to be locked or unlocked
SKIP / UN-SKIP
Select the channel to be bypassed
CHANGE PIN
Persenise your Pin number (4 digits max)
CD/MP3 OPERATION
NS-03600 only
PRECAUTIONS FOR CD/MP3
Never insert foreign objects into the CD slot. If the CD does not insert easily, there may already be another disc in the unit. Some CD-R/CD-RN may not be readable if the format is not compatible.
The format of an MP3 disc must be ISO9660 Level 1 or 2 or Joliet in the expansion format. When naming an MP3 file, ensure the file extension is .MP3
LISTENING TO A CD/MP3
Press the 'CD' button. Playback of the CD will start automatically.
CD NAVIGATION
Press the 'Menu' button and select 'Tracks'. Select desired track.
CD / MP3 FUNCTIONS
Press to access the CDMP3 source
PLAY/PAUSE Play or Pause the track
BACK/PREVIOUS Short Press: Selects previous track
Press and Hold: Rewind track
NEXT/FORWARD Short Press: Selects next track Press and Held: Fast-forward track
MP3 NAVIGATION
Note: The NP3 disc will take approx 10 seconds to load the disc data (if available) to the unit.
Press the 'Menu' button and select 'Songs' to enter the MP3 root directory. Use the 'Rotary Encoder' to navigate the functions of your MP3 folders and files. Select the highlighted folder or file.
Note: Press the 'menu' button to return to the previous menu screen.
REPEAT / SHUFFLE
Press the 'Menu' button and select 'Repeat/Shuffle'. Select 'Repeat Track', 'Repeat Album', 'Shuffle Album' or 'Shuffle All'. Select ON/OFF, Default setting is OFF.
AUX OPERATION
CONNECTING AN
AUXILIARY AUDIO DEVICE
- The Left & Right AUX BC4 plugs are located at the rear of the unit.
* Connect your auxiliary audio device.
Note: You may require an adapter cable to connect your device.
LISTENING TO YOUR
AUXILIARY AUDIO DEVICE
- Press the 'AUX' button to select AUX made (NS-P500) or press the 'Fos' button twice (NS CD600 or NS AV600)
- Start playback on your auxiliary audio device. Use both the volume control on your auxiliary device (if available) and the volume control on the FUSION Marine Stereo to set the volume level.

- PRECAUTIONS
- BEFORE INSERTING IPOD (MS-IP600)
- HANDLING COMPACT DISCS (CD/CD-R/CD-RW)
- PLAYBACK OF CD-R/CD-RW
- FCC COMPLIANCE STATEMENT
- RECORD YOUR PRODUCT DETAILS HERE
- SPECIFICATIONS AND LICENSING
- SPECIFICATIONS
- LICENSING
- CONTENTS
- BUTTON DESCRIPTION 2
- BUTTON DESCRIPTION
- ROTARY ENCODER
- CATCH RELEASE BUTTON
- FUSION MARINE ACCESSORIES
- IPOD EXTERNAL DOCK
- IPOD CONNECTION CABLE (1.5M)
- MARINE WIRED REMOTE
- MARINE ZONE AMPLIFIER
- TROUBLESHOOTING
- RESET BUTTON
- RADIO
- IPOD
- BACK/PREVIOUS
- SHORT PRESS
- PRESS AND HOLD
- FORWARD/NEXT
- PLAY/PAUSE
- NUTE
- CLOCK
- DISPLAY
- INSTALLATION
- MENU STRUCTURE
- ZONE OPERATION
- ZONE SETUP
- ZONE ON/OFF
- VOLUME LIMIT
- LINK ZONE 1 + 2
- LINEOUT
- SUBWOOFER
- LEVEL AND TILE
- SUB FILTER
- SUB UNIT
- CONNECTIONS
- DESCRIPTION COLOUR
- ANTENNA CONNECTION
- AUX INPUT
- WIRED REMOTE (NS-WB600)
- VIDEO CONNECTION (45 AV600)
- ZONE CONNECTIONS
- DVD OPERATION
- PLAYING A DVD/CD/MP3
- DVD/CD/MP3 NAVIGATION
- DVD FUNCTIONS
- GENERAL OPERATION
- POWER
- SELECTING A SOURCE
- ZONE VOLUME
- SETUP
- TONE
- BALANCE
- CLOCK ADJUST
- REGIONS
- LANGUAGE
- POWER SAVE
- RADIO OPERATION
- REGION SELECTION
- OPERATION
- BAND SELECTION
- AUTOMATIC SEEK TUNING
- MANUAL SEEK TUNING
- PRESETS
- STORING A STATION AS A PRESET
- AUTONATIC SEARCH AND STORE PRESETS (FN ONLY)
- RECALLING A PRESET STATION
- DELETING A STORED PRESET
- F.A.S.T
- FUSION ALPHA SEARCH TECHNOLOGY
- F.A.S.T THRESHOLD
- NO IPOD CONNECTED
- IPOD OPERATION
- PRECAUTIONS FOR IPOD
- SELECTING THE CORRECT IPOD SLEEVE
- LISTENING TO AN IPOD
- IPOD NAVIGATION
- REPEAT / SHUFFLE
- SIRIUS SATELLITE RADIO
- ACTIVATING YOUR SIRIUS TUNER
- SIRIUS OPERATION
- SIRIUS NAVIGATION
- CHANNELS
- CATEGORY
- FAVOURITES
- PARENTAL MODE
- ENABLE ON/OFF
- PIN
- LOCK / UNLOCK
- SKIP / UN-SKIP
- CHANGE PIN
- CD/MP3 OPERATION
- PRECAUTIONS FOR CD/MP3
- LISTENING TO A CD/MP3
- CD NAVIGATION
- CD / MP3 FUNCTIONS
- MP3 NAVIGATION
- AUX OPERATION
- CONNECTING AN
- AUXILIARY AUDIO DEVICE
- LISTENING TO YOUR
Brand : Fusion
Model : MS-CD600
Category : Car radio