
XF (2009) - Car JAGUAR - Free user manual and instructions
Find the device manual for free XF (2009) JAGUAR in PDF.


| Product Type | Car |
| Brand | Jaguar |
| Model | XF (2009) |
| Body Style | Sedan |
| Engine Options | 3.0L V6 Petrol (240 hp), 5.0L V8 Petrol (385 hp), 2.7L V6 Diesel (207 hp) |
| Transmission | 6-speed automatic |
| Drivetrain | Rear-wheel drive |
| Length | 4961 mm |
| Width | 1877 mm |
| Height | 1460 mm |
| Wheelbase | 2909 mm |
| Curb Weight | Approximately 1800 kg |
| Fuel Tank Capacity | 70 L |
| Fuel Consumption (combined) | 10-12 L/100km (petrol), 7-8 L/100km (diesel) |
| Safety Features | ABS, ESP, multiple airbags, traction control, parking sensors |
| Key Features | Keyless entry, electric seats, navigation system, xenon headlights |
| Maintenance Interval | Oil change every 16000 km or 12 months |
| Recommended Oil | 5W-30 (petrol), 5W-30 (diesel) meeting Jaguar specifications |
| Tire Pressure (front/rear) | 2.4 bar / 2.6 bar (depending on load) |
| Battery Type | 12V lead-acid, group size H8 |
| Spare Parts Availability | Widely available through Jaguar dealers and aftermarket |
Frequently Asked Questions - XF (2009) JAGUAR
User questions about XF (2009) JAGUAR
0 question about this device. Answer the ones you know or ask your own.
Ask a new question about this device
Download the instructions for your Car in PDF format for free! Find your manual XF (2009) - JAGUAR and take your electronic device back in hand. On this page are published all the documents necessary for the use of your device. XF (2009) by JAGUAR.
USER MANUAL XF (2009) JAGUAR
This handbook forms part of the Owner literature supplied with your new vehicle. Left-hand drive and right-hand drive conditions may be shown in the graphics and where information is specific to a particular country, it is indicated as such.
Please take the time to study the operating instructions with your vehicle as soon as you can.
IMPORTANT
The information contained in this handbook covers all vehicle derivatives and optional equipment. Some of the options may not be fitted to your vehicle, unless they formed part of the original vehicle specification. Therefore, some parts of this handbook may not apply to your vehicle. Furthermore, due to printing cycles, it may include descriptions of options before they become generally available.
The options, hardware and software in your vehicle are from the available specifications for the market in which the vehicle was intended for sale. If your vehicle is to be used in another geographical area, you may have to modify the vehicle specification to suit local conditions. Jaguar Cars Limited is not responsible for the cost of any modifications.
The information contained in this publication was correct when it went to print. Vehicle design changes may have been made after this handbook was printed. When this occurs a handbook supplement is added to the literature pack. Subsequent updates can be viewed on the Jaguar Internet site at: www.ownerinfo.jaguar.com.
In the interest of development, the right is reserved to change specifications, design or equipment at any time without notice and without incurring any obligations. This publication, or part thereof, may not be reproduced nor translated without our approval. Errors and omissions excepted.
© Jaguar 2008
All rights reserved.
Published by Jaguar Technical Communications.
Contents
Introduction
SYMBOLS GLOSSARY....9
LABEL LOCATIONS 9
HEALTH AND SAFETY.... 10
DATA RECORDING.... 11
DISABILITY MODIFICATIONS ...... 11
FASCIA AND CONTROLS 12
PARTS AND ACCESSORIES.... 14
Keys and remote controls
PRINCIPLE OF OPERATION 16
GENERAL INFORMATION ON RADIO
FREQUENCIES 16
USING THE REMOTE CONTROL 17
UNLOCKING AND DISARMING THE VEHICLE. 18
LOCKING AND ARMING THE VEHICLE ..... 19
DOCKING/UNDOCKING THE JAGUAR SMART KEY 20
PROGRAMMING THE REMOTE CONTROL..... 21
CHANGING THE REMOTE CONTROL BATTERY ... 24
EMERGENCY KEY BLADE 25
Locks
LOCKING AND UNLOCKING.... 26
USING THE EMERGENCY KEY BLADE 28
VALET MODE.... 30
JAGUAR SMART KEY SYSTEM TRANSMITTERS 32
KEYLESS ENTRY 33
GLOBAL OPENING AND CLOSING 35
Alarm
ARMING THE ALARM 37
DISARMING THE ALARM 38
SECURITY SENSORS.... 39
Seats
SITTING IN THE CORRECT POSITION ..... 41
ELECTRIC SEATS.... 42
HEAD RESTRAINTS 44
REAR SEATS 45
HEATED SEATS.... 47
CLIMATE SEATS 48
Seat belts
PRINCIPLE OF OPERATION 49
SEAT BELT REMINDER 50
USING SEAT BELTS DURING PREGNANCY.... 51
FASTENING THE SEAT BELTS 51
SEAT BELT HEIGHT ADJUSTMENT 52
Supplementary restraints system
PRINCIPLE OF OPERATION.... 53
AIRBAG WARNING LAMP 57
WHIPLASH PROTECTION.... 57
AIRBAG LABELS.... 58
AIRBAG SERVICE INFORMATION.... 58
Child safety
CHILD SEATS 59
CHILD SEAT POSITIONING 60
BOOSTER CUSHIONS.... 61
CHILD SEAT ANCHOR POINTS.... 62
CHILD SAFETY LOCKS 65
Pedestrian protection
PRINCIPLE OF OPERATION.... 66
AFTER DEPLOYMENT OF THE PEDESTRIAN
PROTECTION SYSTEM 66
Steering wheel
ADJUSTING THE STEERING WHEEL 67
HORN 68
HEATED STEERING WHEEL.... 68
AUDIO CONTROL 69
VOICE CONTROL 69
CRUISE CONTROL.... 74
Lighting
LIGHTING CONTROL 75
AUTOLAMPS 76
REAR FOG LAMPS.... 77
HAZARD WARNING FLASHERS.... 77
DIRECTION INDICATORS 78
HEADLAMPS - DRIVING ABROAD.... 78
HEADLAMP LEVELLING 79
CORNERING OR STATIC BENDING LAMPS.... 79
INTERIOR LAMPS 80
APPROACH LAMPS.... 81
REMOVING A HEADLAMP 81
REMOVING A REAR LAMP 82
CHANGING A BULB 83
HEADLAMP UNIT BULBS 83
Contents
SIDE REPEATER LAMP 85
REAR LAMP BULBS 85
BULB SPECIFICATION CHART.... 87
Wipers and washers
WINDSCREEN WIPERS 88
RAIN SENSOR 89
WINDSCREEN WASHERS.... 89
HEADLAMP WASHERS.... 90
CHECKING THE WIPER BLADES 90
CHANGING THE WIPER BLADES.... 91
Windows and mirrors
ELECTRIC WINDOWS.... 93
INTERIOR MIRROR 94
EXTERIOR MIRRORS 95
BLIND SPOT MONITOR 97
Instruments
INSTRUMENT PANEL OVERVIEW 99
WARNING LAMPS AND INDICATORS ..... 100
AUDIBLE WARNINGS AND INDICATORS ..... 104
Information displays
GENERAL INFORMATION 105
WARNING AND INFORMATION MESSAGES. 106
TRIP COMPUTER 107
TOUCH-SCREEN.... 109
PERSONALISED SETTINGS 111
Climate control
AIR VENTS 115
AUTOMATIC CLIMATE CONTROL.... 116
ELECTRIC SUNROOF 121
Convenience features
SUN VISORS 123
SUN BLINDS.... 123
INSTRUMENT LIGHTING DIMMER...... 123
CLOCK 124
AUXILIARY POWER SOCKETS 125
GLOVE BOX 125
CUP HOLDERS 126
STORAGE COMPARTMENTS.... 127
GARAGE DOOR TRANSCEIVER 128
PORTABLE AUDIO INTERFACE.... 131
Starting the engine
GENERAL INFORMATION.... 132
KEYLESS STARTING.... 133
SWITCHING OFF THE ENGINE.... 134
DIESEL PARTICULATE FILTER (DPF)...... 135
Transmission
AUTOMATIC TRANSMISSION 137
Brakes
PRINCIPLE OF OPERATION 144
HINTS ON DRIVING WITH ABS.... 144
ELECTRIC PARKING BRAKE (EPB) 146
Parking aid
PRINCIPLE OF OPERATION 148
USING THE PARKING AID.... 148
Rear view camera
PRINCIPLE OF OPERATION 152
Driving hints
RUNNING-IN 154
ECONOMICAL DRIVING 155
Cruise control
PRINCIPLE OF OPERATION 156
USING CRUISE CONTROL.... 156
Adaptive cruise control (ACC)
PRINCIPLE OF OPERATION 159
USING ACC 159
FORWARD ALERT FUNCTION 164
ADVANCED EMERGENCY BRAKE ASSIST..... 165
Automatic speed limiter (ASL)
PRINCIPLE OF OPERATION 167
USING THE ASL 167
Driving dynamics
GENERAL INFORMATION.... 169
WINTER MODE 169
DYNAMIC MODE.... 170
STABILITY CONTROL.... 170
Fuel and refuelling
SAFETY PRECAUTIONS.... 174
Contents
FUEL QUALITY.... 174
ALTERNATIVE FUELS FOR PETROL ENGINES.....175
DIESEL ENGINED VEHICLES.... 176
RUNNING OUT OF FUEL 177
FUEL CUT-OFF 177
FUEL FILLER FLAP.... 178
REFUELLING.... 179
DIESEL MISFUELLING PROTECTION DEVICE...... 180
FUEL CONSUMPTION 181
Load carrying
GENERAL INFORMATION 182
LUGGAGE ANCHOR POINTS.... 182
REAR UNDER FLOOR STORAGE.... 182
Towing
TOWING A TRAILER (V6 petrol and diesel vehicles only).... 183
LEVELLING 184
RECOMMENDED TOWING WEIGHTS ..... 185
ESSENTIAL TOWING CHECKS 185
TOW BAR.... 186
Vehicle care
CLEANING THE ALLOY WHEELS 187
CLEANING THE EXTERIOR 187
CLEANING THE INTERIOR 189
REPAIRING MINOR PAINT DAMAGE 191
Maintenance
GENERAL INFORMATION 192
OPENING AND CLOSING THE BONNET ..... 195
ENGINE COMPARTMENT OVERVIEW 196
ENGINE OIL CHECK - V6 Petrol engines ..... 197
ENGINE OIL CHECK - V8 Petrol engines ..... 199
ENGINE OIL CHECK - V6 Diesel engines ..... 201
ENGINE OIL SPECIFICATION 203
ENGINE COOLANT CHECK 204
Status after a collision
DRIVING AFTER A COLLISION 251
INSPECTING SAFETY SYSTEM COMPONENTS... 252
Vehicle recovery
TOWING POINTS.... 253
TRANSPORTING THE VEHICLE 254
TOWING THE VEHICLE ON FOUR WHEELS.. 256
Vehicle identification
VEHICLE IDENTIFICATION PLATE 257
ENGINE NUMBER 257
TRANSMISSION NUMBER 257
VEHICLE IDENTIFICATION NUMBER (VIN)... 257
VEHICLE BUILD DATE PLATE 257
Contents
Technical specifications
ENGINE SPECIFICATIONS 258
WEIGHTS.... 259
DIMENSIONS.... 260
Type approvals
DECLARATIONS OF CONFORMITY 262
Audio introduction
RADIO RECEPTION.... 268
Audio unit overview
AUDIO UNIT OVERVIEW 269
Audio unit operation
ON/OFF CONTROL 271
VOLUME CONTROL.... 271
AUDIO CONTROL 272
WAVEBAND BUTTON 274
AUTOSTORE CONTROL.... 274
STATION PRESET BUTTONS 275
TRAFFIC INFORMATION CONTROL 276
Audio unit menus
RADIO DATA SYSTEM (RDS) 277
PRIORITY PROGRAMME TYPE (PTY) 278
Digital audio broadcasting
GENERAL INFORMATION 280
AUDIO CONTROLS 282
DISPLAY OPTIONS.... 283
CHANNEL AUTOMATIC TUNING.... 284
CHANNEL OPTIONS 284
PRESET BUTTONS 287
SETTINGS.... 288
Compact disc player
COMPACT DISC COMPATABILITY.... 292
LOADING COMPACT DISCS 292
EJECTING COMPACT DISCS 294
COMPACT DISC SELECTION 294
TRACK SELECTION.... 295
COMPACT DISC PAUSE 295
SHUFFLE/RANDOM 295
REPEAT COMPACT DISC TRACKS 296
COMPACT DISC DISPLAY OPTIONS 296
MP3 FILE PLAYBACK 297
Portable audio
PORTABLE AUDIO.... 299
AUXILIARY INPUT DEVICES 302
Telephone
GENERAL INFORMATION...... 307
TELEPHONE PAIRING AND DOCKING...... 309
VOICE MAIL 313
ANSWER OPTIONS 314
PHONE OPTIONS 314
PHONEBOOK 315
MAKING A CALL.... 317
NAMES.... 318
LAST 10 OPTION.... 320
HANDS-FREE CONTROLS 321
OTHER FEATURES 322
TELEPHONE VOICE CONTROL 323
Television
GENERAL INFORMATION...... 328
TELEVISION CONTROLS.... 329
USING THE TELEVISION 330
FINDING TV CHANNELS.... 331
TELEVISION SETUP 332
Navigation system
EUROPEAN DECLARATION OF CONFORMITY .....
380
SYMBOLS GLOSSARY
Warnings
WARNING

Safety warnings are included in this handbook. These indicate either a procedure which must be followed precisely, or information that should be considered with great care in order to avoid the possibility of personal injury.
Cautions
CAUTION

Cautions are included in this handbook. These indicate either a procedure which must be followed precisely, or information that should be considered with great care in order to avoid the possibility of damage to your vehicle.
Symbols

This recycling symbol identifies those items that must be disposed of safely in order to prevent unnecessary damage to the environment.

This symbol identifies those features that can be adjusted, disabled or enabled by your Dealer/Authorised Repairer.
LABEL LOCATIONS

Warning labels attached to your vehicle bearing this symbol mean: Do not touch or adjust components until you have read the relevant instructions in the handbook.

Labels showing this symbol indicate that the ignition system utilises very high voltages. Do not touch any ignition components while the starter switch is turned on.
Warning labels
Labels are attached to your vehicle at several positions. These are applied to draw your attention to important subjects, e.g. tyre pressures, tow bar use, airbags, roll-over risk, engine compartment hazards, etc.
Additional information labels may also be found at these locations.

- Left-hand front suspension tower - Air conditioning label
- Top face of battery - Battery warning symbols
- End of fascia (passenger side) - Passenger airbag label
- Sun visor - Airbag label
- Base of left-hand C pillar - Tyre pressure label, Airbag warning label, Vehicle Identification Number label
- Right-hand B pillar - Vehicle Identification Number label (China)
- Inner face of fuel filler flap - Fuel specification label
It is important that you are familiar with these subjects to ensure that your vehicle and its features are used safely. Using the index at the back of this handbook, refer to the relevant topic for more information.
HEALTH AND SAFETY
WARNINGS

The vehicle should not be parked over long dry grass or other combustible material, particularly during dry weather. As the heat generated by the exhaust and emission control systems may be sufficient to start a fire.

Before exiting the vehicle, ensure that P park is selected and the park brake applied. When exiting the vehicle,
ensure that the Jaguar Smart Key is removed from the vehicle.
DATA RECORDING
Service data recording
Service data recorders in your vehicle are capable of collecting and storing diagnostic information about your vehicle. This potentially includes information about the performance or status of various systems and modules in the vehicle such as engine, throttle, steering or brakes.
In order to properly diagnose and service your vehicle, Jaguar service and repair facilities may access vehicle diagnostic information through a direct connection to your vehicle.
Event data recording
This vehicle is equipped with an Event Data Recorder (EDR). The main purpose of an EDR is to record, in certain crash or near crash-like situations, such as an air bag deployment or hitting a road obstacle, data that will assist in understanding how a vehicle's systems performed. The EDR is designed to record data related to vehicle dynamics and safety systems for a short period of time, typically 30 seconds or less. The EDR in this vehicle is designed to record such data as:
- How various systems in your vehicle were operating.
- Whether or not the driver and passenger safety belts were buckled/fastened.
- How far (if at all) the driver was depressing the accelerator and/or the brake pedal.
• How fast the vehicle was travelling. - The rotational position of the steering wheel.
These data can help provide a better understanding of the circumstances in which crashes and injuries occur.
Note: EDR data are recorded by your vehicle only if a non-trivial crash situation occurs; no data are recorded by the EDR under normal driving conditions and no personal data (e.g. name, gender, age and crash location) are recorded. However, other parties, such as law enforcement, could combine the EDR data with the type of personally identifying data routinely acquired during a crash investigation.
To read data recorded by an EDR, special equipment is required, and access to the vehicle or the EDR is needed. In addition to the vehicle manufacturer, other parties, such as law enforcement, that have the special equipment, can read the information if they have access to the vehicle or the EDR.
DISABILITY MODIFICATIONS
Occupants with disabilities which may require modification of the vehicle, must contact a Dealer/Authorised Repairer before any modifications are made.
FASCIA AND CONTROLS
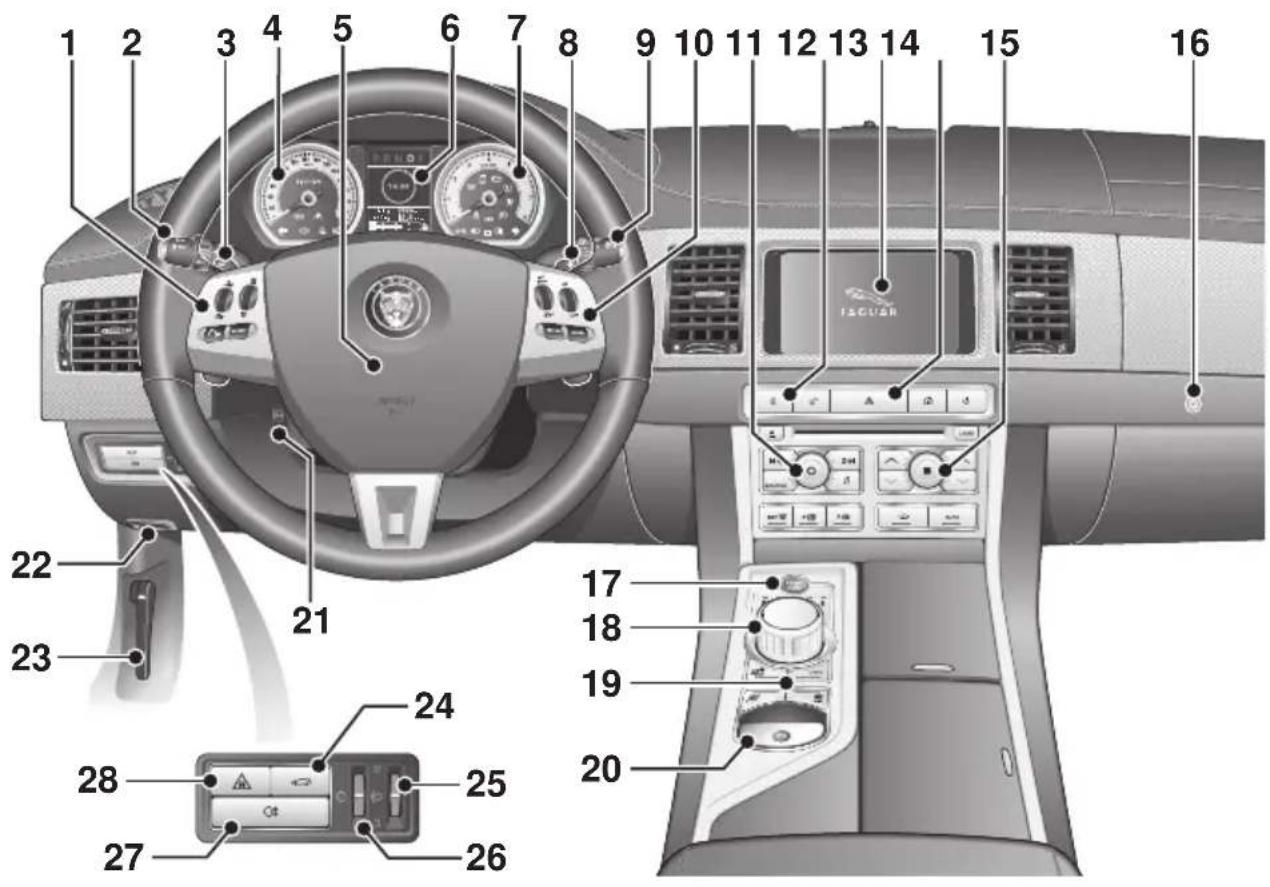


JAG1634
- Steering wheel audio controls. See AUDIO CONTROL (page 69).
- External lamp controls. See LIGHTING CONTROL (page 75).
- Sequential gear change down paddle. See AUTOMATIC TRANSMISSION (page 137).
- Speedometer. See INSTRUMENT PANEL OVERVIEW (page 99).
- Driver's horn and airbag. See HORN (page 68). See Supplementary restraints system (page 53).
- Message centre. See WARNING AND INFORMATION MESSAGES (page 106).
- Tachometer. See INSTRUMENT PANEL OVERVIEW (page 99).
- Sequential gear change up paddle. See AUTOMATIC TRANSMISSION (page 137).
- Wiper and washer control. See Wipers and washers (page 88).
- Cruise control and Adaptive cruise control steering wheel controls. See Cruise control (page 156). See Adaptive cruise control (ACC) (page 159).
- Audio control panel. See Audio unit overview (page 269).
- Fascia lock/unlock buttons. See LOCKING AND UNLOCKING (page 26).
- Touch-screen. See TOUCH-SCREEN (page 109).
- Hazard warning lamp switch. See HAZARD WARNING FLASHERS (page 77).
-
Climate control panel. See Climate control (page 115).
-
Glove box proximity sensor. See GLOVE BOX (page 125).
- Engine START/STOP switch. See Starting the engine (page 132).
- JaguarDrive gear selector. See AUTOMATIC TRANSMISSION (page 137).
- JaguarDrive mode selectors. See Driving dynamics (page 169).
- Electric Parking Brake (EPB). See ELECTRIC PARKING BRAKE (EPB) (page 146).
- Steering wheel adjustment control. See ADJUSTING THE STEERING WHEEL (page 67).
- Starter control docking unit for the Jaguar Smart Key. See DOCKING/UNDOCKING THE JAGUAR SMART KEY (page 20).
- Bonnet release lever. See OPENING AND CLOSING THE BONNET (page 195).
- Luggage compartment release switch. See LOCKING AND UNLOCKING (page 26).
- Headlamp levelling control. See HEADLAMP LEVELLING (page 79).
- Instrument lighting dimmer control. See INSTRUMENT LIGHTING DIMMER (page 123).
- Rear fog lamps switch. See REAR FOG LAMPS (page 77).
- Adaptive Cruise Control (ACC) Forward Alert switch. See FORWARD ALERT FUNCTION (page 164).
PARTS AND ACCESSORIES
WARNINGS

Do not fit non-approved parts and accessories or carry out non-approved alterations or conversions. It may be dangerous and could affect the safety of the vehicle and occupants. Also, the terms and conditions of the vehicle warranty may be invalidated.

Jaguar will not accept any liability for death, personal injury or damage to property which may occur as a direct result of fitment of non-approved accessories or the carrying out of non-approved conversions to Jaguar vehicles.

Jaguar strongly advise against making any modifications to the suspension or steering system. This could seriously affect the handling and stability of the vehicle leading to loss of control or roll-over.
The vehicle has been designed, built and tested, to cope with a variety of driving conditions, some of which can place the severest possible demands on control systems and components. As such, fitting replacement parts and accessories that have been developed and tested to the same stringent standards as the original components, will safeguard the continued reliability, safety and performance of your vehicle.
To augment the vehicle's already impressive performance, a comprehensive range of Jaguar approved spare parts and accessories is available.
Jaguar parts are the only parts built to original equipment specifications and approved by Jaguar designers; this means that every single part and accessory has been rigorously tested by the same engineering team that designed and built the vehicle.
A full list and description of all accessories is available from your Dealer/Authorised Repairer.
Electrical equipment
WARNING

It is extremely hazardous to fit or replace parts or accessories, the installation of which requires the dismantling of, or addition to, either the electrical or fuel systems.
Always consult your Dealer/Authorised Repairer before fitting any accessory.
Fitting inferior quality parts or accessories, may be dangerous and could invalidate the vehicle warranty.
It is recommended that you always consult your Dealer/Authorised Repairer for advice regarding the approval, suitability, installation and use of any parts or accessories before fitting.
Airbag system
WARNING

The components that make up the airbag system are sensitive to electrical or physical interference, either of which could easily damage the system and cause inadvertent operation or a malfunction of the airbag module.
To prevent malfunction of the airbag system always consult your Dealer/Authorised Repairer before fitting any of the following:
- Electronic equipment such as a mobile phone, two-way radio or in-car entertainment system.
- Accessories attached to the front of the vehicle.
• Any modification to the front of the vehicle. - Any modification involving the removal or repair of any wiring or component in the vicinity of any of the airbag system components, including the steering wheel, steering column, instrument or fascia panels.
- Any modification to the fascia panels or steering wheel.
After-sales service
natural_image
Illustration of a Jaguar dealership with a parked car and a JAGUAR sign (no text or symbols on the car or signage)The After Sales Parts service is of paramount importance, with franchised representation in over 100 countries worldwide, Jaguar are able to support your vehicle wherever you go.
Travelling abroad
In certain countries, it is a legal requirement to fit parts made to the vehicle manufacturers' specification.
Owners should ensure that any parts or accessories fitted to the vehicle while travelling abroad, will also conform to the legal requirements of their own country when they return home.
Remove all Jaguar Smart Keys from the vehicle when it is left unattended. This will ensure the vehicle is left in a secure condition.
If a Jaguar Smart Key is lost, a replacement can be obtained and programmed to the vehicle by your Dealer. Notify your Dealer as soon as a Jaguar Smart Key is lost or stolen and have the remaining Jaguar Smart Key(s) reprogrammed.

natural_image
Illustration of a hand holding a car with a sensor or signal detection overlay, showing the car's exterior and interior (no text or symbols)The security system and entry to the vehicle are controlled by the Jaguar Smart Key remote control. All doors and the luggage compartment can be locked and unlocked using the remote control buttons.
Keyless Entry is an enhancement of the Jaguar Smart Key and allows entry to the vehicle, without the need to press a button. Full security integrity of the vehicle is still maintained. See KEYLESS ENTRY (page 33).
The Jaguar Smart Key also allows the vehicle to be started without the use of a starter key. See KEYLESS STARTING (page 133).
Two handsets, incorporating a detachable emergency key blade, are supplied. Separate emergency key blades are available from Dealers.
The emergency key blade number is recorded on an attached label. Peel off the label and attach it to the designated area on the Security Card, supplied in the literature pack. Keep the Security Card safe, but not in the vehicle.
GENERAL INFORMATION ON RADIO FREQUENCIES
Note: The radio frequency used by your remote control may be used by other devices. For example: amateur radios, medical equipment, wireless headphones, or other remote control devices. This may cause the frequency to be jammed, and prevent your remote control from operating correctly.
Environmental conditions can affect the operation of remote controls and the operating range may vary considerably depending on the vehicle's location.
USING THE REMOTE CONTROL
Jaguar Smart Key
WARNING

Never leave the Jaguar Smart Key in the vehicle if children or animals are also left in the vehicle. The vehicle's systems and remote control functions could be operated, which may result in injury.
Note: The operational range of the Jaguar Smart Key will vary considerably depending on atmospheric conditions and interference from other transmitting devices.
Note: Some features of the security system are market dependent or are options, so may not be present on your vehicle.

- Unlock.
- Lock.
- Luggage compartment release.
- Convenience headlamp feature.
- Panic alarm.
- Emergency key blade.
- Emergency key blade release button.
Unlocking

Press to unlock. See UNLOCKING AND DISARMING THE VEHICLE (page 18).
Locking

Press to lock. See LOCKING AND ARMING THE VEHICLE (page 19).
Luggage compartment

Press to unlock, disarm and open the luggage compartment. The vehicle security system will remain active, but for the period the luggage compartment is open, the intrusion and inclination sensing systems will be inhibited. Door and bonnet security will remain active.
When the luggage compartment is subsequently closed, the hazard warning lamps will flash after a few seconds, to confirm that the vehicle has rearmed the full alarm system (if previously armed).
Approach lamps

When approaching the vehicle in the dark, press to switch on the approach illumination. The
headlamps will illuminate for up to 25 seconds. Pressing the button again or operating the starter button, will turn the approach lamps off.
Panic button

Press and hold for three seconds, or press three times within three seconds, to activate the emergency
alarm. The horn, siren and the hazard lamps will operate.
Once active for more than five seconds, the alarm can be cancelled by pressing the button and holding for three seconds, or pressing three times within three seconds.
The emergency alarm will also be cancelled if the Jaguar Smart Key is inserted into the starter control unit and the START/STOP button is pressed or if the vehicle detects a valid Jaguar Smart Key when the START/STOP button is pressed.
Care of the Jaguar Smart Key
Do not expose to extremes of heat, dust, humidity or allow contact with fluids. Do not leave the transmitter exposed to direct sunlight.
Irregular operation
If difficulty is experienced with remote keyless entry, keyless entry, keyless starting or Jaguar Smart Key operation, it may be caused by:
- Internal battery low voltage. Replace the battery. See CHANGING THE REMOTE CONTROL BATTERY (page 24).
- High levels of localised external electrical interference, e.g. a radio transmitter.
- Until the battery can be replaced, or until the vehicle is outside the area of electrical interference, the Jaguar Smart Key must be inserted into the starter control unit.
UNLOCKING AND DISARMING THE VEHICLE

Your vehicle can be unlocked using either Single or Multi-point entry. Single-point entry is a security
feature that only unlocks the driver's door when the unlock button is pressed.
To change from Single to Multi-point entry (or vice versa), press both the lock and unlock buttons simultaneously for three seconds. The hazard warning lamps will flash twice to confirm the change.
The change can also be achieved using the vehicle touch-screen. See PROGRAMMING THE REMOTE CONTROL (page 21).
Single-point entry
First press: Unlocks the driver's door and enables the other doors to be opened from the inside (unless the child safety locks have been activated on the rear doors). The hazard warning lamps will flash twice, to indicate that the vehicle is unlocked and the alarm has been disarmed. The interior lamps will illuminate to assist entry to the vehicle.
Note: In some markets, an audible warning will sound.
Second press: Unlocks the passenger doors and the luggage compartment.
Multi-point entry
Press briefly to unlock all the doors and luggage compartment and to disarm the alarm. The hazard warning lamps will flash twice to indicate that the vehicle is unlocked and the alarm has been disarmed. The interior lamps will illuminate to assist entry to the vehicle.
Note: In some markets, an audible warning will sound.
Power-fold mirrors
If automatic power-fold is enabled, the door mirrors will unfold when the vehicle is unlocked. The power-fold feature can be enabled/disabled using the touch-screen. See EXTERIOR MIRRORS (page 95).
Global opening
Press and hold the unlock button for three seconds. The vehicle will unlock (either single or multi-point) and the alarm will be disarmed immediately. After the three seconds, all of the windows and sunroof will open. This feature can be enabled/disabled using the vehicle touch-screen. See PROGRAMMING THE REMOTE CONTROL (page 21).
LOCKING AND ARMING THE VEHICLE
WARNING

The vehicle will only lock, if all door, luggage compartment and bonnet apertures are closed. If a lock attempt is made when an aperture is open, the vehicle will not lock and two audible error warnings will sound.

Press the lock button to secure the vehicle. The vehicle can be Single or Double locked, as follows:
Single locking
Press the lock button briefly. Single locking secures the vehicle and prevents the doors being opened from outside of the vehicle. The doors can be unlocked and opened from inside the vehicle. The hazard warning lamps will flash once as confirmation.
Note: In some markets, an audible warning will sound.
Double locking
WARNING

Never double lock the vehicle with people, children, or pets inside. In the event of an emergency they would be to escape, and the emergency services are unable to release them quickly.
Press the lock button twice within three seconds. Double locking secures the vehicle and prevents the doors being unlocked or opened from inside or outside of the vehicle, except with the correct Jaguar Smart Key. The hazard warning lamps will flash twice (with a long second flash) and an audible warning will sound, as confirmation.
Double locking provides additional security if the vehicle is left unattended. The vehicle cannot be opened by breaking a window and operating the door locks from inside the vehicle.
Power-fold mirrors
If automatic power-fold is enabled, the door mirrors will fold in towards the vehicle body when the vehicle is locked. The power-fold feature can be enabled/disabled using the touch-screen. See PROGRAMMING THE REMOTE CONTROL (page 21).
Lock confirmation
If you are uncertain whether the vehicle is locked and armed (either by single or double locking), press the lock button again. The hazard warning lights will flash to indicate and confirm the current lock status.
Note: If the vehicle is not already locked and armed, pressing the lock button will single lock the vehicle. Press again to double lock, if required.
Global closing
WARNING

Ensure that no children, pets, or obstructions are in any open aperture before operating global closing.
Safety mechanisms are in place to prevent serious injury, however, injuries can still occur.
Press and hold the lock button for three seconds. The vehicle will single lock and the alarm will be fully armed immediately. After the three seconds, all the windows and the sunroof will close.
Automatic relocking
If a door, or the tailgate, are not opened within one minute of unlocking the vehicle using the Jaguar Smart Key, doors will lock again automatically. This feature can be enabled/disabled using the touch-screen.
See PROGRAMMING THE REMOTE CONTROL (page 21).
DOCKING/UNDOCKING THE JAGUAR SMART KEY
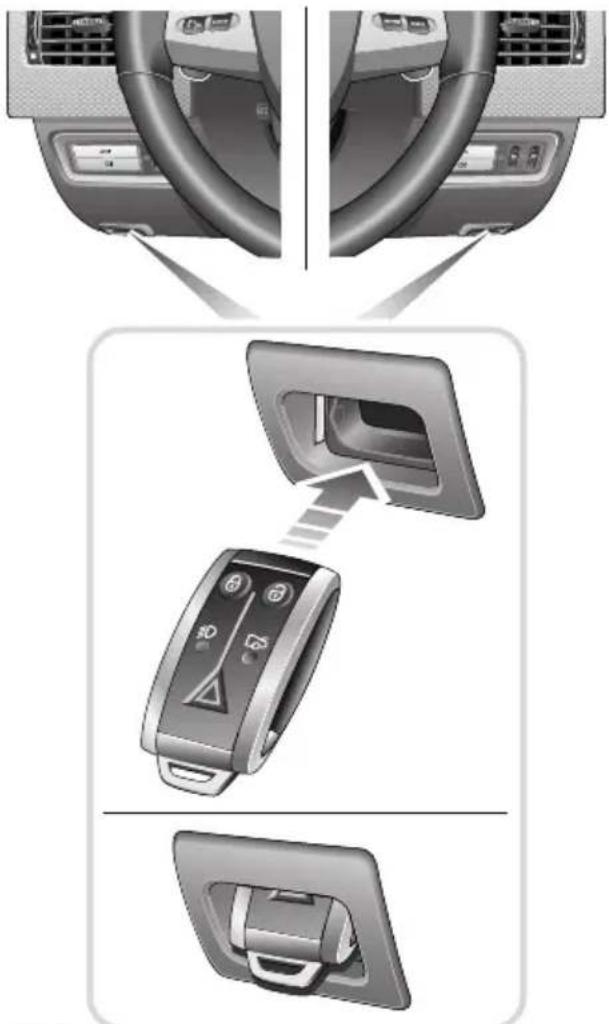
Docking the Jaguar Smart Key
During normal operation, it is not necessary to dock the Jaguar Smart Key. However, if the unlock button on the Smart Key fails to operate and the vehicle has been unlocked using the emergency key blade, it will be necessary to dock the Jaguar Smart Key to deactivate and disarm the alarm system.
The Smart Key should also be docked when the vehicle is being towed, in order to prevent the steering column from locking.
E92455
Insert the Jaguar Smart Key into the starter control unit, located on the driver's side of the vehicle, as shown.
Note: When docking the Jaguar Smart Key, it is recommended that the emergency key blade is left in place. The end of the key blade can then be used as a handle, to pull the Smart Key from the control unit when undocking.
Keys and remote controls
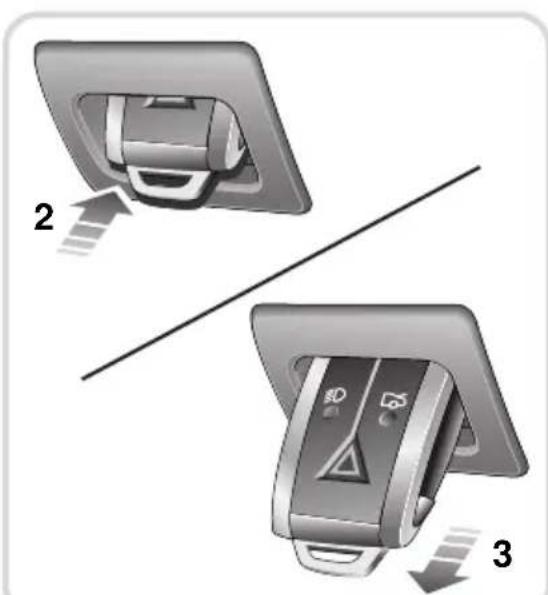
Undocking the Jaguar Smart Key
E92456
CAUTION
Ensure the engine is switched off before attempting to undock the Jaguar Smart Key, otherwise damage to the Smart Key may occur.
To remove the Jaguar Smart Key from the starter control unit:
- Ensure that the vehicle is at rest with the gear selector in the P position and the ignition switched off.
- Press the Jaguar Smart Key and release. The key will eject into its rest position.
- Remove the Jaguar Smart Key from the starter control unit.
Message centre information displays
| Message Meaning | |
| SMART KEY NOT FOUND, PLEASE INSERT IN SLOT | The Jaguar Smart Key has not been detected, insert into the starter control unit. |
| CHECK SMART KEY | The Jaguar Smart Key detected by the in-vehicle systems is not the one belonging to the vehicle. |
| REMOVE SMART KEY | Remove the Jaguar Smart Key from the starter control unit. |
PROGRAMMING THE REMOTE CONTROL
The Jaguar Smart Key and various features of the vehicle security system, can be programmed to your individual requirements by use of the touch-screen.
The programmable features are as follows:
- Drive-away locking (including variable speed)
- Single or multi-point entry (2 stage unlocking)
- Alarm trigger information (market dependent)
- Window global open or close (passive entry vehicles only)
- Valet key mode
- Passive arming
• Automatic relock and arm.
Selecting single (2 stage unlock) or multi-point entry
From the main Home touch-screen menu, select Vehicle:
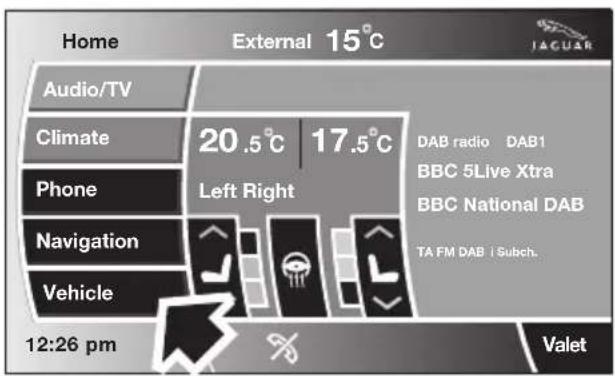

LAN1510
- Select Veh. settings.
- The Security menu is selected automatically as the default.
- Select: 2-stage unlocking On (for single-point entry) or Off (for multi-point entry).
Note: This selection changes the setting for both keyless entry and for when unlocking using the Jaguar Smart Key.
Selecting alarm sensor override
From the main Home touch-screen menu, select Vehicle:

E93148
- Select Veh. settings.
- The Security menu is selected automatically as the default.
- Touch the arrow button to scroll down to Alarm sensors and select either On or Off.
Selecting Off will override the interior and tilt sensors until the vehicle is locked and unlocked again. This facility is normally used for recovery of the vehicle or travelling on a ferry.
Keys and remote controls
Selecting drive-away locking
From the main Home touch-screen menu, select Vehicle:
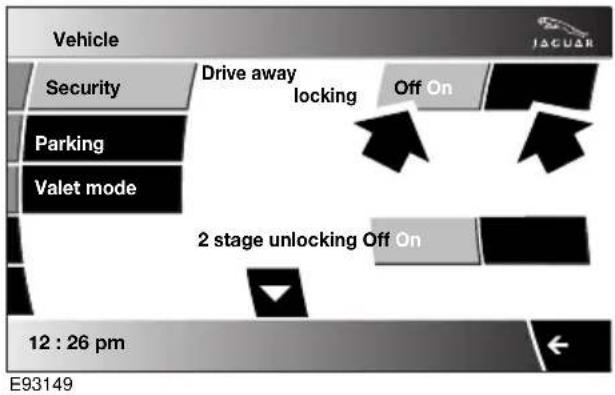
- Select Veh. settings.
- The Security button is selected automatically as the default.
- Select the arrow button to scroll down to Drive away locking and select either On or Off.
Setting the drive-away locking speed
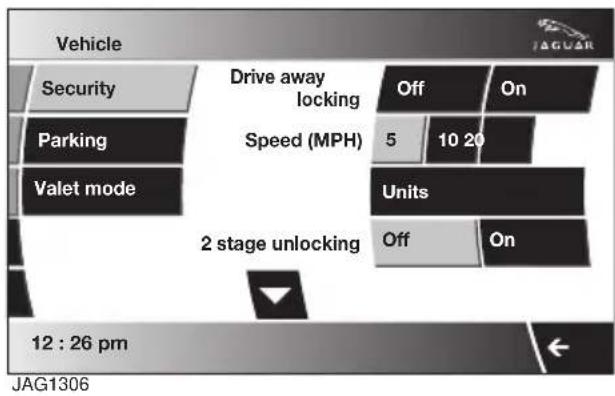
- Once Drive away locking On is selected, select the speed from the list at which you want the locks to activate (8, 16 or 32 km/h or 5, 10 or 20 mph). To change between Imperial and Metric measurement units, select Units.
Selecting window global opening or closing
From the main Home touch-screen menu, select Vehicle:

E93150
- Select Veh. settings.
- The Security button is selected automatically as the default.
- Scroll down to Global open or Global close and select either On or Off.
Selecting passive arming
From the main Home touch-screen menu, select Vehicle:
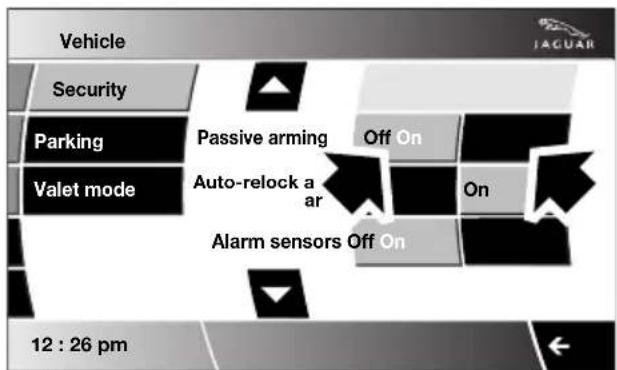
E93151
- Select Veh. settings.
- The Security button is selected automatically as the default.
- Scroll down to Passive arming and select either On or Off.
Selecting automatic relock and arm
From the main Home touch-screen menu, select Vehicle:

E93152
- Select Veh. settings.
- The Security button is selected automatically as the default.
- Scroll down to Auto-relock and arm and select either On or Off.
CHANGING THE REMOTE CONTROL BATTERY

When the battery needs renewing, there will be a significant decrease in the effective range of the Jaguar Smart Key transmitter and the message SMART KEY BATTERY LOW is displayed in the message centre.
To renew the battery, follow the procedure below:
- Remove the key blade from the Jaguar Smart Key. See USING THE REMOTE CONTROL (page 17).
- Remove the two side covers, one at a time, by inserting a small, flat bladed screwdriver between the cover and body and lightly twist the screwdriver.
- Insert the screwdriver between the two body halves of the Jaguar Smart Key. Apply light pressure to the screwdriver and separate the two halves.
- Remove the printed circuit board, taking care not to touch the battery terminals. Remove the old battery and dispose of it safely.
- Fit a new battery, type CR2032 (available from your Dealer/Authorised Repairer), with the positive (+) downwards, in the battery receptacle. Avoid touching the new battery, as moisture/oil from the fingers can reduce battery life and corrode the contacts.
Refit the parts in the reverse order, ensuring that they click securely into place.
Battery disposal

Used batteries must be disposed of correctly, as they contain a number of harmful substances. Seek advise on disposal from your Dealer/
Authorised Repairer and/or your local authority.
EMERGENCY KEY BLADE
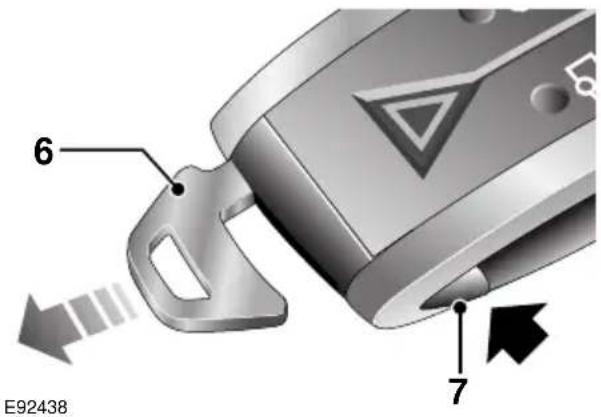
To extract: Press and hold the release button (7), while pulling the key blade (6) from the Jaguar Smart Key body.
To insert: Press and hold the release button while pushing the key blade into appropriate slot in the Jaguar Smart Key.
The key blade operates the left-hand front door lock and the luggage compartment lock. See USING THE EMERGENCY KEY BLADE (page 28).
LOCKING AND UNLOCKING
WARNING

Never double lock the vehicle with people, children or pets inside. In the event of an emergency they would be unable to escape, and the emergency services would be unable to release them quickly.
When the vehicle is double-locked the doors cannot be opened, either from inside or outside the vehicle.
Breaking a window will not allow a door to be opened.
Locking and unlocking from outside the vehicle
Locking and unlocking the vehicle using the Jaguar Smart Key, is explained earlier in this handbook. See USING THE REMOTE
CONTROL (page 17). Locking and unlocking the vehicle using the Keyless Entry system is explained later in this handbook. See KEYLESS ENTRY (page 33).
Note: To help prevent locking the Jaguar Smart Key inside the vehicle, it has been made difficult to slam lock a door using the interior door locking lever. The door will not lock.
Luggage compartment
CAUTION
If the luggage compartment is opened after the driver and passenger doors are locked, ensure that the Jaguar Smart Key remains outside the vehicle when it is closed again. If the Jaguar Smart Key is inadvertently left inside the luggage compartment, an audible warning will sound and the luggage compartment will re-open after three seconds.
Note: If the Jaguar Smart Key is placed within a metal box, it will not be detected by the vehicle security system.
The luggage compartment can be opened at any time, using the appropriate button on the Jaguar Smart Key or via keyless entry. It can also be opened using the exterior release, provided the doors are unlocked.
Provided the vehicle is not locked or alarmed, the luggage compartment can also be opened using the interior release button.
The luggage compartment can also be unlocked and opened using the emergency key blade, as described later in this section.
Drive-away locking
This feature locks all unsecured locks when the vehicle reaches a designated forward speed. This designated speed and whether or not drive-away locking is enabled, can be set using the vehicle touch-screen. See PROGRAMMING THE REMOTE CONTROL (page 21).
Locking and unlocking from inside the vehicle
Door lock and release levers

-
Press the locking lever to lock the door, pull the lever to unlock the door. Operating the locking lever on either front door will lock all closed doors. If the doors are locked, operating the locking lever on either front door will unlock all four doors (provided the doors were locked from inside the vehicle and the alarm is disarmed).
-
Pull the release lever to open a door. If the doors are locked, operating the lever will have no effect.
Note: If the car was locked using the Jaguar Smart Key, then operating the locking lever will only unlock that door and the alarm will sound.
Note: If the vehicle has been double-locked, then the interior door lock and release levers will not operate. The vehicle must be unlocked using the Jaguar Smart Key.
Fascia buttons

Locking: With all the doors closed, press the button to lock all doors and the luggage compartment. Press and hold to lock all doors and the luggage compartment and close all windows and the sunroof. The windows and sunroof will stop closing if the button is released.
Note: The fascia locking button will not function unless all the doors are closed.

Unlocking: Press to unlock all doors and the luggage compartment. Press and hold to unlock all doors and the luggage compartment and open all windows and the sunroof. The windows and sunroof will stop opening if the button is released.
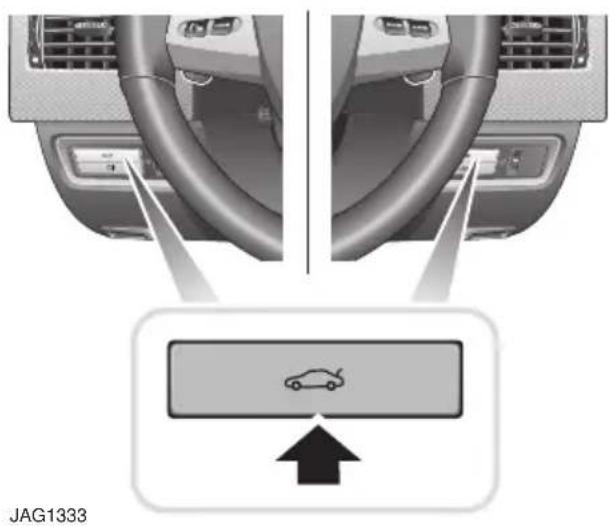
Press to open the luggage compartment.
Mislock
If one of the doors, the bonnet, or the luggage compartment are not shut fully when the vehicle is locked using the Jaguar Smart Key or by Keyless locking, the vehicle will not lock and two warning tones will sound. Check that all doors, the bonnet and the luggage compartment are closed properly and lock the vehicle again.
If one or more of the doors fails to lock properly when a lock attempt is made using the Jaguar Smart Key, two warning tones will sound and one or more of the doors may not be locked.
USING THE EMERGENCY KEY BLADE
The emergency key blade will be needed to unlock the vehicle, if the Jaguar Smart Key has a discharged battery or is damaged. The emergency key blade is also used for accessing the luggage compartment if the vehicle has been left in Valet mode. Withdraw the key from the Jaguar Smart Key for use. See USING THE REMOTE CONTROL (page 17).
Locking and unlocking the doors

JAG1310
Remove the front left-hand door lock cover as follows:
- Insert the emergency key blade into the slot on the underside of the cover.
- Gently lever the key blade upwards.
- Carefully twist the key blade, to lever the cover off the retaining clips.
Insert the key blade into the exposed lock to operate.
Note: To refit the door lock cover, push it firmly back into place until all three securing tabs click into position.
To lock: Ensure all the doors are closed, then turn the key blade towards the front of the vehicle and release. This will lock all doors but will not arm the alarm.
To unlock: Turn the key blade towards the rear of the vehicle and release. If the security system is disarmed, all doors and the luggage compartment will be unlocked. If the security system is armed, only the front left-hand door will unlock. The interior lighting will be turned on at reduced level for two minutes.
If the vehicle is unlocked using the emergency key blade with the security system armed, the alarm will sound when a door is opened. To deactivate the alarm, press the unlock button on the Jaguar Smart Key or press the engine START/STOP button with the Smart Key inside the vehicle. If the Jaguar Smart Key is inoperable, the alarm can be deactivated by docking the Smart Key into the starter control unit. See DOCKING/UNDOCKING THE JAGUAR SMART KEY (page 20).
Unlocking the luggage compartment
If Valet mode is selected, or if the vehicle battery is discharged, it will be necessary to use the emergency key blade to unlock and open the luggage compartment.
Note: If the security system is in Valet mode, the touch-screen can be used to cancel Valet mode, in which case the luggage compartment can then be opened in the normal manner.
Note: If the alarm is armed when the emergency key blade is used to unlock the luggage compartment, the alarm will sound when the luggage compartment is opened. Press the unlock button on the Jaguar Smart Key to disarm/deactivate the alarm.

- Use the emergency key blade to prise away the black lock cover.
- Insert the emergency key blade, then turn the key clockwise to unlock and open the luggage compartment.
Note: Unlocking the luggage compartment using the emergency key blade will cancel Valet mode.
VALET MODE
Valet mode allows the vehicle to be locked by a parking attendant, without giving access to the luggage compartment and glove compartment. Valet mode also prevents operation of the touch-screen, to prevent access to telephone numbers or navigation addresses.
Selecting valet mode


JAG1511
From the main Home touch-screen menu, select Valet:
Enter a four digit Personal identification Number (PIN) (personally chosen) by touching the digit screen pad. On completion, touch the OK button.
If you wish to cancel the PIN, touch the C button at any time during entering the number.

JAG0948
Once the PIN has been entered, a pop-up screen is displayed, advising you to remove the emergency key blade from the Jaguar Smart Key and to keep it safe. Select OK.
The screen will indicate that the PIN has been accepted by displaying Valet on.
The luggage compartment and glove compartment are now securely locked in Valet mode.
On exiting and securing the vehicle, hand the Jaguar Smart Key, with the emergency key blade removed, to the attendant.
Note: Ensure that the emergency key blade is kept safely at all times.
Deselecting valet mode
When you enter the vehicle, the Valet mode screen will be displayed automatically.
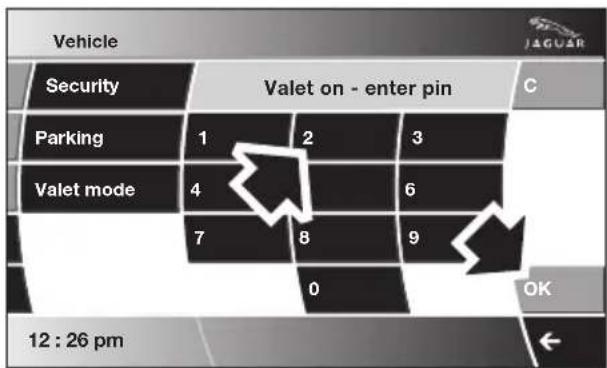
JAG0946
Enter your four digit PIN and touch the OK button.
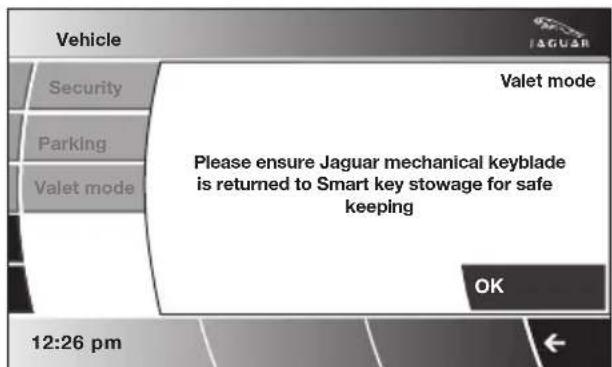
JAG0949
A pop-up screen is displayed, advising you to return the emergency key blade to the Jaguar Smart Key. Select OK.
The screen will indicate that your PIN has been accepted by displaying Valet off.
- The luggage compartment will return to the previously set security requirement.
- The glove compartment will now open as normal.
Note: If the PIN number has been forgotten, the luggage compartment can be unlocked by using the emergency key blade. This will cancel the Valet mode.
JAGUAR SMART KEY SYSTEM TRANSMITTERS

JAG1305
- Cabin front transmitter.
- Cabin rear transmitter.
- Front exterior door handle transmitters.
- Rear exterior door handle transmitters.
- Luggage compartment interior transmitter.
- Luggage compartment exterior transmitter.
- Keyless vehicle module.
WARNING

Any person fitted with an implanted medical device should ensure that the device is kept at a distance of at least 22 cm (8.7 inches) away from any transmitter mounted in the vehicle. This is to avoid any possibility of interference between the system and device.
KEYLESS ENTRY

natural_image
Top-down architectural sketch of a car showing front, rear, and perspective views (no text or symbols)E93153
Keyless entry allows the driver to unlock and disarm the vehicle by simply operating the door handle. The Keyless Entry function operates in the following manner:
- As a door handle is operated, the vehicle emits a search signal.
- If the Jaguar Smart Key is within approximately 1.0 m (3 feet) of the operated door handle, the signal will be acknowledged.
- The vehicle recognises the Jaguar Smart Key and disarms the alarm and unlocks the vehicle according to the current security setting (either Single-point or Multi-point entry). See USING THE REMOTE
CONTROL (page 17). The hazard warning lamps flash twice as confirmation (in some markets an audible warning will sound twice).
Note: The Jaguar Smart Key needs only to be on the driver's person or in a non-metallic bag or briefcase. It does not need to be exposed or handled.
Note: If Single-point entry is the current security setting and a door other than the driver's door is opened first, then all doors will be unlocked. If the driver's door is opened, only the driver's door will be unlocked. All other doors and the luggage compartment will remain locked.
Jaguar Smart Key check
When the last open door is closed, the vehicle will perform a search of the vehicle interior for the Jaguar Smart Key. If one is not found,
SMART KEY NOT FOUND, PLEASE INSERT IN SLOT will be displayed for four seconds in the message centre. This is to alert the driver that the Jaguar Smart Key may have been inadvertently removed from the vehicle.
Keyless locking
WARNING

Never double-lock the vehicle with people, children or pets inside. In the event of an emergency they would be unable to escape and the emergency services would be unable to release them quickly.
natural_image
3D rendered image of a car door handle with a black arrow pointing to the side (no text or symbols on the object itself)The vehicle will not lock automatically.
The vehicle will only lock if all doors, luggage compartment and bonnet are closed. If a lock attempt is made with an open aperture, the vehicle will not lock and two audible error warnings will sound.
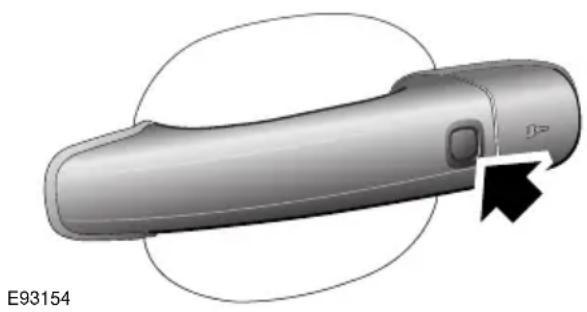
- To single-lock the vehicle, press the button on the door handle once. The hazard warning lamps will flash once as confirmation (in some markets, an audible warning will sound).
- To double-lock the vehicle, press the button twice within three seconds. The hazard warning lamps will flash twice (with a long second flash). In some markets, a double audible warning will sound.
Note: Keyless locking will only activate if the Jaguar Smart Key is outside the vehicle. If no Smart Key is present, two audible error warnings will sound.
Window global closing
Press and hold the button on the door handle for three seconds, to lock the vehicle, arm the alarm and also close all open windows and the sunroof. The windows and sunroof will stop closing when the button is released.
Convenience mode
When the door is opened using either the Jaguar Smart Key or keyless entry, the vehicle's electrical system initiates the convenience mode. The following systems become functional:
- Memory.
- Seat and steering column adjustment.
• Interior and exterior lighting. - Message centre.
- Auxiliary power socket.
Steering column lock
CAUTION

During vehicle recovery, the Jaguar Smart Key must remain inside the vehicle (or be stowed in the starter control unit in the centre console), so that the steering column remains unlocked.
Your vehicle is fitted with an electronic steering column lock. The column unlocks when it detects a Jaguar Smart Key inside the vehicle.
The steering column automatically locks when the starter switch is turned off and the driver's door is opened.
Any malfunction of the steering column lock will be indicated by the message STEERING COLUMN LOCKED displaying in the message centre. If this occurs:
- Press the starter button to return to the convenience mode.
- Try again to unlock the steering column lock, by turning the steering wheel gently to the left and right.
- If the malfunction still persists, seek qualified assistance as soon as possible.
GLOBAL OPENING AND CLOSING
WARNING

Accidental closing of an electrically operated window or sunroof on fingers, hands or any vulnerable part of the body, can result in serious injury.
Always observe the following precautions:
Ensure that you have a clear view of all open apertures on the vehicle and that all apertures are unobstructed before activating global closing.
Global opening and closing is enabled/disabled via the touch-screen. See PROGRAMMING THE REMOTE CONTROL (page 21).
Window global opening

Press and hold the unlock button on the Jaguar Smart Key for at least three seconds. The alarm will disarm, all doors and the luggage compartment will unlock and all the windows and sunroof will open.
Note: The windows and sunroof will continue to open when the unlock button is released.
Press and hold the interior unlock button on the fascia. After three seconds, all the windows and the sunroof will open.
Note: The windows and sunroof will stop opening when the unlock button is released.
Window global closing (not Japan)

Press and hold the lock button on the Jaguar Smart Key. The alarm will arm, all doors and the luggage
compartment will lock and, after three seconds, all open windows and sunroof will close.
Note: The windows and sunroof will continue to close when the lock button is released.
natural_image
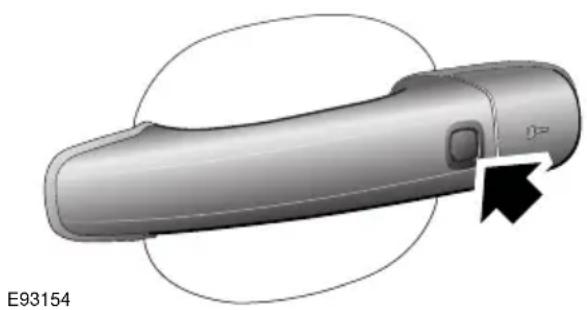
3D rendered image of a car door handle with a black arrow pointing to the side panel (no text or symbols on the object itself)Press and hold the exterior locking button on the driver's door handle for at least three seconds, with a valid Jaguar Smart Key in the vicinity of the door.
Note: The windows and sunroof will stop closing when the lock button is released.
Press and hold the interior lock button on the fascia. After three seconds, all open windows and the sunroof will close.
Note: The windows and sunroof will stop closing when the lock button is released.
Cancelling global opening/closing
To stop the windows and sunroof from opening/closing, during global opening/closing operation, press any of the buttons on the Jaguar Smart Key or operate the driver's window switch. To stop a particular window from opening, operate the relevant window switch.
ARMING THE ALARM

The engine is automatically immobilised when the Jaguar Smart Key is removed from the vehicle. The alarm system is armed when the lock button on the Jaguar Smart Key is pressed or the button on the exterior door handle is pressed with a valid Jaguar Smart Key in close proximity. The hazard lamps will flash to indicate that the alarm is armed (in certain markets, an audible tone will sound). The alarm can also arm automatically (known as passive arming), 30 seconds after all doors, luggage compartment and bonnet apertures are closed, and the Jaguar Smart Key is removed from the vehicle. Passive arming does not lock the vehicle.
This feature can be enabled/disabled using the vehicle touch-screen. See PROGRAMMING THE REMOTE CONTROL (page 21).
Full alarm
To set full alarm protection, ensure that all the windows and the sunroof are closed. Then, on vehicles fitted with double-locking, press the lock button twice within three seconds. The hazard warning lights will flash twice to confirm the alarm state and, in some markets, an audible tone will sound.
Once fully armed the alarm will sound if:-
- The bonnet, luggage compartment, or a door are opened.
- If a front door is unlocked using the emergency key blade or the interior door lock release levers and then opened.
- Movement is detected within the vehicle interior.
-
A window, front or rear windscreen, or sunroof glass are broken.
• The vehicle is raised or tilted.
• The vehicle battery is disconnected. -
An attempt is made to disconnect the alarm siren.
- An attempt is made to start the vehicle, without a valid Jaguar Smart Key present.
Note: If the alarm is armed and a window or the sunroof are left open, the alarm may sound due to movement of air currents.
Note: Some of the above conditions are market or option dependent and therefore may not apply to your vehicle.
Perimeter alarm
To set perimeter alarm protection, briefly press the lock button once. The hazard warning lights will flash once to confirm the alarm state.
Once armed the perimeter alarm will sound if:-
- The bonnet, luggage compartment, or a door are opened.
- If a front door is unlocked using the emergency key blade or the interior door lock release levers and then opened.
• The vehicle battery is disconnected. - An attempt is made to disconnect the alarm siren.
- An attempt is made to start the vehicle, without a valid Jaguar Smart Key present.
Note: This setting should be used in circumstances such as travelling on a ferry, when pets are to be left in the vehicle, when a window must be left open etc.
Note: Some of the above conditions are market or option dependent and therefore may not apply to your vehicle.
Alarm indicator

natural_image
Interior view of a car dashboard and steering wheel, showing a speedometer and a warning light icon (no text or symbols)The alarm status is displayed by the indicator.
• Indicator off - alarm disarmed.
- Indicator flashes once per second - alarm is armed and engine immobilised.
Battery-backed sounder
In certain markets, a separate battery backed sounder is fitted. This device will sound the alarm if the vehicle battery or the alarm sounder is disconnected when the security system is armed.
DISARMING THE ALARM

When the vehicle is unlocked using the Jaguar Smart Key or by valid keyless entry, the alarm is
automatically disabled. The hazard lamps will flash twice to indicate that the alarm is disabled. In certain markets, a double audible tone will sound.
Disarming when the unlock button fails to work
If, when pressed, the unlock button fails to operate the vehicle can still be unlocked and the alarm disabled. To unlock the vehicle:-
- Unlock the left-hand front door using the emergency key blade. See USING THE EMERGENCY KEY BLADE (page 28).
- Dock the Jaguar Smart Key into the starter control unit. See DOCKING/UNDOCKING THE JAGUAR SMART KEY (page 20).
Note: When the left-hand front door is unlocked using the key, the alarm will sound until the Jaguar Smart Key is docked.
Deactivating the alarm when triggered
If the alarm has been triggered, it can be deactivated by any one of the following methods:-
- Pressing the unlock button on the Jaguar Smart Key.
- Docking the Smart Key into the starter control unit.
- Opening a door using keyless entry.
- Pressing the START/STOP button with a valid Jaguar Smart Key present.
Alarm trigger information
If you have reason to believe that the alarm was triggered when you were away from the vehicle, it is possible to check on your return using the touch-screen.
From the touch-screen Home menu, select Vehicle and then Veh. settings. The Security menu is displayed automatically as the default.
Use the arrow icons to scroll to the second screen.

JAG1309
A text display (arrowed) will indicate if the alarm has been triggered, and also indicate what the cause of the trigger was (e.g. Driver door, Passenger door, Inclination sensor, Trunk, etc.).
SECURITY SENSORS
Note: If the vehicle is to be transported by road, rail or sea, the vehicle should not be double-locked or the tilt and intrusion sensors should be deactivated using the touch-screen. See PROGRAMMING THE REMOTE CONTROL (page 21). This prevents the alarm from sounding as the vehicle pitches and rolls.
Tilt sensor
The tilt sensor detects any change in the vehicle's inclination to the ground. When the alarm is armed and the vehicle double-locked, any change in the vehicle's inclination will activate the tilt alarm. This feature protects against unauthorised towing away or jacking-up of the vehicle.
The tilt alarm is disarmed when the vehicle security system is disarmed using the Jaguar Smart Key.
Intrusion sensor
The intrusion sensor is mounted in the roof console and detects any movement within the vehicle cabin via the use of ultrasonic sound waves. When the alarm is armed and the vehicle double-locked, any movement detected inside the cabin will activate the alarm.
Note: It takes approximately 30 seconds for the sensor to create an ultrasonic profile of the cabin and be fully armed.
The intrusion alarm is disarmed when the vehicle security system is disarmed using the Jaguar Smart Key.
Note: Ensure all windows and sunroof are closed prior to arming the alarm and double-locking the vehicle. Failure to do so may result in false alarms being sounded due to movements detected outside the vehicle.
Passive arming
This vehicle is fitted with a passive arming feature which can, if enabled, automatically arm the anti-theft system. Passive arming will automatically arm the perimeter alarm system 30 seconds after the driver's door is closed, provided all doors, bonnet and luggage compartment are closed, the ignition is switched off and there are no valid Jaguar Smart Keys inside the vehicle.
It will also automatically arm the perimeter alarm system 30 seconds after the vehicle is unlocked, if none of the doors or the luggage compartment are opened.
Passive arming will not lock the vehicle, although access to the luggage compartment via the interior or exterior release buttons will be inhibited and the fuel filler flap will be locked.
Passive arming can be disabled/enabled using the touch-screen. See PROGRAMMING THE REMOTE CONTROL (page 21).
Automatic relocking and re-arming of the alarm
Automatic relock and re-arm is a feature which, if enabled, automatically relocks the vehicle and arms the anti-theft system.
If the vehicle is in a locked and armed state and the remote unlock button is pressed, but none of the doors or the luggage compartment are opened within 45 seconds, the vehicle will automatically relock all the doors and the luggage compartment and will re-arm the alarm system.
Note: Automatic relocking and arming will only relock to a centrally locked state and will only arm to a perimeter alarm condition.
Automatic relocking and re-arming can be disabled/enabled using the touch-screen. See PROGRAMMING THE REMOTE CONTROL (page 21).
Sensor faults
If the security systems detect a fault with one of the security sensors, two error tones will sound from the alarm siren after the vehicle is unlocked and disarmed. If this condition occurs, please visit your Dealer/Authorised Repairer for rectification.
SITTING IN THE CORRECT POSITION
WARNING

Do not adjust the seat while the vehicle is moving. Doing so could cause loss of vehicle control and personal injury.
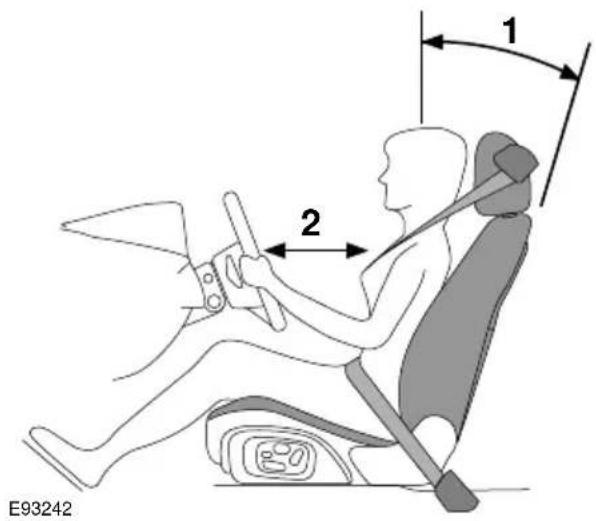
The seat, head restraint, seat belt and airbags, all contribute to the protection of the user. Correct use of these components will give you greater protection, therefore you should observe the following points:
- Sit in an upright position with the base of your spine as far back as possible and the seatback reclined no more than 30 degrees.
- Do not move the driver's seat too close to the steering wheel. Ideally, a minimum distance of 254 mm (10 inches) is recommended between the breastbone and the steering wheel airbag cover. Hold the steering wheel in the correct position with your arms slightly bent.
- Adjust the head restraint so that its highest point is level with the top of your head.
- Position the seat belt so that it is mid-way between your neck and your shoulder. Fit the strap tightly across your hips, not across your stomach.
- Ensure that your driving position is comfortable and enables you to maintain full control of the vehicle.
ELECTRIC SEATS

flowchart
graph TD
    A["1: Seat with directional arrows"] --> B["2: Rear assembly"]
    B --> C["3: Rear assembly with directional arrows"]
    C --> D["4: Rear assembly with directional arrows"]
    D --> E["5: Rear assembly with directional arrows"]
    E --> F["6: Rear assembly with directional arrows"]
    F --> G["7: Rear assembly with directional arrows"]
    G --> H["8: Rear assembly with directional arrows"]
    H --> A
    style A fill:#f9f,stroke:#333
    style B fill:#f9f,stroke:#333
    style C fill:#f9f,stroke:#333
    style D fill:#f9f,stroke:#333
    style E fill:#f9f,stroke:#333
    style F fill:#f9f,stroke:#333
    style G fill:#f9f,stroke:#333
    style H fill:#f9f,stroke:#333
- Cushion length adjustment.
- Bolster adjustment:
A. Bolster inflate.
B. Bolster deflate.
- Lumbar support adjustment.
- Seat back angle adjustment.
- Head restraint height adjustment.
- Height adjustment.
- Fore and aft adjustment.
- Cushion front tilt adjustment.
WARNINGS

Do not adjust a seat while the vehicle is moving. Failure to follow this instruction could potentially cause I injury or loss of vehicle control.

Before making rearward, height or reclining seat adjustments, check that the rear passenger has adequate leg room.

The driver and front passenger must not ride with the seat fully reclined.
To adjust the seats, the Jaguar Smart Key must be in the vehicle and the ignition turned on.
Driving position memory

- Memory preset 1.
- Memory preset 2.
- Memory Set button.
- Indicator light.
Once you have adjusted the driver's seat, steering column and exterior mirrors for your ideal driving position, the vehicle can memorise these settings for future use.
- Press the memory set button to activate the memory function.
- Press one of the preset buttons within five seconds to memorise the current settings. An audible chime will sound and MEMORY 1 (or 2) SETTINGS SAVED is displayed in the message centre, to confirm the settings have been memorised.
A seat position can only be memorised during the five second active period.
Any existing settings for a memory preset will be over-written when programming a memory position.
Recalling a memorised position
Press the appropriate memory preset button (1 or 2), MEMORY 1 (or 2) SETTINGS RECALLED will be displayed in the message centre.
HEAD RESTRAINTS
WARNINGS

Head restraints are designed to support the head, not the back of the neck. The restraint must be positioned correctly to restrain rearward movement of the head in a collision. An incorrectly adjusted head restraint increases the risk of death or serious injury in the event of a collision.

Adjust the head restraint so that the top of the head restraint is above the centre line of the head. An incorrectly adjusted head restraint increases the risk of death or serious injury in the event of a collision. See SITTING IN THE CORRECT POSITION (page 41).

On front head restraints, it is possible to adjust the tilt of the head restraint forwards or backwards. For greater protection in the event of a collision, the head restraint should be adjusted so that it is as close to the back of the head as is practical.

Do not drive, or carry passengers, with the head restraints removed from occupied seats. The absence of a correctly adjusted head restraint increases the risk of death or serious injury in the event of a collision.

Never adjust the head restraints while the vehicle is in motion. An incorrectly adjusted head restraint increases the risk of death or serious injury in the event of a collision.
For information on adjusting power-operated head restraints, refer to the Electric seats section. See ELECTRIC SEATS (page 42).
Whiplash protection
Both front seats are equipped with Active Head Restraints (AHR), which reduce the risk of neck and spinal injury (whiplash) in the event of a rear impact. See WHIPLASH PROTECTION (page 57).
Head restraint tilt adjustment

natural_image
Illustration of a mechanical device with directional arrows indicating motion or force, no text or symbols present.To adjust the angle of the head restraint, press the locking button on the side of the restraint (solid arrow) and move the restraint to the desired position. Release the button to lock in place.
The head restraint should be tilted so that it is in close proximity to the back of the head, when seated in the normal driving position.
Manual head restraints

- Press the locking collar to release the head restraint.
- Whilst pressing the locking collar, move the head restraint up or down to the required position.
Note: It is not necessary to press the locking collar to adjust the head restraint upwards.
Head restraint removal
CAUTION

Do not attempt to remove a front head restraint fitted with a display screen.
This may damage electrical connections.
Manual head restraints may be removed, if required, to fit larger child seats. Press the locking collar and lift the restraint out of the seat back. Ensure the restraint is refitted once the child seat is removed.
Note: It is not possible to remove power-operated head restraints.
Note: Refer to the Child Safety section for details on correct child restraint fitment. See CHILD SEATS (page 59).
REAR SEATS
WARNINGS

Always ensure that objects carried within the vehicle are secured properly. Unsecured items can cause death or serious injury in the event of an impact or sudden manoeuvre.

Never allow passengers to travel in the luggage compartment under any circumstances. All vehicle occupants should be seated correctly, and wear a seat belt at all times when the vehicle is in motion. Failure to do so will greatly increase the risk of death and serious injury in the event of an accident or heavy braking.

Always take note of safety warnings and labels attached to the rear seats. The labels give advice on safely folding and erecting the seats.
The split fold rear seat can be folded completely to accommodate large loads, or partially to accommodate long loads, and still retain seating for passengers.
Folding the rear seats

natural_image
Interior view of a car seatbelt with a highlighted seatbelt component (no text or symbols)Stow the rear seat armrest.

natural_image
Diagram showing a car interior with a highlighted cylindrical component and directional arrows, no text or symbols present.With the luggage compartment open, pull the relevant seat release handle, located as shown (illustration shows view from the rear of the vehicle, with the luggage compartment open).
natural_image
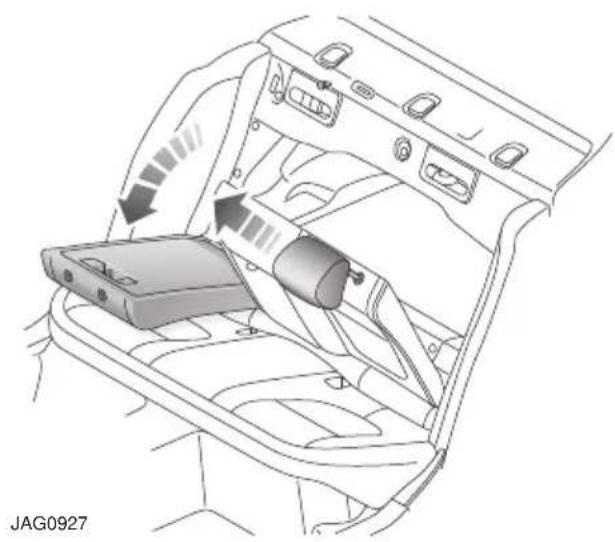
Interior view of a car showing a battery inside the intake frame with directional arrows indicating flow (no text or symbols)Fold the seat back part-way forward and remove the head restraint(s) from the folded seat back. See HEAD RESTRAINTS (page 44).

natural_image
Technical line drawing of a car interior showing the rear compartment with a rectangular device and ventilation slots (no text or symbols)Fully fold the seat back forward and, if required, repeat the process for the second seat section.
WARNING

Ensure that the removed rear head restraints are stored securely. Never leave them loose in the vehicle, as they can cause serious injury or death in the event of an accident, heavy braking, or sudden manoeuvres.
Raising the rear seats
The process for raising the rear seat is the reverse of folding.
WARNINGS

Ensure that when the seat back is raised, the seat belts are routed correctly and are not trapped by the seat back.

Ensure that when the seat back is raised, the locking mechanism is fully engaged. Failure to do so can
increase the risk of death or serious injury in the event of an accident or sudden manoeuvre or heavy braking.

Before driving, ensure that the head restraints are correctly fitted to the rear seats.
HEATED SEATS


JAG1512
Note: To prevent the battery from becoming discharged the seat heaters will only operate when the engine is running.
Seat heating is adjusted through the vehicle touch-screen (from either the Climate or the Home menu). The seat heaters have three temperature levels, indicated by the three bars adjacent to each seat icon.
- Touch the left or right-hand seat icon (as appropriate) to activate the seat heater, which initially selects the maximum temperature level (three bars).
- Touch the icon a second time to select the medium temperature setting (two bars).
- Touch the icon a third time to select the lowest temperature setting (one bar).
- Touch the icon again to switch off the seat heaters.
CLIMATE SEATS

Note: To prevent the battery from becoming discharged the climate seats will only operate when the engine is running.
Seat ventilation is adjusted through the vehicle touch-screen (from either the Climate or the Home menu). The climate seats have three heated and three cooled settings, indicated by the three bars adjacent to each seat icon. These bars will appear red when heated ventilation is selected, or blue when cooled ventilation is selected.
Heated ventilation
Touch the up arrow to activate heated ventilation for the chosen seating position. The system automatically selects the maximum heated ventilation setting (3 red bars illuminated).
To adjust the level of heated ventilation, touch the down arrow the appropriate number of times:
- 1 touch = intermediate heated ventilation (2 red bars).
- 2 touches = minimum heated ventilation (1 red bar).
- 3 touches = heated ventilation off (no bars illuminated).
Cooled ventilation
Touch the down arrow to activate cooled ventilation for the chosen seating position. The system automatically selects the maximum cooled ventilation setting (3 blue bars illuminated).
To adjust the level of cooled ventilation, touch the up arrow the appropriate number of times:
- 1 touch = intermediate cooled ventilation (2 blue bars).
- 2 touches = minimum cooled ventilation (1 blue bar).
- 3 touches = cooled ventilation off (no bars illuminated).
Backrest ventilation only
It is possible to set the seat ventilation so that only the seat backrest is ventilated. Backrest only ventilation is selected using the touch-screen.

JAG0914
• From the Climate menu, select Settings.
- For the left or right front seat select the appropriate icon; either full seat ventilation (1) or seat backrest ventilation only (2).
natural_image
Two identical line drawings of a seated human figure with a bandage, no text or symbols presentWARNINGS

Seat belts are designed to bear upon the bony structure of the body, and should be worn low across the front of the pelvis or the pelvis chest and shoulders, as applicable; wearing the lap section of the belt across the abdominal area must be avoided.

Seat belts should be adjusted as firmly as possible, consistent with comfort, to provide the protection for which they have been designed. A slack belt will greatly reduce the protection afforded to the wearer.

Care should be taken to avoid contamination of the webbing with polishes, oils and chemicals, and particularly battery acid. Cleaning may safely be carried out using mild soap and water.

The belt should be replaced if webbing becomes frayed, contaminated or damaged.

It is essential to replace the entire assembly after it has been worn in a severe impact even if damage to the assembly is not obvious.

Belts should not be worn with the straps twisted.
WARNINGS

Do not carry hard, fragile or sharp items between your person and the seat belt. In an impact, the pressure from the seat belt on such items can cause them to break, which in turn may cause death or serious injuries.

Each belt assembly must only be used by one occupant; it is dangerous to put a belt around a child being carried on the occupant's lap.

The occupants of the front seats should not travel with the seat back at more than 30 degrees from upright.
Doing so will reduce the protection afforded by the seat belt.
Seat belt safety
WARNINGS

Seat belts should be worn by all vehicle occupants, for every journey, no matter how short. Failure to do so, will greatly increase the risk of death or serious injury in the event of an accident.

Never wear just the lap belt or just the shoulder belt of a lap/shoulder diagonal seat belt. Both of these actions are extremely dangerous and may increase your risk of injury.

No modifications or additions should be made by the user which will either prevent the seat belt adjusting devices from operating to remove slack, or prevent the seat belt assembly from being adjusted to remove slack.
A slack seat belt offers a greatly reduced level of occupant protection in an impact.
WARNINGS

If any damage, wear, cuts, defects or impaired operation are noted with the seat belts, the vehicle should be taken to a Dealer/Authorised Repairer for immediate attention. Do not use the vehicle if the seat belts cannot be operated correctly.

When using seat belts to restrain items other than occupants, take care to ensure that the belts are not damaged, or exposed to sharp edges.

Care must be taken to avoid contaminating the seat belt webbing and seat belt mechanisms with any chemicals, liquids, grit, dirt or cleaning products. If the seat belts do become contaminated, they should be replaced immediately. Contaminated seat belts my not operate correctly in an impact and cannot be relied upon.

The use of comfort clips, or devices that would create slackness in the seat belt system, is not advised.
Seat belt checks
Note: If the vehicle is parked on an incline, the seat belt mechanism may lock. This is not a fault and the belt should be gently eased out from the upper anchorage.
The seat belts should be inspected regularly to check for fraying, cuts or wear to the webbing, and the condition and security of the mechanism, buckles, adjusters, and mounting points.
- With the seat belt fastened, give the webbing near the buckle a quick upward pull. The buckle must remain securely locked.
- With the seat belt unfastened, unreel the seat belt to the limit of its travel. Check that it unreels smoothly with no snatches or snags. Allow the belt to fully retract, again checking for smooth operation.
- Partially unreel the seat belt, then hold the tongue plate and give a quick forward pull. The mechanism must lock and prevent any further unreeling.
If any of the seat belts fail to meet those criteria, immediately contact your Dealer/Authorised Repairer.
SEAT BELT REMINDER

If the driver's seat belt is not fastened when the vehicle is in motion, a chime will be heard and the seat belt warning indicator will illuminate. The warning chime and indicator will also be activated if the front passenger seat is occupied without the seat belt being fastened.
Note: Objects placed on the front passenger seat may activate the seat belt reminder warning chime and indicator. It is recommended that any objects placed on the front passenger seat are secured using the seat belt.
USING SEAT BELTS DURING PREGNANCY
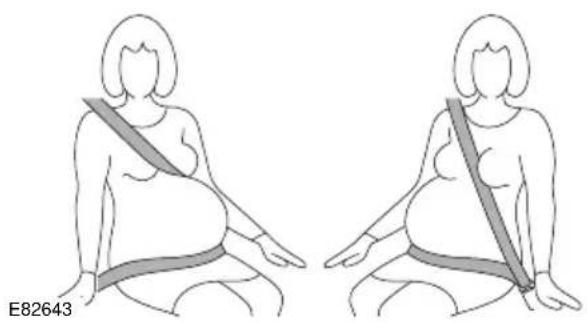
natural_image
Illustration of a pregnant woman sitting with a bandage, showing two different positions (no text or symbols)WARNINGS

Position the seat belt correctly for the safety of the mother and unborn child. Never wear just the lap strap, and never sit on the lap strap whilst using just the shoulder strap. Both of these actions are extremely dangerous and may increase your risk of serious injury in the event of an accident or during emergency braking.

Never place anything between you and the seat belt in an attempt to cushion the impact in the event of an accident. It can be dangerous and will reduce the effectiveness of the seat belt in preventing injury.
Position the lap strap comfortably across the hips beneath the abdomen. Place the diagonal part of the seat belt between the breasts and to the side of the abdomen. Ensure that the seat belt is not slack or twisted.
FASTENING THE SEAT BELTS

natural_image
Close-up of a car seatbelt buckle with a magnified inset showing the cable being inserted (no text or symbols visible)E93298
- Draw the belt out smoothly, ensure that the belt height, the seat, and your position on the seat are correct. The belt should lay flat across the pelvis, chest, and mid-point of the collar bone between the neck and shoulder.
- With the seat belt correctly positioned, place the metal tongue into the buckle nearest to you. Press it in until a click is heard.
Releasing the seat belts
Note: When releasing the seat belt it is advisable to hold the belt before pressing the release button. This will prevent the belt from retracting too quickly.
To release the seat belt, press the red button.
SEAT BELT HEIGHT ADJUSTMENT
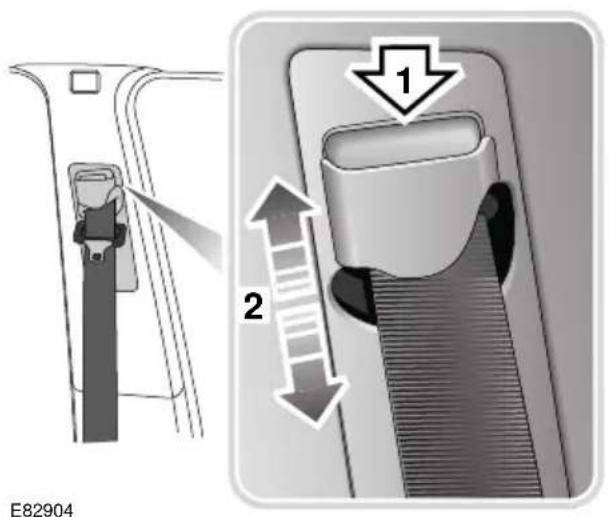

WARNING

Correct seat belt adjustment is essential for safety and comfort.
Ensure that the height is correctly
adjusted and the mechanism is locked in place before driving the vehicle. Do not attempt to adjust the seat belt height once the vehicle is in motion. Doing so may cause you to loose control of the vehicle, or incorrectly adjust the seat belt.
- Press to release the catch.
- With the catch depressed move the mechanism slide up or down to the required height. Ensure that the locking mechanism has engaged.
When correctly positioned the seat belt should cross the collar bone at the mid-point between the neck and end of your shoulder.
Where possible, rear seat passengers should adjust their seating position to achieve the same seat belt position.
In the event of a collision, the airbag control unit monitors the rate of deceleration caused by the collision. This information is then used to determine whether airbags should be deployed.
Airbag deployment is dependent on the rate at which the passenger compartment changes velocity following the collision. The circumstances affecting different collisions (vehicle speed, angle of impact, type and size of object hit, etc.), vary considerably and will affect the rate of deceleration accordingly.
The Supplementary Restraint System (SRS) components include:-
- SRS warning indicator.
- Rotary coupler.
- Airbag modules.
- Seat belt pre-tensioners (front seat belts).
- Restraints control module.
- Crash sensors.
• Airbag wiring harnesses.
The SRS is not designed to operate as a result of:
- Rear impacts.
- Minor front impacts.
- Minor side impacts.
- Heavy braking.
- Driving over bumps and pot holes.
Therefore, it follows that considerable superficial damage to the vehicle can occur, without causing the airbags to deploy.
Airbags
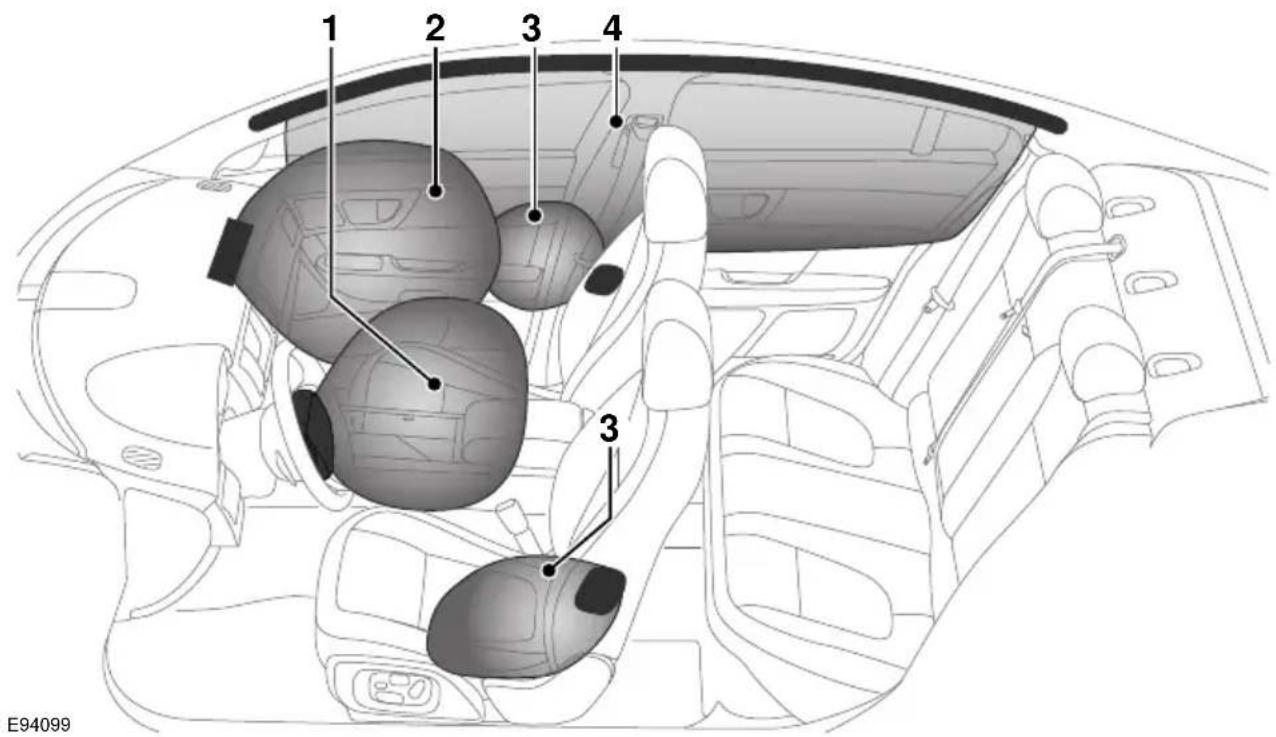
- Driver's airbag.
- Front passenger airbag.
- Seat mounted side airbags.
- Curtain airbags.
WARNINGS

High speed impacts may cause serious injury or death irrespective of safety features fitted to a vehicle.
Always drive with caution and consideration for the vehicle's characteristics, road and weather conditions.

The airbag cannot provide protection in some types of impact, therefore seat belts should be worn at all times
by the driver and passengers in all seating positions.
WARNINGS

Airbags inflate at high speeds, and can cause injuries. To minimise the risk of injury, ensure that all vehicle occupants wear correctly positioned seat belts, sit correctly in the seats, and position the seats as far back as practical.

Sitting centrally and correctly in each seating position helps ensure that a gap is maintained between the side of the vehicle and the head and torso. This will aid inflation of the curtain and seat-mounted airbags.

Airbag inflation takes place instantaneously. Not all airbags are designed to protect against the effects of secondary impacts. During secondary impact, a level of protection may be provided by a correctly worn seat belt.
WARNINGS

Phone systems should only be installed by qualified persons familiar with the operation of, and
requirements for, vehicles fitted with SRS. If you are in any doubt, seek advice from your Jaguar Dealer/Authorised repairer.
Note: The general location of airbags fitted to the vehicle are marked by the word AIRBAG.
Always contact your Dealer/Authorised repairer if:-
- An airbag inflates.
- The front or sides of the vehicle are damaged.
- Any part of the SRS shows signs of cracking or damage, including trim covering airbags.
Airbag operation
WARNINGS

For the airbags to operate correctly the roof lining and door post trims must be in good condition, correctly fitted, and free from obstruction. Any damage, wear, or incorrect fitment should be referred to your Dealer/Authorised repairer as soon as possible for examination and repair.

Do not allow passengers to obstruct the operation of the airbags by placing any part of their person, or any objects, in contact with, or close to, an airbag module. Airbags deploy at very high speeds and can cause serious injury or death if objects or occupants are within the area of deployment.
Airbags cannot deploy correctly if they are obstructed. Examples of obstructions are:-
- Any part of an occupants body in contact with, or close to, an airbag covering.
- Objects placed on, or close to, an airbag cover.
- Clothing, sun screens, or other material hanging from grab handles.
- Clothing, cushions, or other material, covering seat mounted airbags.
- Seat covers which are not approved by Jaguar, or specifically designed for use with seat mounted airbags.
- Luggage that intrudes into the area that will be occupied by a deploying airbag system.
This list is not exhaustive and it remains the responsibility of the driver and passengers to ensure that the airbags are not obstructed in any way.
Deployment and deflation
In the event of a collision, the restraints control system monitors the rate and direction of deceleration. If required to supplement the seat belts, airbags will be deployed as appropriate. After operation, frontal airbags do not retain pressure.
Front airbags
The front passenger's and driver's airbags are able to deploy in two stages, depending on the severity of the frontal impact. In a severe impact, the airbags inflate fully to offer maximum protection. In a lower severity impact, less inflation may be required, so the airbags inflate in a different manner.
Side and curtain airbags
To ensure that the side and curtain airbags are fully effective:
WARNINGS

Do not allow passengers to obstruct the operation of the airbags by placing any part of their person, or any objects, in contact with, or close to, an airbag module. Airbags deploy at very high speeds and can cause serious injury or death if objects or occupants are within the area of deployment.

Do not sit too close to, lean or sleep against the door trim. The side and curtain airbags could injure you as they deploy.
Do not lean out of the window.

Only use approved accessories (e.g. seat covers).

Due to the function of the curtain airbag deployment, consult your Jaguar Dealer/Authorised Repairer, prior to installing any accessories in the upper environment/pillar trim area (e.g. hands-free telephone kits).
Side and curtain airbags are designed to offer increased protection for the torso and head in a side impact. The curtain airbags may deflate at a slower rate than the front or side airbags, to afford prolonged protection.
Airbag deployment effects
WARNINGS

When an airbag inflates, a by-product of the gas generation may be released as small particles. It is possible that this may cause irritation and should be thoroughly flushed from the eyes and any cuts or abrasions.

After inflation, some airbag components are at high temperatures. To prevent injury, do no touch the airbag components until they have cooled.

In order to react with sufficient speed, airbags are deployed by a pyrotechnic device. Consequently, airbag deployment is accompanied by a very loud noise which may cause discomfort and temporary loss of hearing.
AIRBAG WARNING LAMP

The airbag warning indicator is mounted in the instrument pack, and will illuminate as a bulb check
when the starter switch is turned on.
WARNING

If the warning indicator signals that a fault is present in the system, do not use a child restraint on the front
passenger seat. Doing so will increase the risk of death or serious injury to the child.
If any of the following warning indicator conditions occur, the vehicle should be checked by your Dealer/Authorised repairer immediately.
- The warning indicator fails to illuminate when the starter switch is initially turned on.
- The warning indicator fails to extinguish within six seconds of the starter switch being turned on.
- The warning indicator illuminates at any time other than the bulb check, when the starter switch is on.
WHIPLASH PROTECTION

Both front seats are equipped with Active Head Restraints (AHR), which reduce the risk of neck and spinal injury (whiplash) in the event of a rear impact.
When activated, the head restraint moves upwards and forwards, supporting the occupant's head.
After activation, the whiplash protection mechanism automatically resets and does not need to be replaced.
AIRBAG LABELS

Airbag warning information is printed on the driver and passenger sun visors.
AIRBAG SERVICE INFORMATION
WARNINGS
Do not attempt to service, repair, replace, modify, or tamper with, any part of the SRS. This includes wiring or components in the vicinity of SRS components. Doing so may cause the system to trigger, or render the system inoperative, either of which may result in death or serious injuries.
Do not use any electrical test equipment or devices in the vicinity of SRS components or wiring. Doing so may cause the system to trigger, or render the system inoperative, either of which may result in death or serious injuries.
All of the following operations should only be carried out by a Dealer/Authorised Repairer, or suitably qualified person:-
- Removal or repair of any wiring or component in the vicinity of any SRS components.
• Installation of electrical, or electronic, equipment and accessories. - Modification to the front or sides of the vehicle exterior.
- Attachment of accessories to the front or sides of the vehicle.
In the event of the vehicle being dismantled, airbag module removal and disposal must be carried out by a qualified person.
CHILD SEATS
WARNINGS

Do not use a child restraint on a seat protected by an airbag in front of it. There is a risk of death or serious injury when the airbag deploys.

Crash statistics show that children are safest when properly restrained in a child or infant restraint system that is secured in a rear seating position.

For optimum safety, children should travel in the rear of the vehicle at all times; front passenger seat travel is not recommended. However, if it is essential that a child travels in the front, set the vehicle seat fully rearward and seat the child in an approved forward-facing child seat. Do not use a rear-facing child seat - an inflating airbag could impact with the seat and cause serious injury.

Do not use a forward facing child seat until the child using it is above the minimum weight of 9 kg (20 lb.) and able to sit up unaided. Up to the age of two, a child's spine and neck are not sufficiently developed to avoid injury in a frontal impact.

Do not allow a baby or infant to be held or carried on the lap. The force of a crash can increase effective body weight by as much as thirty times, making it impossible to hold onto the child.

Children typically require the use of a booster seat appropriate to their age and size, thereby enabling the seat belts to be properly fitted, reducing the risk of injury in a crash. Children could be endangered in a crash if their child restraints are not properly secured in the vehicle.
WARNINGS

Do not use a child seat that hooks over the seat back. This type of seat cannot be satisfactorily secured and is unlikely to be safe for your child.
The seat belts fitted to your vehicle are designed for adults and larger children. For their safety, it is very important for all infants and children under 12 years of age to be restrained in a suitable child safety seat appropriate to their age and size.
Children are always safest when seated in a rear seating position.
If it is essential that a child travels in the front passenger seat, Jaguar recommends that the following preparations are made before fitting the child restraint.
- Adjust the front passenger seat fully rearwards.
- Adjust the lumbar support to its minimum support position.
- Adjust the seat cushion to its highest position. If cushion front tilt adjustment is possible, adjust it to its lowest position.
- Adjust the seat back to the fully upright position.
- Adjust the seat belt adjustable upper anchorage to its lowest position.
In some countries, legislation prohibits children travelling in the front of a vehicle.
Ensure that you are familiar with the legislation in force where the vehicle is being used and are in full compliance.
WARNING

Original text according to ECE R94. 01. Extreme hazard! Do not use a rearward facing child restraint on a tected by an airbag in front of it!
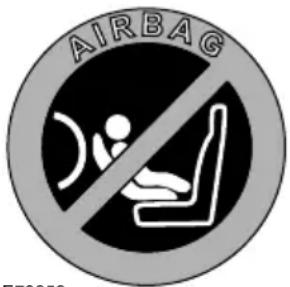
E79258

This symbol is affixed to the end of the fascia on the passenger side. Its purpose is to warn against the use of a rear facing child seat in the front passenger seat, when the front passenger airbag is fitted.
Child restraint check list
Every time a child travels in the vehicle observe the following:-
- Use appropriate child restraints.
- Carefully follow the restraint system manufacturers instructions.
- Adjust the harnesses for every child on every trip.
- Ensure that all slack is removed from the adult seat belt.
- Always attach the top tether when installing an ISOFIX seat. See CHILD SEAT ANCHOR POINTS (page 62).
- Always check the security of the child restraint.
-
Do not dress a child in bulky clothing, or place any objects/padding between the child and the restraint.
-
Regularly check the fit and condition of child restraints. If the fit is poor, or wear/damage is visible replace the restraint immediately.
- Set a good example - always wear your seat belt.
CHILD SEAT POSITIONING
CAUTION

Information given within the table is correct at the time of going to press. However, availability of child restraints may change. Please consult your Dealer/Authorised Repairer for the latest recommendation.
For optimum safety, children should travel in the rear of the vehicle at all times; front passenger seat travel is not recommended. However, if it is essential that a child travels in the front, set the vehicle seat fully rearward and seat the child in an approved forward-facing child seat. Do not use a rear-facing child seat - an inflating airbag could impact with the seat and cause serious injury.
Note: The information contained in the following table may not be applicable to all countries. If you are in any doubt regarding the type and fitment of child seats seek advice from your Dealer/Authorised Repairer.
Note: The legislation which governs how and where children should be carried when travelling in a vehicle, is subject to change. It is the responsibility of the driver to comply with all regulations in force.
Child safety seating and positions
| Seating positions Front passenger* Rear outboard Rear centre | |||
| Mass group | |||
| 0 = Up to 10 kg (22 lb.)0 to 9 months | X | U | U |
| 0+ = Up to 13 kg (29 lb.)0 to 18 months | X | U | U |
| I = 9 to 18 kg (20 to 40 lb.)9 months to 4 years | UF | U | U |
| II = 15 to 25 kg (33 to 55 lb.)4 to 9 years | U | U | U |
| III = 22 to 36 kg (49 to 79 lb.)8 to 12 years | U | U | U |
- U = Suitable for universal category restraints approved for this mass group.
- UF = Suitable for forward facing Universal category restraints approved for this mass group.
- X = Not suitable for child restraint fitment in this mass group.
* Jaguar recommend that the front passenger seat be positioned fully rearward, with the cushion adjusted to the highest position when installing child restraints.
Note: Ages given are approximate. In case of doubt, the child's weight, not age, should be used when considering an appropriate child seat.
BOOSTER CUSHIONS
In a situation where a child is too large to fit into a child safety seat, but is still too small to safely fit the three point belt properly, a booster seat is recommended for maximum safety. Follow the manufacturer's instructions for fitting and use, then adjust the seat belt to suit.
CHILD SEAT ANCHOR POINTS
ISOFIX anchor points (not Australia)
WARNINGS

Do not attempt to fit ISOFIX restraints to the centre rear seating position. The anchor bars are not designed to ISOFIX restraint in this position.

If the restraint is not correctly anchored, there is a significant risk of injury to the child in the event of a collision or emergency braking.

Child restraint anchorages are designed to withstand only loads imposed by correctly fitted child
restraints. Under no circumstances are they to be used for adult seat belts, harnesses or for attaching other items or equipment to the vehicle.

If removing a head restraint in order to fit a child restraint, always secure the head restraint when storing it. If
left loose in the vehicle, it may cause death or serious injury during sudden braking or an impact.

Both of the outer rear seat positions are equipped to accept ISOFIX restraints.

This symbol is shown on a label sewn into the seats to indicate the position of the ISOFIX lower anchorages.
Note: The information contained in the following table may not be applicable to all countries. If you are in any doubt regarding the type and fitment of child seats seek advice from your Jaguar Dealer/Authorised Repairer.
ISOFIX child seats
| Mass group Size classes Fixtures Rear outboard seats | ||||
| Carrycot F/G ISO L1/L2 X | ||||
| 0 = Up to 10 kg (22 lb.)0 to 9 months | E | ISO R1 | IL* | |
| 0+ = Up to 13 kg (29 lb.)0 to 18 months | C/D/E | ISO R1/R2/R3 IL* | ||
| I = 9 to 18 kg (20 to 40 lb.)9 months to 4 years | C/DA/B1/B | ISO R2/R3ISO F2/F2X/F3 | XIUF | |
| II = 15 to 25 kg (33 to 55 lb.)4 to 9 years | - | N/A | N/A | |
| III = 22 to 36 kg (49 to 79 lb.)8 to 12 years | - | N/A | N/A | |
- IUF = Suitable for ISOFIX forward child restraint systems of universal category approved for use in the mass group.
- IL = These ISOFIX child restraint systems are of the specific vehicle, restricted or semi-universal categories.
- * = Child seats suitable for use in these locations are Britax Cosy-Tot Premium Infant carrier and Britax Duo Plus child seat.
Note: Ages given are approximate. In case of doubt, the child's weight, not age, should be used when considering an appropriate child seat.
Installing an ISOFIX child seat
To install an ISOFIX child seat:-
-
Raise or remove the head restraint from the relevant seat.
-
Lift the velcro flap to expose the ISOFIX locking mechanism.
-
Slide the child seat into the locking mechanism.

natural_image
Mechanical assembly diagram showing a lever mechanism with arrows indicating motion (no text or symbols)- Test the security of the child restraint. To do this attempt to pull the restraint away from the vehicle seat and twist the restraint from side to side. Even if the restraint appears secure you should still check the anchor points visually to ensure correct attachment.
Note: Always ensure that if an upper tether is provided, it is fitted and tightened correctly.
Tether anchorage points (Australia only)

WARNING

Child restraint anchorages are designed to withstand only those loads imposed by correctly fitted
child restraints. Under no circumstances are they to be used for adult seat belts, harnesses or for attaching other items or equipment to the vehicle.

If a child seat or restraint system is to be fitted to the centre seating position, the centre armrest must be
in the stowed position (folded into the seat).
Note: A tether anchorage is provided for the centre seat position. Do not use this anchor position with an ISOFIX child seat.
Attaching tether straps
- Install the child restraint securely in one of the rear seating positions.
- Pass the tether strap over the seat back and beneath the head restraint.
- Attach the tether strap hook to the tether anchor point on the back of the seat. Ensure that the tether strap hook is facing the correct way. See illustration.
- Tighten the tether strap according to the manufacturer's instructions.
CHILD SAFETY LOCKS
Child safety locks are fitted to the rear doors to allow you to prevent accidental opening of the doors when the vehicle is in motion.
If children are to be carried in the rear seat positions, it is recommended that the rear door interior handles are disabled.
Note: For convenience, the rear door interior handles should be re-enabled when carrying adult passengers in the rear seat positions.

To change the child lock settings:-
-
Open the door to access the child safety lock.
-
Insert the emergency key into the slot and rotate a quarter of a turn, to enable or disable the interior door handle, as required.
The pedestrian protection system has been designed to reduce lower leg and head injuries in the event of a frontal collision with a pedestrian.
The bumper includes energy absorbing foam and plastics in its construction to reduce leg injuries and sensors that detect the collision with a pedestrian.

natural_image
Illustration of a person standing next to a car with an arrow indicating airflow or damage (no text or symbols)Deployment
During a pedestrian collision, the sensors initiate a bonnet deployment system that releases the bonnet hinge system and raises the rear edge of the bonnet by approximately 130 mm (5.1 inches).
This increases the gap between the bonnet and the components within the engine compartment e.g. engine, suspension etc. This increased gap creates a cushion to mitigate injury caused to the pedestrian.
The bonnet deployment system is active only when the ignition is on and the vehicle is driven between the speeds of approximately 20 km/h (12 mph) and 45 km/h (28 mph).
AFTER DEPLOYMENT OF THE PEDESTRIAN PROTECTION SYSTEM
CAUTION

Do not attempt to open the bonnet if the pedestrian protection system has been deployed.
The vehicle must be stopped as soon as it is safe to do so.
The hazard warning lamps will be activated and can only be switched off by pressing the engine START/STOP button to turn the engine off and on again.
A warning message CHECK PEDESTRIAN SYSTEM will appear on the message centre and the vehicle should be transported to the nearest Dealer/Authorised Repairer. The vehicle must not be driven when the bonnet has been deployed. See Vehicle recovery (page 253).
Note: If the warning message CHECK PEDESTRIAN SYSTEM appears in the message centre when the bonnet has not been deployed, the vehicle should be taken to the nearest Dealer/Authorised Repairer immediately. It can be driven.
If any significant damage occurs to the front bumper it should be inspected by a Dealer/Authorised Repairer as soon as possible.
ADJUSTING THE STEERING WHEEL

WARNING

Never adjust the steering wheel position whilst the vehicle is in motion. Doing so will reduce control of the vehicle and may cause unpredictable steering movements.
CAUTION

Do not use steering wheel mounted security devices, as movement of the steering wheel in entry and exit mode, could result in damage to the vehicle or possible injury to the occupant.
The steering wheel can be adjusted for tilt and reach, as follows:
- Turn the switch to the COLUMN or AUTO position.
- Move the switch forwards or rearwards to adjust reach.
- Move the switch up or down to adjust tilt.
Two steering wheel positions can be stored and recalled by the driver position memory system.
The message centre will indicate which switch position has been selected by displaying the message COLUMN ADJUST or COLUMN ADJUST AUTO.
Entry and exit mode
Entry and exit mode provides automatic movement of the steering column, to allow easier entry to, or exit from, the vehicle.
Entry and exit mode is selected by setting the steering column adjustment switch to the AUTO position.
Exit: If the driver's door is opened, the steering column will move to the uppermost tilt position, unless already in that position.
Entry: When the door is closed and the ignition is switched on, the steering column will return to its previous position.
Note: If the steering column switch is moved away from AUTO when the steering column is in the Exit position, the steering column will move back to its previous (driving) position, when the driver's door is closed and the ignition is switched on.
If the steering column position is manually adjusted during Entry or Exit operation, steering column movement will stop.
HORN

natural_image
Close-up of a car steering wheel with a logo and arrow indicator (no readable text or symbols)The dual tone horn is operated by pressing the centre pad on the steering wheel.
The horn also operates as the alarm sounder, if the vehicle alarm system is activated.
HEATED STEERING WHEEL
The heated steering wheel is activated via the touch-screen main Home menu.

JAG1514
With the engine running, touch the steering wheel icon to turn the heating on. The icon will glow red when the steering wheel heater is on.

E94700
The heated steering wheel can also be activated via the Climate menu on the touch-screen. With the engine running, touch the steering wheel icon to turn the heating on or off.
AUDIO CONTROL

- Rotate (up or down) to increase or decrease volume.
- Rotate (up or down) and release, to scroll up or down through preset radio stations or CD tracks.
Rotate and hold (for two seconds) to select the next or previous radio station on the waveband, or to select the next or previous loaded CD (on multi-disc CD players).
- Press repeatedly to scroll through the audio source options, comprising: FM1, FM2, AM, CD, DAB radio, Auxiliary input, Portable Audio Interface and TV options.
Press and hold (for two seconds) to select Phonebook view (when a phone is connected to the system).
- Press to mute the audio unit.
Press to dial, answer or end a phone call.
VOICE CONTROL
JaguarVoice control provides a safe and convenient way of operating certain vehicle systems, without the need to operate the controls manually.
Voice commands are available for the phone, navigation and touch-screen display systems, and a notepad facility is provided, to allow voice notes to be recorded. Help and tutorial functions provide advice on operating the system. Information on JaguarVoice operation of the telephone and navigation systems is detailed later in this handbook.
See TELEPHONE VOICE CONTROL (page 323).
See USING VOICE CONTROL (page 373).
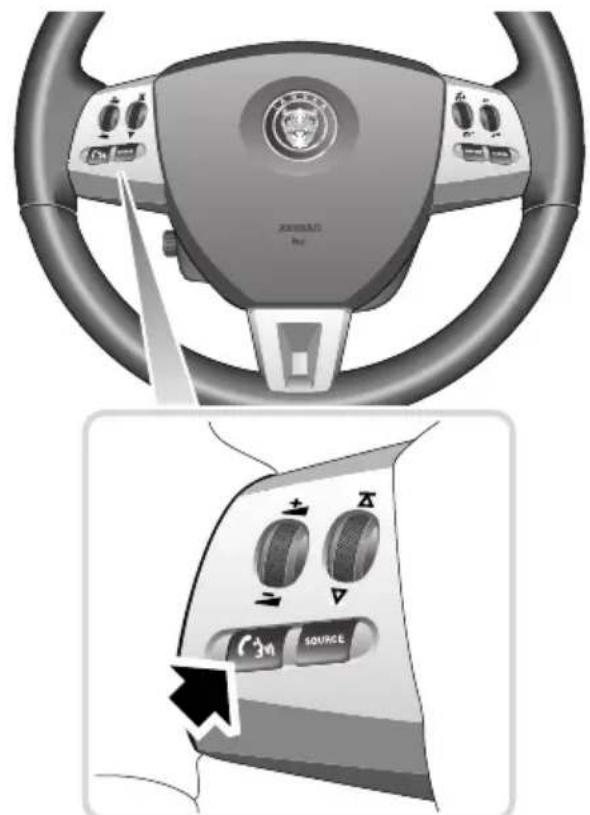
E95902
The system is controlled using the voice button on the steering wheel (arrowed). Voice commands are picked up by a dedicated microphone and audible feedback will be heard through the audio system speakers.
Activating the system
To activate voice control, press the voice button on the steering wheel. A tone will be heard and LISTENING will be displayed in the message centre, to indicate that the system is now waiting for a voice command.
Note: It is only necessary to press the voice button at the beginning of each voice session.
Language and accent
Voice feedback is given in the same language as is set for Voice recognition. For example, if the Voice recognition language is set to UK English, the system will not recognise other languages (e.g. US English). The language for the system can be changed using the touch-screen as follows:

E96024
- From the Home menu, select Comms.
- From the Comms menu, select Voice and then select Settings.
- Select Change, then select the desired language from the options available.
Note: Changing the Voice recognition language will not affect the language settings for the touch-screen.
Giving a command
Note: If background noise is excessive (e.g. driving with windows open), the voice system may not recognise a given voice command.
Press and release the Voice button on the steering wheel and, after the tone, say one of the commands listed later in this section, or one of the commands given in either the Telephone voice section or the Navigation voice section, as appropriate. See TELEPHONE VOICE CONTROL (page 323). See USING VOICE CONTROL (page 373).
Note: Always wait until the tone finishes sounding before giving a voice command.
Give commands while facing forwards, in a natural speaking voice as if talking to a passenger or on the phone. Most accents are understood without difficulty, but if the system does not recognise the command, the system will respond with SORRY and allow two more attempts to say the command.
The system will repeat the command (as understood by the system) back to you as confirmation. The command will then be acted on or the system will ask for further information - always wait until after the tone has sounded before speaking.
Once you are familiar with system requests, it is possible to skip to the end of the request (to when the tone sounds) to give your response. To achieve this, briefly press and release the voice button on the steering wheel during the system request.
Note: If the Voice button on the steering wheel is pressed before the system is ready to receive a command, VOICE NOT READY will be displayed in the message centre.
Cancelling voice control
To cancel a voice command, press and hold the Voice button on the steering wheel until a double tone is heard.
Note: If a phone call is received during a voice session, voice control is cancelled.
Voice system tutorial
To listen to a tutorial on how to use JaguarVoice, press and release the voice button and, after the tone, say VOICE TUTORIAL.
The tutorial is divided into four lessons and has a total duration of approximately four minutes. The tutorial can only be undertaken with the vehicle stationary and parked.
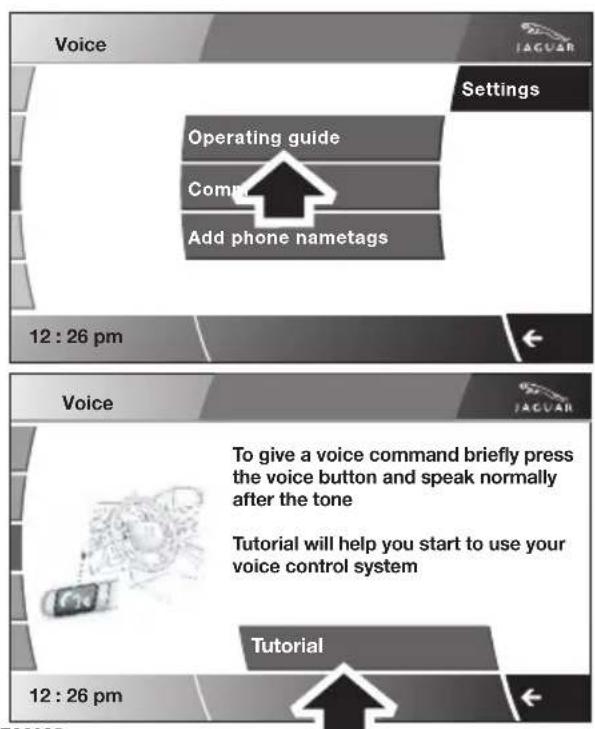
E96025
The tutorial can also be accessed via the touch-screen.
- Select Comms from the Home menu.
- From the Comms menu, select Voice.
- From the Voice menu, select Operating guide and then select Tutorial.
To cancel the tutorial, press and release the Voice button and say CANCEL. To skip to the previous or next lesson of the tutorial, press and release the Voice button and say PREVIOUS or NEXT.
Command help
For a list of the most commonly used voice commands, press and release the Voice button and, after the tone, say the appropriate command from the following list:
- VOICE HELP
- NAVIGATION HELP
- PHONE HELP
- DISPLAY HELP
- NOTEPAD HELP
Full command list
A full list of voice commands available can be accessed on the touch-screen.
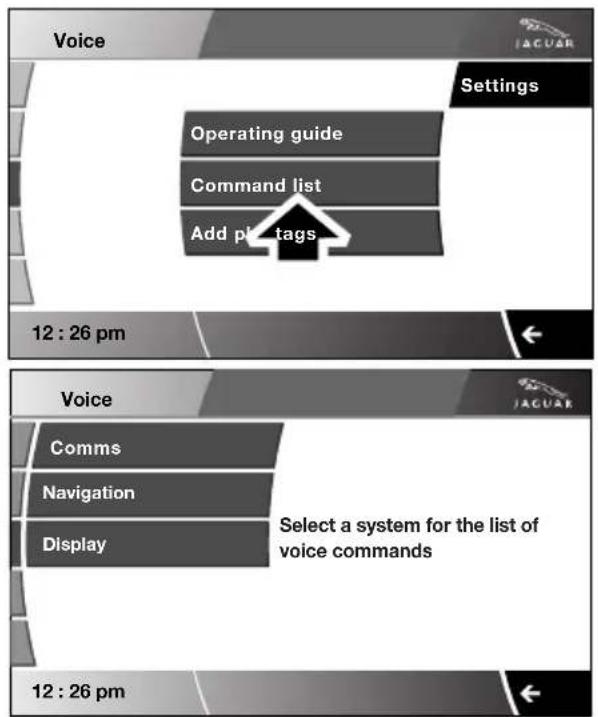
E96026
- Select Comms from the Home menu.
- From the Comms menu, select Voice.
- From the Voice menu select Command list.
- Select Navigation or Display to view the relevant command list or select Comms to view the options available.
If Comms was selected, you can now choose which system's command list you wish to view (Voice, Notepad or Phone)

JAG0899
- Select the appropriate system (Phone in this example).
- Scroll down to view the entire command list for the chosen system.
Nametags
Nametags allow the voice system to be personalised with the addition of names for phone numbers and navigation locations, destinations and waypoints. A nametag can be any unique name chosen by the user.
Details for storing and using nametags in conjunction with the telephone and Navigation systems, are given later in this handbook.
See TELEPHONE VOICE CONTROL (page 323). See USING VOICE CONTROL (page 373).
A spoken list of currently stored nametags can be heard by pressing and releasing the Voice button and saying PHONE PLAY DIRECTORY or NAVIGATION PLAY DIRECTORY, as appropriate.
Notepad
The notepad facility enables the user to record a note, up to a maximum of 30 seconds duration, which can be subsequently recalled.
Note: To hear information on notepad commands, press the Voice button, wait for the tone to sound and then say NOTEPAD HELP.
Recording a note
- Press and release the Voice button, wait for the tone to sound, then say RECORD NOTE.
- Say the words of the note to be recorded, then press and hold the Voice button to end and save the note.
Note: The maximum length of a note is 30 seconds, after which time the recording of the note will be ended automatically.
Playing a note
Press and release the Voice button, wait for the tone to sound, then say PLAY NOTEPAD. If multiple notes are stored on the system, press and release the Voice button during playback and say NEXT, to skip to the next note.
Deleting notes
To delete an individual note, press and release the Voice button during playback of the note to be deleted and say DELETE.
To delete all notes stored on the system, press and release the Voice button and say CLEAR NOTEPAD.
Voice volume adjustment
The volume level for voice recognition can be adjusted independently, either by using the steering wheel controls or using the touch-screen:
- Press the voice button on the steering wheel, to initiate a voice session. Use the volume control thumbwheel on the steering wheel to adjust the volume, as required.
- Select Vehicle from the touch-screen Home menu, then select Veh. settings. Find the correct entry from the menu of infotainment volume settings and adjust as required.
Voice commands
This is a list and a description of the basic Voice commands used to operate the system. A list and description of telephone and Navigation system commands, is detailed later in this handbook. See TELEPHONE VOICE CONTROL (page 323). See NAVIGATION SYSTEM VOICE COMMANDS (page 374).
| Command Description | |
| VOICE HELP Plays | information on operating the Voice system. |
| VOICE TUTORIAL | Initiates a four-part tutorial on use of the Voice system. |
| DISPLAY HELP Plays | information on touch-screen display voice commands. |
| DISPLAY SHOW PHONE | The Phone menu is displayed on the touch-screen. |
| DISPLAY SHOW NAVIGATION | The Navigation main menu is displayed on the touch-screen (the navigation caution must be accepted before the menu is displayed). |
| DISPLAY ON Turns | the touch-screen on. |
| DISPLAY OFF Turns | the touch-screen off. |
| NOTEPAD HELP PL | ays information on notepad commands. |
| RECORD NOTE All | ows recording of a note, up to 30 seconds long. |
| PLAY NOTEPAD PL | ays all currently stored notes. |
| CLEAR NOTEPAD | Deletes all notes currently stored in notepad. |
CRUISE CONTROL

- SET - Rotate and release to engage cruise control (at the vehicle's current speed). With cruise control operating, rotate up or down to increase or decrease the speed in 2 km/h (1 mph) steps.
- CANCEL - Press to cancel cruise control. The previously programmed set speed will be retained and can be reselected by pressing RESUME.
- RESUME - Press to resume the previously programmed set speed (e.g. after cruise control has been cancelled).
- GAP (ACC only) - Rotate up or down to increase or decrease the time gap to the vehicle ahead. The gap can be set to one of four pre-defined intervals. The current setting will be displayed in the message centre.
For more information about cruise control: See USING CRUISE CONTROL (page 156).
For more information about adaptive cruise control (ACC): See USING ACC (page 159).
LIGHTING CONTROL
Note: If the ignition system is switched off and the lamps are left on, the message centre will display LIGHTS ON.
The exterior lamps are controlled by the left-hand column stalk switch.
The rotary collar on the stalk has three positions for turning the exterior lamps on or off and positions for autolamps and exit delay.
Off
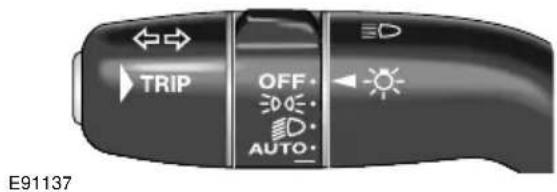
All exterior lamps off (except vehicles provided with daylight running lamps).
Side lamps

Switches on the side lamps, tail, number plate and any other marker lamps required by local legislation. The instrument panel will also be lit.
Headlamps
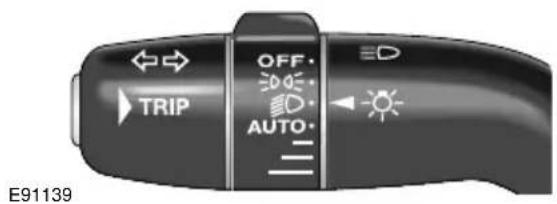
Select this position to switch on the headlamps.

Headlamp flash: Pull the switch towards the steering wheel and release to flash the high beam on and off. The high beam will remain on for as long as the switch is held.
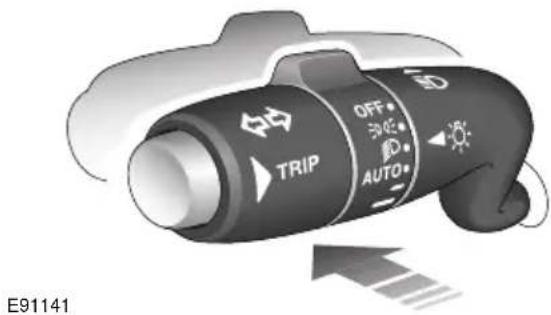
High beam: With the headlamps on, push the switch away from the steering wheel to switch to high beam.
The blue warning indicator on the instrument panel will illuminate.
To turn high beam off and return to low beam, pull the column switch towards the steering wheel.
Note: If the rotary control switch is moved to the OFF position, with high beam still activated, both low and high beam will be extinguished. Both low and high beam will illuminate when the headlamps are turned on again.
Daylight running lamps
In certain countries it is a legal requirement for the lamps to be on during the hours of daylight.
With the rotary collar in the OFF position, low beam headlamps, side lamps, tail, number plate lamps and, where fitted, side marker lamps will switch on automatically with the following conditions:
• The ignition is on (market dependent).
• The vehicle gear selector out of park.
• The park brake is not applied (is released).
Condensation
In certain circumstances, misting may occur on the inside of a lamp lens. This is caused by natural changes in environmental conditions. This misting is not detrimental to lamp performance and will clear during normal usage.
AUTOLAMPS

A light sensor, mounted on the front of the fascia, monitors exterior light levels and automatically switches the side lamps and low beam headlamps on or off.
The ignition system must be on for full automatic light operation.
When light fades towards dusk, the side lamps and headlamps will switch on automatically.
At dawn, as light increases, the side lamps and headlamps switch off automatically.
Do not cover the sensor and keep the windscreen clean. Obstructing the light in this area of the sensor may lead to unwanted operation of the side lamps and headlamps.
Note: Low exterior light levels, caused by adverse weather conditions, may also cause the autolamp system to switch on the side and headlamps.
Windscreen wiper detection
This function only operates when autolamps is selected. The side lamps and headlamps will switch on automatically if the windscreen wipers are switched on for 20 seconds or more. Once the windscreen wipers are switched off, the side lamps and headlamps will automatically switch off two minutes later.
Exit delay

Three settings on the rotary collar set the time that the headlamps will remain on after the driver's door has closed:
- 30 seconds.
- 60 seconds.
- 120 seconds.
The message centre displays the selected delay time (e.g. AUTOLAMP DELAY 0:60) or displays AUTOLAMP DELAY OFF when the autolamp delay function has been turned off.
Note: If the lamp switch rotary collar is in the AUTO position there will be no exit delay and the headlamps will extinguish when the ignition system is turned off.
REAR FOG LAMPS

Rear fog lamps will only operate when headlamp dipped beam or Auto lamps are selected. Press the rear fog lamp button to switch on, press again to switch off.
HAZARD WARNING FLASHERS

Press the switch to turn the hazard warning lamps on. When the hazard warning lamps are operating, the indicator warning lamps will flash in time with the hazard warning lamps. Press again to turn the lamps off.
Use only in an emergency, to warn traffic of a vehicle breakdown or approaching danger.
Note: Hazard warning lamps can be used when the ignition is on or off.
DIRECTION INDICATORS
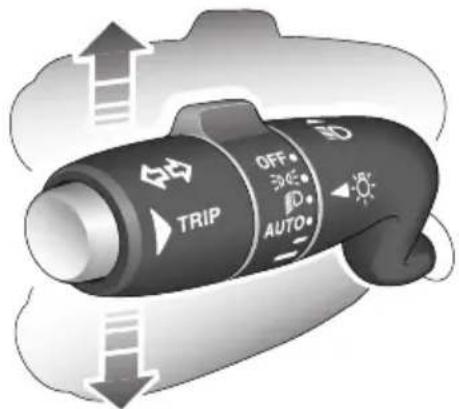
E91163
The direction indicators are operated using the indicator stalk. Move the stalk up or down, to indicate a right or left turn. A green warning indicator will flash in the instrument panel.
The indicators will operate three times (e.g. to indicate a lane change) if the stalk is briefly pushed up or down. Lane change flash can be disabled or enabled by a Dealer/Authorised Repairer.
Note: Should a direction indicator bulb fail, the corresponding green warning indicator will flash at twice the normal rate and the audible ticking will sound at twice the normal rate.
HEADLAMPS - DRIVING ABROAD

natural_image
Mechanical assembly diagram showing internal components and motion arrows (no text or symbols)E94707
Note: The headlamps must be removed in order to change the beam pattern.
See REMOVING A HEADLAMP (page 81).
The tourist lever allows you to adjust the headlamps to the correct beam pattern for driving in countries where vehicles drive on the left, or the right.
When new, the lever will be set to the correct position for the country in which the vehicle is sold. To change the pattern for driving on the other side of the road, move the lever to the opposite position.
Note: When changing the beam pattern using the lever, ensure that you change the lever position on both headlamps.
HEADLAMP LEVELLING Halogen headlamps
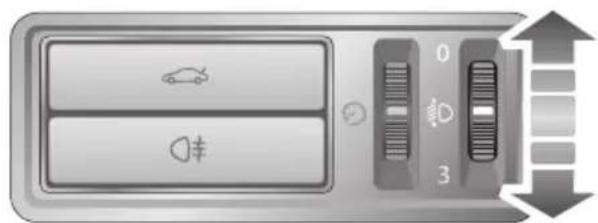
JAG1334
Use the headlamp levelling control to account for vehicle loading changes.
| Vehicle load Switch position | |
| Driver only 0 | |
| Driver and front seat passenger | 1 |
| Driver and passengers in all seats | 2 |
| Maximum gross vehicle weight | 2 |
| Maximum rear axle load 2 or 3 | |
Xenon headlamps
Headlamp levelling is adjusted automatically if Xenon headlamps are fitted, to account for vehicle load conditions, to avoid dazzling oncoming drivers.
CORNERING OR STATIC BENDING LAMPS
Cornering or static bending lamps are angled outwards from the centre line of the vehicle. These lamps broaden the beam of the headlamps when cornering during normal night driving.

natural_image
Top-down view of two cars on a road with dashed lane markings (no text or symbols)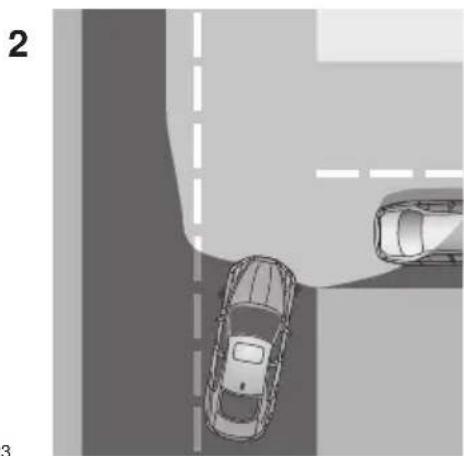
natural_image
Top-down view of two cars on a road intersection, no visible text or symbols- Light spread of a vehicle not fitted with static bending lamps.
- Light spread of a vehicle fitted with static bending lamps
The system switches on the lamp if it has received an input from the vehicle's direction indicator. Only the lamp on the same side as the operating direction indicator illuminates.
The system only operates with the ignition switched on.
INTERIOR LAMPS
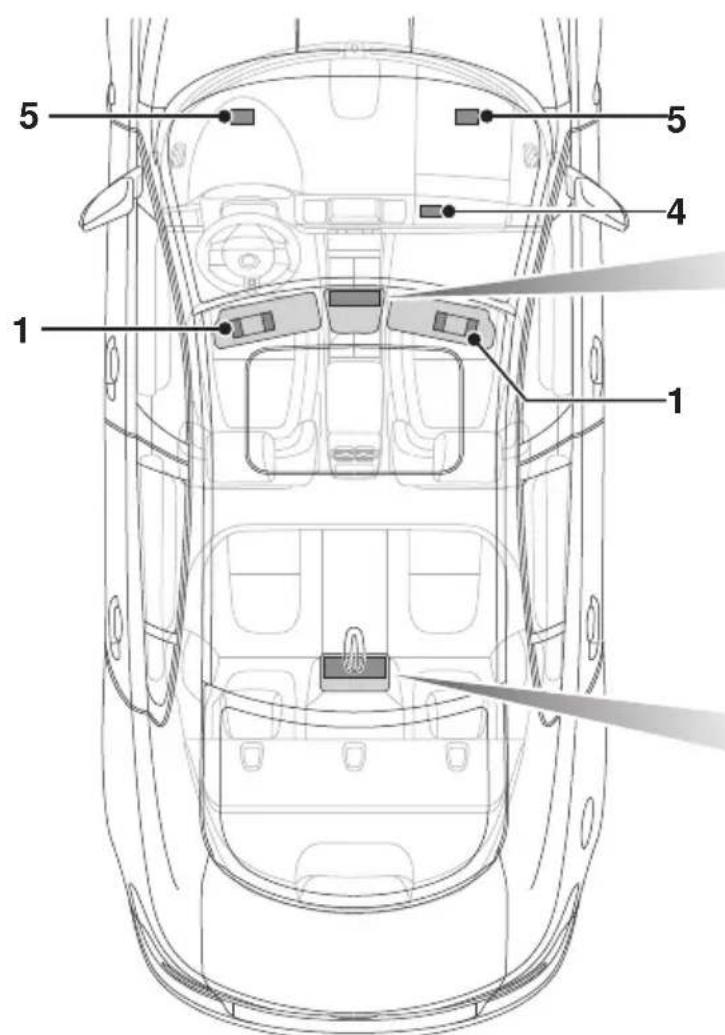
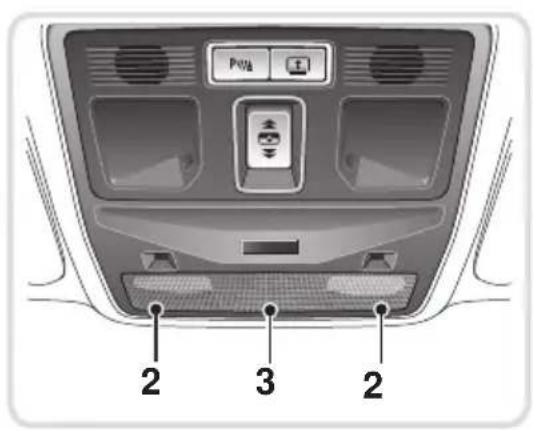

natural_image
3D diagram of a rectangular device with labeled parts and directional arrows indicating movement or flow (no text or symbols present)E94712
- Sun visor lamps. Switch on automatically when the vanity mirror is opened.
- Front map reading lamps. Move your finger close to (or touch) the relevant proximity switch to switch on/off.
-
Front interior courtesy lamp. Illuminates when the doors are unlocked and extinguish 20 seconds after all doors are closed or when the vehicle is locked. The lamps are operated by proximity sensors. Move your finger close to (or touch) the appropriate lens to switch on or off manually. Touch the lens for 2 seconds to deactivate/activate automatic illumination.
-
Glove box lamp. Automatically illuminates when the glove box is opened.
- Footwell lamps. Automatically illuminate when the front doors are opened.
- Rear map reading/interior lamps. Switch on automatically when the doors are opened. Press the appropriate switch to activate an interior lamp manually (e.g. as a map reading lamp). Press the appropriate switch again to extinguish the lamp. Touch the front courtesy lamp lens for approximately 2 seconds to deactivate/activate automatic illumination of the rear interior lamps.
Note: For lamps controlled by proximity sensors, the wearing of gloves may interfere with operation. If you are wearing gloves, it may be necessary to touch the proximity switch to operate the lamps.
Ambience lighting
Ambience lighting. Automatically illuminates when the headlamps are on. Ambience lighting creates a blue glow around the centre console and front door armrests.
Luggage compartment lamp
Automatically illuminates when the luggage compartment is opened.
APPROACH LAMPS

This feature is activated by pressing the headlamp icon button on the Jaguar Smart Key. See USING THE
REMOTE CONTROL (page 17). The headlamps will remain on for 25 seconds or until the button is pressed again, or until the engine START/STOP button is pressed.
REMOVING A HEADLAMP
CAUTION

It is recommended that the following procedure should only be attempted by ified technician. If in doubt, consult your r/Authorised Repairer.

Do not place the removed lamp unit face down on hard or abrasive surfaces. so may scratch the surface of the lens.
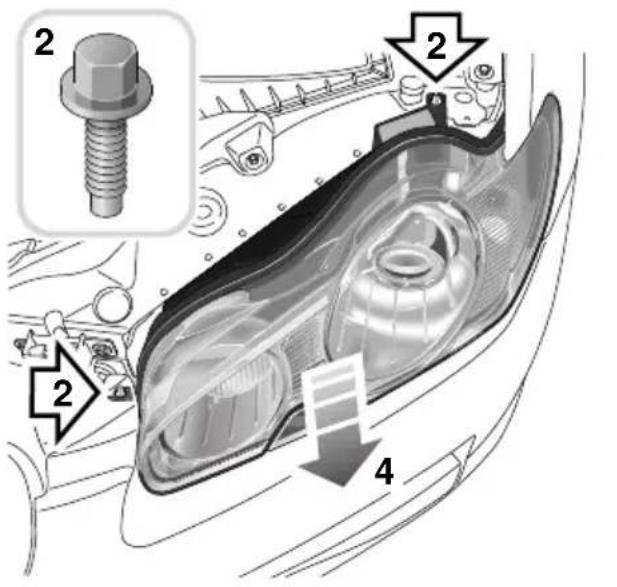

natural_image
Diagram showing a car wheel rim and its side profile with a numbered arrow labeled '3' (no text or symbols beyond label)- Open the bonnet. See OPENING AND CLOSING THE BONNET (page 195).
- Remove the two bolts from the top of the headlamp unit.
- Remove the retaining bolt located in the wheel arch.
Note: To improve access to the wheel arch, turn the steering wheel to full lock, in the direction of the affected headlamp.
- Pull the headlamp away slightly from the body of the vehicle.

E94720
- Press the tab and pull to disconnect the electrical connector.
- Press the clip and pull to disconnect the headlamp washer hose (if headlamp washers are fitted).
- Remove the headlamp unit.
REMOVING A REAR LAMP
CAUTION
It is recommended that the following procedure should only be attempted by a qualified technician. If in doubt, consult your Dealer/Authorised Repairer.
Do not place the removed lamp unit face down on hard or abrasive surfaces. Doing so may scratch the surface of the lens.

natural_image
Mechanical assembly diagram showing components with arrows indicating movement or force (no text or symbols present)
natural_image
Diagram of a curved mechanical component with internal structure and directional arrow, no readable text or symbolsOnly the rear direction indicator and reverse lamp bulbs can be replaced. Failure of any other rear lamp unit should be investigated by a qualified technician. Consult your Dealer/Authorised Repairer.
Note: Access to the rear lamp units is achieved through access hatches, located behind the rear boot trim.
- Remove the two retaining nuts.
- Pull and slide the lamp unit rearwards to remove.
CHANGING A BULB
General information
CAUTION
Always replace bulbs with the correct type and specification. If you are in any doubt contact your Dealer/Authorised Repairer for advice.
Note: In certain markets its a legal requirement to carry spare bulbs. A replacement bulb kit is available as an approved accessory from your Dealer/Authorised Repairer.
Halogen bulbs
Halogen bulbs are used for main beam and dipped beam headlamps. Take care not to touch the glass part of the bulb with your fingers; always use a cloth to handle the bulb. If necessary use methylated spirits to remove finger prints.
Xenon lamps
WARNINGS

Replacement or maintenance of Xenon lamps should only be carried out by suitably qualified personnel.

High voltage is required to ignite the gas and metal vapour which are used to power Xenon lamps. Contact with age can cause serious injuries.

Xenon lamp units operate at a very high temperature. Ensure that the lamp units have cooled before attempting to touch them.

Xenon lamp units contain Mercury which is highly toxic and can be extremely harmful.

Seek advice about the correct disposal of Xenon lamp units from your Dealer/Authorised Repairer, or your local authority.
HEADLAMP UNIT BULBS
Halogen dipped beam

E94732
With the headlamp unit removed:-
- Rotate the cover counter-clockwise to remove.
- Twist the bulb holder counter-clockwise and withdraw it from the headlamp unit.
- Pull the bulb from the holder to remove.
Note: When fitting the replacement bulb, ensure the orientation of the tab (arrowed) is as shown.
Lighting
Halogen dipped and main beam

Direction indicator bulbs

E94734
With the headlamp unit removed:-
-
Twist the indicator bulb holder counter-clockwise, and remove it from the lamp unit.
-
Press the bulb into the holder, then twist it to remove.
With the headlamp unit removed:-
- Rotate the relevant cover counter-clockwise to remove.
- Twist the bulb holder counter-clockwise and withdraw it from the headlamp unit.
- Pull the bulb from the holder to remove.
Note: When fitting the replacement bulb, ensure the orientation of the tab (arrowed) is as shown.
Lighting
Side lamp bulbs
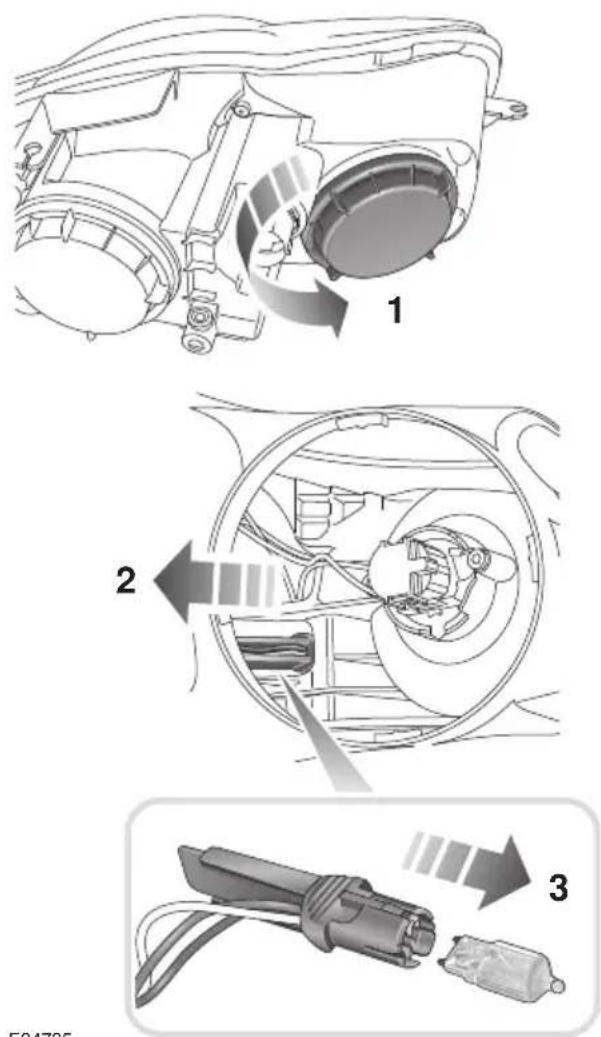
- Rotate the cover counter-clockwise and remove.
- Pull the bulb holder tab to remove from the lamp unit.
- Pull the bulb to remove.
When replacing, push the bulb holder into its socket in the lamp unit until it clicks in place.
SIDE REPEATER LAMP
CAUTION

These lamps are LED units and should only be replaced by a Dealer/Authorised Repairer.
REAR LAMP BULBS
Rear direction indicator and reverse lamp bulbs

E94736
With the rear lamp unit removed:-
- Squeeze the two tabs together, then pull to remove the relevant bulb holder.
- Press and release the tab on the electrical connector and pull to remove the bulb unit.
Lighting
Number plate lamp bulb
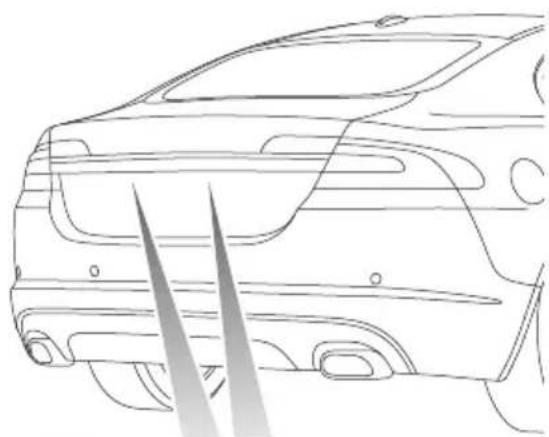
natural_image
Side profile sketch of a car showing front and rear sections with no visible text or symbols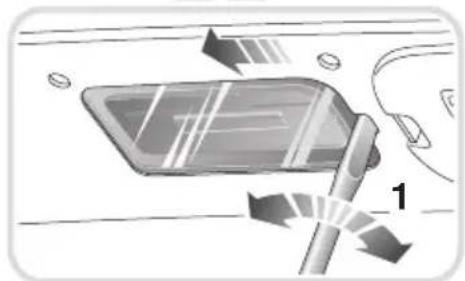
natural_image
Diagram showing a device with directional arrows and a numbered label '1' (no readable text or symbols)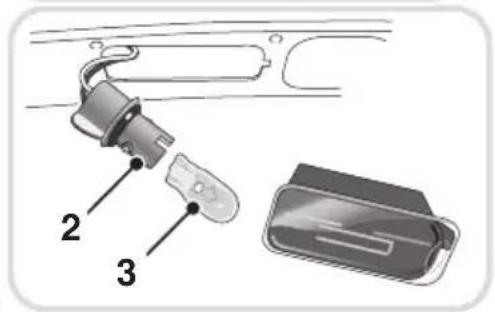
E94737
- Using a small flat-bladed screwdriver as shown, lever out the side of the lamp unit and remove.
- Twist the bulb holder 90° counterclockwise to access the bulb.
- Pull to remove the bulb from the holder.
Other rear lamp bulbs
CAUTION
LED lamp units should only be replaced by a Dealer/Authorised Repairer.
The following rear lamps are LED units and should not be replaced by the owner:
- Tail lamps.
- Brake lamps.
- Rear fog lamps.
• High level brake lamp. - Rear side marker lamps.
BULB SPECIFICATION CHART
CAUTION

Before attempting to replace a bulb, ensure that both the affected lamp and the vehicle's ignition are turned off. If the circuit is live a short circuit can occur which may damage the vehicle's electrical system.
| Lamp Specification Power (Watts) | ||
| Halogen headlamp (Low and High beam) H7/H7 | 55/55 | |
| Xenon headlamp (Low and High beam) D1S/H7 | 35/55 | |
| Front side lamps W5W HCB 5 | ||
| Front direction indicators | PY21W | 21 |
| Rear direction indicators | PY19W | 19 |
| Reverse lamps | PS19W | 19 |
| Number plate lamps | W5W | 5 |
| Interior overhead lamps | W6WX | 6 |
| Footwell lamps | W5W | 5 |
| Luggage lamp | S10W | 10 |
| Tailgate lamps | W5W | 5 |
| Glove box lamp | W5W | 5 |
| Vanity mirror lamp | 2 x TS1.3W | 1.3 |
Note: The tail lamp, stop lamp, rear fog lamps, rear side lamps, side repeater lamps and high mounted stop lamp, are LED units and are non-serviceable. If any of these lamps should fail, they should be investigated by qualified personnel. Consult your Dealer/Authorised Repairer.
WINDSCREEN WIPERS
CAUTIONS
Do not operate the windscreen wipers on a dry screen. The drag on the wiper mechanism may cause damage.
In freezing or very hot conditions, ensure that the wipers have not stuck to the windscreen before operating. The drag on the wiper mechanism may cause damage.
Remove any snow, ice or frost from the windscreen, around the wiper arms and blades, and the screen scuttle, before operating the wipers. Snow and ice can cause damage to the wiper mechanism, if left uncleared.
Note: If the wiper blades become stuck or jammed, an electronic cut-out may temporarily halt wiper operation. If this happens, switch off the wipers and the ignition. Clear any obstructions and free the wiper blades, before attempting to switch on the ignition.
Wiper operation

- Windscreen wipers off and parked.
- Rain sensor activated wipe.
- Low speed wipe.
- High speed wipe.
- Rain sensor sensitivity control.
Rain sensor variable delay

JAG1622
- Maximum sensitivity.
- Rotate control to adjust sensitivity.
- Minimum sensitivity.
With the rain sensor activated, the sensitivity of the rain sensor can be adjusted. Rotate the control upwards to reduce the sensitivity of the rain sensor.
Single wipe

natural_image
Illustration of a(JAG1621) remote control device with directional arrows indicating motion (no text or symbols on the device itself)Pull the stalk towards the steering wheel for a single wipe. Holding the switch in this position, operates the wipers at normal speed until the switch is released.
Speed-dependent mode
If vehicle speed drops below 2 km/h (1.2 mph) with the wipers operating, the wiper frequency automatically reduces. The wipers will switch to the next lowest speed. When the vehicle's speed increases to over 8 km/h (5 mph), the original wiper speed settings are restored automatically.
RAIN SENSOR
CAUTION
Ensure that the wipers are switched off before entering a car wash. If the rain sensitive wipers operate during the car washing process damage may occur to the wiper mechanism.
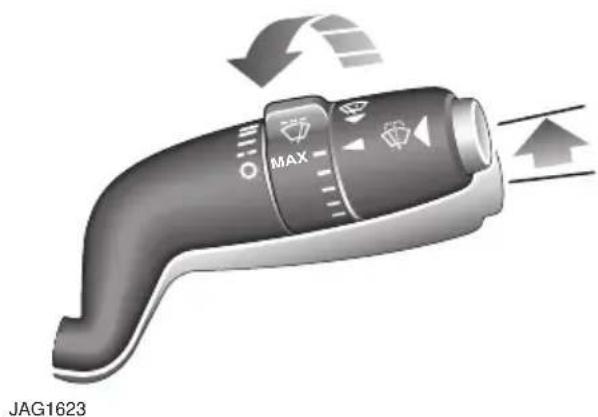
natural_image
Illustration of a handheld device with directional arrows and control buttons (no text or symbols on the device itself)The rain sensor is able to detect the presence and amount of rain, dirt or snow on the windscreen and automatically activates the windscreen wipers accordingly.
To activate the rain sensitive wipers, move the wiper stalk to the rain sensor/intermittent delay position and adjust the rain sensor sensitivity control as required. See WINDSCREEN WIPERS (page 88).
WINDSCREEN WASHERS
WARNING

Some screenwash products are flammable, do not allow screenwash to come into contact with sources of ignition.
CAUTION
Only screenwash products which are approved for automotive use should be used, and then only in accordance with the manufacturer's instructions.

natural_image
3D rendered image of a handheld device with directional control buttons and a black arrow pointing to the right side (no text or symbols on the device itself)To operate the windscreen washers press and release the button on the end of the wiper stalk. The wipers will perform 5 normal speed wipes, followed by a drip wipe (if configured). The washers will operate during the first two wipes. If the washers are operated with the wipers operating at normal or fast speed, the washer jets will operate for two wipes and operation of the wipers will not be affected.
Note: If the button is pressed and held, the wipers and washers will operate at normal speed until the button is released (or for a maximum of 10 seconds). After the button is released, the wipers will operate for a further three wipes, followed by a drip wipe (if configured). If the wipers are already operating at normal or fast speed, operating the washers will not affect wiper operation.
Low screen wash
If the low washer fluid warning is on, the windscreen wipers will not operate when the wash/wipe is activated, even though there may be washer fluid remaining in the reservoir which is sprayed onto the screen. This is to prevent damage to the wiper blades, scratching of the glass or smearing dirt across the screen. Normal, fast or single wipe can be selected manually, to clear any spray from the windscreen.
Timed jet function

If the timed jet function is configured, the washer jets will only operate on the up stroke of the wipers.
This function can be enabled/disabled by your Dealer/Authorised Repairer.
Drip wipe

If the drip wipe function is configured, the wipers will operate four seconds after a wash wipe cycle has finished, to clear any remaining drips from the windscreen.
This function can be enabled/disabled by your Dealer/Authorised Repairer.
Blocked jets
WARNING

Do not operate the washer jets during adjustment. Windscreen washer fluid may cause irritation to the eyes and skin. Always read and observe the washer fluid manufacturers instructions.
If a washer jet becomes blocked, use a thin strand of wire to unblock the jet by inserting the wire into the jet. Ensure that the wire is completely removed after unblocking.
HEADLAMP WASHERS
Headlamp power wash operates automatically with the windscreen wash, and will only operate if the headlamps are switched on and there is sufficient washer fluid in the reservoir.
Headlamp wash operates with every fourth operation of the screen washers, provided that ten minutes have elapsed since the last operation of the headlamp washers.
Note: The power wash sequence is reset when the headlamps or the ignition are turned off.
Note: Headlamp power wash is inhibited when the low washer fluid warning is on.
CHECKING THE WIPER BLADES
WARNING

Only use cleaning products which have been approved for use on automotive glass and rubber.
Inappropriate products can cause smearing, and increase glare.
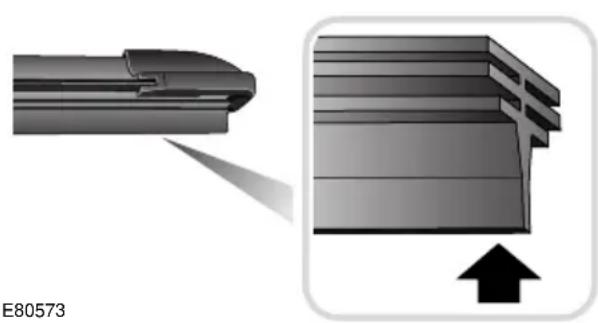
natural_image
Technical illustration of a mechanical component with an arrow indicating upward motion (no text or symbols)The wiping edge of the blades should be checked and cleaned periodically. Check the blade rubber and replace the blade immediately if cracks, splits or roughness are detected, to prevent damage to the glass.
Clean the blade edge by wiping with a soft cloth or sponge, using warm soapy water.
If the wipers fail to clear the windscreen when operated, check the condition of the blade and replace if necessary.
CHANGING THE WIPER BLADES
CAUTIONS

When checking or changing the wiper blades, they can be set to the service position or parked normally.
Service position
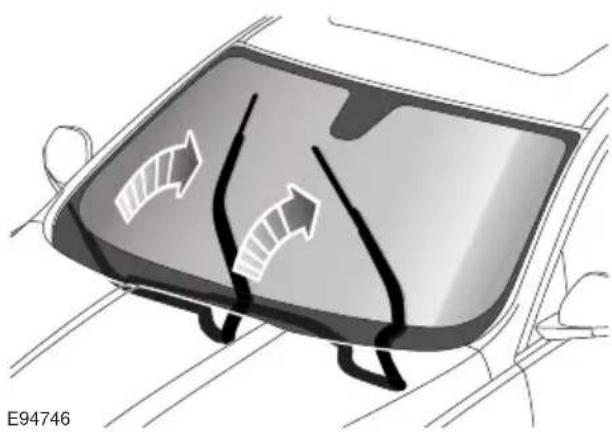
natural_image
Diagram of a car's frontview showing airflow direction arrows (no text or symbols)The windscreen wiper service position allows the wipers to be parked in a more accessible position. This makes it easier to change wiper blades.
Setting the service position
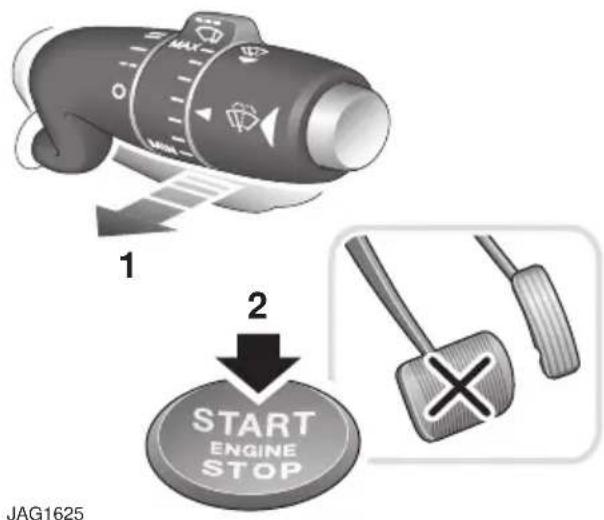
flowchart
graph TD
    A["Start Engine Stop"] -->|1| B["Arrow to Start"]
    B -->|2| C["Arrow to Stop"]
- With the ignition switched off, pull the wiper stalk towards the steering wheel to the single wipe position. Hold the stalk in this position.
- Make sure the brake pedal is not applied and, while still holding the wiper stalk in the single wipe position, press the ignition START/STOP button to switch on the ignition.
The wipers will move to the vertical (service) position. Release the wiper stalk.
To return the wiper blades to the operating position, turn the ignition off.
Changing the wiper blades
CAUTION
Only fit the correct length and type of wiper blade. Failure to do so may cause damage to the wiper system, it may also affect the operation of the rain sensor.

Having set the wipers to the service position, lift the wiper blade clear of the windscreen. The removal procedure for the wiper blade is as follows:-
- Push the clips together on the underside of the wiper mounting.
- Rotate the clips and blade away from the wiper mounting.
- Slide the wiper blade off the wiper arm.
To fit the new blade, follow the removal procedure in reverse.
ELECTRIC WINDOWS
WARNING

All of the windows have an anti-trap protection system. However, before closing a window care must be taken to ensure that none of the occupants have any part of their body in a position where it could be trapped. Even with an anti-trap system serious injury or death can occur.

natural_image
3D illustration of a remote control device with four directional arrows indicating navigation or mode (no text or symbols)With the ignition on or engine running, press a switch down to lower the window, pull it up to raise the window. Release the switch at any point to stop window movement.
The windows will operate for five minutes after the engine is switched off, as long as none of the doors are opened.
One-shot operation
All four windows have one-shot operation. Briefly pull the switch up and release, the window will continue to raise until fully closed. Briefly press the switch down and release, the window will continue to lower until fully open. Pressing or pulling the switch again will stop the window.
Overriding anti-trap protection
Anti-trap protection will stop window movement if an obstruction or resistance is detected. Check the window and its aperture and remove any obstructions, ice, etc. If it is still necessary to raise the window, the override procedure is as follows:-
- Attempt to close the window. Anti-trap will prevent closure and lower the window.
- Within ten seconds, attempt to raise the window again. Anti-trap will prevent closure and lower the window.
- Attempt to close the window for a third time, this time holding the switch in the close position. The window will raise whilst the switch is held. Hold until closed.
Note: If this procedure fails to remove the blockage, the window operation may need to be reset.
Window reset
The windows will need to be reset if the battery is disconnected, becomes discharged or power supply is interrupted.
Reset as follows:-
- Close the window fully.
- Release the switch, then lift it to the close position and hold for two seconds.
- Open the window fully.
- Release the switch, then push it to the open position and hold for two seconds.
- Lift and release the switch to operate the one-shot function.
- Repeat the procedure on each window.
Window isolator

natural_image
Close-up of a computer control panel with a downward arrow and a small symbol on the button (no readable text or labels)WARNING

If children are carried in the rear seats, the isolator switch should be used to prevent operation of the windows. If the windows are operated by young children there is a risk of serious injury or death.
To prevent operation of the rear windows, press the inhibitor switch. To allow passengers control of the windows, press the switch again.
INTERIOR MIRROR
Auto dimming

natural_image
Diagram of a car front mirror showing the side and side views (no text or symbols)E94836
The interior mirror dimming is adjusted automatically according to the amount of ambient light when the ignition is on. If reverse gear is selected, the automatic dimming feature is turned off to allow maximum visibility for reversing.
Note: If the mirror becomes detached from the windscreen it should be re-attached by a Dealer/Authorised Repairer.
Note: If the rear screen is obscured, or the light falling on the mirror is reduced by an obstruction, the automatic dimming feature may not operate correctly.
Manual dimming

natural_image
Diagram of a car frontview mirror showing the side mirror and airflow direction (no text or symbols)E94837
To dim the light levels reflected by the mirror, push the lever forward. To return it to normal light levels, pull the lever back.
EXTERIOR MIRRORS
Adjusting and folding
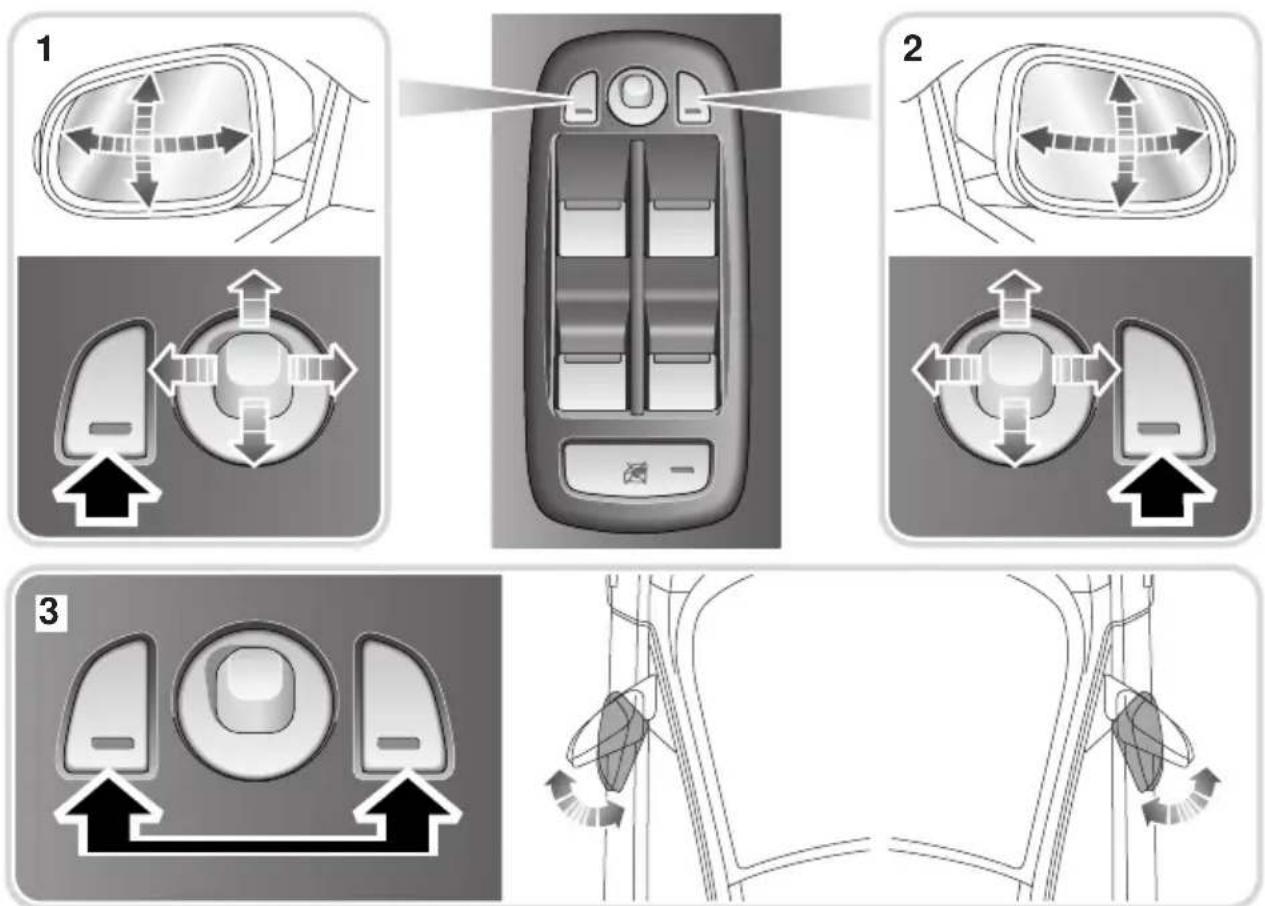
E94820
- Left mirror adjustment.
- Right mirror adjustment.
- Powerfold.
Note: Depending on the type of lens used, distances may be difficult to judge accurately when only using the mirrors.
Adjusting
Mirror adjustment is available with the ignition switched on:
- Press the left or right mirror button as required. The tell-tale light in the switch will illuminate to indicate that it has been selected.
- Move the joystick control to adjust the mirror as required.
Folding
To fold the mirrors back, press both left and right buttons at the same time. To unfold the mirrors, press both of the buttons again.
The mirrors can be folded when the ignition is on, and for up to five minutes after the ignition is switched off, provided the driver's door is not opened. If the door is opened, it will be necessary to turn the ignition on again, before folding the mirrors.
Note: If the mirrors are folded manually, or knocked into the folded position accidentally, the mirror head will be loose. To re-engage the mechanism, fold, then unfold the mirrors using the switches.
Automatic folding
The mirrors can be configured to automatically fold when the vehicle is locked and unfold when unlocked.
Note: If the mirrors were folded using the switches, they will not unfold when the vehicle is unlocked.
To select or deselect automatic folding:
- From the touch-screen Home menu, select Vehicle.
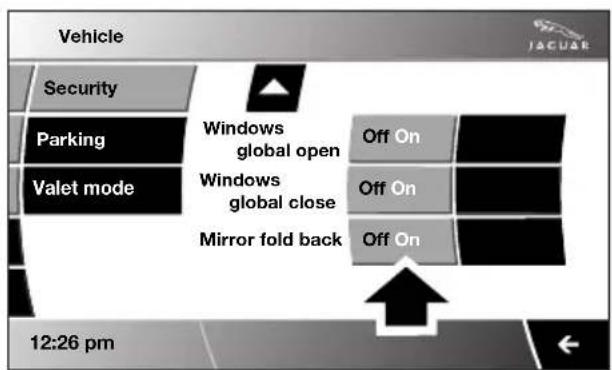
E94821
-
Security is displayed as the default menu. Select Parking. Touch the arrow icon at the bottom of the menu to scroll down the list, until the screen above is displayed.
-
Select Mirror fold back - On or Off.
Mirror dip when reversing
The mirrors can be configured so that when reverse gear is selected, the passenger door mirror is automatically adjusted to provide an improved viewing angle for reversing.
The exact dipped position can be adjusted using the joystick control, when the mirror is dipped. The next time reverse is selected, the newly adjusted position will be selected.
When the gear selector is moved out of reverse, or if vehicle speed exceeds 12 km/h (7.5 mph) while reversing, the mirror will return to its previous position.
To select or deselect mirror dip:
- From the touch-screen Home menu, select Vehicle.
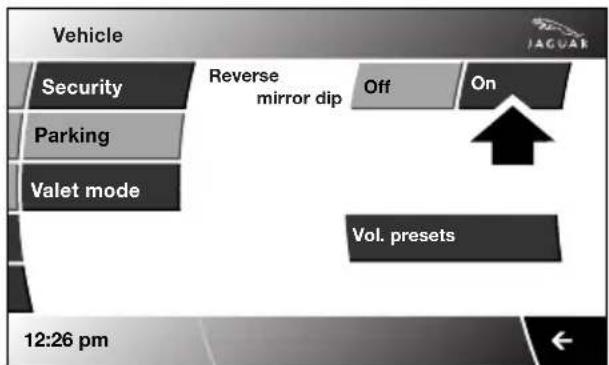
E94822
-
Security is displayed as the default menu. Select Parking.
-
Select Reverse mirror dip - On or Off.
Heating elements
The external mirrors are equipped with heating elements which disperse ice or mist from the glass. The heating elements will operate automatically, depending on the external ambient temperature and conditions.
BLIND SPOT MONITOR
WARNINGS

The Blind Spot Monitor (BSM) system is a supplement to, not a replacement for, a safe driving style and use of the exterior and rear-view mirrors. It remains the driver's responsibility to detect other vehicles, and their relative distance and speed, when deciding whether or not it is safe to change lanes.

Please note that BSM may not be able to give adequate warning of vehicles approaching very quickly from behind les that are being overtaken rapidly.

The radar sensors may be impaired by rain, snow or road spray. This may affect the system's ability to reliably detect a vehicle/object within the blind spot. In such conditions, take extra care when changing lanes.

BSM may not be able to detect all vehicles and may also detect objects, such as roadside barriers, etc.
CAUTIONS

Ensure that the warning indicators in the exterior mirrors are not obscured by stickers or other objects.

Do not attach stickers or objects to the rear bumpers, that may interfere with the radar sensors.

natural_image
Top-down line drawing of four cars on a road with a shaded intersection area (no text or symbols)The Blind Spot Monitor (BSM) system monitors a zone that covers the area adjacent to the vehicle, that is not easily visible by the driver and is designed to identify any object overtaking the vehicle. The system uses a radar on each side of the vehicle to identify any overtaking vehicle/object within the blind spot area of the vehicle, while disregarding other objects which may be stationary or travelling in the opposite direction, etc.
The radar monitors the area extending from the exterior mirror rearwards, to approximately 7 metres (23 feet) behind the rear wheels, and up to 2.5 metres (8.2 feet) from the side of the vehicle (the width of a typical carriageway lane).
Note: This radar sensor is approved in all RTTE countries.
Note: The system covers an area of a fixed lane width. If the lanes are narrower than a typical carriageway lane, objects travelling in non-adjacent lanes may be detected.
BSM automatically switches on and becomes active when the vehicle is travelling at greater than 16 km/h (10 mph) in a forward drive gear. When the system initiates, it performs a self-check, during which the warning icons in the mirrors illuminate alternately for a short period of time.
BSM is designed to work most effectively when driving on multi-lane highways.

If an object is identified by the system as being an overtaking vehicle/object, an amber warning icon (1) illuminates in the relevant exterior mirror, to alert the driver that there is a potential hazard in the vehicle's blind spot and therefore, that a lane change might be dangerous.
Note: If an overtaking vehicle is detected on both sides of the vehicle simultaneously, the warning icons in both mirrors will illuminate.
Note: BSM is automatically turned off when reverse (R) gear is selected, when the vehicle is in park (P), the vehicle is travelling below 16 km/h (10 mph) and also when the electrical connector for the trailer socket is plugged in on vehicles with a factory-fitted towing bracket. When in these conditions, an amber warning indicator within the exterior mirror is displayed.
Sensor blockage
The BSM system will automatically disable if either of the sensors become completely obscured, an amber warning indicator dot (2) is displayed in the exterior mirror and the message BSM sensor blocked appears in the message centre.
Note: Blockage testing is only initiated when vehicle speed is above 32 km/h (20 mph) and will take at least two minutes of accumulated time travelling above this speed, to determine that the sensor is blocked.
If the sensors become blocked, then please check that there is nothing obscuring the rear bumper and that it is clear from ice, frost and dirt.
System fault
If a fault with one of the radar sensors is detected, an amber warning indicator dot is displayed in the exterior mirror and the message BSM not available is displayed in the message centre.
Note: Even if the detected fault only affects the radar sensor on one side of the vehicle, the whole system is disabled. If the fault is temporary, the system will operate correctly once the engine has been switched off and then on again.
If a fault in the system occurs, consult your Dealer/Authorised Repairer.
INSTRUMENT PANEL OVERVIEW
Instrument panel
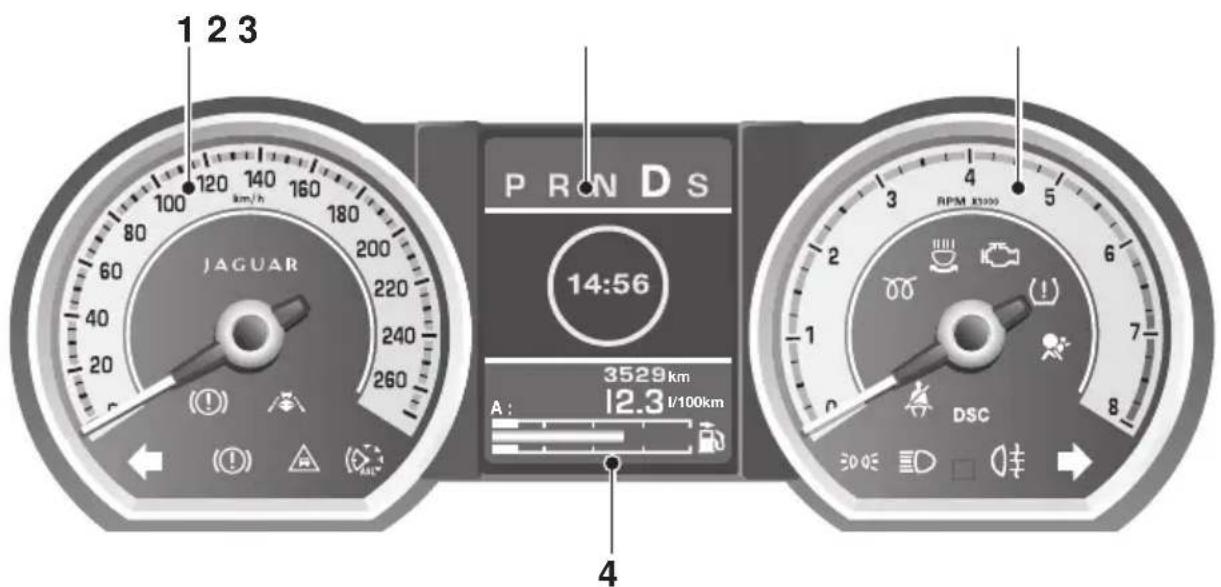
JAG1630
- Speedometer.
- Message centre.
- Tachometer.
- Fuel gauge.
The instruments will not show correct information until the ignition system is on.
Speedometer
Indicates road speed.
Message centre
Displays warning and information messages and gear selector mode and position information. See WARNING AND
INFORMATION MESSAGES (page 106).
See AUTOMATIC TRANSMISSION (page 137).
Tachometer
Indicates engine speed in revolutions per minute (RPM) x 1000.
Fuel gauge
CAUTION

Never allow the vehicle to run out of fuel. The resulting misfire may cause serious damage to the catalytic convertor.
The message centre will display FUEL LEVEL LOW, when the fuel level is approximately 1/16 of tank capacity. This gives an approximate range of 50 to 65 km (30 to 40 miles).
As a reminder for the location of the fuel filler, there is an arrow above the fuel pump symbol, which points to the relevant side of the vehicle.
WARNING LAMPS AND INDICATORS

- Anti-lock Braking System (ABS)/Electronic Parking Brake (EPB).
- Adaptive Cruise Control (ACC).
- Glow plugs (diesel only).
- Adaptive front lighting system (AFL).
- Engine malfunction.
- Tyre Pressure Monitoring System (TPMS).
- Airbag.
- Right-hand direction indicator.
- Rear fog lamp.
- Dynamic Stability Control (DSC).
- High beam.
- Side lamps.
- Seat belt.
- Message centre.
- Automatic Speed Limiter (ASL).
- Forward alert.
- Brakes - Electric Parking Brake (EPB) On/Brake fluid low/Electronic Brakeforce Distribution (EBD)
- Left-hand direction indicator.
RED warning indicators are for primary warnings. A primary warning must be investigated immediately by the driver or seek qualified assistance as soon as possible.
AMBER warning indicators are for secondary warnings, to indicate that a vehicle system is in operation or that the driver must take action and then seek qualified assistance.
Other indicators within the instrument panel indicate system status (e.g. blue for main beam or green for direction indicators, when in use).
Indicator check
An indicator bulb check is initiated when the ignition system is switched on and lasts for three seconds (excepting the airbag warning indicator which will remain on for six seconds). If any warning indicator remains on after this period, investigate the cause before driving. Some warning indicators have associated messages displayed on the message centre.
Note: Not all warning indicators are included in the check (e.g. main beam headlamps and direction indicators).
Brake - Red
WARNING

If the message LOW BRAKE FLUID is displayed, check the brake fluid level and top-up as necessary. Do not drive the vehicle until the brake fault is rectified. Seek qualified assistance before continuing.

Illuminates when the ignition system is on and the parking brake is applied and/or the brake fluid is low. The indicator will also illuminate when there is a fault with the Electronic Brakeforce Distribution (EBD) system.
If the indicator is illuminated and there are no associated messages, it means that the parking brake is applied.
If the indicator is illuminated and the message PARK BRAKE ON is displayed, it means that the parking brake is applied but the vehicle is moving. Release the parking brake or stop the vehicle when it is safe to do so.
If the indicator is illuminated and the message LOW BRAKE FLUID with a red priority lamp is displayed on the message centre, low brake fluid is indicated. In this case, loss of braking in one or both brake circuits may be imminent. Stop the vehicle gently and check and top-up the brake fluid reservoir, using the recommended fluid. If the warning message remains, do not drive the vehicle until the brake fault is rectified. Seek qualified assistance before continuing. See BRAKE FLUID CHECK (page 206).
If the indicator is illuminated and the message EBD FAULT (with red backlight) is displayed in the message centre, a fault with the EBD system is indicated. Stop the vehicle gently, as soon as safety permits and seek qualified assistance.
Seat belt - Red

The warning indicator stays illuminated when the ignition is on and:
- The driver's seat belt is not fastened.
- Or a passenger is sitting in the front seat and their seat belt is not fastened.
The indicator should extinguish when the relevant seat belt is fastened.
Beltminder - Red

The beltminder feature, which uses the same indicator as the seat belt warning, provides reminders to the driver that the driver's and/or front passenger's seat belt is unbuckled.
If the vehicle is moving at or above 16 km/h (10 mph) and the seat belt of an occupied seat is not fastened, the warning indicator will flash.
The flashing will last for ten seconds and then repeat every 30 seconds for approximately five minutes or until the belt(s) is fastened or the vehicle stops.
If the warning indicator stays illuminated with the seat belt(s) fastened, seek qualified assistance as soon as possible. It is safe to drive the vehicle with the indicator illuminated, provided that the seat belt(s) is properly fastened.
Ensure that all occupants fasten their seat belt before driving.
Note: If a heavy object is placed on the front passenger seat, it may activate the Beltminder feature. It is recommended that the object be placed in the luggage compartment.
Anti-lock Braking System (ABS)/ Electronic Parking Brake (EPB) - Amber
WARNING

If the ABS and brake warning indicators are illuminated at the same time, do not drive the vehicle until the
fault is rectified. Seek qualified assistance immediately.

Illuminates if a fault has been detected in the ABS (accompanied by a warning message in the
message centre).
The brake system will continue to function normally, but without ABS braking.
The warning indicator will also illuminate if a fault has been detected in the EPB system (accompanied by a warning message in the message centre).
If the warning indicator illuminates or stays illuminated after the bulb check cycle, seek qualified assistance as soon as possible.
Adaptive Front Lighting - Amber

Illuminates when there is a system fault. Seek qualified assistance as soon as possible.
Engine malfunction - Amber

Illuminates when the ignition system is on and remains illuminated until the engine is started.
If the indicator illuminates when the engine is running, there is an engine malfunction.
Specialised diagnostic equipment is required to repair such faults. Seek qualified assistance as soon as possible.
The vehicle may activate limp-home mode, with the possibility of reduced engine performance. Drive with caution.
Dynamic Stability Control (DSC) - Amber
DSC
The indicator will flash twice every second when DSC is operating.
The message DSC NOT AVAILABLE
will be displayed and the indicator will illuminate continuously, if a fault is detected.
When Trac DSC is selected, the message TRAC DSC is displayed for four seconds and the warning indicator remains illuminated.
When DSC is switched off, a chime will sound, the message DSC OFF is displayed in the message centre and the warning indicator remains illuminated.
Rear fog lamps - Amber

Illuminates when the rear fog lamps are switched on.
Adaptive Cruise Control - Amber

Illuminates when adaptive cruise control is active, to indicate that the vehicle is in follow mode.
Forward alert - Amber

Illuminates when the forward alert function is active.
Airbag - Amber

Flashes if the airbag system develops a fault, then illuminates permanently until the fault has been
diagnosed and cleared.
Seek qualified assistance as soon as possible.
Tyre Pressure Monitoring System - Yellow

Illuminates when one or more tyres are significantly under-inflated. The vehicle should be stopped as soon
as possible and the tyres checked and inflated to the recommended pressure.
High beam - Blue

Illuminates when the high beam headlamps are switched on or flashed.
Automatic Speed Limiter - Green

Illuminates when Automatic Speed Limiter is active.
Side lamps - Green

Illuminates when the side (parking) lamps are switched on.
Direction indicators - Green

The appropriate indicator will flash when the column stalk is moved up or down to signal a turn. If a
direction indicator bulb fails, the audible ticking and warning indicator will sound and flash at twice the normal rate, when that direction indicator is selected.
Hazard warning indicators
When the hazard warning lamps are switched on, both direction indicator warning indicators flash simultaneously.
AUDIBLE WARNINGS AND INDICATORS
Various sounds are produced for warning and notification purposes as follows:
| Hazard or Condition Chime or tone/remedy | |
| External lamps remain on when the driver's door is opened. | A chime will sound until the lamps are switched off or driver's door is closed (unless the lighting control is in AUTO position). |
| Hazard warning indicators on. | A ticking will sound until the hazard indicators are switched off. |
| Direction indicators on. A ticking | will sound until the indicators are switched off. |
| Memory 1 (or 2) settings saved. | A short tone as the memory selection is saved. |
| Airbag system failure. A tone sequence is repeated five times. Seek qualified assistance as soon as possible. | |
| Seat belt reminder. | A chime will sound until an unfastened seat belt is fastened. The warning will cease if occupied front seat belts are buckled, the ignition is turned off or more than approximately three minutes has elapsed since the start of the chime. |
| Electric parking brake (EPB). | If the EPB is applied while the vehicle is moving a continuous chime will sound; release the EPB. If there is a fault with the system which would prevent the application of the EPB, a brief sequence of chimes is initiated. |
| Adaptive Cruise Control (ACC) driver intervene. | Multiple chime. Apply the brakes. |
| ACC low speed automatic switch off. | A chime will sound to indicate that the ACC system is no longer operating. |
| Forward Alert Multiple chime. Apply the brakes. | |
| Speed is over 15 km/h (9 mph) above the set limit speed. | A short warning chime. Reduce speed. |
| Gear selector is not in Park with ignition off. | A chime will sound. Select Park. |
| Entry delay warning (European markets only). | Intermittent slow, low pitched chime. Disarm vehicle. |
| The Jaguar Smart Key cannot be detected. | A chime will sound. The remote handset should be inserted into the starter control unit. |
| The Jaguar Smart Key is to be removed from the starter control unit. | A chime will sound for 60 seconds if the Jaguar Smart Key is in the starter control unit and the driver's door is opened. The remote handset should be removed from the starter control unit. |
| DSC OFF | A chime will sound. |
GENERAL INFORMATION
The driver message centre display is situated within the instrument panel between the tachometer and speedometer gauges. The message centre is active as soon as a door is opened for access.
The primary function of the message centre is to inform the driver of the following:
- Warning messages.
• Temporary alert messages.
• Information messages. - Turn-by-turn navigation.

E95066
The message centre screen is divided into various zones displaying the following:
- Gear selection, automatic or manual.
- Warning messages, accompanied by a red or amber backlight, if system faults are detected. Status messages are displayed to indicate changes in state of certain vehicle functions (e.g. navigation).
When there are no current warning messages, turn-by-turn navigation information is displayed, giving instructions for the next junction. This facility can be turned off via the touch-screen. See TURN-BY-TURN NAVIGATION (page 339).
The clock can be shown when no other information is required to be displayed. See CLOCK (page 124).
-
Trip computer information, including total distance covered by the vehicle. See TRIP COMPUTER (page 107).
-
Set trip computer information display relating A, B or Auto trip computer. See PERSONALISED SETTINGS (page 111).
On diesel and V8 petrol models, the electronic engine oil dipstick reading can also be displayed, when selected using the trip computer button. See ENGINE OIL CHECK - V8 Petrol engines (page 199).
- The fuel level gauge. The small arrow on the top of the fuel pump symbol denotes which side of the vehicle the fuel filler cap is located.
WARNING AND INFORMATION MESSAGES
WARNING

If a warning indicator is displayed, stop the vehicle as soon as possible when it is safe to do so. Do not ignore critical warning messages. Failure to do so may result in serious damage to the vehicle.
Most displayed warning messages have an associated warning indicator, which will illuminate on to indicate the message priority. Also from time to time information messages will be displayed.
If more than one message is active, each is displayed in turn for two seconds in order of priority.
Messages take priority over the trip computer data and will be displayed when the ignition is on.
Note: The message centre information messages and their meanings, are detailed where necessary within the appropriate subject sections.
Clearing messages from the display
It is possible to temporarily clear certain warning or information messages from the message centre.

JAG1515
When a message is displayed in the message centre (e.g. WASHER FLUID LOW), a red warning triangle icon appears on the touch-screen, where shown.
Touch the icon to temporarily stop the currently displayed message from appearing. Once the message is removed, the colour of the warning icon in the message centre changes to white, as a reminder that an outstanding message exists.
Note: Certain warnings, that are critical for the safe operation of the vehicle, cannot be cleared from the display.
Note: If multiple messages are displayed, this process can be repeated to remove all messages from the display.
Removed messages will display again, whenever the ignition is switched on, until the fault is rectified (i.e. in this example, when the washer fluid is topped up).
TRIP COMPUTER
The computer memory stores data for a journey or series of journeys until it is reset to zero.
The displayed information is for guidance only, as it can be affected by traffic, road and weather conditions.
Three independent memories are available, A, B and Auto. A and B memories can be set independently, while the Auto trip will reset after every ignition cycle as the vehicle moves.
Full trip computer information for the trip memories can be displayed on the vehicle touch-screen located in the centre console, while current selected trip computer information is displayed on the instrument panel message centre.
To access the trip computer touch-screen settings:
- From the touch-screen Home menu, select Vehicle.
- Select Trip computer.
- Select requirements from the menu.
Trip computer information centre display

Vehicle total distance travelled (1) and trip distance (2) are displayed, as well as average fuel economy and average speed if selected via the touch-screen. Also A, B or Auto will be displayed, depending on the current memory selected.
Odometer
The odometer shows the total vehicle distance travelled since the vehicle was new.
The odometer and trip distance reading is displayed in either miles or kilometres, depending on the settings selected via the touch-screen.
Changing the display

Press the TRIP button on the end of the left column stalk switch repeatedly to display the message centre data in the following order:
- Trip distance
- Average speed
• Average fuel consumption - Range.
Trip distance (A, B and Auto)
Distance travelled since the last memory reset. The maximum trip reading is 16 090 kilometres (9 999.9 miles). The computer will automatically reset to zero if this distance is exceeded.
Average speed (A, B and Auto)
The average speed since the last press of the reset button.
Average fuel consumption (A, B and Auto)
The average fuel consumption, stated as litres per 100 kilometres (except Japan, kilometres per litre), miles per litre or miles per gallon (UK only), based on the accumulated distance travelled and the accumulated fuel used.
Range
This shows the predicted distance, miles or kilometres, that the vehicle should travel on the remaining fuel, assuming average fuel economy and fuel consumption stay constant.
Electronic dipstick (diesel and V8 petrol engines only)
This shows the current engine oil level and any associated warnings. See ENGINE OIL CHECK - V8 Petrol engines (page 199).
ML-km (also Miles-litre)
The display of metric or imperial units is selected via the touch-screen.
Display language
The display language is selected via the touch-screen.
Reset
Resetting of the trip memories is carried out via the touch-screen.
Service interval indicator
The service interval message will only be displayed when the vehicle has less than 3400 km (2000 miles) before the service is due.
When the ignition is switched on, and the vehicle has started its service countdown, SERVICE REQ'D XXXX km (XXXX MLS) is displayed in the message centre. At the same time the display will glow Amber.
After approximately five seconds, the display reverts to show the preset requirements.
When the service distance has been reached, SERVICE REQUIRED is displayed in the message centre and the display will glow Red.
After approximately five seconds, the display reverts to show the preset requirements.
The distance countdown reduces in increments of 50 km or 50 miles, depending on which display units have been selected.
The distance countdown is controlled by the engine management system and is automatically adjusted to allow for driving style and conditions. This gauges when the service becomes necessary.
CAUTION
If no service interval indicator is displayed during the vehicle service cycle, make sure that your vehicle is serviced in accordance with the intervals, as stated in the Service Portfolio.
Note: After the completion of each service, the Dealer/Authorised Repairer will reset the distance display to commence the countdown to the next service.
TOUCH-SCREEN

JAG1516
- Touch-screen.
- Home menu button.
- Touch-screen on/off.
Note: When the engine is stopped, for the touch-screen to remain active, press the engine START/STOP button again without pressing the brake pedal.
- Touch-screen: When initially activated, the touch-screen will display the main Home menu. From this menu, all touch-screen facilities and operations are initiated by touching the relevant touch-screen buttons and icons.
- Home menu button: Press to return to the main Home menu from all facilities.
- Touch-screen on/off: Press once to turn the screen on, press again to revert to screen-saver mode. A further press will turn the touch-screen off.
System facilities
There are six major systems controlled via the touch-screen, with their individual levels of operation and settings. They are as follows:
• Audio: Radio display AM/FM or DAB, auxiliary and portable audio, TV or CD.
• Climate: Air conditioning, Distribution, Seats, Heated steering wheel, Automatic air recirculation.
• Phone: Digit dial view, Phonebook, Last ten calls (made, received, missed).
- Navigation: Destination, Stored locations, Navigation setup, Route options.
- Vehicle: Security, Parking, Valet mode, Trip computer, Clock, Brightness, Contrast, System settings, Vehicle settings, Display settings.
• Voice: Operating guide, Command list, Add phone nametag, Settings.
Touch-screen use
WARNING

In the interest of road safety, only operate, adjust or view the system when it is safe to do so.
CAUTION
Always run the engine during prolonged use of the touch-screen. Failure to do so may discharge the vehicle battery, preventing the engine from starting.
When the engine START/STOP button is pressed, the touch-screen is activated by the on/off switch on the centre console.
The buttons on the centre console, below the touch-screen display, are referred to as hard buttons and should be pressed firmly. The touch-screen buttons are soft buttons and only require short, light pressure to function. Do not use excessive pressure.
When operating touch-screen buttons, always extend the tip of one finger, and withhold the thumb and remaining fingers from the screen. Touching the screen with more than one finger at a time may cause false inputs.
Throughout the handbook, the expression Select an item (or similar wording) means touch the on-screen button to select or alter the required item.
The handbook shows the on-screen menus, explains how to operate the controls and illustrates how to select or alter settings and requirements. After becoming familiar with the controls, follow the on-screen menus and prompts, to operate the system as required.
Touch-screen display icons
Touch-screen display icons are as follows (they may not all be displayed at the same time):

Return to the previous screen displayed.

Warning triangle button indicating an information or warning message in the message centre.
Touch the button to temporarily remove the warning message from the message centre display. See WARNING AND INFORMATION MESSAGES (page 106).

Telephone: send button.

Telephone: end call.

Page up or increase setting to required value.

Page down or decrease setting to required value.

Direct access to the valet mode setting screen.

Telephone signal strength indicator (if supported by Bluetooth phone).

Telephone battery level indicator (if supported by Bluetooth phone).

No phone connected.
Touch-screen care
CAUTION

Care must be taken to avoid spilling or splashing fluids onto the touch-screen.
Do not use any abrasive cleaners to clean your touch-screen. For approved screen cleaners, you should contact your Dealer/Authorised Repairer.
The touch-screen inner bezel must be kept clean to maintain optimum performance. Finger marks and attracted dust should be regularly removed using a soft cloth and a Jaguar approved cleaning agent.
Where possible, avoid exposing the touch-screen to direct sunlight for long periods.
PERSONALISED SETTINGS
General Information
The touch-screen provides touch-control of the vehicle Audio, Climate, Phone, Navigation and Vehicle systems, as fitted.
Note: When the engine is stopped, the touch-screen reverts to the stand-by mode. To activate the touch-screen press the engine Start/Stop button again.
Home menu display
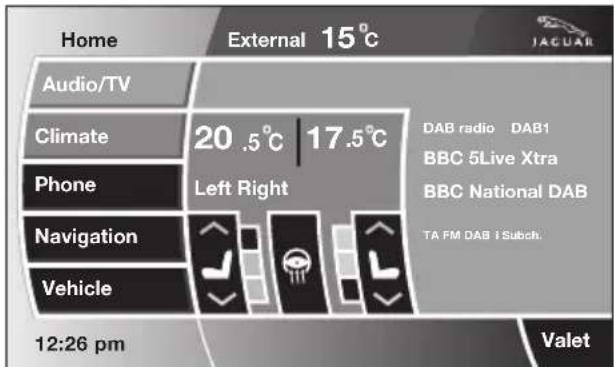
JAG1517
When initially activated, the touch-screen will display the main Home menu. The Home menu may also be displayed at any time by pressing the Home button on the screen surround.
Screen settings: The touch-screen brightness and contrast can be set to individual requirements, including dimming for night driving. This is accessed via the Vehicle menu. Select Cont./Bright.

JAG1416
Auto dimming: Select Auto dimming On. Brightness and contrast are automatically adjusted by the ambient light level. As the light level decreases, the touch-screen brightness will decrease, until the full night screen level of brightness is initiated.
Further adjustment of the touch-screen brightness can be achieved by using the + or - buttons in the Cont./Bright. screen or by adjustment of the instrument panel dimmer switch. See INSTRUMENT LIGHTING DIMMER (page 123).
Pop-up messages
The operation of certain functions will cause a small message (pop-up) to appear, overlaying the touch-screen display.

E95072
The pop-up is mainly for information and will disappear automatically after a few seconds, or can be dismissed by touching the pop-up screen area. If any action or adjustment is required, the message will clearly indicate what is required and which button to touch.
Touch-screen systems
There are five major systems controlled via the touch-screen with their individual levels of operation and settings. They are as follows:
- Audio
- Climate
• Phone/Comms/Voice - Navigation
- Vehicle.
Note: The Phone entry is renamed Comms if the JaguarVoice system is fitted and renamed Voice if the JaguarVoice system is fitted but without telephone.
Audio system
The vehicle Audio system interacts with Navigation, In-car Telephone and Climate Control systems.
The Audio system can be controlled from the switches on the console, the touch-screen buttons and from the multi-function controls on the left-hand side of the steering wheel. See AUDIO CONTROL (page 69).
Detailed instructions on the use of the audio system are provided later in this handbook. See Audio unit operation (page 271).
Automatic climate control
The automatic climate control system can be controlled from the switches on the console and the touch-screen buttons.
See AUTOMATIC CLIMATE CONTROL (page 116).
Phone/Comms/Voice
The communications system is composed of the following facilities:
- Digit dial
- Phonebook
- Last ten calls made, received, missed.
- Voice
The telephone system can be controlled from the touch-screen, by voice recognition or by using the multi-function controls on the left-hand side of the steering wheel.
See ADJUSTING THE STEERING WHEEL
(page 67). Detailed instructions on the use of the phone are provided later in this handbook. See Telephone (page 307).
Navigation system
Detailed instructions on the use of the navigation system are provided later in this handbook. See Navigation system (page 334).
Vehicle system
The following system functions are set using the touch-screen:
- Trip computer
- Clock adjust
- Brightness and contrast
- System settings
- Vehicle settings
Languages and distance units
The screen text and distance units are available in various languages and either Imperial or Metric units.
The required languages and units are accessed by selecting Vehicle from the Home menu, then selecting:
- Trip computer
- Unit change
- Preferences and then selecting from the menu.

flowchart
graph LR
    A["Vehicle"] --> B["Display set."]
    B --> C["Preferences"]
    C --> D["Button audio"]
    D --> E["Vol. presets"]
    F["km, km/h, 1/100km"] --> G["Miles, MPH, MPG"]
    H["°C"] --> I["°F"]
    J["Change"] --> K["Display language English UK"]
    L["12:26 pm"] --> M["←"]
E95073
To change the units: Touch the button corresponding to the desired unit display (metric or imperial).
Note: The choice of units displayed is market dependent. The illustration above represents a typical screen.
Temperature display is selected by touching either °C or °F.
Note: Celsius or Fahrenheit may be selected independently of metric or Imperial units.
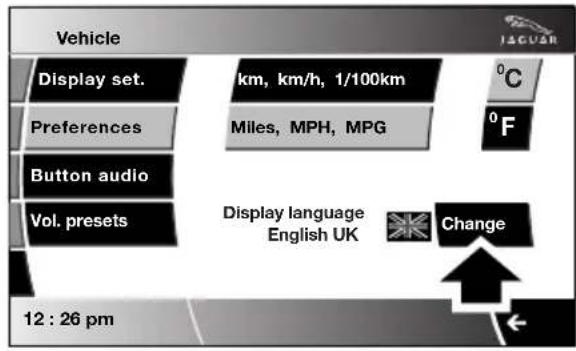
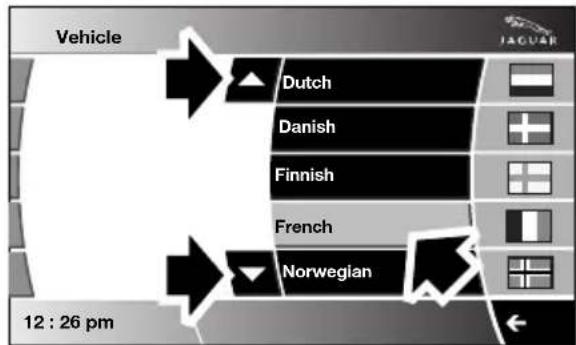
E95074
To change the language: The language choices are displayed as a list. Scroll up or down through the list using the up or down arrows. Touch to select the chosen language.
Note: The navigation system is not affected by the language change. To change the navigation system language display, refer to the navigation system instructions later in this handbook. See Navigation system (page 334).
Timeout to home menu
The time period before the touch-screen display reverts to the Home menu, after the last user input, can be adjusted to suit personal preference.
From the Home menu, select Vehicle.

E95075
1. Select Syst. settings.

E95076
- Select Display set, then touch the + or - buttons to increase or decrease the timeout delay. The timeout can be adjusted from ten seconds to five minutes.
Note: An initial default setting of one minute is set if no time adjustment is made.
- To prevent the display from reverting to the Home menu, select Timeout to home screen Off.
AIR VENTS

- Air volume adjust.
- Air direction adjust.
- Solar sensor.
CAUTIONS

Do not obstruct the solar sensor (3) or the temperature and humidity sensor, located adjacent to the glove box.

Do not obstruct the extract vents for the climate system, located in the trim panel behind the rear seats.
The rotating air vents activate and rotate out of the fascia when the engine START/STOP button is pressed, provided the climate system has not been manually switched off. Adjust the volume of air using the thumbwheels (1) and the direction of the air using the direction controls (2), to suit your requirements.
It is possible to set the air vents so that they remain permanently on view, even when the ignition is switched off.
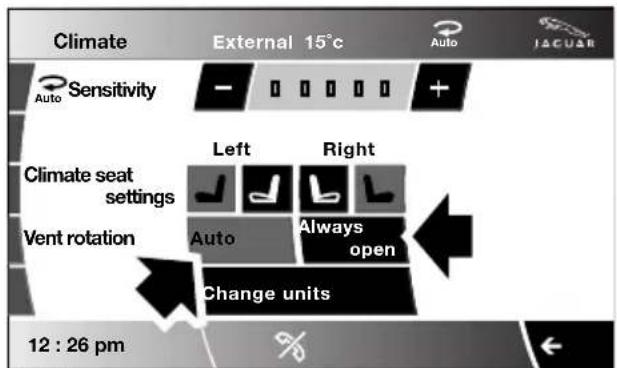
E95447
From the touch-screen Climate menu, select Settings. Select Vent rotation Always open.
Rear vents
The temperature of the air supplied by the rear air vents is dependent on the combined temperature settings for the driver and front passenger. For example, if the driver temperature is set to 21°C (70°F) and 20°C (68°F) for the front passenger, the temperature of the air supplied to the rear of the vehicle will be approximately 20.5°C (69°F).
AUTOMATIC CLIMATE CONTROL
Automatic climate control provides efficient regulation of the vehicle environment, without constant adjustments from the occupant.
Sensors inside the vehicle monitor temperature, humidity and direct sunlight. The electronic control system automatically adjusts the heat input, blower speed, air intake and airflow distribution, to maintain the selected temperature(s) and reduce misting. The air conditioning system also incorporates a pollen/odour filter, to further increase the comfort of the vehicle environment.
Automatic operation provides optimum comfort under most driving conditions.
It is recommended that automatic control (AUTO) is selected as the normal operating mode.
Automatic control can be overridden at any time.
Controls

E95086
- Touch-screen display.
- Left-hand temperature control.
- Right-hand temperature control.
- Blower speed, rotate to change blower speed. Press to turn the climate control system on/off.
- AUTO mode, press to select fully automatic operation.

- Recirculation, press to switch on/off.
- Heated rear screen, press to switch on/off.
- Heated front screen, press to switch on/off.
- Defrost program, press to switch on/off.
Temperature controls

Separate controls allow the driver and front passenger zone temperatures to be independently adjusted. Press the upper (red)
button to increase temperature and the lower (blue) button to decrease temperature.
Both driver and passenger temperatures are displayed on the touch-screen.
Selecting the maximum or minimum temperature settings for the driver temperature zone, causes the display to change to HI or LO respectively. This cancels AUTO mode.
To quickly change from HI or LO to a convenient mid-range temperature of 22^ C ( 72^ F), press and hold AUTO for a few seconds.
Note: The maximum possible temperature differential between the driver and passenger settings is 3^ C ( 5.4^ F)
Windscreen defrost and demist
To remove frost or heavy misting from the windscreen, press the DEF button. The following functions will activate:
- The blower switches on at a high speed (blower speed can be adjusted manually to suit).
- The air conditioning activates (to dehumidify the air) and cannot be switched off.
- Recirculation is cancelled and cannot be selected.
- The front and rear screen heaters switch on automatically (if the engine is running).
To deselect, press the DEF button again or press AUTO.
Heated screens

The front (F) and rear (R) screen heaters, may be switched on and off in any mode, including with
the climate control system off. However, they will only operate when the engine is running.
The front screen heater switches off automatically after 5 minutes. The rear screen heater switches off automatically after 21 minutes.
The screen heaters can be manually deselected using the push buttons.
In cold ambient conditions, the front and rear screen heaters will switch on automatically for the timed period when the engine is started.
The front and rear screen heaters will automatically come on at temperatures below 5^ C ( 41^ F).
Auto mode
Automatic operation utilises the air conditioning and other climate controls, to provide a controlled environment over a
temperature range of 16^ C to 28^ C ( 59^ F to 83^ F) and should be regarded as the normal operating mode.
To select automatic climate control press the AUTO button.
Select the required temperature.
Front and rear screen heating and timed air recirculation may be selected in AUTO mode, but selecting any other manual control will cancel AUTO operation.
To resume fully automatic operation at any time, press the AUTO button.
Blower speed
Set the blower speed as required by adjusting the rotary control.
Press to turn the climate control
system on or off.
When operating in AUTO mode, blower speed is controlled automatically and AUTO is displayed on the touch-screen. Any adjustment of the knob will cancel AUTO mode.
Note: In AUTO mode, if heating is required, the blower only operates at low speed, until the engine reaches normal operating temperature.
Recirculation

Press to turn recirculation on or off. The button indicator illuminates when recirculation is turned on.
When selected, the air is recirculated inside the vehicle. This helps to maintain a high or low temperature, and is useful for preventing fumes from entering the vehicle.
Recirculation may also be selected in AUTO mode, if the climate control system detects high levels of pollution in the atmosphere outside the vehicle (if a smog sensor is fitted). Manual operation of the recirculation control will override the automatic setting. This facility can be switched off through the Settings menu on the touch-screen.
Note: Prolonged use at low temperatures may cause the windows to mist.
Air conditioning
Press the AUTO button to turn the air conditioning on.
The air conditioning system is controlled automatically in AUTO mode to maintain the desired temperature and humidity (even if higher temperature settings are selected).
The air conditioning system is also switched on automatically in defrost mode (DEF) in order to dehumidify the air.
Note: Water may collect underneath the vehicle when parked. This is moisture expelled from the interior of the vehicle by the air conditioning system and is not cause for concern.
Heated/climate seats and heated steering wheel
The heated seats, climate seats and heated steering wheel can be controlled from both the Home and Climate menus on the touch-screen. See HEATED SEATS (page 47). See CLIMATE SEATS (page 48). See HEATED STEERING WHEEL (page 68).
Touch-screen operation
Certain functions of the climate control system are adjusted using the Climate menu on the touch-screen.
Select Climate from the Home menu.
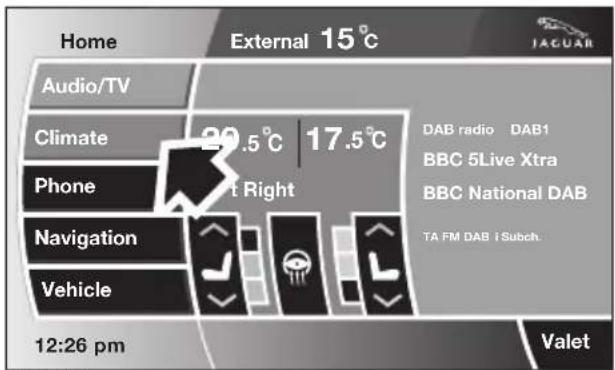
JAG1518
The climate main menu is displayed, from which the climate control settings can be adjusted.

E95094
Climate control display icons
The climate control display buttons and icons are as follows:
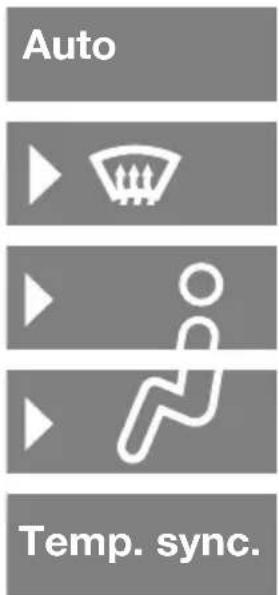
Auto climate control on.
Air distribution to windscreen.
Air distribution to face.
Air distribution to feet.
Synchronizes the passenger's climate control zone to the driver's settings.

Blower speed control decrease and increase.

Access to the Settings control menu to set the vent rotation mode, to adjust
personal climate zone settings and also to access the automatic air recirculation sensor control setting.
A/C
Air conditioning on/off. When the air conditioning is switched off, Economy
mode is selected automatically. Economy mode turns off the air conditioning compressor and reduces power consumed by the climate control system. This will reduce air conditioning performance. Prolonged use of Economy mode, may cause the windows to mist.
OFF
Climate control on/off button.
Note: If the air vents are programmed to rotate, they will rotate into the fascia when climate control is turned off.
External temperature
The external temperature is displayed at the top of the Climate menu.
Smog/pollution filter
The smog filter operates in conjunction with the air recirculation feature, to reduce pollutants entering the vehicle.
When pollution is detected by the smog sensor, air recirculation is selected automatically, to help prevent pollution entering the vehicle.
The sensitivity of the smog sensor can be adjusted for personal preference or the sensor can be switched off entirely, as follows:
- Select Settings from the Climate menu.
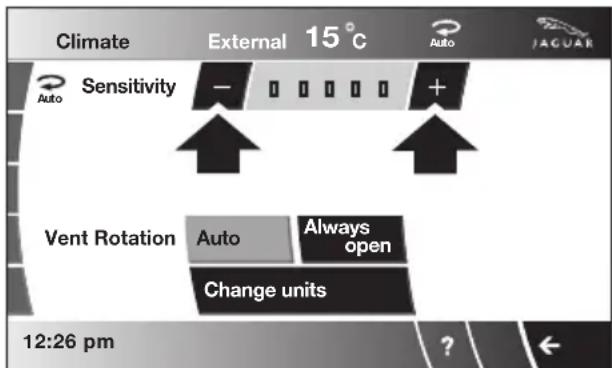
JAG1519
- Touch the + or - buttons to increase or decrease the sensitivity of the smog sensor.
There are five sensitivity settings, indicated by the five bars between the + and - buttons. To switch the smog filter off, touch the - button until none of the five bars are illuminated.

This icon appears at the top of the touch-screen when the smog filter is on. When the smog sensor is
switched off, this icon will not be displayed.
ELECTRIC SUNROOF
WARNINGS

Extreme care must be taken to ensure that none of the occupants have any part of their body in a position where it could be trapped by the sunroof when closing. Although an anti-trap mechanism is fitted, serious injuries can occur.

Never leave children alone in the vehicle, as this could result in serious injury or death.

It is recommended that the Jaguar Smart Key be removed when leaving the vehicle.
Operation

E95097
The sunroof can only be operated with the ignition on.
Tilt
With the roof closed, press and release the front of the switch (1). The sunroof will move to the tilted position automatically. It can be stopped at any point by pressing the button again.
Fully open
With the sunroof closed, press and release the rear of the switch (2). The sunroof will move to the fully open position automatically. It can be stopped at any point by pressing the button again.
Close
- From the fully open position, press and release the front of the switch (1). The roof will return to the closed position automatically.
- From the tilted position, press and release the rear of the switch (2). The roof will return to the closed position automatically.
Anti-trap mechanism
WARNING

The sunroof can cause serious injury should a body part become trapped. Always ensure that the sunroof is free from obstructions before closing.
If the sunroof encounters resistance when closing it will stop, and then open fully. This is to prevent serious injury or damage to the mechanism.
Override
CAUTION
Wherever possible remove any dirt, leaves etc. from the sunroof mechanism before closing. Failure to do so may damage the sunroof mechanism.
The anti-trap mechanism can be overridden to allow the roof to be closed when movement is restricted by dirt. To override the anti-trap mechanism, press and hold the front of the switch until the roof reaches the closed position.
Calibration
If the battery is disconnected, or the power supply is interrupted, whilst the sunroof is partially open it will need to be recalibrated.
Once the battery is reconnected, or the power supply is restored, recalibrate the sunroof as follows:
- Switch the ignition on.
- Press the front of the switch, so that the sunroof is in the tilt position, then release the switch.
- Press the front of the sunroof switch, and hold for thirty seconds.
- After thirty seconds the sunroof will begin to move. Keep the front of the switch pressed until the sunroof has fully opened, then closed.
- Once the open/close cycle has completed and the sunroof has stopped moving, release the switch.
The sunroof can now be operated as normal.
Sunroof blind

natural_image
Diagram of a car interior showing a device with a directional arrow, no text or symbols presentThe blind can be manually opened and closed, using the handle, with the sunroof closed or tilted open.
The blind opens automatically when the sunroof is fully opened and cannot be closed with the sunroof in this position. The sunroof needs to be fully closed before the blind can be closed.
SUN VISORS

Pivot the sun visor downward to reduce sun glare through the front windscreen. If required, the visor can unclipped and then be pivoted towards the side window to reduce sun glare from that side of the vehicle.
Vanity mirror
Pivot the sun visor downward and raise the cover on the vanity mirror to illuminate the mirror. Close the cover to extinguish the lamps. If the cover is left open, the lamps will extinguish automatically after 16 minutes to prevent battery drain.
SUN BLINDS
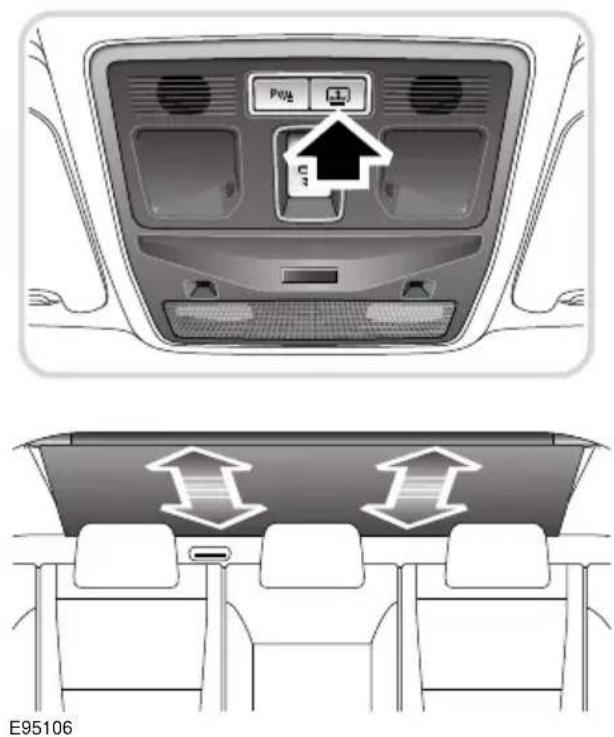
natural_image
Interior view of a car showing the backrest and rear seats with directional arrows indicating airflow or movement (no text or symbols)Press the switch to raise or lower the sun blind.
INSTRUMENT LIGHTING DIMMER

natural_image
Interior view of a car showing cable routing and a close-up of the dashboard panel with directional arrows (no text or symbols)Rotate the thumbwheel up to increase, and down to decrease, the level of instrument illumination.
CLOCK
The clock is set using the touch-screen. Select Vehicle from the Home menu.
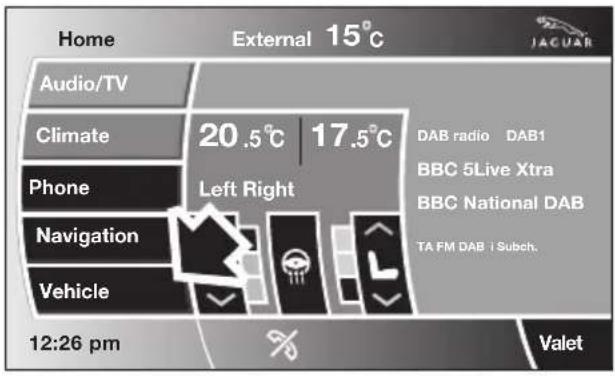

JAG1521
- From the Vehicle menu, select Clock adjust.
- Touch the up or down arrow icons to adjust the hours.
- Touch the up or down arrow icons to adjust the minutes.
- Touch to switch between 12 and 24 hour clock display.
- Touch to set the new time. The time display in the bottom left corner of the screen will now change to reflect any adjustments made.
Note: Any adjustments made will be lost, unless Set is selected before exiting the Clock adjust menu.
Setting the clock as the screensaver
From the Home menu on the touch-screen, select Vehicle.
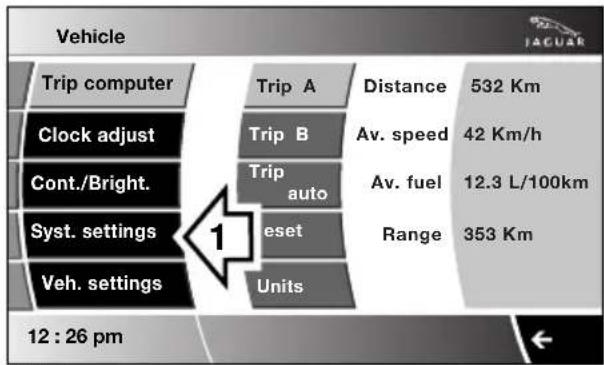
E95075
From the Vehicle menu, select Syst. settings (1).

JAG1522
Select Display set. (2), then touch the clock symbol (3). The clock will now appear as the screensaver.
Note: To select an alternative screensaver from the four available, click on the appropriate icon.
AUXILIARY POWER SOCKETS

natural_image
Interior view of an airplane cabin with seatbelt and circular dial (no text or symbols)The auxiliary power socket is located in the cubby box.
CAUTIONS
Only Jaguar approved accessories should be plugged into the power sockets. Using any other equipment may damage the vehicle's electrical system. If you are in any doubt contact your Dealer/Authorised Repairer.
The engine should be running when using accessories for long periods. Failure to do so can discharge the battery.
GLOVE BOX

The glove box is opened using the JaguarSense proximity sensor on the fascia (arrowed). To open the glove box, place the tip of your finger close to and directly over the sensor, as shown in the left-hand inset of the illustration.
The sensor is able to distinguish between a finger approach and an accidental finger rub approach from a knee or other large items, including being wiped for cleaning purposes. Under these conditions, the sensor will not react to the input and the glove box will remain closed.
Note: When the vehicle alarm is armed or Valet mode is selected, the proximity sensor is disabled, preventing the glove box from being opened.
Note: The wearing of gloves may interfere with the operation of the proximity sensor. If gloves are worn, it may be necessary to touch the sensor to open the glove box.
CUP HOLDERS

E95112
WARNINGS

The cup holders should only be used for soft containers. Containers which are hard (cans, metal, ceramic, hard plastic etc.) can cause serious injury if the vehicle is involved in an accident, sudden manoeuvre or braking.

Do not carry open drinks containers. Hot liquids can cause serious injury when spilled and may damage the vehicle.

Do not drink, or use the drinks holders when driving. Doing so would break concentration, which may result in loss of control.
- Front single cup holder.
- Front twin cup holder.
- Rear cup holders.
To access a front cup holder, press and release the lid. To access the rear cup holders, fold down the rear seat armrest.
Twin cup holder

natural_image
Diagram showing airflow or heat transfer between a car's airway and its internal combustion chamber (no text or symbols)E95113
The twin cup holder can be converted into a storage compartment by removing the insert. Use one hand to squeeze the two sides of the insert together and, lifting the edge nearest the driver first, use the other hand to rotate the insert up and out of its compartment, towards the passenger seat.
Note: An ashtray and cigar lighter pack, which replaces the front twin cup holder, is available from your Dealer/Authorised Repairer.
STORAGE COMPARTMENTS
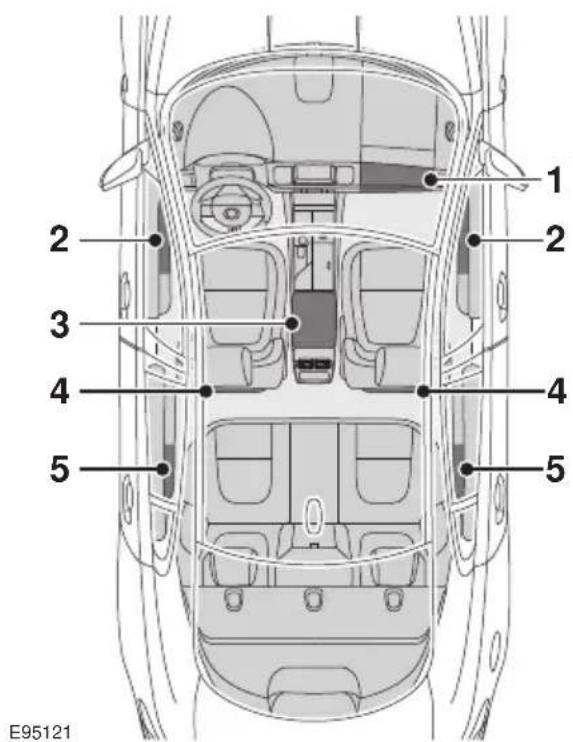
- Glove box.
- Front door stowage.
- Cubby box.
- Seat map pockets.
- Rear door stowage.
WARNING

Ensure that any items stored in the vehicle are secure and cannot move. If the vehicle is involved in an accident, or subject to sudden braking or direction change, loose items can cause serious injury.
GARAGE DOOR TRANSCEIVER

WARNINGS

Do not use the transceiver with any garage door opener that lacks the safety stop and reverse feature as required by safety standards. Using a garage door opener without these features increases risk of serious injury or death.

When programming the transceiver to a garage door opener or entry gate, ensure the area is clear. This will prevent potential harm or damage as the gate or garage door will activate during the programme.
CAUTION

This device may suffer from interference if operated in the vicinity of a mobile or fixed station transmitter. This interference is likely to affect the hand-held transmitter as well as the in-car transceiver.
The door transceiver is located in the rear-view mirror. It can be programmed to transmit the radio frequencies of up to three different transmitters, which can be used to activate garage doors, entry gates, home lighting, security systems or other radio frequency operated devices.
Although this section mainly describes the procedures for a garage door opener, it also equally applies to the previously mentioned applications.
In some countries, this feature is also known as the HomeLink® Universal Transceiver.
For further information, see Information and Assistance later in this section.
Before programming
CAUTION

When programming a device that may require you to press and re-press the hand-held transmitter (cycle), unplug the device during the cycling process to prevent possible motor failure.
For best results, fit a new battery to the hand-held transmitter of the garage door opener (or other device) before programming. If your garage door opener receiver (located in the garage) is equipped with an antenna, ensure that the antenna is hanging straight down.
To erase all programming
For first time programming, ensure that the engine is switched off:
- Ensure that the ignition system is in convenience mode.
- Press and hold the two outer buttons on the transceiver in the rear-view mirror. Keep the buttons pressed until the indicator lamp begins to flash (this will take approximately 20 seconds), then release the buttons.
All memories in the garage door opener have now been cleared.
Note: Do not perform this procedure when programming the additional garage door opener buttons.
Programming
Ensuring that the engine is switched off:
- Ensure that the ignition system is on.
-
Hold the end of the original garage door opener hand-held transmitter approximately 50 to 150 mm (2 to 6 inches) away from the transceiver in the rear-view mirror, keeping the indicator lamp in view.
-
Using both hands, simultaneously press and hold both the chosen transceiver button on the rear-view mirror, as shown above, and the hand-held transmitter button. Keep both buttons pressed. The indicator lamp will flash slowly at first and then change to a fast flash. When the indicator lamp flashes rapidly, release both buttons. The rapid flashing lamp indicates successful programming.
-
If, after 60 seconds, the indicator lamp does not flash rapidly, release both the transceiver and the hand-held transmitter buttons and repeat the procedure starting with Step 2. Position the hand-held transmitter at a different angle and/or distance.
-
Press and hold the programmed garage door opener button and observe the indicator lamp.
-
If the indicator is continuous, programming is complete and your device should activate when the garage door opener button is pressed and held for approximately 1 to 2 seconds and then released.
- If the indicator lamp blinks rapidly for two seconds and then turns a continuous light, proceed with the following programming instructions for rolling code device equipment.
Rolling code device equipment programming
Note: The assistance of a second person, may make the following steps quicker and easier. Once the button has been pressed there are only 30 seconds in which to complete Step 3.
- At the garage door opener receiver (motor head unit) in the garage, locate the learn or smart button/switch.
- The name of the button or switch may vary between manufacturers.
- Press and release the learn or smart button.
- Return to the vehicle and firmly press and hold the programmed garage door opener button for two seconds and release.
- Repeat the press, hold, release sequence three times to complete the programming process.
The garage door opener in the rear-view mirror should now activate the rolling code device.
Reprogramming a single garage door opener button
To programme a device to a previously trained button:
- Press and hold the desired pre-programmed garage door opener button for at least 20 seconds, but no longer than 30 seconds, until the indicator lamp begins to flash.
- Without releasing the rear-view mirror button, position the hand-held transmitter approximately 50 to 150 mm (2 to 6 inches) away from the transceiver in the rear-view mirror, keeping the indicator lamp in view.
- Carry out Step 3 of Programming.
Entry gate programming
The technology of some entry gates requires you to press and re-press (cycle) the hand-held transmitter button every two seconds during programming.
Continue to press and hold the desired rear-view mirror button while you cycle your hand-held transmitter until the indicator lamp flashes rapidly.
Information and assistance
CAUTION
It is recommended that when you sell or dispose of the vehicle, the programmed transceiver buttons be erased for security purposes.
For information on the range of available compatible products or accessories, or for assistance, you should contact your Dealer/Authorised Repairer.
You can also contact the supplier's helpline on 0 0800 0466 354 65. This toll-free number can be called from anywhere within Europe. No separate country code is required (the first zero is not required when calling from within Germany).
Contact can also be made via the internet. The website address is www.eurohomelink.com. The e-mail address is:
info@eurohomelink.com.
Note: Keep the original transmitter for future use or programming procedures if, for example, you purchase a new vehicle.
Note: The manufacturer is not responsible for any radio or TV interference caused by unauthorised modifications to this equipment. Such modifications could void the user's authority to operate the equipment.
PORTABLE AUDIO INTERFACE

- USB connector port.
- iPod input port.
- Auxiliary input port.
The interface sockets are located in the cubby box and can be used to integrate personal media devices with the vehicle's audio system. See Portable audio (page 299).
GENERAL INFORMATION
START/STOP button
The START/STOP button is used to start or stop the engine, or to turn on the ignition without starting the engine.
Note: The START/STOP button will only be operational if a valid Jaguar Smart key is detected within the vehicle.
Switching on the ignition
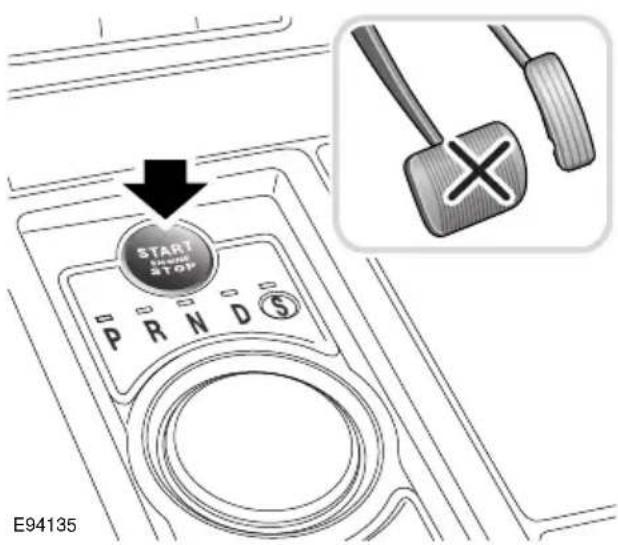
To turn on the ignition without starting the engine, make sure the brake pedal is not applied and that there is a valid Jaguar Smart Key in the vehicle, then press and release the START/STOP button. The warning indicators illuminate and most electrical systems will be operational.
Note: If the brake pedal is pressed when the START/STOP button is pressed, the engine will start.
Steering column lock
CAUTION
During vehicle recovery, the Jaguar Smart Key must remain inside the vehicle (or be stowed in the starter control unit in the centre console), so that the steering column remains unlocked.
Your vehicle is fitted with an electronic steering column lock. The column unlocks when it detects a Jaguar Smart Key inside the vehicle.
The steering column automatically locks when the starter switch is turned off and the driver's door is opened.
If the steering column remains locked, even with a valid Jaguar Smart Key in the vehicle, STEERING COLUMN LOCKED is displayed in the message centre. If this occurs:
- Press the starter button to return to the convenience mode.
- Try again to unlock the steering column lock, by turning the steering wheel gently to the left and right.
- If the malfunction still persists, seek qualified assistance as soon as possible.
KEYLESS STARTING
WARNING

Never start the engine or leave it running, when the vehicle is in an enclosed space. Exhaust gases are poisonous and can cause unconsciousness and death if inhaled.
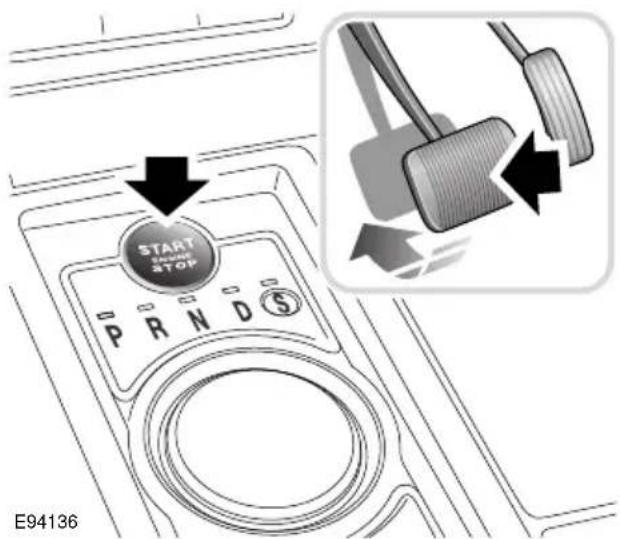
With the Jaguar Smart Key inside the vehicle and the brake pedal depressed, press and release the START/STOP button to start the engine.
Note: On diesel models, Smart Start in progress is displayed in the message centre. If the brake pedal is released, a gear change is made or if a fault occurs, Smart Start cancelled is displayed in the message centre and the start procedure is cancelled.
Starting a petrol engine
With the brake pedal applied and with a valid Jaguar Smart Key in the vehicle, press and release the START/STOP button. The engine will start, the JaguarDrive selector will elevate out of the centre console and the air vents in the front fascia will rotate to the open position.
Starting a diesel engine
With the brake pedal applied and with a valid Jaguar Smart Key in the vehicle, press and release the START/STOP button. In ambient conditions, after 3 seconds, the engine will start to crank. The JaguarDrive selector will elevate out of the centre console and the air vents in the front fascia will rotate to the open position.
Note: Smart Start in progress is displayed in the message centre prior to the engine cranking. If, during the start procedure, the brake pedal is released, a gear change is made or if a fault occurs, Smart Start cancelled is displayed in the message centre and the start procedure is cancelled.
Cold climates
In very cold conditions, the delay between pressing the START/STOP button and the engine cranking, can be up to 12 seconds. During this delay, keep the brake pedal applied and do not press the START/STOP button again, as this will switch off the ignition. Also in very cold conditions, expect engine cranking times to increase.
Engine block heaters
CAUTION

The fitting of an engine block heater does not eliminate the need for antifreeze.
Engines are more difficult to start when the ambient temperature is very low. In geographical areas where temperatures below -10^ ( 14^ ) are experienced frequently, it is advisable to fit an engine block heater. The block heater will have an insulated connector at the front of the vehicle, which is connected to a mains supply using a suitable extension cable. The heater can remain in use overnight if required. Typically, an engine block heater will use between 400W and 1000W per hour.
For further information consult your Jaguar Dealer/Authorised Repairer.
If the engine fails to start
When pressing the engine START/STOP button to start the engine, if the security status indicator lamp on the top surface of the instrument panel remains flashing, a fault condition is indicated. Seek qualified assistance as soon as possible.
Note: If the Jaguar Smart Key is placed in the door pocket, it may be outside the range of the sensors when the door is opened.
Note: If the fuel system inertia switch has tripped, the ignition circuit will be isolated. See FUEL CUT-OFF (page 177).
Petrol engines
If the engine persistently fails to start, press the START/STOP button (without applying the brake pedal) to return the ignition to convenience mode. Slowly depress the accelerator pedal fully, hold it in this position and press the START/STOP button with the brake pedal applied, the engine will start to crank. Release the accelerator pedal when the engine starts.
If the engine still fails to start, consult your Dealer/Authorised Repairer.
Diesel engines
If the engine persistently fails to start, press and hold the START/STOP button (with the brake pedal applied). Keep the START/STOP button and the brake pedal pressed until the engine starts, then release.
If the engine still fails to start, consult your Dealer/Authorised Repairer.
SWITCHING OFF THE ENGINE
WARNING

Never switch off the engine when the vehicle is in motion.
With the gear selector in position P, press the engine START/STOP button. The engine will stop and the ignition system will return to convenience mode. The audio, telephone and touch-screen systems will revert to stand-by mode and the JaguarDrive selector will retract into the centre console. Pressing the START/STOP button again (without pressing the brake pedal) will activate the systems.
DIESEL PARTICULATE FILTER (DPF)
The Diesel Particulate Filter (DPF) forms part of the emissions reduction system fitted to your vehicle. The DPF will remove a high proportion of the harmful carbon microspheres (soot) before they leave the exhaust. It achieves this by filtering out the particles, which are then stored until they are burnt away and the filter is emptied.
Regeneration
CAUTION
The regeneration procedure produces high temperatures in the DPF. Heat can be felt radiating from beneath the vehicle, which is normal and not a cause for concern. However, the vehicle should not be parked over combustible material, particularly during dry weather. The heat generated could be sufficient to start a fire when in close proximity to combustible material such as long dry grass, paper etc.
Unlike a normal filter which requires periodic replacement, the DPF has been designed to regenerate, or clean itself, to maintain operating efficiency. This regeneration process takes place automatically in most cases. However, some unfavourable driving conditions may mean that the regeneration process must be initiated deliberately by the driver.
Warning indicators and messages
CAUTION
Failure to take the appropriate action when a warning message appears, may result in damage to the engine and DPF system, increased vehicle emissions and costly repairs.
If regeneration cannot be achieved automatically by the system, due to short journeys for example, the driver will be notified via a warning indicator or message.
DPF FULL
If this message appears in the message centre (with a red backlight), the vehicle should be taken to your Dealer/Authorised Repairer as soon as possible.
DPF FULL SEE HANDBOOK
If this message appears in the message centre (with an amber backlight), the driver should carry out the DPF regeneration procedure that follows, as soon as possible.
Regeneration procedure
If the warning DPF FULL SEE HANDBOOK appears in the message centre, carry out the following procedure as soon as possible.
Note: At all times during this procedure you should observe all relevant speed limits, laws and regulations. Always take account of traffic and weather conditions and drive with consideration for other road users.
- Drive the vehicle until the engine reaches normal operating temperature. The engine should not be left idling to achieve working temperature.
- Drive the vehicle for a further twenty minutes, keeping the vehicle at a steady speed between 75 km/h (45 mph) and 120 km/h (75 mph).
Keeping a constant speed enables the DPF to regenerate more efficiently. It is therefore recommended that Cruise control is used to achieve this, if possible.
- If regeneration is successful, the warning message will extinguish. If the message remains, repeat the process.
If the warning message fails to extinguish after 60 minutes of driving, contact your Dealer/Authorised Repairer for assistance.
AUTOMATIC TRANSMISSION
CAUTIONS
Never select the Park (P) position whilst the vehicle is in motion. Doing so may cause serious damage to the transmission.
Never select the Reverse (R) position whilst the vehicle is in forward motion. Doing so may cause serious damage to the transmission.
Never select a forward gear whilst the vehicle is in rearward motion. Doing so may cause serious damage to the transmission.
Do not rev the engine or allow it to run above normal idle speed while selecting D or R, or while the vehicle is stationary with any gear selected.
Do not allow the vehicle to remain stationary for any length of time, with a gear selected and the engine running. Always select P or N if the engine is to idle for a prolonged period.
The transmission system is designed to operate in two distinct modes, conventional automatic and Jaguar Sequential Shift.
The automatic modes are accessed by the gear selector:
• D - Drive - automatic shifting.
• S - Sport - sport automatic shifting.
The Jaguar Sequential Shift mode enables sequential manual gear selection in D (temporary) and S (permanent) modes, via the steering wheel mounted paddles.
Note: In addition to the standard shift patterns available in D and S, the transmission will adapt to differing conditions by modifying shift points, based upon vehicle sensor information for road gradient, cornering, braking pressure and driving style.
JaguarDrive selector

The JaguarDrive selector elevates out of the centre console when the engine is started, in readiness for gear selection. Press the brake pedal, then rotate the control to select the chosen gear (P, R, N or D) or, from D, press down on the control and rotate to select S (Sport).
P should be selected before switching off the engine. However, it is possible to switch the engine off with R, D or S selected - the selector will automatically select P, while retracting into the centre console.
Note: If the engine is switched off with N selected, the system will wait for 10 minutes before selecting P. This procedure is to allow the vehicle to be conveyed through a car wash only and should not be used for vehicle recovery purposes.
To prevent the transmission from automatically selecting P (e.g. for vehicle recovery purposes), it is necessary to activate the Emergency Park Release.
See TRANSPORTING THE VEHICLE (page 254).
Selector positions
P - Park: Use when parked. In this position the transmission is locked, do not attempt to select P if the vehicle is moving.
Note: P will be selected automatically when the engine is switched off.
R - Reverse: Do not select if the vehicle is moving forward.
N - Neutral: Disconnects drive to the wheels. Use the parking brake when stopping temporarily with N selected.
D - Drive: Gear changing is automatic for all six forward gears. The shift points are determined by accelerator pedal position and road speed, to provide the best balance of performance, refinement and fuel economy, for the large majority of driving conditions.
S - Sport: Gear changing is automatic for all six forward gears, with modified gear shift points to maximise the vehicle response in demanding driving conditions. This mode is not suitable for town or highway cruising.
Note: Both D and S positions also offer additional features, which are listed under Automatic mode and Sport mode, later in this section.
Stationary vehicle
When the vehicle is stationary, the selector may be left in D or S, unless the vehicle is to be parked. When stopping for extended periods, either select P or apply the parking brake and select N.
Selector interlock
The transmission is equipped with an interlock, to prevent inadvertent selection of a drive gear (D, S or R) from the P or N positions. To release the interlock to select a drive gear, press the brake pedal while making the selection.
Ensure the required driving range has selected prior to releasing the brake pedal. The range indicator (R, D or S) on the selector and message centre displays, will illuminate continuously to confirm selection.
Note: If the brake pedal is released too early during selector rotation from P or N to a driving range (R, D or S), then the selected range will not be engaged. The selected range will flash on the selector and message centre displays.
To obtain the selected range, press the brake pedal, select P or N and reselect the required range, ensuring the brake pedal is depressed.
If N is selected for less than 2 seconds (e.g. when moving the selector between R and D), the interlock will not activate and the brake pedal will not need to be pressed.
Note: The interlock is deactivated when the vehicle is travelling at more than 5 km/h (3 mph).
If the selector fails to elevate
If the JaguarDrive selector is obstructed when the engine is started, it may be prevented from elevating out of the centre console. If this occurs, turn off the ignition, ensure that the selector is not obstructed and then start the engine. The selector should elevate as normal. If the selector still fails to elevate, even if there is no obstruction, a fault in the system is indicated. The selector can still be used in the lowered position, but be aware that it will not automatically select P when the engine is switched off, so P should be selected manually. The fault should be rectified by a Dealer/Authorised Repairer at the earliest opportunity.
Starting
In the unlikely event that the selector did not rotate back to P when the vehicle was previously switched off, and the selector has remained in R, D or S, it will not be possible to start the engine. The vehicle will go to ignition on. The selected range will flash and the selector will now be unlocked, to allow the driver to select P and start the engine.
Automatic mode
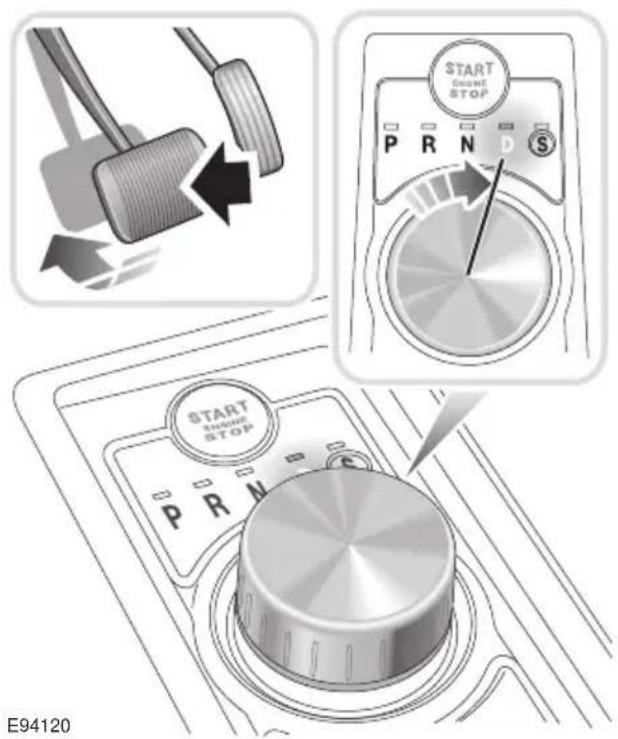
To select Drive (D) when the vehicle is stationary:-
- Apply the foot brake.
- Rotate the gear selector to D.
When in D the transmission will automatically select the most appropriate gear for the current driving conditions.
Note: When a gear is selected the vehicle may begin to move as soon as the foot brake is released.
Kick-down
When D is selected and the accelerator pedal is depressed fully, the transmission will downshift to the lowest appropriate gear. Once the accelerator pedal is returned to a normal driving position, the transmission will up-shift to the highest appropriate gear.
Note: Kick-down operation will vary according to road speed, current gear in use and accelerator movement.
Fast off
Activated when rapidly lifting off the accelerator pedal and takes account of road gradient. This feature inhibits up-shifts, enhancing performance.
Note: If Sport mode is selected, driver type recognition will vary the activation of this feature according to driving style.
Shift adapt under braking
Under braking, the transmission will vary the down-shift point in proportion to braking effort and road gradient. This feature works in conjunction with the positive torque function, resulting in a smoother down-shift.
Note: If Sport mode is selected, driver type recognition will vary the activation of this feature according to driving style.
Corner recognition
Inhibits up-shifts during cornering, to provide improved vehicle balance.
Note: If Sport mode is selected, driver type recognition will vary the activation of this feature according to driving style.
Road gradient recognition
When the vehicle is being driven on an uphi gradient, the transmission adapts the shift pattern to make better use of engine power.
When driving on a long downhill gradient, the transmission may automatically select a lower gear, to increase engine braking. Selecting Sport mode (S) will increase the tendency of the transmission to select a lower gear in these conditions, further increasing engine braking.
Note: It is also possible to manually select a lower gear to increase engine braking via use of the shift paddles.
Sport mode

To select Sport mode:
- With the selector in D, push down on the selector.
- Rotate from D to S.
Note: When Sport mode is selected SPORT will be displayed in the message centre, and the selector indicator will illuminate.
Sport mode enhances the responsiveness of the transmission, to provide a sporting feel to driving the vehicle. Sport mode is recommended for overtaking manoeuvres and for when rapid progress is desired.
To return to automatic mode move the selector lever back to the D position. The D on the selector display will illuminate to confirm that automatic mode has been selected.
Transmission
Driver type recognition
In Sport mode, the transmission monitors driving style and in combination with sensors in the vehicle, varies the shift schedule, fast-off, corner recognition and shift adapt under braking functions, according to the driving style.
Manual mode - Jaguar Sequential Shift

E94122
Shifts in the Jaguar Sequential Shift manual mode are made using the steering wheel mounted shift paddles and are optimised to provide a rapid response to gear shift requests. Up-shift requests (+) are optimised for performance via the short shift function, resulting in firmer feeling shifts than in automatic mode. Down-shift requests (-) utilise a throttle blip during the shift, resulting in improved shift feel.
The Jaguar Sequential Shift manual mode can be accessed either temporarily, or permanently.
Temporary manual gear selection: When the gear selector is in the D position, manual mode may be directly accessed by the single action of operating the steering wheel mounted shift paddles.
This convenience feature allows immediate but temporary use of the shift paddles when the gear selector is in D.
If continued use of manual mode is required, the gear selector may be subsequently moved to the S position to enter permanent manual mode in the currently selected gear.
If the gear selector remains in the D position, temporary manual mode will be held whilst the driver is accelerating, decelerating, cornering or continuing to request shifts via the paddles.
The transmission will revert to automatic operation after a short period of driving at steady speed; alternatively the shift-up (+) paddle may be held for a short period (approximately one second) to return directly to automatic operation in D.
Permanent manual gear selection: Select the S position, permanent manual mode is then accessed by the operation of the steering wheel mounted shift paddles.
The message centre will highlight the currently selected gear.
Note: When the transmission is set to permanent manual mode (i.e. using the paddles to change gear while in Sport mode) and Dynamic mode is selected, transmission up-shifts are fully controlled by the driver. This means that the transmission will not change up a gear automatically, even when the vehicle's rev limit is reached. When the rev limit is reached, the gear position indicator in the message centre will glow amber, to indicate that the next gear should be selected.
To exit from the Jaguar Sequential Shift permanent manual mode, either pull and hold the shift-up paddle for approximately one second (to return directly to automatic operation in S), or rotate the gear selector to the D position. The transmission will revert to the D automatic shift mode.
Manual operation
To shift-up, briefly pull the shift-up (+) paddle on the right-hand side of the steering wheel towards you.
To shift-down, briefly pull the shift-down paddle (-) on the left-hand side of the steering wheel towards you.
The message centre display will change to highlight the requested gear.
Note: The transmission will inhibit up-shifts and down-shifts if the requested shift would result in an engine speed outside the normal operating range of the engine. If this occurs, the message centre will briefly display the requested gear selection, but will return to displaying the current gear.
The Jaguar Sequential Shift mode also has the following features:
Kick-down: Operation of kick-down in Jaguar Sequential Shift mode will override the currently selected gear. The lowest available gear will be selected for maximum acceleration and will be highlighted in the message centre display. Subsequent manual shifts may then be selected as usual.
Positive torque: Provides throttle blips on down-shifts, improving shift feel and response.
Shift assist: The transmission will automatically up-shift at the engine speed redline in Jaguar Sequential Shift mode, as if commanded manually.
The transmission will automatically down-shift, when the engine speed drops too low for the currently selected gear.
When the vehicle approaches, or comes to rest, second gear is automatically selected.
Subsequent pull-aways will occur in second gear, unless the accelerator pedal demand is high or a down-shift is manually selected, in which case, first gear will be selected.
In all cases the message centre will display the current gear.
Note: During sustained braking, if a down-shift is selected at a speed which would result in the engine speed exceeding its normal operating range, the gear change will be indicated in the message centre, but the down-shift will be delayed until the vehicle speed has reduced sufficiently for the gear selection to be made, without causing the engine speed to exceed its normal operating range.
Limp-home mode
Note: The driver should be aware that the vehicle's performance will be reduced and must take this into account when driving. Also the use of the Jaguar Sequential Shift paddles will be disabled. In this event, seek qualified assistance as soon as possible.
In the unlikely event of an electrical or mechanical failure, transmission operation will be limited. The vehicle gear selector ranges P, R, N, D and S may still be used to enable the vehicle to be driven to a safe area.
Some faults will cause the selector to be locked in position until the ignition is switched off. If the selected range flashes, it signifies that the driver request cannot be engaged. Re-select N and repeat the attempt.
If the transmission is still unable to select the requested gear, contact your Dealer/Authorised Repairer.
Message centre display
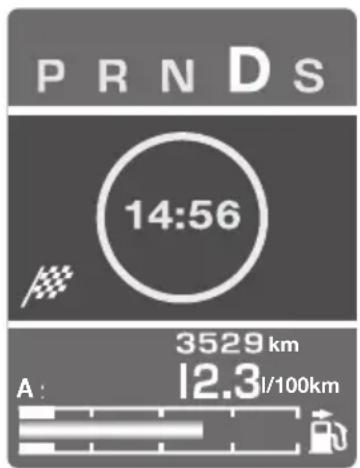
JAG1629
The message centre will confirm the JaguarDrive selector position (selected gear).
Selector position is shown highlighted at the top of the message centre and confirmed by the dot on the circular representation of the selector.
If manual mode is selected, the numbers 1 to 6 appear at the top of the display, with the currently selected gear highlighted.
Note: With the transmission set to permanent manual mode and Dynamic mode selected, when the rev limit is reached, the gear position indicator in the message centre will glow amber, to indicate that the next gear should be selected.
The message centre may also display the following messages with associated warning indicators:
ENGINE SYSTEMS FAULT (Red)
RESTRICTED PERFORMANCE (Red or Amber) GEARBOX FAULT (Amber)
If any of these messages are displayed it is likely that loss of power or driveability will be experienced. Seek qualified assistance as soon as possible.
Do not rest your foot on the brake pedal whilst the vehicle is in motion. This may cause a light application of the brakes, which can result in overheating, reduced brake performance, and excessive brake wear.

Never allow the vehicle to coast (freewheel) with the engine turned off. The engine must be running to provide full braking assistance. The brakes will still function with the engine off, but far more pressure will be required to operate them.

If the red brake warning indicator illuminates, safely bring the vehicle to a stop, as quickly as possible. Seek qualified assistance before proceeding.

Never place non-approved floor matting or any other obstructions under the brake pedal. This restricts pedal travel and braking efficiency.
Brake pads
Brake pads require a period of bedding in when new. Drive with extra caution for the first 500 km (300 miles) to avoid the need for heavy braking.
Brake pad wear warning
When the brake pads are wearing low, the warning message BRAKE PADS LOW is displayed in the message centre. Arrange for your vehicle to be seen by your Dealer/Authorised Repairer at the earliest opportunity.
Wet conditions
Driving through heavy rain or water can have an adverse effect on braking efficiency. Under such circumstances, it is recommended that you lightly apply the brakes intermittently to dry the brakes.
ABS warning indicator

If this amber warning indicator illuminates while driving and/or ABS FAULT is displayed in the message centre, drive with extra caution, avoid heavy braking where possible, and seek qualified assistance as soon as possible.

If this red warning indicator illuminates while driving and/or the message LOW BRAKE FLUID is
displayed in the message centre, check the brake fluid level at the earliest opportunity and top-up as required. See BRAKE FLUID CHECK (page 206).
HINTS ON DRIVING WITH ABS
WARNINGS

ABS cannot overcome the physical limitations of braking distance. Nor can it overcome the lack of grip on a face (e.g. aquaplaning on water).

Braking distance is increased on a slippery surface. This applies to all vehicles, even those fitted with ABS.

The driver should not be tempted to take risks when driving, in the hope that ABS will correct errors of rent. In all cases it remains the driver's ability to drive with due care and, paying particular attention to the speed, weather, road conditions etc.
ABS (Anti-Lock Braking System) allows maximum brake pressure, and thus maximum braking efficiency, to be applied, and prevents the road wheels locking. This allows the driver to retain steering control during heavy braking under most road conditions.
ABS optimises tyre to road adhesion under maximum braking conditions, though it cannot provide increased cornering ability.
During emergency braking conditions ABS constantly monitors the speed of each wheel. ABS varies the brake pressure to individual wheels, according to the grip available. The constant alteration of brake pressure can be felt as a pulsing sensation through the brake pedal. This is not a cause for concern, as it is designed to demonstrate to the driver that ABS is operating.
ABS braking techniques
For optimum ABS performance, these instructions on braking techniques during ABS operation should be followed:
- Do not release the brake pressure when the pulsating effect is felt. Maintain a constant pressure until the manoeuvre is completed.
- To familiarise yourself with the feel of the brake pedal during ABS braking, practise an emergency stop procedure, always making sure it is safe to do so. With the seat belts fitted to all occupants, drive the vehicle at 32 km/h (20 mph) and brake sharply.
- ABS enables the driver to steer around obstacles during emergency braking. However, the consequences of turning sharply at high speed cannot be overcome by the ABS.
- Do not attempt to pump the brakes to avoid skidding, as this can interfere with ABS operation. The ABS will not allow the wheels to skid under normal road conditions.
- The ABS will tend to keep the vehicle straight during braking. Because braking distances may increase under certain road conditions, it is necessary to plan and make turning manoeuvres as early as possible.
Electronic Brakeforce Distribution (EBD)
EBD balances the distribution of braking forces between the wheels on the front and rear axles, to maintain maximum braking under all vehicle loading conditions.
For example; Under light loads, EBD applies less braking effort to the rear wheels, to maintain stability. Conversely, it allows full braking effort to the rear wheels when the vehicle is towing or is heavily laden.

A fault with the EBD system is indicated by illumination of the red brake warning indicator and the
message EBD FAULT is displayed in the message centre. Gently stop the vehicle, as soon as safety permits, and seek qualified assistance.
Emergency Brake Assist (EBA)
WARNING

The EBA system is an additional safety system; it is not intended to relieve the driver of his or her responsibility for exercising due care and attention when driving.
The EBA system measures the rate at which the brake pressure increases. If the system detects an emergency braking situation, EBA automatically initiates full braking effect. This can reduce stopping distances in critical situations.
EBA stops operating as soon as the brake pedal is released.
DSC
EBA is part of the Dynamic Stability Control (DSC) system and a fault with the EBA system is indicated by the amber DSC warning indicator illuminating and DSC NOT AVAILABLE (with amber backlight) displaying in the message centre. Seek qualified assistance as soon as possible.
Brake vacuum assist
(V6 petrol models only)
When the engine is cold and/or engine vacuum is low, Brake vacuum assist provides additional brake pedal assistance. When the function is operating, a pulsation may be felt through the brake pedal - this is not a cause for concern.
A fault is indicated by the message BRAKE ASSIST FAULT (with amber backlight) appearing in the message centre. Increased brake pedal effort may be required to slow the vehicle when the engine is cold and/or engine vacuum is low. Seek qualified assistance.
natural_image
Interior view of an airplane cabin showing the dashboard and seat area (no text or symbols visible)The switch which operates the parking brake is mounted on the centre console to the rear of the gear selector.
To engage the parking brake (1): Pull the parking brake switch upwards and release. The switch will return to the neutral position. The Parking brake warning and Brake fluid low warning indicator on the instrument panel will illuminate.
The Drive Away Release feature allows the parking brake to release automatically as the vehicle is driven away.
To disengage the parking brake (2): With the ignition system on or with the engine running, apply the foot brake and press the parking brake switch down.
If the parking brake is applied while the vehicle is stationary and D or R is selected, applying the throttle will automatically release the parking brake.
The parking brake is also automatically released when the gear selector is moved from the P position.
If the parking brake is inadvertently applied when the vehicle is moving at above 3 km/h (1.8 mph), PARK BRAKE APPLIED is displayed in the message centre, the warning indicator in the instrument panel will illuminate and a warning chime will sound.
If the parking brake is applied whilst the vehicle is moving, releasing the switch will disengage the parking brake. The parking brake cannot be applied when the vehicle is moving, if the accelerator pedal is pressed.
Note: If the vehicle is in motion, the parking brake should only be used as an emergency brake.
CAUTION

Always apply the parking brake when the vehicle is parked.
The warning indicator in the instrument panel will remain on for a short time, if the parking brake is applied when the ignition system is reverted to the convenience mode.

If a fault in the system is detected, the amber brake warning indicator will illuminate and PARK BRAKE
FAULT or CANNOT APPLY PARK BRAKE will be displayed in the message centre. Seek qualified assistance as soon as possible.
If the battery has been discharged or disconnected, APPLY FOOT AND PARK BRAKE will be displayed in the message centre when the ignition is next switched on. Depress the foot brake and pull the parking brake switch up to apply the parking brake. This is required to reset the parking brake system. The parking brake will now function correctly.
It remains the driver's responsibility to be vigilant when reversing. Small children or animals may not be detected by the system.

It remains the driver's responsibility to detect obstacles and estimate the vehicle's distance from them. Some overhanging objects, barriers, thin obstructions or painted surfaces which could possibly cause damage to the vehicle may not be detected by the system. Always be vigilant when reversing.
CAUTIONS
Objects moving away from the vehicle will be reported. However, whilst driving away, object warning may be temporarily reported due to ground reflection.
Systems using the same frequency band as the front parking sensors, may cause irregular tones to be emitted.
Note: Once the system has been activated by selecting reverse or using the switch, the front and rear sensors are active when the gear selector is in neutral. Therefore, if an obstacle is detected an audible warning tone will sound.
The parking aid is automatically in standby when the ignition is on and provides the driver with information on most obstructions, and their distance from the vehicle, when manoeuvring. This is achieved by using four ultrasonic sensors on each bumper.
When objects are detected the Park aid will emit a warning tone which increases in frequency and then becomes constant, as the vehicle gets closer to the object.
USING THE PARKING AID
Touch-screen
To set the volume of the parking aid warning tones:
- Select Vehicle from the touch-screen Home menu, then select Veh. settings.
- Select Parking, then select Vol. presets.
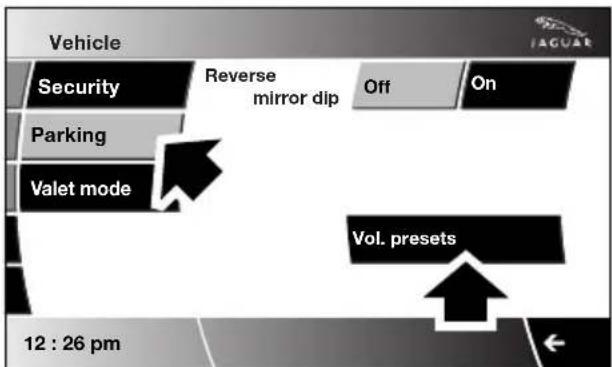

E94137
Touch the Parking aid + or - button to increase or decrease the warning tone volume.
Note: This adjusts both front and rear speaker volume.

E94138
When the parking aid is active, a pop-up screen is initiated displaying a plan view of the vehicle and the immediate surrounding area. This can be cancelled by touching the screen within the pop-up area.
Note: If a rear-view camera is fitted, when reverse gear (R) is selected, the camera display is selected automatically. To view the parking aid display, touch the screen. The rear view camera will indicate when a rear parking aid sensor has been activated, by showing a red panel over the relevant area of the camera display. See Rear view camera (page 152).
Rear parking aid
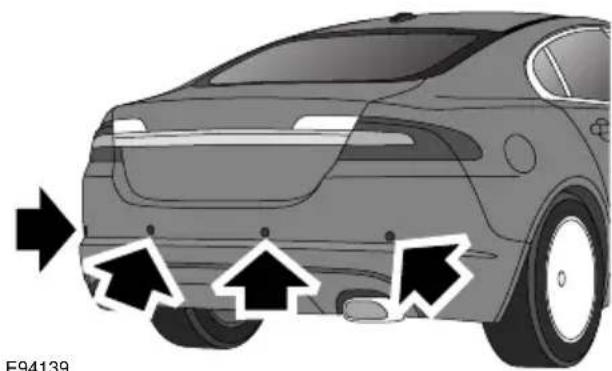
natural_image
Side view of a car with three arrows pointing to the front side (no text or symbols)The rear parking aid operates only with the ignition is on and reverse gear selected. If obstacles are detected within operating range (shown in next illustration), the parking aid automatically provides an audible proximity warning.
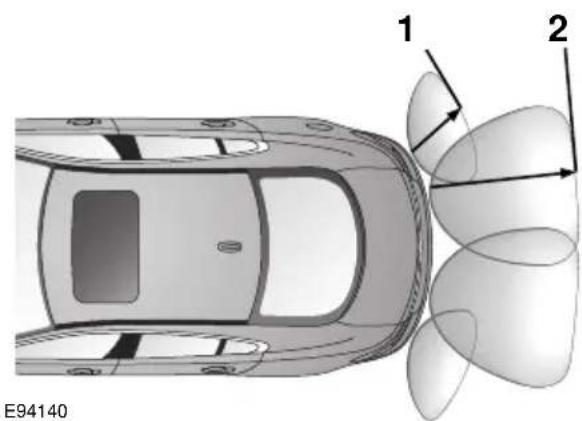
- Approximately 600 mm (24 inches).
- Approximately 1800mm (71 inches).
Note: The outer rear sensors (1) will show visual detection on the touch-screen, before the audible warning is given.
Front and rear parking aid
CAUTION
The parking aid system automatically switches off when the vehicle is moving above 15 km/h (9 mph) in D, and will need to be reselected when moving below 15 km/h (9 mph).
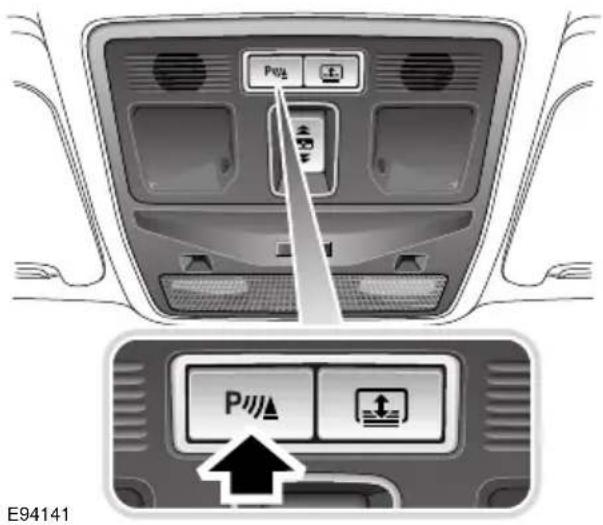
When both front and rear parking aids are fitted, a switch is located in the overhead console.
Pressing the switch turns both the front and rear parking aids on or off. The switch warning indicator will come on when the system is turned on. A switch is not provided when only a rear parking aid is fitted.
Note: The front parking aid will also operate when reverse gear is selected.
The front parking aid provides an audible proximity warning when driving forwards or reversing.
The front and rear sensors only operate within a fixed speed range in forward gears and are not effective when moving forwards above 15 km/h (9 mph).

Objects are detected within the approximate operating range from the front of the vehicle, as shown in the illustration above:
- 600 mm (24 inches).
- 1800 mm (71 inches).
- 800 mm (31 inches).
If an obstacle is detected at the front or rear of the vehicle, a warning tone will be heard from the front or rear speaker respectively.
Note: The outer rear sensors (1) will show visual detection on the touch-screen, before the audible warning is given.
The warning tone increases in rate as the vehicle approaches the obstacle.
The front or rear warning tone will become continuous when the obstacle is detected at or within 300 mm (12 inches) from the vehicle.
Note: The outer front and rear sensors will switch off if the distance to an object increases or remains constant for 3 seconds. The sensors will reactivate automatically if a new object is detected within the operating range, or if the distance to the original object reduces.
Rear fitted accessories
Particular care must be taken when reversing with rear fitted accessories e.g. bicycle carrier, as the rear park assist will only indicate the distance from the bumper to the obstacle.
Cleaning the sensors
Do not clean the sensors with abrasive or sharp objects or materials.
For reliable operation, the sensors in the front and rear bumpers should be kept free from ice, frost and grime.
When using a high pressure spray the sensors should only be sprayed briefly and not from a distance of less than 200 mm (8 inches).
System fault
If the system has a fault when engaging reverse gear or turning on the ignition, then a single, three second tone will be heard (only once per ignition cycle) and a pop-up warning will appear on the touch-screen. If both front and rear parking aids are fitted, the warning indicator in the parking aid switch will flash for three seconds and then switch off, if a fault is detected.
If a fault is detected, the system is automatically disabled.
The parking aid may sound spurious tones if it detects a frequency tone using the same band as the sensors (e.g. air brakes).
It remains the driver's responsibility to detect obstacles and estimate the vehicle's distance from them when reversing. Some overhanging objects or barriers, which could possibly cause damage to the vehicle, may not be detected by the camera.

Always be vigilant when reversing.

E96469
The system provides a rear view image to assist in reversing the vehicle.
The camera is positioned centrally and unobtrusively, just above the rear license plate. When reverse gear (R) is selected, the rear view camera displays a wide-angle, colour view from the rear of the vehicle, displayed on the touch-screen.
The camera display also incorporates graphic overlays to aid the driver in assessing vehicle direction, width and proximity to surrounding objects. These are detailed under Camera overlays later in this section.
The camera display on the touch-screen has priority over the parking aid display. To view the parking aid display instead, touch the touch-screen.
If a parking aid sensor is activated with the camera in use, a corresponding red shaded area will appear on the camera display to identify which sensor has been activated.
To cancel the rear view camera display at any time, touch the touch-screen.
The camera image will not be displayed when any of the following apply:
• D is selected and the vehicle speed is greater than 16 km/h (10 mph).
- D is selected for longer than 2 seconds and the vehicle speed is less than 16 km/h (10 mph).
Camera overlays

JAG1651
CAUTIONS
If, after the ignition has been switched off, the steering wheel is turned, the projected wheel trajectory graphics (A) will display as being straight (as in the second illustration), until the vehicle is driven for approximately 10 seconds.

JAG1652
A. Solid line: This is the projected wheel trajectory.
B. Dotted line: This is the safe working width of the vehicle (including standard exterior mirrors).
C. Boot access guideline: Do not reverse the vehicle beyond this point if access to the boot is required.
D. Rear bumper.
E. Parking sensor activation: A red area will appear on the camera image, to indicate which rear parking sensor(s) has been activated.
RUNNING-IN
Apart from a few precautionary recommendations, there are no strict running-in procedures for this vehicle.
By observing the following advisory precautions you will ensure maximum engine, transmission and brake life for your vehicle:
Engine
- Allow the engine to reach operating temperature before operating at engine speeds over 3 500 rev/min.
• Vary the speed frequently. - From 1 500 kilometres (940 miles) onwards, gradually increase performance of the vehicle up to the permitted maximum speed.
Engine oil consumption
A certain amount of oil consumption is normal. The rate of consumption will depend on the following:
• The quality and viscosity of the oil.
- Climatic conditions.
- The speed at which the engine is being operated.
- Road conditions.
Drivers should expect above normal consumption when the engine is new, and after running-in if high speeds are sustained.
Brakes
To ensure that brake pads reach their optimum wear and performance condition, usually within 500 kilometres (300 miles), it is recommended that the following points are observed.
- Where possible, avoid heavy or harsh braking, as this can result in damage to the brake pads and discs.
- Avoid prolonged use of the brakes (e.g. when descending severe gradients).
- Frequent light application of the brakes is desirable. This helps to fully bed-in the brake pads.
These running-in guidelines also apply when new brake discs or pads have been fitted.
Final drive unit
During the first 1 500 kilometers (940 miles):
- Avoid full throttle applications and do not exceed 190 km/h (120 mph). Observe the national speed limits in the country in which you are travelling.
- Do not participate in motor racing events, test track days, sports driving schools or similar for the first 8 000 kilometers (4 975 miles).
ECONOMICAL DRIVING
There are two main factors which influence fuel economy, the way the vehicle is driven and maintenance.
Driving tips for economy
- Avoid unnecessary journeys, especially short stop-start trips.
- Accelerate smoothly and gently from a stand still.
- Allow time to brake gently and smoothly.
- Be aware of traffic and road conditions ahead, and take action in time to avoid hard braking or acceleration.
- When stationary apply the park brake, and select neutral.
- Turn off the air conditioning when not needed.
Maintenance and fuel economy
Regular servicing by a Dealer/Authorised Repairer, along with regular checks by the driver are essential for vehicle longevity and fuel economy.
The condition of the engine (oils, filters, spark plugs, settings etc.) tyre pressures, and wheel alignment, will all have a bearing on fuel economy. For this reason it is essential that the vehicle is checked regularly by the driver and serviced by an approved Dealer/Authorised Repairer at the correct intervals.
Note: If you are in any doubt about the maintenance requirements, intervals, or checks required, contact your Dealer/Authorised Repairer for advice.
Cruise control enables the driver to maintain a constant road speed without using the accelerator pedal. This is particularly useful for motorway cruising, or for any journey where a constant speed can be maintained for a lengthy period.

The cruise (speed) control system can be used by the driver to maintain a selected vehicle speed above 30 km/h (18 mph).
Adjustment controls on the steering wheel allow the driver manual control of the system. Brake operations also influence the cruise control system.
- SET - The speed adjustment control thumb wheel is used to engage cruise control initially by rolling it upwards. It is also used to increase (+) or decrease (-) the set speed until the desired speed is obtained.
- CANCEL - Cancels cruise control but retains the set speed in memory.
- RESUME - Resumes the cruise control set speed after it has been cancelled.
USING CRUISE CONTROL
Setting vehicle speed
WARNING

Only use cruise control when conditions are favourable, for example, straight, dry, open roads with light traffic.

In certain conditions, such as a steep downhill gradient, the vehicle speed may exceed the set cruising speed.
This is because engine braking is unable to maintain or reduce the vehicle speed. Driver intervention may be required.
When you are travelling at the speed you require, roll the speed adjustment control (1) upwards or downwards to increase or decrease speed.
Cruise control will engage and maintain the set speed and you can remove your foot from the accelerator pedal.
Note: Cruise control will automatically disengage when the brake pedal is pressed or when the vehicle speed falls below 30 km/h (18 mph).
Changing the speed

There are two ways to change the set speed:
- Accelerate or decelerate to the desired speed then roll the speed adjustment control upwards (+).
- Increase or decrease the speed by rolling the speed adjustment control upwards (+) or downwards (-) until the desired speed is obtained.
Note: The set speed can be increased or decreased in steps of 2 km/h (1 mph), by rolling the speed adjustment control upwards (+) or downwards (-) briefly until the desired speed is obtained.
Resuming the speed
If the vehicle is accelerated above the set speed, then the set speed will be resumed when the accelerator pedal is released.
If CANCEL is pressed, or the brake pedal is pressed, the cruise control will disengage but the set speed memory will be retained. Press RESUME and the vehicle will return to the set speed.
Note: Cruise control will not resume at speeds below 30 km/h (18 mph).
RESUME will not operate if the ignition has been turned off.
CAUTIONS
! RESUME should only be used if the driver is aware of the set speed and intends to return to it.
It is not recommended to resume set speed when a low gear is selected as excessive engine speeds will occur.
Cruise control will switch off and clear the memory when:
• The ignition system is switched off.
- A fault occurs. The cruise control system will switch off and cannot be used until the fault is cleared.
Automatic switch off
Cruise control will switch off but the set speed will remain in the memory when:
• The CANCEL button is pressed.
• The brake pedal is pressed.
• Speed falls below 30 km/h (18 mph).
- Neutral, Park or Reverse gear positions are selected.
• Dynamic Stability Control is operating.
- The difference between the actual and set speed is too great.
- When the vehicle reaches a maximum speed of 192 km/h (120 mph).
- The accelerator pedal is used to accelerate beyond the set speed for too long a period.
Message centre information displays
| Message Warning | Indicator | Priority Indicator | Meaning |
| CRUISE OVERRIDE None | None Driver | is pressing | the accelerator pedal, overriding Cruise Control function. Message will disappear when accelerator pedal is released and Cruise Control speed is resumed. |
| CRUISE CANCELLED None | None Driver | has cancelled cruise control or is braking. | |
| CRUISE NOT AVAILABLE None | None Cruise Control or Adaptive Cruise Control malfunction. | ||
Adaptive cruise control (ACC)
The Adaptive Cruise Control (ACC) system is designed to aid the driver to maintain a gap from the vehicle ahead or a set road speed if there is no slower vehicle ahead. The system is intended to provide enhanced operation of the vehicle when following other vehicles which are in the same lane and travelling in the same direction.
WARNING

ACC is not a collision warning or avoidance system. Additionally, ACC will not react to:
- Stationary or slow moving vehicles below 10 km/h (6 mph).
- Pedestrians or objects in the roadway.
- Oncoming vehicles in the same lane.
The ACC system uses a radar sensor, which projects a beam directly forward of the vehicle to detect objects ahead.

natural_image
Front view of a silver sedan car with headlights and grille (no visible text or symbols)The radar sensor is mounted centrally behind the bumper cover above the cooling aperture, to provide a clear view forward for the radar beam.
CAUTION

Only use ACC when conditions are favourable (i.e. main roads with free flowing traffic).

Do not use in poor visibility, specifically fog, heavy rain, spray or snow.
CAUTION

Do not use on icy or slippery roads.

It is the drivers responsibility to stay alert, drive safely and be in control of the vehicle at all times.

Keep the front of the vehicle free from dirt, metal badges or objects, including vehicle front protectors, which may prevent the sensor from operating.

Do not use ACC when entering or leaving a motorway.
USING ACC

The system is operated by adjustment controls mounted on the steering wheel. The driver can also intervene at any time by use of the brake or accelerator pedals. The steering wheel adjustment controls operate as follows:
- SET - Rotate the thumbwheel upwards (+) or downwards (-), to increase or decrease speed, until the desired speed is achieved.
- Gap increase or decrease. Four settings available by adjusting the thumb wheel.
- CANCEL - Cancels but retains the set speed in memory.
- RESUME - Resumes the set speed after it has been cancelled.
Setting the speed
Accelerate as normal until the required speed is reached.

Rotate the speed adjustment control upwards (+) to store the vehicle speed in the memory and engage the system.
The set speed will be displayed on the message centre (e.g. SETSPEED 80 KM/H (50 MPH)).
Changing the speed
There are three ways to change the set speed:
- Accelerate or brake to the desired speed then rotate the speed adjustment control upwards (+).
- Increase or decrease the speed by rotating the speed adjustment control upwards (+) or downwards (-), until the required set speed is shown on the message centre. The vehicle speed will gradually adjust to the selected speed.
- Increase or decrease the speed in steps of 2 km/h (1 mph) by rotating the speed adjustment control upwards (+) or downwards (-) briefly until the desired speed is obtained.
ACC operates between approximately 30 km/h and 180 km/h (18 mph and 112 mph) dependent on the country specification.
Set speeds outside this range will not be captured.
The ACC may apply the brakes to slow down the vehicle to the new set speed. The new set speed will be displayed on the message centre until ACC is cancelled.
Follow mode gap settings
WARNING
When in follow mode, the vehicle will not decelerate automatically to a stop, nor will the vehicle always decelerate quickly enough to avoid a collision, without driver intervention.
Once a set speed has been selected, the driver can release the accelerator and the set road speed will be maintained.
When a vehicle ahead enters the same lane or a slower vehicle is ahead in the same lane, the vehicle speed will be adjusted automatically until the gap to the vehicle ahead corresponds to the default gap setting (gap level 3). The vehicle is now in follow mode.

The amber warning indicator in the instrument panel will be illuminated.

The message centre will display the gap set.
The vehicle will then maintain the constant time gap to the vehicle ahead until:
- The vehicle ahead accelerates to a speed above the set speed.
- The vehicle ahead moves out of lane or out of view.
• A new gap distance is set.
If necessary, the vehicle brakes will be automatically applied to slow the vehicle to maintain the gap to the vehicle in front.
The maximum braking which is applied by the ACC system is limited and can be overridden by the driver applying the brakes, if required.
Note: Driver braking will cancel ACC.
If the ACC system predicts that its maximum braking level will not be sufficient, then an audible warning will sound while the ACC continues to brake. DRIVER INTERVENE will be displayed on the message centre. The driver should take immediate action.
When in follow mode, the vehicle will automatically return to the set speed when the road ahead is clear, for instance when:
- The vehicle in front accelerates or changes lane.
- The driver changes lane to either side or enters an exit lane.
The driver should intervene if appropriate.
Changing the follow mode set gap
The gap from the vehicle ahead can be decreased or increased by rolling the thumbwheel on the steering wheel. Four gap settings are available and the selected gap setting will be displayed on the message centre when either ACC button is pressed.
Each gap level is indicated by an additional chevron in front of the vehicle icon in the message centre (one chevron (gap level 1) being the shortest, four chevrons (gap level 4) being the longest). After the ignition is switched on, the default gap (gap level 3) will be automatically selected ready for ACC operation.
Note: When the ignition is switched off, the gap setting will revert to the default setting (gap level 3) when switched on again.
Note: It is the driver's responsibility to select a gap appropriate to the driving conditions.
Overriding the speed and follow mode
WARNING

Whenever the driver is overriding the ACC by depressing the accelerator pedal, the ACC will not automatically apply the brakes to maintain separation from any vehicle ahead.
The set speed and gap can be overridden by pressing the accelerator pedal when cruising at constant speed or in follow mode. If the vehicle is in follow mode, the instrument warning indicator will go out when the ACC is overridden by the driver using the accelerator and CRUISE OVERRIDE will be displayed on the message centre. When the accelerator is released the ACC function will operate again and vehicle speed will decrease to the set speed, or a lower speed if follow mode is active.
Automatic low speed switch off
If the speed of the vehicle decreases below 30 km/h (18 mph), the ACC system will be automatically switched off and the instrument warning indicator will go out.
If the brakes were being applied by the ACC system, they will be slowly released.
This will be accompanied by an audible warning, and DRIVER INTERVENE will be displayed on the message centre. The driver must take control.
Automatic switch off
ACC will disengage, but not clear the memory when;
• the CANCEL button (3) is pressed
• the brake pedal is pressed
- Neutral (N), Park (P) or Reverse (R) gear positions are selected
• Dynamic Stability Control activates.
ACC will disengage, and clear the memory when;
• the ignition system is switched off
• maximum vehicle speed is reached
• a fault occurs in the ACC system.
Resuming the speed and follow mode
CAUTION

RESUME should only be used if the driver is aware of the set speed and intends to return to it.
By pressing the RESUME button (4) after ACC has been cancelled, for example, after braking, the ACC will become active again provided that the set speed memory has not been erased. The original set speed will be resumed (unless a vehicle ahead causes the follow mode to become active) and the set speed will be displayed in the message centre for four seconds.
Hints on driving with ACC
The system acts by regulating the speed of the vehicle using engine control and the brakes. Gear changes may occur in response to deceleration or acceleration whilst in ACC.
ACC is not a collision avoidance system. However, during some situations the system may provide the driver with an indication that intervention is required.
An audible alarm will sound, accompanied by the message DRIVER INTERVENE if the ACC detects:
- A failure has occurred whilst the system is active
- That using maximum ACC braking only is not sufficient.
Note: ACC operates when the gear selector lever is in position S or D.
Note: When engaged, the accelerator pedal rests in the raised position. Fully release the pedal to allow normal ACC operation.
Note: When braking is applied by the ACC, the vehicle brake lamps will be switched on although the brake pedal will not move.
Detection beam issues
1

natural_image
Top-down view of three cars on a road with a dashed lane and shadow line (no text or symbols)2

natural_image
Top-down diagram of a road scene with a car and a vehicle, showing a traffic cone and sensor array (no text or symbols)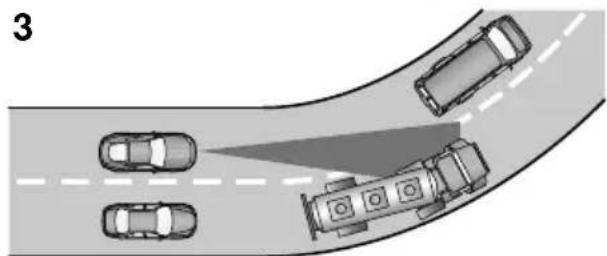
natural_image
Top-down diagram of a road intersection with vehicles and a truck, no text or symbols presentE91498
Detection issues can occur:
- When driving on a different line to the vehicle in front.
- When a vehicle edges into your lane. The vehicle will only be detected once it has moved fully into your lane.
- There may be issues with the detection of vehicles in front when going into and coming out of a bend.
In these cases ACC may brake late or unexpectedly. The driver should stay alert and intervene if necessary.
ACC malfunction
If a malfunction occurs during operation of the system in cruise or follow modes, the ACC system will switch off and cannot be used until the fault is cleared. The message DRIVER
INTERVENE appears briefly and is then replaced by the message CRUISE NOT
AVAILABLE. If malfunction of the ACC or any related system occurs at any other time, the message CRUISE NOT AVAILABLE will be displayed. It will not be possible to activate the ACC system in any mode.
Accumulations of dirt, snow or ice on the sensor or cover may inhibit ACC operation. Fitting of a vehicle front protector or metallised badges may also affect ACC operation.
The ACC system relies on its radar to detect objects and constantly scans ahead. If the radar detects no objects ahead in ACC or follow mode, then the ACC will be deactivated, the audible alarm sounds and the message
DRIVER INTERVENE displays briefly. The message ACC SENSOR BLOCKED will then be displayed.
The same messages may also be displayed while driving on open roads with few objects for the radar to detect.
Clearing the obstruction allows the system to return to normal operation. If the obstruction is present when ACC is inactive, e.g. on initial starting or with the ACC system switched off, the message ACC SENSOR BLOCKED will be displayed.
Tyres other than those recommended may have different sizes. This can affect the correct operation of the ACC.
Adverse weather conditions
WARNING

Do not use in poor visibility, specifically fog, heavy rain, spray or snow.

Do not use on icy or slippery roads.
During adverse weather conditions such as heavy rain or snowfall, the sensitivity of radar blockage detection is increased, so that it can correctly detect any reduced performance caused by a blocked sensor.
During these conditions, the warning message ACC SENSOR BLOCKED may be displayed more frequently, especially in areas where there are few roadside objects for the radar to detect.
FORWARD ALERT FUNCTION

JAG1303
Limited detection and warning of objects ahead, is provided during ACC operation by the ACC FORWARD ALERT warning. The enhanced forward alert feature additionally provides warnings when ACC is not engaged; if an object is detected close ahead, then the warning tone and message will be issued. The brakes will not be applied.
The forward alert system does not initiate any action. The driver must take appropriate action when the FORWARD ALERT message is displayed. However, the system monitors driver actions (e.g. braking, steering or indicating) and may not initiate the warning display if the appropriate action has been taken early enough.
The Forward alert function may be switched on or off using the forward alert switch, located where shown.

When the indicator in the instrument panel is on, Forward alert is active.
The sensitivity of the warning may be changed:
- Press the gap decrease button when ACC is disengaged to display and then decrease the sensitivity of the alert.
- Press the gap increase button to display and then increase the sensitivity of the alert.

FORWARD ALERT is displayed in the message centre.
Advanced Emergency Brake Assist, is an additional safety system and is not intended to relieve the driver of the responsibility for exercising due care and attention when driving.
On vehicles fitted with Advanced Emergency Brake Assist, brake response is improved during emergency braking when a moving vehicle is detected close ahead.
Advanced Emergency Brake Assist activates If the risk of collision increases after the FORWARD ALERT warning is displayed.
See FORWARD ALERT FUNCTION (page 164). The brakes are automatically applied gently in preparation for rapid braking (which may be noticeable). If the brake pedal is then pressed quickly, then braking is implemented fully, even if the pressure on the pedal is light.
See HINTS ON DRIVING WITH ABS (page 144).
Advanced Emergency Brake Assist is available at speeds above approximately 7 km/h (5 mph) and will function even if Forward Alert and Adaptive Cruise Control are switched off. A fault with the system will be indicated by the warning FORWARD ALERT UNAVAILABLE appearing in the message centre. Advanced Emergency Brake Assist will not be available until the fault is rectified.
CAUTION
The system may not react to slow moving vehicles and will not react to stationary vehicles or vehicles not travelling in the same direction as your vehicle.
Advanced Emergency Brake Assist can only improve braking performance if the driver applies the brakes.
Warnings may not appear if the distance to the vehicle ahead is very small or if steering wheel and pedal movements are large (e.g. to avoid a collision).
Advanced Emergency Brake Assist utilises the same radar sensor as Adaptive Cruise Control and Forward Alert - the same limitations of performance apply.
See PRINCIPLE OF OPERATION (page 159).
See USING ACC (page 159).
See FORWARD ALERT FUNCTION (page 164).
MESSAGE CENTRE INFORMATION MESSAGES
| Message Meaning | |
| CRUISE OVERRIDE Driver is pressing the accelerator pedal overriding cruise control function. Message will disappear when accelerator pedal is released and cruise control speed is resumed. | |
| CRUISE CANCELLED Driver has cancelled cruise control or is braking. | |
| CRUISE NOT AVAILABLE | Cruise control or Adaptive Cruise Control malfunction. |
| DRIVER INTERVENE Action by the driver to apply the brakes is required. | |
| SETSPEED XXX KM/H Speed set for Adaptive Cruise Control. | |
| GAP Set the distance (time gap). | |
| RADAR SENSOR BLOCKED | Clean the front of the vehicle in the area of the sensor unit (the sensor is mounted centrally behind the bumper cover above the cooling aperture).This message may also appear under the following conditions:If stone chip protection has been applied.On rural roads with few roadside objects.In heavy rain. |
| FORWARD ALERT OFF | Forward alert feature has been switched off.WARNING:A warning will not be given for objects detected in the vehicle's path of travel. |
| FORWARD ALERT Forward Alert feature has been switched on or the setting changed. A warning will be given for objects detected in the vehicle path of travel.A longer gap indicates that the system will warn when detected objects are further away than the previous setting.Action by the driver to apply the brakes is required. | |
| FORWARD ALERT UNAVAILABLE | Advanced emergency brake assist and Forward Alert functions are unavailable. |
Automatic Speed Limiter (ASL) set speeds must be within local speed restriction limits. The driver must always ensure that a safe speed is set, taking into account the prevailing traffic and road conditions.

In certain conditions, such as a steep downhill gradient, the vehicle speed may exceed the set speed limit. This is because engine braking is unable to maintain or reduce the vehicle speed. Driver intervention may be required.
ASL can be used in a situation where varying vehicle speed is likely but a maximum speed must not be exceeded. For example, where a local speed limit is 80 km/h (50 mph), the set speed could be at that limit or just under.
If ASL is not selected, cruise control is always available by simply rotating the thumb wheel on the right-hand side of the steering wheel to set a cruising speed. The ASL button allows the driver to select between cruise control and the automatic speed limiter. The ASL can be set to any speed between 30 km/h (18 mph) and 240 km/h (150 mph).
Note: Although ASL only operates at speeds between 30 km/h (18 mph) and 240 km/h (150 mph), the maximum speed can be set when the vehicle is stationary.
When ASL is selected, the warning indicator in the instrument panel will illuminate. When the ASL button is pressed again, the light will extinguish, ASL will be cancelled and cruise control will be available again.

USING THE ASL
Setting a speed limit

- Press the ASL button.
- Use the thumb wheel (1) to set the required speed. The message centre display in the instrument panel will show the selected speed.
- The set speed can be adjusted at any time by rotating the thumb wheel (1).
LIMITER SET
XXX km/h (MPH)
Note: The message is also displayed at other times as an information display.
When ASL is selected and a set speed inserted, the engine will respond normally up to the set speed. Further accelerator pedal pressure will not increase the vehicle speed beyond your set speed, unless kickdown is initiated, in which case ASL will be suspended.
Suspending ASL
ASL can be suspended by pressing the CANCEL button (3). Applying sudden, rapid acceleration (kickdown) will also suspend ASL.
LIMITER CANCELLED
Resuming ASL
If ASL has been suspended, it can be reinstated with a single press of the RESUME button (2), however, ASL will only reinstate if the vehicle speed is less than the current speed set in memory and greater than 30 km/h (18 mph). The message centre will display an appropriate message if the vehicle speed is too fast to resume ASL.
TOO FAST TO RESUME
Exceeding the set speed
If the set speed is exceeded, e.g. on a steep downhill section, the message centre will display an appropriate message along with an amber warning indicator.
OVER LIMIT XXX km/h (MPH)
There are three categories of over limit displays:
- If the set speed is exceeded by up to 3 km/h (1.8 mph), the message centre will display the message along with an amber warning indicator.
- If the set speed is exceeded by more than 7 km/h (4 mph), the message centre will display the message along with a flashing red warning indicator.
- If the set speed is exceeded by more than 7 km/h (4 mph) for a duration of four seconds, the message centre will display the message along with a flashing red warning indicator and an audible warning tone.
Use your brakes to rectify the situation.
ASL unavailable
If ASL is not available due to a fault, the message centre will display an appropriate message along with an amber warning indicator.
LIMITER NOT AVAILABLE
The message and warning indicator will display when the driver attempts to use ASL.
When the ignition is switched off, ASL is deactivated and any set speed is deleted from memory.
GENERAL INFORMATION
WARNING

It remains the driver's responsibility to drive safely, according to the prevailing conditions and within the law.
JaguarDrive Control
JaguarDrive Control is a selectable vehicle optimisation system, designed to fine-tune the driving characteristics of the vehicle by accommodating different driving conditions or driving styles.
The system allows the performance envelope of the vehicle to be stretched and prevents the necessity for a single, compromised configuration for all conditions, thereby increasing the vehicle's abilities.
The vehicle systems optimised by JaguarDrive Control are:
• Engine management.
• Transmission management.
- Dynamic Stability Control and traction control.
- Adaptive dynamics.
• Active Differential Control (E-diff) - Supercharged vehicles only.
Note: Changing from one special mode to another, will introduce noticeably different vehicle responses. For example, the engine revs produced by the accelerator position when a special mode is not selected, may increase or decrease when a mode is selected.
To familiarise yourself with, and get the best from, the JaguarDrive Control modes, you should try out the modes in circumstances which are safe for you and other road users.

- Dynamic mode switch.
- Winter mode switch.
- DSC mode switch.
WINTER MODE
Press to operate. Designed for use in slippery conditions, when active, Winter mode selects 2nd gear for driving away on level ground (no incline), softens the responsiveness of the engine and modifies the gear change strategy. This ensures that optimum traction is maintained.
Winter mode optimises stability of the vehicle to suit slippery conditions, when grip is reduced. The vehicle performs in a more gentle and controlled manner, to avoid skidding, allowing more confident progress under adverse conditions.
Note: Winter mode cannot be active at the same time as Dynamic mode. Winter mode will remain selected indefinitely after the ignition is switched off, until deselected by the driver.
DYNAMIC MODE
(V8 petrol and diesel vehicles only)

Press to operate. Dynamic mode co-ordinates the vehicle's control systems to deliver a high
performance driving experience. This setting enhances key vehicle systems so that the vehicle's full potential can be exploited. The vehicle's responses are aimed at involving the driver more in focused and purposeful driving, helping swift progress.
Note: When the transmission is set to permanent manual mode (i.e. using the paddles to change gear while in Sport mode) and Dynamic mode is selected, transmission upshifts are fully controlled by the driver. This means that the transmission will not change up a gear automatically, even when the vehicle's rev limit is reached. When the rev limit is reached, the gear position indicator in the message centre will glow amber, to indicate that the next gear should be selected.
Note: Dynamic mode cannot be active at the same time as Winter mode. Dynamic mode will remain selected for approximately six hours after the ignition is switched off, after which point it will need to be reselected if required.
STABILITY CONTROL
Dynamic Stability Control (DSC)
WARNING

The fact that the vehicle is fitted with DSC, must never allow the driver to be tempted into taking risks which could affect his or her safety or that of other road users. In all cases, it remains the driver's responsibility to drive safely according to the prevailing conditions.
Dynamic Stability Control (DSC) is operational whenever the engine is running, unless it has been manually switched off. When the system is operating, the warning indicator in the instrument panel will flash.
The DSC system controls the Anti-lock Braking System (ABS), traction control and yaw control of the vehicle.
The DSC system assists the driver in retaining directional control of the vehicle in situations where the vehicle is sliding (understeer or oversteer). It must not encourage the driver to drive beyond the limit of adhesion or at speeds higher than those suitable for the prevailing road and traffic conditions.
DSC applies braking pressure to individual wheels if excessive variation is detected. This ensures that the vehicle follows the driver's intended direction of travel as closely as possible.
Traction control will intervene to control wheel spin by automatically reducing the power output from the engine and applying braking to individual wheels. This improves acceleration, particularly on surfaces with uneven friction (e.g. one wheel on ice with another on tarmac).
Note: For recommended DSC mode selection, refer to the JaguarDrive Control scenarios section in this handbook.
TracDSC
WARNING

Vehicle safety may be reduced by inappropriate use of TracDSC. TracDSC should only be used in suitable conditions.
TracDSC is an alternative setting of DSC with reduced system interventions. With TracDSC engaged, traction may be somewhat increased, although stability may be reduced compared to normal DSC. TracDSC is intended for use only on dry tarmac, by suitably experienced drivers and should not be selected for other surfaces or by drivers with insufficient skill and training to operate the vehicle safely with the TracDSC function engaged.
The less restrictive TracDSC setting may be preferred, for example, by expert drivers engaged in high performance driving on dry Tarmac surfaces such as tracks and circuits.
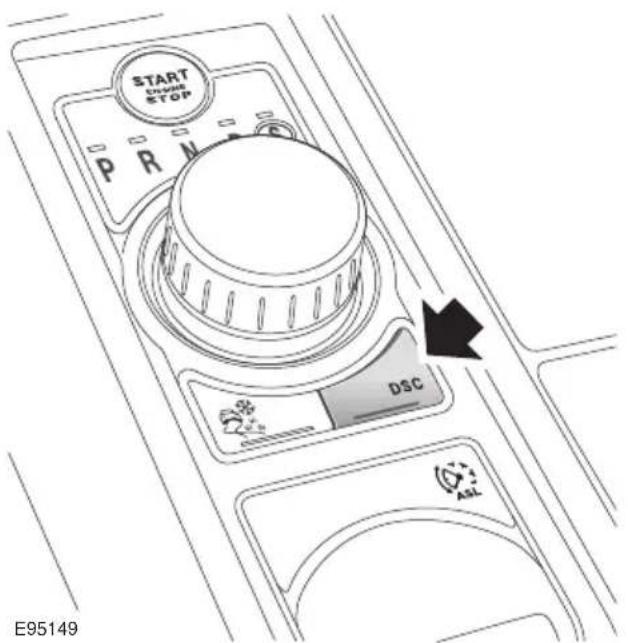
Switching between DSC and Trac DSC
- Press and hold the DSC switch for less than 10 seconds.
- The message centre will temporarily display either Trac DSC or DSC ON.
- The warning indicator in the instrument panel will illuminate while Trac DSC is selected.
- The warning indicator will flash when DSC or Trac DSC is active.
Note: If cruise control is engaged, it will automatically disengage if stability control activates.
Switching between DSC OFF and ON
Switching DSC OFF
- Press and hold the DSC switch for more than 10 seconds.
- The message centre will display DSC OFF and a short warning chime will sound.
- The warning indicator in the instrument panel will illuminate.
Switching DSC ON
If DSC is OFF:
- Press and release the DSC switch.
- The DSC system will switch on, the message centre will temporarily display DSC ON.
- The warning indicator in the instrument panel will be extinguished.
Note: Switching the engine off and then on again, will always revert DSC status to DSC ON, regardless of which JaguarDrive Control mode is selected.
Note: In rare circumstances, when TracDSC is selected or DSC is off, high acceleration on rough roads may cause DSC to switch back on. This prevents high loads on the vehicle driveline. DSC will subsequently remain on, unless TracDSC is selected or DSC is switched off manually.
Stability control indicator

If there is a fault, the warning indicator will illuminate in the instrument panel and the message
centre will display DSC NOT AVAILABLE with an amber backlight.
It is safe to drive the vehicle, but the DSC system will not activate under wheel spin or slide conditions. You should seek qualified assistance as soon as possible.
Adaptive dynamics (Supercharged vehicles only)
Jaguar Adaptive dynamics continuously monitors the road and driver inputs and optimises the vehicle suspension settings for ride comfort and control.
The adaptive dynamics system is linked to Dynamic mode, modifying the suspension settings for a more sporting character.
If the message centre displays the message ADAPTIVE DYNAMICS FAULT, a fault has been detected in the adaptive dynamics system. Seek qualified assistance as soon as possible.
Active Differential Control (E-diff) (Supercharged vehicles only)
The E-diff improves traction when one driven wheel has more grip than the other. This improves progress out of corners and on patchy or uneven surfaces. The E-diff can also increase stability in oversteer situations, depending on road conditions and driver inputs.
Settings for the E-diff are made automatically, without the need for driver selection.
If there is a fault with the E-diff system, the message centre will display EDIFF SYSTEM FAULT. If DSC is off, then TracDSC will be selected automatically. The driver can still switch between DSC modes, as normal and the vehicle is safe to drive, but seek qualified assistance as soon as possible.
Note: If the E-diff is active continuously for an extended period (e.g. on a patchy surface with DSC off) then the E-diff may be temporarily deactivated to prevent overheating. If DSC is off, then TracDSC will be selected automatically. The message centre will display EDIFF NOT AVAILABLE. The driver can still switch between DSC modes as normal and the E-diff will become available again automatically when it has cooled sufficiently.
JaguarDrive Control scenarios
The table below gives examples of the drive control settings suggested for different driving scenarios.
| Scenario Suggested driver selection | ||||
| Tyre fitment JaguarDrive Control | Dynamic Stability Control (DSC) | Transmission | ||
| Wet grass Standard Winter mode DSC On | (default) | Drive (D) | ||
| Very wet tarmac | ||||
| Slippery boat launch ramp | ||||
| Hill descents while towing on slippery surfaces | Sport (S) + Manual | |||
| Ice/light snow Standard or All Season tyres | Drive (D) | |||
| Snow ploughed hard-topped roads (including black ice) | All Season tyres | |||
| Packed snow roads Winter tyres | ||||
| Deep fresh snow Snow chains Sport (S) | ||||
| Normal driving conditions (e.g. dry tarmac, town driving, motorway cruising etc.) | Standard | No driver selection required. Special modes off. | Drive (D) | |
| Overtaking on a dry road | Drive (D) or Sport (S) | |||
| Pulling out onto a busy road in dry conditions | ||||
| Favourite country lane (public road) | Dynamic mode Sport (S) | or Sport (S) + Manual | ||
| Private track/race day | TracDSC (where conditions permit) | |||
SAFETY PRECAUTIONS
WARNINGS

Petroleum gasses are highly flammable, have a low flash point, and are explosive, especially in confined spaces. Avoid exposing the gasses to any potential sources of ignition as the resulting fire and explosion may cause serious injuries and/or death.

Only use containers specifically designed for carrying fuel and always remove them from the vehicle to fill them. Failure to do so may result in spillage, and cause a fire.

Switch off the engine when refuelling, as it is both a source of extreme temperatures, and electrical sparks. The resulting fire and explosion may cause serious injury and death.

Switch off any personal electronic devices such as mobile phones, or music players. They have the potential to cause electrical sparks. The resulting fire and explosion may cause serious injury and death.

Do not smoke, use a naked flame, or cause sparks. The resulting fire and explosion may cause serious injury and death.

Do not overfill the fuel tank. Overfilling may cause spillage when the vehicle is driven. Spillage may also occur if the fuel expands in high ambient temperatures.

Any modifications to the fuel system not specifically designed for this Jaguar are prohibited. Such modifications in some circumstances, could result in a fire. All service actions should be entrusted to a Dealer/Authorised Repairer.
WARNINGS

The presence of any unusual fumes (e.g. petrol or exhaust fumes) in the passenger compartment and/or luggage compartment, should be corrected immediately by a Dealer/Authorised Repairer. If you must drive under these conditions, do so only with all windows fully open.
FUEL QUALITY
Water in fuel
CAUTIONS
If the warning WATER IN FUEL is displayed in the message centre, an excessive amount of water has collected in the fuel filter bowl. Seek assistance from a Jaguar Dealer/Authorised Repairer to have the filter drained, as soon as possible.
Petrol engined vehicles
CAUTIONS
Do not use leaded fuels, lead substitutes or fuel additives. Doing so can cause damage to the engine, fuel and emission control systems.
Only use high quality petrol, as using lower quality fuels can cause damage to the engine, fuel and emission control systems.
Fuel system cleaning agents should not be used, unless approved by Jaguar. Unapproved products may be harmful to fuel system components on your vehicle.
It is the driver's responsibility to fill the vehicle with the correct fuel. If the vehicle is filled with the wrong type of fuel, do not start the engine. Call for Roadside Assistance.
Unleaded fuel
Unleaded fuel must be used for the emission control system to operate properly. Its use will also reduce spark plug fouling, exhaust system corrosion and engine oil deterioration.
Octane rating
The recommended unleaded fuel should have an octane rating of 95 RON (Research Octane Number) or higher. However, you may also use unleaded fuel with a lower RON, but performance will be reduced. The minimum octane rating for fuel to be used is 91 RON.
Note: Using unleaded fuel with a lower octane rating than recommended, can cause persistent heavy engine knock (a metallic rapping noise). If severe, this can lead to engine damage.
If a heavy knock is detected, even when using fuel to the recommended octane rating, or if you hear knock while holding a steady speed on level roads, consult your Dealer/Authorised Repairer to have the problem corrected. Failure to do so is misuse of the vehicle, for which Jaguar Cars is not responsible. However, occasional, light knock for a short time while accelerating or driving up hill, may occur.
ALTERNATIVE FUELS FOR PETROL ENGINES
Fuels containing alcohol
CAUTIONS

Fuel containing alcohol can cause paint damage, which may not be covered under the warranty.
Some fuel suppliers sell fuel containing alcohol without advertising its presence. Where uncertainty exists, check with the service centre operator.
Note: Some difficulty in starting may be encountered when using alcohol blended fuel.
Ethanol
CAUTIONS
This vehicle is not suitable for use with fuels containing more than 10% Ethanol.
Do not use E85 fuels (85% Ethanol content). Equipment necessary for the use of fuels containing more than 10% Ethanol is not fitted to this vehicle. If E85 fuels are used, serious engine and fuels system damage will occur.
Fuels containing up to 10% Ethanol (grain alcohol) may be used. Ensure that the fuel has octane ratings no lower than those recommended for unleaded fuel. Most drivers will not notice any operating difference with fuel containing Ethanol. If a difference is detected, the use of conventional unleaded fuel should be resumed.
Methanol
CAUTION
Wherever possible avoid using fuel containing Methanol.
Some fuels contain Methanol (Methyl or wood alcohol). If you use fuels containing Methanol the fuels must also contain co-solvents and corrosion inhibitors for Methanol. Also, do not use fuels which contain more than 10% Methanol even if they contain co-solvents and corrosion inhibitors. Fuel system damage or vehicle performance problems resulting from the use of such fuels is not the responsibility of Jaguar, and may not be covered under the warranty.
Methyl Tertiary Butyl Ether (MTBE)
Unleaded fuel containing an oxygenate known as MTBE can be used provided that the ratio of MTBE to conventional fuel does not exceed 15%. MTBE is an Ether based compound derived from Petroleum, which has been specified by several refiners as the substance to enhance the Octane rating of fuel.
Reformulated gasoline
Several petroleum companies have announced the availability of reformulated fuels. These fuels are specially formulated to further reduce vehicle emissions. Jaguar fully supports all efforts to protect and maintain ambient air quality and encourages the use of reformulated gasoline, where available.
DIESEL ENGINED VEHICLES
CAUTION
Do not use RME (bio-diesel) except in the case of those proprietary diesel fuels which contain a mix of up to 5%. Jaguar can accept no responsibility for damage caused by using RME in concentrations greater than 5%.
Use only high quality diesel fuel according to EN590 or equivalent.
The quality of diesel fuel is variable, depending on geographic location. Always use premium or the highest quality fuel available in your locality. High quality fuel ensures a longer life for your engine components. Lower grade fuel contains higher levels of sulphur, which is detrimental to engine components. If low quality fuel is used, light coloured smoke may be evident at the exhaust.
Note: Jaguar vehicles are capable of running with up to a 5% blend of bio-diesel, in accordance with European Standard EN590. Prolonged use of additives is not recommended. Do not add paraffin or petrol to diesel fuels.
CAUTIONS
If you inadvertently fill your vehicle with petrol instead of diesel, do not attempt to start the engine. Contact your Dealer/Authorised Repairer immediately. Attempting to start the engine with petrol in the fuel tank, will cause extensive damage to the engine and fuel system, which will not be covered by your Jaguar warranty.
Jaguar cars can accept no responsibility for any damage caused by running your vehicle with petrol or vegetable oil in the fuel tank.
Winter grade diesel fuel
To make sure of reliable diesel engine operation during cold seasonal periods, Winter grade fuel must be used. This fuel is normally available from fuel retailers during these periods and the fuel companies adjust the fuel quality to suit climatic conditions.
If the vehicle is not filled with Winter grade diesel fuel, it is recommended that the engine is idled for a period of over two minutes after starting, to prevent fuel solidification during operation.
Sulphur content
CAUTION

Your vehicle is fitted with a Diesel Particulate Filter (DPF), the maximum
Sulphur content must not exceed 0.005%.
Using an incorrect fuel will cause serious damage to the DPF. See DIESEL
PARTICULATE FILTER (DPF) (page 135).
In some countries diesel may contain higher levers of Sulphur, which could cause damage to the vehicle, if in doubt contact a local Dealer/Authorised Repairer for advice.
RUNNING OUT OF FUEL
CAUTION

Avoid running out of fuel. Doing so can cause damage to the vehicle's engine, fuel and emission control systems.
Note: If the vehicle does run out of fuel, a minimum of 4 litres (0.9 gallons) will be required to restart the engine. The vehicle will need to be driven 1.6-5 km (1-3 miles) in order to reset the engine management and monitoring systems.
Note: If the vehicle does run out of fuel, seeking qualified assistance is advisable.
Diesel engines
Vehicles with diesel engines are equipped with a system to prevent the fuel tank from emptying completely. When the fuel reaches a minimum level, the system will activate a reduced power mode (i.e. the engine will not run properly). This will be followed by the engine stopping in approximately 1.6 km (1 mile).
This feature prevents the fuel system from running dry, which could cause damage to the vehicle. If the gauge indicates low fuel or the warning indicator illuminates, the fuel tank should be refuelled as soon as possible at the next filling station, with at least 4 litres (0.9 gallons) of fuel.
If the system protection function has activated, the vehicle must firstly be refuelled, then restarted using the following procedure:
- With the brake pedal pressed, press and hold the engine START/STOP button and crank the engine for five seconds.
- Release the START/STOP button.
- With the brake pedal pressed, press and release the START/STOP button to crank the engine. The engine should start within approximately five seconds.
Note: If the engine does not start, pause for ten seconds with the ignition in convenience mode, before repeating the procedure from the beginning.
CAUTION

Do not crank the engine for longer than 30 seconds, or damage to the fuel pump may occur.
FUEL CUT-OFF
The fuel system cut-off forms part of the Supplementary Restraint System (SRS) fitted to your vehicle. Following an impact, and depending on the severity, the fuel pump may be switched off.
Resetting the fuel cut-off
WARNING

The fuel cut-off should never be reset if you can smell fuel, or a leak can be seen. Doing so can lead to a fire which may cause personal injury or death.
- Switch the ignition off and wait for one minute.
- Turn the ignition on for 30 seconds.
- Check the vehicle thoroughly for fuel leaks. If a leak is detected switch the ignition off immediately.
-
Do not start the vehicle if a leak is present. Seek qualified advice and have the vehicle recovered.
-
If no leaks are detected, start the vehicle.
FUEL FILLER FLAP
WARNINGS

Open the fuel filler cap slowly and allow the pressure to release before fully removing the cap to avoid fuel spillage due to rapid expansion.

Take note of all warnings and instructions given on the label affixed to the inside of the filler flap. Failure to do so may result in injury or death.
Note: The fuel filler flap cannot be opened when the alarm system is armed.
The fuel filler flap is located on the right-hand side of the vehicle, at the rear.
- Ensure that the vehicle is fully unlocked. Push and release the rear of the flap (in the area indicated in the illustration) to unlatch.
- Pull the fuel filler flap open. The label on the inside of the flap indicates the correct fuel for the vehicle.
1
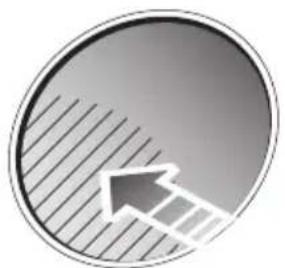
natural_image
Circular icon with diagonal hatching and a white arrow pointing right (no text or symbols)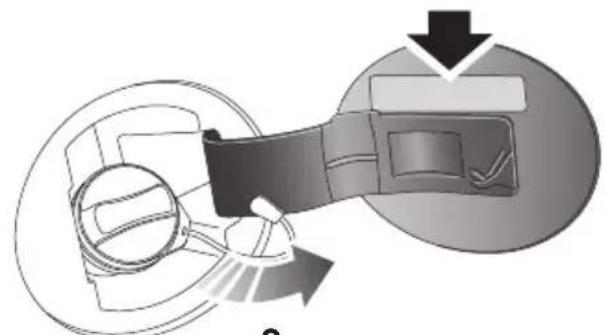
natural_image
Diagram showing a mechanical assembly with a belt and directional arrow, no text or symbols present2
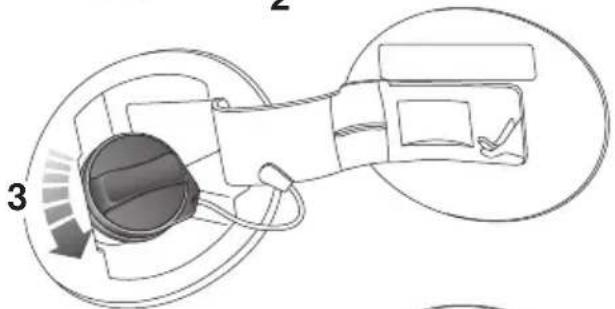
natural_image
Diagram of a medical or surgical device with labeled parts (no readable text or symbols)
natural_image
Technical diagram of a mechanical device with labeled component 4, showing internal components and no readable text or symbols.E95150
-
Twist the cap counter-clockwise to undo.
-
Stow the cap on the lip provided on the top of the hinge arm, as shown.
When replacing the cap, turn it clockwise until the ratchet clicks. Failure to do so could cause the Engine malfunction warning indicator to illuminate.
To close the filler flap, push the flap closed until it latches.
REFUELLING
Fuel filler
WARNINGS

When refuelling ensure that all windows, doors, and sunroof are fully closed, particularly if young children or animals are in the vehicle. Fuel vapour contains harmful chemical compounds, some of which may cause cancer.

Do not attempt to fill the tank to its maximum capacity. If the vehicle is to be parked on a slope, in direct sunlight or high ambient temperature, expansion of the fuel could cause spillage. Filling station pumps are equipped with automatic cut-off sensing, to avoid fuel spillage. Fill the tank until the filler nozzle automatically cuts off supply. Do not attempt to fill the tank beyond this point.
CAUTIONS

Check the fuel pump information carefully, to ensure that you are putting the correct fuel into the vehicle. Filling a vehicle with the incorrect fuel can cause serious engine and fuel system damage.

It is the driver's responsibility to fill the vehicle with the correct fuel. If the vehicle is filled with the wrong type of fuel, do not start the engine. Call for Roadside Assistance.
Filling station pumps used for diesel commercial vehicles deliver fuel at a higher rate than normal. The higher fill rate can cause premature cut-off and may cause fuel spillage. Therefore, it is recommended that only standard light vehicle pumps are used.

natural_image
Illustration of a hand using a fuel pump to adjust a car wheel (no text or symbols visible)E95151
If the fuel cuts off as soon as the trigger on the pump is operated, check that the correct fuel has been selected. Immediate cut-off may have been caused by the fuel guard system.
See DIESEL MISFUELLING PROTECTION DEVICE (page 180).
Fuel tank capacity
Avoid the risk of running out of fuel and never intentionally drive the vehicle when the fuel gauge indicates that the tank is empty. When refuelling your vehicle after the fuel gauge reads empty, you may not be able to add the fuel quantity shown below, as there will be a small reserve remaining in the tank.
All engines
| Fuel specification:Petrol 95-98 RONDiesel EN 590 | |
| Total tank capacity:Petrol 69.5 litresDiesel 68.1 litres | (15.3 gallons)(15 gallons) |
| Fill capacity (when fuel gauge indicates empty) | 64 litres(14.1 gallons) |
| Reserve capacity (when fuel gauge indicates empty) | 5.5 litres(1.2 gallons) |
DIESEL MISFUELLING PROTECTION DEVICE
WARNINGS

When the misfuelling protection device is activated, it could cause fuel to be discharged from the filler neck.
Diesel engine vehicles in some markets are equipped with a misfuelling protection device, incorporated into the fuel filler neck, designed to alert that the wrong fuel type has been selected. If the narrow filler nozzle fitted to pumps delivering unleaded petrol is correctly inserted (i.e. fully inserted) into the filler neck, the misfuel protection device will activate.
The protection device continually interrupts the fuel flow from the pump, until the protector mechanism in the filler neck is reset.
When activated, the yellow protection device will be visible in the filler neck. The device will need to be reset before the tank can be correctly filled with diesel fuel. This is achieved using the reset tool, located in the luggage compartment, clipped onto the battery restraining bar.
Note: It is the driver's responsibility to fill the vehicle with the correct fuel. The diesel misfuelling protection device only reduces the risk of filling the vehicle with the incorrect fuel.
CAUTIONS

Using the incorrect fuel can result in major damage to your vehicle's engine and fuel system.
Note: When refuelling the vehicle using a disposable fuel canister, use a canister designed for diesel fuel where possible. The spout on petrol canisters may activate the protection device. The device may also be activated by fuel pumps with a smaller nozzle than those fitted to standard diesel pumps.
Resetting the protection device

To reset the misfuelling protection device:
- Insert the reset tool (with the teeth uppermost) into the filler neck opening, as far as it will go. The triangular section on the reset tool stops on the protection device at the required insertion depth.
- Pivot the reset tool handle downwards to engage the teeth into the protection device.
- Keeping the reset tool handle held down, slowly pull the reset tool out of the filler neck to reset the misfuelling protection device.
Note: To ensure that the protection device is correctly reset, check that the yellow protector is no longer visible in the filler neck.
After resetting the misfuelling protection device, remove the tool from the filler neck and secure it to the battery restraining bar. If subsequent driveability difficulties are encountered, seek assistance from your Dealer/Authorised Repairer.
FUEL CONSUMPTION
The fuel consumption figures shown below have been calculated using a standard testing procedure (the new EC test procedure from Directive 99/100/EC), and produced in accordance with The Passenger Car Fuel Consumption (Amendment) Order 1996.
Under normal use, a vehicle's actual fuel consumption figures may differ from those achieved through the test procedure, depending on driving technique, road and traffic conditions, environmental factors, vehicle load and condition.
| Variant Urban | Extra-urban Combined CO2 emissions | g/km | ||
| 3.0 V6 Diesel 9.5 | l/100 km(30.0 mpg) | 5.5 l/100 km(51.3 mpg) | 6.8 l/100 km(42.0 mpg) | 179 |
| 3.0 V6 Petrol 15.8 | l/100 km(17.8 mpg) | 7.5 l/100 km(37.8 mpg) | 10.5 l/100 km(26.8 mpg) | 249 |
| 5.0 V8 Petrol -Normally aspirated | 17.3 l/100 km(46.3 mpg) | 7.8 l/100 km(36.4 mpg) | 11.1 l/100 km(25.4 mpg) | 264 |
| 5.0 V8 Petrol -Supercharged | 18.7 l/100 km(15.1 mpg) | 8.7 l/100 km(32.4 mpg) | 12.5 l/100 km(22.5 mpg) | 292 |
Urban cycle
The urban test cycle is carried out from a cold start and consists of a series of accelerations, decelerations and periods of steady speed driving and engine idling. The maximum speed attained during the test is 50 km/h (30 mph) with an average speed of 19 km/h (12 mph).
Extra-urban cycle
The extra-urban test cycle is carried out immediately after the urban test. Approximately half of the test comprises steady-speed driving, while the remainder consists of a series of accelerations, decelerations and engine idling. The maximum test speed is 120 km/h (75 mph) and the average speed 63 km/h (39 mph). The test is carried out over a distance of 7 km (4.3 miles).
Combined
The combined figure is an average of the urban and extra-urban test cycle results, which has been weighted to take account of the different distances covered during the two tests.
For additional information on fuel consumption figures and exhaust emissions, visit the Vehicle Certification Agency (VCA) website at http://www.vcacarfueldata.org.uk/.

GENERAL INFORMATION
Weights and load capacities
Note: It is the driver's responsibility to ensure that the maximum weights are not exceeded, and that the load is distributed correctly within the vehicle.
Information and values for the maximum weights can be found in the Weights section. See WEIGHTS (page 259).
Roof racks
CAUTION

Your vehicle is not designed for use with a roof rack. Do not fit a roof rack to the vehicle, as damage may result.
LUGGAGE ANCHOR POINTS
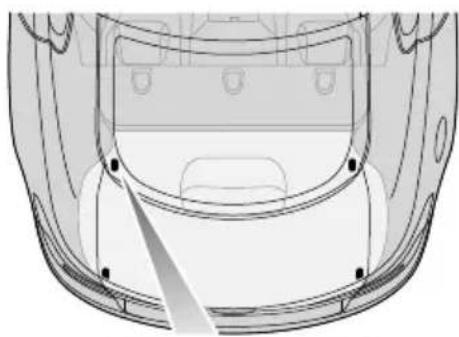
natural_image
Technical line drawing of a car rear bumper with no visible text or symbolsE95152

WARNINGS

All items carried in the luggage area should be properly secured. Loose items can cause serious injury or
death in the event of an accident or sudden manoeuvre.
Four load securing rings are provided in the rear luggage area to assist in safely securing items carried.
Note: A range of approved luggage retention accessories are available from your Dealer/Authorised Repairer.
REAR UNDER FLOOR STORAGE
On vehicles not fitted with a spare wheel, there is a storage compartment beneath the luggage compartment floor. Lift the hatch for access and hook the strap over the upper boot seal to keep the hatch open.
TOWING A TRAILER (V6 petrol and diesel vehicles only)

natural_image
Side-by-side line drawing of a sedan and a jet skis on a lift (no text or symbols)E95507
WARNINGS

Never exceed the maximum weights for either the vehicle, or the trailer. Doing so can cause accelerated wear and damage to the vehicle. It can also adversely affect vehicle stability and braking, which in turn can lead to loss of control and increased braking distance resulting in a rollover or crash.

To preserve handling and stability, only fit Jaguar approved towing accessories.

Never use towing eyes or lashing points to tow a trailer. They have not been designed for this purpose and doing so may cause them to fail resulting in injury or death.

When towing, do not exceed 100 km/h (60 mph) or 80 km/h (50 mph) if a temporary spare wheel is in use.
Note: It is the driver's responsibility to ensure that the towing vehicle, and the trailer are being used correctly, and in accordance with manufacturers recommendations and any applicable legislation.
Your Dealer/Authorised Repairer and main motoring and caravanning organisation can advise you on towing, towing weight capacities and about regulations that apply in other countries.
The following are important points of safety, stability and comfort, upon which further advice should be sought:
- Maximum braked towing weight is permissible, provided that long periods of uphill driving on gradients over 8% are not undertaken.
- In high altitude mountainous regions, the thinner atmosphere can reduce engine performance. Above 1000 metres (3250 feet), the stipulated maximum permitted gross train weight must be reduced by 10% for every 1000 metres (3250 feet) in altitude.
Towing
Diesel engine vehicles
The diesel engine management system incorporates sensors to determine optimum performance. It is also designed to protect the engine when arduous conditions are encountered during towing. When ambient temperature exceeds 40^ C ( 104^ F), the engine coolant temperature may increase above normal operating level. If this occurs, the management system will initiate a series of actions to restore normal operating conditions. The actions may include:
• A message centre message.
• Engine performance reduction.
- Air conditioning system cycling. The system temperature output will fluctuate between hot and cold, in order to dissipate engine heat. If engine overheat persists, the air conditioning will move to continuous heat output.
It is advisable to bring the vehicle and trailer to a convenient stop and allow the engine to idle until normal temperature is restored. Do not turn off the engine.
Trailer electrical connection
CAUTION
Only connect approved electrical circuits, which are in good condition to the trailer socket. Connecting incorrect, or faulty circuits may seriously damage the vehicle's electrical circuits.
Note: The rear parking sensors are automatically disabled when the trailer electrical connection is made using Jaguar approved towing equipment.
The vehicle's electrical system has been designed to support all towing requirements, and comply with legal requirements for the specific territory in which the vehicle is first sold.
LEVELLING
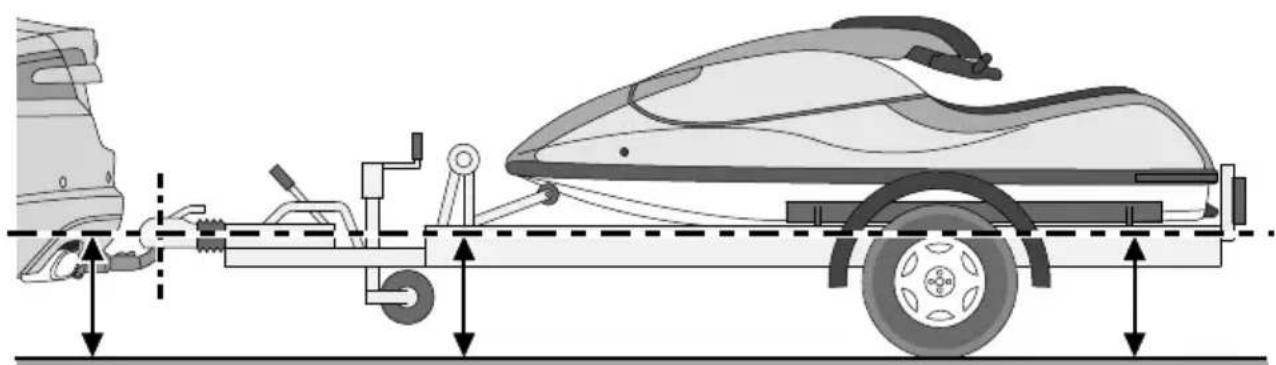
natural_image
Side-view diagram of a jet ski lift with attached vehicle and support structure (no text or symbols)E95506
To maintain vehicle stability, it is essential that the trailer is loaded so that it remains parallel to the ground. This is particularly important when towing twin axled trailers.
RECOMMENDED TOWING WEIGHTS
| Maximum permissible towing weights | |
| Unbraked trailers 7 | 50 kg (1653 lb.) |
| Trailers with overrun brakes | 1850 kg (4080 lb.) |
| Nose/Tongue weight | 75 kg (165 lb.) |
WARNING

Do not exceed the Gross Vehicle Weight (GVW), maximum rear axle weight, maximum trailer weight, or nose/tongue weight. Exceeding any of these limits could cause instability and loss of control. See WEIGHTS (page 259).
Nose/tongue weight must be the greater of 50 kg (110 lbs) or 7% of the actual trailer weight, up to the maximum tow hitch load. Nose/tongue weight can be measured using a proprietary brand of nose weight indicator. If it is necessary to increase the nose/tongue weight up to the maximum allowed, the vehicle load should be reduced accordingly. This ensures that the Gross Vehicle Weight (GVW), and maximum rear axle load, are not exceeded.
Note: When towing the maximum permissible gross vehicle weight can be increased by a maximum of 100 kg (220 lb.) provided that the road speed is limited to 100 km/h (60 mph).
Note: When calculating rear axle loading, remember that the trailer nose/tongue weight, the load in the vehicle's luggage area and the weight of rear seat passengers must all be added together.
Towing weights - Australia only
The weight of a trailer must not exceed 1.5 times the towing vehicle's weight. The nose/tongue weight must be a minimum of 7% of gross caravan/trailer weight, up to a maximum of 350~kg (722 lbs).
ESSENTIAL TOWING CHECKS
- The trailer should be parallel to the ground when loaded and connected to the vehicle.
- When calculating the laden weight of the trailer remember to include the weight of the trailer, plus the weight of the load.
- If the load can be divided between the vehicle and trailer, loading more weight into the vehicle will generally improve stability. Do not exceed the vehicle's weight limits. See WEIGHTS (page 259).
- Ensure that all applicable regulations and legislation are complied with when loading and towing a trailer.
- Increase rear tyre pressures of the towing vehicle to those for maximum vehicle loading conditions.
- Ensure trailer tyre pressures are set to trailer manufacturer's recommendations.
- If the vehicle is loaded to maximum Gross Vehicle Weight (GVW) the nose weight is limited (see Towing weights table).
- Ensure that a suitable breakaway cable or secondary coupling is used. Refer to the trailer manufacturer's instructions for guidance.
- Ensure that the tow ball is secure.
- Check the operation of all trailer lights.
WARNING

Do not loop the breakaway cable over the tow ball as it may slide off.
Towing
TOW BAR
Tow bar dimensions and mounting points

E95505

Note: Dimensions given are in millimetres.
CLEANING THE ALLOY WHEELS
CAUTION

Do not use non-approved, or acid based wheel cleaners. These can damage the coating which may lead to corrosion of wheel rims.
Wash the wheels with soap and water, this should be done more frequently when the wheels are exposed to heavy dirt deposits, salt, clay etc. If you are unsure how often to clean the wheels in particular conditions, seek advice from your Dealer/Authorised Repairer.
Jaguar approved wheel cleaner should be used to remove heavy soiling.
CLEANING THE EXTERIOR
CAUTIONS

Some high pressure cleaning systems are sufficiently powerful to penetrate and window seals, and damage trim and locks. Never aim the water jet directly at engine air intake, heater air intakes, body (doors, sunroof, windows etc.) or at any onents which may be damaged (lamps, rrs, exterior trim etc.).

Ensure that you read and comply with all warnings and instructions supplied with any cleaning products.

Never use cleaning products which are not approved for use on vehicles.

natural_image
Illustration of a car cleaning a surface with a power plug and spray bottle (no text or symbols)Washing the vehicle paintwork
CAUTION

Substances which are corrosive, such as bird droppings, tree resin, dead
insects, tar spots, road salt and industrial fall out, can damage the vehicle's paintwork. Any such deposits should be removed as soon as possible to prevent damage.
Remove heavy deposits of mud and dirt with a hose before washing the vehicle.
When salt is used on the roads, wash the vehicle immediately after encountering such conditions. Clean undersides and wheel arches using a high pressure jet.
Wash the vehicle frequently using a sponge and generous quantities of cold or luke warm water containing a suitable car shampoo. Rinse thoroughly and dry with a chamois leather or synthetic substitute.
For best results, do not wash the vehicle under strong sunlight. Always allow the vehicle to cool down before washing.
Do not use a dry cloth to wipe dirty paintwork. Dust and gritty substances are abrasive and will scratch the paintwork. Remove dirt using a cellulose sponge and plenty of warm (never hot) water. Rinse off with clean water and dry using a clean, damp chamois leather. Wash the vehicle frequently.
Do not use household soaps or detergents. The use of Jaguar Vehicle Shampoo is recommended.
Note: The vehicle's brightwork should be cleaned using a sponge and generous quantities of cold or lukewarm water only. Rinse thoroughly and dry with a chamois leather or synthetic substitute.
Using an automatic wash
CAUTIONS
Commercially operated automatic car washes, jet washes and power-operated mops, are not recommended. The detergents used can contain certain chemicals which may, over time, be detrimental to some exterior parts of the vehicle. Prolonged usage of automatic car washes and power-operated mops will also cause fine scratches in the paint surface.
Ensure that Auto wipe is not selected when entering a car wash, or damage to the wiper blades and arms can occur if they operate during the wash cycle.
Ensure that when using an automatic drive through car wash, N (Neutral) is selected and that the ignition is left in convenience mode for the duration of the wash.
Note: Regular use of automatic car washes tends to dull the lustre of the paintwork.
- Drive up to the entry of the car wash and onto the conveyor.
- Select N (Neutral) using the JaguarDrive selector.
-
Press and release the engine START/STOP button to stop the engine. The JaguarDrive selector should remain raised and the selector and message centre should indicate that N is selected.
-
The vehicle should remain in this condition while it is conveyed through the car wash.
- At the end of the wash cycle, when directed to start the engine by the car wash instructions, press the brake pedal and press and release the engine START/STOP button to start the engine.
- Select D (Drive) using the JaguarDrive selector and drive away.
Do not start the engine or change the JaguarDrive selector position during the car wash.
After leaving the car wash, switch on the windscreen wiper immediately to remove water and prevent a build up of wax.
Underbonnet cleaning
CAUTIONS
Do not use a high pressure washer or steam cleaner in the engine compartment. Damage to components could occur.
Ensure that the brake fluid reservoir is kept dry at all times. Only use a clean, dry cloth to clean the brake fluid cap and reservoir.
Glass surfaces
Clean the rear window with a soft cloth to avoid damaging the heating element. Do not scrape the glass or use any abrasive cleaning fluid.
Mirror glass is particularly susceptible to damage. Wash with soapy water. Do not use abrasive cleaning compounds or metal scrapers to remove ice.
The following products will ensure glass surfaces and windscreen wipers are kept in good condition:
- Jaguar Screen Clean Paste - Apply only to the windscreen exterior to ensure effective operation of the windscreen wiper.
- Jaguar Glass Cleaner - Interior and exterior of all other glass surfaces.
- Jaguar Screen Wash - Washer reservoir additive.
- Jaguar Winter Care Kit comprising de-icer, ice scraper, anti-mist wipe cloth and aerial cleaner - for use in adverse weather conditions.
Cleaning the rear screen
To avoid damaging the heating elements when cleaning the inside of the rear screen, use only a soft damp cloth/chamois leather. Do not use solvents or sharp objects to clean the glass.
Removing grease and tar
CAUTION

Ensure that after using methylated or white spirit, the area is washed immediately with soapy water, to remove all traces of spirit.
Remove grease or tar with Jaguar Tar Remover or methylated spirit (alcohol). White spirit is also effective, but must not be applied to rubber, particularly the windscreen wiper blades.
Bird droppings
Do not allow bird droppings or tree sap to harden. Remove from paintwork immediately with a lukewarm soap and water solution.
Polishing
CAUTION

Chrome polish, or other abrasive cleaners, must not be used on the vehicle's brightwork. The vehicle's brightwork should be cleaned using a sponge and generous quantities of cold or lukewarm water only. Rinse thoroughly and dry with a chamois leather or synthetic substitute.
For maximum protection against road dust, salts, industrial fall-out etc., it is recommended that the vehicle is polished regularly using Jaguar polish and a polishing cloth.
CLEANING THE INTERIOR
WARNING

Ensure that you read all of the information and instructions for use provided with cleaning products.
Some products contain substances that are harmful and can cause health problems if used incorrectly.
CAUTIONS

Some products, if used incorrectly can cause damage to the interior surfaces of the vehicle.

To prevent airbag damage, the steering wheel centre pad and other areas containing airbags should only be cleaned sparingly with a damp cloth, warm water and a non-detergent soap. Do not allow these areas to be flooded with chemical solvents, liquids, furniture cream or polishes.
Leather
Leather is an easy to maintain natural product. However, dust and substances can penetrate the pores and crease the leather, causing surface wear and brittleness.
To prevent ingrained dirt and staining, inspect the seat upholstery regularly and clean every one to two months, as follows:
- Wipe off fine dust from the seat surfaces using a clean, damp, non-coloured cloth. Change frequently to a clean area of cloth, to avoid abrasive action on the leather surface. Avoid over-wetting.
- If this is not sufficient, use a cloth which has been dampened with warm soapy water and then wrung out. Use only mild non-caustic soap.
- Use Jaguar Leather Cleaner for heavily soiled areas. Dry off and rub with a clean soft cloth, changing surfaces regularly.
When staining (e.g. from clothing) or spillage occurs, clean the affected area immediately as described above.
Use Jaguar Leather Cleaner several times a year to maintain its appearance and suppleness. The cleaner will nourish and moisturise and help to improve the surface protective film against dust and substances.
- Do not use solvents. Do not use detergents, furniture polish or household cleaners. While these products may initially give impressive results, their use will lead to rapid deterioration of the leather and will invalidate the warranty. Jaguar recommend a basic set of products that have been specially selected for the type of leather in your vehicle.
-
Dark clothing may stain leather seats just like other upholstery products.
-
Sharp objects such as belts, zip fasteners, rivets, etc., can leave permanent scratches and scratch marks on the leather surface.
- Unless spillages such as tea, coffee or ink are washed away immediately, permanent staining may have to be accepted.
If a valet service is used, ensure that the specialist concerned is aware of, and follows, these instructions precisely.
Cloth and fabric
CAUTIONS
Never use soap, ammonia, bleach or other cleaners intended for use on hard surfaces.
Do not use upholstery cleaner on electrical equipment such as fascia switches.
When cleaning around electrical equipment such as switches, ensure that fluids do not leak into any gaps around the components or between panels or trim.
Use Jaguar Upholstery Cleaner, following the instructions. Avoid over-wetting.
Removing stains
Most stains on woollen fabric can be removed if treatment is carried out immediately, before the stain has a chance to dry-in.
Most stains can be treated with one of three cleaning fluids: Jaguar Upholstery Cleaner, dry cleaning fluid or clean water. Follow the instructions on the package.
Instrument pack, clock, and audio equipment
Only use a soft dry cloth to clean the instrument pack, clock and audio equipment. Do not use cleaning fluids or sprays.
Carpet and mats
Marks or stains can be removed by gentle scrubbing with a weak solution of soap and warm water.
For more stubborn stains a commercially available carpet cleaner should be used.
Seat belts
WARNING

Do not allow any water, cleaning products, or fabric from cloths to enter the seat belt mechanism. Any substance which enters the mechanism may affect the performance of the seat belt in an impact.
Extend the seat belts fully, then use warm water and a non-detergent soap to clean. Allow the seat belts to dry naturally whilst fully extended and do not allow the belts to retract until fully dry.
Note: Whilst cleaning the seat belt, take the opportunity to examine the webbing for damage and wear. Any wear or damage should be reported to, and rectified by, a Dealer/Authorised Repairer.
Airbag module covers
WARNINGS

Airbag covers should only be cleaned using a slightly dampened cloth, and a small amount of upholstery cleaner.

Do not allow the airbag covers, or surrounding areas, to become contaminated with liquids. Any
substance which enters the mechanism, can prevent correct deployment of an airbag during an impact.
REPAIRING MINOR PAINT DAMAGE
Regularly inspect the paintwork for damage. Any stone chips, fractures, or deep scratches, in the paint/bodywork should be repaired promptly. Bare metal will corrode quickly, and if left untreated can result in expensive repairs.
Minor chips and scratches can be touched up using materials and advice available from a Dealer/Authorised Repairer. Larger areas of damage will require professional repair, and you should consult a Dealer/Authorised Repairer.
GENERAL INFORMATION
CAUTION
Severe damage to the electrical system and electronic components can occur, if any attempt is made to diagnose faults in the electrical system using conventional diagnostic equipment (e.g. the use of test lamps or low impedance voltmeters). The fitting of any electrical accessory should only be entrusted to a Dealer/Authorised Repairer.
Regular systematic maintenance is the key to ensuring the continued reliability and efficiency of your vehicle.
Maintenance is the owner's responsibility and you must ensure that owner maintenance operations, oil services, inspections and brake fluid and coolant changes are carried out when required and according to the manufacturer's recommendations.
The routine maintenance requirements for your vehicle are shown in the Service Portfolio book. Most of this necessary workshop maintenance requires specialised knowledge and equipment, and should preferably be entrusted to a Dealer/Authorised Repairer.
Service Portfolio
The Service Portfolio book includes a Service Record section, which enables a record to be kept of all the servicing and inspections that are carried out on the vehicle. This section of the book also has an area for brake fluid changes to be recorded.
Ensure your service provider signs and stamps the book after each service and inspection.
Owner maintenance
CAUTION
Any significant or sudden drop in fluid levels, or uneven tyre wear, should be reported to a qualified technician without delay.
In addition to the routine services and inspections, a number of simple checks must be carried out more frequently. These checks can be carried out by the owner and advice is given on the pages that follow.
Daily checks
- Operation of lamps, horn, direction indicators, wipers, washers and warning indicators.
• Operation of seat belts and brakes. - Look for fluid deposits underneath the vehicle that might indicate a leak. Condensation drips from the air conditioning is normal.
Weekly checks
CAUTION

Ensure that you take notice of any message centre information and warnings relating to engine oil level (V8 petrol and diesel engines only). Top-up the level when advised to do so. See ENGINE OIL CHECK - V8 Petrol engines (page 199).
- Engine oil level (non-electronic dipstick vehicles). See ENGINE OIL CHECK - V6 Petrol engines (page 197).
• Engine coolant check. See ENGINE COOLANT CHECK (page 204). - Brake fluid level. See BRAKE FLUID CHECK (page 206).
• Power steering fluid level. See POWER STEERING FLUID CHECK (page 208). - Screen washer fluid level. See WASHER FLUID CHECK (page 209).
- Tyre pressures and condition. See TYRE CARE (page 217).
- Operate air conditioning. See AUTOMATIC CLIMATE CONTROL (page 116).
Note: The engine oil level on V6 petrol engines, should be checked more frequently if the vehicle is driven for prolonged periods at high speeds. The engine oil level on diesel and V8 petrol engines is checked automatically at all times by the electronic dipstick.
Severe driving conditions
When a vehicle is operated in severe conditions, more frequent attention must be paid to servicing requirements.
Severe driving conditions include:
- Driving in dusty and/or sandy conditions.
-
Driving on rough and/or muddy roads and/or wading.
-
Driving in extremely hot or cold conditions.
- Driving in areas using road salt or other corrosive materials.
- Towing a trailer or driving in mountainous conditions.
Contact your Dealer/Authorised Repairer for advice.
Emission control
Your vehicle is fitted with various items of emission and evaporative control equipment, designed to meet specific territorial requirements. You should be aware that unauthorised replacement, modification or tampering with this equipment by an owner or repair shop, may be unlawful and subject to legal penalties.
In addition, engine settings must not be tampered with. These have been established to ensure that your vehicle complies with stringent exhaust emission regulations. Incorrect engine settings may adversely affect exhaust emissions, engine performance and fuel consumption. They may also cause high temperatures, which will result in damage to the catalytic converter and the vehicle.
Road testing dynamometers (rolling roads)
Because your vehicle is equipped with anti-lock brakes, it is essential that any dynamometer testing is carried out only by a qualified person, familiar with the dynamometer testing and safety procedures practised by Dealers/Authorised Repairers.
Safety in the garage Fuel system
WARNINGS

If the vehicle has been driven recently, do not touch exhaust and cooling system components until the engine has cooled.

Never leave the engine running in an unventilated area - exhaust gases are poisonous and extremely dangerous.

Do not work beneath the vehicle with the wheel changing jack as the only means of support.

Keep your hands and clothing away from drive belts, pulleys and fans.
Some fans may continue to operate after the engine has stopped.

Remove metal wrist bands and jewellery, before working in the engine compartment.

Do not touch electrical leads or components while the engine is running, or with the starter switch turned on.

Do not allow tools or metal parts of the vehicle to make contact with the battery leads or terminals.
WARNINGS

Under no circumstances should any part of the fuel system be dismantled or replaced by anyone other than a suitably qualified vehicle technician. Failure to comply with this instruction, may result in fuel spillage with a consequent serious risk of fire.

Ensure sparks and naked lights are kept away from the engine compartment.

Wear protective clothing, including, where practicable, gloves made from an impervious material.
Poisonous fluids
Fluids used in motor vehicles are poisonous and should not be consumed or brought into contact with open wounds. These include; battery acid, antifreeze, brake, clutch and power steering fluid, petrol, diesel, engine oil and windscreen washer additives.
For your own safety, always read and obey all instructions printed on labels and containers.
Used engine oil
Prolonged contact with engine oil may cause serious skin disorders, including dermatitis and cancer of the skin. Always wash thoroughly after contact.

It is illegal to pollute drains, water courses or soil. Use authorised waste disposal sites to dispose of used oil and toxic chemicals.
Maintenance
OPENING AND CLOSING THE BONNET
Opening the bonnet
CAUTION
Do not attempt to open the bonnet if the pedestrian protection system has deployed. See PRINCIPLE OF OPERATION (page 66).

- Pull the bonnet release handle located in the left-hand front footwell.
- Lift the bonnet safety catch lever located below the centre point of the bonnet, and raise the bonnet.
Closing the bonnet
WARNING

Do not drive with the bonnet retained by the safety catch alone.
- Lower the bonnet until the safety catch engages. Using both hands, press the bonnet down until the catches click.
- Check that both catches are fully engaged by attempting to lift both sides of the front edge of the bonnet. This should be free from all movement.
ENGINE COMPARTMENT OVERVIEW
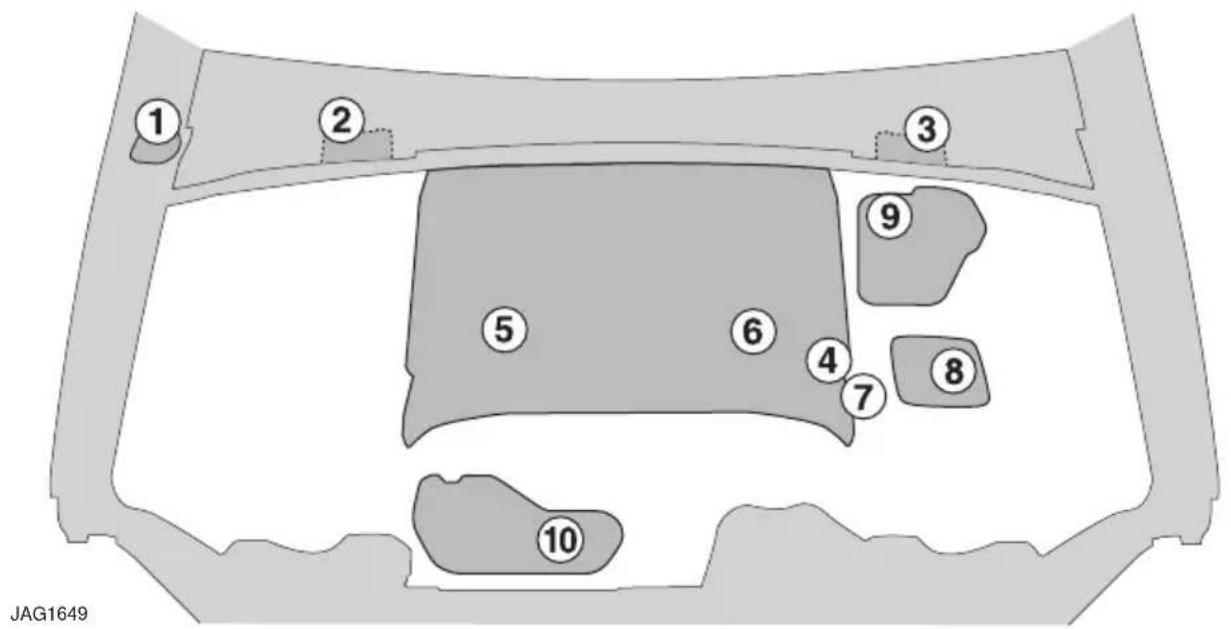
- Washer fluid
- Brake fluid (right-hand drive)
- Brake fluid (left-hand drive)
- Engine oil - V8 petrol engines
- Engine oil - Diesel engines
- Engine oil - V6 petrol engines
- Engine oil dipstick - V6 petrol engines
- Power steering
- Coolant - V8 petrol engines
- Coolant - Diesel and V6 petrol engines
WARNINGS

While working in the engine compartment, always observe the safety precautions listed under Safety in the garage. See GENERAL INFORMATION (page 192).

Do not drive the vehicle if there is a possibility that leaked fluid will come into contact with a hot surface, such as the exhaust. A resulting fire may cause death or serious injury.
Washer fluid reservoir cap (Blue)
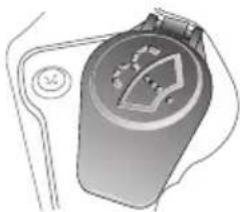
natural_image
Illustration of a mechanical device with a circular component and a knob (no text or symbols)E96100
Brake fluid reservoir cap (Yellow)
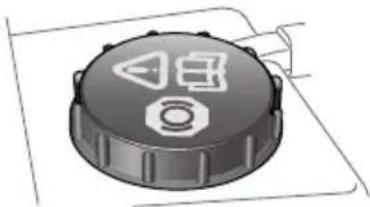
natural_image
Circular mechanical component with three triangular symbols and a bolted end, mounted on a base plate (no text or labels visible)E96101
Engine oil filler caps (Black)

natural_image
Gray gear-shaped icon with a white circular symbol containing a stylized human figure (no text or symbols)JAG1635
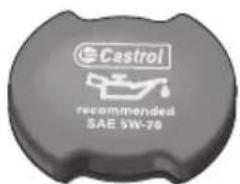
Engine oil dipsticks (Red/yellow) - V6 Petrol only

natural_image
Two grayscale 3D-rendered objects resembling mechanical tools or connectors (no text or symbols visible)Power steering fluid reservoir cap (Black)

natural_image
3D rendering of a small electronic component with a knob and wiring, labeled E95161 (no readable text or symbols beyond label)Coolant reservoir cap (Black)

natural_image
Close-up of a mechanical component with gear and internal components (no visible text or symbols)ENGINE OIL CHECK - V6 Petrol engines
CAUTIONS
If the message ENGINE OIL PRESSURE LOW is displayed, stop the engine as soon as it is safe to do so and seek qualified assistance. Do not start the engine until the cause has been identified and rectified.
Your vehicle's warranty may be invalidated if damage is caused by the use of improper engine oil. Low quality or obsolete oils do not provide the protection required by modern, high performance engines. Failure to use an oil that meets the required specification could cause excessive engine wear, a build up of sludge and deposits and increased pollution. It could also lead to engine failure.
Do not use oil additives of any type as engine damage could occur. Use only specified lubricants.
The oil consumption of an engine is influenced by many factors. Under high loads an engine will consume more oil than usual. Diesel engines consume slightly more oil than petrol engines.
Above normal oil consumption should be expected when the engine is new.
Check the oil level weekly, when the engine is cold and with the vehicle resting on level ground.
Checking the oil level
Note: If it is necessary to check the oil level when the engine is hot, switch off the engine and let stand for five minutes to allow the oil to drain into the sump. Do not start the engine.

- Withdraw the dipstick (1) and wipe the blade clean with a lint free cloth.
- Fully re-insert the dipstick and withdraw again to check the oil level. Never allow the oil level to fall below the lower mark or notch on the dipstick.
As a general guide, if the level on the dipstick:
- Is nearer to the upper mark or notch than the lower, add no oil.
- Is nearer to the lower mark or notch than the upper, add half a litre (one pint) of oil.
- Is below the lower mark or notch, add one litre (two pints) of oil and re-check the level after a further five minutes.
Topping up the oil
CAUTIONS
Your vehicle warranty may be invalidated if damage is caused by using oil that does not meet the required specification.
Failure to use an oil that meets the required specification could cause excessive engine wear, a build up of sludge and deposits, and increase pollution. It could also lead to engine failure.
Overfilling with oil could result in severe engine damage. Oil should be added in small quantities and the level re-checked to ensure that the engine is not overfilled.
- Unscrew the oil filler cap (2).
- Add oil to maintain the level between the MIN and MAX marks or notches on the dipstick. Clean up any oil spilled during topping-up.
- Check the oil level again after 5 minutes. It is essential to use the correct specification oil, and to ensure it is suitable for the climatic conditions in which the vehicle is to be operated.
Note: The approximate quantity of oil required to raise the level from MIN to MAX on the dipstick is 1.0 litre (1.76 pints).
ENGINE OIL CHECK - V8 Petrol engines
CAUTIONS

It is recommended that the oil level is checked weekly. If any significant or sudden drop in oil level is noted you should seek qualified assistance immediately.

Your vehicle's warranty may be invalidated if damage is caused by the use of improper engine oil. Low quality or obsolete oils do not provide the protection required by modern, high performance engines. Failure to use an oil that meets the required specification could cause excessive engine wear, a build up of sludge and deposits and increased pollution. It could also lead to engine failure.

Do not use oil additives of any type as engine damage could occur. Use only specified lubricants.
Engine oil consumption
A certain amount of oil consumption is normal. The rate of consumption will depend on the following:
• The quality and viscosity of the oil.
- Climatic conditions.
- The speed at which the engine is being operated.
- Road conditions.
Drivers should expect above normal consumption when the engine is new.
Checking the oil level
For an accurate oil level reading to be taken, the following conditions must be met:
- The vehicle needs to be parked on level ground.
- The oil level should be checked when the oil is hot. It is therefore recommended that a reading is taken after a journey.
- The vehicle needs to stand for approximately 10 minutes after the engine is switched off, to allow the oil to drain back into the sump.
Note: The system will not give a reading until the oil level has stabilised.
Once the above conditions are met, check the oil level as follows:
- Switch on the ignition - do not start the engine.
- Set the transmission to Park (P).
- Press the TRIP button on the end of the left-hand column stalk repeatedly, until the oil can icon is displayed at the bottom of the message centre.
- The oil level and topping-up advice will be shown in the message centre. Top-up as instructed.
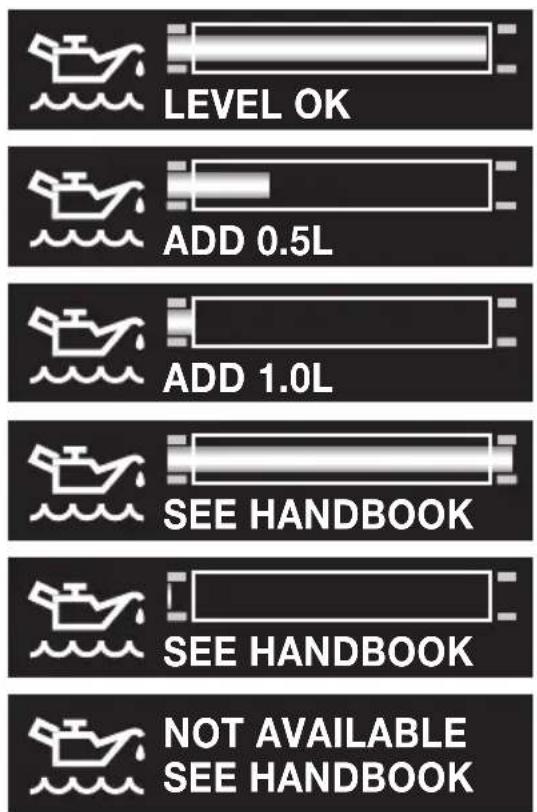
A
B
C
D
E
F
JAG1412
A. Oil at recommended level. No top-up required.
B. Add 0.5 litres (0.9 pint) of oil.
C. Add 1 litre (1.8 pints) of oil.
D. Oil level above maximum for safe operation. Do not drive the vehicle. Seek qualified assistance.
E. Oil level below minimum for safe operation. Add 1.5 litre (2.6 pints) of oil, then recheck level.
F1. Oil level stabilising, oil level not available. Wait ten minutes and then recheck the oil level display.
F2. If this display is accompanied by the warning message ENGINE OIL LEVEL MONITOR SYSTEM FAULT, a fault with the oil level monitor is indicated. Seek qualified assistance.
Topping up the oil
CAUTIONS
Your vehicle warranty may be invalidated if damage is caused by using oil that does not meet the required specification.
Failure to use an oil that meets the required specification, could cause excessive engine wear, a build-up of sludge and deposits and increase pollution. It could also lead to engine failure.
Overfilling with oil could result in severe engine damage.

natural_image
Diagram of a vehicle engine compartment with a highlighted component and an arrow indicating direction (no text or symbols present)- Unscrew the oil filler cap (arrowed).
- Add the appropriate quantity of oil (as indicated by the message centre oil level display). Wait 5 minutes to let the oil level stabilise and re-check the level.
Clean up any oil spilled during topping up.
- Once the correct level is achieved, refit the filler cap and hand tighten securely.
Note: The approximate quantity of oil required to raise the level from the minimum level of safe operation to the maximum, is 1.5 litres (2.6 pints).
ENGINE OIL CHECK - V6 Diesel engines
CAUTIONS
If the warning ENGINE OIL CRITICALLY LOW is displayed in the message centre, stop the engine as soon as it is safe to do so and seek qualified assistance. Do not start the engine until the cause has been identified and rectified.
Your vehicle's warranty may be invalidated if damage is caused by the use of improper engine oil. Low quality or obsolete oils do not provide the protection required by modern, high performance engines. Failure to use an oil that meets the required specification could cause excessive engine wear, a build up of sludge and deposits and increased pollution. It could also lead to engine failure.
Do not use oil additives of any type as engine damage could occur. Use only specified lubricants.
Engine oil consumption
A certain amount of oil consumption is normal. The rate of consumption will depend on the following:
• The quality and viscosity of the oil.
- Climatic conditions.
- The speed at which the engine is being operated.
- Road conditions.
Drivers should expect above normal consumption when the engine is new.
Oil level warnings
Warnings will be displayed in the message centre if the oil level is not maintained within the safe operating levels (minimum and maximum). A warning will also be displayed if there is a fault with the oil level monitoring system.
• ENGINE OIL LOW (amber): The oil is at the minimum level for safe operation. Top-up with 1 litre (1.8 pints) of oil.
- ENGINE OIL HIGH (amber): This warning is displayed when the engine is started, if the oil is above the maximum level for safe operation. Seek qualified assistance to have the engine oil drained, before driving the vehicle.
- ENGINE OIL CRITICALLY LOW (red): The oil is below the minimum level for safe operation. Stop the vehicle as soon as safety permits and top-up with 1.5 litres (2.6 pints) of oil. Wait for 5 minutes, recheck the oil level reading and top-up again if necessary.
• ENGINE OIL LEVEL MONITOR SYSTEM FAULT (amber): A fault with the oil level monitoring system is indicated. Seek qualified assistance as soon as possible.
Checking the oil level
The engine oil level is automatically monitored and is displayed in the trip computer area of the message centre.
The current oil level can be viewed with the ignition on, with the engine stopped and the transmission in Park (P).
To view the current oil level, allow 5 minutes after stopping the engine (to allow the oil level to stabilise), then press the TRIP button on the end of the left column stalk repeatedly, until the oil can icon is displayed at the bottom of the message centre.

JAG1412
A. Oil at recommended level. No top-up required.
B. Add 0.5 litres (0.9 pint) of oil.
C. Add 1 litre (1.8 pints) of oil.
D. Oil level above maximum for safe operation. Do not drive the vehicle. Seek qualified assistance.
E. Oil level below minimum for safe operation. Add 1.5 litre (2.6 pints) of oil, then recheck level.
F1. Oil level stabilising, oil level not available. Wait ten minutes and then recheck the oil level display.
F2. If this display is accompanied by the warning message ENGINE OIL LEVEL MONITOR SYSTEM FAULT, a fault with the oil level monitor is indicated. Seek qualified assistance.
Topping up the oil
CAUTIONS
Your vehicle warranty may be invalidated if damage is caused by using oil that does not meet the required specification.
Failure to use an oil that meets the required specification, could cause excessive engine wear, a build-up of sludge and deposits and increase pollution. It could also lead to engine failure.
Overfilling with oil could result in severe engine damage.

natural_image
Diagram of a car engine bay with a highlighted component and an arrow pointing to a specific area (no text or symbols present)- With the ignition on, but the engine not running, unscrew the oil filler cap (arrowed).
- Add the appropriate quantity of oil (as indicated by the message centre oil level display). Wait 5 minutes to let the oil level stabilise and re-check the level.
Clean up any oil spilled during topping up. - Once the correct level is achieved, refit the filler cap and hand tighten securely until one click is heard.
Note: The approximate quantity of oil required to raise the level from the minimum level of safe operation to the maximum, is 1.5 litres (2.6 pints).
Note: The ignition must be left on during the top-up, so that the electronic dipstick can register and display the new oil level. This enables an accurate level re-check.
ENGINE OIL SPECIFICATION
It is essential to use the correct specification of engine oil, and to ensure it is suitable for the climatic conditions in which the vehicle is to be operated.
Jaguar recommends:

| Model Specification | |
| V6 Petrol engines | 5W-30 engine oil, meeting Jaguar specification WSS M2C913-B is preferred. Where this is not possible, oil meeting ACEA A1/B1 or ACEA A3/B3 specification may be used. |
| V8 Petrol engines | 5W-20 engine oil, meeting Jaguar specification WSS M2C925-A only. |
| Diesel engines | 5W-30 engine oil, meeting Jaguar specification WSS M2C934-B only. |
| Japan V6 Petrol engines | 5W-30 engine oil, meeting specification ILSAC GF-4 with API SM is preferred. Where this is not possible, oil meeting ILSAC GF-3 API SL specification may be used. |
| Japan V8 Petrol engines | 5W-20 engine oil, meeting Jaguar specification WSS M2C925-A only. |
ENGINE COOLANT CHECK
Checking the coolant level
CAUTIONS
Running the engine without coolant will cause serious engine damage.
If persistent coolant loss is noticed, seek qualified assistance immediately.
The coolant level in the expansion tank should be checked at least weekly (more frequently in high mileage or severe operating conditions). Always check the level when the system is cold.
Ensure the coolant level is maintained between the level indicator marks located on the inside of the expansion tank filler neck.
If the level has fallen appreciably, suspect leakage or overheating and arrange for the vehicle to be examined by a qualified technician.

natural_image
Technical illustration of a mechanical component with two views: top shows a flanged cap and threaded hole, bottom shows a circular inset with 'MAX' label (no text or symbols on main diagram)E95163
Diesel and V6 petrol engines
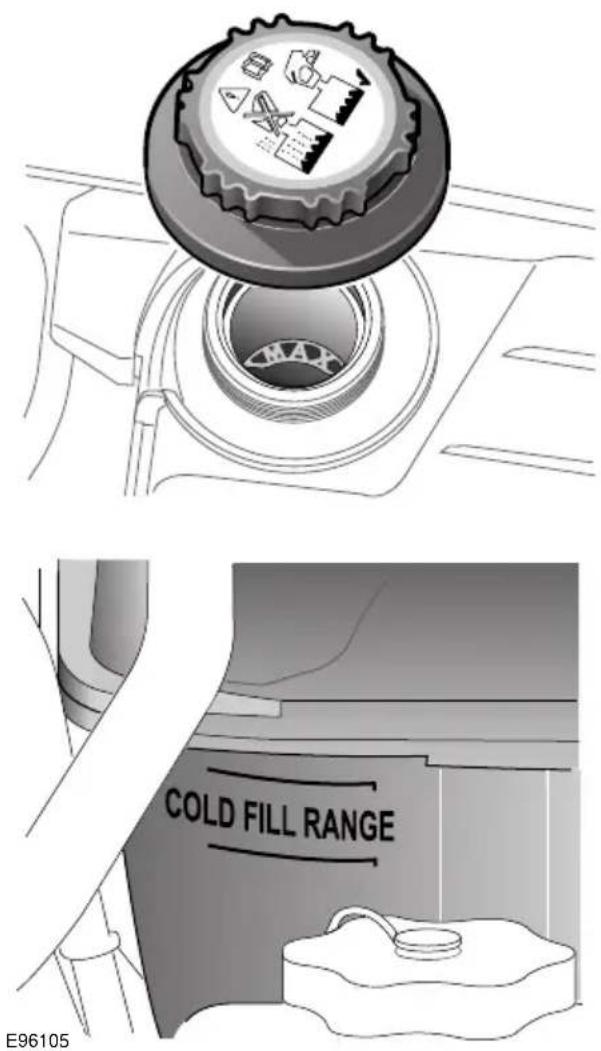
V8 petrol engines
If the message LOW COOLANT LEVEL is displayed in the message centre, stop the vehicle as soon as safety permits and top-up the coolant reservoir with the recommended antifreeze/water mix.
If the message centre displays the message ENGINE OVERHEATING, pull off the carriageway and allow the engine to idle for five minutes and then switch off the ignition for ten minutes. Switch on the engine and, provided that the warning does not occur, continue your journey, avoiding harsh acceleration. Seek qualified assistance as soon as possible.
Topping up the coolant
WARNINGS

Never remove the filler cap when the engine is hot - escaping steam or scalding water could cause serious personal injury.

Antifreeze is highly inflammable. Do not allow antifreeze to come into contact with naked flames or other sources of ignition (e.g. a hot engine) - a fire may result.

Unscrew the filler cap slowly, allowing the pressure to escape before removing completely.
CAUTION

When travelling in territories where the water supply contains salt, always ensure you carry a supply of fresh (rain or distilled) water. Topping up with salt water will cause serious engine damage.
Top-up to the upper level indicator mark located on the side of the expansion tank. Use only a 50% mix of water and antifreeze to specification WSS M97B44 (coloured orange) Extended Life Coolant.
Note: In an emergency - and only if the approved antifreeze is unavailable - top-up the cooling system with clean water, but be aware of the resultant reduction in frost protection. Do not top-up or refill with conventional antifreeze formulations. If in doubt consult a qualified technician.
Ensure the cap is tightened fully after top-up is completed by turning the cap until the ratchet cap clicks.
Antifreeze
WARNINGS

Antifreeze is poisonous and can be fatal if swallowed - keep containers sealed and out of the reach of children. If accidental consumption is suspected, seek medical attention immediately.

If the fluid comes into contact with the skin or eyes, rinse immediately with plenty of water.
CAUTIONS

The use of non-approved antifreeze will have an adverse effect on the engine g system and therefore engine ility.

Antifreeze will damage painted surfaces; soak up any spillage with an absorbent immediately and wash the area with a re of car shampoo and water.
Antifreeze contains important corrosion inhibitors. The antifreeze content of the coolant must be maintained at 50% ± 5% all year round (not just in cold conditions). To ensure that the anti-corrosion properties of the coolant are retained, the antifreeze content should be checked once a year and completely renewed every ten years, regardless of distance travelled. Failure to do so may cause corrosion of the radiator and engine components.
The specific gravity of a 50% antifreeze solution at 20^ C ( 68^ F) is 1.068 and protects against frost down to -40^ C ( -40^ F).
Use antifreeze to specification WSS M97B44 (coloured orange) Extended Life Coolant.
BRAKE FLUID CHECK
WARNING

Seek qualified assistance immediately if brake pedal travel is unusually long, unusually short or if there is any significant loss of brake fluid. Driving under such conditions could result in extended stopping distances or complete brake failure.

If the quantity of fluid in the brake reservoir drops below the recommended level, a red warning indicator in the instrument pack will illuminate and the message BRAKE FLUID LOW will be displayed in the message centre.
Note: If the warning indicator illuminates or the message is displayed, while the vehicle is being driven, stop the vehicle as soon as safety permits by gently applying the brakes. Check and top-up the fluid level if necessary.
Checking the fluid level
WARNINGS

Brake fluid is highly toxic - keep containers sealed and out of reach of children. If accidental consumption is suspected, seek medical attention immediately.

If the fluid comes into contact with the skin or eyes, rinse immediately with plenty of water.

Brake fluid is highly inflammable. Do not allow brake fluid to come into contact with naked flames or other sources of ignition (e.g. a hot engine) - a fire may result.

Do not drive the vehicle with the fluid level below the MIN mark.
With the vehicle on level ground, check the fluid level at least every week (more frequently in high mileage or arduous operating conditions).
The brake fluid reservoir is located beneath a cover on the raised platform to the rear of the main underbonnet area. See ENGINE
COMPARTMENT OVERVIEW (page 196).

natural_image
Illustration of a dome-shaped object with a labeled arrow pointing to its top (no text or symbols present)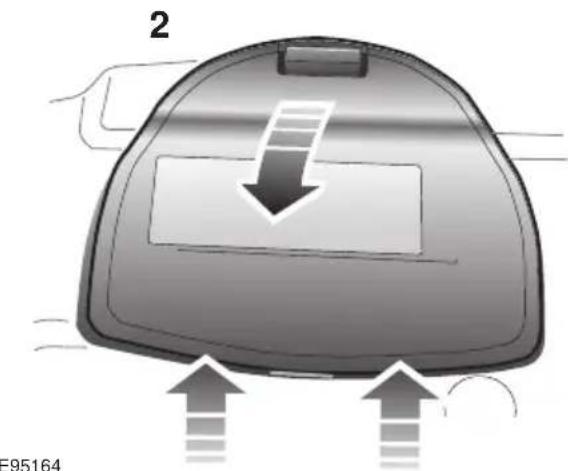
natural_image
Diagram of a device with a downward arrow and two upward arrows, no text or symbols present.- Release the catch.
- Lift the cover forwards, then pull rearwards, to release the hinges.
- Clean the filler cap with a clean, dry cloth before removing, to prevent dirt or moisture from entering the reservoir.
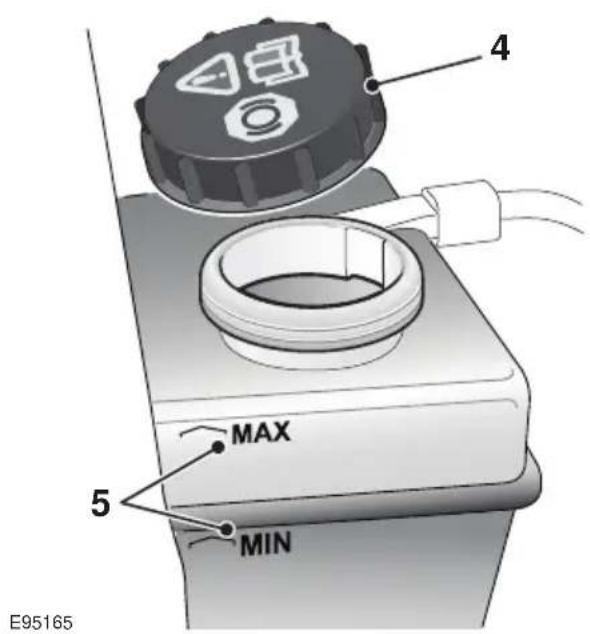
- Remove the filler cap.
- The brake fluid level should be between the MIN and the MAX marks on the side of the reservoir.
The fluid level may drop slightly during normal use, as a result of brake pad wear, but should not be allowed to drop below the MIN mark.
Topping up the fluid
CAUTIONS
Brake fluid will damage painted surfaces. Soak up any spillage with an absorbent cloth immediately and wash the area with a mixture of car shampoo and water.
Only use new fluid from an airtight container (fluid from open containers or fluid previously bled from the system, will have absorbed moisture, which will adversely affect performance, and must not be used).
- Top up the reservoir to the MAX mark using Shell DOT4 ESL brake fluid. If unavailable, a low viscosity brake fluid that meets ISO 4925 class 6 specification. Only fluid of this type and standard may be used.
- Replace the cap.
- Refit the reservoir cover.
POWER STEERING FLUID CHECK
WARNINGS

Power steering fluid is highly toxic. Keep containers sealed and out of reach of children. If accidental consumption of fluid is suspected, seek medical attention immediately.

If the fluid comes into contact with the skin or eyes, rinse immediately with plenty of water.

Power steering fluid is highly inflammable. Do not allow power steering fluid to come into contact with naked flames or other sources of ignition (e.g. a hot engine) - a fire may result.
Checking the fluid level
CAUTIONS
!
The engine must not be started if the fluid level has dropped below the MIN mark. Severe damage to the steering pump could result.
!
Seek qualified assistance immediately if there is a noticeable drop in the fluid level. Severe damage to the steering pump could result.
!
If fluid loss is slow, the reservoir may be topped-up to the upper level mark to enable the vehicle to be driven to a repair facility for examination. However, it is recommended that you seek qualified assistance before driving the vehicle.
Check and top-up the fluid with the vehicle on level ground, with the engine switched off and the system cold. Ensure that the steering wheel is not turned after stopping the engine.
The level of fluid can be seen through the translucent body of the reservoir.

The fluid level should be between the MIN and the MAX marks.
Topping up the fluid
CAUTIONS
It is imperative that the power steering system does not become contaminated in any way. Always use new fluid and clean the area around the filler neck both before removing the filler cap and after topping up. Never return drained fluid to the system.
Power steering fluid will damage painted surfaces. Soak up any spillage with an absorbent cloth immediately and wash the area with a mixture of car shampoo and water.
Do not fill the reservoir above the MAX mark.
- Clean the filler cap before removing to prevent dirt from entering the reservoir.
- Remove filler cap.
- Using Mobil ATF320, top-up the reservoir until the fluid level is between the MIN and MAX marks.
- Replace filler cap.
WASHER FLUID CHECK
WARNINGS

Some screen washer products are inflammable, particularly if high or undiluted concentrations are exposed to sparking. Do not allow screen washer fluid to come into contact with naked flames or sources of ignition.

If the vehicle is operated in temperatures below 4^ (40°F), use a washer fluid with frost protection. In cold weather, failure to use a washer fluid with frost protection, could result in impaired vision and increase the risk of a vehicle crash.
CAUTIONS

Do not use an antifreeze or vinegar/water solution in the washer reservoir - antifreeze will damage painted surfaces, while vinegar can damage the windscreen washer pump.

Body panels may suffer discolouration as a result of screen washer fluid spillage. Take care to avoid spillage, particularly if an undiluted or high concentration is being used. If spillage occurs, wash the affected area immediately with water.
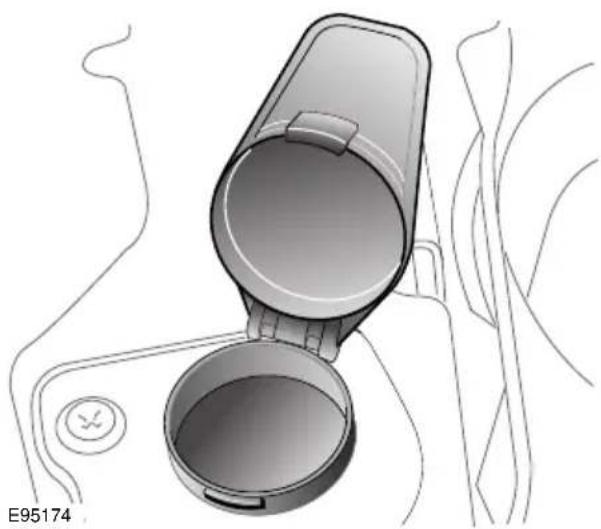
natural_image
Diagram of a device with a lid and base, showing internal components and wiring (no text or symbols)The washer reservoir supplies the windscreen and headlamp washer jets.
Check and top-up the reservoir level at least every week.
Fill with Jaguar Windscreen Washer Fluid, diluted with clean water, as specified in the instructions on the bottle. Using a non-approved fluid may adversely affect the wiper blade rubber, resulting in ineffectual and noisy wiping.
Operate the washer switches periodically to check that the nozzles are clear and properly directed.
Topping up the fluid
- Clean the filler cap before removing to prevent dirt from entering the reservoir.
- Open filler cap.
- Top-up the reservoir until the fluid is visible in the filler neck.
- Close filler cap.
TECHNICAL SPECIFICATIONS
Lubricants and fluids
| Part Variant Specification | ||
| Engine oil V6 Petrol | engines | SAE 5W-30 meeting Jaguar specification WSS M2C913-B is preferred. Oil meeting ACEA A1/B1 or ACEA A3/B3 specification may be used. |
| V8 Petrol engines | Use only Castrol 5W-20 engine oil meeting specification WSS M2C925-A. | |
| Diesel engines | SAE 5W-30 meeting Jaguar specification WSS M2C934-B only. | |
| V6 engines Japan only | SAE 5W-30 meeting specification ILSAC GF-4 with API SM is preferred. Oil meeting ILSAC GF-3 API SL specification may be used. | |
| Power steering fluid | All vehicles Mobil | ATF320 power steering fluid. |
| Brake fluid All vehicles | Shell DOT4 ESL | is preferred. If unavailable, a low viscosity brake fluid that meets ISO 4925 specification may be used. |
| Screen washer | All vehicles Screen wash with frost protection. | |
| Coolant | All vehicles 50% | mixture antifreeze of water and specification WSS M97B44 (coloured orange) Extended Life Coolant. |
If in doubt about the required specification of a lubricant or fluid for your vehicle, seek advice from your Dealer/Authorised Repairer.
Capacities
| Item Variant Capacity | ||
| Fuel tank Diesel vehicles 68.1 litres | (15 gallons) | |
| Petrol vehicles 69.5 litres (15.3 gallons) | ||
| Fuel capacity (when the fuel gauge indicates empty) | Diesel vehicles 64 litres (14.1 gallons) | |
| Petrol vehicles 64 litres (14.1 gallons) | ||
| Reserve capacity (when the fuel gauge indicates empty) | Diesel vehicles 5.5 litres (1.2 gallons) | |
| Petrol vehicles 5.5 litres (1.2 gallons) | ||
| Engine oil refill and filter change Diesel vehicles 6.4 litres (11.3 pints) | ||
| Engine oil MIN to MAX on dipstick | Diesel vehicles | 1.0 litres (1.8 pints) |
| Petrol vehicles 1.0 litres (1.8 pints) | ||
| Washer reservoir | With headlamp wash | 5.5 litres (9.7 pints) |
| Washer reservoir | Without headlamp wash | 4.4 litres (7.7 pints) |
| Cooling system (fill from dry) | Diesel vehicles 12.5 litres (22 pints) | |
| V6 Petrol vehicles 9.25 litres (16.3 pints) | ||
| V8 Normally Aspirated Petrol vehicles | 12.5 litres (22 pints) | |
| V8 Supercharged Petrol vehicles | 12.3 litres (21.6 pints) | |
| Cooling system (service fill) | Diesel vehicles 9.7 litres (17.1 pints) | |
| V6 Petrol vehicles 7.42 litres (13.1 pints) | ||
| V8 Normally Aspirated Petrol vehicles | 7.5 litres (13.2 pints) | |
| V8 Supercharged Petrol vehicles - both drain points used | 8.6 litres (15.1 pints) | |
The quoted capacities are approximate and provided as a guide only. All levels must be checked using the dipstick or level marks as applicable.
BATTERY WARNING SYMBOLS

Do not allow any naked flames, or other sources of ignition near the battery as the battery may emit explosive gasses.

Ensure that when working near, or handling the battery, suitable eye protection is worn. This will reduce the risk of eye damage caused by acid splashes.

To prevent risk of injury, do not allow children near the battery.

Be aware that the battery may emit explosive gasses.

The battery contains acid which is extremely corrosive, and toxic.
BATTERY CARE
WARNINGS

Do not allow the battery electrolyte (fluid) to come into contact with your skin or eyes. It is both corrosive and toxic, and the resulting injuries can be severe. If any electrolyte does come into contact with your skin or eyes, immediately rinse the affected area with clean, cold water. Immediate medical advice will be required.

If battery electrolyte comes into contact with your skin and/or clothes you should remove the affected clothing and flush the skin with copious amounts of water. Seek medical assistance immediately.
WARNINGS

If battery electrolyte comes into contact with your eyes, flush with copious amounts of clean cold water. Seek medical assistance immediately, and continue to flush with water.

If swallowed, battery electrolyte can be fatal. If electrolyte is swallowed, seek medical assistance immediately.

Do not connect any 12 volt equipment directly to the battery terminals. Doing so may cause a spark, which can result in an explosion.

The cell plugs and vent pipe must be in place at all times when the battery is connected to the vehicle. Ensure that the vent pipe is clear of obstructions and not kinked. Failure to do so may cause a pressure build up in the battery, resulting in an explosion.

Do not expose the battery to a naked flame or spark as the battery produces explosive, flammable gas.

Never jump start (boost) or charge, a frozen battery. Doing so can result in an explosion.

Remove all metal jewellery before working on, or near, the battery, and never allow metal tools or vehicle components to come into contact with the battery terminals. Metal objects can cause sparks and/or short circuits, resulting in an explosion.

Do not allow the battery posts or terminals to come into contact with your skin. They contain lead and lead compounds, which are toxic. Always wash your hands thoroughly after handling the battery.
CAUTION
Do not allow battery electrolyte to come into contact with fabrics or painted surfaces. If battery electrolyte comes into contact with any surface, the surface should be washed down immediately with copious amounts of clean water. Battery electrolyte is both corrosive and toxic, and can damage a wide range of materials if left.
Your vehicle is fitted with a low maintenance battery, which is located under the floor of the luggage compartment.
In hot climates more frequent checks of the battery electrolyte level and condition are required. If necessary, the battery cells can be topped up using distilled water.
When the ignition is switched on, but without the engine running, BATTERY NOT CHARGING is displayed in the message centre. The battery will only charge when the engine is running.
Note: Do not connect any 12 volt equipment (e.g. a 12 volt inspection lamp), directly to the battery terminals. Use the accessory socket located in the cubby box, for connecting Jaguar approved accessories.
Battery Monitoring System (BMS)
Your vehicle is equipped with a Battery Monitoring System (BMS) which manages the battery charging system and, if excessive battery discharge is occurring when the engine isn't running, shuts down non-essential electrical systems to protect battery power.
In the event that too many electrical systems are operational when the engine is not running, and the battery charge is insufficient, the audio and entertainment systems (if active) and climate control system will be switched off. This will be confirmed by a low battery warning message displayed on the touch-screen. If this occurs, switch on and run the engine for at least five minutes, preferably with all auxiliary electrical systems switched off (e.g. lights, wipers, climate control, seat heaters etc.).
Note: The audio system can be operated during this five minute period when the engine is running.
If the engine is switched off before the five minute period ends and the audio system is switched on, the warning message will re-appear on the touch-screen and the audio, entertainment and climate control systems will switch off again. For this reason, it is important that the engine is left running for the full five minute period.
Charging faults
If there is a fault in the battery charging system, CHARGING FAULT is displayed with red backlighting in the message centre. If this occurs, switch off all non-essential electrical systems and seek qualified assistance at the earliest opportunity.
USING BOOSTER CABLES
WARNINGS

Always wear appropriate eye protection when working with batteries.

During normal use, batteries emit explosive hydrogen gas - ensure sparks and naked lights are kept away from the luggage compartment.

Do not attempt to start the vehicle if the electrolyte in the battery is suspected of being frozen.

Make sure both batteries are of the 12 volt type and that the booster cables have insulated clamps and are d for use with 12 volt batteries.

Do not disconnect the discharged battery.

Do not connect positive (+) terminals to negative (-) terminals and ensure booster cables are kept away from wing parts in the engine compartment.

Do not connect a booster cable to the negative (-) terminal of the battery. Always connect to the recommended earthing point.
Note: Before connecting booster cables, ensure that the battery connections on the disabled vehicle are correct and that all electrical equipment has been switched off.
-
Connect one end of the positive booster cable to the positive terminal on the donor vehicle's battery.
-
Connect the other end of the positive booster cable to the positive terminal on the disabled vehicle's battery.
-
Connect one end of the negative booster cable to the earth point of the donor vehicle that is recommended for jump starting by the manufacturer.
- Connect the other end of the negative booster cable to a suitable earth point on the disabled vehicle. The earth point should be at least 0.5 metres (20 inches) away from the battery and as far as possible from any fuel or brake pipes.
- Check that all cables are clear of any moving components and that all four connections are secure.
- Start the engine of the donor vehicle, and allow it to idle for a few minutes.
- Start the engine of the disabled vehicle.
- Allow both vehicles to idle for two minutes.
- Switch off the donor vehicle.
Disconnecting the cables
WARNING

To avoid serious injury use extreme caution when removing the booster cables as the engine will be running on the previously disabled vehicle. This means that you may be working close to components which are moving at high speed, carry high voltage, or may be hot.
Note: Do not switch on any electrical equipment until after the cables have been disconnected.
The engine should be running on the previously disabled vehicle and the engine switched off on the donor vehicle. Disconnect the booster cables in the exact reverse order of that used for connection.
CHARGING THE VEHICLE BATTERY
WARNING

Ensure that the correct type of battery charger is used. Using an unsuitable charger may damage the battery and could cause the battery to explode.

Always charge the battery in a well ventilated area, away from any naked flames, sparks or other ignition sources. During charging, the battery can produce a highly explosive and flammable gas.
CAUTIONS

Battery disconnection, removal and replacement, should only be carried out by qualified personnel. Consult your Dealer/Authorised Repairer.

If the battery has been removed from the vehicle to be charged, the Battery Monitoring System will automatically recalibrate. During this time, Low Battery warning messages may appear.

Always follow the instructions supplied with the battery charger. Failure to do so may result in damage to the battery.
CHANGING THE VEHICLE BATTERY
WARNING

Use caution when lifting the battery our of, or into, the vehicle. It is heavy and may cause injury when lifting or if dropped.

Do not tilt the battery more than 45^ , as it may cause damage and may cause the electrolyte to leak out. Battery electrolyte is highly corrosive and toxic.
CAUTIONS
Battery disconnection, removal and replacement, should only be carried out by qualified personnel. Consult your Dealer/Authorised Repairer.
If the vehicle battery is replaced by a new battery, the vehicle electrical system must be reset to the new battery by qualified personnel. Failure to reset the electrical system, may result in Low Battery warning messages. Consult your Dealer/Authorised Repairer.
Only a replacement battery of the same type and specification as the original should be fitted. Other batteries may vary in size or have different terminal positions, which could cause a fire hazard when connected to the vehicle's electrical system.

Do not rest the battery on any part of the vehicle, as it may cause damage due to its weight.

Do not run the engine with the battery disconnected. Doing so may damage the charging system.
Battery disposal

Used batteries must be disposed of correctly as they contain a number of harmful substances. Seek advice on disposal from your Dealer/
Authorised Repairer, and/or your local authority.
GENERAL INFORMATION
Tyre markings

JAG1525
- P indicates that the tyre is for passenger vehicle use.
- The width of the tyre from sidewall edge to sidewall edge in millimetres.
- The aspect ratio, also known as the profile, gives the sidewall height as a percentage of the tread width. So, if the tread width is 205 mm, and the aspect ratio is 50, the sidewall height will be 102 mm.
- R indicates that the tyre is of Radial ply construction.
- The diameter of the wheel rim given in inches.
- The load index for the tyre. This index is not always shown.
-
The speed rating denotes the maximum speed at which the tyre should be used for extended periods. †
-
Tyre manufacturing standard information, which can be used for tyre recalls and other checking processes. Most of this information relates to the manufacturer, place of manufacture etc. The last four numbers are the date of manufacture. For example, if the number was 3106, the tyre was made in the 31st week of 2006.
- M+S or M/S indicates that the tyre has been designed with some capability for mud and snow.
-
The number of plies in both the tread area, and the sidewall area, indicates how many layers of rubber coated material make up the structure of the tyre. Information is also provided on the type of materials used.
-
Wear rate indicator. A tyre rated at 400 for example, will last twice as long as a tyre rated at 200.
- The traction rating grades a tyres performance when stopping on a wet road surface. The higher the grade the better the braking performance. The grades from highest to lowest are, AA, A, B, and C.
- The maximum load which can be carried by the tyre.
- Heat resistance grading. The tyre's resistance to heat is grade A, B, or C, with A indicating the greatest resistance to heat. This grading is provided for a correctly inflated tyre, which is being used within its speed and loading limits.
- The maximum inflation pressure for the tyre. This pressure should not be used for normal driving.
† Speed ratings
| Rating Speed km/h (mph) | |
| Q 160 | (99) |
| R 170 | (106) |
| S 180 | (112) |
| T 190 | (118) |
| U 200 | (124) |
| H 210 | (130) |
| V 240 | (149) |
| W 270 | (168) |
| Y 300 | (186) |
TYRE CARE
WARNINGS

Defective tyres are dangerous. Do not drive the vehicle if a tyre is damaged, excessively worn, or incorrectly
inflated. failure.
Doing so may lead to premature tyre

Avoid contaminating the tyres with vehicle fluids as they may cause damage to the tyre.

Avoid spinning the wheels. The forces released can damage the structure of the tyre and cause it to fail. Doing so may lead to premature tyre failure.

If wheel spin is unavoidable due to a loss of traction (in deep snow, for example), do not exceed the 50 km/h
(30 mph) may lead
) point on the speedometer. Doing so I to premature tyre failure.

Do not exceed the maximum pressure stated on the sidewall of the tyre.
Over-inflation could cause the tyre to fail suddenly.
Tyre pressures
WARNINGS

Never drive your vehicle if the tyre pressures are incorrect.
Under-inflation causes excessive
flexing and uneven tyre wear. This can lead to sudden tyre failure. Over-inflation causes a harsh ride, uneven tyre wear and poor handling.

Pressure checks should only be carried out when the tyres are cold, and the vehicle has been stationary
for more than three hours. A hot tyre at or below recommended cold inflation pressure is dangerously under-inflated.
WARNINGS

If the vehicle has been parked in strong sunlight, or used in high ambient temperatures do not reduce the tyre pressures. move the vehicle into the shade and allow the tyres to cool before re-checking the pressures.
All of the vehicle's tyres (including the spare) should be checked regularly for damage, wear and distortion. If you are in any doubt about the condition of a tyre, have it checked immediately by a tyre repair centre or your Dealer/Authorised repairer.
Checking the tyre pressures
WARNING

Tyre pressures should be checked regularly using an accurate pressure gauge, when the tyres are cold. Failure to properly maintain your tyre pressures could increase the risk of tyre failure resulting in loss of vehicle control and personal injury.

natural_image
Line drawing of a car interior showing lane markings and a directional arrow (no text or symbols)E95180
The recommended tyre pressures are listed on a placard label fixed to the end of the left-hand side door. These pressures provide optimum ride and handling characteristics for all normal operating conditions.
If winter tyres are fitted, please refer to the winter tyre pressure information. See USING WINTER TYRES (page 223).
In the interest of safety, reliability and fuel efficiency, check the tyres, including the spare, for condition and pressure on a weekly basis and before long journeys.
Do not check tyre pressures immediately after the vehicle has travelled in excess of 1.6 km (1.0 mile). Tyre temperatures and pressures increase when running. Deflating a warm tyre to the recommended pressure will result in under-inflation.
If tyre pressures are checked while the vehicle is inside a protected covered area, e.g. a garage, and subsequently driven in lower outdoor temperatures, tyre under-inflation could occur.
A slight pressure loss occurs naturally with time. If this exceeds 0.14 bar (2 lbf/in ^2 , 14 kPa,) per week, have the cause investigated and rectified by qualified assistance.
Tyre pressures (including the spare) should be checked at least once a week with normal on-road use, but should be checked daily if the vehicle is used off-road. Always check the tyre pressures before setting off on a long journey. If it is necessary to check tyre pressures when the tyres are warm, you should expect the pressures to have increased by up to 0.3-0.4 bar (4-6 lbf/in ^2 , 30-40 kpa). Do not reduce the tyre pressures to the cold inflation pressure under these circumstances. Allow the tyres to cool fully before adjusting the pressures.
The following procedure should be used to check and adjust the tyres pressures.
- Remove the valve cap.
- Firmly attach a tyre pressure gauge/inflator to the valve.
- Read the tyre pressure from the gauge, and add air if required.
- If air is added to the tyre, remove the gauge and re-attach it before reading the pressure. Failure to do so may result in an inaccurate reading.
- If the tyre pressure is too high, remove the gauge and allow air out of the tyre by pressing the centre of the valve. Refit the gauge to the valve and check the pressure.
- Repeat the process adding or removing air as required until the correct tyre pressure is reached.
- Refit the valve cap.
Note: It is an offence in certain countries to drive a vehicle with incorrect tyre pressures.
Note: It is the driver's responsibility to ensure that the tyre pressures are correct.
Tyre valves
Keep the valve caps screwed down firmly to prevent water or dirt entering the valve. Check the valves for leaks when checking the tyre pressures.
Pressure compensation for ambient temperature changes
If the intended journey will take the vehicle into an area where the ambient local temperature is known to be lower than the journey start point, tyre pressure under-inflation could occur.
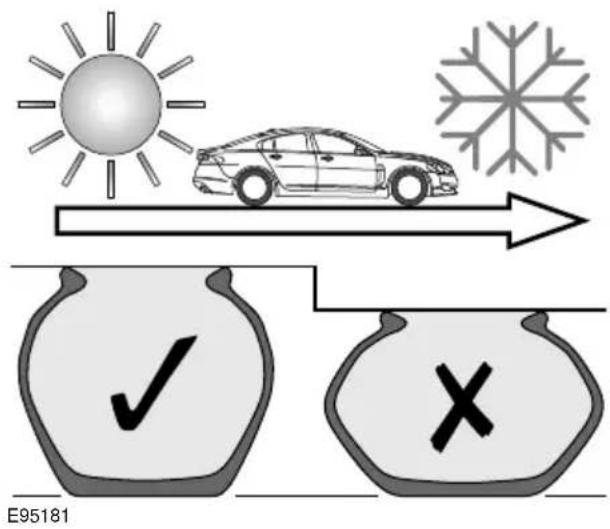
A colder ambient local temperature will reduce pressure within the tyre. An effect is to decrease sidewall height and to increase tyre shoulder wear with the potential for tyre failure. Vehicle dynamics could also be adversely affected.
In order to minimise this effect, tyre pressures can be adjusted to compensate before the start of the journey. Alternatively, tyre pressures can be adjusted when the area of lower ambient temperature is reached.
In this situation, the vehicle must be left in the ambient local temperature for a least one hour before tyre pressure is adjusted.
To compensate for colder ambient temperatures, tyre pressures should be increased by 0.14 bar (2lbf/in², 14 kPa) for each 10°C (20°F) decrease.
Note: Ensure that correct tyre pressures are maintained when moving to areas of differing ambient temperature.
The Tyre Pressure Monitoring system (TPM system) may issue a warning if the under-inflation becomes significant. When driving through variable climatic conditions the TPM system warnings may be intermittent.
Tyre pressure compensation chart - high ambient temperatures
| Tyre pressure temperature compensation | |
| Ambient temperature - °C (°F) | Pressure compensation - bar (lbf/in2, kPa) |
| 20 (68) use placard label | |
| 30 (86) + 0.14 | (2, 14) |
| 40 (104) + 0.28 | (4, 28) |
| 50 (122) + 0.41 | (6, 41) |
Tyre pressures during long term vehicle storage
To minimise the possibility and effects of flat spots during storage, the tyres may be inflated to the maximum pressure indicated on the tyre wall.
Note: Before using the stored vehicle on the road again, ensure that correct tyre pressures are restored.
Flat spots
If the vehicle is stationary for a long period, when the ambient temperature is high, the tyres may form flat spots. When the vehicle is driven, these flat spots will cause a vibration which will steadily disappear as the tyres warm up and regain their original shape.

natural_image
Three progressive tire wheel illustrations showing clockwise motion with arrows indicating rotation (no text or symbols)E80322
In order to minimise flat spotting, the tyre pressures can be increased. Tyre pressures should be increased by 0.14 bar/14 kPa (2 lbf/in²) for each 10°C (20°F) temperature increase above 20°C (68°F)
Long term storage
Flat spotting can be minimised during long term storage, by increasing the tyre pressures to the maximum indicated on the tyre sidewall.
Note: The tyre pressures should be reduced to the correct pressure before the vehicle is driven.
Tyre wear
Good driving practise will improve the mileage you obtain from your tyres, and avoid unnecessary damage.
- Always ensure that the tyre pressures are correctly adjusted.
- Always observe the posted speed limits, and advisory speeds for bends.
- Avoid pulling away quickly, or hard acceleration.
- Avoid making fast turns or braking sharply.
- Wherever possible, avoid potholes, or obstacles on the road.
- Do not drive up kerbs, or rub the tyres against them when parking.
Wear indicators
WARNING

Wear indicators show the minimum tread depth recommended by the manufacturers. Tyres which have worn to this point will have reduced grip and poor water displacement characteristics.
CAUTION

If tread wear is uneven across a tyre, or the tyre wears excessively, the vehicle should be checked by your Dealer/Authorised Repairer as soon as possible.

natural_image
Abstract pattern of interlocking curved lines and stripes, no text or symbols present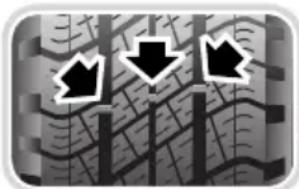
natural_image
Abstract graphic with three black arrows pointing downward on a textured gray background (no text or symbols)When the tread has worn down to approximately 2 mm, wear indicators start to appear at the surface of the tread pattern. This produces a continuous band of rubber across the tread as a visual indicator.
To maintain performance and grip the tyre must be replaced as soon as the wear indicator becomes visible. Sooner, if legislation requires replacement at a greater tread depth.
Note: Tread depth should be checked regularly, in some case more frequently than the service intervals. For advice on checking tyres contact your Dealer/Authorised repairer or a tyre dealer.
Age degradation
Tyres degrade over time due to the effects of ultraviolet light, extreme temperatures, high loads, and environmental conditions. It is recommended that tyres are replaced at least every six years, but they may require replacement more frequently.
Jaguar recommends that even if unused, the spare tyre be replaced at the same time as the four road tyres.
Punctured tyres
WARNING

Do not drive the vehicle with a punctured tyre. Even if the punctured tyre has not deflated, it is unsafe to use, as the tyre may deflate suddenly at any time. See TYRE REPAIR KIT (page 229).
Tyre checks
Not all punctures result in the tyre deflating immediately. Therefore, it is important to check the tyres for damage and foreign objects, regularly.
When driving, if a sudden vibration, or change to the vehicle's handling is noticed, reduce speed immediately. Do not brake hard, or make any sudden manoeuvres or direction changes. Drive slowly to an area off the main highway and stop the vehicle.
Note: Driving the vehicle to a safe area may cause damage to the punctured tyre, but occupant safety is far more important.
Inspect the tyres for signs of punctures, damage or under inflation. If any damage or deformity is detected, the tyre should be replaced. If a spare tyre is not available, then the vehicle should be recovered to a tyre repair centre, or Dealer/Approved repairer.
Replacement tyres
WARNINGS

Do not fit cross-ply tyres.

Do not fit tubed tyres.

Do not swap tyres around the vehicle. Tyres bed in to the specific characteristics of each wheel
position. Swapping them around may affect the vehicle's handling and traction.

Always fit replacement tyres of the same type, and wherever possible of the same make and tread pattern.

Replacement wheels should be genuine Jaguar parts. This will maintain the designed driving characteristics.

If the use of tyres not recommended by Jaguar is unavoidable, ensure that you read, and fully comply with, the
tyre manufacturers instructions. Failure to do so, may lead to tyre failure due to incorrect fitment or use.
Ideally, tyres should be replaced in sets of four. If this is not possible, replace the tyres in pairs (front and rear). When tyres are replaced, the wheels should always be re-balanced and alignment checked.
The correct tyre specification for your vehicle can be found on the tyre information label.
Directional tyres
Directional tyres are designed to operate correctly when rotating forwards (when the vehicle is travelling forwards).
Typical direction indicators

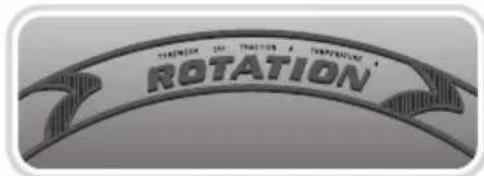

natural_image
Top-down view of a car tire with six spokes and a central hub, showing tread pattern (no text or symbols)E95182
USING WINTER TYRES
Winter tyres are more suitable during extremes of low temperatures, snow and ice and will considerably improve the vehicle's handling during these conditions.
Do not exceed 240 km/h (150 mph) when using Jaguar approved winter tyres.
Winter tyres must be fitted to all four wheels.

CAUTION

Tyres with an all season icon or M+S have a level of winter performance and need not be replaced.
Approved winter tyre sizes
Front:
- Dunlop Wintersport M3 - 235/55R17 99H, 245/45R18 96V, 245/45R18 100V, 245/40R19 98V.
- W240 Pirelli Sotto Zero - 245/45R18 100V, 245/40R19 98V, 255/35R20 97V
Rear:
- Dunlop Wintersport M3 - 235/55R17 99H, 245/45R18 96V, 245/45R18 100V, 245/40R19 98V.
- W240 Pirelli Sotto Zero - 245/45R18 100V, 245/40R19 98V, 285/30R20 99V
Winter tyre pressures
| Up to 240 km/h (150 mph) | |
| Front 2.0 | bar (30 lbf/in ^2 , 207 kPa) |
| Rear 2.3 | bar (33 lbf/in ^2 , 230 kPa) |
USING SNOW CHAINS
CAUTION
It is essential that only snow chains of the recommended type are fitted, other snow chains may cause damage to the vehicle.
Snow chains, of the recommended type, can only be fitted to rear wheels. They should not be used on temporary use spare wheels.
You should contact your Dealer/Authorised Repairer for details and availability of approved snow chains.
The maximum speed when using snow chains is 50 km/h (30 mph).
Remove the snow chains immediately the roads are clear of snow.
Ensure the fitting instructions supplied with the snow chains are kept in a safe place, for example, with this literature pack.
Note: When using snow chains, select JaguarDrive Control Winter mode with DSC switched on.
RUN FLAT TYRES
WARNING

If a run-flat tyre is deflated, maximum vehicle speed must not exceed 80 km/h (50 mph).

Run-flat tyres can be identified by the lettering RSC on the sidewall. The tyre construction utilises a specially reinforced sidewall, which allows the vehicle to be driven at restricted speeds, even when the tyre is depressurised. Run-flat tyres can only be fitted to special rims, constructed for run-flat tyre use.
A tyre pressure monitoring system is mandatory when the vehicle is fitted with run-flat tyres. See TYRE PRESSURE MONITORING SYSTEM (page 234).
If the tyre has deflated, the vehicle should be driven with caution, as handling characteristics will be different compared to a fully inflated tyre.
If the vehicle is fully laden with passengers and luggage, the maximum distance that can be completed on a fully deflated tyre, is approximately 80 kilometres (50 miles).
Stop immediately if the tyre construction begins to break down or if the tyre dislodges from the wheel rim. Typically, this will be accompanied by excessive vibration.
A tyre driven in a deflated condition must be replaced as soon as possible.
Vehicles fitted with run-flat tyres are not fitted with a spare wheel or jacking equipment. Therefore, run-flat tyres should be replaced with the same type of tyre.
TOOL KIT
Tool kit contents

- Jack.
- Wheel brace.
- Chock.
- Locking wheel nut adaptor.
- Towing eye.
WARNING
After use, the tool kit should be returned to the under floor storage area and correctly stowed. Do not leave the tool kit or its components loose in the storage area, as they can prove hazardous during an impact or sudden manoeuvre.
Note: When returning the tool kit to its stowage position, hook the T-bar of the clamp over the jack handle, to secure in position.
Note: The jack requires occasional maintenance. Examine the jack for wear, damage or corrosion and lubricate the moving parts.
CHANGING A ROAD WHEEL
WARNINGS

Always ensure replacement tyres have the correct rating and specifications (e.g. load index, size, speed rating) for your vehicle.

When using tyres other than those recommended by Jaguar, do not exceed the speed capacity recommended by the manufacturer.

Wheels are extremely heavy. Take care when lifting and particularly when removing and replacing a wheel in its storage position in the luggage compartment.
If a wheel change is required, pull off the road completely. Park on ground which is as level and solid as possible. Ensure that the vehicle is clear of any objects that will obstruct the safe removal of the wheel. Switch on hazard warning lamps and, where legally required, display the warning triangle.
Regular maintenance of tyres contributes not only to safety, but to the designed function of the vehicle. Road-holding, steering and braking are especially vulnerable to incorrectly pressurised, badly fitted or worn tyres.
Tyres of the correct size and type, but of different make can have widely varying characteristics. It is therefore recommended that Jaguar approved tyres are fitted to all wheels.
CAUTION
Ultra high performance tyres. This vehicle is equipped with an Ultra High Performance (UHP) tyre and wheel combination designed to give maximum dry road performance with consideration for aquaplaning resistance. UHP tyres have performance enhancing soft rubber tread compound. If driven aggressively they may suffer rapid tread wear and a shorter life than can be expected from other tyre types. This wheel and tyre combination is more susceptible to damage from road hazards.
Do not use this combination for driving on snow or ice. High performance tyres must be replaced with winter tyres when weather conditions dictate.
Temporary use spare wheel
Observe the following warnings before using the wheel:
WARNINGS

Note the temporary use spare wheel warning label. Adhere to instructions on the label. Failure to comply can be dangerous.

When a temporary use spare wheel is fitted, drive with caution and replace with the specified wheel and tyre as soon as possible.

Do not fit more than one temporary use spare wheel and tyre assembly at one time.

The temporary use spare wheel must be inflated to 4.2 bar (60 lbf/in ^2 , 420 kPa) and cannot be repaired.

Temporary use spare wheel, maximum speed is 80 km/h (50 mph).
WARNINGS

If the vehicle is fitted with Tyre Pressure Monitoring System (TPM System). See TYRE PRESSURE MONITORING SYSTEM (page 234).

DSC must be on when the temporary use spare wheel is in use.
Locking wheel nuts
Vehicles may be equipped with a locking wheel nut on each wheel. These are similar to standard wheel nuts, and can only be removed using the special adaptor provided with the jacking equipment.

- Insert the adaptor firmly onto the locking wheel nut.
- Using the wheel brace, unscrew the wheel nut and adaptor.
- Return the locking wheel nut adaptor to the correct storage position.
Note: A code number is stamped on the side of the locking nut. Ensure the number is recorded on the Security Card supplied with the literature pack. Quote this number if a replacement is required. Do not keep the Security Card in the vehicle.
Spare wheel location
The spare wheel and jacking tools are stored under the luggage compartment floor panel.
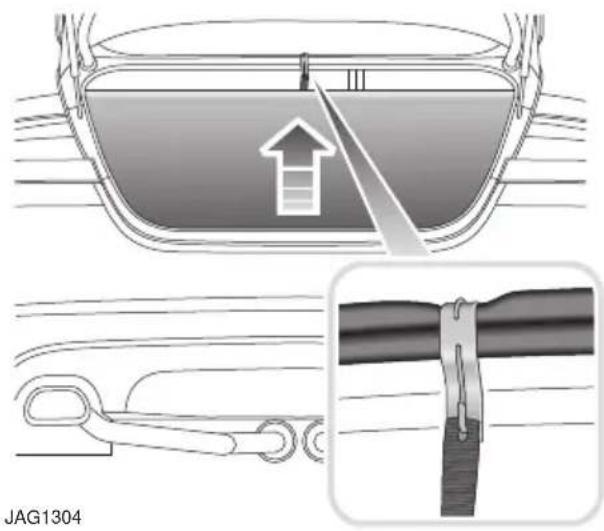
To remove the spare wheel: Raise the luggage compartment floor panel, hooking the strap over the upper boot seal as illustrated.

Unscrew the Tee bolt, releasing the retaining clamp and hook.
Remove the tool tray from the spare wheel and remove the spare wheel from the luggage compartment.
Remove the jack and wheel nut wrench from the tray.
Note: When refitting the Tee bolt, ensure that the retaining hook (1) fits over the jack handle, as illustrated.
Wheel changing safety
Before raising the vehicle, or changing a wheel ensure that you read, and comply with the following warnings.
WARNINGS

Always find a safe place to stop, off the highway and away from traffic.

Ensure that the vehicle is on firm level ground.

Disconnect trailer/caravan from vehicle.

Switch on the hazard warning lamps.

Ensure that all passengers, and animals, are out of the vehicle and in a safe place away from the highway.

Place a warning triangle at a suitable distance behind the vehicle, facing towards oncoming traffic.

Ensure that the front wheels are in the straight ahead position, and engage the steering lock.

Apply the parking brake, and engage Park (P).

Ensure that the jack is on firm level ground.

Never place anything between the jack and the ground, or the jack and the vehicle.

When one rear wheel is lifted off the ground the selection P (Park) position will not prevent the vehicle from
moving and possibly slipping off the jack as the park brake only operates on the rear wheels.

Do not start or run the engine while the vehicle is supported only by a jack.
WARNINGS

The jack is designed for use when changing a wheel only. Never work beneath the vehicle with the jack as the only means of support - use vehicle support stands.

Always chock the wheel diagonally opposite the wheel to be changed, using the wheel chock supplied in the tool kit. Chock the front of a front wheel, or the rear of a rear wheel.

If jacking the vehicle on a slight slope is unavoidable, place chocks on the downhill side of the two opposite wheels. An additional chock will be needed.

Take care when lifting the spare wheel, and removing the punctured wheel. The wheels are heavy, and can cause injuries if not handled correctly.

Remove the spare wheel prior to jacking the vehicle. To avoid destabilising the vehicle when raised.

Take care when loosening the wheel nuts. The wheel brace may slip off if not properly attached, and the wheel nuts may give way suddenly. Either unexpected movement may cause an injury.
Wheel changing procedure
WARNINGS

Do not attempt to lift the vehicle unless the jack head is fully engaged in the jacking point.

Ensure that the park brake is applied.
CAUTION
Ensure before raising the vehicle that the jack is correctly positioned to avoid any damage to the vehicle sills or sill panels.
- Ensure that all passengers are in a safe place, clear of the vehicle.
- Apply the parking brake and select gear position P (Park).
- Ensure that the jack is placed on firm and level ground.
Observe the instructions printed on the jack. Use the jack only for lifting the vehicle during wheel changing and only use the jack which is stored in the vehicle.
Before raising the vehicle slacken but do not remove the wheel nuts.
There are four jacking points on the underside of the floor. Two indented, triangular indicators are provided on each sill cover. These indicate the location for the jack.
The simplest way to correctly locate the jacking point is to feel along the sill panel to the triangular indentation and then fit the jack to the body, not to the sill panel.
Carefully raise the vehicle by turning the jack handle. Stop jacking the vehicle when the tyre just clears the ground. Minimum tyre lift gives maximum vehicle stability.
Remove the wheel nuts and the wheel.
To remove the centre badge use the plastic tipped end of the wheel nut wrench handle, push the centre badge from its housing from the inside of the wheel.
Push the centre badge into the replacement wheel. If the temporary use spare wheel is to be fitted, keep the centre badge safely and fit it to the repaired full size wheel when it has been refitted.
Fit the spare wheel and loosely secure with the wheel nuts.
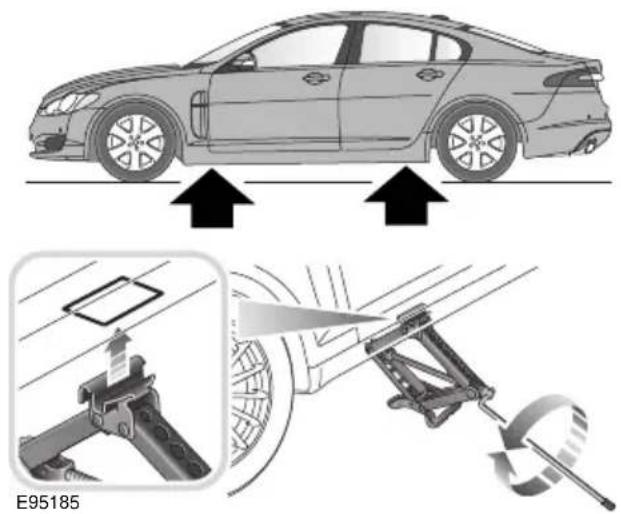
Tightening the wheel nuts
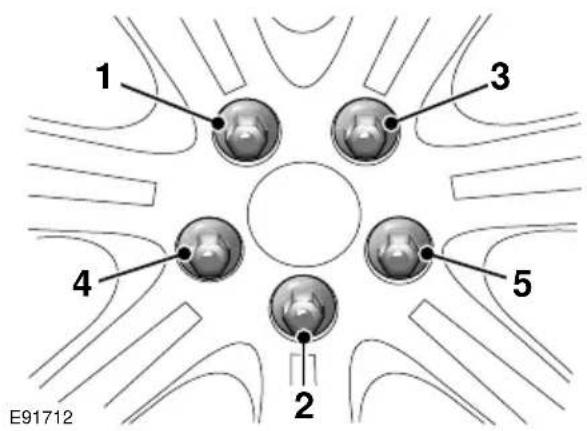
Using the wheel nut wrench, lightly tighten the wheel nuts alternately using the sequence shown in the illustration.
Lower the jack and tighten the wheel nuts alternately. Do not overtighten by using foot pressure or extension bars on the wheel nut wrench.
At the earliest opportunity have the wheel nuts tightened with a torque wrench to 125 Nm (92 lb.ft).
This torque must not be exceeded.
TYRE REPAIR KIT
WARNINGS

To ensure vehicle safety, it is essential that you read and understand the following information.
Failure to follow the instructions given here, may lead to serious tyre damage and may result in death or serious injury.

If you are in any doubt regarding your ability to carry out the instructions, contact your Dealer/Approved Repairer before attempting the repair.
Your vehicle may not be equipped with a spare tyre. If this is the case, in its place in the rear underfloor storage compartment, you will find a Jaguar tyre repair kit (except where run-flat tyres are fitted). The Jaguar tyre repair kit can be used to repair one tyre and it is essential that you read the following guide before attempting to repair a tyre.
The Jaguar tyre repair kit seals most punctures caused by nails, or similar items, with a maximum diameter of 6 mm (1/4 inch).
Note: The sealant used in the tyre repair kit has a shelf life and the expiry date is shown on the tyre sealant bottle. Ensure that the container is replaced before the expiry date.
Jaguar tyre repair kit safety information
WARNINGS

Some tyre damage may only be partially sealed, or may not seal at all, depending on the amount and type of damage. Any loss of tyre pressure can seriously affect vehicle safety.

Do not use the tyre repair kit if the tyre has been damaged by driving while under-inflated.

Only use the tyre repair kit to seal damage located within the tyre tread area.

Do not use the tyre repair kit to seal damage to the tyre sidewall.

Do not exceed 80 km/h (50 mph) when a repaired tyre is fitted to the vehicle.

The maximum distance that should be driven when a repaired tyre is fitted, is 200 km (125 miles).

When a repaired tyre is fitted, drive with caution and avoid sudden braking or steering manoeuvres.

Only use the tyre repair kit for the vehicle with which it was supplied.

Do not use the tyre repair kit for any other purpose than tyre repair.

Never leave the tyre repair kit unattended when in use.

Only use the tyre repair kit within the -30 °C to +70 °C temperature range.

Always keep children and animals at a safe distance from the tyre repair kit when in use.

Do not stand directly beside the compressor when it is operating.
WARNINGS

Check the tyre sidewall prior to inflation. If any cracks, damage or deformities are apparent, do not inflate the tyre.

Watch the tyre sidewall during inflation. If any cracks, bumps or similar damage, or deformities switch off the compressor and deflate
Jaguar tyre repair kit
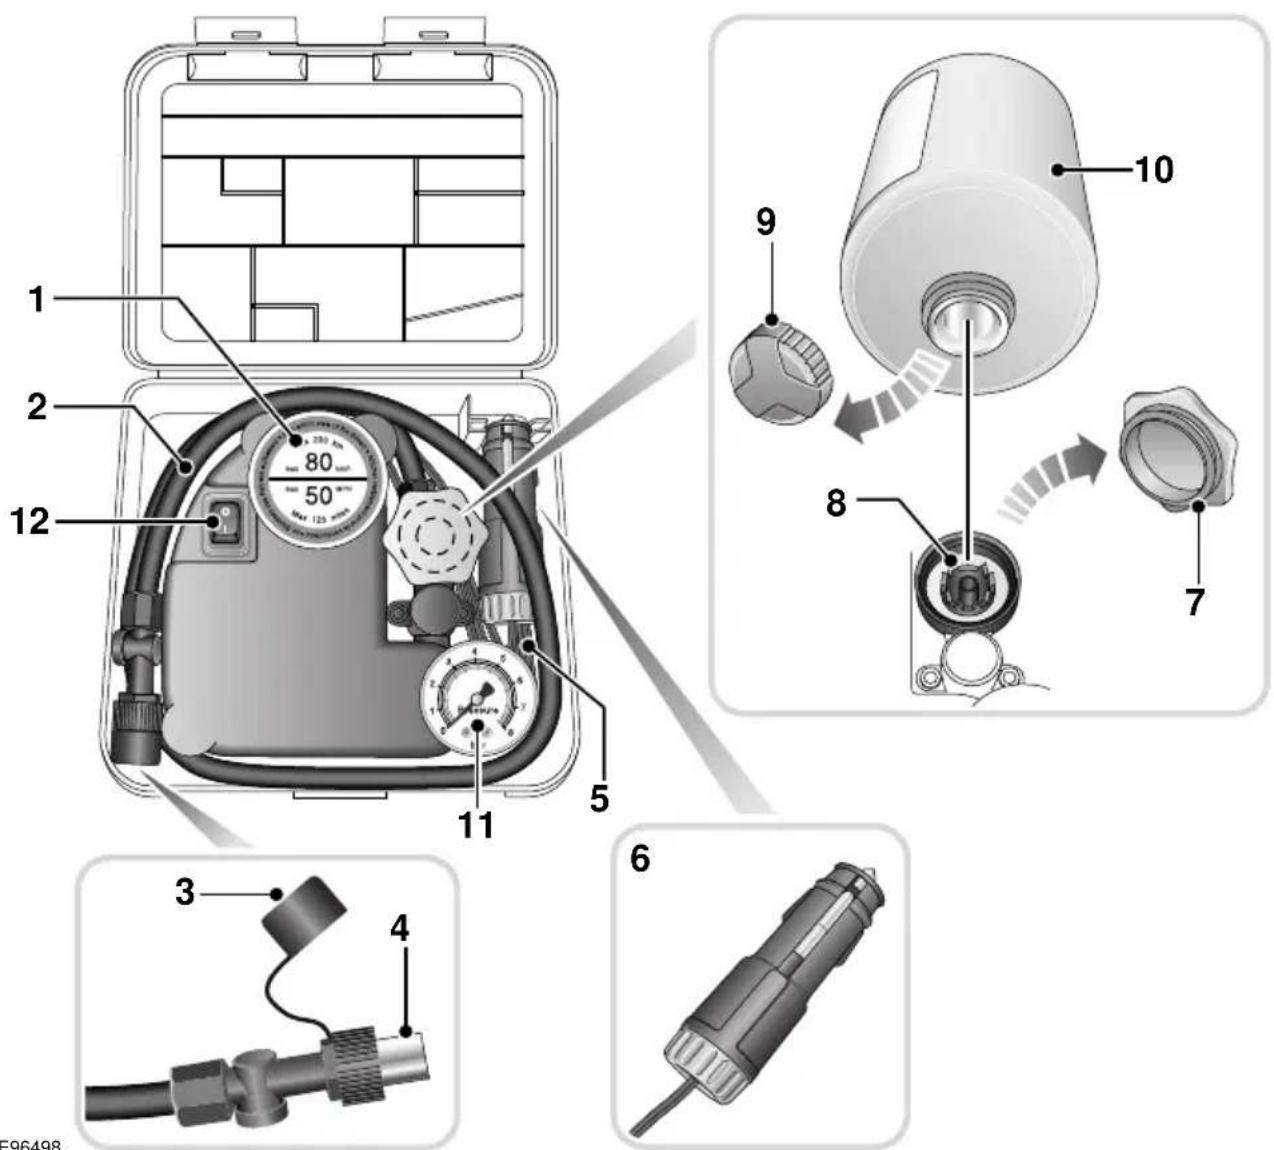
E96498
- Maximum speed label. 80 km/h (50 mph).
- Tyre inflation hose.
- Inflation hose protective cap.
- Inflation hose connector.
- Compressor power cable.
-
Power cable connector.
-
Sealant bottle receiver cap (orange).
- Sealant bottle receiver.
- Sealant bottle cap.
- Sealant bottle.
- Tyre pressure gauge.
- Compressor on/off switch (I = on. 0 = off.).
Using the Jaguar tyre repair kit
WARNINGS

Avoid skin contact with the sealant which contains natural rubber latex.

If the tyre inflation pressure does not reach 1.8 bar (26 lbf/in ^2 , 180 kPa) within seven minutes, the tyre may have suffered excessive damage. A temporary repair will not be possible, and the vehicle should not be driven until the tyre has been replaced.
CAUTIONS
Before attempting a tyre repair, ensure that the vehicle is parked safely, as far away from passing traffic as possible.
Ensure that the parking brake is applied and P (Park) is selected.
Do not attempt to remove foreign objects such as nails, screws, etc. from the tyre.
Always run the engine when using the compressor, unless the vehicle is in an enclosed or poorly ventilated space, as this may cause asphyxiation.
To prevent overheating, do not operate the compressor continuously for longer than ten minutes.
Note: All vehicle drivers and occupants should be made aware that a temporary repair has been made to a tyre fitted to the vehicle. They should also be made aware of the special driving conditions imposed when using a repaired tyre.
Repair procedure
WARNING

Check the tyre sidewall prior to inflation. If there are any cracks, bumps or similar damage, do not attempt to inflate the tyre. Do not stand directly beside the tyre while the compressor is pumping. Watch the tyre sidewall. If any cracks, bumps or similar damage appear, turn off the compressor and let the air out by means of the pressure relief valve. Do not continue to use the tyre.
- Open the tyre repair kit and peel off the maximum speed label. Attach the label to the fascia in the driver's field of vision. Take care not to obstruct any of the instruments or warning lights.
- Uncoil the compressor power cable and the inflation hose.
- Unscrew the orange cap from the sealant bottle receiver and the sealant bottle cap.
- Screw the sealant bottle into the receiver (clockwise) until tight.
- Screwing the bottle onto the receiver will pierce the bottle's seal. Do not unscrew a full, or partly used bottle from the receiver. Doing so will result in sealant leaking from the bottle.
- Remove the valve cap from the damaged tyre.
- Remove the protective cap from the inflation hose and connect the inflation hose to the tyre valve. Ensure that the hose is screwed on firmly.
- Ensure that the compressor switch is in the off (0) position.
-
Insert the power cable connector into the auxiliary power socket. See AUXILIARY POWER SOCKETS (page 125).
-
Unless the vehicle is in an enclosed area, start the engine.
- Set the compressor switch to the on (I) position.
- Inflate the tyre to a minimum of 1.9 bar (26 lbf/in ^2 ) and a maximum of 3.5 bar (51 lbf/in ^2 ).
- When pumping the sealant through the tyre valve, the pressure may rise up to 6 bar (87 lbf/in ^2 ). The pressure will drop again after approximately 30 seconds.
- During the inflation, switch the compressor off briefly, to check the tyre pressure using the gauge mounted on the compressor.
- It should not take longer than seven minutes to inflate the tyre. If, after seven minutes, the tyre has not yet reached minimum pressure, the tyre should not be used.
- Once the tyre has been inflated, switch off the compressor. If desired, the engine may be turned off after the compressor has been turned off.
- Remove the power connector from the auxiliary power socket.
- Remove the inflation hose from the tyre valve, by unscrewing it as quickly as possible (counter-clockwise).
- Replace the inflation hose protective cap and the tyre valve cap.
- Do not remove the sealant bottle from the receiver.
-
Ensure that the tyre repair kit (including the bottle and receiver caps) are placed securely in the vehicle. You will need to use the kit to check the tyre pressure after approximately 3 km (2 miles), so ensure they are easily accessible.
-
Immediately drive the vehicle for approximately 3 km (2 miles), to allow the sealant to coat the inner surface of the tyre and form a seal at the puncture.
Checking the tyre pressure after a repair
WARNINGS

When driving the vehicle, if you experience vibrations, abnormal steering, or noises, reduce speed immediately. Drive with extreme caution and reduced speed, to the first safe place to stop the vehicle. Visually examine the tyre and check its pressure. If there are any signs of damage or deformity to the tyre, or the tyre pressure is below 1.3 bar (19 lb/in ^2 ), do not continue driving.

Consult a tyre repair centre or your Dealer/Authorised Repairer, for advice concerning the replacement of a tyre after using a tyre repair kit.
- Drive the vehicle for 3 km (2 miles) then stop in a safe place. Carry out a visual examination of the tyres condition.
- Make sure that the sealant container section is in its original position.
- Screw the inflation hose connector firmly onto the tyre valve.
- Read the tyre pressure from the gauge.
- If the pressure of the sealant filled tyre is above 1.3 bar (19 lb/in ^2 ) adjust the pressure to the correct value. See TYRE CARE (page 217).
- Ensure that the compressor switch is in the off (0) position and insert the power cable connector into the auxiliary power socket.
If the vehicle is in a well ventilated area, start the engine.
- Switch the compressor to on (I) and inflate the tyre to the correct pressure.
- To check the tyre pressure, turn off the compressor then read the pressure from the gauge.
- When the compressor is off, if the tyre pressure is too high, release the required amount of pressure using the pressure relief valve.
- Once the tyre is inflated to the correct pressure, switch off the compressor and remove the power plug from the auxiliary socket.
- The use of the tyre repair kit sealant may lead to error prompts and incorrect readings of the Tyre Pressure Monitoring System. Therefore, use the tyre repair kit pressure gauge to check and adjust the damaged tyre's inflation pressure.
- Unscrew the inflation hose connector from the tyre valve, replace the tyre valve cap and the inflation hose connector protective cap.
- Ensure that the tyre repair kit is placed securely in the vehicle.
- Drive to the nearest tyre repair centre or Dealer/Authorised Repairer, for a replacement tyre to be fitted. Ensure that you make the repair centre aware that the tyre repair kit has been used before the tyre is removed.
- Both the tyre inflation hose, and the sealant container should be replaced once a new tyre has been fitted.

Only sealant containers which are completely empty should be disposed of with normal household waste. Sealant containers which contain some sealant, and the tyre inflation hose, should be disposed of by a tyre specialist or your Dealer/Authorised Repairer, in compliance with local waste disposal regulations.
TYRE PRESSURE MONITORING SYSTEM
WARNINGS

The Tyre Pressure Monitoring (TPM) system is NOT a substitute for manually checking tyre pressures.
The TPM system only provides a low pressure warning and does not re-inflate your tyres. Tyre pressures should be checked regularly using an accurate pressure gauge when cold. Failure to properly maintain your pressures could increase the risk of tyre failure, with consequential loss of vehicle control and personal injury.

The TPM system can NOT register damage to a tyre. Regularly check the condition of your tyres, especially if the vehicle is driven off-road.
CAUTION

When inflating tyres, care should be taken to avoid bending or damaging the TPM system valves. Always ensure correct alignment of the inflation head to the valve stem.
Note: Non-approved accessories may interfere with the system. If this occurs, TYRE PRESSURE SYSTEM FAULT is displayed in the message centre.
Note: Different types of tyre may affect the performance of the TPM system. Always replace tyres in accordance with recommendations. See TYRE SPECIFICATIONS - ARDUOUS TERRAIN (page 239).
Your vehicle may be equipped with a TPM System which monitors pressure in each tyre (temporary use spare wheels are not fitted with sensors and are consequently not monitored).

natural_image
Technical illustration of two mechanical components with numbered callouts (1 and 2), no text or symbols present.E91713
Wheels fitted with a TPM system can be easily visually identified by the external metal lock nut and valve (1). All Jaguar non-TPM system wheels have a rubber valve fitted (2).
TPM system operation
The TPM system monitors pressure of the tyres via sensors located in each wheel and a receiver located within the vehicle. Communication between sensor and receiver is via Radio Frequency (RF) signals.

The tyre pressure warning comprises a yellow warning telltale within the instrument panel, and
the associated messages within the message centre.
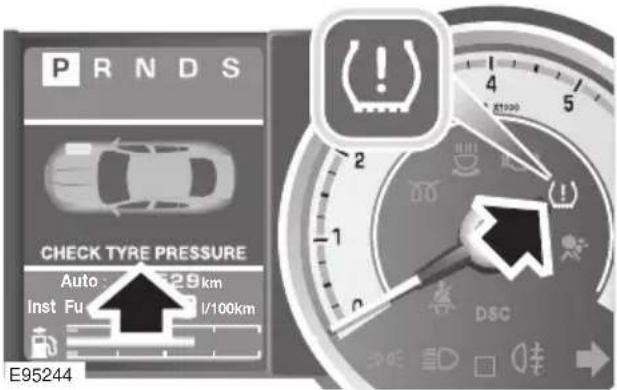
If the telltale light illuminates, you should stop and check your tyres as soon as possible and inflate them to the recommended pressure as stated on the tyre pressure placard. If low pressure warnings occur frequently, the cause must be determined and rectified.
When driving through variable climatic conditions the TPM system warnings may be intermittent.
Your vehicle will also indicate a TPM System malfunction by initially flashing and subsequent continuous illumination of the warning telltale. A text message will accompany the system malfunction and will display TYRE PRESSURE SYSTEM FAULT. The TPM system fault sequence will be activated at every ignition cycle until the fault is rectified. When a malfunction occurs, the system may not be able to detect or signal low tyre pressure as intended.
TPM system malfunctions may occur for a variety of reasons which may include other radio frequency systems that could cause interference or the installation of incompatible replacement tyres on the vehicle.
Tyre pressure warning with speed
If the vehicle is to be driven at speeds in excess of 160 km/h (100 mph), the tyre pressures should be increased as stated in this handbook or on the placard label. Failure to increase the tyre pressures and driving in excess of 160 km/h (100 mph), will illuminate the yellow warning telltale and display a text message TYRE PRESSURES LOW FOR SPEED. In the event of this warning being displayed, vehicle speed should be reduced
Temporary use spare wheel and tyre change
If the temporary use spare wheel is fitted the system will automatically recognise the change in wheel positions. Then after approximately ten minutes of driving above 25 km/h (18 mph), a message TYRE NOT MONITORED will be displayed accompanied by illumination of the warning telltale and the corresponding block in the vehicle graphic.
The warning telltale will initially flash and will subsequently revert to continuous illumination. Extended use of the temporary use spare wheel will produce an additional text message TYRE PRESSURE SYSTEM FAULT.
This TPM system display sequence will be activated at every ignition cycle until the temporary use spare wheel is replaced by a fully operational full size wheel and tyre assembly.
Always replace the temporary use wheel before having TPM system faults investigated. The fault may well be rectified with the fitment of a fully operational full size running tyre in lieu of the temporary use spare wheel assembly.
Tyre changing
Always have your tyres serviced or changed by a qualified engineer.
Care must be taken to avoid contact between the bead of the tyre and the sensor during removal and refitting of the tyre, otherwise the sensor may become damaged and or inoperable.
CAUTION
Valve stem seal, washer, nut, valve core and cap should be replaced at every tyre change. Valve stem seal, washer and nut must be replaced if valve retention nut is loosened. Sensor units and nuts must be refitted using correct torque figures and associated profile. Damage to the vehicle may result if these precautions are not taken.
Sensors can be removed from the wheel by the unscrewing of the valve retention nut.
Replacement sensor
Should the sensor require replacing, it should be carried out by a Dealer/Authorised Repairer.
A replacement sensor must be fitted to a running wheel in order to be recognised by the system. The vehicle needs to be stationary for 15 minutes during the sensor fitment before the system is ready to detect the new sensor. The vehicle must be driven for a minimum of fifteen minutes after the sensor change, and then remain stationary for fifteen minutes to activate full TPM system operation.
If the TPM system warning for any wheel does not clear, even after ensuring correct inflation and driving for more than ten minutes above 25 km/h (18 mph), you should seek qualified assistance as soon as possible.
TPM System information messages
| Message Warning | Indicator | Priority Indicator | Meaning |
| CHECK TYRE PRESSURE (Graphic indication displays which tyre is under-inflated.) | TPM System | Amber You should as soon as possible stop, check your tyre and inflate them to the recommended pressure. | |
| CHECK ALL TYRE PRESSURES | TPM System | Amber May be displayed when the vehicle is learning that a new sensor is fitted to the vehicle and one or more tyres has low pressure. You should as soon as possible stop, check your tyres and inflate them to the recommended pressure. | |
| TYRE PRESSURE SYSTEM FAULT | TPM System | Amber 1. The wheels do not have TPM System sensors fitted.2. The TPM System sensors have become defective, an unapproved accessory is interfering with the system or a general fault has been detected. Seek qualified assistance as soon as possible. | |
| TYRE NOT MONITORED (Graphic indication displays which tyre is not monitored.) | TPM System | Red 1. A temporary use spare wheel is fitted. Vehicle speed should be limited to 80 km/h (50 mph). 2. A TPM System sensor has become defective, an unapproved accessory is interfering with the system or a wheel has been fitted that does not have a sensor. Seek qualified assistance as soon as possible. | |
| TYRE PRESSURES LOW FOR SPEED | TPM System | Amber The tyre pressures are not suitable for high speed driving. You should reduce vehicle speed and inflate the tyres to recommended pressures for high speed driving. | |
TYRE GLOSSARY
lbf/in² or psi
Pounds per square inch, an imperial unit of measure for pressure.
kPa
Kilo Pascal, a metric unit of measure for pressure.
Cold tyre pressure
The air pressure in a tyre which has been standing in excess of three hours, or driven for less than 1.6 km (1 mile).
Maximum inflation pressure
The maximum pressure to which the tyre should be inflated. This pressure is given on the tyre side wall in lbf/in ^2 (psi) and kPa.
Note: This pressure is the maximum allowed by the tyre manufacturer. It is not the pressure recommended for use.
Kerb weight
The weight of a standard vehicle, including a full tank of fuel, any optional equipment fitted, and with the correct coolant and oil levels.
Gross vehicle weight
The maximum permissible weight of a vehicle with driver, passengers, load, luggage, equipment, and towbar load.
Accessory weight
The combined weight (in excess of those items replaced) of items available as factory installed equipment.
Production options weight
The combined weight of options installed which weigh in excess of 1.4 kg (3 lb) more than the standard items that they replaced, and are not already considered in kerb or accessory weights. Items such as heavy duty brakes, high capacity battery, special trim etc.
Vehicle capacity weight
The number of seats multiplied by 68 kg (150 lb) plus the rated amount of load/luggage.
Maximum loaded vehicle weight
The sum of kerb weight, accessory weight, vehicle capacity weight, plus any production option weights.
Rim
The metal support for a tyre, or tyre and tube, upon which the tyre beads are seated.
Bead
The inner edge of a tyre that is shaped to fit to the rim and form an air tight seal. The bead is constructed of steel wires which are wrapped, or reinforced, by the ply cords.
TYRE SPECIFICATIONS - ARDUOUS TERRAIN
In certain markets, due to the possibility of very uneven or unmetalled roads, it is necessary to fit tyres suitable for the conditions. These markets and the relevant tyre specification are detailed below.
The following chart details the tyres recommended for use in the countries listed below:
A. Australia, Bahrain, Egypt, Israel, Jordan, Kuwait, Lebanon, Malaysia, Mexico, Morocco, Oman, Qatar, Saudi Arabia, South Africa, Syria, Thailand, United Arab Emirates.
B. Argentina, Belarus, Brazil, Bulgaria, Chile, Dominican Republic, Estonia, Guatemala, Indonesia, Kazakhstan, Panama, Philippines, Russia, Sri Lanka, Ukraine, Uzbekistan.
| Wheel position Tyre size Pattern A B | ||||
| Front and rear 235/55R17 99W Pirelli P7 No No | ||||
| Front and rear | 245/45R18 100Y X/L | Pirelli PZero Asymmetric | Yes | Yes |
| Front and rear | 245/45R18 100W X/L | Dunlop Sport 01 Asymmetric | Yes | Yes |
| Front and rear | 245/40R19 98Y X/L | Dunlop Sport 01 Asymmetric | Yes | Yes |
| Front | 255/35R20 97Y X/L | Pirelli PZero Asymmetric | Yes | Yes |
| Rear | 285/30R20 99Y X/L | Pirelli PZero Asymmetric | Yes | Yes |
| Temporary use spare wheel (front and rear): | ||||
| Alloy 4J x 18 | T135/80R18 | Pirelli | ||
For all other countries you should refer to your local Dealer/Authorised Repairer for specific tyre fitment.
Accessory wheels and tyres
natural_image
Silhouette of a car with no text or symbols1 ____ 2 ____
3
E95187
- Front tyre pressure.
- Rear tyre pressure.
- Wheel and tyre information (size, speed rating, etc.).
Note: Use the table above to record accessory wheel and tyre information.
WARNING

Contact your Dealer/Authorised Repairer before fitting any accessory wheels and tyres. Your Dealer/Authorised Repairer will be able to offer guidance regarding the correct accessories. Fitting incorrect wheel/tyre combinations can seriously affect the ride and handling of your vehicle. In extreme cases, this may lead to loss of control of the vehicle.
CHANGING A FUSE
CAUTIONS
Always turn off the ignition system and the affected electrical circuit, before replacing a fuse.
Fit Jaguar approved replacement fuses of the same rating and type, or fuses of matching specification. Using an incorrect fuse may result in damage to the vehicle's electrical system, and can result in a fire.
No attempt should be made to repair a fuse that has blown.
If the replacement fuse blows after installation, the system should be checked by your Dealer/Authorised Repairer.
Note: Jaguar recommend that owners do not remove or replace relays. It is recommended that you seek qualified assistance in the event of a relay failure.
Always switch off the ignition and the affected electrical circuit, before replacing a fuse.
Fuse failure is identified by an inoperative circuit.
A special tool for removing and replacing Mini fuses is provided in the engine compartment fuse box, together with spare fuses.

E95262
Two types of fuses are fitted in the fuse boxes:
-
Mini-type
-
J-Case
If a spare fuse is used, renew it (or have it renewed) with a fuse of the same amperage rating.
Push the tool onto the suspect fuse and withdraw it.
If the wire in the fuse is broken, the fuse has blown.
Fit a new fuse using the tool.
Checking or renewing a blown fuse
J-Case fuses (2) and relays should only be replaced by a qualified technician.
Fuses are colour coded according to the amperage and the rating is also marked on each fuse.
FUSE BOX LOCATIONS
CAUTION
When a fuse box lid is removed, take care to protect the box from moisture, and refit the lid at the earliest opportunity.

There are three separate fuse boxes fitted to the vehicle, each one containing fuses protecting a different group of circuits.
They are located in:
- The engine compartment
- The passenger compartment.
- The luggage compartment.
Engine compartment fuse box
The fuse box is located underneath a cover on the right-hand side of the engine compartment.

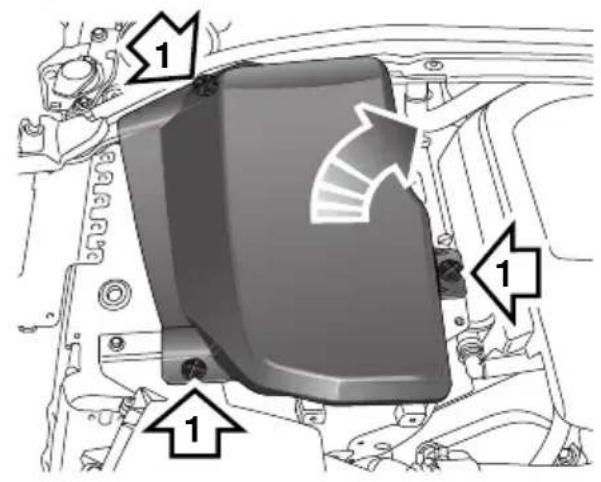

natural_image
Technical diagram of a mechanical assembly with arrows indicating directional components (no text or symbols)Remove the engine compartment right-hand cover by releasing the turnbuckles (1).
Remove the fuse box lid by pressing the retaining lugs (solid arrows) and lifting.
When refitting, press the fuse box lid in the area of the retaining lugs until the lid engages.
Passenger compartment fuse box

natural_image
Interior view of a car showing the backrest seat and side panel, with an inset close-up highlighting a device (no text or symbols present)The passenger compartment fuse box is located behind an access hatch in the right-hand footwell.
Press the release catch to access the fuse box.
Luggage compartment fuse box

natural_image
Technical line drawing of a mechanical component with a highlighted section and arrow (no text or symbols)The fuse box is located behind an access hatch on the right-hand side of the luggage compartment.
Push down on the top of the hatch and pull away from the side of the vehicle, to access the fuse box.
Fuse and relay positions
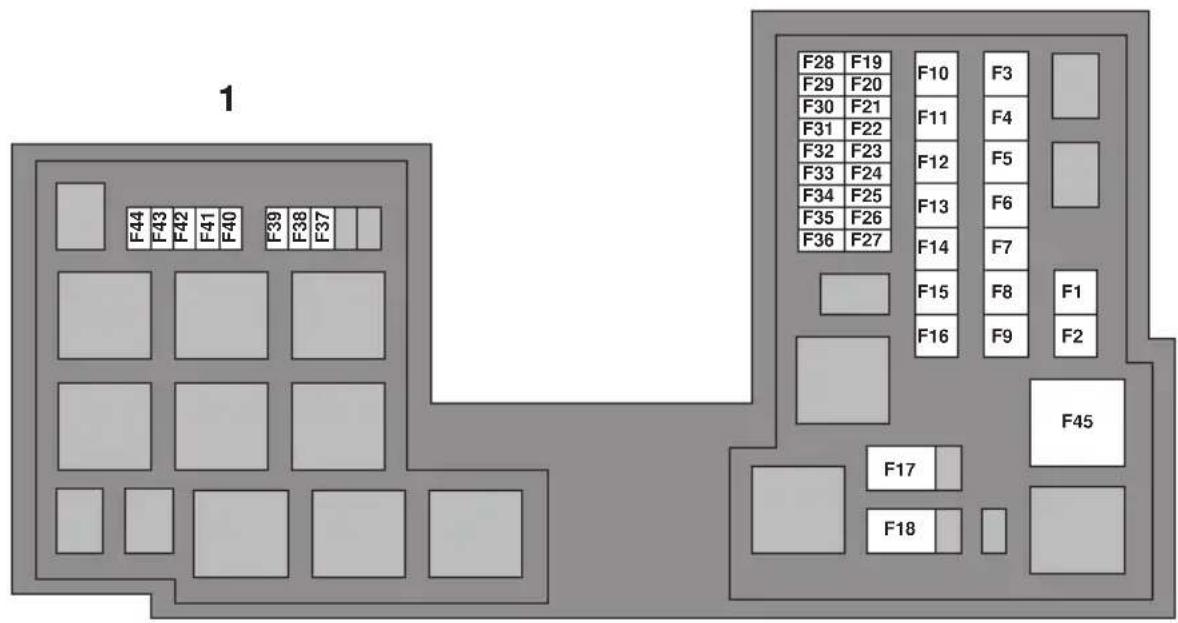
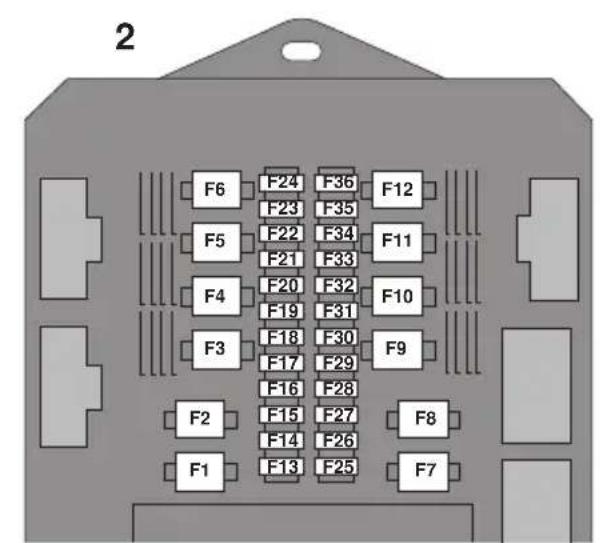

JAG1533
- Engine compartment fuse box.
- Passenger compartment fuse box.
- Luggage compartment fuse box
FUSE SPECIFICATION CHART
Engine compartment fuse box
| Fuse No | Rating (amps) | Fuse Colour | Circuit |
| F1 - - | Not used. | ||
| F2 - - | Not used. | ||
| F3 20A | Blue Emissions system (petrol only). | ||
| F4 20A | Blue Emissions system (petrol only). | ||
| F5 40A | Green Anti-lock brake pump. | ||
| F6 30A | Pink Power wash pump. | ||
| F7 - - | Not used. | ||
| F8 - - | Not used. | ||
| F9 50A | Red Engine management. | ||
| F10 - - | Not used. | ||
| F11 - - | Not used. | ||
| F12 | 50A Red Secondary air injection (petrol only). | ||
| F13 | 30A Pink Wipers. | ||
| F14 | 30A Pink Starter solenoid. | ||
| F15 | 40A Green Screen heater. | ||
| F16 | 40A Green Screen heater. | ||
| F17 | 80A | Black | Radiator fan. (V6 petrol only) |
| F18 | 60A | Yellow | Glow plugs (diesel only). |
| F19 - - | Not used. | ||
| F20 | 15A Blue Horn. | ||
| F21 | 25A | Clear | Anti-lock brakes. |
| F22 | 15A Blue Cigar lighter. | ||
| F23 - - | Not used. | ||
| F24 5A | Tan Adaptive cruise control. | ||
| F25 | 10A Red Anti-lock brakes. | ||
| F26 | 10A | Red | Engine management. JaguarDrive selector. Transmission control module. |
| F27 5A | Tan Diesel | - Engine management. | |
| F27 | 5A Tan | Tan Petrol - Secondary air injection. | |
| F28 - - | Not used. | ||
| F29 - - | Not used. | ||
| F30 - - | Not used. | ||
| F31 - - | Not used. | ||
| F32 - - | Not used. | ||
| F33 - - | Not used. | ||
| F34 - - | Not used. | ||
| F35 5A | Tan Air conditioning compressor clutch. | ||
| F36 15 | A Blue Engine management system (diesel only).20A Blue Engine management system (V8 petrol only). | ||
| F37 15 | A Blue Ignition system (petrol only). | ||
| F38 5A | Tan Power steering. | ||
| F39 5A | Tan Headlamp levelling system. | ||
| F40 15 | A Blue Water pump (Supercharged vehicles only). | ||
| F41 | 5A10A | Tan Red | Diesel - Emissions system.Petrol - Engine management system. |
| F42 | 30A10A | Green Red | Diesel - Engine management system. Ignition supply.Petrol - Engine management system. Ignition supply. Radiator fan. |
| F43 5A | Tan Diesel - Fuel system.10A | Red | Petrol - Engine management system. Emission control. |
| F44 5A | Tan Engine management system (diesel only)15A Blue Fuel injectors (petrol only). | ||
| F45 | 100A | Blue Radiator fan (diesel and V8 petrol only). | |
Passenger compartment fuse box
| Fuse No | Rating (amps) | Fuse Colour | Circuit |
| F1 -- | Not used. | ||
| F2 -- | Not used. | ||
| F3 20A | Blue Driver's seat adjustment. | ||
| F4 20A | Blue Driver's seat adjustment. | ||
| F5 -- | Not used. | ||
| F6 -- | Not used. | ||
| F7 -- | Not used. | ||
| F8 20A | Blue Front passenger's seat adjustment. | ||
| F9 20A | Blue Front passenger's seat adjustment. | ||
| F10 20A | Blue Left-hand rear door controls. | ||
| F11 20A | Blue Right-hand rear door controls. | ||
| F12 | -- Not used. | ||
| F13 10A | Red Steering column adjust. | ||
| F14 | -- Not used. | ||
| F15 | -- Not used. | ||
| F16 5A | Tan Sunblind. | ||
| F17 | -- Not used. | ||
| F18 | -- Not used. | ||
| F19 | -- Not used. | ||
| F20 5A | Tan Remote control receiver. | ||
| F21 5A | Tan Foot brake. | ||
| F22 5A | Tan Electric parking brake. | ||
| F23 | 5A | Tan | Driver's seat. Audio system. Auto headlamps. Upper centre console switches. |
| F24 | 10A | Red | Front passenger seat. Electric windows. Mirror adjustment. |
| F25 20A | Yellow Driver's heated/climate seat | ||
| F26 15A | Blue Trailer power connector. Road pricing system. | ||
| F27 | 20A | Yellow | Front passenger's heated/climate seat. |
| F28 15A | Blue Auxiliary power socket. | ||
| F29 20A | Yellow Keyless entry system. | ||
| F30 10A | Red Air conditioning. | ||
Fuses
| Fuse No | Rating (amps) | Fuse Colour | Circuit |
| F31 15 | A Blue Sunroof. | ||
| F32 5A | Tan Jaguar | Smart Key docking station. | |
| F33 5A | Tan Diagnostic connector. | ||
| F34 5A | Tan Instrument pack. | ||
| F35 15 | A Blue Interior lamps. | ||
| F36 10 | A Red Suspension system. | ||
Luggage compartment fuse box
| Fuse No | Rating (amps) | Fuse Colour | Circuit |
| F1 | 30A | Pink Air | blower. |
| F2 | 30A | Pink Electric parking brake. | |
| F3 | - | - | Not used. |
| F4 | - | - | Not used. |
| F5 | - | - | Not used. |
| F6 | - | - | Not used. |
| F7 | 30A | Pink Heated rear screen. | |
| F8 | 30A | Pink | Audio system (Premium audio only). |
| F9 | 50A | Red RBD link. | |
| F10 | 40A Green Rear electronic differential (e-Diff). | ||
| F11 | - | - | Not used. |
| F12 | - | - | Not used. |
| F13 | - | - | Not used. |
| F14 | 5A | Tan Telephone. | |
| F15 | 10A | Red TV. | DVD. DAB radio. |
| F16 | - | - | Not used. |
| F17 | - | - | Not used. |
| F18 | - | - | Not used. |
| F19 | - | - | Not used. |
| F20 | - | - | Not used. |
| F21 | - | - | Not used. |
| F22 | - | - | Not used. |
| F23 - - | Not used. | ||
| F24 - - | Not used. | ||
| F25 25 | A Clear Fuel pump. | ||
| F26 15 | A Blue Audio system. | Portable audio interface. | |
| F27 10 | A Red Navigation. | Voice recognition. Touch-screen. | |
| F28 15 | A Blue Trailer power connector. | Road pricing system. | |
| F29 15 | A Blue Trailer power connector. | ||
| F30 25 | A Clear Driver's door module. | ||
| F31 25 | A Clear Front passenger | door module. | |
| F32 - - | Not used. | ||
| F33 | 5A | Tan | Tyre pressure monitoring system. |
| F34 - - | Not used. | ||
| F35 10 | A Red Supplementary restraint system. | ||
| F36 10 | A Red Pedestrian protection system. | ||
HAZARD WARNING FLASHERS
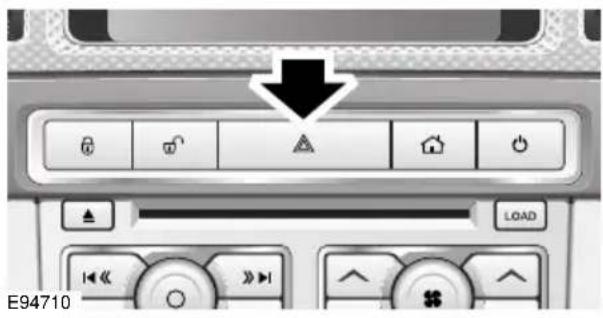
If the vehicle is stationary in an unsafe location, or may cause a hazard to other road users, switch on the hazard warning flashers. Press the switch to turn the hazard warning lamps on.
Note: Hazard warning lamps can be used when the ignition is on or off.
WARNING TRIANGLE
The warning triangle is located in the luggage compartment, attached to a luggage anchor point.
FIRST AID KIT
If the vehicle is equipped with a first aid kit, it is strapped to the side of the luggage compartment.
FIRE EXTINGUISHER
Dependent on market, if the vehicle is equipped with a fire extinguisher, it will either be located in the luggage compartment, or mounted to the front passenger seat.
DRIVING AFTER A COLLISION
Before starting or driving
WARNING

If the vehicle is involved in a collision it should be checked by a Dealer/Authorised repairer, or suitably qualified personnel, before starting or driving.
If the vehicle has been involved in an accident it should be checked thoroughly before attempting to start the engine or drive the vehicle.
Check for:-
- Fuel leaks.
- Fluid leaks.
- Battery damage.
- Damage to wiring.
- Damage to lights.
- Damage to steering, suspension, wheels or tyres.
- Sharp or protruding bodywork.
• Operation of doors and locks. - Condition and operation of seat belts and SRS components.
- Activation of the pedestrian protection system.
- Condition of child seats and their mounting/attachment points.
Note: This list is not exhaustive.
Resetting the fuel cut-off
WARNING

The fuel cut-off should never be reset if you can smell fuel, or a leak can be seen. Doing so can lead to a fire which may cause personal injury or death.
The fuel system cut-off forms part of the Safety and Restraint System (SRS) fitted to your vehicle. Following an impact, and depending on the severity, the fuel pump may be switched off.
- Switch the ignition off, and wait for 10 seconds.
- Without pressing the brake pedal, press the engine START/STOP button, to switch the electrical circuits on. Wait for 30 seconds.
- Check the vehicle thoroughly for fuel leaks. If a leak is detected switch the ignition off immediately.
- The vehicle must not be started if a leak is present. Seek qualified advice, and have the vehicle recovered.
- If no leaks are detected, start the engine.
When driving
When driving a vehicle which has been involved in a collision use caution and pay extra attention to the operation of the vehicle. If any changes in vehicle operation after the collision are noted when compared to it's operation before the collision, do not continue to drive the vehicle. Stop the vehicle as soon as it is safe to do so, and have the vehicle recovered.
Pay particular attention to changes in:-
- Steering.
- Braking.
- Unusual noises.
- Warning lights or messages displayed.
- Problems with electrical systems.
INSPECTING SAFETY SYSTEM COMPONENTS
Following a collision the seat belt and Supplementary Restraint System components should be inspected for damage and/or deformity. The inspection and any subsequent repair work should only be carried out by a Dealer/Authorised Repairer, or other suitably qualified personnel.
Components which require inspection include:-
- Seat belt webbing and mechanisms.
- Seat belt pre-tensioners.
• Airbag covers and modules. - Seat frames and mounting points.
- Child seats.
• Child seat anchor points.
• Pedestrian protection system.
Note: This list is not exhaustive.
In addition to the physical items checked, the electronic control system and its associated wiring should also be checked thoroughly. This process will include a diagnostic check which can only be carried out by a Dealer/Authorised repairer or suitably qualified and equipped persons.
WARNING

It is not recommended that the vehicle be driven or used until all of the occupant protection systems have been checked.
TOWING POINTS
Front and rear towing eyes and lashing points

E95301
WARNINGS

The towing eyes at the front and rear of the vehicle are designed for on-road recovery only. If they are
used for any purpose other than those indicated, it may result in vehicle damage and serious injury.

Never use the towing eyes to tow a trailer, caravan etc. Doing so may result in vehicle damage and serious injury.
CAUTION

Only use the lashing points indicated, or over-tyre tie-downs, to secure the
vehicle to the transporter or trailer. Use of any other position (e.g. lower control arms) may result in damage to the vehicle.
The front and rear towing eyes are the only recommended lashing points on the vehicle.
Attaching the front towing eye
The front towing eye is included in the tool kit, located in the under-floor area of the luggage compartment. See TOOL KIT (page 224).
-
Press the lower edge of the towing eye cover in the front bumper to open, then pull from the aperture, allowing the cover to hang from its retaining strap.
-
Locate the towing eye through the bumper and screw the towing eye counter-clockwise into its fixing, until secure.
TRANSPORTING THE VEHICLE

natural_image
Illustration of a car on an open ramp with a flatbed truck nearby (no text or symbols)
natural_image
Illustration of a car being towed by a truck, with a large 'X' symbol above (no text or labels)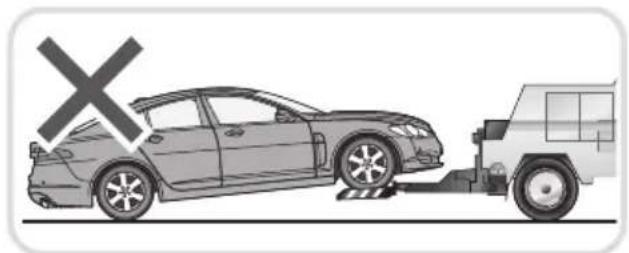
natural_image
Diagram showing a car being stopped by a vehicle, with a cross symbol indicating the vehicle's origin (no text or labels present)E95304
The recommended method for recovery/transportation of the vehicle, is on a transporter or trailer designed for that purpose.
Ensure that transportation is carried out by suitably qualified persons, and that the vehicle is secured correctly.
If the vehicle is being transported on a trailer or vehicle flat-bed transporter, the parking brake must be applied, the wheels are chocked and the Emergency Park Release (EPR) operated, to ensure that the transmission remains in N and does not automatically select P.
Emergency Park Release (EPR)
When recovering your vehicle, it is essential that the EPR is operated. EPR prevents the transmission from automatically selecting P, ensuring that the transmission remains in neutral (N). EPR is operated by a lever located behind a trim panel in the cubby box. Before activating the EPR, select P, apply the parking brake and turn the ignition off.


E96407
- Open the twin cup holder lid.
- Open the cubby box lid.
- Using a flat-bladed screwdriver, lever the trim panel upwards (at the point indicated) to release and remove.

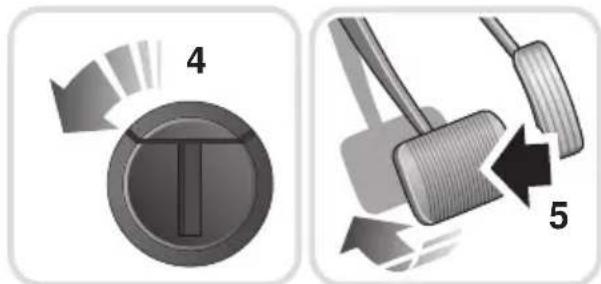
E96408
- Using a flat-bladed screwdriver, turn the locking device 90° counter-clockwise.
- Apply the foot brake.
- Use the strap to pull the EPR lever upwards, until it latches in the vertical position.
When EPR is activated, the JaguarDrive selector will remain in P, but the selector indicator and the gear display in the message centre will both flash N (if ignition is on), to indicate that EPR is active.
When vehicle transportation has been completed, EPR should be cancelled, to allow Park to be re-engaged.
Cancelling EPR
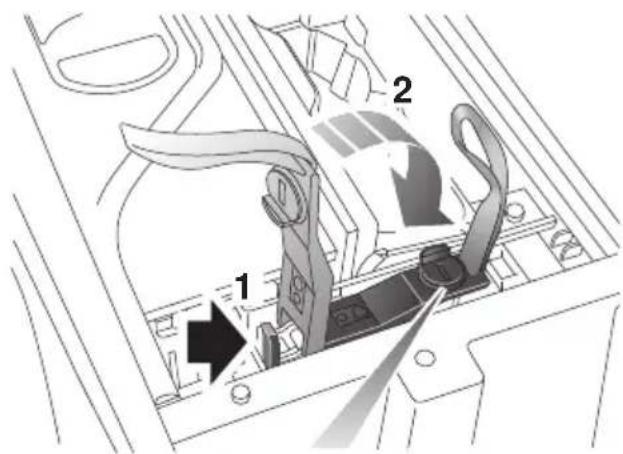

natural_image
Circular icon with a T symbol and an arrow pointing to the number 3, no text or symbols present.E96409
- Using a flat-bladed screwdriver, release the latch (arrowed).
- Return the EPR lever to its horizontal position.
- Turn the locking device 90° clockwise to secure.
- Replace the trim panel and close the cubby box and twin cup holder lids.
TOWING THE VEHICLE ON FOUR WHEELS
WARNINGS

Ensure that the remote control remains docked whilst the vehicle is being towed. Removing the remote control will engage the steering lock, which will prevent the vehicle from steering correctly.

If the engine cannot be run whilst the vehicle is being towed, there will be no power assistance for the steering or brakes. This will result in greater effort being required to steer or slow the vehicle, and greatly increased stopping distances.
CAUTIONS

The vehicle should only be towed in a forward direction with all four wheels on the ground.

The vehicle should only be towed for a maximum of 0.8 km (0.5 miles), at a maximum speed of 48 km/h (30 mph). Towing for a greater distance or at a higher speed, may result in serious damage to the transmission.
Note: The recommended recovery method is to raise all four wheels.
Towing procedure
- The vehicle should be parked on firm level ground, with the parking brake on, and the gear selector in P (Park).
- Secure the towing attachment from the recovery vehicle to the front towing eye. See TOWING POINTS (page 253).
- Dock the Jaguar Smart Key and switch on the ignition. See GENERAL INFORMATION (page 132).
CAUTION

Leaving the ignition switched on for extended periods will cause the battery to drain.
- Apply the foot brake and release the parking brake.
- With the foot brake still applied, activate the Emergency Park Release (EPR). See TRANSPORTING THE VEHICLE (page 254).
- The vehicle can now be towed a maximum of 0.8 km (0.5 miles) at a maximum speed of 48 kmh (30 mph).
- Upon arrival at the destination, ensure wherever possible that the vehicle is parked on firm level ground.
- Lower the Emergency Park Release (EPR) lever, to cancel EPR and to re-engage P (Park).
- Apply the parking brake.
- Switch off the ignition and remove the Jaguar Smart Key.
WARNING

Use extreme caution when detaching towing equipment. Vehicle movement is possible which can result in serious injuries.
- Remove the towing attachment from the towing eye.
VEHICLE IDENTIFICATION PLATE

natural_image
Diagram of a car's side profile showing the seatbelt and dashboard area, with an arrow pointing to a specific component (no text or symbols present)The Vehicle Identification Number (VIN) and recommended maximum vehicle weights, are shown on a plate adhered to the hinge side of the left-hand (right-hand in China) front door. VIN should match the VIN recorded in the Service Portfolio, and the VIN visible through the windscreen.
ENGINE NUMBER
Note: To access the number, it may be necessary to remove the engine covers. For further assistance, contact your Dealer/Authorised Repairer.
V6 Petrol engines
The number is located on the lower left-hand side of the cylinder block, near the bedplate.
V8 Petrol engines
The number is located on the front of the right-hand cam cover.
Diesel engines
The number is located on a metal label attached to the top of the left-hand camshaft cover
TRANSMISSION NUMBER
The transmission number is located on a label attached to the transmission casing.
VEHICLE IDENTIFICATION NUMBER (VIN)

E95306
As a deterrent to thieves, and to assist the Police, the VIN is stamped on a plate which is visible through the lowest part of the left side of the windscreen.
Note: If you need to communicate with a Dealer/Authorised repairer, you may be asked to quote the VIN number.
VEHICLE BUILD DATE PLATE
This is the calendar month and year in which the body and power train assemblies were conjoined and the vehicle was driven from the production line.
The vehicle built date is shown on the VIN plate.
ENGINE SPECIFICATIONS
| Data V6 Diesel | |
| Number of cylinders 6 | |
| Displacement 2998 cc | |
| Compression ratio 16:1 |
| Data V6 Petrol | |
| Number of cylinders 6 | |
| Displacement 2967 cc | |
| Compression ratio 10.5:1 |
| Data V8 Normally Aspirated Petrol | |
| Number of cylinders 8 | |
| Displacement 5000 cc | |
| Compression ratio 11.5:1 | |
| Data V8 Supercharged Petrol | |
| Number of cylinders 8 | |
| Displacement 5000 cc | |
| Compression ratio 9.5:1 | |
WEIGHTS
| Variant Vehicle | weight from | Front axle weight from | Rear axle weight from | Max. luggage compartment load1 |
| V6 Diesel 1820 kg | 4012 lbs | 1016 kg | 804 kg | 35 kg |
| 2240 lbs | 1772 lbs | 77 lbs | ||
| V6 Petrol 1679 kg | 3702 lbs | 878 kg | 801 kg | 35 kg |
| 1936 lbs | 1766 lbs | 77 lbs | ||
| V8 Normally Aspirated Petrol | 1780 kg | 961 kg | 819 kg | 35 kg |
| 3924 lbs | 2119 lbs | 1806 lbs | 77 lbs | |
| V8 Supercharged Petrol | 1891 kg | 1022 kg | 869 kg | 35 kg |
| 4169 lbs | 2253 lbs | 1916 lbs | 77 lbs |
Note: ^1 The maximum permitted luggage compartment load can be exceeded, provided the requirements regarding the maximum permissible axle weights and tyre pressures are followed.
| Variant Gross Vehicle Weight (GVW) ^1 | Maximum front axle load ^2 | Maximum rear axle load ^2 | Gross Train Weight ^3 | |
| V6 Diesel 2360 kg | 5203 lbs | 1200 kg | 1215 kg | 4210 kg |
| 2646 lbs | 2679 lbs | 9281 lbs | ||
| V6 Petrol 2215 kg | 4883 lbs | 1090 kg | 1180 kg | 4065 kg |
| 2403 lbs | 2601 lbs | 8962 lbs | ||
| V8 Normally Aspirated Petrol | 2285 kg | 1130 kg | 1200 kg | Not Applicable |
| 5038 lbs | 2491 lbs | 2646 lbs | ||
| V8 Supercharged Petrol | 2345 kg | 1165 kg | 1200 kg | Not Applicable |
| 5170 lbs | 2568 lbs | 2646 lbs | ||
^1 The maximum permissible weight of the vehicle including passengers and load.
^2 The front and rear axle maximum loads can not be reached simultaneously as this will exceed the GVW limit.
^3 The maximum permissible weight of the vehicle and braked trailer including their respective loads.
DIMENSIONS

E95307
| Item | Description mm/inches | |
| 1 | Width 2053/80.5 | |
| 2 | Width with mirrors folded 1877/74.0 | |
| 3 | Track - front 1559/61.4 | |
| 4 | Maximum height 1460/57.5 | |
| 5 | Track - rear ^1 1571-1605/61.9-63.2 | |
| 6 | Wheelbase | 2909/114.5 |
| 7 | Length excluding number plate plinth | 4961/195.3 |
| - | Turning circle (kerb to kerb) | 11.5 m/37.7 ft. |
^1 Narrowest dimension applies to 20 inch wheels only.
Wheel alignment data (China only)
| Wheel alignment - front +0.25° | |
| Wheel alignment - rear +0.13° | |
| Camber - front -0.30° | |
| Camber - rear -0.69° | |
| Castor - front 6.61° | |
| Castor - rear non-adjustable | |
Brake pedal travel (China only)
The brake pedal travel is set at the factory and is non-adjustable.
DECLARATIONS OF CONFORMITY
SIEMENS VDO
A u t o m o t i v e
NiemensWDO Automotive AG: P.O. Box 10 09 43: D-93079 Regensburg
| Name | Regina Quegwer |
| Department | SV C BC P2 RF TG |
| Tel. | +49(0)941/790-3554 |
| Fax | +49(0)941/790-133 554 |
| Regina.Quegwer@siemens.com | |
| Internet | www.siemensvdo.de |
| Our Ref. | DoC_5WK46956.doc |
| Date. | 16/12/2003 |
Declaration of Conformity in accordance with Directive 1999/5/EC (R&TTE Directive)
Manufacturer: Siemens VDO Automotive AG Body & Chassis Electronics
Address: Dep. SV C BC P2 RF TG Siemensstrasse 12 D-93055 Regensburg Germany
Product type designation: 5WK4 B956
Intended use: Radio frequency transmitter used in vehicle locking/unlocking systems
The product mentioned above complies with the essential requirements and other relevant provisions of Directive 1999/5/EC, when used for its intended purpose:
Health and safety pursuant to §3.1.a: Applied standard(s): EN 60950: 2000
Electromagnetic compatibility pursuant to § 3.1.b: Applied standard(s): EN 301 489 -01, -3: V.1.4.1 (2002-08) Efficient use of spectrum pursuant to § 3.2: Applied standard(s): EN 300 220 -1: V.1.3.1 (2000-09)
The following marking applies to the above mentioned product:

Siemens VDO Automotive AG
Regensburg, 2003-12-16

Jean-François Tarabbia Executive Vice President Body & Chassis Electronics Operations

Norbert Müller
Vice President
Wireless Products and Modules
SiemensVDO Automotive AG Body & Chassis Electronics
Helmut Matschi Klaus Müller
Postal Address: SiemensVDO Automotive AG
P.O. Box 10 08 43 D-93009 Regensburg
Office Address: Siemensstraße 12 D-53055 Regensburg Tel. +49(0)941/790-0
Siemens/DO Automotive AG - Chairman of the Supervisory Board, Edward G. Knubasi - Managing Board Franz Wreasing, Chairman - Members: Klaus Eppen, Dünter Hauptraum, Jonathan Lother - Registered Office: Moconen / Commercial Registry: München, info: 12307
SIEMENS VDO
A u t o m o t i v e
Siemens VDD Automotive AG - Postbuch 10.02-43 - 59000 Rogersburg
Naro
Schneider Tanja
Department
SV CBC P2 RFTG
Phone
+49(0)941/790-6622
Fax
+49(0)941/790-136622
tanja.schneider@siemens.com
Internet
www.siemersvdo.da
Your Letter
Doc_5WK45693.60c
Our Ref.
18.01.2006
Declaration of Conformity
We, the undersigned, declare that
the transmitter 5WK45693 uses the same schematic, layout and pcb as transmitter 5WK4 8956.
They only differ in:
Capacitor C301, 680pF/2% was changed to capacitor C311, 680pF/2%. Resistor R302, 18kOhm was changed to resistor R322, 33kOhm. Capacitor C103, 10nF was changed to capacitor C103, 22nF.
These modifications were necessary to adapt several car lines.
These modifications do not influence the RF characteristics of the transmitter.
Yours truly,
Siemens VDO Automotive AG

Dr. Martin Fischer
Vice President
Wireless Products and Modules
Siemens VDO Automotive AG
Body & Chassis Electronics
Postal Address:
Siemens VDO Automotive AG
Office Address:
Siemensstraße 12
93055 Regensburg
Tel. +49(0)941/790-02
Helmut Matschi
Klaus Möller
Postfach 10 09 43
93009 Regensburg
Siemens VDO Automotive AG - Chairman of the Supervisory Board: Professor Dr. Edward G. Krubas/ke - Managing Board: Wolfgang Deher, Chairman - Members: Dr. Klaus Egger Clarist Hauphmann, Reinhard Pitzer - Registered Office: Monches - Commercial Registry: Monches, HRB 192637
I:POSTZULA|Volvo/PK|Veranten-Redesign|SWK45693Doc_5WK45693.doc
SIEMENS VDO
Automotive
Siemens/DO Automotive AG - P.D. Box 10 09-43 - D-9309 Regensburg
Name Regina Quegwer
Department SV C BC P2 RF TG
Tel. +49(0)941/790-3554
Fax +49(0)941/790-133 554
E-Mail Regina.Quegwer@siemens.com
Internet www.siemensvdo.de
Our Ref. DoC 5WK48956.doc
Date. 16/12/2003
Declaration of Conformity in accordance with Directive 1999/5/EC (R&TTE Directive)
| Manufacturer: | Siemens VDO Automotive AG Body & Chassis Electronics |
| Address: | Dep. SV C BC P2 RF TG Siemensstrasse 12 D-93055 Regensburg Germany |
| Product type designation: | 5WK4 8956 |
| Intended use: | Radio frequency transmitter used in vehicle locking/unlocking systems |
The product mentioned above complies with the essential requirements and other relevant provisions of Directive 1999/5/EC, when used for its intended purpose:
Health and safety pursuant to §3.1.a: Applied standard(s):
EN 60950:2000
| Electromagnetic compatibility pursuant to § 3.1.b: | Applied standard(s):EN 301 489 -01, -3: V.1.4.1 (2002-08) |
| Efficient use of spectrum pursuant to § 3.2: | Applied standard(s):EN 300 220 -1: V.1.3.1 (2000-09) |
The following marking applies to the above mentioned product:
CE
Siemens VDO Automotive AG
Regensburg, 2003-12-16

Jean-Francois Tarabbia Executive Vice President Body & Chassis Electronics Operations

Norbert Müller Vice President Wireless Products and Modules
SiemensVDO Automotive AG Body & Chassis Electronics
Postal Address: SiemensVDO Automotive AG
Office Address: Siemensstraße 12 D-93055 Regensburg Tel. +49(0)941/790-0
Helmut Matschi Klaus Müller
P.O. Box 10 0943 D-93009 Regensburg
Siemens VDO Automotive AG - Chairman of the Supervisory Board; Edward G. Krabasik - Managing Board; Franz Wressnig, Chairman - Members: Klaus Egger, Günter Hauptmann, Johann Löthner - Registered Officer: München - Commercial Registry: München, HRB 132637
SIEMENS VDO
Automotive
SiemensVDO Automotive AG -P.O. Box 10-09-43 eD-93009 Regensburg
| Name | Dagmar Kolar |
| Department | SV C TS RBG EMC-Laboratory |
| Tel. | +49(0)941/790-6699 |
| Fax | +49(0)941/790-136699 |
| dagmar.koiar@siemens.com | |
| Internet | www.siemensvdo.de |
| Our Ref. | Doc_5WK49096.doc |
| Date. | 03/08/2005 |
Declaration of Conformity in accordance with Directive 1999/5/EC (R&TTE Directive)
| Manufacturer: | Siemens VDO Automotive AGBody & Chassis Electronics |
| Address: | Dep. SV C BC P2 RF TGSiemenstrasse 12D-93049 RegensburgGermany |
| Product type designation: | 5WK4 9096 |
| Intended use: | Radio frequency receiver used in vehicle locking/unlocking systems |
The product mentioned above complies with the essential requirements and other relevant provisions of Directive 1999/5/EC, when used for its intended purpose:
| Health and safety pursuant to §3.1.a: | Applied standard(s):EN 60950:2000 |
| Electromagnetic compatibility pursuant to § 3.1.b: | Applied standard(s):EN 301 489-1,-3: V1.4.1 (2002-08) |
| Efficient use of spectrum pursuant to § 3.2: | Applied standard(s):EN 300 220-1: V1.3.1 (2000-09) |
The following marking applies to the above mentioned product:
CE
Siemens VDO Automotive AG
Regensburg, 2005-08-03

Dr. Martin Fischer
Vice President
Wireless Products and Modules
SiemensVDO Automotive AG
Body & Chessis Electronics
Postal Address:
SiemensVDO Automotive AG
Office Address:
Siemenstrasse 12
D-93055 Regensburg
Tel. +49(0)941/790-0
Siemens VDO Automotive AG „Chairman of the Supervisory Board: Edward G. Kubasik Managing Board: Franz Wressnig, Chairman „Members: Klaus Egger, Günter Hauptmann, Johann Lötner „Registered Office: München „Commercial Registry: München, HRB 132637
SIEMENS VDO
Siemens VDO Automotive
Name Kolar Dagmar Department SV C TS RBG 42
Phone +49 941 790-6699 Fax +49 941 790-136699
Mobile
E-Mail dagmar.kolar@siemens.com Internet www.siemensvdo.com
Your letter of Our Reference Date DoC_5WK49243.doc 10. Nov. 2006
Declaration of Conformity in accordance with Directive 1999/5/EC (R&TTE Directive)
| Manufacturer: | Siemens AG Siemens VDO Automotive Body & Chassis Electronics | |
| Address: | Siemensstrasse 12 D-93055 Regensburg Germany | |
| Product type designation: | 5WK4 9243 | |
| Intended use: | Radio frequency transmitter used in vehicle locking/unlocking systems | |
| The product mentioned above complies with the essential requirements and other relevant provisions of Directive 1999/5/EC, when used for its intended purpose: | ||
| Health and safety pursuant to §3.1.a: | Applied standard(s): EN 60950: 2001 | |
| Electromagnetic compatibility pursuant to §3.1.b: | Applied standard(s): EN 301 489 -01: V1.6.1 (2005-09) EN 301 489 -03: V1.4.1 (2002-08) | |
| Efficient use of spectrum pursuant to §3.2: | Applied standard(s): EN 300 220 -1: V1.3.1 (2000-09) EN 300 220 -3: V1.1.1 (2000-04) | |
The following marking applies to the above mentioned product:


Siemens AG
Division: Body & Chassis Electronics
Heazi: Helmut Meschi, Klaus Müller
Group: Siemens YDO Automobile
Group Executive Management Wolfgang Cohen, Group President
Ranhard Pinger, Dr. Klase Egger, Helmut Matachi

Dr. Ulrich Schrey
Vice President
Interior Controls Platform Engineering
Postal address:
Siemens AG
Pointach 10 09 43
95000 Regensburg
Office address:
Slementstraße 12
93065 Regensburg
Tel. +49 941 790-02
Siemens Aktiengesellschaft. Chairman of the Supervisory Board Heinrich v. Pierer; Managing Board Klaus Kleinfeld, Chairman and Chief Executive Officer: Johannes Fedimayer, Thomas Ganewindt, Joe Kaeser, Edward G. Krubski, Rudi Lamorecht, Eduardo Montes, Jürgen Radomski, Erdh R. Reinhardt, Hermann Requardt,
Linal J. Sharal, Claus Weyrich, Maus Wuchere
Registered office: Berlin and München; Commercial registee: Berlin Charlottenburg, HRB 1203, München, HRB 6654
EC-Declaration of Conformity
Manufacturer:
Valeo Raytheon Systems, Inc.
Address/Adipo
EU: Lalernstrasse 12, 74321 Bietigheim-Bissingen, Germany
( USA: 150 Stephenson Highway, Troy, MI 48083 USA )
Declares that the product:
type:
MultiBeam Radar 24GHz
model:
MBR Gen2
Intended use:
Blind Spot Detection
complies with the essential requirements of Article 3 of the R&TTE 1999/5/EC Directive, if used for its intended use and that the following standards has been applied:
1 Health (Article 3.1 of the R&TTE-Directive)
Applied Standard
EN 50385
Issue 2002
2 Safety (Article 3.1 of the R&TTE-Directive)
Applied Standard
EN 60950-1
Issue 2006
3 Electromagnetic Compatibility (Article 3.1 b of the R&TTE-Directive)
Applied Standard
ETSI EN 301 489-1
Issue V1.6.1
ETSI EN 301 489-3
Issue V1.4.1
4 Efficient Use of the radio frequency spectrum (3.2 of the R&TTE-Directive)
Applied Standard
ETSI EN 300 440-1
Issue V1.3.1
ETSI EN 300 440-2
Issue V1.1.2
10/10/2007
Eric Amiot

(Place and date of the declaration of conformity)
(Name and signature)
RADIO RECEPTION

natural_image
Illustration of vehicles approaching a central point with signal beams, surrounded by buildings and roads (no text or symbols)JAG1328
Some interference is to be expected from time to time during a journey. Occasionally, it may be necessary to return the audio unit, to offset the effects of moving from one transmitter area to another.
While Radio Data System (RDS) automatic retuning helps to reduce the effects of signal changes, some manual retuning may still be required (especially for local stations) in areas of weak reception.
FM Signals travel in a straight line, so large obstacles, such as tall buildings, can shield the vehicle from the signal, causing distortion or loss of reception (known as dead spots).
Distortion can also occur if FM signals received directly from the transmitter, mix with signals deflected by obstructions such as mountains, hills and tall buildings. This is known as multi-path distortion.
Note: Although distortion, interference and lack of signal clarity are sometimes attributed to a fault in the radio, this is rarely the case.
AUDIO UNIT OVERVIEW
The Jaguar infotainment system contains AM/FM radio, compact disc player and portable audio interface. Digital (DAB) radio, six-disc CD player and TV are optional.
WARNING

Sustained exposure to high sound levels can damage your hearing.
Audio controls
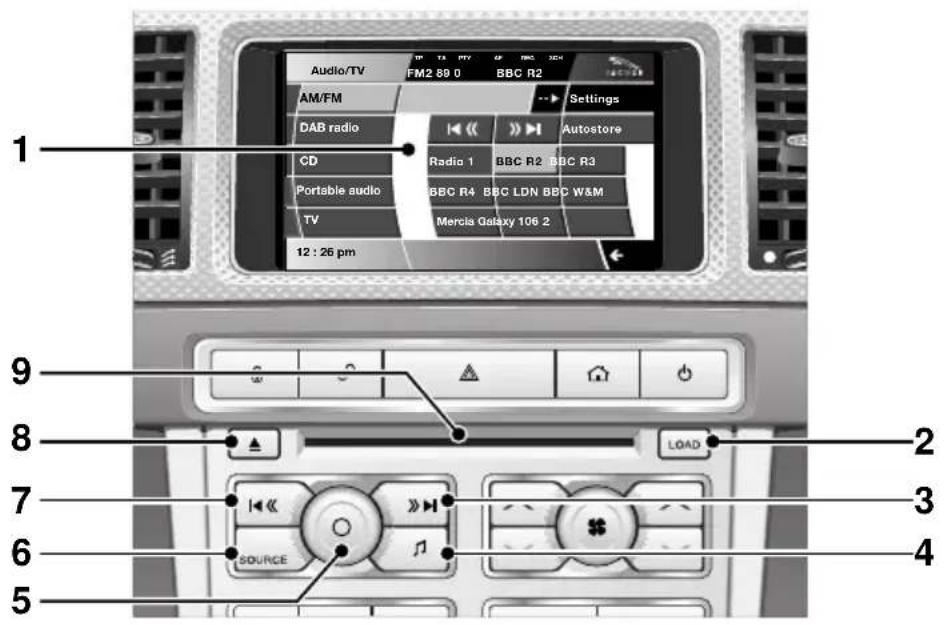
E93935
The audio unit is controlled by the touch-screen (1) and console buttons (2-8).
- Touch-screen: See TOUCH-SCREEN (page 109).
- LOAD: Press to load one or more CDs. See LOADING COMPACT DISCS (page 292).
- Seek up: Short press to seek next station frequency up or next CD track.
-
Settings button:
-
Short press to display the audio Settings menu.
-
Long press (two seconds) to display the Vol presets settings menu.
-
Audio system on/off and volume control:
-
Press to switch the system on/off.
-
Rotate to increase or decrease volume level. Any volume adjustment made in any mode will be memorised for that mode.
-
SOURCE: Press repeatedly to scroll through all audio sources: FM1, FM2, AM, DAB1, DAB2, DAB3, CD, Portable audio and TV.
-
Seek down: Short press to seek next station frequency down or previous CD track.
- Eject: Press to eject CD. See EJECTING COMPACT DISCS (page 294).
- CD load and eject slot.
CAUTIONS
Care must be taken to avoid spilling or splashing drinks onto the audio unit controls, speakers or touch-screen. In the event of such an occurrence, contact your Dealer/Authorised Repairer.
The audio unit may be damaged if unsuitable items, such as coins or credit cards, are inserted into the CD load slot.
Steering wheel controls

- Rotate up or down to increase or decrease volume.
- Rotate up or down and release repeatedly to scroll through preset radio stations or CD tracks. Rotate up and hold for two seconds to select next strong radio station or next loaded CD (if a six-disc system is fitted).
- SOURCE: Press repeatedly to scroll through all audio sources.
- Press to mute audio unit. This button is also used to dial, answer or end calls in phone mode and to start a Voice session.
Sound system overview
There are three versions of the sound system:
- The standard Jaguar sound system comprises a 140W system with AM/FM radio featuring EON, RDS, PTY, TA and in-dash CD player with automatic volume control, MP3 compatibility (six-disc system only) and 8 speakers
- The Jaguar 320W Premium Sound System system also includes a remote amplifier, upgraded speakers plus an additional subwoofer mounted in the rear of the vehicle.
- The Bowers & Wilkins 440W Surround Sound System has been developed in conjunction with Bowers & Wilkins™ and incorporates upgraded kevlar speakers, additional mid range speakers mounted in the front doors, an additional centre speaker mounted in the fascia and additional surround sound speakers to support Dolby Prologic II Surround Sound™.
Audio unit operation
ON/OFF CONTROL
The audio system can be used with the vehicle ignition on or off, but will switch off automatically when the ignition is switched off. To operate the audio system when the ignition has been switched off, press the On/off volume control.
The audio system can be switched on in one of two ways:

With the vehicle ignition on or off, press the on/off control on the console, or;

E94045
With the vehicle ignition on and the touch-screen active, select Audio/TV from the Home menu.

E94046
The touch-screen displays the current audio settings. The information displayed will depend on the mode selected, e.g. AM/FM radio.
VOLUME CONTROL
WARNING

Sustained exposure to high sound levels can damage your hearing.
The volume of the audio output can be adjusted in one of two ways:

Rotate the audio on/off and volume control on the audio console, or;

Rotate the volume control on the steering wheel.

E94087
While the volume is being adjusted, the volume level is displayed on the touch-screen display using a graduated bar.
Volume settings
A number of functions have preset volume levels. You can adjust these settings on the Vol presets menu.
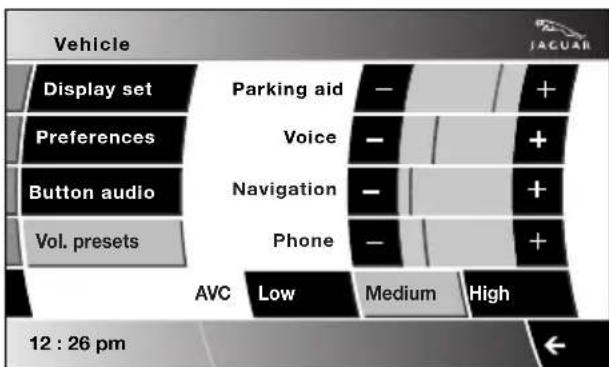
E94052
- From the touch-screen Home menu, select Vehicle.
- Select Syst. settings and then select Vol. presets.
- Use the + and - icons to adjust the volume levels for the options available.
Automatic volume control (AVC)
This maintains radio volume at a level sufficient to overcome road noise, as vehicle speed increases or decreases.
On the Vol presets menu, select Low, Medium or High levels for AVC.
The default AVC setting is Medium.
AUDIO CONTROL
Sound settings
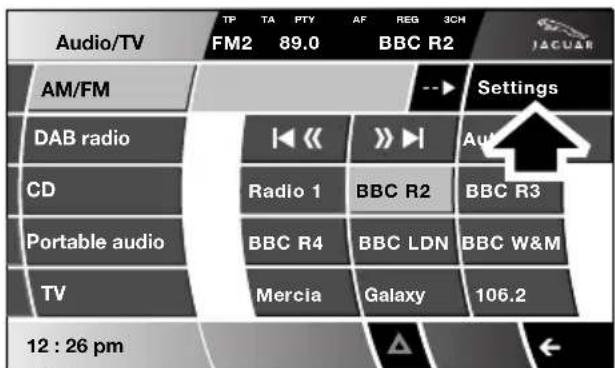
E94055
On the main AM/FM screen, select Settings.
Select Sound to display the sound quality settings menu.
Note: The list of settings available depends on the sound system fitted to the vehicle.
See AUDIO UNIT OVERVIEW (page 269).
Audio unit operation
Standard and Premium sound systems

E94056
To increase or decrease Bass and Treble levels, select + or −.
Balance and Fade levels can be optimised for a selected seating position, by selecting L (left) or R (right) adjustment and R (rear) or F (front) adjustment.
On vehicles fitted with a Subwoofer, to adjust the Subwoofer volume level up or down, select Sub + or -.
Bowers & Wilkins™ surround sound system
Bass, Treble and Sub are adjusted as for the Premium system.
Select Stereo, 3Ch (3-channel surround sound) or DPLII (Dolby Prologic II surround soundTM), to choose the sound mode you require. Your selection will be displayed in the information panel at the top of the display.
Note: DPLII is not available for AM/FM radio broadcasts.
Note: The settings available for adjustment depend on the sound mode currently selected (Stereo, 3Ch or DPLII).
From the Options menu, select Bal/Fade.

E94274
Select the four directional icons as required to adjust the balance and fade.
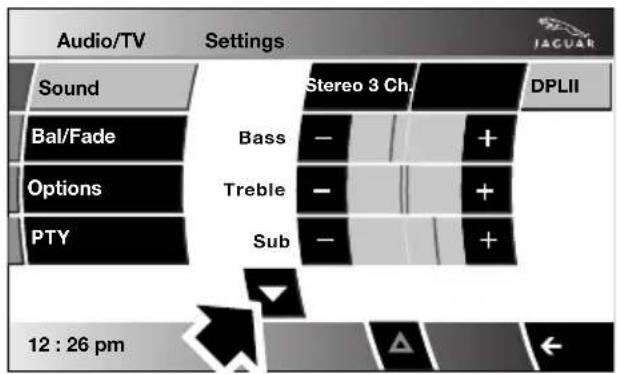

E94671
Select DPLII and on the Settings menu, you can scroll down to the Centre and Surround settings. Select the + or - buttons to adjust these settings as required.
WAVEBAND BUTTON

Select AM/FM to cycle the radio through FM1, FM2 and AM (both Medium and Long wavebands).
Your waveband selection will be shown in the display panel.
Note: If a CD is being played, select AM/FM to start radio operation.
AUTOSTORE CONTROL
The Autostore function finds and stores up to nine strong stations on a selected waveband to presets 1 to 9. This is a useful way to locate and store stations with a good signal when travelling in an unfamiliar area.
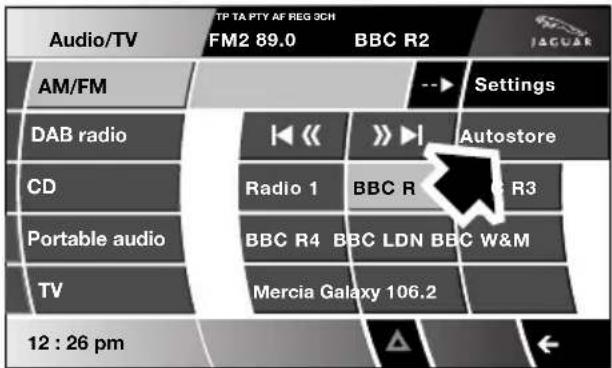
E94050
If no preset stations are currently stored, select Autostore to start the process for storing presets.
If preset stations are already stored, a short touch will recall those stations and tune to the previous station, whereas a long touch of Autostore will start a new autostore process.
The radio will be briefly muted while it searches the selected waveband (AM or FM) for up to nine strong stations.
When the process is complete, the radio will default to preset 1 and audio volume will be restored.
If stations cannot be located for all the preset positions, those that are found will be allocated positions commencing with number 1, leaving the remainder empty.
Note: The display will show — for empty presets.
When stations have been stored, select
Autostore to switch between the automatically-stored stations and the manually-stored stations.
Audio unit operation
STATION PRESET BUTTONS
Tuning stations
The seek buttons on the audio console and on the touch-screen perform the same function.
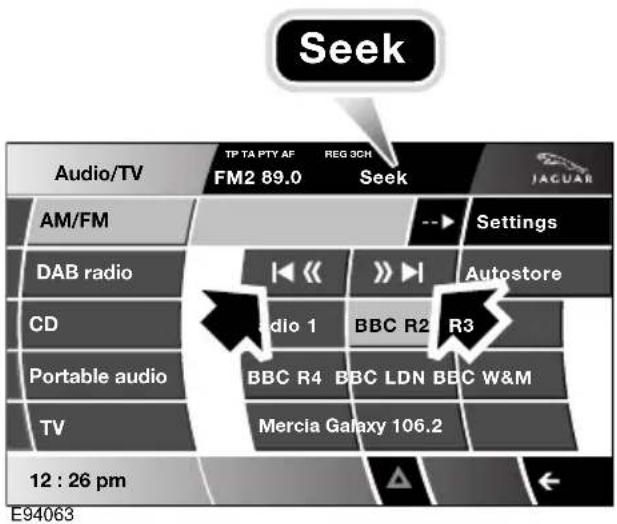
Short touch: In AM or FM mode, selecting and releasing the seek buttons will activate radio tuning through the frequency range, up or down, to the next available strong station.
The touch-screen displays Seek on the upper display until a station has been found, and will then display the station name during broadcast (if available).

Long touch (two seconds): In AM or FM mode, for as long as the seek button is being touched, the frequencies will be scanned either up or down. If you then release the button, the touch-screen displays Manual for a short time and repeated short touches of the button will manually change the frequency.
Storing stations as presets
On each waveband, nine stations can be memorised using the touch-screen keypad.

After tuning to a station, touch and hold (two seconds) the selected preset number. An audible signal indicates that the station is stored. If RDS information is broadcast, the station name will replace the preset number.
Briefly touch the preset key to recall the stored station.
Rotate and release the steering wheel selector control repeatedly to cycle through all the preset stations.
TRAFFIC INFORMATION CONTROL
With the Traffic Announcements (TA) option on, local traffic announcements will interrupt normal broadcasts or playback.
If audio volume is set at a minimum, then the volume will increase for the announcement, returning to the previous volume setting afterwards.
When broadcasting an announcement, a traffic announcement pop-up is displayed.
When enabled, TA will appear at the top of the touch-screen. The audio unit then checks that the station has Radio Data System (RDS) Traffic Programme (TP). If it is not available on the current station, the display will not show TP. If TP is not displayed with TA after 45 seconds have elapsed, then the audio unit will search for a new TP station.
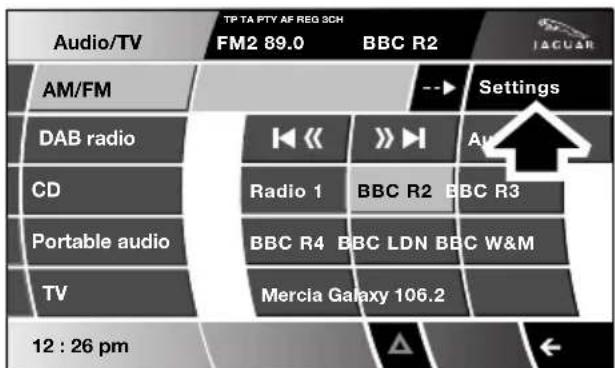
E94055
To change this setting, on the AM/FM screen, select Settings.

E94053
Select Options and then switch the Traffic option On or Off.
Note: You can switch the Traffic option on and off on the Settings menu for each individual source.
Skipping traffic announcements

E94059
Traffic announcements (TA) can be skipped during broadcast by selecting Skip, which will cancel the pop-up and the announcement. You will be returned to your selected station.
Note: Selecting Skip will not switch off TA permanently and it will remain ready for the next interrupt.
Select Traffic off to switch TA off completely (the TA indicator will clear from the display).
Selecting anywhere on the pop-up screen will cancel the pop-up, but the traffic announcement will continue to be broadcast.
Note: TA relies on the broadcast information from local radio stations and may be better in some locations than others.
RADIO DATA SYSTEM (RDS)
Options menu overview
Your radio is equipped with Radio Data System (RDS), which enables the audio unit to receive additional information with normal FM radio signals.
When tuned to certain stations on the FM waveband, the radio decodes signals transmitted to provide the functions listed below (dependent upon the service available from the broadcasters).
Note: Not all FM radio stations broadcast RDS information. If you are currently tuned to a non-RDS station, then RDS features will be unavailable.
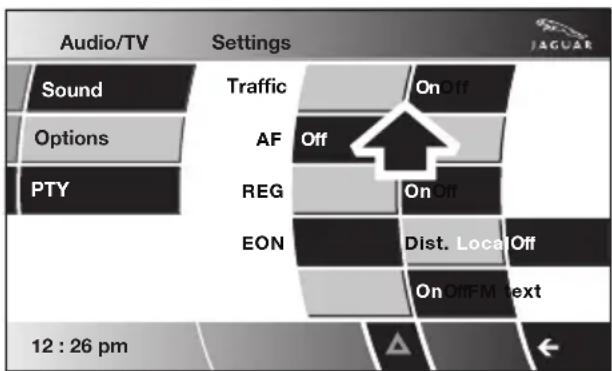
E94053
Select Settings to display the Settings menu, then select Options to display the list of RDS options.
Traffic
RDS provides local travel information (where broadcast). See TRAFFIC INFORMATION CONTROL (page 276).
Regionalisation (REG)
As you drive into different radio reception areas, RDS automatically retunes the radio to the strongest signal. The Regional (REG) option stops the system from tuning to another local radio station with a stronger signal.
From the Options menu, you can switch the REG option On or Off. With REG on, your selected local radio station will remain tuned even if reception levels drop.
Alternative frequency (AF)
Some radio stations broadcast on different frequencies in different parts of the country. If the selected station signal weakens, the radio will automatically re-tune to a stronger alternative frequency (AF), if one is available (this feature is particularly useful on long journeys where the vehicle travels through different transmitter areas serving the same radio station).
From the Options menu, you can switch AF On or Off.
Enhanced other networks (EON)
The Enhanced Other Network (EON) option will tune to any radio station on the same station network as the one that you are listening to, if the signal becomes weak.
Either local (Local) or distant (Dist.) networks can be enabled on the Options menu, or the option can be switched Off.
FM text
Text sent by station

E94057
FM text displays any text messages sent out by the current station.
Select the arrow icon to display a pop-up screen showing the complete text message.

E94058
Select Cancel to remove the pop-up screen.
PRIORITY PROGRAMME TYPE (PTY)
PTY overview
The Programme Type (PTY) feature has two functions:
- To set a desired PTY category for the current station.
- To search for a station in a selected PTY category and then retune to that station (if found).
Select Settings to display the Settings menu. Select PTY to display a list of available PTY categories.
Selecting PTY categories

E94088
Select the arrow icon to scroll through the list of available PTY categories.
Select a PTY category to select it in the list; touch the category again to clear the selection. If you want to deselect all PTY categories, select Clear all.
Note: If no PTY categories are selected, then the text PTY will disappear from the top of the touch-screen display.
While tuned to a station, touch the required PTY category (or categories), then touch the previous screen arrow. The audio unit will now wait for RDS information to indicate that a station has changed its programme type.
If the current station is already in the selected PTY category and reception is lost, then the radio will attempt to find another station with the correct PTY category.
Note: PTY is active in FM radio, CD, TV and Portable audio modes only.
PTY alarm (where broadcast)

E94062
The Alarm option in the PTY menu will alert you to a crisis of national or international importance. Any radio broadcast or other audio playback will be interrupted. When such a broadcast is made, the word ALARM will be displayed on the touch-screen. The default setting is On.
PTY search
If you touch a PTY category and then select PTY search, the audio unit will search for and then retune to an available station belonging that category. If no station is found in that category, then NO PTY is displayed and you will return to the current station.
While PTY is displayed (for ten seconds following a search), a search of PTY categories can be performed using the Seek buttons.
GENERAL INFORMATION
Digital radio reception

natural_image
Diagram showing concentric signal waves between three towers and a car, with no text or symbols present.E94094
DAB radio is very different from normal AM/FM radio in both operation and sound quality. The DAB network is designed to provide near CD quality from radio broadcasts. In most locations DAB signals are available without hiss, crackle, pop or interference, and no fading or overlap.
DAB radio can significantly increase the number of radio channels/stations available. The DAB signals are transmitted to most major cities, towns and motorway networks.
Radio signals travel in a straight line so large obstacles, such as tall buildings, can shield the vehicle from the signal, causing temporary loss of reception (known as dead spots).
Digital radio is transmitted from regional transmitters. Some local channels are not available outside the range of their transmitters. If you want to listen to local channels as you move around the country, use the auto-tune function (AUTO) to build new channel lists. For more information on the auto-tune function. See CHANNEL AUTOMATIC TUNING (page 284).
Note: If any auxiliary electrical equipment is connected to the vehicle, then this may reduce the DAB radio sound quality.
Digital audio broadcasting
Ensembles
Unlike AM/FM radio, DAB transmits several channels/stations on a single frequency. A group of channels is known as an ensemble. Ensembles may consist of six or more channels (national or local). Some may have sub-channels offering several listening options.
When scrolling through the channels the sub-channels will appear in order, and can be selected in the same way as the channels. If reception is lost when the vehicle is in motion select AUTO to build a new list of ensembles.
The table below provides an example of the ensembles, channels and sub-channels available in one location.
| Ensemble Channel/station Sub-channel 1 Sub-channel 2 | |||
| First ensemble Channel/station 1 | |||
| Channel/station 2 Sub-channel | |||
| Channel/station 3 | |||
| Channel/station 4 | |||
| Channel/station 5 | |||
| Channel/station 6 Sub-channel Sub-channel | |||
| Channel/station 7 | |||
| Channel/station 8 | |||
| Channel/station 9 | |||
| Second ensemble Channel/station 1 | |||
| Channel/station 2 | |||
| Channel/station 3 | |||
| Channel/station 4 | |||
| Channel/station 5 | |||
| Channel/station 6 | |||
| Third ensemble Channel/station 1 | |||
| Channel/station 2 | |||
| Channel/station 3 | |||
| Channel/station 4 | |||
AUDIO CONTROLS
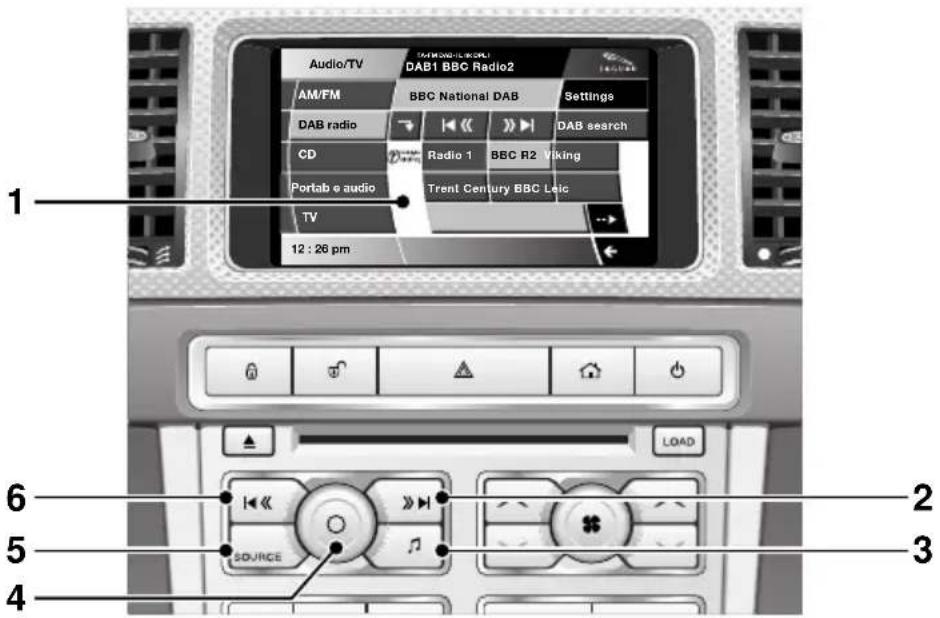
-
Touch-screen. See TOUCH-SCREEN (page 109).
-
Seek up.
-
Short press to find the next channel.
-
Long press (two seconds) to find next available ensemble.
-
Settings:
-
Short press to display the audio Settings menu.
-
Long press (two seconds) to display the Vol presets menu.
-
On/off and volume control.
-
SOURCE button.
- Press repeatedly to select the next available audio source FM1, FM2, AM, DAB1, DAB2, DAB3, iPod, USB, Auxiliary, TV.
-
Seek down.
-
Short press to find previous channel.
- Long press (two seconds) to find previous available ensemble.
Steering wheel controls
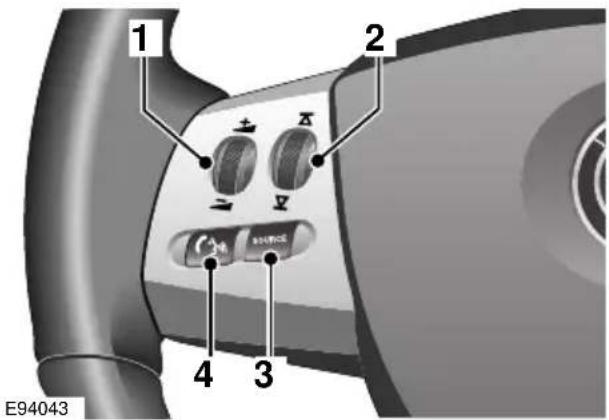
- Rotate up or down to increase or decrease the audio volume.
- Rotate and release to scroll through channels. Rotate and hold for two seconds to select next available digital ensemble.
- Press the SOURCE button repeatedly to scroll through the available audio sources FM1, FM2, AM, DAB1, DAB2, DAB3, CD, iPod, USB, Auxiliary input and TV.
- Press to mute the audio unit.
Digital audio broadcasting
DISPLAY OPTIONS
Touch-screen information panel

E94179
- DAB band indicator.
- TA-FM is displayed if the FM traffic option is enabled. See SETTINGS (page 288).
- The arrow icon indicates that subchannels are available under the current channel. SubCh is displayed if a subchannel is tuned to.
- Link is displayed if the Link DAB option is enabled. See SETTINGS (page 288).
- Dolby Prologic II surround sound indicator.
- Channel name.
- DAB-i indicates that DAB Announcements are enabled.
Note: The display can also show PTY or Ensemble information if you have selected one of these options under DAB text on the Settings menu. See SETTINGS (page 288).
DAB radio text
Many digital channels transmit additional text (DLS, Dynamic Label Segment) to accompany a broadcast. For safety reasons, this text does not scroll across the screen.

E94180
The first 16 characters of text are displayed (1). If you want to read the full text, you must select the additional text button (2).

E94181
The DAB radio text pop-up screen displays all 128 characters of text. This text may change periodically, if the broadcaster chooses to do so.
To remove the pop-up screen, briefly touch it.
Digital audio broadcasting
CHANNEL AUTOMATIC TUNING
Note: When you first use the DAB radio, you will be unable to listen to any digital broadcasts until you have completed the auto-tune process.


E94182
In DAB mode, select DAB search, then select Auto-tune to start automatic tuning and build a list of all the digital ensembles and channels that are available in your region.
While automatic tuning is running, the message Auto-tuning will be displayed on the touch-screen, along with a percentage complete. When tuning is complete, the first channel found will start playing.
Note: The auto-tune process can take longer than one minute to complete.
To update the list of local channels when you move to a different region, select Auto-tune again. You can also add local channels as presets to minimise the need for auto-tuning as you move location.
CHANNEL OPTIONS

To receive digital broadcasts, short press the SOURCE button repeatedly to toggle between the available sources, or briefly touch the DAB Radio button on the touch-screen. See AUDIO CONTROLS (page 282).
Choose DAB1, DAB2 or DAB3 to receive digital radio broadcasts. The three DAB sources enable you to preset up to 18 different channels. See PRESET BUTTONS (page 287).
The channel that was last played on your chosen digital source will be selected for playback automatically.
Note: If this is the first time you have used DAB radio, you must first build a list of available channels using the auto-tune function.
See CHANNEL AUTOMATIC TUNING (page 284).
Digital radio channels are organised into groups called ensembles. Some channels may sometimes provide one or more subchannels.
Digital audio broadcasting

If the digital radio signal is lost or the system takes time to tune in to a channel, then the display screen will show the message No reception.
The problem may be caused by a temporary problem, such as buildings or trees blocking the signal, or it might be a problem with the broadcast service operator. Try tuning to an alternative channel and return later to see if the problem has been resolved. If you are unable to tune to any other channels, switch off the audio unit and then try again.
Finding a channel
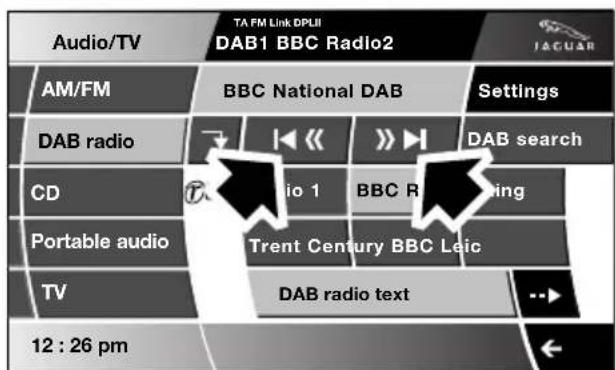
E94187
Briefly touch one of the channel seek buttons to select the next available digital channel. The seek up button selects the next channel, the seek down button selects the previous channel.
Note: If the next or previous channel is in a different ensemble, then there will be a pause before the channel is located. The message Searching... is displayed on the screen.
On the touch-screen, if channels have been preset, select one of the six preset buttons to start playing that channel. If no channel has been preset, the button will display ---.
Finding a subchannel
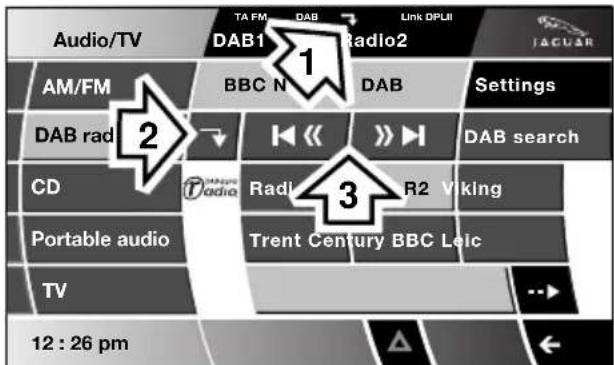
E94188
If subchannels are available under the current channel, the subchannel arrow icon (1) is displayed at the top of the touch-screen and the Subchannel button is enabled.
To access the subchannels, select the downward-pointing arrow (2). Select the seek buttons (3) to find the next/previous subchannel.
To return to the channel tier, select the upward-pointing arrow.
Note: When you select and play a subchannel, the subchannel icon is replaced by SubCh.
Note: You cannot store a subchannel as a preset.
Note: If you select the preset button for the channel containing the subchannel you are currently playing, you will be returned to the channel.
Finding an ensemble
Touch and hold (two seconds) the seek buttons to find the next or previous ensemble. See AUDIO CONTROLS (page 282).
After a few seconds pause, the first channel in the ensemble found will start playing.
DAB search
The DAB search menu enables you to view lists of available ensembles, channels and subchannels. You can also perform searches based on programme type (PTY).
Select DAB search to display the DAB search menu.
Auto-tune
Select Auto-tune to build a list of available ensembles and channels for your current location. See CHANNEL AUTOMATIC TUNING (page 284).
Ensemble list

E94189
Select Ensemble list to display a list of all available ensembles. Select an ensemble name in the list to display a list of channels in that ensemble. Select a channel name to tune that channel.
Channel list
Select Channel list to display a complete list of all channels in all available ensembles. Select a channel name to tune that channel.
Subchannel list
Select Subchannel list to display a list of any subchannels available for the currently tuned channel. If no subchannels are currently available, then the Subchannel list option is disabled. If the maximum five subchannels are available, then use the arrows to scroll through the list.
PTY
Channels are categorised by the broadcaster as belonging to a programme type (PTY) category. You can display a list of channels organised according to their PTY category.
Select PTY to display a list of PTY categories that contain channels. Select a PTY category to display a list of channels in that category. Select a channel name to play that channel.
Briefly touch one of the seek buttons repeatedly during the first ten seconds of broadcast, to cycle through all channels contained in the PTY category that you chose. Stop touching the seek button when you have found a channel you want.
Channel data
Select Channel data to display technical data relating to the currently-tuned channel. The data listed is as follows: Channel name, Ensemble name, Bit rate (kbits/s) and Audio level.
Digital audio broadcasting
PRESET BUTTONS
Storing channels as presets

E94183
Store up to eighteen digital channels (six each on DAB1, DAB2 and DAB3) using the numbered preset keys. Follow the procedure below to store channels as presets.
- Search for and start playing the channel you want to preset.
- Touch and hold (two seconds) the preset button on which you want to store the current channel. Audio output is muted for a further two seconds while the channel is stored and a confirmation message is displayed.
- Repeat steps 1 and 2 for each channel that you want to store as a preset.
Note: You cannot store a subchannel as a preset. If you try to store a subchannel, you will store the channel to which the subchannel belongs.
Recalling a preset channel
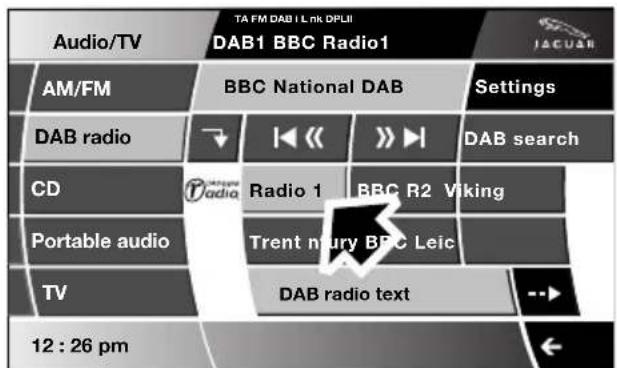
E94184
Make sure that you have selected the appropriate digital source (DAB1, DAB2 or DAB3) and then briefly touch the preset button you require. The channel you have selected will start to play automatically.

E94487
Note: If you try to recall a channel that has previously been stored as a preset, but is now unavailable or invalid, the message No channel found is displayed. You must choose another channel.
SETTINGS

E94190
In DAB mode, select Settings.
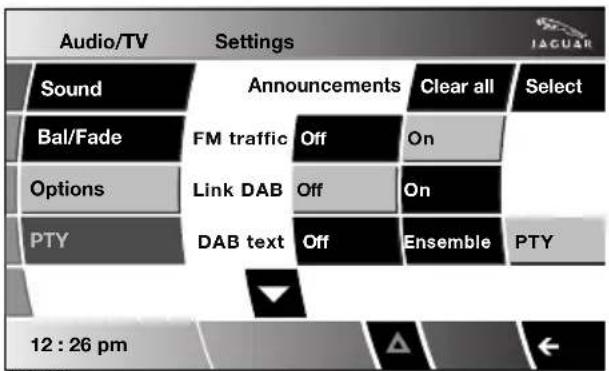
E94191
Select Options.
Note: If Settings is selected once, but no action is taken for a further ten seconds, the system will exit the menu automatically.
Announcements
You can select up to four types of announcement from a list of eleven, for example, News, Area/Weather, Traffic and Alarm.
When a DAB announcement is broadcast, it will interrupt normal play for the duration of the announcement.
Note: The Alarm announcement type, broadcasts information concerning crises of national or international importance.

E94192
To display the full list of announcement types, touch Select.

E94193
Select an announcement type to enable it, select it again to disable it. If you want to clear all enabled types, select Clear all. To scroll through the list, select the arrow buttons.
Note: If you have already selected four announcement types, you will be unable to select further types.
Digital audio broadcasting
FM traffic
The FM traffic option detects the presence of local traffic announcements on FM stations. As soon as an announcement is received, radio reception or CD play will be interrupted. At the end of the announcement, radio or CD play will resume.

E94194
Select On or Off to enable or disable the FM traffic option.
Note: The audio unit switches to an FM broadcast for the duration of the announcement, so there may be a temporary loss of sound quality.
Link DAB
Regional ensembles containing a list of local digital channels are broadcast by a variety of regional providers.
A channel in two different regional ensembles will share an identification if broadcast by the same provider. If channels are being broadcast by different suppliers, then they will not share the same identification.
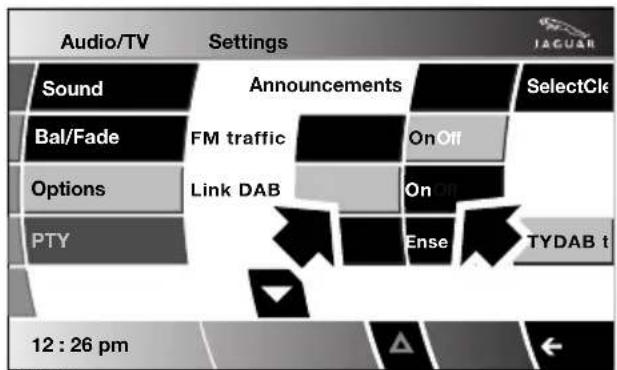
E94195
If you move from one region to another and Link DAB is enabled, the DAB radio will attempt to retune to a channel with the same identification in a different ensemble.
If the signal strength for a local channel falls below an acceptable level, the audio unit will automatically search other available ensembles for another channel with the same identification.
If an alternative channel is found in another ensemble that is also in your current channel list, then the new channel is tuned automatically after a few seconds. If a channel is not found after a few seconds, then No reception is displayed on the screen.
The word Link is displayed at the top of the touchscreen to indicate that Link DAB is enabled.
DAB text
The DAB text option controls the type of information that is displayed on the screen when a channel or subchannel is playing.

E94196
- Select Ensemble to display the name of the ensemble to which the current channel belongs.
- Select PTY to display the name of the programme type to which the current channel belongs.
- Select Off to display only the channel name.
DAB country
If you move the vehicle to a different country, you can change DAB Country options to make sure that you receive the best possible reception and sound quality.
Note: If you have already selected a DAB format, then the DAB country option is disabled.


E94197
Select Change to display a list of countries where DAB services are available. Select the country name to enable it.
Note: When you change the DAB country, the audio unit will automatically start auto-tuning. If you Cancel the auto-tune, the country setting will remain changed but you may not have access to all available ensembles for that country. See CHANNEL AUTOMATIC TUNING (page 284).
Note: This option is disabled when the vehicle is moving
Digital audio broadcasting
DAB format
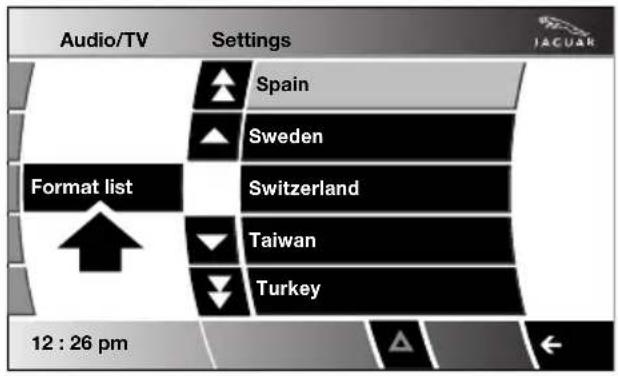
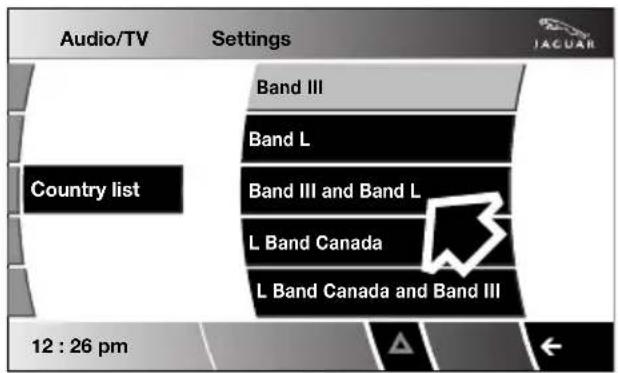
E94198
Different regions or countries may use different digital bands to broadcast DAB channels. If you know the band(s) required, then you can choose from the Band selection list.
Select Change to display a list of formats. The available bands are:
Note: When you change the DAB format, the audio unit will automatically start auto-tuning. If you Cancel the auto-tune, the format setting will stay changed but you may not have access to all available ensembles for that format. See CHANNEL AUTOMATIC TUNING (page 284).
Note: This option is disabled when the vehicle is moving
COMPACT DISC COMPATABILITY
CAUTIONS
Irregular shaped CDs and CDs with a scratch protection film should not be used.
! CDs with labels (or stickers) attached, should not be used. Labels may become warped and prevent the CD from being ejected, causing damage to the CD player. Such damage is not covered by the warranty agreement.
The CD unit will play compact discs that conform to the international Red Book standard audio specification. Copy-protected CDs from some manufacturers do not conform to this standard and playback cannot be guaranteed.
Due to technical incompatibility, recordable (CD-R) discs and re-writable (CD-RW) discs may not function correctly.
Dual format, dual-sided discs (DVD Plus, CD-DVD format) are thicker than normal CDs and consequently playback cannot be guaranteed in Jaguar audio units, and jamming could occur. Warranty claims, where this type of disc is found to be inside an audio unit returned for repair, will not be accepted.
The following CD formats may cause the CD player to malfunction. It is recommended that the following types of CD are not used:
- 8 cm (3.1 in.) discs with or without an adaptor.
• CDs that are not circular.
• CDs with a paper label. - CDs that are warped, dirty, scratched or have an abnormal edge.
- Dual format, dual-sided discs (DVD Plus, CD-DVD format).
• DVDs.
It is recommended that only high quality 12 cm (4.7 in.) circular discs, that show the Compact Disc Digital Audio logo, are used.
LOADING COMPACT DISCS
CAUTIONS

Do not force the disc into the slot.
Note: Some privately recorded CD-R discs may not have been acceptably formatted to be able to be played on this CD player.
An in-dash compact disc (CD) player is installed in the audio unit. The CD player will accommodate one or up to six discs (where fitted).
The unit will play Compact Disc Digital Audio (CDDA) discs (normal discs), MP3 and WMA files.
Compact disc player
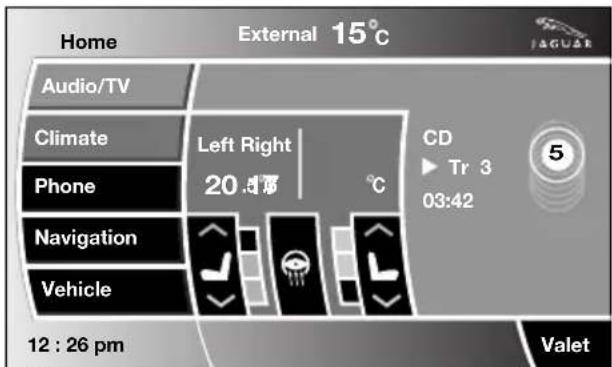
E94065
The Home menu indicates whether a CD is loaded and (if applicable) which CD slot is loaded and ready for playing. If no CDs have been loaded, the touch-screen displays ghosted discs.
To access the CD player touch-screen menu:
- From the touch-screen Home menu, select Audio/TV.

E94090
- Select CD.
You can also press the SOURCE button repeatedly to scroll through all audio sources to find CD.
Loading a CD (player empty)
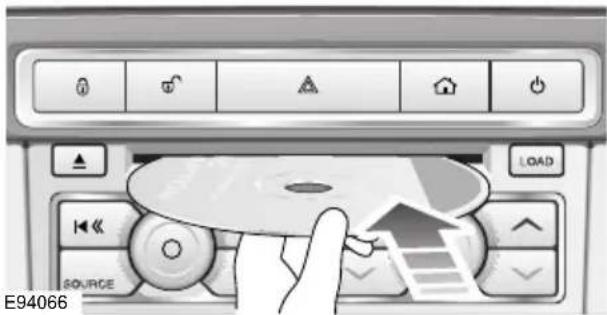
Gently place a CD into the loading slot. A CD loading message is displayed on the touch-screen, while the disc is drawn into the player and the disc is loaded.
Loading one CD (six CD player, part-loaded)

E94067
Touch one of the empty disc slots (2). You are prompted to insert the CD into the empty slot.
1 indicates the currently playing CD and 3 indicates slots that are already loaded.
Compact disc player
Loading several CDs (six CD player)

Press the LOAD button and insert each CD into the CD slot as requested by the message on the touch-screen. A pop-up message will indicate which slot is being selected in turn until the unit is fully loaded.
When the CD player has been loaded, you can operate the CD using the touch-screen controls.
EJECTING COMPACT DISCS

Press the eject button. A short press will eject a single CD, while a long press will eject each loaded CD in sequence.
When a disc is ejected, remove it from the loading slot. If you fail to remove an ejected disc, it will be drawn back into the player after ten seconds.
If you want to stop ejecting multiple discs, on the touch-screen, select Cancel.
COMPACT DISC SELECTION

flowchart
graph TD
    A["Loading CD 1"] --> B["Audio/TV"]
    A --> C["CD"]
    A --> D["Portable audio"]
    A --> E["TV"]
    A --> F["12:26 pm"]
    B --> G["AM/FM"]
    B --> H["DAB radio"]
    B --> I["1"]
    C --> J["2"]
    C --> K["3"]
    C --> L["4"]
    C --> M["5"]
    C --> N["6"]
    C --> O["Mix"]
    C --> P["Repeat"]
    style A fill:#f9f,stroke:#333
    style B fill:#ccf,stroke:#333
    style C fill:#cfc,stroke:#333
    style D fill:#fcc,stroke:#333
    style E fill:#cff,stroke:#333
    style F fill:#ffc,stroke:#333
    style G fill:#cfc,stroke:#333
    style H fill:#fcc,stroke:#333
    style I fill:#cfc,stroke:#333
    style J fill:#fcc,stroke:#333
    style K fill:#cfc,stroke:#333
    style L fill:#cfc,stroke:#333
    style M fill:#cfc,stroke:#333
    style N fill:#cfc,stroke:#333
    style O fill:#cfc,stroke:#333
On a six CD player, when a CD has been selected on the touch-screen, the upper display indicates which disc is being loaded and play will start when loading is complete. Touch another disc on the screen to load and start playing that disc.
- TP: The background radio station provides Traffic Programme (TP) and is able to support Traffic Announcements (TA).
- TA: Traffic announcements are available in the CD mode and will interrupt the playing of the CD. At the end of the announcement, the CD will resume playing.
TRACK SELECTION

Tr 12 - Track number of the track being played.
03:47 - Track elapsed play time from start of track.
You can move to the next or previous CD track, using the seek buttons either on the touch-screen or on the audio console.
See AUDIO UNIT OVERVIEW (page 269).
Briefly touch the seek buttons to move to the previous or next track.
Touch and hold (two seconds) to play rapidly back through one or more tracks (review) or rapidly forward through one or more tracks (cue).
Normal playback resumes when the seek button is released.
COMPACT DISC PAUSE
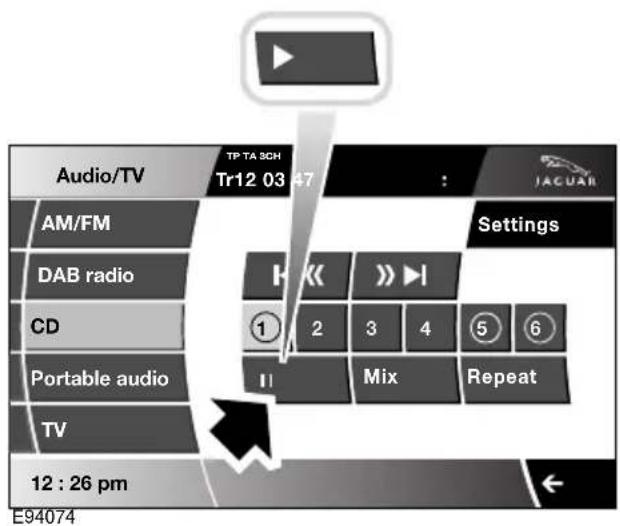
Select II to pause the current track. While play is paused, the pause icon becomes a play icon, select it again to resume playback.
Note: If the volume is turned down to zero, CD playback is automatically paused. Play resumes when the volume is increased.
SHUFFLE/RANDOM

Briefly touch Mix to activate the Mix CD option, which shuffles the track order for the current CD so that tracks are played in a random sequence. If you are playing an MP3 CD, a brief touch will mix the tracks in the current folder.
Compact disc player
Touch and hold (two seconds) Mix to activate the Mix all option, which shuffles the order of play for all tracks across all loaded CDs. If you are playing an MP3 CD, a long touch will mix the tracks from all the folders on the current disc.
REPEAT COMPACT DISC TRACKS

Briefly touch Repeat to play the current track repeatedly. Select again to cancel repeat and resume normal play.
Touch and hold (two seconds) Repeat to repeat play the whole CD. Select again to cancel repeat and resume normal play. This feature applies only the 6-disc CD unit.
COMPACT DISC DISPLAY OPTIONS

E94078
In CD mode, select Settings to display the CD Settings menu.
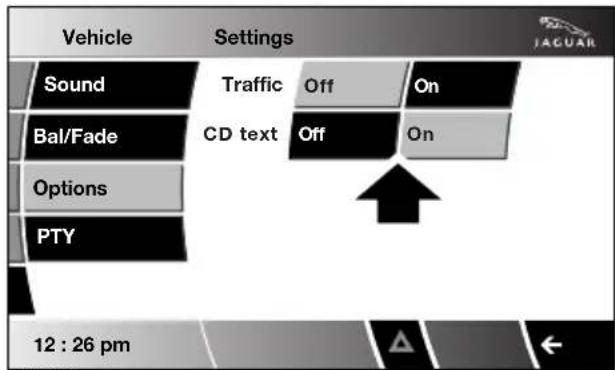
E94079
Traffic: Traffic announcements can be switched On or Off. See TRAFFIC INFORMATION CONTROL (page 276).
CD text: CD text can be switched On or Off. CD text displays track-related information that has been saved on the CD (not all CDs will provide CD text).
MP3 FILE PLAYBACK
On audio units fitted with a 6-disc CD player, you can play CDs containing MP3 files.
MP3 discs have the potential to hold more music than a conventional CD, because each track can be compressed to a higher degree during recording.
If you record your own music, each session must be properly closed but the whole disc does not have to be finalised.
Some pre-recorded and personally-recorded discs, can contain additional information on the disc, e.g. CD titles, track titles and the artist's name (this information is contained in ID3 Tags).
Additional touch-screen controls enable you to select folders and tracks and display various items of information about the recordings.
CAUTION

Copyright laws vary in different countries; please check the laws in your country if you want to record from copyright source material.
Note: A mixture of CDs and MP3 discs can be loaded into the 6-disc CD player together.
Note: The audio system will play MP3, WMA, WAV and AAC files. The highest compression rate supported, is 320k bits per second (kbps). If anything less than 128 kbps is used, Digital Signal Processing (DSP) functionality may be lost.
Note: The CD player is not guaranteed to play every disc available because of variation in the quality of discs.
Using MP3 discs
When an MP3 disc is first played, the first track in the root folder will play first. If you restart play after switching to another disc or audio source, then play will resume from the point you left it.
Note: The CD player may take a long time (one minute or more) to load an MP3 disc, owing to the number of tracks on it. To minimise the loading on the system, a rigid folder structure is recommended.

E94082
If the MP3 disc has been recorded with the music files contained within folders, additional information is available by selecting Folders.

E94083
A list of folders and files is displayed on the touch-screen. The titles of any folders and tracks recorded on the CD, will be displayed in alphabetical order, even when the disc has been recorded in a different order.

E94084
Select the folder to access the tracks contained within the folder. To help you navigate through multiple folders and files, the display changes when you select folders, sub-folders and tracks.
If more than four folders or files are listed, select the up/down arrow icons to scroll through the list.
Select a track to start playing that track.
Note: If you have selected a track using the Folders function, then you will return to the same folder when you next access the folder menu.
MP3 folder structure
A CD-R or CD-RW can have MP3 folders and tracks recorded in many different ways, with many layers of folders and with tracks distributed throughout the folder structure.
Note: Any CD containing a mixture of MP3 and CDDA tracks will be treated as a CD (any MP3 tracks will be ignored).
PORTABLE AUDIO
Portable audio overview
The portable audio system is located in the centre console cubby box. You can connect a variety of audio devices, including iPods, via this interface to the audio system.
CAUTION

We recommend that you replace the rubber cover when a portable device is rugged in. This will prevent damage to them. The cover is not waterproof.

Please disconnect your iPod when leaving the vehicle. Failure to do so may result in the iPod battery discharging.
If you are connecting an iPod or mass storage device, you can use the touch-screen to operate and search the device. Many of the controls are similar to those available for CD play.
The devices that you can connect to the portable audio interface include:
- USB mass storage devices, for example memory stick.
- iPod.
• Auxiliary device (no touch-screen control).
Note: The portable audio interface supports the following iPods:
- iPod (generations 3-5).
- iPod Mini.
- iPod Nano (generations 1-3).
- iPod Photo.
- iPod Classic.
Note: The audio system will play MP3, WMA, WAV and AAC files.
Note: Some MP3 players have their own file system that is not supported by this system. To use your MP3 player, you must set it to USB Removable Device or Mass Storage Device mode (see manufacturer's information for further details). Only music that has been added to the device in this mode can be played via the vehicle's portable audio system.
Note: The system will support devices with a storage capacity up to 256 GB (approximately 65 000 tracks).
Connecting an iPod
On the audio Home screen, select Audio/TV, then Portable audio, then iPod.
Note: You can also press the SOURCE button repeatedly to select Portable audio device.
A dedicated iPod lead is supplied with the Portable audio interface. Plug in your iPod with the usual care necessary to protect the connector pins from damage.

Play will start automatically from the point at which the iPod was last played.
Connecting a USB device
On the audio Home screen, select Audio/TV, then Portable audio, then USB.
Note: You can also press the SOURCE button repeatedly to select Portable audio device. Insert the USB device into the socket indicated.

Whenever the device is connected, the first track in the first available folder is played automatically.
Note: We recommend that only music files are loaded on the USB device. This will speed up the automatic indexing of files.
Connecting an auxiliary device
On the audio Home screen, select Audio/TV and then select Portable audio.
Note: You can also press the SOURCE button repeatedly to select Portable audio device.


natural_image
Interior view of a car showing steering wheel, dashboard, and seatbelt (no text or symbols)Insert the AUX jack plug into the socket indicated.
Select AUX.
Play will start when you switch on and start playing the auxiliary device.
Note: You cannot operate or search the auxiliary audio device using the touch-screen, so all buttons on the touch-screen are unavailable.
Connecting more than one device

E94709
You can connect an iPod and a USB device simultaneously to the portable audio interface and switch between them using the touch-screen. Select iPod, USB or AUX, to switch between modes.
The device docked first will remain the active device until you choose to change.
If, after changing to the newly-docked device, you change back to the first device, play will resume at the point you left it (USB and iPod only).
Note: You cannot use a USB hub to connect more than one USB device to the audio unit.
Note: Devices connected to the iPod and USB ports will be charged, but devices that are fully discharged will not play. Please disconnect your iPod when leaving the vehicle. Failure to do so may result in the iPod battery discharging.
Note: Options such as Repeat and Mix relate to the device currently playing, they will not apply to any subsequent device.
AUXILIARY INPUT DEVICES
Playing a portable device
WARNING

Auxiliary devices cannot be controlled using the touch-screen. We strongly advise against controlling playback or altering settings on the auxiliary device while driving.
If you are using a USB mass storage device or iPod, you can control playback using the touch-screen controls.
If you are using any portable audio device via the AUX socket, then you must control playback from the device itself.
Autoplay
Whenever a USB device is docked, play will start automatically at the first track in the first available folder.
For an iPod, play will always resume from the current track, whether previously docked or not.
Pause

E94341
Select II to pause playback, select the button again to resume playback.
Mix

E94342
USB:
- Briefly touch Mix to play tracks in the current folder in a random sequence.
- Touch and hold (two seconds) Mix to play all tracks on the device in a random sequence.
iPod:
- Briefly touch Mix to play tracks in the current playlist in a random sequence.
- Touch and hold (two seconds) Mix to play all tracks on the iPod in a random sequence.
If the Mix option is active, select Mix to cancel it and return to normal playback.
Repeat

USB:
- Briefly touch Repeat to repeat play the current track continuously.
- Touch and hold (two seconds) Repeat to repeat all tracks in the current folder on a loop.
iPod:
- Briefly touch Repeat to repeat play the current track continuously.
- Touch and hold (two seconds) Repeat to repeat all tracks on the iPod on a loop.
Select Repeat again to cancel it and return to normal playback.
Displaying track information
Many tracks will be saved with additional information contained in an id3 tag. You can choose to display some or all of this information on the screen. The default display provides track title information only.

E94648
Briefly touch the --> button repeatedly to toggle through the information, including track title, artist, album and genre.

E94649
Touch and hold (two seconds) the --> button to display the Portable audio text pop-up screen providing all the id3 tag information available for the track.
If no information is available, the screen will display the text No entry.
Touch the pop-up screen to close it.
Searching a portable device
Next/previous track

E94344
Briefly touch the seek buttons to move to the previous or next track.
If the Mix option is switched on, then the next track will be the next in the randomised playlist. In Mix mode, selecting previous will only return playback to the beginning of the currently playing track.
Fast forward/reverse

E94345
Touch and hold a seek button to fast forward or reverse through the current track. Release the seek button to resume normal play.
USB folders
The Folder option enables you to explore the folder structure on the USB device.
Note: Only compatible file types will be displayed on the touch-screen.
Note: We recommend that only compatible files are loaded onto the device. This will speed up the automatic indexing of your files.
Note: This feature is most useful when the files and folders on the USB device have been organised logically.

E94346
Select Folders to display all folders on the device.

E94348
Select a folder name to display a list of tracks in that folder. Use the arrow icons (if displayed) to scroll through the list.
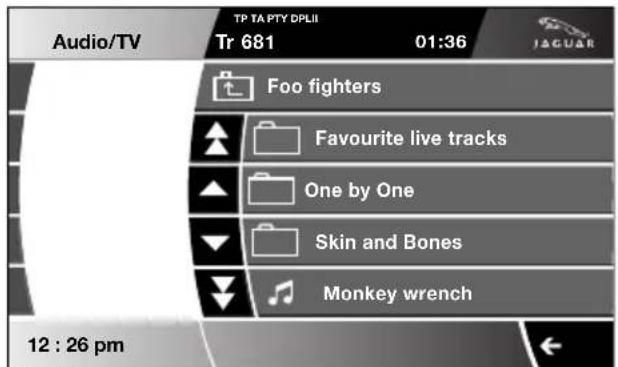
E94349
Select a track to start playback of that track. Play will continue as normal through the remainder of the tracks in that folder.
Select the open folder icon at the top of a menu to move back to the level of that folder.
iPod folders

Select Folders to display all search methods available on the iPod. Search methods include, Playlist, Artist, Album, Genre, Composer, Podcast, Audio Book and Song.

E94350
Select a search method from the list to display a list of items found.
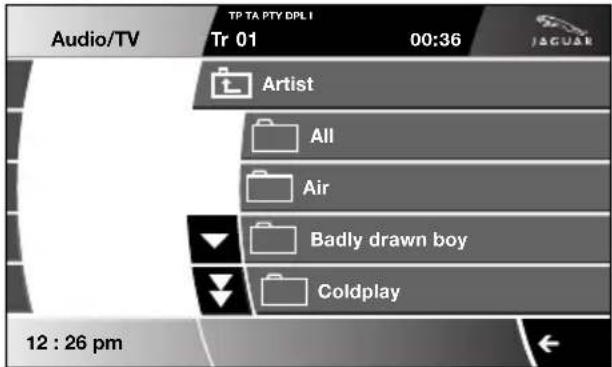
E94351
If you select Artist, a list of artists will be displayed.
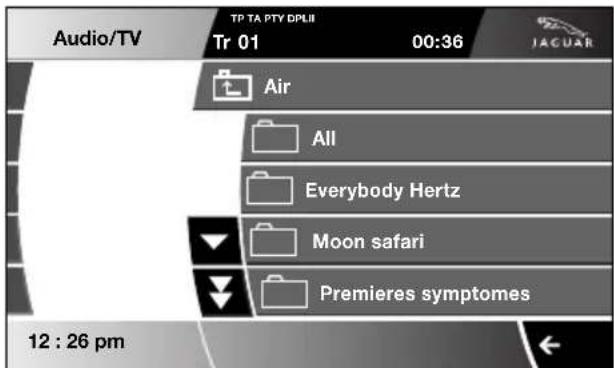
E94352
If you select an album title, a list of tracks is displayed. Select a track to start playback.
Select the open folder icon at the top of a menu to move back to the level of that folder.
Portable device settings

E94355
In Portable audio mode, select Settings, then select Options.
Traffic announcements
With Traffic enabled, traffic announcements (TA) will interrupt portable audio playback.
Portable audio text
With Portable audio text enabled, any text information saved on the device associated with a track, for example artist name, will be displayed on the touch-screen during playback of that track.
Page jump
Only five items are displayed on screen from a list of many items. If you select a single arrow scroll button, then four items will scroll past.
The Page jump setting helps you to navigate a very long list of items by setting the number of items scrolled through when a double-arrow page scroll button is selected.
For example, if you select 10 under Page jump, then 10 × 4 (40) items will scroll past each time you select a page scroll button.
GENERAL INFORMATION
WARNING

Using the telephone near the car: Do not telephone inside a garage or near an open car bonnet. The air may contain fuel vapours and the telephone could produce sparks and start a fire.

Unusual ambient conditions: Switch off the telephone in areas where high explosives are being used. High frequency remote controls could be interfered with and cause an explosion. Switch off your telephone in areas with a high explosion risk. This includes filling stations, fuel storage areas or chemical factories, as well as places where the air contains fuel vapour, chemicals or metal dust. The telephone might produce sparks and cause a fire or explosion.

Medical equipment: The functioning of cardiac pacemakers or hearing aids may be impaired when the phone is in use. Check with a doctor or manufacturer whether any such devices you or your passengers are using, are sufficiently protected against high-frequency energy.

Always stow your mobile phone securely. In an accident, loose items can cause injury.

Using any hand-held appliance while driving, can be dangerous and is illegal in certain countries.
Note: The vehicle telephone system is designed to function with a wide variety of Bluetooth® telephones.
As these telephones have a wide range of audio and echo characteristics, it may take a few seconds for the vehicle telephone system to adapt and deliver optimum audio performance.
It may be necessary to reduce the in-vehicle volume slightly, to fully optimise audio performance and reduce echo.
In order to achieve the best possible audio performance, it may be necessary to select a lower speed on the heater blower and reduce the system volume slightly, when using certain mobile phones.
Telephone networks
The telephone network standard allows you to use your telephone in many countries.
However, telephone reception may be poor or unavailable in remote regions. This may be due to the inadequate power of the transmitter, which results in a weak signal or incomplete coverage.
What is Bluetooth®?
Jaguar Bluetooth® Connectivity was developed to be used with a selected range of mobile phones, from a number of different manufacturers. Some mobile phones feature different operating software versions - the correct version is needed for successful integration with the Jaguar Bluetooth® system.
Bluetooth is an international standard that allows electronic components to communicate with each other, using a short-range radio link. Bluetooth eliminates the need for wires or cables: Typically, devices can communicate at a range of up to 10 metres (33 feet).
The Bluetooth in-car telephone system allows certain mobile phones to be used hands-free in your vehicle. There is no need to connect the mobile phone to a cradle or cable.
Bluetooth® is a registered trademark of Bluetooth SIG, Inc.
Please refer to the Owner section of the Jaguar website at www.jaguar.com, for a list of compatible phones. Alternatively, please refer to your Dealer/Authorised Repairer.
Note: The Bluetooth technology phones listed on Jaguar.com, have been tested for compatibility with Jaguar vehicles.
Performance will vary, based on phone software version, coverage and your wireless carrier. Phones are warranted by their manufacturer, not Jaguar.
If your mobile phone battery charge becomes low it may switch off its Bluetooth link to the vehicle. This is normal operation for mobile phones, to help preserve the remaining battery charge. In this event, the touch-screen will display a phone connection message.
The mobile phone must be paired and docked with the vehicle system before use.
See TELEPHONE PAIRING AND DOCKING
(page 309). Once paired and docked, the phone can be operated via the steering wheel switches or the touch-screen. The mobile phone doesn't need to be physically connected to the vehicle, it can be left in a jacket pocket, for instance. Calls are routed through the vehicle's audio speakers, and a dedicated microphone is fitted within the overhead console and is directionally biased towards the driver.
You can use the system to answer or reject incoming calls, make outgoing calls or alter the call volume. The system does not support SMS text messaging.
Note: The vehicle ignition system must be on and the touch-screen system must be active, in order to use the phone.
Call volume
The volume of telephone calls can be adjusted for hands-free operation. To adjust the volume, operate the audio system's volume control during a phone call.
If the audio system is in use when the phone becomes active, the audio system source is suppressed for the duration of the call.
Charging your phone
It is possible to use the in-car 12V/USB socket to charge your mobile phone. Refer to the mobile phone operating instructions for charging information.
Safety
WARNING

Read the following information thoroughly before using your telephone.
Driving
Check local regulations covering the use of in-car telephones in the areas that you intend to use your telephone, and always obey them. Observe the following guidelines if you are using the phone when driving.
- Give full attention to driving - safe driving is your prime responsibility.
- Always use hands-free operation when driving.
- When receiving a call, if driving conditions demand, pull off the road and park.
Electronic devices
Most modern electronic equipment is shielded from Radio Frequency (RF) signals. However, certain equipment may not be shielded against RF signals from your phone.
Pacemakers
The Health Industry Manufacturers' Association recommends that a minimum separation of 15 centimetres (six inches) is maintained between a wireless phone antenna and a pacemaker, to avoid potential interference with the pacemaker. These recommendations are consistent with the independent research by, and recommendations of, Wireless Technology Research.
TELEPHONE PAIRING AND DOCKING
Before use, your mobile phone must be paired and docked with the vehicle's Bluetooth system. This is done via your mobile phone or the touch-screen.
Pairing and docking using your mobile phone
Follow the steps below, to pair and dock your phone with the vehicle using your mobile phone.
Note: The process of pairing and docking your phone with the vehicle using the mobile phone, will vary depending on the type of mobile phone used.

E96911
- Ensure that the ignition is on and the touch-screen is active.
- Ensure that there is no mobile phone currently docked with the vehicle's Bluetooth system. If a mobile phone is docked with the system, you will not be able pair and dock another phone until the current phone has been undocked. To undock a phone, select Phone or Comms on the home screen, then Settings and then Undock.
-
Using the mobile phone, search for Bluetooth devices. See your phone's operating instructions for further information.
-
When the vehicle's Bluetooth system is discovered, your mobile phone will list Jaguar as a discovered Bluetooth device. Select this device from the list.
- You will now be requested to enter a Bluetooth PIN. When pairing and docking from your mobile phone, this number is always 1313.
Once your phone is paired to the vehicle's Bluetooth system, it can connect automatically. If the phone does not automatically connect, you will have to connect manually with the Jaguar Bluetooth System, via the mobile phone. Please consult the mobile phone's handbook for further information.
Note: Some mobile phones require you to authorise the connection each time you start the system. To change this, you must set Jaguar as ‘authorised’ in the mobile phone’s known device list. This will enable connections from the vehicle to the mobile phone to take place automatically without confirmation each time. Please consult the mobile phone’s handbook for further information.
Pairing and docking using the touch-screen
- Switch on your mobile phone's Bluetooth connection, using the phone's menu. Make sure that your mobile phone is in Bluetooth discoverable mode, sometimes referred to as find me mode (see your phone's operating instructions for more information).
- Switch the ignition system on, ensure that the touch-screen is active.

E96908
- From the home menu select Comms. If your car is not fitted with JaguarVoice, Phone will appear in the position occupied by Comms.

E96912
- Select Settings.

JAG1311
- Select Search new. The system will search for all Bluetooth phones that are in range. If a phone is already docked, it will be automatically undocked when a Search is initiated.
Telephone

E96918
- Select your phone from the displayed list.

JAG1312
- Once you have selected your phone, a pop-up window appears.
- To pair and dock the phone, enter XXXX on the handset (XXXX being a random four digit code displayed on the touch-screen). Enter this into your phone (see your phone's operating instructions for more information).
- Your phone is now paired and docked ready for use. For further information, refer to the following procedures - Making a call, Ending a call, Receiving a call.
- Once a mobile phone has been paired and docked with the vehicle, the system will search for the last connected phone, each time the ignition is switched on.
Note: Due to the duration of a Bluetooth search, it is advised that the timeout to home screen feature is switched off before attempting to search for Bluetooth devices. This setting can be changed within Vehicle, Syst settings, Display set, Timeout to home screen.
Note: You do not need to manually pair and dock the phone with the vehicle every time you switch the ignition on. If an incorrect code is entered, your mobile phone should prompt you to enter the correct code.
The Bluetooth system supports Bluetooth Hands Free Profile 1.5 (HFP 1.5). If the mobile phone paired to the system also supports this profile, additional features will be available such as battery level indicator, signal strength indicator and network operator. If the mobile phone does not support these features, they will not be available on the touch-screen. However, you can refer to the mobile phone's display to determine these items.
Pairing other phones
Up to five mobile phones can be paired with the vehicle in the same way. However, only one can be docked for use. For further information, refer to Changing the docked phone.
Telephone
Changing the docked phone
Only one phone can be docked to the vehicle at any one time. To dock a different paired phone to the vehicle, follow the steps below:
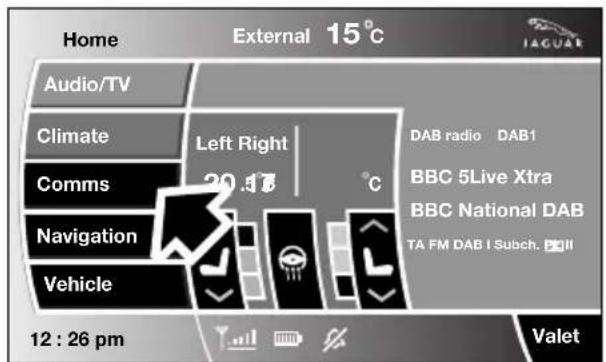
E96908
- From the home menu, select Comms (Phone on vehicles without Voice).
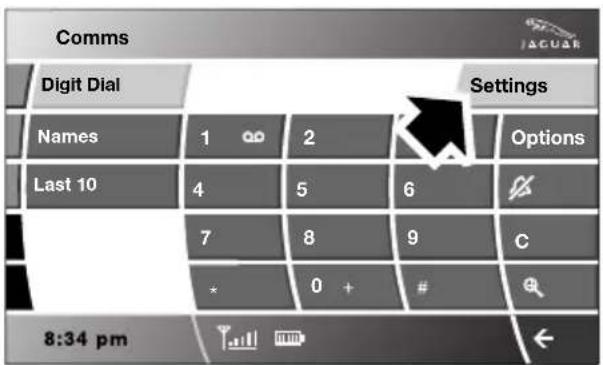
E96912
- Select Settings.
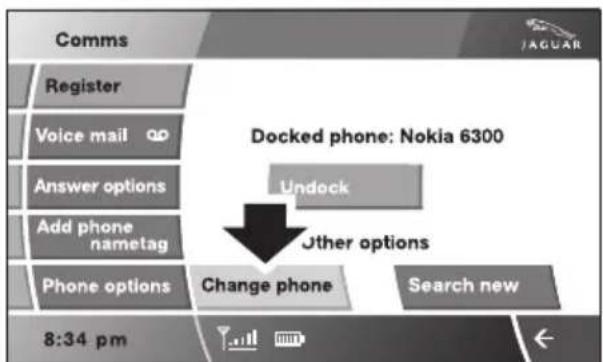
JAG1313
- Select Change phone.

JAG1314
- Select Dock from the list of available phones.
Deleting a paired phone
To delete a phone from the system, follow the steps below:

E96908
- From the home menu, select Comms (Phone on vehicles without Voice).
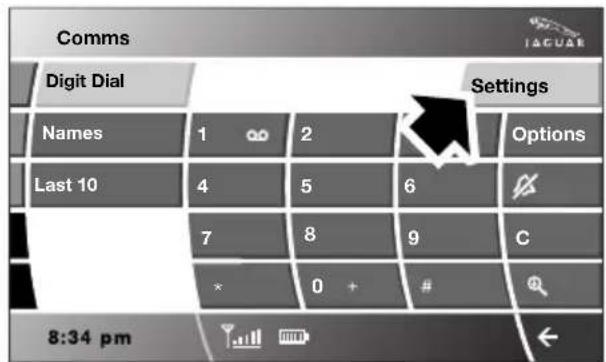
E96912
- Select Settings.
Telephone
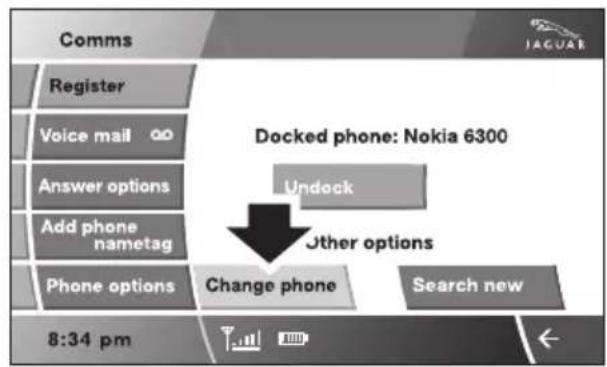
JAG1313
3. Select Change phone.

JAG1314
- Select Delete. This permanently removes the phone from the vehicle's Bluetooth system list. To use the phone again, you have to pair and dock the phone to the vehicle.
- The phone does not need to be present to be deleted from the list.
Register
From the Settings main menu, selecting Register gives the options to Undock, Change phone or Search new. For further information, refer to the following procedures - Pairing other phones, Changing the docked phone.
VOICE MAIL
You can set up your voice mail to be accessed via the touch-screen. The voice mail (network service) option is an answering service, where callers who are unable to reach you can leave messages.

E96913
Select Voice mail, enter the number provided by your service provider and select OK. This number is stored in the system and used to retrieve any voice mail messages.
Retrieving voice mail

E96922

To listen to your voice mail messages, select and hold 1.
The voice mail features can be used as if dialled from the mobile phone.
ANSWER OPTIONS

E96933
- Select Answer options.
- Auto answer: If automatic answer is on, the call will automatically answer after a few seconds. Select Off or On.
- Caller announce: This feature, if available, allows the callers name to be announced. Select Off or On.
PHONE OPTIONS

E96917
- Select Phone options (1).
- Ring tones (Ring tone options).
- Phonebook (Phonebook options).
Ring tones
Four ring tones are available (for in-vehicle ringing) or you can use your mobile phone's own ring tone:
Select Ring tones (2). Select Portable's inband tone to use your mobile phones ring tone.
Note: Not all phones support inband ringing.
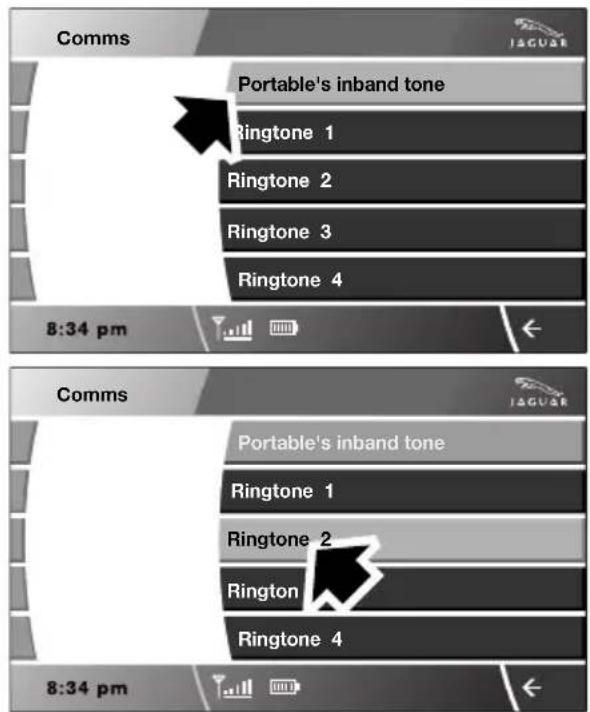
E96916
Or, select Ring tone 1, 2, 3 or 4, to use a Jaguar preset ring tone.
Note: The system will store the ring tone setting associated with each mobile phone.
PHONEBOOK
The phonebook option (3), allows you to download your mobile phone's directory (either automatically or manually) or erase it from the vehicle's memory, assuming that the phone supports this feature.
The system can store a maximum of 750 entries, although this figure varies, depending on the type of mobile phone used. Refer to
Phone capacity.
Note: It may take several minutes to copy the phonebook to the vehicle, depending on the phone and number of entries stored. The telephone system may not be operational during this period.
Automatic download
Any phone numbers stored in your mobile phonebook, can be copied to the vehicle's phonebook.
If Auto Download is on, the mobile phone phonebook will be transferred to the vehicle every time the phone is connected (docked).
This feature will only work on phones that support AT Phonebook Profile. Refer to your phone's operating instructions.
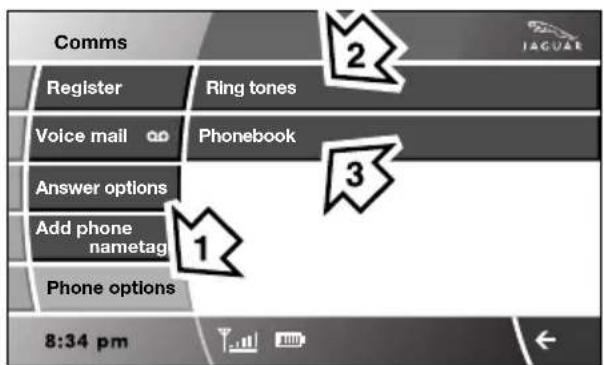
E96917
To change Auto Download: Select Phone options (1), then select Phonebook (3).

E96914
Select Off or On.
If On is selected, the vehicle will automatically download the entire directory, each time the phone is docked.
Manual download
If your phone does not support AT Phonebook (automatic phonebook download), you may be able to manually send your phonebook (individual entries or in full) to the vehicle's Bluetooth system using the phone's Object push facility. Refer to your phone's operating instructions to determine whether this feature is available.

E96957
To initiate a manual download, select Phone options, then Phonebook and then Start manual download.
The Bluetooth system will disconnect the currently docked phone and will be able to receive phonebook data sent from that phone. Please refer to your phone's operating instructions for details of how to send phonebook data using Bluetooth.
Once the phonebook data has been sent, select Exit to reconnect the last docked phone.
The vehicle's Bluetooth system will now display the manually downloaded phonebook data. For more information, refer to your phone's operating instructions.
Note: This feature only allows you to send phonebook data from the last docked phone. You cannot download data from the Bluetooth system to a mobile phone.
Once a paired phone is deleted from the paired phone list, the phonebook data associated with this phone is deleted.
Erase entire phonebook
To erase the entire phonebook:
Select Phone options (1), then select Phonebook (3).
Select Erase entire phonebook.
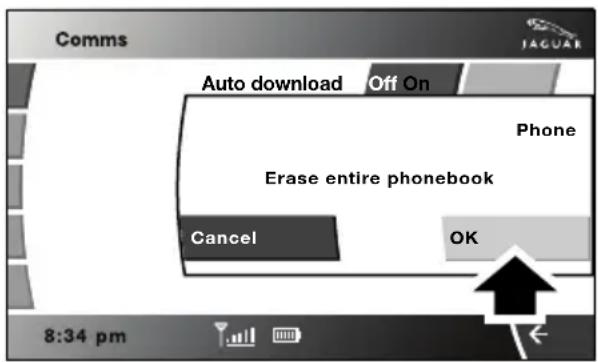
E96923
A pop-up window alerts you that you are about to Erase entire phonebook. Select OK to remove all names from the vehicle phonebook.
To delete one or more names, but not all, refer to Deleting names from the Directory.
Note: This feature deletes phonebook entries stored in the vehicle memory and not those stored in the mobile phone memory.
Phonebook capacity
Certain mobile phones store the phonebook in two different areas, the SIM card and the phone memory. Where possible, the vehicle will display both SIM card and phone memory entries up to a maximum of 750. With some mobile phones, the number of entries from one or both of these areas may be restricted. It is not always possible to transfer addresses stored in one or both of these areas.
The number of entries displayed is dependent upon the number of SIM and phone memory entries supported by the mobile phone.
Note: Certain mobile phones do not allow phonebook entries stored on the SIM card to be transferred via Bluetooth. However, it may be possible to transfer the SIM phonebook to the mobile phone's memory, before copying it to the vehicle phonebook. Refer to your mobile phone operating instructions for more information. It is advisable to remove duplicate and blank entries from the mobile phone, before the phonebook is downloaded.
Telephone
MAKING A CALL
Before you make a call, your mobile phone must be paired and docked with the vehicle's Bluetooth system.

E96908
From the Home menu, select Comms.
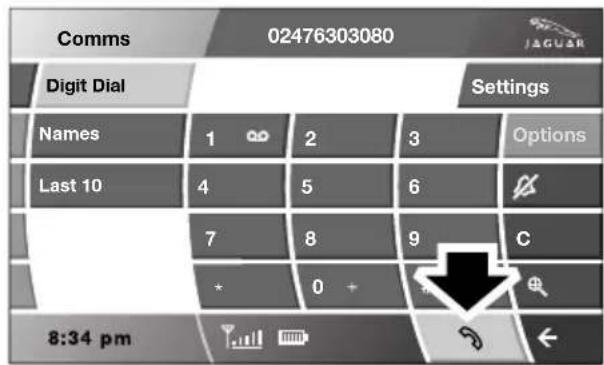
E96924
Key in the phone number, including the area code, if applicable - the number will be displayed. Touch the connect icon.
Changing a phone number
When entering a number, you can change the phone number shown on the touch-screen using the C button.
A momentary touch erases a single digit, a long touch erases the complete number.
Receiving a call
If the audio system is in use when the phone becomes active, the audio system source is suppressed for the duration of the call.
If automatic answer has been programmed, the call will automatically answer after a few seconds. Refer to Answer options.
To answer a call: The preferred method to accept an incoming call, if Automatic answer is not active, is to use the hands-free controls on the steering wheel (refer to Hand-free controls). Alternatively, you can accept or reject the incoming call, from the pop-up displayed on the touch-screen.
Ending a call
The preferred method to end a call is to use the hands-free controls on the steering wheel. Refer to Hands-free controls.
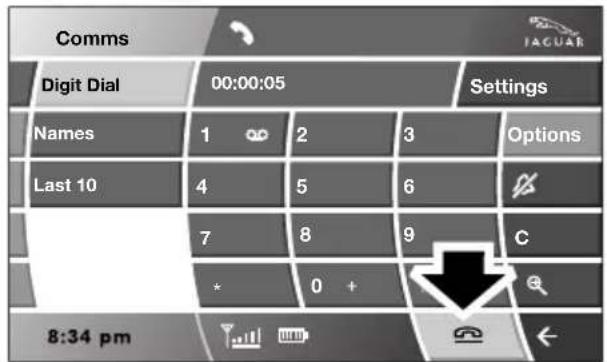
E96925
Alternatively, select the End call icon (arrowed).
Continuity of calls
Whilst in a call, the call remains connected if the vehicle is in convenience mode. When the call ends, another call cannot be made or received through the vehicle system, unless the ignition is on and the touch-screen system active.
Telephone
NAMES
Directory name search

E96908
From the Home menu, select Comms.

E96926
Select Names.


JAG1315
-
Using the keyboard, select the first letter of the contact name. If the name begins with the second or third letter on the button, touch the button two or three times respectively (i.e. if the name begins with an F, touch the DEF button three times).
-
Select OK.
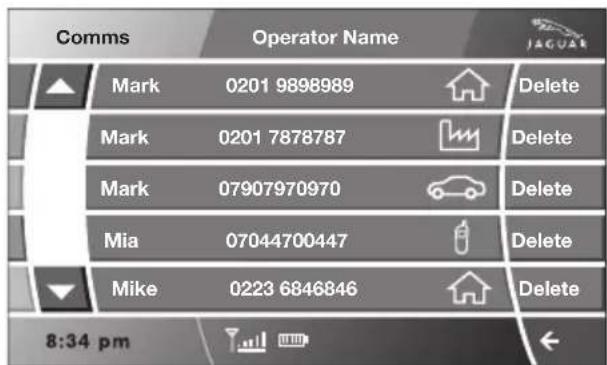
JAG0900
Select the desired name to make a call.
Note: Using the hands-free controls, you can search the phonebook via the message centre.
Telephone
Directory contact types
If your phone supports contact type data, you will be able to see a contact type icon in the vehicle's phonebook directory. These can be seen on the right-hand side of each contact in the directory and will indicate one of the following types:

natural_image
Four gray-scale icons representing industrial, home, mobile phone, and car (no text or symbols)Work.
Home.
Mobile.
Car.
No Icon Voice.
Deleting names from the directory

E96908
From the Home menu, select Comms.

E96926
Select Names.


JAG1315
-
Using the keyboard, select the first letter or letters of the contact name to narrow your search. The selected letter(s) appears in the upper display.
-
Select OK.
The search fields are opened and matching contacts are listed.
Telephone

JAG0901
Select Delete to remove a name(s) from the phonebook.
LAST 10 OPTION
The Last 10 option allows you to view the last 10 calls made, received or missed.

E96908
From the home menu, select Comms.

flowchart
graph TD
    A["Comms"] --> B["Digit Dial"]
    B --> C["Names"]
    C --> D["Last 10"]
    D --> E["1"]
    E --> F["Calls made"]
    F --> G["Calls received"]
    G --> H["Calls missed"]
    H --> I["4"]
    I --> J["Settings"]
E96927
- Select Last 10.
-
Select Calls made or.
-
Select Calls received or
- Select Calls missed.

E96928
The search fields are opened and a list of the calls made, received or missed are listed, with the most recent at the top.
To make or return a call, select the name from the list. Your call will be routed automatically.
Note: The vehicle will display the list in the order that they are sent from the mobile phone. Some phones may arrange the list in reverse or other order.
HANDS-FREE CONTROLS
Four system adjustment controls are situated on the left-hand side of the steering wheel, duplicating functions of buttons on the touch-screen. Using these buttons is the preferred method of adjustment, as driver distraction is minimised.
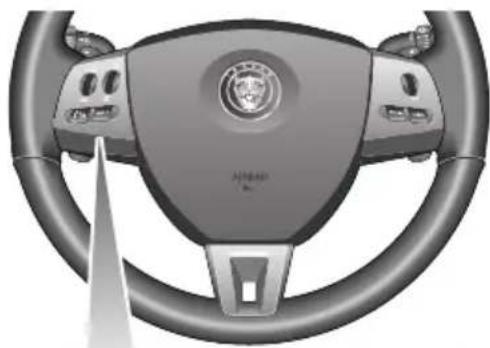
natural_image
Interior view of a car steering wheel with brand logo and Chinese text (no readable document text)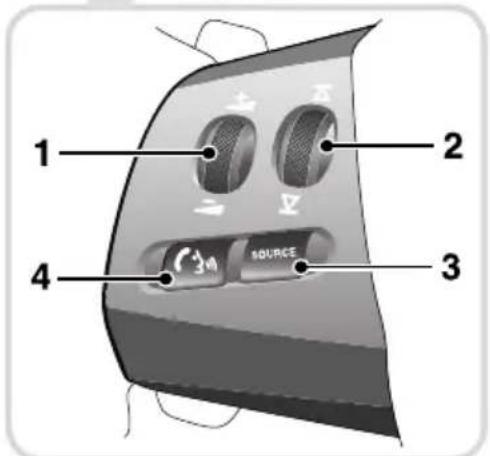
E71452 G
- Scroll up/down to increase or decrease volume.
- Scroll up/down to next/previous memory location.
- Source. Press and hold to access phone mode on the touch-screen and message centre.
- Voice button. Briefly press to dial, answer or end a phone call. This button is also used for voice control functions.
Phonebook scrolling using message centre
Press and hold the Source button on the steering wheel, to scroll through and select a phonebook contact via the message centre.
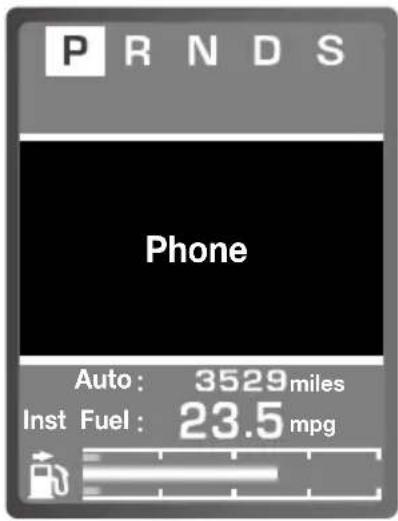
E96934
Phone will be displayed and the Phonebook can be accessed on the touch-screen.

E96958
Use the scroll up and down buttons to search through the Phonebook. Each entry will be shown in the message centre.
With the required contact displayed, press the Voice button on the steering wheel to make the phone call.
Making/ending a call
To dial:
Key in the phone number, including the area code. The number will be displayed.
To connect:

Press this button on the steering wheel, or

Touch this icon on the touch-screen.
To end a call:

Press this button on the steering wheel, or

Touch this icon on the touch-screen.
OTHER FEATURES
Keyboard magnification
This option allows the user to increase the keyboard size.
When making a call using the numerical key pad displayed on the touch-screen, the Magnify icon becomes selectable.

E96930
Select the Magnify icon to enlarge the keypad.
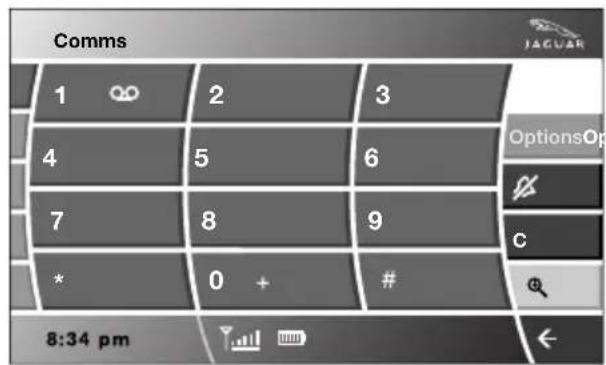
E96931
Select the Magnify icon again to reduce the size.
Do not disturb mode
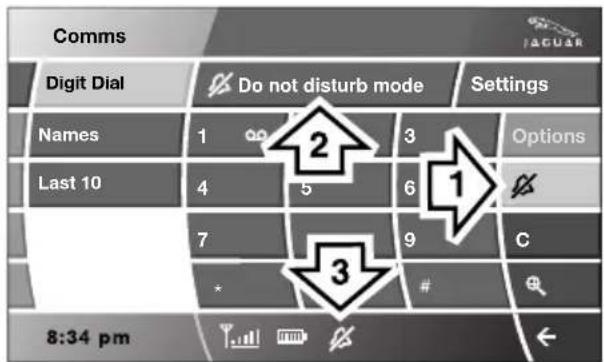
E96929
If you do not wish to be disturbed by incoming phone calls, select the bell icon (1) on the touch-screen. A visual representation will be displayed on the touch-screen, to advise the driver that the Do not disturb mode is selected (3) and Do not disturb mode will be visible when in telephone mode (2). Any incoming calls will be rejected or diverted to voice mail.
TELEPHONE VOICE CONTROL
WARNING

Do not use voice control when placing emergency calls. Your voice and tone could be affected by stressful situations and, as a result, the process of establishing a connection could be delayed.
Voice control allows many of the telephone features to be activated by voice commands.

The system is controlled by the switch on the left-hand side of the steering wheel.
Note: The voice control directory is separate from your phone SIM card address or phonebook. See VOICE CONTROL (page 69).
The voice control system understands predefined commands which need to be spoken word for word. A list of all telephone voice commands is below.
- PHONE HELP
- PHONE DIAL NUMBER
- PHONE REDIAL
- PHONE STORE NAME
- PHONE DIAL NAME
• PHONE ACCEPT CALLS - PHONE REJECT CALLS
• PHONE DIAL LAST ANSWERED CALL
• PHONE DIAL LAST MISSED CALL
• PHONE DIAL VOICEMAIL
• PHONE PLAY DIRECTORY
• PHONE DELETE DIRECTORY
• PHONE DIAL HANDSET NAME
Most of the above commands are self explanatory, those which are not, are explained more fully in the following section.
Operating the system

E95902
Press and release the voice button on the steering wheel (arrowed) and after the tone, speak one of the system commands.
In response to your command, the system will repeat your instruction and Listening will appear in the message centre. The system will either carry out your command or ask for more information. If the system asks for more information, wait until the tone has sounded before replying.
To cancel a voice control session, press and hold the switch on the steering wheel (until a double tone sounds).
Telephone
Dialling a phone number
The system will guide you through the process. After each prompt where the system asks for a response, always wait for the tone before responding.
The phone number can be given as a series of single digits (from zero to nine). Either Zero or Oh is recognised, but zero is likely to give the best results.
For example: 01926543791 = zero, one, nine, two, six, five, four, three, seven, nine, one.
You can also speak the number in groups of three to six digits. If you adopt this approach, always wait for the system to respond with Continue before providing the next group of numbers.
It is also possible to give the number as a whole, with no pause between the digits.
To dial a phone number, follow one of the procedures listed below.
If, during the procedure, the system prompts you with a response of Continue, you can use the following commands.
- DELETE - Will delete all digits entered and prompt for entry of a number;
- CORRECTION - Deletes the digit entered last, repeats the digits given so far and prompts Continue;
- CANCEL - Cancels this dialogue;
- DIAL - Terminates the entry of digits and dials the entered number.
Telephone numbers up to 20 digits are acknowledged. If a longer number is given, the message Number too long will be heard.
Dialling a number in groups
| Step Voice command System response | ||
| 1. PHONE DIAL NUMBER PHONE DIAL NUMBER, NUMBER PLEASE | ||
| 2. ZERO, ONE, NINE, TWO, SIX ZERO, ONE, NINE, TWO, SIX. CONTINUE? | ||
| 3. FIVE, FOUR, THREE FIVE, FOUR, THREE. CONTINUE? | ||
| 4. | SEVEN, NINE, ONE | SEVEN, NINE, ONE. CONTINUE? |
| 5. | DIAL | DIALLING |
Dialling a number as a whole
| Step | Voice command | System response |
| 1. | PHONE DIAL NUMBER | PHONE DIAL NUMBER, NUMBER PLEASE |
| 2. | ZERO, ONE, NINE, TWO, SIX, FIVE, FOUR, THREE, SEVEN, NINE, ONE | ZERO, ONE, NINE, TWO, SIX, FIVE, FOUR, THREE, SEVEN, NINE, ONE. CONTINUE? |
| 5. | DIAL | DIALLING |
Phone store name
The system will guide you through the process. After each prompt where the system asks for a response, always wait for the tone before responding.
To store a name, follow the procedure below.
If, during the procedure, the system prompts you with a response of Continue, you can use the following commands.
- DELETE - Will delete all digits entered and prompt for entry of a number;
- CORRECTION - Deletes the digit entered last, repeats the digits given so far and prompts Continue;
- CANCEL - Cancels this dialogue;
- STORE - Terminates the entry of digits and stores the entered phone number.
| Step Voice command System response | ||
| 1. PHONE STORE NAME PHONE STORE NAME, NUMBER PLEASE | ||
| 2. ZERO, ONE, NINE, TWO, SIX, FIVE, FOUR, THREE, SEVEN, NINE, ONE | ZERO, ONE, NINE, TWO, SIX, FIVE, FOUR, THREE, SEVEN, NINE, ONE. CONTINUE? | |
| 3. STORE NAME, PLEASE | ||
| 4.PLEASE REPEAT NAME | ||
| 5.STORED | ||
| 6. DIAL | DIALLING | |
Storing nametags using the touch-screen
Nametags can also be added to the system by using the Add Phone nametag feature on the touch-screen, as described below.
- From the Home menu, select the Comms button.
- From the Comms menu, select the Add Phone Nametag button.
- A numerical touch-screen is displayed. Enter the phone number.
- When the number is entered, select the Add button in the top right-hand corner and, once the tone has sounded, speak the name that you wish the number to be stored under.
Note: The storage of the nametag itself is subject to the nametag not being too short (less than 0.4 seconds), too long (longer than 4 seconds), not sounding too much like another stored nametag and relies on the repetition of the nametag sounding the same as the first utterance of it. If any of these criteria are not met, the system will prompt you to give a new nametag.
Note: The Add button will be greyed out if the phone number is not valid.
Dialling a nametag
To dial a number stored under a nametag in the directory, press and release the voice button and say Phone dial name. The system will repeat the command and will prompt you for a stored nametag by saying Name please. After the tone, speak the nametag of the required number. The system will replay the stored nametag and ask for confirmation that it is correct. Answer with Yes or No, as appropriate.
Dialling voicemail
The number for your voicemail service needs to be stored in the system, before using this facility. To store the voicemail number:
• From the Home menu, select Comms.
• From the Comms menu, select Settings.
- The phone Settings menu has a Voice mail button, to allow your voicemail number to be entered.
To dial the voicemail number, press and release the Voice button on the steering wheel, wait for the tone to sound, then say Phone dial voicemail.
Play all stored nametags
To play all the nametags stored in the directory, press and release the Voice button on the steering wheel and after the tone, say Phone play directory. The list can be interrupted at any time, by pressing and releasing the button again. Once interrupted, you can then use the commands, REPLAY, DIAL, DELETE, EDIT or CANCEL.
Dialling a nametag stored on the handset
To dial a number associated with a nametag stored on the phone handset, press and release the Voice button on the steering wheel and, after the tone, say Phone dial handset name.
Message centre messages
A number of responses by the telephone voice system are reinforced by text messages appearing in the message centre display.
These messages are in the following list.
- LISTENING
- VOICE NOT READY
• NOT AVAILABLE PHONE IN USE
• COMMAND NOT RECOGNISED
• NO SPEECH DETECTED - STORING
• COMMAND CANCELLED - SEARCHING
• HOLD BUTTON TO CANCEL - DIRECTORY
Phonebook entries
You can also view the phonebook entries on the message centre. See HANDS-FREE CONTROLS (page 321).
GENERAL INFORMATION
Introduction
TV viewing is possible when the vehicle is stationary with the transmission in the P (Park) position. The TV picture can be viewed in preview mode or full-screen.
If the vehicle is moving when TV is selected or if the vehicle is driven off when the TV is operating, a warning message will display, the TV picture will cease and only audio reception is available.
Note: Japan market: The TV will operate normally up to speeds of 5 km/h (3 mph), after which the TV picture will cease and only audio reception is available.
TV sound is provided through the audio system speakers.
TV reception
Repositioning the vehicle may improve the picture whereas in difficult locations (distant transmitter, hills etc.), reception may not be possible at all. Sound quality may also be affected to a lesser degree by loss of signal, which can give rise to variable quality over short distances while on the move.
Note: Television systems require consistent and strong signals for good quality reception. These signals are affected by transmitter coverage and surrounding features (hills, high buildings, trees etc.) which will reduce the signal, thus reducing picture quality.
TV inhibit with vehicle moving

E94679
If the vehicle is moved whilst the TV picture is being displayed, the TV will be inhibited and returned to the TV Menu screen.
A warning indicator will appear across the screen for three seconds stating For your safety, the picture is off while the vehicle is in motion.
With the TV picture inhibited, TV sound and channel changing continues to be available.
TELEVISION CONTROLS
TV controls
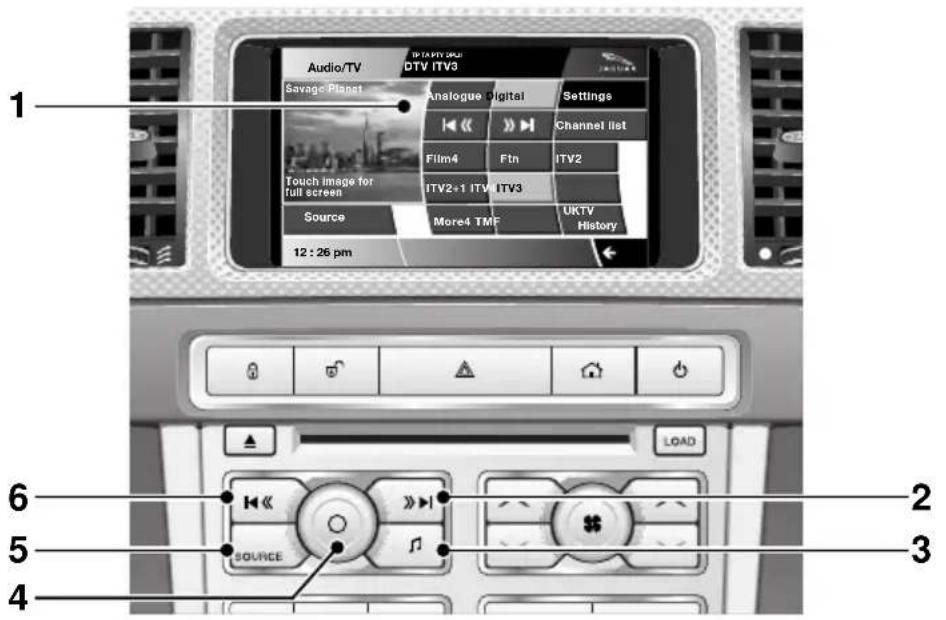
E94705
- Touch-screen: See TOUCH-SCREEN (page 109).
- Seek up: Short press to seek next channel frequency; long press for next available channel.
-
Settings:
-
Short press to display the audio Settings menu.
-
Long press (two seconds) to display the Vol presets menu.
-
On/off and volume control:
-
Press the control to switch the system on/off.
-
Rotate the control to increase or decrease volume level. Any volume setting made whilst in audio, phone, navigation or voice activation mode, will be memorised for that system.
-
SOURCE: Press to change the source media through FM1, FM2, AM, DAB1, DAB2, DAB3, CD, iPod, USB, Auxiliary input and TV.
- Seek down: Short press to seek previous preset channel; long press for previous available channel.
Television
Steering wheel controls

- Rotate up or down to increase or decrease volume.
- Rotate up or down and release repeatedly to scroll through preset TV channel. Rotate up and hold for two seconds to select next strong TV channel.
- Press repeatedly to scroll through all sources.
- This button can be used to mute the TV sound at any time.
USING THE TELEVISION
On/off control
To operate the TV, the ignition system must be on (press the engine START/STOP button).

Press the audio on/off and volume control on the audio console.
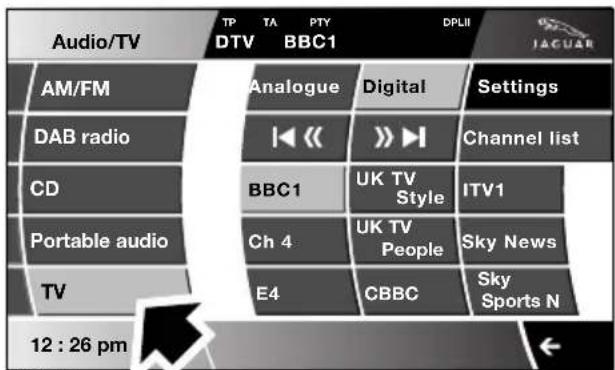
E94680
On the touch-screen Home menu, select Audio/TV, then select TV. The buttons on the left of the screen will slide away and be replaced by the TV preview picture. To redisplay the buttons for five seconds, select the Source button under the TV preview picture. See TELEVISION CONTROLS (page 329).
Volume control
The volume of the TV output can be adjusted in one of two ways:

Rotate the audio on/off and volume control on the audio console, or;
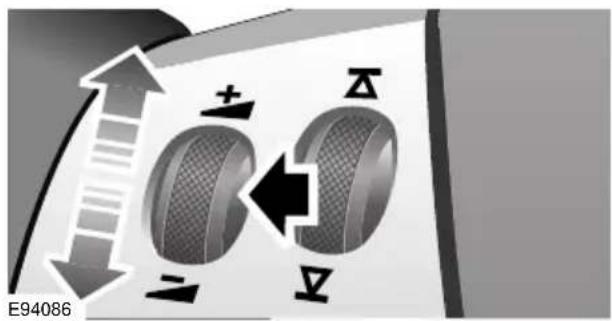
Rotate the volume control on the steering wheel.
Television
Analogue/Digital option
The TV offers both analogue and digital TV reception. You can switch between the two modes using the touch-screen controls.
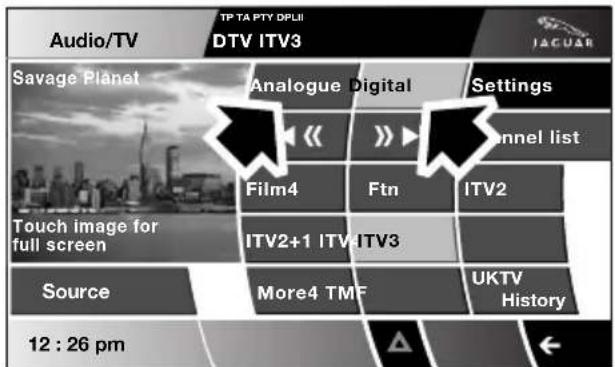
E94681
Select Digital to display the options available for digital TV.
Select Analogue to display the options available for analogue TV.
Note: If no channels have been preset, no channel names will be displayed on preset keys.
Loss of reception

E94682
For a variety of reasons, you might lose reception on the channel you are currently viewing. This might happen because you have moved outside the area for a local channel or because the signal has become blocked by an obstruction. In either case, the message No reception will be displayed.
Full screen view
The TV main screen displays a preview picture in a small screen alongside all the touch-screen controls and preset channels.
Touch anywhere on the TV picture to display it in full screen mode. A list of control buttons is displayed on the full screen picture for five seconds before disappearing.

E94687
To redisplay the buttons in full screen mode, touch the screen again.
FINDING TV CHANNELS
Next/previous channel

E94696
Select the seek buttons on the touch-screen to find the next/previous TV channel that is available.
If you are watching in full screen mode, you must first touch the picture to display the seek buttons on screen.
Channel list

E94697
On the preview screen, select Channel list to display the channels available. The channel list will update automatically. While you are viewing the channel list, it is updated automatically.
Use the arrow keys to scroll through the channel list.
Using presets channels
On each waveband, nine channels can be memorised using the touch-screen keypad.
Storing channels

E94701
After tuning to a channel, touch and hold (two seconds) the selected preset button. An audible signal indicates that the channel is stored. If the information is broadcast, the channel name will be displayed.
Recalling channels
Briefly touch the preset key on the touch-screen to recall the stored channel.
Rotate and release the steering wheel selector control repeatedly to cycle through all the preset channels.
TELEVISION SETUP
TV screen format
You can change the format of the picture displayed on the touch-screen. The default format is 16:9 with the additional options of 4:3 and Zoom.

E94702
Touch the TV picture to display full screen mode with control buttons displayed.
Select 4:3, Zoom or 16:9, as required. If no further change is made within five seconds, the format you have chosen will remain displayed and the control buttons will disappear.
TV settings

E94703
On the TV main menu, select Settings, then select Options.

E94704
Note: You cannot change any TV settings while the vehicle is moving.
Traffic
The Traffic option detects the presence of local radio traffic announcements. As soon as an announcement is received, TV play will be interrupted. At the end of the announcement, play will resume as normal.
Select On or Off to enable or disable the Traffic option.
TV country
If you move the vehicle to a different country, you can change the TV country setting to make sure that you receive the best possible reception and sound quality. On the Options menu, the currently selected TV country is displayed.
Note: If you have already selected a TV format, then the TV country option is disabled.
For TV country, select Change to display a list of all countries where TV services are available. Select the country name to enable it.
The TV country setting determines the most appropriate settings for TV broadcasts in your current location.
TV format
You can change the TV format setting from the Options menu. If you change the format, then the TV country setting will be disabled because there are fewer formats that can apply to more than one country.
On the Options menu, the currently selected TV format is displayed, for example PAL-C. Select Change to view a complete list of available formats. Use the arrow buttons to scroll through the list.
In the interests of road safety, only operate, adjust or view the system when it is safe to do so.
Loading the navigation DVD
Note: Before use, ensure that the navigation DVD player is loaded with the correct mapping DVD for your country.

JAG0840
CAUTION

Do not allow moisture, dirt or foreign objects to enter the slot.
The navigation DVD player is located behind an access panel on the left-hand side of the luggage compartment. The trim panel will need to be removed (as shown) to access the DVD player.
- Turn on the vehicle ignition.
- Move the lock/unlock button to the unlock position (1).
- Press the unload button (2) to eject a DVD, if one is installed in the DVD player.
- Load the correct Navigation System DVD with the printed side upwards.
- Move the lock/unlock button to the locked position. Replace the access cover.
SATELLITE SIGNALS
The system uses signals from the Global Positioning System (GPS) satellites, which allow the approximate position of the vehicle to be calculated. This is combined with information from vehicle sensors and data from the Navigation DVD, to establish the true vehicle position.
The navigation computer then integrates this data with the information stored on the DVD, enabling you to plan and follow a route to your desired destination.
Digitised area
Ensure that you are using the latest version of the correct DVD for your country.
Note: Your Dealer/Authorised Repairer will have details of how to order DVD updates.
The navigation DVD provided, contains a digitised street map. Larger cities and boroughs are completely covered. The regional and unclassified roads or access roads and the town centre for smaller towns and boroughs are included.
One way streets, pedestrian zones, turn bans and other traffic regulations are taken into account as far as possible. There may be discrepancies between the data on the navigation DVD and the actual local situation, due to temporary or permanent changes to road systems and their traffic regulations.
If the vehicle battery has been disconnected, or if the vehicle has been transported to a new location on another vehicle (e.g. by trailer or train), the navigation system may require several minutes to identify the new position.
Errors in vehicle position
Under certain driving conditions, it is possible that the vehicle position shown may be incorrect. Some examples are shown below:
- Negotiating circular ramps in car parks.
• Elevated roads in proximity to other roads.
• Where two roads run parallel to each other. - Driving on steep roads.
- When the vehicle is transported by ferry or train.
• After the tyres have been replaced. - When using snow chains.
- After the vehicle has been rotated on a turntable.
- After vehicle battery removal or supply fuse failure.
Reception of GPS signals
GPS signals are highly directional and reception may occasionally be interrupted. Some examples of situations likely to cause problems are shown below:
- Inside buildings
• Forest roads between mountains - Between tall buildings
- Roads under cliffs.
The vehicle's direction and speed sensors will minimise any adverse effect on the operation of the navigation system, if this should occur.
Normal operation will resume once the obstruction has been passed.
GETTING STARTED
If the screen is already displaying another function (radio, phone, etc.), touch either the back arrow or the Home button below the touch-screen to access the Home Menu.

JAG1523
Select Navigation.

JOL4500ENG
Read the caution and touch Agree or select Language if you need to select a different navigation language.
Non-European countries only
The introduction screen text for non-European countries is as shown below and not as seen on the previous illustration:
Most functions are inhibited whilst the vehicle is in motion. Please read the handbook for operating instructions. Always obey traffic regulations
Note: In some countries the front seat passenger may enter data whilst the vehicle is in motion.
Navigation system
MENU STRUCTURE
| The following menu outlines the touch-screenNavigationsystem menu structure. | |
| Navigation SetupUser Settings | |
| Quick POI Selection | |
| Calibration | |
| Restore Defaults | |
| RDS-TMC | |
| Language Selection | |
| Stored LocationsMemory Add | |
| Destination/waypoint Edit | |
| Previous Delete | |
| Avoid Points | |
| Home | |
| Destination EntryAddress House | |
MAIN MENU


JOL4506ENG
After selecting navigation, the main menu is displayed showing available functions. For detailed information on these items:
See DESTINATION ENTRY (page 356).
See ROUTE PREFERENCES (page 347).
See USER SETTINGS (page 338).
There are additional sections in this handbook specifically showing Points of Interest (POIs) and End User Licence Agreements.
Select the menu item required.
Note: To view the map without the buttons showing, touch anywhere on the map display. To display the buttons, touch Menu.
USER SETTINGS
From the main navigation menu select Navigation Setup.
A number of user settings can be made from this menu.

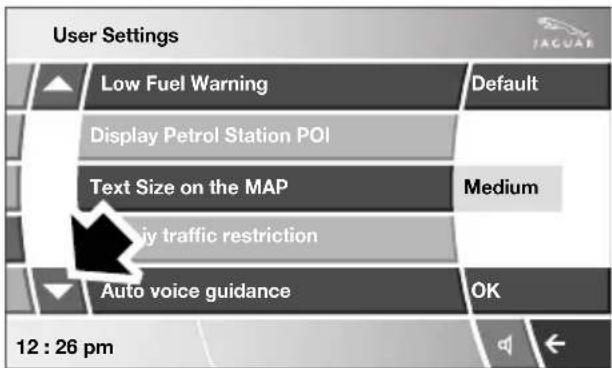

JOL4547ENG
Select those which you require then touch OK.
Note: Touch a dark blue band to deselect that feature or a light band to select it.
The individual details must be firstly set in the navigation setup menu.
Saving user preferences to memory


JOL4507ENG
Use the scroll arrows (1) to see the options. Most of these selections are either on or off, light blue band is not selected, dark blue band is selected.
Touch the line of your choice then OK (2).
TURN-BY-TURN NAVIGATION
(Message centre guidance)
Turn-by-turn navigation guidance (displayed in the message centre) can be turned on or off as follows:
From the main navigation menu, select Navigation Setup, then select User Settings.
Scroll through the user settings list until the Message centre guidance band is displayed. Touch the band to select/deselect the feature.
If the band is dark blue, then Message centre guidance is active. If the band is light blue, Message centre guidance is turned off.
LANGUAGE SELECTION
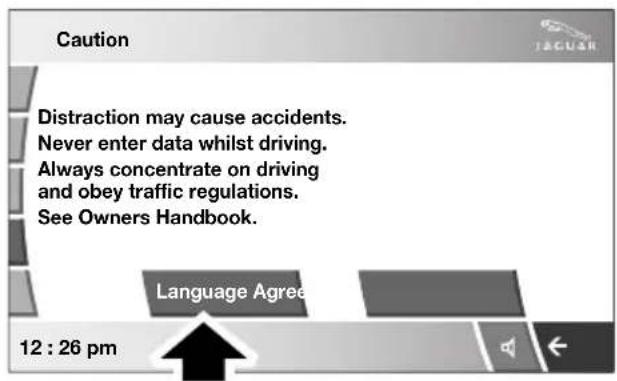

JOL4501ENG
From the initial navigation screen, select Language and select your language.
If necessary, use the scroll arrows to the left of the list to search up or down.
MEASUREMENT UNITS
Distances are shown on the screen and given in voice guidance, either in metric units (kilometres and metres) or in Imperial units (miles and yards) and can only be changed from the vehicle touch-screen menu, not from the navigation system menu.
To change the measurement units, select Vehicle on the vehicle touch screen, then select Unit Change.

flowchart
graph TD
    A["Vehicle"] --> B["Display set"]
    A --> C["Preferences"]
    A --> D["Button audio"]
    A --> E["Vol. presets"]
    B --> F["km km/h 1/100"]
    C --> G["Mls. MPH MPG"]
    H["JAGUAR"] --> I["^0C"]
    H --> J["^0F"]
    K["Display language English UK"] --> L["Change"]
    M["12:34 pm"] --> N["←"]
JOL4657ENG
To change the units: The unit choices are selected by touching either km or Mls.
KEYBOARD LAYOUT
The keyboard layout can be changed from a QWERTY type to ABCDEF type, from the User Settings screen, accessible from the Navigation Setup screen.


JOL4658ENG
Touch the bar to change the keyboard layout, then touch OK.
MAP SPLIT SCREEN
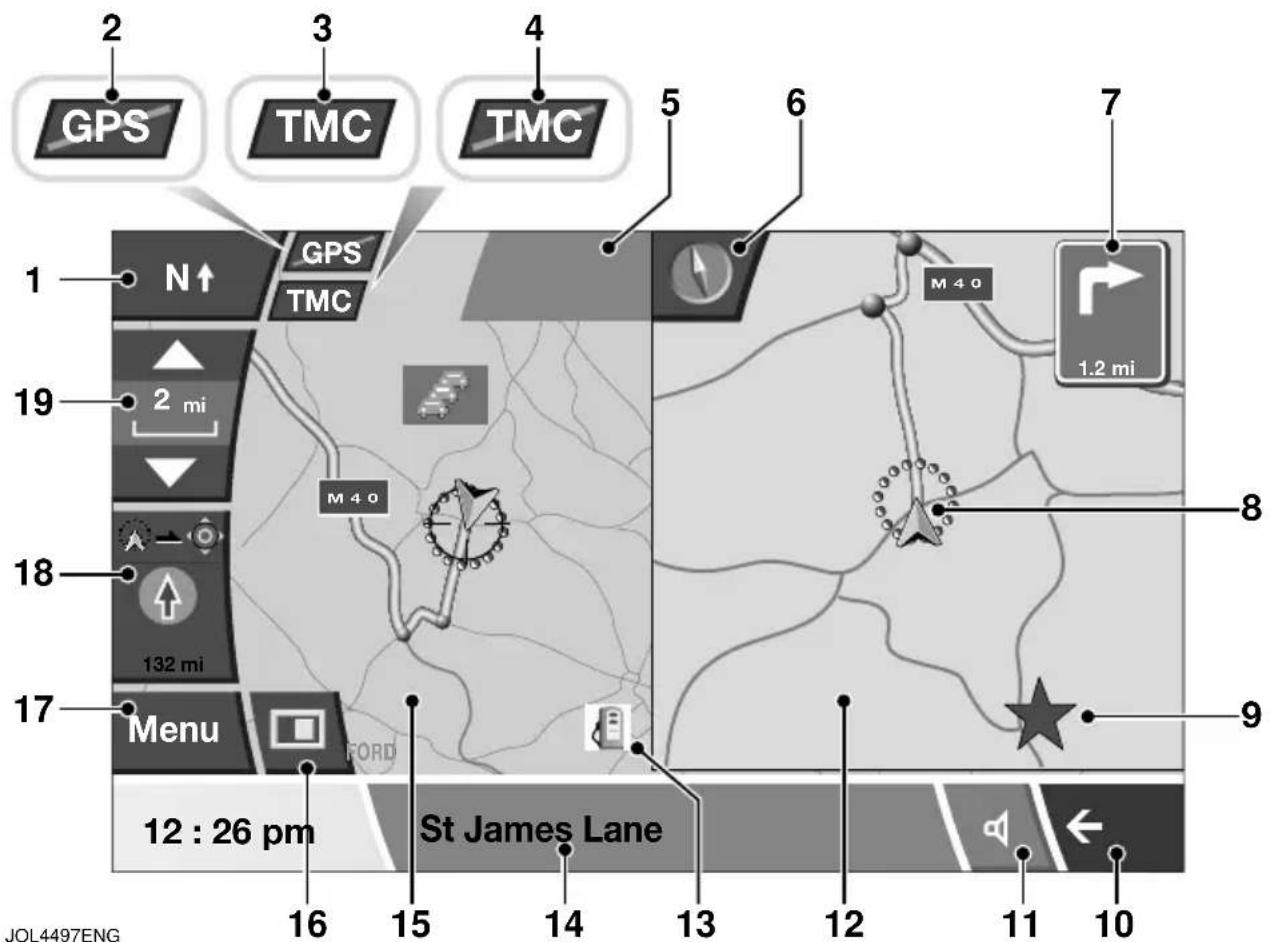
- North is up.
- GPS (Global Positioning System) a signal is not being received.
- TMC (Traffic Message Channel), a signal is being received.
- TMC, a signal is not being received.
- Message box.
- Small compass display which always indicates North.
- Next direction display.
- Current vehicle position.
- TMC Incident (Red Star).
-
Back one screen arrow.
-
Repeat last voice instruction.
- Split screen.
- POI - fuel station shown.
- The POI button will not be active if the zoom level is above 1 km (½ mile).
- Current street location.
- Normal screen.
- Screen mode selection.
- Menu
- Distance display.
- Zoom
MAP DISPLAY ICONS
The icons on the split screens are:

This is only displayed when a satellite signal is not being received.

This icon is displayed when TMC is selected and a signal is received.

When the bar is across the TMC, then a signal is not being received and TMC will not function.

Touching this icon toggles it with the N (North) icon (1). The compass always points North or else the vehicle direction arrow always points to the top of the map.
Distance and direction for the next turn.

If the compass icon (6) is showing, the vehicle direction icon (8) is always to the top of the map irrespective of where North is.

Example RDS-TMC Icon (this one showing incident).

Go back one screen.

Touch to repeat last voice instruction.

Example POI (this one showing a fuel station).

This icon shows information concerning journey distance and the estimated time remaining before arriving at your destination.
It also indicates your journey from your current position to the next waypoint or to your destination. In this example the journey is to your destination, shown in the top of the icon as the vehicle position arrow and a pointer towards a red circle.
This icon shows distance from your current position, distance and direction to way point 2.

This is your zoom button, enabling you to alter the map scale. The current level of zoom is shown between the two arrows (e.g. 2 miles). You may also see a zoom bar on the map.

This icon is toggled with the compass (6). When this is showing, North is always to the top of the map.

This icon is visible when the navigation screen has been scrolled away from the current vehicle position, so that the vehicle (compass) icon is no longer visible. Touch the icon to re-centre the screen on the current vehicle position.
Navigation system
Other icons


This displays a larger next junction guidance arrow on the right screen.

This facility is only available when travelling on a motorway and appears automatically to display the remaining motorway exits (up to the required exit for your route) and the exit numbers.


Automatically shows the next junction on the right of the screen.
JOL4528ENG
Other icons can be shown to select different views of the screen(s). Touch the button, arrowed above, to show the icons for selection.

Show full screen.

Show the split screen.

Show the compass.

List of forthcoming junctions and turn directions shown on the split screen.
Navigation system
SETTING A DESTINATION
After touching Agree, the initial map screen is displayed, now select Menu
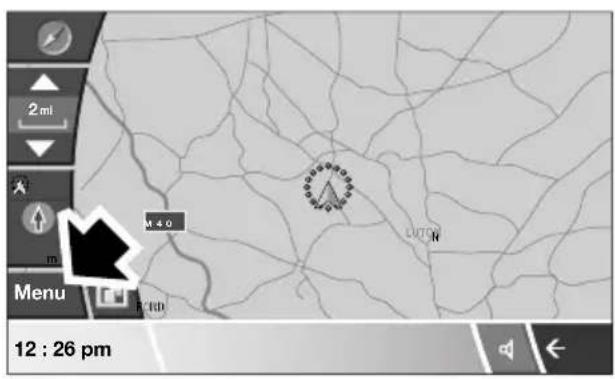

JOL4502ENG

JOL4503ENG
From the Navigation Menu, select Destination Entry.
Note: If you wish to view the map without the buttons showing, touch anywhere on the map display. To display the buttons, touch Menu.
If at any time you make a mistake, use the back arrow key on the lower right side of the screen to either go back one letter or number at a time or repeatedly touch it until the previous screen is shown.
The Destination Entry menu provides a choice of methods for entering a destination. For this example, the destination address, 81 Austin Place, Abingdon, Oxfordshire will be used.
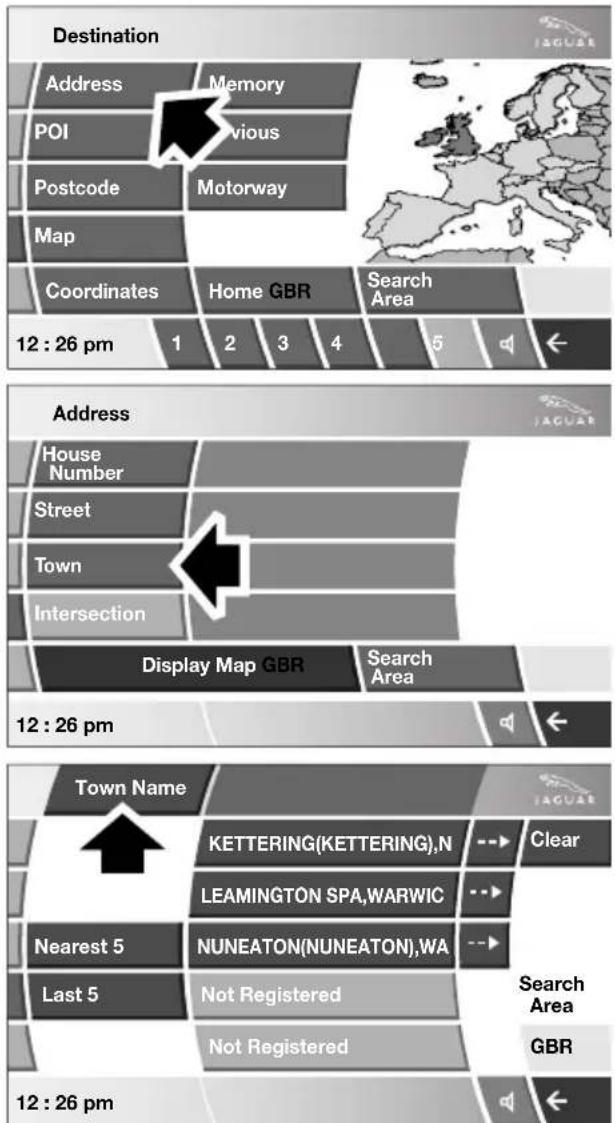
JOL4536ENG
From the Destination screen select Address and input the Town name.
Navigation system
Input the destination town name by touching the letters on the display. Only letters which are highlighted can be used. Delete incorrect letters by touching the back arrow.
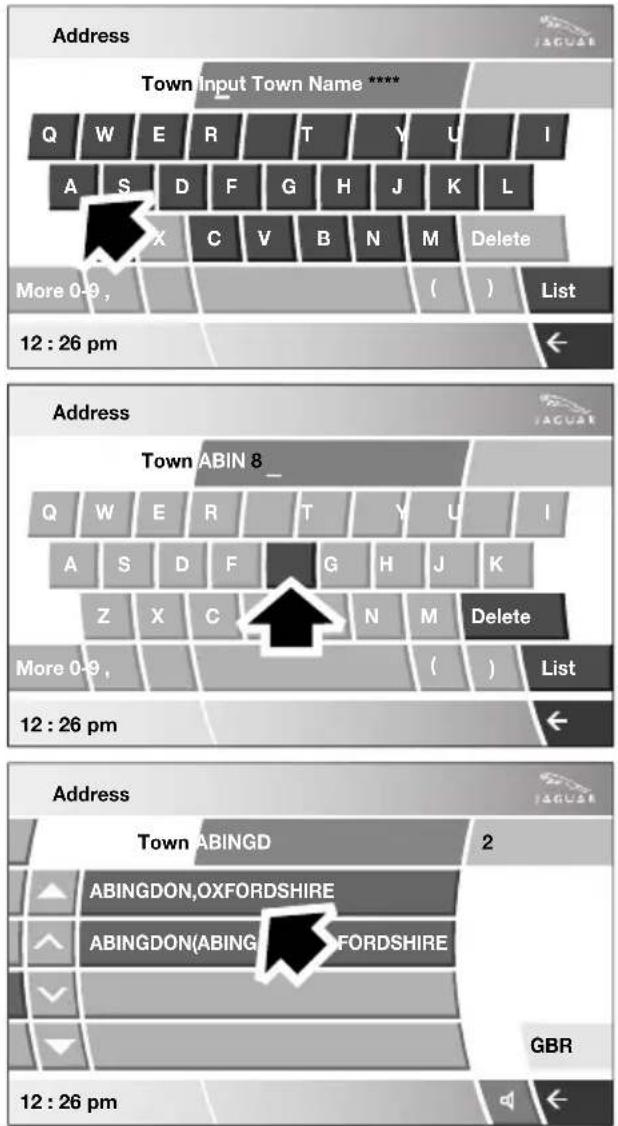
JOL4537ENG
Once sufficient letters have been inputted the system will display all the possible towns.
If necessary, use the scroll arrows to the left of the list to search up or down.
Select (touch) the town you require.
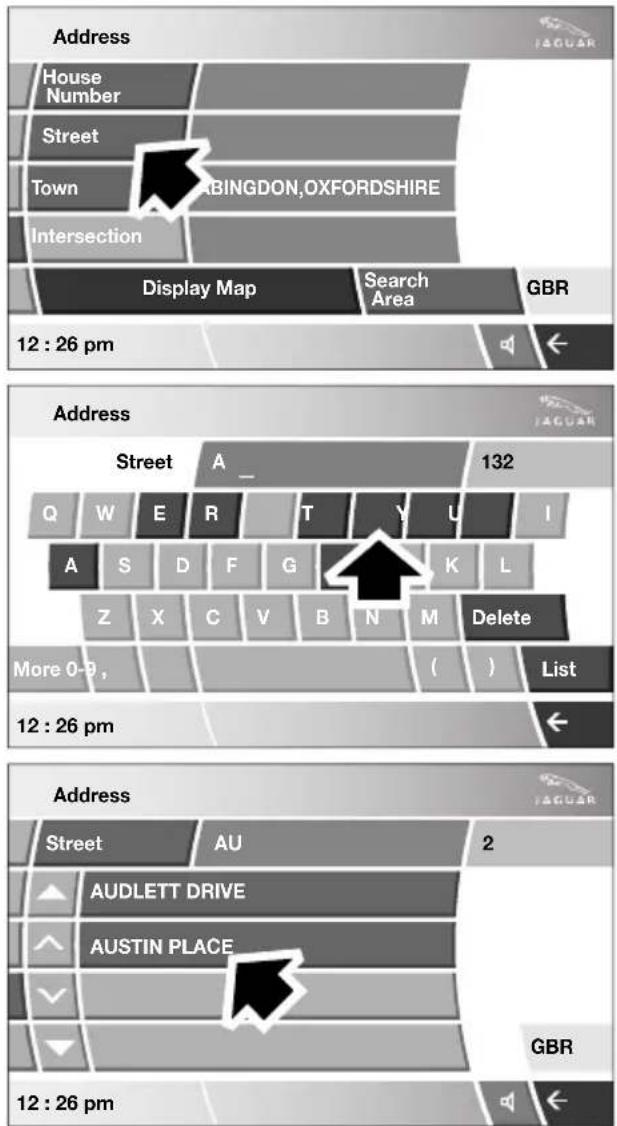
JOL4538ENG
Now enter the street name.
Once again, only letters which are available will be highlighted. When the system recognises enough letters, the street or a list of streets will be displayed.
Select the street you require.
Navigation system

JOL4539ENG

JOL4540ENG
The map screen showing the route settings and destination details is displayed.
Touch Route Prefs. (1) to change the route settings or Destination to start the route calculation. If a destination is already set, touch Waypoint to add a waypoint in the journey.
Enter the house number of the address (if known) then touch OK to confirm.
If the house number is not known, press OK (1) - the mid-point of the street is then used as the destination.
Note: If a list of house number ranges is displayed, select the applicable range and then enter the number.
Navigation system
ROUTE PREFERENCES
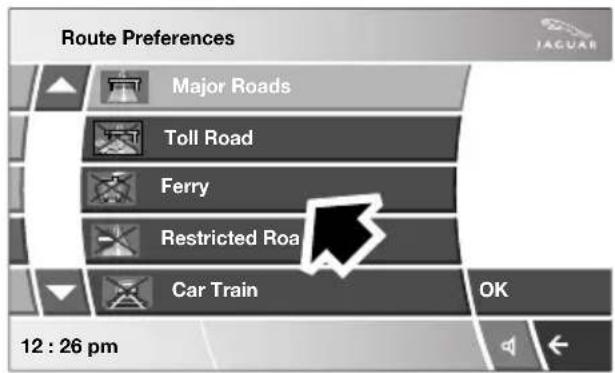

JOL4541ENG
If Route Prefs. is selected, the route preferences screen will be displayed. select the desired option(s) and select OK to confirm.
Note: Touch a dark blue band to select that feature or a light blue band to deselect it.
START GUIDANCE

JOL4542ENG
After touching Destination, the system will calculate the route.
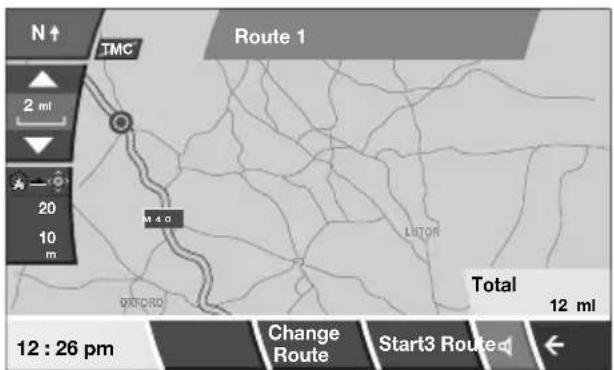
JOL4659ENG
There is now a choice to select 3 Route, Change Route or to Start navigation guidance.

JOL4669ENG
If 3 Route is touched, a choice of three different routes is displayed on the map.
Navigation system

JOL4672ENG
The roads on the map are drawn in three different colours to highlight each route.
Select route 1, 2 or 3 by touching the respective box displayed on the right side of the map.

JOL4670ENG
If Change Route is touched you will be given a menu to select from. Each menu item is described in detail this handbook.
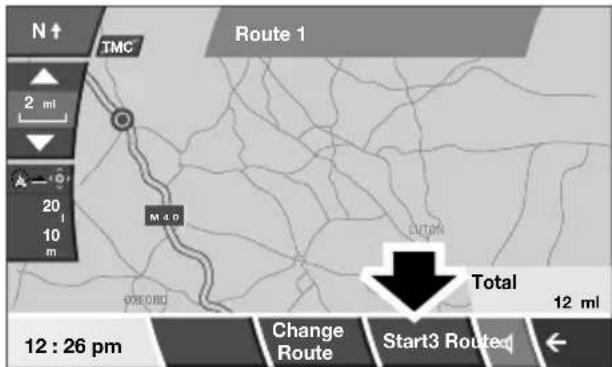
JOL4671ENG
When you have made your selection, if any, touch Start.

JOL4543ENG
The route will be highlighted on the map, with an arrow icon showing your current position and a circle within a red circle showing your destination. The road name/number is also listed in the text area below the map.
Drive away, following the voice guidance given by the system.

JOL4544ENG
As you approach a junction, in addition to the voice guidance, an inset on the map will display an enlarged view of the junction.
When your destination is reached, voice and visual confirmation is given.
VOICE GUIDANCE
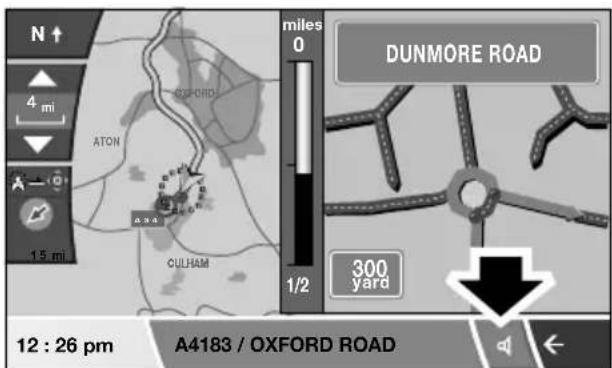
JOL4545ENG
The last voice guidance message can be repeated by touching the speaker icon in the lower right of the screen.
To turn voice guidance on or off but maintain route guidance proceed as follows:


JOL4504ENG
Go to the Navigation Menu, then select Auto Voice Guidance Off. This takes you to the User Settings menu.
If the panel is deep blue, Auto Voice Guidance is on, if the panel is light blue then it is muted. To change the voice guidance setting, touch the bar, then touch OK (1).
Note: The repeat voice guidance key (the speaker icon) is always available for use.
Navigation system
CANCEL GUIDANCE
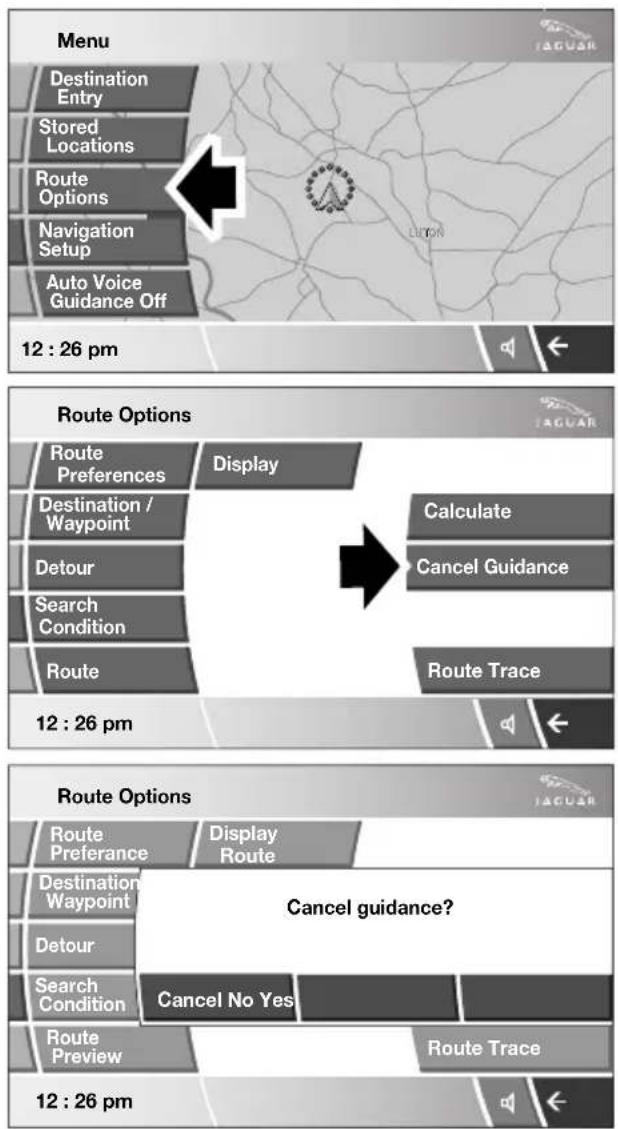
JOL4546ENG
To cancel guidance, touch the Menu button on the touch-screen, select Route Options and then Cancel Guidance.
QUICK POI SELECTION
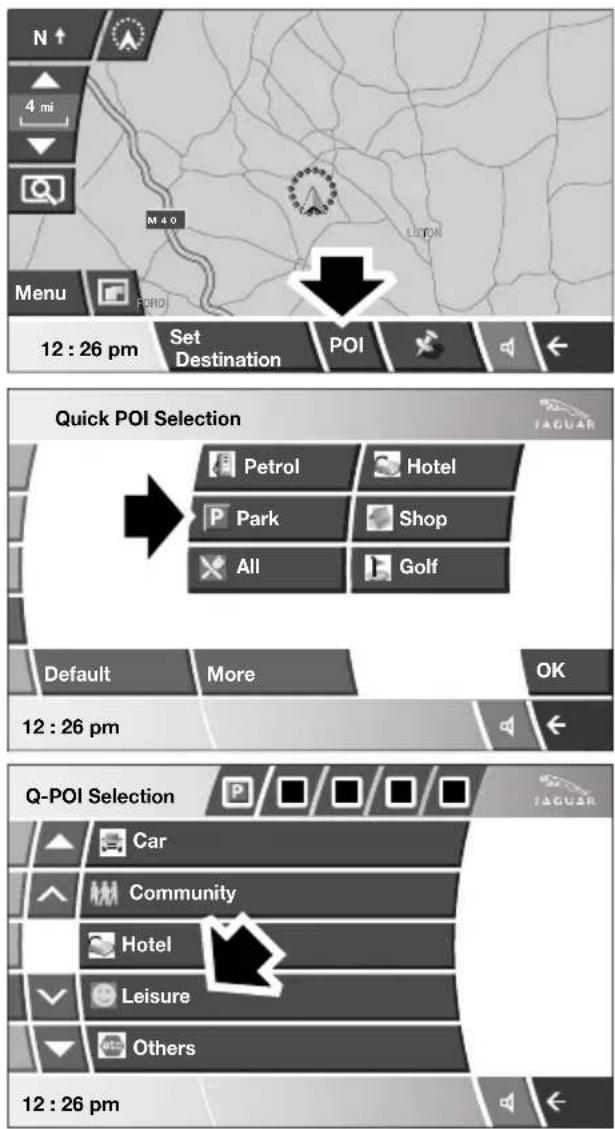
JOL4508ENG
Touch the Map screen to display the POI button. Touch the POI button. The screen shows six suggested categories that can be selected as quick points of interest.
Note: The POI button will not be active if the zoom level is above 1 km ( 12 mile).
Select a Quick POI category, or select More to see further POIs.
The map screen with the POI icon(s) is displayed. Select the five POIs you wish to see when the Quick POIs are displayed.
Navigation system
CALIBRATION
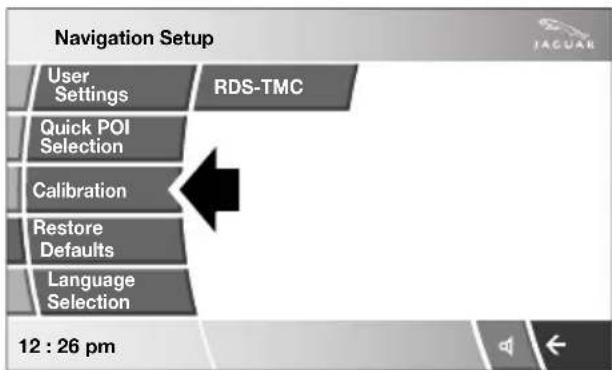


JOL4548ENG
If the vehicle has been moved, for example, by rail or trailer, the vehicle position/direction may need to be calibrated.
JOL4509ENG
The map showing the heading adjustment arrows is displayed. Adjust the heading by touching and using the arrows until the navigation symbol shows the correct alignment. Touch OK to confirm the new heading.
Navigation system
RESTORE SYSTEM DEFAULTS
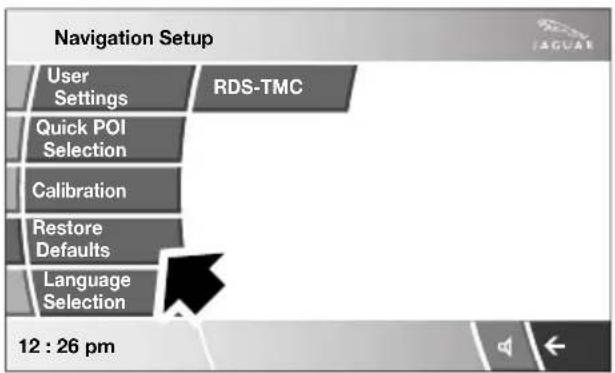

JOL4550ENG

If you have made any changes to the system default settings, speed settings etc. then using this menu will restore the original settings.
JOL4656ENG
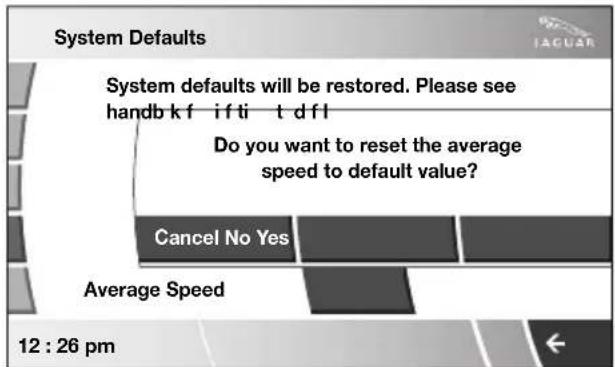
JOL4549ENG
LANGUAGE SELECTION

JOL4510ENG
Language change can be made from the map screen, or as shown above using the Navigation Setup menu.
MEMORY
From the navigation menu, select Stored Locations. This enables you to manage destinations such as, place of work, home, favourite restaurant or areas to avoid.
From the Stored Locations menu you can save up to 106 memory points, add your home address and save up to 10 areas to avoid.
For this example we will store the exit at the M69 motorway and on to the A5 major road to Nuneaton.


JOL4551ENG
Select Memory Points to add a memory point (stored location).
Touching any of the Stored Locations submenus, shown in the top illustration above, allows you to Add, Edit or Delete.
Note: The screen above appears in many of the navigation submenu selections.
Select Add to store a memory point.
Navigation system
To store a memory point
For this example we will choose a motorway exit.

JOL4552ENG

JOL4553ENG
We will choose a motorway exit on the M69. Touch the motorway letter M, then touch the numeric key (0 - 9) to change the keypad.
Enter 69.

JOL4554ENG
Choose Exit.

JOL4555ENG
Select an exit, for this example choose the A5.
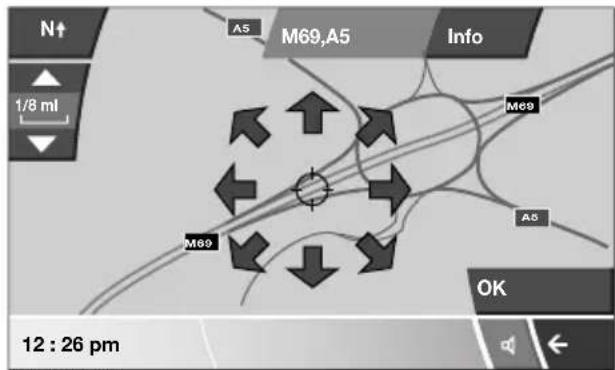
JOL4556ENG
The map shows the M69 and the A5. Touch OK.

JOL4557ENG
Select Nuneaton.
Navigation system

JOL4558ENG
Information on Destination/Waypoint entry is given elsewhere in this handbook. See DESTINATION ENTRY (page 356).
AVOID POINTS

JOL4559ENG
After a route has been selected you can set a single or a series of Avoid Points. Touch Avoid Points and the map is displayed. Using your finger, touch the map and drag it until the circle is over the area you wish to avoid.
Use the zoom bar if required to firstly enlarge the search area and, after moving the circle to the general area, zoom to precisely the area to avoid.

JOL4660ENG
Use the Reduce/Enlarge buttons to find the exact area you wish to avoid. Touch OK.

JOL4560ENG
The area to avoid is stored.
HOME
From the Stored Locations menu select HOME.
DESTINATION ENTRY
Setting a destination
From the Navigation Menu, select Destination Entry.
The Destination Entry menu provides a choice of methods for entering a destination.
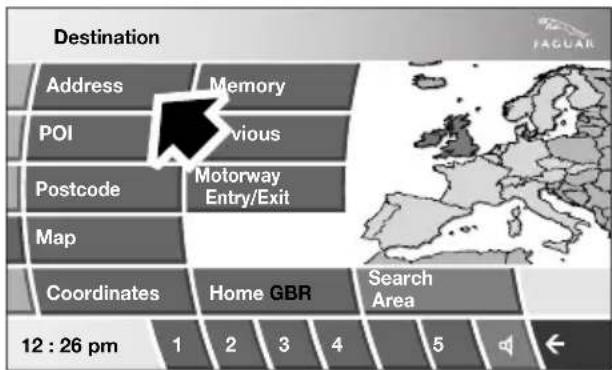
JOL4561ENG
Choosing your route

JOL4562ENG
Once the destination has been calculated options for your journey can be made by touching Route Prefs. or by selecting 3 Route or Change Route.
Information about altering your route preferences is given earlier in this handbook. See ROUTE PREFERENCES (page 347).
Start guidance
When the system has calculated the route, the map is displayed.
The route will be highlighted on the map, with an icon showing your current position. The road name/number is also listed in the text area.
If no destination is set, the Destination key is highlighted and Waypoint is greyed out (not selectable).
If a destination is set and no waypoint is set both Destination and Waypoint are highlighted.
Drive away, following the voice guidance given by the system. As you approach a junction, in addition to the voice guidance, an inset on the map will display an enlarged view of the junction.
When your destination is reached, voice and visual confirmation is given.
Points of interest
To set a POI as destination or a waypoint. See POINTS OF INTEREST (page 362).
POSTCODE
Not all countries have this facility. Enter the postcode of your waypoint or destination from the keypad. Ensure that any spaces and punctuation is as used in reality otherwise the system may not find it.
Postcode formats
The following is a list of countries where the navigation system provides full postcode entry:
- Austria
- Belgium
- Denmark
- France
- Germany
- Italy
- Spain
- Switzerland
- Luxembourg
• United Kingdom
The following is a list of countries where the navigation system provides reduced postcode entry:
- Netherlands - The four numeric digits only, e.g. 4817
- Sweden - Only the first three digits of the postcode can be entered, e.g. 162 00 must be entered as 162.
When the postcode has been entered touch OK.
MAP
After selecting map, the local area map is displayed. If the destination or waypoint is not shown on the map, use the zoom button to increase the area. By using your finger on the touch-screen move the circle to the area for your destination or waypoint, zooming in if required.
This location can be stored as a destination or waypoint.
COORDINATES
If you know the coordinates of your destination they can be entered from this screen. The full latitude must be entered first before the longitude coordinates can be entered.

JOL4564ENG

JOL4565ENG

JOL4566ENG
When the coordinates have been entered, touch OK.
If the coordinates entered are not contained within the area covered by the DVD, a message will be shown. This can also occur if the incorrect coordinates have been entered.
MEMORY
Points of interest (POI)

JOL4567ENG
Select POI Name, POI Near (1) or a Search Area (2) from the Destination menu screen.

JOL4568ENG

JOL4570ENG
Input the POI name using the keypad or select List to see the complete list of POIs.

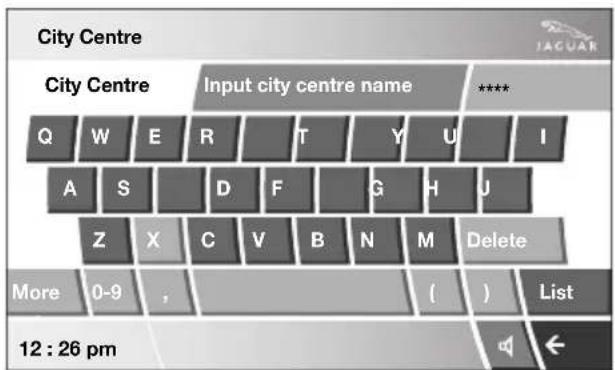
JOL4569ENG
Select the POI name, or select a search area such as a city centre to find the selected POI.
PREVIOUS
After selecting Previous from the menu, the screen shows a list of stored previous destinations. Select your destination, by touching the bar, and the details are displayed for confirmation.
Note: Whilst driving, list scrolling is not active. You can only choose from the items shown at the top of the list.
Navigation system
MOTORWAY
This enables you to select a motorway exit or entrance as a destination or as part of a route itinerary.
From Destination Entry select Motorway Entry/Exit.

JOL4552ENG
Enter the motorway name or number. In this example the M69 is selected with a destination of Nuneaton, exiting the M69 on to the A5.

JOL4553ENG

JOL4554ENG
Now select an entrance or exit.

JOL4555ENG
The screen gives all of the entrance or exit junctions on the M69. Choose the A5.

JOL4556ENG
The map showing the selected motorway and the selected exit junction is displayed.
Navigation system
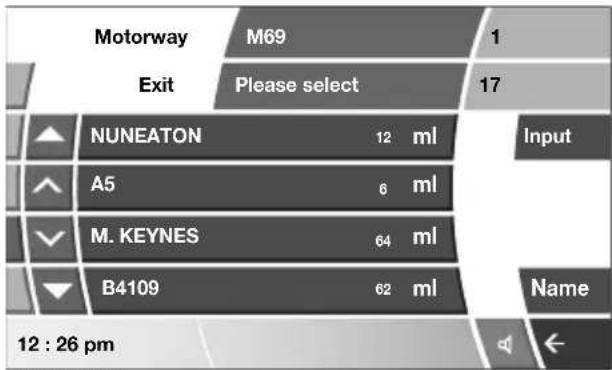
other
| Motorway | M69 | 1 | 17 | | :--- | :--- | :--- | :--- | | Exit | Please select | | | | ▲ | NUNEATON | 12 ml | Input | | ▲ | A5 | 6 ml | | | √ | M. KEYNES | 64 ml | | | ▼ | B4109 | 62 ml | Name | | 12 : 26 pm | | | ← |JOL4557ENG
Now Nuneaton is selected by touching the bar.

JOL4558ENG
The destination has now been set and the route is calculated.
COMPASS
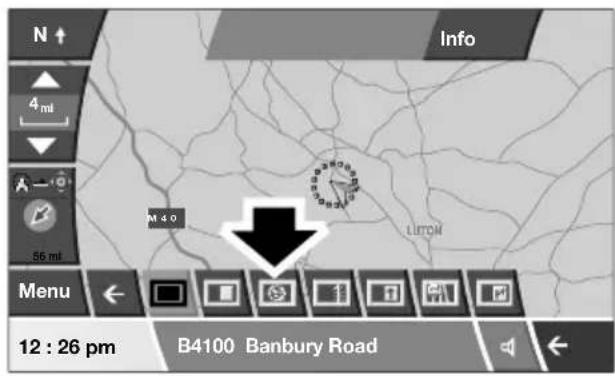

JOL4571ENG
Select the compass icon and the compass will be displayed.
Navigation system
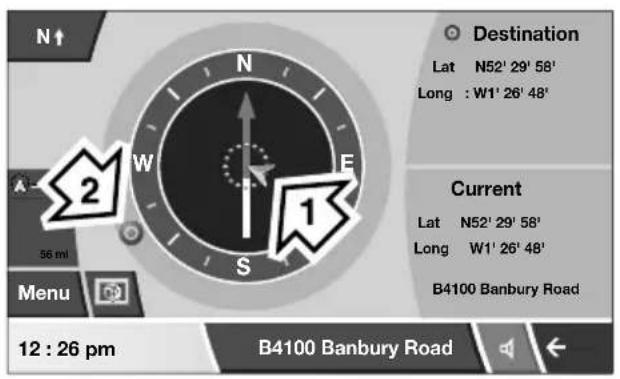

JOL4572ENG
The illustration above shows the map display always facing North. The car (1) position faces its compass direction of travel and item (2) is the destination or next waypoint.


JOL4573ENG
In this illustration the car (1) position faces upwards to the top of the map and item (2) is the destination or next waypoint.
POINTS OF INTEREST
The Navigation System DVD contains information about a large number of points of interest (POI). There are many categories of POI, including fuel stations, restaurants, railway stations and hospitals.
This chapter explains how to select a specific POI. A selected POI can be set as a destination.

JOL4584ENG
From the Destination Entry menu, select POI.
JOL4585ENG
Input the POI name, for example Petrol to display fuel stations on the map, or touch List for a list of POIs.
Note: If entering a POI name results in too many matches being listed, try entering the town name first. If you do not know the name of the POI you want, try selecting a POI category.
Alternatively, choose Category to see all categories of POI and make your selection.

JOL4586ENG
Use the scroll arrows to change pages.
Some POIs are sub-categorised, e.g. selecting Community will be further divided into:
• Community Centre.
• Exhibition Centre.
- Hospital.
- Park & Recreation.
- Town Hall
When the appropriate POI has been selected, the system begins to search for a route to that POI.
Note: POI icons can only be displayed up to the 1 km ( 12 mile) zoom level.
For this example, choose Petrol Station and 3D Petrol.

JOL4587ENG
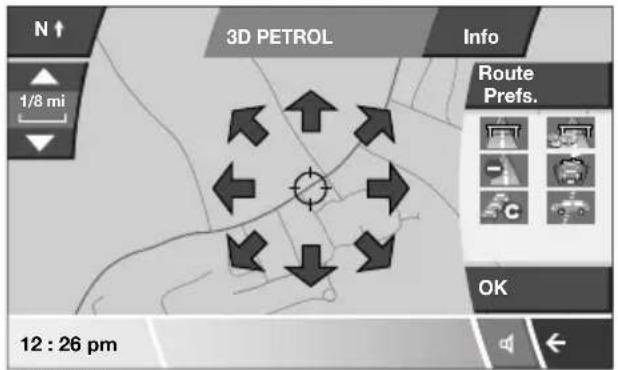
JOL4588ENG
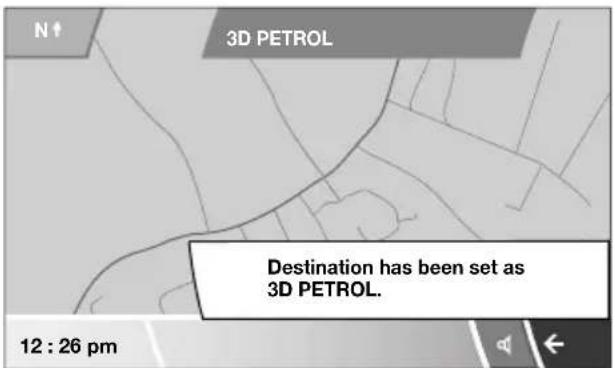
JOL4589ENG
Once the POI has been selected the route is determined. Touch Route Prefs. to change the route settings, or touch OK to start the route calculation.
The map screen showing the destination details and route settings is displayed.
POI ICON DISPLAY
After selecting a category, the map display shows the location of each POI in the selected category, indicated by the appropriate POI icon.
For information about a particular POI, touch the desired POI icon.
List of icons
Shopping

flowchart
graph TD
    A["Travel"] --> B["Shopping Centre"]
    B --> C["End"]

Navigation system

flowchart
graph TD
    A["Hotel"] --> B["Car"]
    B --> C["Car Rental"]
    C --> D["Jaguar Dealer"]
    D --> E["Parking"]
    E --> F["Petrol Station"]
    F --> G["Community"]
    G --> H["Community Centre"]
    H --> I["Exhibition Centre"]
    I --> J["Hospital"]
    J --> K["Park & Recreation"]
    K --> L["Town Hall"]
    L --> M["Others"]
    M --> N["etc"]
    N --> O["Historical Monument"]
    P["Leisure"] --> Q["Bowling Centre"]
    P --> R["Casino"]
    P --> S["Cinema"]
    P --> T["Golf Course"]
    P --> U["Ice Skating Rink"]
    P --> V["Music Club"]
    P --> W["Ski Resort"]
    P --> X["Sports Centre"]
    P --> Y["Tourist Attraction"]
    P --> Z["Vineyard"]
Navigation system
Others continued


Museum

Theatre

Town Centre

University/College
Restaurant


All Restaurants

Chinese


Fast Food

French

Italian

Japanese

Other Restaurants
CANCELLING POI ICON DISPLAY
If the display of POI icons is no longer required, they can be turned off as follows:
- Touch the map screen to display the additional buttons.
- Touch POI Off to cancel the display of POI icons on the map.
JAGUAR DEALERSHIP LOCATIONS
Details of Jaguar Dealerships are held on the Navigation System DVD as a points of interest (POI) category. Certain Dealers may be located in areas that are not fully mapped on the DVD. If a route is set to one of these Dealers, guidance may only be possible to the nearest town centre; a warning message will be displayed.
If Jaguar Dealerships (or certain other categories, such as airports) are selected, they will be displayed across all search areas.
ENTRY BY TOWN
If a town name is entered first, the points of interest listed will be restricted to that town.
- From the Input POI Name screen, touch Town.
• Enter the town name required. - Touch List to display the list of possible towns.
- Select the town required.
The Input POI screen is displayed again.
• Enter the POI name required.
ENTRY BY CATEGORY
If a POI category is selected first, the points of interest listed will be restricted to that category.
OTHER SELECTION METHODS
Town centres
The POI database holds town centre locations. To select a town centre, proceed as follows:
- From the Input POI Name screen, enter the town name required in the Name text area (do not select the Town button).
- Touch List to display the list of matches.
- For the town centre, select the entry showing the town name only.
Note: In some cases, more than one town centre location may be listed.
CATEGORIES AND SUB-CATEGORIES
The POI database is divided into a number of categories. Each main category is further divided into a number of sub-categories.
The first entry in the list of Restaurant sub-categories, is ALL. This selects all of the Restaurant sub-categories.
To narrow the search, touch the Town button. This will display the alpha keyboard, to allow the desired town name to be entered.
Search area
When searching the database, only points of interest in the current search area are included, except for the sub-categories marked All search areas in the POI category list.
List button
The List button becomes active, when the characters entered reduce the possible entries to a small enough number (the list is displayed automatically when the number of entries reduces to four or less).
You can also select List (when active) without entering a POI name. All the relevant points of interest will be displayed, e.g. in a selected town or category.
All button
The AII button returns to searching all categories after selecting one category.
POI ENTRY MESSAGES
While searching for points of interest, you may encounter one of the following messages:
- There are no POIs in this Category.
- No POIs Found in this Town.
QUICK POI SELECTION
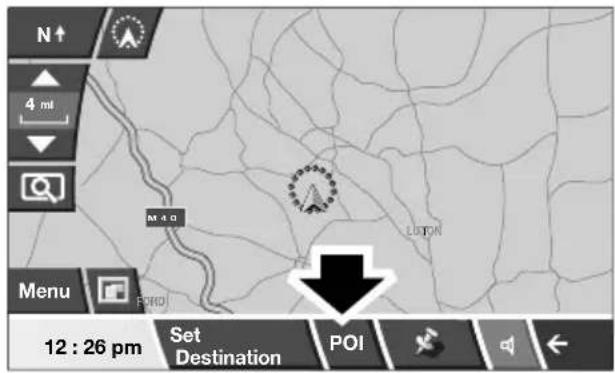

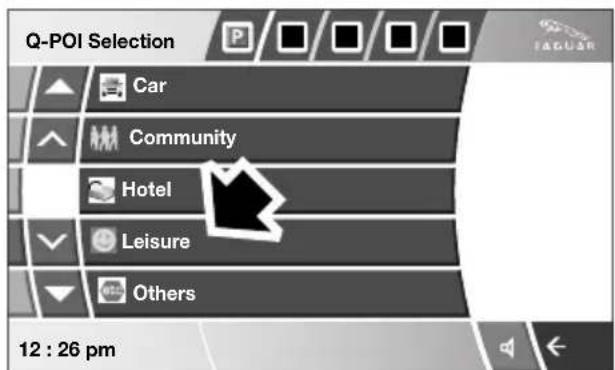
JOL4508ENG
A total of five POIs can be stored.
Changing the Quick POI Categories
The five default Quick POI categories can be changed as required.
- At the Map screen, touch anywhere on the map.
- Touch the POI button.
- Select the Quick POI category that you wish to replace.
The screen shows the full list of POI categories.
- Select the new category required from the list.
The screen shows the new selection of category icons.
- Repeat for another category icon if required.
- Touch OK to apply the new settings.
SELECTING A QUICK POI CATEGORY
- Touch the Initial Map screen, then touch the POI button. The screen shows six suggested categories that can be selected as quick points of interest.
Note: The POI button will not be active if the zoom level is below 1 km ( 12 mile).
- Select a Quick POI category. The map screen is displayed with POI icons.
Other categories
You can also select from the complete list of POI categories.
- Touch List Categories and select a category from the list displayed.
Local POI search
This selects the points of interest in all categories within 32 kilometres (20 miles) of the vehicle.
- Touch the All Local POIs button.
MEMORY POINTS
The procedure for using memory points is functionally the same as for using the Quick Points of Interest.
The map display shows the location of all stored memory points in view.
- For information about a particular memory point, touch the desired memory point icon.
After touching the memory point icon, the name of the selected memory point is displayed at the top of the screen.
Note: Unlike POIs, memory points are displayed at all zoom levels.
Memory point details
- Touch Info. to display the details of the selected memory point.
The details include Icon, Name, Position and Tel.
The telephone number can be called by touching the telephone button, if a Jaguar telephone is fitted.
The memory point details can be edited.
RDS-TMC OVERVIEW
Radio Data System-Traffic Message Channel (RDS-TMC) is a feature that announces traffic hold-ups on your route, as broadcast by radio stations that transmit TMC information.
Touch the RDS-TMC button on the Navigation Menu to access the TMC menu.
Touch the Change button - the system begins a search of all radio stations being received in your locality.
The tuner will scan the FM frequency once and this may take a few minutes. Searching will be displayed while scanning is in progress.
When a station is found which is offering TMC information, the RDS name is shown on the list and the search for more stations will continue.
Note: In the United Kingdom the station giving TMC information is Classic FM.
You can stop the search at any time and select any stations presented on the list, by touching the Change button or the button next to the desired station in the list.
RDS-TMC display
When a TMC signal is received the icon in the top left of the screen will appear gray. If a TMC signal is not being received, the icon will be shown with a bar through it.
The system will inform the driver of any roadworks, narrow road, contraflow, accidents, slippery road, diversion, information, parking information, congestion or other hazard.
The driver is informed of a traffic event as follows:
- A TMC Event icon shown on the map at the location of the event.
- Text can be displayed showing the details of each occurrence which can be selected either by touching the screen icon or from the traffic information list.
- Voice guidance will describe the event on the route. This information will be repeated when the repeat switch is selected.
- Dynamic route guidance, which calculates an alternative route when the system receives the traffic event warning affecting the route currently set in the navigation system.
- Traffic event list shows all events sorted by road name/ distance on your selected route in a straight line or along your actual route.
The information regarding the hold-up is maintained and updated even if the vehicle crosses into another country.
RDS-TMC icons
Any traffic event (broadcast on TMC) in your area, will be displayed as a warning icon on the map and an alert may be displayed as a message giving the road number(s) and between which junctions the hold-up or event occurs. Voice guidance will also inform you of the hold-up when an event icon exists on the current route.
This data is stored in the system for up to of 30 minutes.
The colour of the TMC icon changes in order to show the type and priority of a TMC event. The background colour of the icon returns to normal when there is no longer an event or hold-up, or if any re-route instructions are calculated.
The TMC Event icons appear on the navigation map display to indicate the location and nature of a TMC event.
TMC Event icons will appear on the map, even if the event does not occur on your route.
Level 1 TMC event icons

Incident (Red star)

Moving Tailback Ahead (Red arrow)

Moving Tailback Both Carriageways (Red double arrow)

Slow Traffic Ahead (Yellow arrow)

Slow Traffic Both Carriageways (Yellow double arrow)

Information (Yellow circle)

Incident (Yellow star)

Stationary Traffic Ahead (Red arrow pointing on line)

Stationary Traffic Both Carriageways (Red double arrow pointing on line)
Note: Single arrow icons indicate that the traffic event affects traffic travelling in the direction of the arrow. Double arrows indicate that both directions are affected.
Level 2 TMC event icons

Other Hazard (Yellow)

Roadworks (Pink)

Narrow Road (Pink)

Contraflow (Pink)

Accidents (Pink)

Slippery Road (Yellow)

Diversion (Yellow)

Parking Information (Grey)

Information (Gray)

Congestion (Red)
USING TMC
Dynamic route guidance
Dynamic route guidance will calculate an alternative route to avoid a traffic event when the system receives an event warning.
The system calculates a new route for all sections. However, if any way points are set, the system calculates for the next way point.
If the event on route is serious (closed road) or if the new route is shorter than the current one and the current one was not recalculated within the last 5 minutes, then a message to confirm the new route will be displayed. This pop-up message will be displayed for 10 minutes and if the new route is not rejected, then the vehicle will follow the new route.
Voice guidance
While voice guidance is on, the system will give audio guidance for traffic events on route.
If the on route icon is touched, with audio guidance switched on, the audio message will be repeated. If the icon is grey, the audio guidance function has been switched off and touching the icon will not repeat any message.
After the vehicle passes the event, you will be notified of the next nearest event on route.
Audio messages are not given if you are in that event.
Traffic on route

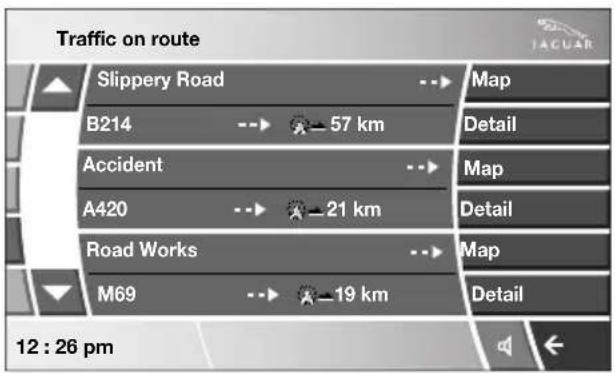
JOL4655ENG
While the vehicle is on the guidance route, the system will generate a traffic event list for that route when you touch the Traffic on Route screen button.
If a route is calculated but the vehicle is not on the highlighted route, a pop-up is displayed with an error message.
On route event icon
The on route event icon will show a traffic event as a line of stationary vehicles with the distance to the start point of the event. Touch the icon to repeat audio guidance (when audio guidance is switched on).
The icon will be displayed on the map with the following conditions:
- The map scale is between 50 metres and 4 km (1/32 mile and 2 miles).
- RDS-TMC setting is on and there are some events on the route.
The on route event icon will show the nearest event on the route and the distance to the event.
All traffic events
When the All Traffic Events button on the RDS-TMC setting screen is touched, all traffic events are listed by road name. If an event occurs on more than one road of your route, the system will list it with the first road name.
Each event is seen as text information from the menu.
While the list is being displayed the information is not updated.
When you select a road the system shows traffic events, if there are any, with the basic information.
Note: The maximum text length displayed is 24 characters.
The basic information screen shows:
- Road number.
- Brief information of the event.
- Direction and distance to the start point of the event (in a straight line).
Up to 20 events can be shown in distance order from the current vehicle position. If the event list is longer than three the remaining can be seen by scrolling the screen.
When the Map button is touched, the map screen will display the place of the event start point. The scale is always 500 metres (1/4 mile). If the event has finished, the map screen will still be displayed when the Map button is touched but no event icon will be shown on the map.
When the Detail button is touched, the system shows the detail of that event.
Navigation system
SURVEILLANCE SETTING
If you frequently travel through an area that is subject to slow or stationary traffic, it is possible to set a surveillance area which can be viewed at any time.
Up to three areas can be set for this surveillance.
RDS-TMC radio data for the selected surveillance area must be available and TMC must be enabled in order to show TMC events in this area

JOL4661ENG
From the Navigation Setup menu select RDS-TMC.

JOL4662ENG
Select Surveillance Setting.

JOL4663ENG
Select Add.
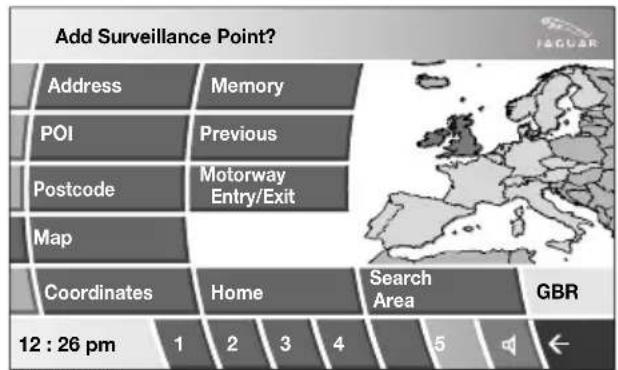
JOL4664ENG
Choose any of the methods above to select a surveillance area.

JOL4665ENG
If you select Map you can position the area accurately by zooming in using the binoculars icon (arrowed).

JOL4666ENG
Choose to save as any one of the three choices.

JOL4667ENG
The map will display the saved area.
USING VOICE CONTROL
JaguarVoice allows many of the navigation features to be activated by voice commands.
The system is controlled by the switch on the left-hand side of the steering wheel.
Briefly press the switch on the steering wheel (arrowed) and after the tone, speak one of the system commands.
In response to your command, the system will repeat your instruction and Listening will appear in the message centre. The system will either carry out your command or ask for more information. If the system asks for more information, wait until the tone has sounded before replying.

natural_image
Interior view of a car steering wheel with brand logo and control buttons (no readable text or symbols)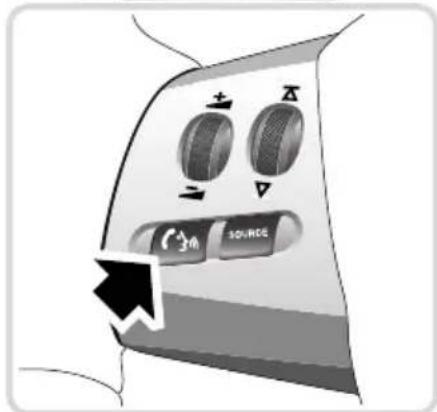
E95902
To cancel a voice control session, press and hold the switch on the steering wheel.
The voice control system understands pre-defined commands, which need to be spoken word for word. A list of all navigation voice commands is given in the following table.
Nametags
Information on nametags is given earlier in this handbook. See VOICE CONTROL (page 69).
Message centre messages
A number of responses by the navigation voice system are reinforced by text messages appearing in the message centre display.
NAVIGATION SYSTEM VOICE COMMANDS
| Voice command System response | |
| NAVIGATION HELP Gives spoken information about the navigation commands. | |
| NAVIGATION VOICE GUIDANCE ON | Switches on voice guidance for a set route. |
| NAVIGATION VOICE GUIDANCE OFF | Switches off voice guidance for a set route. |
| NAVIGATION SHOW MAP Displays the navigation map on the touch-screen | |
| NAVIGATION SHOW TURN LIST GUIDANCE | Lists forthcoming junctions and turn directions on the split screen. |
| NAVIGATION SHOW CURRENT POSITION | Shows current position of vehicle on the map. |
| NAVIGATION SHOW DESTINATION | Shows a route preview and allows you to fast forward to the end. |
| NAVIGATION SHOW ENTIRE ROUTE MAP | Shows complete route. |
| NAVIGATION SHOW ARROW GUIDANCE | Changes right-hand side of split screen to show arrow guidance directions. See COMPASS (page 360). |
| NAVIGATION SHOW CROSSROADS GUIDANCE | If there is a crossroads within 500 metres (1640 feet), the right-hand side of split screen changes to show crossroad guidance directions. If there are no crossroads, a voice message There are no nearby crossroads on the set route will be given. |
| NAVIGATION SHOW MOTORWAY GUIDANCE | When travelling on a motorway, changes right-hand side of split screen to show the remaining motorway exits, and their numbers, up to the required exit for the route. |
| NAVIGATION DUAL MAP MODE Displays split screen view. | |
| NAVIGATION SINGLE MAP MODE | Shows full screen map. |
| NAVIGATION SHOW NORTH UP Changes orientation of the map so that North is at the top of the screen. | |
| NAVIGATION SHOW HEADING UP | Changes orientation of the map so that the vehicle is always heading up the screen. A compass in the top left-hand corner will point to North. |
| NAVIGATION SHOW RIGHT MAP NORTH UP | Changes orientation of the right-hand map so that North is at the top of the screen. |
| NAVIGATION SHOW RIGHT MAP HEADING UP | Changes orientation of the right-hand map so that the vehicle is always heading up the screen. |
| NAVIGATION ZOOM IN MAXIMUM | Displays the map (left-hand map in split screen mode) at the maximum magnification. |
Navigation system
| Voice command System response | |
| NAVIGATION ZOOM OUT MAXIMUM | Displays the map (left-hand map in split screen mode) at the minimum magnification. |
| NAVIGATION RIGHT MAP ZOOM IN MAXIMUM | In split screen mode, displays the right-hand map at the maximum magnification. |
| NAVIGATION RIGHT MAP ZOOM OUT MAXIMUM | In split screen mode, displays the right-hand map at the minimum magnification. |
| NAVIGATION ZOOM LEVEL (NUMBER) | Allows you to specify the level of magnification of the map (left-hand map in split screen mode). A selection of between 1 and 13 can be made, e.g. voice commandNavigation zoom level eleven, will set the magnification level accordingly. |
| NAVIGATION ZOOM IN (NUMBER) | Allows you to zoom in on the map (left-hand map in split screen mode) according to the user specified increment (a selection of between 1 and 12 can be made). If the current zoom level is five, the voice commandNavigation zoom in two, will cause the system to zoom in to level three. |
| NAVIGATION ZOOM OUT (NUMBER) | Allows you to zoom out on the map (left-hand map in split screen mode) according to the user specified increment (a selection of between 1 and 12 can be made). If the current zoom level is five, the voice commandNavigation zoom out two, will cause the system to zoom out to level seven. |
| NAVIGATION RIGHT MAP ZOOM IN (NUMBER) | Allows you to zoom in on the right-hand map. A selection of between 1 and 12 can be made, e.g. If the current zoom level is five, the voice commandNavigation zoom in two, will cause the system to zoom in to level three. |
| NAVIGATION RIGHT MAP ZOOM OUT (NUMBER) | Allows you to zoom in on the right-hand map. A selection of between 1 and 12 can be made, e.g. If the current zoom level is five, the voice commandNavigation zoom out two, will cause the system to zoom out to level seven. |
| NAVIGATION GO HOME | Sets the destination to your currently set Home. Home location can be stored using the Stored locations option, available from the Navigation menu on the touch-screen. |
| NAVIGATION GO TO NAME | The system will respond withName pleaseand you can specify a previously stored nametag either as a destination or a waypoint. |
| NAVIGATION GO TO PREVIOUS DESTINATION | Allows you to specify a previously stored destination either as a new destination or a waypoint. If you are following route guidance, and this is the last destination set, this will be your current destination. |
Navigation system
| Voice command System response | |
| NAVIGATION GO TO PREVIOUS STARTING POINT | Allows you to specify the start point of a previous route either as a destination or a waypoint. If you are following route guidance, and this is the last start point set, this will be your current start point. |
| NAVIGATION SHOW (NEXT, 1ST, 2ND, 3RD, 4TH, 5TH) WAYPOINT | Displays the waypoint asked for, provided it has been set. |
| NAVIGATION DELETE NEXT WAYPOINT | Deletes the next waypoint from the route and recalculates the route if appropriate. |
| NAVIGATION DETOUR | This command prompts the navigation system to propose a detour in the route being followed. This takes effect from your current position and the length of the detour can be specified in Route Preferences. SeeROUTE PREFERENCES(page 347). |
| NAVIGATION DETOUR ENTIRE ROUTE | This command prompts the navigation to offer one of the alternative routes calculated for the current destination. |
| NAVIGATION CANCEL GUIDANCE | Cancels route guidance. |
| NAVIGATION AVOID MAJOR ROADS | Ensures that routes are calculated avoiding major roads. |
| NAVIGATION PREFER MAJOR ROADS | Ensures that major roads are included when routes are calculated. |
| NAVIGATION AVOID TOLL ROADS | Ensures that routes are calculated avoiding toll roads. |
| NAVIGATION PREFER TOLL ROADS | Ensures that toll roads are included when routes are calculated. |
| NAVIGATION AVOID FERRIES | Ensures that routes are calculated avoiding ferries. |
| NAVIGATION PREFER FERRIES | Ensures that ferries are included when routes are calculated. |
| NAVIGATION PLAY DIRECTORY | Prompts a voice message giving all the navigation nametags. This can be interrupted by pressing the voice control button and, after the tone, sayingREPLAY, GO TO, DELETE or CANCEL. |
| NAVIGATION DELETE DIRECTORY | Delete the entire directory of navigation nametags. |
| NAVIGATION MARK CURRENT POSITION | Marks the vehicle's current position as a memory point. |
| NAVIGATION DYNAMIC GUIDANCE ON | Switches on dynamic route guidance. |
| NAVIGATION DYNAMIC GUIDANCE OFF | Switches off dynamic route guidance. |
Navigation system
| Voice command System response | |
| NAVIGATION SHOW TRAFFIC INFORMATION | Displays Traffic information. |
| NAVIGATION HIDE TRAFFIC INFORMATION | Hides Traffic information. |
| NAVIGATION STORE NAME Allows you to store nametags for waypoints or destinations. Each nametag must meet the following criteria:Be spoken in more than 0.4 seconds, but less than four seconds.Not similar to any other nametag.Once stored, you must always speak the name in the same manner as during storage.If the criteria is not met, the system will supply one of the following feedback:Name too short, new name please.Name too long, new name please.(nametag) sounds too much like (another nametag).The names entered are different, new name please. | |
| NAVIGATION (POI) Provided that the map magnification is at 1 km (0.6 mile) or less, this voice command allows you to select up to five Points Of Interest (POI) from the list below.PetrolParkingTown centreHotelHospitalGolf courseShoppingRestaurantI'm hungryTourist informationJaguar (Dealer) - not AustraliaMotorway servicesIf more then five POIs are selected, a feedback message ofNavigation POI offwill be heard. Clear your current selection to allow further POIs to be displayed. | |
| NAVIGATION POI OFF Hides all the POI icons. | |
ORDNANCE SURVEY DATA
Please read this agreement carefully before using the Navigation System.
This is a licence agreement to use the Ordnance Survey (OS) Code-Point data incorporated in the Navigation System. By using this Code-Point data you accept and agree to all the terms and conditions below.
Ownership
The OS Code-Point data is licensed by Ordnance Survey with permission of Her Majesty's Stationery Office.
© Crown Copyright. All rights reserved.
Licence grant
OS grants you a non-exclusive licence to use your copy of the OS Code-Point data for your personal use solely as part of the Navigation System. You may transfer the licence to a subsequent purchaser of the vehicle with which the Navigation System is supplied, provided that the purchaser agrees to abide by each of the terms of this licence.
Licence Terms
These licence terms are governed by English Law and are subject to the exclusive jurisdiction of the English courts.
Limitations of use
The OS Code-Point data is restricted for use in the specific system for which it was created. Except to the extent explicitly permitted by mandatory applicable laws, you may not extract or re-utilise any part of the contents of the OS Code-Point data, not reproduce, copy, modify, adapt, translate, disassemble, decompile, or reverse engineer any portion of the OS Code-Point data.
Limitation of liability
Ordnance Survey does not warrant or represent that any of the Code-Point data is accurate, error-free or suitable for your purposes. In no event shall OS or the supplier of the Navigation System using the OS Code-Point data be liable for any consequential, special, incidental or indirect damages for any direct or indirect loss of revenue, profits, business, data, or use, incurred by you or any third party arising out of your use of the OS Code-Point data, whether in an action in contract or tort (including negligence and breach of statutory duty) or otherwise, even if OS or the supplier of the Navigation System has been advised of the possibility of such damages. In any event, OS's liability for direct damages is limited to the price of the copy of the OS Code-Point data. Nothing in these licence terms shall operate to exclude or limit any liability which cannot be excluded or limited by law.
THE DISCLAIMER OF WARRANTY AND LIMITATION OF LIABILITY, SET FORTH IN THIS AGREEMENT, DO NOT AFFECT OR PREJUDICE YOUR STATUTORY RIGHTS WHERE YOU HAVE ACQUIRED THE DATABASE OTHERWISE THAN IN THE COURSE OF A BUSINESS.
NAVTEQ CORPORATION
Please read this agreement carefully before using the Navigation System.
This is a licence agreement for your copy of the Navigable Map Database, (the 'DATABASE') originally made by NAVTEQ Corporation), used in the Navigation System. By using this DATABASE you accept and agree to all the terms and conditions below.
Ownership
The DATABASE and the copyrights and intellectual property or neighbouring rights therein are owned by NAVTEQ Corporation or its licensors.
Licence grant
NAVTEQ Corporation grants you a non-exclusive licence to use your copy of the DATABASE for your personal use or for use in your business' internal operations. This license does not include the right to grant sub-licenses.
Limitations of use
The DATABASE is restricted for use in the specific system for which it was created. Except to the extent explicitly permitted by mandatory applicable laws, you may not extract or re-utilise substantial parts of the contents of the DATABASE, not reproduce, copy, modify, adapt, translate, disassemble, decompile, or reverse engineer any portion of the DATABASE.
Transfer
You may not transfer the DATABASE to third parties, except together with system for which it was created, provided that you do not retain any copy of the DATABASE, and provided that the transferee agrees to all terms and conditions of this agreement.
Disclaimer of warranty
NAVTEQ Corporation does not warrant or make any representations regarding, either express or implied, regarding the use or results of the use of the DATABASE in terms of its correctness, accuracy, reliability, or otherwise and expressly disclaims any implied warranties of quality, performance, merchantability, fitness for a particular purpose or non-infringement.
NAVTEQ Corporation does not warrant that the DATABASE is or will be error-free. No oral or written information or advice provided by NAVTEQ Corporation, your supplier or any other person shall create a warranty.
Limitation of liability
The price of the DATABASE does not include any consideration for assumption of risk of consequential, indirect or unlimited direct damages which may arise in connection with your use of the DATABASE.
Accordingly, in no event shall NAVTEQ Corporation or supplier of the navigation system using the DATABASE ('Supplier') be liable for any consequential, special, incidental or indirect damages, including without limitation, loss of revenue, data, or use, incurred by you or any third party arising out of your use of the DATABASE, whether in an action in contract or tort or based on a warranty, even if NAVTEQ Corporation or the Supplier has been advised of the possibility of such damages. In any event, NAVTEQ Corporation's liability for direct damages is limited to the price of your copy of the DATABASE.
THE DISCLAIMER OF WARRANTY AND LIMITATION OF LIABILITY, SET FORTH IN THIS AGREEMENT, DO NOT AFFECT OR PREJUDICE YOUR STATUTORY RIGHTS WHERE YOU HAVE ACQUIRED THE DATABASE OTHERWISE THAN IN THE COURSE OF A BUSINESS. Some states and laws do not allow the exclusion of implied warranties, so the above disclaimer may not apply to you.
WARNING

The DATABASE reflects reality as existing before you received the DATABASE and it comprises data and information from government and other sources, which may contain errors and omissions. Accordingly, the DATABASE may contain inaccurate or incomplete information due to the passage of time, changing circumstances, and due to the nature of the sources used. The DATABASE does not include or reflect information on - inter alia - neighbourhood safety; law enforcement; emergency assistance; construction work; road or lane closures; vehicle or speed restrictions; road slope or grade; bridge height, weight or other limits; road or traffic conditions; special events; traffic congestion; or travel time.
Government end users
If the DATABASE is for a region of North America and is being acquired by or on behalf of the United States government or any other entity seeking or applying rights similar to those customarily claimed by the United States government, the DATABASE is licensed with ‘limited rights’.
Utilization of the DATABASE is subject to the restrictions specified in the ‘Rights in Technical Data and Computer Database’ clause at DFARS 252.227–7013, or the equivalent clause for non-defence agencies. Manufacturer of the DATABASE of North America is NAVTEQ Corporation, 10400 W. Higgins Road, Suite 400, Rosemont, Illinois 60018, USA.
EUROPEAN DECLARATION OF CONFORMITY
CE Hereby, DENSO CORPORATION declares that this DN-NS-019 is in compliance with the essential requirements and other relevant provisions of Directive 1999/5/EC.
A
ABS driving hints 144
ACC 159
Accessories.... 14
Adaptive cruise control 159
Adaptive cruise control (ACC) principle of operation ..... 159
Adaptive dynamics 172
Adjusting the headlamps. 78
Adjusting the steering wheel 67 entry and exit mode 67
Advanced emergency brake assist ..... 165
AFS 79
Air vents 115
rear vents 115
Airbag labels 58
Airbag service information 58
Airbag warning lamp 57
Alarm trigger information 39
Alarm sensor override.... 22
Approach lamps 81
Arming 19
Arming the alarm .... 37 alarm indicator .... 38 battery-backed sounder .... 38 full alarm.... 37 perimeter alarm .... 37
ASL 167
Audible warnings and indicators ..... 104
Audio portable interface 131
Audio control.... 69, 272 sound settings .... 272
Audio controls. 282 steering wheel controls. 282
Audio unit overview.... 269 audio controls.... 269 sound system overview.... 270
Autolamps.... 76 exit delay.... 77 windscreen wiper detection .... 76
Automatic climate control .... 116
controls .... 116
touch-screen operation.... 119
Automatic speed limiter 167
Automatic speed limiter (ASL) principle of operation ..... 167
Automatic transmission ..... 137
automatic mode ..... 139
JaguarDrive selector ..... 137
limp-home mode ..... 143
manual mode ..... 141
message centre display ..... 143
sport mode ..... 140
starting ..... 139
Autostore control .... 274 Auxiliary connections .... 299 connecting a USB device .... 300 connecting an auxiliary device .... 301 connecting an iPod .... 300 connecting more than one device .... 301 portable audio overview .... 299
Auxiliary input devices ..... 302 displaying track information..... 303 playing a portable device ..... 302 portable device settings ..... 306 searching a portable device ..... 304
Auxiliary power sockets ..... 125
B
Battery charging faults 213
Battery care .... 212 Battery Monitoring System (BMS) .... 213
Battery charging ..... 215 Battery warning symbols ..... 212
Blind spot monitor....97 sensor blockage....98 system fault....98
Block heaters .... 134
Bonnet lock 195
Booster cables 214
Booster cushions 61
Brake fluid check 206 checking the fluid level. 206 topping up the fluid 207
Brakes brake pads .... 144 pad wear warning.... 144 principle of operation .... 144
Bulb changing 83
direction indicator bulb (front) ..... 84
headlamp unit bulbs 83
high level brake lamp 86
number plate lamp bulb 86
rear lamp bulbs.... 85
side lamp bulb 85
side repeater lamp 85
Bulb specification chart 87
C
Cancel guidance 350
Car wash 187
Cautions 9
Changing a bulb 83
general information.... 83
Changing a fuse. 241
checking or renewing a blown fuse... 241
Changing a road wheel 225
locking wheel nuts 226
spare wheel location 226
temporary use spare wheel 225
tightening the wheel nuts 229
wheel changing procedure 228
wheel changing safety. 227
Changing the remote control battery ..... 24
Changing the vehicle battery ..... 215
battery disposal.... 215
Changing the wiper blades 91
changing the wiper blades 92
service position.... 91
Channel automatic tuning 284
Channel options. 284
DAB search 286
finding a channel. 285
finding a subchannel.... 285
finding an ensemble 286
Charging the vehicle battery 215
Checking the wiper blades. 90
Child safety locks 65
Child seat anchor points 62
installing an ISOFIX child seat. 63
ISOFIX anchor points 62
tether anchorage points 64
Child seat positioning 60
Child seats 59
child restraint check list 60
Cleaning the alloy wheels 187
Cleaning the exterior. 187
bird droppings ..... 189
cleaning the rear screen ..... 189
glass surfaces 189
polishing 189
removing grease and tar. 189
underbonnet cleaning....188
using an automatic wash ..... 188
washing the vehicle paintwork ..... 187
Cleaning the interior 189
airbag module covers....191
carpet and mats 191
cloth and fabric 190
instrument pack, clock, and audio equipment 190
leather 190
removing stains 190
seat belts 191
Climate seats 48
backrest ventilation only....48
cooled ventilation 48
heated ventilation 48
Clock....124
setting the clock as the screensaver...124
Compact disc display options. 296
Compact disc pause 295
Compact disc player
CD compatibility....292
loading CDs 292
Compact disc selection. 294
Compass view. 360
Condensation - lamps. 76
Controls overview 12
Coolant check 204
Cornering lamps 79
Cruise control ..... 74, 156 principle of operation ..... 156
Cup holders 126
twin cup holder 127
D
Destination entry. 356
choosing your route 356
coordinates. 357
map 357
memory 358
motorway 359
points of interest. 356
postcode.... 357
previous 358
setting a destination 356
start guidance 356
Diesel particulate filter (DPF).... 135
regeneration 135
regeneration procedure. 136
warning indicators and messages.... 135
Digital audio broadcasting general information.... 280
Dimensions 260
brake pedal travel (China only) ..... 261
wheel alignment data (China only) . . . 261
Dipstick - electronic 199, 202
Direction indicators 78
Disability modifications 11
Disarming 18
Disarming the alarm 38
deactivating the alarm when triggered . 38
disarming when the unlock button fails to work 38
Display options 283
DAB radio text. 283
touch-screen information panel ..... 283
Docking the Jaguar Smart Key 20
DPF 135
Drive control general information.... 169
Driving after a collision 251
before starting or driving 251
resetting the fuel cut-off 251
when driving.... 252
Dynamic mode 170
E
Economical driving....155
driving tips for economy ..... 155
maintenance and fuel economy ..... 155
E-Diff (differential) 172
Ejecting compact discs....294
Electric parking brake (EPB) ..... 146
Electric seats 42
driving position memory 43
Electric sunroof 121
anti-trap mechanism ..... 121
calibration 122
operation 121
sunroof blind 122
Electric windows 93
one-shot operation....93
overriding anti-trap protection ..... 93
window isolator 94
window reset 93
Emergency brake assist (advanced) ..... 165
Emergency key blade 25, 28
Engine
block heaters 134
Engine compartment overview ..... 196
brake fluid reservoir 196
coolant reservoir 197
engine oil dipsticks 197
engine oil filler 196
power steering fluid reservoir ..... 197
washer fluid reservoir ..... 196
Engine coolant check 204
checking the coolant level .....204
topping up the coolant 205
Engine number 257
diesel engines 257
petrol engines 257
Engine oil check
engine oil consumption ..... 199, 201
engine oil specification. 203
V6 diesel engines 201
V6 petrol engines 197
V8 petrol engines 199
Engine specifications 258
EPB....146
Errors in vehicle position 335
Essential towing checks 185
Event data recording 11
Exterior mirrors 95
adjusting and folding 95
mirror dip when reversing. 96
F
Fascia - controls overview ..... 12
Fastening the seat belts 51
releasing the seat belts 51
Ferry
disarming the tilt alarm sensor ..... 22
Fire extinguisher 250
First aid kit. 250
Forward alert function 164
Fuel
octane rating.... 175
petrol fuel guard 180
refuelling.... 179
Fuel cut-off 177
resetting the fuel cut-off 178
Fuel filler flap.... 178
Fuel guard 180
Fuel quality 174
alternative fuels for petrol engines . . . 175
diesel engined vehicles 176
petrol engined vehicles 174
unleaded fuel.... 175
Fuse box locations. 242
engine compartment fuse box. . . . . . 242
fuse and relay positions 244
luggage compartment fuse box.....243
passenger compartment fuse box....243
Fuse specification chart. 245
G
Garage door transceiver 128
before programming.... 128
entry gate programming 130
information and assistance 130
programming 129
reprogramming a single garage door opener button.... 130
rolling code device equipment programming 130
to erase all programming ..... 129
General information on radio frequencies. . 16
Global opening and closing. 35
cancelling global opening/closing ..... 36
window global closing (not Japan)....36
window global opening 35
Glove box 125
H
Hazard warning flashers ..... 77, 250
Head restraints 44
head restraint removal 45
manual head restraints....45
tilt adjustment 44
whiplash protection 44
Headlamp adjustment....78
Headlamp levelling 79
halogen headlamps 79
xenon headlamps 79
Headlamp removal 81
Headlamp washers 90
Heated seats 47
Heated steering wheel. 68
Hints on driving with ABS. 144
ABS braking techniques ..... 145
ABS warning indicator ..... 144
brake vacuum assist (V6 petrol models only) 146
Electronic Brakeforce Distribution (EBD) .. 145
Emergency Brake Assist (EBA).....146
Horn 68
|
Information displays general information .... 105
Information messages 106
Inspecting safety system components . . . 252
Instrument lighting dimmer 123
Instrument panel overview 99
instrument panel 99
Interior lamps 80
rear interior lighting 80
Interior mirror. 94
auto dimming 94
manual dimming 94
Isofix child restraints 62
J
Jaguar Smart Key 17 system transmitters 32
Jump starting 214
K
Keyboard layout 340
Keyless entry.... 33 convenience mode.... 34 Jaguar Smart Key check.... 33 keyless locking.... 34 steering column lock.... 35
Keyless starting. 133
if the engine fails to start 134
starting a diesel engine. 133
starting a petrol engine. 133
Keys emergency key blade ..... 25, 28 Keys and remote controls principle of operation ..... 16
L
Lamps cornering lamps.... 79 static bending lamps.... 79
Language selection 339
Levelling 184
Lighting condensation 76
Lighting control.... 75 daylight running lamps.... 76 headlamps.... 75 off.... 75 side lamps.... 75
Load carrying general information.... 182
Loading compact discs ..... 292 loading a CD (player empty) ..... 293 loading one CD (six CD player, part-loaded) 293 loading several CDs (six CD player) .. 294
Loading the map DVD 334 Locking 19
Locking and unlocking .... 26 locking and unlocking from inside the vehicle .... 27 locking and unlocking from outside the vehicle .... 26 mislock .... 28 using the emergency key blade .... 28 valet mode .... 30
Luggage anchor points. 182
M
Main menu 338
Maintenance general information .... 192 technical specifications .... 210
Map display icons....342 Measurement units....340
Mirrors heated 96
MP3 file playback ..... 297 MP3 folder structure ..... 298 using MP3 discs ..... 297
N
Navigation digitised area ..... 335 getting started ..... 336 map display icons ..... 342 map screen ..... 341 memory ..... 353 menu structure ..... 337 route preference..... 347 saving preferences..... 339 setting a destination..... 344 start guidance ..... 347 turn guidance off ..... 350 turn voice guidance on or off ..... 349
Navigation overview loading the DVD....334
Navigation setup calibration ..... 351 language selection ..... 353 quick POI selection ..... 350, 366 restore system defaults ..... 352 user settings ..... 338
0
Octane rating.... 175
Oil check
V6 diesel engines 201
V6 petrol engines 197
V8 petrol engines 199
Oil level check 199, 202
On/off control 271
Opening and closing the bonnet ..... 195
closing the bonnet 195
opening the bonnet 195
P
Parking aid 148
principle of operation 148
Parking brake 146
Parts 14
Pedestrian protection
principle of operation 66
Pedestrian protection system
after deployment.... 66
Personalised settings
audio system.... 112
automatic climate control ..... 112
general Information.... 111
home menu display.... 111
languages and distance units ..... 113
navigation system 112
phone/comms/voice 112
pop-up messages 112
timeout to home menu ..... 114
touch-screen systems. 112
vehicle system 113
Petrol fuel guard 180
Points of interest 362
cancelling the icon display 365
categories and sub-categories ..... 366
entry by category 365
entry by town 365
entry messages 366
icon display 363
Jaguar Dealerships. 365
list of icons. 363
memory points. 367
other selection methods. 366
selecting a quick POI category ..... 367
Pollution sensor 120
Portable audio....299
Portable audio interface 131
Power steering fluid check 208
checking the fluid level 208
topping up the fluid 208
Preset buttons 287
recalling a preset channel. 287
storing channels as presets ..... 287
Principle of operation
airbag deployment effects ..... 56
airbag operation 55
airbags 54
deployment 66
deployment and deflation ..... 55
introduction 53
seat belt checks 50
seat belt safety 49
seat belts 49
wet conditions 144
Priority programme type (PTY).....278
PTY overview 278
PTY search 279
selecting PTY categories .....278
Programming the remote control ..... 21
selecting alarm sensor override ..... 22
selecting automatic relock and arm .... 24
selecting drive-away locking .....23
selecting passive arming ..... 23
selecting single (2 stage unlock) or multi-point entry 22
selecting window global opening or closing 23
R
Radio data system (RDS) 277
alternative frequency (AF).... 277
extended other networks (EON) ..... 277
FM text 278
options menu overview. 277
regionalisation (REG) 277
traffic 277
Radio reception.... 268
Rain sensor 89
RDS-TMC 368
all traffic events 371
display 368
dynamic navigation. 370
icons.... 368
on route events. 371
surveillance setting. 372
traffic on route 370
using TMC 370
voice guidance 370
Rear fog lamps 77
Rear lamp removal 82
Rear seats 45
folding the rear seats 46
raising the rear seats 47
Rear under floor storage 182
Rear view camera principle of operation ..... 152
Recommended towing weights ..... 185
Refuelling 179
fuel consumption 181
fuel filler 179
fuel tank capacity 179
Remote control 17
Remote control battery 24
Remote control programming.... 21
Removing a headlamp.... 81
Removing a rear lamp.... 82
Repairing minor paint damage ..... 191
Repeat compact disc tracks 296
Run flat tyres. 224
Running out of fuel 177
diesel engines. 177
Running-in 154
brakes 154
engine 154
engine oil consumption ..... 154
final drive unit 154
s
Safety 10
Safety precautions 174
Satellite signal reception....335
Satellite signals 334
Seat belt height adjustment 52
Seat belt reminder 50
Seat belts principle of operation .... 49
Seats front 42
head restraints 44
memory 43
Service data recording ..... 11
Setting avoid points 355
Settings 288
announcements 288
DAB country....290
DAB format 291
DAB text....290
FM traffic 289
link DAB 289
Shuffle/random....295
Sitting in the correct position ..... 41
Smart key 17
Smog sensor 120
Snow chains....223
Stability control 170
adaptive dynamics ..... 172
Dynamic Stability Control (DSC) ..... 170
JaguarDrive Control scenarios ..... 173
stability control indicator ..... 172
switching between DSC and Trac DSC. 171
switching between DSC OFF and ON . . 171
tracDSC 171
Starting the engine general information .... 132
Static bending lamps 79
Station preset buttons 275
storing stations as presets ..... 275
tuning stations 275
Steering wheel. 67
heated 68
Storage compartments ..... 127
Stored locations
home. 355
memory 353
setting avoid points. 355
store a memory point 354
Sun blinds 123
Sunvisors 123
vanity mirror 123
Sunroof 121
Supplementary restraints system
principle of operation 53
Switching off the engine 134
T
Technical specifications
accessory wheels and tyres 240
capacities 211
lubricants and fluids 210
Telephone 309
general information.... 307
Television
general information.... 328
Television controls
TV controls 329
Television setup.
TV screen format 332
TV settings 333
Tilt alarm sensor override
Tilt sensor 39
Tool kit 224
tool kit contents 224
Touch-screen
system facilities 109
touch-screen care 111
touch-screen display icons ..... 110
touch-screen use 110
Tow bar
tow bar dimensions and mounting points. .
186
Towing 183
diesel engines....184
Towing a trailer....183
trailer electrical connection ..... 184
Towing points 253
front and rear towing eyes and lashing points....253
Towing the vehicle on four wheels ..... 256
towing procedure 256
Track selection 295
Traffic information control 276
skipping traffic announcements ..... 276
Transmission number. 257
Transmitters 32
Transporting the vehicle 254
Emergency Park Release (EPR) ..... 254
Trip computer 107
average fuel consumption (A, B and Auto). 108
average speed (A, B and Auto) ..... 107
changing the display 107
display language....108
information display....107
ML-km (also Miles-litre)....108
odometer 107
range 108
reset 108
service interval indicator (Diesel vehicles) . 108
trip distance (A, B and Auto) ..... 107
Turn-by-turn navigation 339
Type approvals 262
declarations of conformity ..... 262
Tyre care 217
age degradation 221
directional tyres 222
flat spots. 220
pressure compensation for ambient temperature changes ..... 219
punctured tyres. 221
replacement tyres 222
tyre checks 221
tyre pressures. 217
tyre pressures during long term vehicle storage 220
tyre wear.... 220
Tyre glossary.... 238
Tyre pressure monitoring system ..... 234
replacement sensor 236
temporary use spare wheel. 236
TPM System information messages . . 237
TPM system operation 235
tyre changing 236
Tyre repair kit 229
checking the tyre pressure after a repair. . . 233
Jaguar tyre repair kit.... 231
Jaguar tyre repair kit safety information . . . 230
using the Jaguar tyre repair kit ..... 232
U
Undocking the Jaguar Smart Key ..... 21
Unlocking 18
Using ACC 159
ACC malfunction.... 163
automatic low speed switch off ..... 162
automatic switch off 162
changing the follow mode set gap ... 161
changing the speed. 160
detection beam issues 163
entering the follow mode set gap .... 160
hints on driving with ACC 162
overriding the speed and follow mode 161
resuming the speed and follow mode. 162
setting the speed 160
Using booster cables.... 214
disconnecting the cables 214
Using cruise control 156
automatic switch off. 157
changing the speed ..... 157
message centre information displays. . 158
resuming the speed ..... 157
setting vehicle speed ..... 156
Using seat belts during pregnancy ..... 51
Using snow chains ..... 223
Using the ASL....167
ASL unavailable 168
exceeding the set speed. 168
resuming ASL 168
setting a speed limit. 167
suspending ASL. 168
Using the parking aid 148
cleaning the sensors ..... 151
front and rear parking aid. 150
rear fitted accessories ..... 151
rear parking aid 149
system fault 151
touch-screen 148
Using the remote control ..... 17
approach lighting 17
care of the Jaguar Smart Key 18
docking the Jaguar Smart Key ..... 20
emergency key blade 25
irregular operation 18
Jaguar Smart Key....17
Jaguar Smart Key system transmitters . 32
locking and arming the vehicle. ..... 19
luggage compartment 17
panic button....17
undocking the Jaguar Smart Key ..... 21
unlocking and disarming the vehicle . . . 18
Using the telephone.... 309
answer options 314
changing a phone number 317
changing the docked phone ..... 312
continuity of calls 317
deleting a paired phone. 312
deleting names from the Directory . . . 319
directory contact types ..... 319
ending a call 317
erase entire phonebook. 316
hands-free controls. 321
keyboard magnification. 322
last 10 option 320
making a call.... 317
making-ending a call.... 322
message centre messages ..... 327
names 318
operating the system 323
other features 322
pairing other phones.... 311
phone options 314
phonebook 315
phonebook capacity 316
receiving a call 317
register 313
retrieving voice mail 313
telephone pairing and docking ..... 309
telephone voice control. 323
voice mail 313
Using the television 330
analogue/digital option 331
finding TV channels 331
full screen view 331
on/off control 330
using preset channels 332
volume control 330
Using winter tyres 223
Approved Winter tyre sizes ..... 223
Winter tyre pressures 223
V
Valet mode 30
Vehicle build date plate 257
Vehicle identification number (VIN).....257
Vehicle identification plate 257
Vents 115
VIN 257
Voice control....69,373
activating the system ..... 70
command help 71
language and accent. 70
nametags 72
notepad 73
using the system 70
voice commands 73
voice system tutorial 71
voice volume adjustment ..... 73
Volume control 271
volume settings 272
W
Warning labels 10
Warning lamps and indicators ..... 100
adaptive cruise control ..... 102
adaptive front lighting 102
airbag 102
anti-lock braking system (ABS) ..... 102
automatic speed limiter ..... 103
beltminder 101
brake 101
direction indicators. 103
dynamic stability control (DSC) ..... 102
engine malfunction....102
forward alert....102
hazard warning indicators ..... 103
high beam 103
indicator check. 100
rear fog lamps 102
seat belt 101
side lamps 103
tyre pressure monitoring system ..... 102
Warning triangle 250
Warnings 9
Washer fluid check 209
topping up the fluid 209
Washing 187
Waveband button 274
Weights 259
Wheels and tyres general information ....216
technical specifications 239
Whiplash protection 57
Index
Windscreen washers 89
blocked jets.... 90
drip wipe. 90
low screen wash 90
timed jet function 90
Windscreen wipers 88
rain sensor variable delay 88
single wipe 88
speed-dependent mode 89
wiper operation. 88
Winter mode 169
Winter tyres. 223
Wiper blades 90





- IMPORTANT
- Contents
- Introduction
- Keys and remote controls
- Locks
- Alarm
- Seats
- Seat belts
- Supplementary restraints system
- Child safety
- Pedestrian protection
- Steering wheel
- Lighting
- Wipers and washers
- Windows and mirrors
- Instruments
- Information displays
- Climate control
- Convenience features
- Starting the engine
- Transmission
- Brakes
- Parking aid
- Rear view camera
- Driving hints
- Cruise control
- Adaptive cruise control (ACC)
- Automatic speed limiter (ASL)
- Driving dynamics
- Fuel and refuelling
- Load carrying
- Towing
- Vehicle care
- Maintenance
- Status after a collision
- Vehicle recovery
- Vehicle identification
- Technical specifications
- Type approvals
- Audio introduction
- Audio unit overview
- Audio unit operation
- Audio unit menus
- Digital audio broadcasting
- Compact disc player
- Portable audio
- Telephone
- Television
- Navigation system
- SYMBOLS GLOSSARY
- Warnings
- WARNING
- Cautions
- CAUTION
- Symbols
- LABEL LOCATIONS
- Warning labels
- HEALTH AND SAFETY
- DATA RECORDING
- Service data recording
- Event data recording
- DISABILITY MODIFICATIONS
- PARTS AND ACCESSORIES
- Electrical equipment
- Airbag system
- After-sales service
- Travelling abroad
- GENERAL INFORMATION ON RADIO FREQUENCIES
- USING THE REMOTE CONTROL
- Jaguar Smart Key
- Unlocking
- Locking
- Luggage compartment
- Approach lamps
- Panic button
- Care of the Jaguar Smart Key
- Irregular operation
- UNLOCKING AND DISARMING THE VEHICLE
- Single-point entry
- Multi-point entry
- Power-fold mirrors
- Global opening
- LOCKING AND ARMING THE VEHICLE
- Single locking
- Double locking
- Lock confirmation
- Global closing
- Automatic relocking
- DOCKING/UNDOCKING THE JAGUAR SMART KEY
- Docking the Jaguar Smart Key
- PROGRAMMING THE REMOTE CONTROL
- Selecting single (2 stage unlock) or multi-point entry
- Selecting alarm sensor override
- Selecting drive-away locking
- Setting the drive-away locking speed
- Selecting window global opening or closing
- Selecting passive arming
- Selecting automatic relock and arm
- CHANGING THE REMOTE CONTROL BATTERY
- Battery disposal
- EMERGENCY KEY BLADE
- LOCKING AND UNLOCKING
- Locking and unlocking from outside the vehicle
- Drive-away locking
- Locking and unlocking from inside the vehicle
- Door lock and release levers
- Fascia buttons
- Mislock
- USING THE EMERGENCY KEY BLADE
- Locking and unlocking the doors
- Unlocking the luggage compartment
- VALET MODE
- Deselecting valet mode
- JAGUAR SMART KEY SYSTEM TRANSMITTERS
- KEYLESS ENTRY
- Jaguar Smart Key check
- Keyless locking
- The vehicle will not lock automatically.
- Window global closing
- Convenience mode
- Steering column lock
- GLOBAL OPENING AND CLOSING
- Window global opening
- Window global closing (not Japan)
- Cancelling global opening/closing
- ARMING THE ALARM
- Full alarm
- Perimeter alarm
- Alarm indicator
- Battery-backed sounder
- DISARMING THE ALARM
- Disarming when the unlock button fails to work
- Deactivating the alarm when triggered
- Alarm trigger information
- SECURITY SENSORS
- Tilt sensor
- Intrusion sensor
- Passive arming
- Automatic relocking and re-arming of the alarm
- Sensor faults
- Recalling a memorised position
- HEAD RESTRAINTS
- Whiplash protection
- Head restraint tilt adjustment
- Head restraint removal
- REAR SEATS
- Raising the rear seats
- CLIMATE SEATS
- Heated ventilation
- Cooled ventilation
- Backrest ventilation only
- Seat belt safety
- Seat belt checks
- SEAT BELT REMINDER
- USING SEAT BELTS DURING PREGNANCY
- FASTENING THE SEAT BELTS
- Releasing the seat belts
- SEAT BELT HEIGHT ADJUSTMENT
- Airbag operation
- Deployment and deflation
- Front airbags
- Side and curtain airbags
- Airbag deployment effects
- AIRBAG WARNING LAMP
- AIRBAG LABELS
- AIRBAG SERVICE INFORMATION
- CHILD SEATS
- Child restraint check list
- CHILD SEAT POSITIONING
- BOOSTER CUSHIONS
- CHILD SEAT ANCHOR POINTS
- ISOFIX anchor points (not Australia)
- ISOFIX child seats
- Installing an ISOFIX child seat
- Attaching tether straps
- CHILD SAFETY LOCKS
- Deployment
- AFTER DEPLOYMENT OF THE PEDESTRIAN PROTECTION SYSTEM
- Entry and exit mode
- HEATED STEERING WHEEL
- AUDIO CONTROL
- VOICE CONTROL
- Activating the system
- Language and accent
- Giving a command
- Cancelling voice control
- Voice system tutorial
- Command help
- Full command list
- Nametags
- Notepad
- Recording a note
- Playing a note
- Deleting notes
- Voice volume adjustment
- Voice commands
- LIGHTING CONTROL
- Off
- Side lamps
- Headlamps
- Daylight running lamps
- Condensation
- AUTOLAMPS
- Windscreen wiper detection
- Exit delay
- REAR FOG LAMPS
- HAZARD WARNING FLASHERS
- HEADLAMP LEVELLING Halogen headlamps
- Xenon headlamps
- CORNERING OR STATIC BENDING LAMPS
- INTERIOR LAMPS
- Ambience lighting
- Luggage compartment lamp
- REMOVING A HEADLAMP
- REMOVING A REAR LAMP
- CHANGING A BULB
- General information
- Halogen bulbs
- Xenon lamps
- HEADLAMP UNIT BULBS
- Halogen dipped beam
- SIDE REPEATER LAMP
- REAR LAMP BULBS
- Other rear lamp bulbs
- BULB SPECIFICATION CHART
- WINDSCREEN WIPERS
- Speed-dependent mode
- RAIN SENSOR
- WINDSCREEN WASHERS
- Low screen wash
- Timed jet function
- Drip wipe
- Blocked jets
- HEADLAMP WASHERS
- CHECKING THE WIPER BLADES
- CHANGING THE WIPER BLADES
- ELECTRIC WINDOWS
- One-shot operation
- Overriding anti-trap protection
- Window reset
- INTERIOR MIRROR
- EXTERIOR MIRRORS
- Adjusting and folding
- Adjusting
- Folding
- Automatic folding
- Mirror dip when reversing
- Heating elements
- BLIND SPOT MONITOR
- Sensor blockage
- System fault
- INSTRUMENT PANEL OVERVIEW
- Instrument panel
- Speedometer
- Message centre
- Tachometer
- Fuel gauge
- Indicator check
- Brake - Red
- Seat belt - Red
- Beltminder - Red
- Anti-lock Braking System (ABS)/ Electronic Parking Brake (EPB) - Amber
- Adaptive Front Lighting - Amber
- Engine malfunction - Amber
- Dynamic Stability Control (DSC) - Amber
- DSC
- Rear fog lamps - Amber
- Adaptive Cruise Control - Amber
- Forward alert - Amber
- Airbag - Amber
- Tyre Pressure Monitoring System - Yellow
- High beam - Blue
- Automatic Speed Limiter - Green
- Side lamps - Green
- Direction indicators - Green
- Hazard warning indicators
- AUDIBLE WARNINGS AND INDICATORS
- WARNING AND INFORMATION MESSAGES
- Clearing messages from the display
- TRIP COMPUTER
- Odometer
- Trip distance (A, B and Auto)
- Average speed (A, B and Auto)
- Average fuel consumption (A, B and Auto)
- Range
- Electronic dipstick (diesel and V8 petrol engines only)
- ML-km (also Miles-litre)
- Display language
- Reset
- Service interval indicator
- TOUCH-SCREEN
- System facilities
- Touch-screen use
- Touch-screen display icons
- Touch-screen care
- PERSONALISED SETTINGS
- Home menu display
- Pop-up messages
- Touch-screen systems
- Audio system
- Automatic climate control
- Phone/Comms/Voice
- See ADJUSTING THE STEERING WHEEL
- Vehicle system
- Languages and distance units
- Timeout to home menu
- Select Syst. settings.
- Rear vents
- Temperature controls
- Windscreen defrost and demist
- Heated screens
- Auto mode
- Blower speed
- Recirculation
- Air conditioning
- Heated/climate seats and heated steering wheel
- Touch-screen operation
- Climate control display icons
- A/C
- External temperature
- Smog/pollution filter
- ELECTRIC SUNROOF
- Tilt
- Fully open
- Close
- Anti-trap mechanism
- Override
- Calibration
- Vanity mirror
- CLOCK
- Setting the clock as the screensaver
- Before programming
- To erase all programming
- Rolling code device equipment programming
- Reprogramming a single garage door opener button
- Entry gate programming
- Information and assistance
- info@eurohomelink.com.
- START/STOP button
- KEYLESS STARTING
- Starting a petrol engine
- Starting a diesel engine
- Cold climates
- Engine block heaters
- If the engine fails to start
- Petrol engines
- Diesel engines
- SWITCHING OFF THE ENGINE
- DIESEL PARTICULATE FILTER (DPF)
- Regeneration
- Warning indicators and messages
- DPF FULL
- DPF FULL SEE HANDBOOK
- Regeneration procedure
- AUTOMATIC TRANSMISSION
- Selector positions
- Stationary vehicle
- Selector interlock
- If the selector fails to elevate
- Starting
- Kick-down
- Fast off
- Shift adapt under braking
- Corner recognition
- Road gradient recognition
- Driver type recognition
- Manual operation
- Limp-home mode
- ENGINE SYSTEMS FAULT (Red)
- RESTRICTED PERFORMANCE (Red or Amber) GEARBOX FAULT (Amber)
- Brake pads
- Brake pad wear warning
- Wet conditions
- ABS warning indicator
- HINTS ON DRIVING WITH ABS
- ABS braking techniques
- Electronic Brakeforce Distribution (EBD)
- Emergency Brake Assist (EBA)
- Brake vacuum assist
- (V6 petrol models only)
- USING THE PARKING AID
- Rear parking aid
- Front and rear parking aid
- Rear fitted accessories
- Cleaning the sensors
- Camera overlays
- RUNNING-IN
- Engine
- Engine oil consumption
- Final drive unit
- ECONOMICAL DRIVING
- Driving tips for economy
- Maintenance and fuel economy
- USING CRUISE CONTROL
- Setting vehicle speed
- Changing the speed
- Resuming the speed
- Automatic switch off
- USING ACC
- Setting the speed
- Follow mode gap settings
- Changing the follow mode set gap
- Overriding the speed and follow mode
- Automatic low speed switch off
- Resuming the speed and follow mode
- Hints on driving with ACC
- Detection beam issues
- ACC malfunction
- Adverse weather conditions
- FORWARD ALERT FUNCTION
- USING THE ASL
- LIMITER SET
- XXX km/h (MPH)
- Suspending ASL
- LIMITER CANCELLED
- Resuming ASL
- TOO FAST TO RESUME
- Exceeding the set speed
- OVER LIMIT XXX km/h (MPH)
- ASL unavailable
- LIMITER NOT AVAILABLE
- JaguarDrive Control
- WINTER MODE
- DYNAMIC MODE
- STABILITY CONTROL
- Dynamic Stability Control (DSC)
- TracDSC
- Switching between DSC and Trac DSC
- Switching between DSC OFF and ON
- Switching DSC OFF
- Switching DSC ON
- Stability control indicator
- Adaptive dynamics (Supercharged vehicles only)
- Active Differential Control (E-diff) (Supercharged vehicles only)
- JaguarDrive Control scenarios
- SAFETY PRECAUTIONS
- FUEL QUALITY
- Water in fuel
- Petrol engined vehicles
- Unleaded fuel
- Octane rating
- ALTERNATIVE FUELS FOR PETROL ENGINES
- Fuels containing alcohol
- Ethanol
- Methanol
- Methyl Tertiary Butyl Ether (MTBE)
- Reformulated gasoline
- DIESEL ENGINED VEHICLES
- Winter grade diesel fuel
- Sulphur content
- RUNNING OUT OF FUEL
- FUEL CUT-OFF
- Resetting the fuel cut-off
- FUEL FILLER FLAP
- REFUELLING
- Fuel filler
- Fuel tank capacity
- DIESEL MISFUELLING PROTECTION DEVICE
- FUEL CONSUMPTION
- Urban cycle
- Extra-urban cycle
- Combined
- Weights and load capacities
- Roof racks
- LUGGAGE ANCHOR POINTS
- REAR UNDER FLOOR STORAGE
- TOWING A TRAILER (V6 petrol and diesel vehicles only)
- Diesel engine vehicles
- Trailer electrical connection
- LEVELLING
- RECOMMENDED TOWING WEIGHTS
- Towing weights - Australia only
- ESSENTIAL TOWING CHECKS
- TOW BAR
- CLEANING THE ALLOY WHEELS
- CLEANING THE EXTERIOR
- Washing the vehicle paintwork
- Using an automatic wash
- Underbonnet cleaning
- Glass surfaces
- Cleaning the rear screen
- Removing grease and tar
- Bird droppings
- Polishing
- CLEANING THE INTERIOR
- Leather
- Cloth and fabric
- Removing stains
- Instrument pack, clock, and audio equipment
- Carpet and mats
- Airbag module covers
- REPAIRING MINOR PAINT DAMAGE
- Service Portfolio
- Owner maintenance
- Daily checks
- Weekly checks
- Severe driving conditions
- Emission control
- Road testing dynamometers (rolling roads)
- Safety in the garage Fuel system
- Poisonous fluids
- Used engine oil
- OPENING AND CLOSING THE BONNET
- Opening the bonnet
- Closing the bonnet
- ENGINE OIL CHECK - V6 Petrol engines
- Checking the oil level
- Topping up the oil
- ENGINE OIL CHECK - V8 Petrol engines
- ENGINE OIL CHECK - V6 Diesel engines
- Oil level warnings
- ENGINE OIL SPECIFICATION
- ENGINE COOLANT CHECK
- Checking the coolant level
- Topping up the coolant
- Antifreeze
- BRAKE FLUID CHECK
- Checking the fluid level
- Topping up the fluid
- POWER STEERING FLUID CHECK
- WASHER FLUID CHECK
- Lubricants and fluids
- BATTERY WARNING SYMBOLS
- BATTERY CARE
- Battery Monitoring System (BMS)
- Charging faults
- USING BOOSTER CABLES
- Disconnecting the cables
- CHARGING THE VEHICLE BATTERY
- CHANGING THE VEHICLE BATTERY
- Tyre markings
- TYRE CARE
- Tyre pressures
- Checking the tyre pressures
- Tyre valves
- Pressure compensation for ambient temperature changes
- Tyre pressure compensation chart - high ambient temperatures
- Tyre pressures during long term vehicle storage
- Flat spots
- Long term storage
- Tyre wear
- Wear indicators
- Age degradation
- Punctured tyres
- Tyre checks
- Replacement tyres
- Directional tyres
- Typical direction indicators
- USING WINTER TYRES
- Approved winter tyre sizes
- Front:
- Rear:
- Winter tyre pressures
- USING SNOW CHAINS
- RUN FLAT TYRES
- TOOL KIT
- CHANGING A ROAD WHEEL
- Temporary use spare wheel
- Locking wheel nuts
- Spare wheel location
- Wheel changing safety
- Wheel changing procedure
- TYRE REPAIR KIT
- Jaguar tyre repair kit safety information
- Jaguar tyre repair kit
- Using the Jaguar tyre repair kit
- Repair procedure
- Checking the tyre pressure after a repair
- TYRE PRESSURE MONITORING SYSTEM
- TPM system operation
- Tyre pressure warning with speed
- Temporary use spare wheel and tyre change
- Tyre changing
- Replacement sensor
- TYRE GLOSSARY
- lbf/in² or psi
- kPa
- Cold tyre pressure
- Maximum inflation pressure
- Kerb weight
- Gross vehicle weight
- Accessory weight
- Production options weight
- Vehicle capacity weight
- Maximum loaded vehicle weight
- Rim
- Bead
- TYRE SPECIFICATIONS - ARDUOUS TERRAIN
- The following chart details the tyres recommended for use in the countries listed below:
- Accessory wheels and tyres
- CHANGING A FUSE
- Checking or renewing a blown fuse
- FUSE BOX LOCATIONS
- Engine compartment fuse box
- FUSE SPECIFICATION CHART
- Fuses
- WARNING TRIANGLE
- FIRST AID KIT
- FIRE EXTINGUISHER
- DRIVING AFTER A COLLISION
- Before starting or driving
- Check for:-
- When driving
- INSPECTING SAFETY SYSTEM COMPONENTS
- TOWING POINTS
- Front and rear towing eyes and lashing points
- Attaching the front towing eye
- TRANSPORTING THE VEHICLE
- Emergency Park Release (EPR)
- TOWING THE VEHICLE ON FOUR WHEELS
- Towing procedure
- ENGINE NUMBER
- V6 Petrol engines
- V8 Petrol engines
- TRANSMISSION NUMBER
- VEHICLE BUILD DATE PLATE
- Brake pedal travel (China only)
- DECLARATIONS OF CONFORMITY
- SIEMENS VDO
- Declaration of Conformity in accordance with Directive 1999/5/EC (R&TTE Directive)
- CE
- RADIO RECEPTION
- Audio controls
- Sound system overview
- ON/OFF CONTROL
- VOLUME CONTROL
- Volume settings
- Automatic volume control (AVC)
- Sound settings
- Standard and Premium sound systems
- Bowers & Wilkins™ surround sound system
- WAVEBAND BUTTON
- AUTOSTORE CONTROL
- STATION PRESET BUTTONS
- Tuning stations
- Storing stations as presets
- TRAFFIC INFORMATION CONTROL
- Skipping traffic announcements
- RADIO DATA SYSTEM (RDS)
- Options menu overview
- Traffic
- Regionalisation (REG)
- Alternative frequency (AF)
- Enhanced other networks (EON)
- FM text
- Text sent by station
- PRIORITY PROGRAMME TYPE (PTY)
- PTY overview
- Selecting PTY categories
- PTY alarm (where broadcast)
- PTY search
- Digital radio reception
- Ensembles
- Steering wheel controls
- DISPLAY OPTIONS
- DAB radio text
- CHANNEL AUTOMATIC TUNING
- CHANNEL OPTIONS
- Finding a channel
- Finding a subchannel
- Finding an ensemble
- DAB search
- Auto-tune
- Channel list
- Subchannel list
- PTY
- Channel data
- PRESET BUTTONS
- Storing channels as presets
- Recalling a preset channel
- Select Options.
- Announcements
- FM traffic
- Link DAB
- DAB text
- DAB country
- COMPACT DISC COMPATABILITY
- LOADING COMPACT DISCS
- Loading several CDs (six CD player)
- EJECTING COMPACT DISCS
- COMPACT DISC SELECTION
- MP3 FILE PLAYBACK
- Using MP3 discs
- MP3 folder structure
- Portable audio overview
- Connecting an iPod
- Connecting a USB device
- Connecting an auxiliary device
- AUXILIARY INPUT DEVICES
- Playing a portable device
- Autoplay
- Pause
- Mix
- USB:
- iPod:
- Repeat
- Displaying track information
- Searching a portable device
- Next/previous track
- Fast forward/reverse
- USB folders
- Portable device settings
- Traffic announcements
- Portable audio text
- Page jump
- Telephone networks
- What is Bluetooth®?
- See TELEPHONE PAIRING AND DOCKING
- Call volume
- Charging your phone
- Safety
- Driving
- Electronic devices
- Pacemakers
- TELEPHONE PAIRING AND DOCKING
- Pairing and docking using your mobile phone
- Pairing and docking using the touch-screen
- Pairing other phones
- Changing the docked phone
- Deleting a paired phone
- Select Change phone.
- Register
- VOICE MAIL
- Retrieving voice mail
- ANSWER OPTIONS
- PHONE OPTIONS
- Ring tones
- PHONEBOOK
- Phone capacity.
- Automatic download
- Manual download
- Erase entire phonebook
- Phonebook capacity
- MAKING A CALL
- Changing a phone number
- Receiving a call
- Ending a call
- Continuity of calls
- NAMES
- Directory contact types
- LAST 10 OPTION
- HANDS-FREE CONTROLS
- Phonebook scrolling using message centre
- Making/ending a call
- To dial:
- To connect:
- To end a call:
- OTHER FEATURES
- Keyboard magnification
- Do not disturb mode
- TELEPHONE VOICE CONTROL
- Dialling a phone number
- Phone store name
- Storing nametags using the touch-screen
- Dialling a nametag
- Dialling voicemail
- Play all stored nametags
- Dialling a nametag stored on the handset
- Message centre messages
- Phonebook entries
- TV reception
- TELEVISION CONTROLS
- TV controls
- USING THE TELEVISION
- Analogue/Digital option
- Full screen view
- FINDING TV CHANNELS
- Using presets channels
- Storing channels
- Recalling channels
- TELEVISION SETUP
- TV screen format
- TV settings
- TV country
- TV format
- Loading the navigation DVD
- SATELLITE SIGNALS
- Digitised area
- Errors in vehicle position
- Reception of GPS signals
- GETTING STARTED
- Non-European countries only
- USER SETTINGS
- TURN-BY-TURN NAVIGATION
- (Message centre guidance)
- MEASUREMENT UNITS
- KEYBOARD LAYOUT
- MAP DISPLAY ICONS
- SETTING A DESTINATION
- VOICE GUIDANCE
- MEMORY
- To store a memory point
- AVOID POINTS
- HOME
- DESTINATION ENTRY
- Start guidance
- Points of interest
- POSTCODE
- Postcode formats
- MAP
- COORDINATES
- PREVIOUS
- MOTORWAY
- POI ICON DISPLAY
- List of icons
- Others continued
- Restaurant
- CANCELLING POI ICON DISPLAY
- JAGUAR DEALERSHIP LOCATIONS
- ENTRY BY TOWN
- ENTRY BY CATEGORY
- OTHER SELECTION METHODS
- Town centres
- CATEGORIES AND SUB-CATEGORIES
- Search area
- List button
- All button
- POI ENTRY MESSAGES
- QUICK POI SELECTION
- Changing the Quick POI Categories
- SELECTING A QUICK POI CATEGORY
- Other categories
- Local POI search
- MEMORY POINTS
- Memory point details
- RDS-TMC OVERVIEW
- RDS-TMC display
- RDS-TMC icons
- Level 1 TMC event icons
- Level 2 TMC event icons
- USING TMC
- Dynamic route guidance
- On route event icon
- All traffic events
- SURVEILLANCE SETTING
- USING VOICE CONTROL
- ORDNANCE SURVEY DATA
- Ownership
- Licence grant
- Licence Terms
- Limitations of use
- Limitation of liability
- NAVTEQ CORPORATION
- Transfer
- Disclaimer of warranty
- Government end users
- EUROPEAN DECLARATION OF CONFORMITY
- A
- B
- C
- D
- E
- F
- G
- H
- |
- J
- K
- L
- M
- N
- 0
- P
- R
- s
- T
- U
- V
- W
- Index
Brand : JAGUAR
Model : XF (2009)
Category : Car