
Beo6 - Remote control BANG & OLUFSEN - Free user manual and instructions
Find the device manual for free Beo6 BANG & OLUFSEN in PDF.


| Product Type | Remote Control |
| Brand | Bang & Olufsen |
| Model | Beo6 |
| Dimensions (approx.) | 150 x 60 x 20 mm |
| Weight (approx.) | 200 g |
| Power Supply | Rechargeable Li-ion battery |
| Charging Method | Via included docking station or USB cable |
| Display | Backlit LCD screen |
| Navigation | Touch-sensitive scroll wheel and buttons |
| Motion Sensor | Yes (wakes remote when picked up) |
| Compatible Devices | Bang & Olufsen audio/video systems (BeoVision, BeoSound, etc.) |
| Wireless Technology | Infrared (IR) and possibly RF |
| Range (approx.) | Up to 10 meters (IR) |
| Languages Supported | Multiple languages (configurable in settings) |
| Maintenance & Cleaning | Wipe with a soft, dry cloth. Do not use liquids. |
| Safety Warning | Do not expose to moisture or extreme temperatures. |
| Spare Parts & Repairability | Battery replacement available via authorized service centers. |
| General Information | Designed to control Bang & Olufsen systems with intuitive interface. |
Frequently Asked Questions - Beo6 BANG & OLUFSEN
User questions about Beo6 BANG & OLUFSEN
0 question about this device. Answer the ones you know or ask your own.
Ask a new question about this device
Download the instructions for your Remote control in PDF format for free! Find your manual Beo6 - BANG & OLUFSEN and take your electronic device back in hand. On this page are published all the documents necessary for the use of your device. Beo6 by BANG & OLUFSEN.
USER MANUAL Beo6 BANG & OLUFSEN
Product documentation, 4
Learn about the documentation provided with your Beo6.
Using Beo6, 5
How to use the buttons in the Beo6 display and the physical buttons.
Operating non-Bang & Olufsen products, 6
How to operate, for example, set-top boxes.
Using the charger, 7
How to use the table charger.
Beo6 Setup menu, 8
Which options are provided with the Beo6 Setup menu.
Wireless setup, 11
How to set up your remote control for a wireless network.
Maintenance, 15
How to clean your remote control.
Introduction
The Beo6 remote control is customised to give easy access to the Bang & Olufsen products in your home.
When you purchase a Beo6, your Bang & Olufsen retailer configures it to match your individual product setup.
This allows for a personal design for each user and ensures that all buttons in your Beo6 are relevant to your specific setup.
It also means that if new functions and features, such as 2-way communication become available in your Bang & Olufsen products, the Beo6 must be reconfigured by your retailer to support these new functions and features.
If you change your product setup, for example if you purchase a new product, always have your Bang & Olufsen retailer reconfigure your Beo6 remote control to enable support of the new functions and features.

Beo6 is fully compatible with Beo5. This means that if a User's guide explains operation with the Beo5 remote control, you can use the Beo6 remote in exactly the same way.
Product documentation

All the buttons in your customised Beo6 are explained in the personal Beo6 glossary.
With your remote control, you receive a brief Getting Started explaining the basic functions of the remote control. This Guide provides further information about the remote control, such as moving buttons or reassigning channel numbers to your channel logos. The Guide is kept up to date if new features and functions are introduced in the Beo6. However, Beo6 support of such updates depends on the configuration of the remote control.
As an additional help to the Guides, a personal Beo6 button overview and a matching glossary are created for you every time your Bang & Olufsen retailer customises your Beo6 for you in the store.
The button overview provides you with a 'road map' to your Beo6 and allows you to quickly find the button or function you need.
In the personal Beo6 glossary, you can find explanations to all the buttons available in your specific setup.
If your configuration is changed, you can get a new Beo6 button overview and glossary that matches your new setup.
Using Beo6
Before you start using your remote control for the very first time, it must be charged. Refer to page 7 for information about how to charge your remote control.
When fully charged, your remote control is ready for use.
To activate the Beo6 display, just pick up your remote control or touch the screen lightly – The Beo6 display lights up if the surroundings are dark. Then select a button by a press on the screen.
Once a source is selected, operation is carried out by pressing buttons on the screen or via the Beo6 ball – for example to adjust volume, step through tracks or channels and pause playback.

When you pick up the remote control or touch the screen, the display lights up if the surroundings are dark.
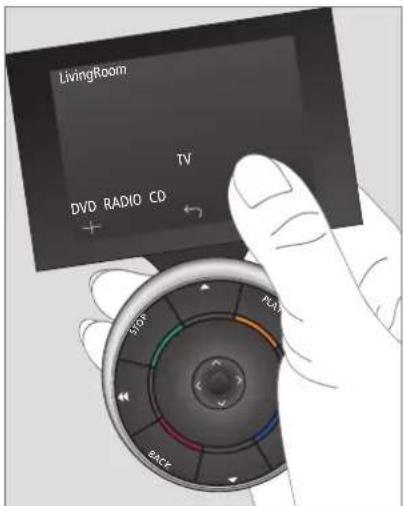
Once the display is active, the buttons appear on the screen. Press a button to activate a source or function.
Operating non-Bang & Olufsen products
If your Bang & Olufsen video product is equipped with a Peripheral Unit Controller, you can connect supported non-Bang & Olufsen products such as set-top boxes to it – and still operate it with your remote control. Bang & Olufsen support the most common set-top boxes in all markets. Simply have your retailer program your Beo6 to the set-top box that you have, and its remote control buttons will appear in the Beo6 display.
Other selected non-Bang & Olufsen products such as lights, curtains and blinds can be operated with Beo6 as well – some of them via the supported Home Automation System, and others directly from Beo6.
The main functions of your equipment can be operated with the Beo6 remote control. Not all functions may be supported by Beo6. The available services and functions are shown in the Beo6 display, when you activate the equipment.
Contact your Bang & Olufsen retailer for further information about operating non-Bang & Olufsen products with Beo6.
NOTE! Buttons related to non-Bang & Olufsen products are not translated or explained in the Beo6 glossary.
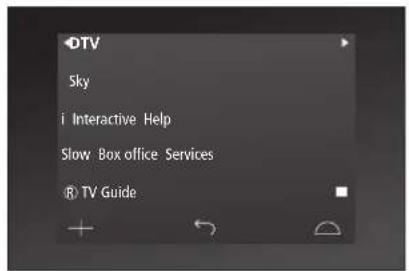
Example of buttons used to operate a set-top box.

Example of buttons used to operate a Home Automation System.
Using the charger
Beo6 is a battery powered remote control that requires regular charging like a cordless phone. The customised Beo6 charger is used for this purpose.
To make sure that your remote control is fully charged at all times, we recommend that you place it in the charger whenever it is not in use.
If you are unable to switch on the remote control when you press and hold the centre button, it needs to be recharged.
If the remote control is completely discharged, place it in the charger shortly and it will have sufficient capacity for you to switch on the TV or radio. Then leave it to charge while you watch or listen.
Place the remote control correctly in the charger. To be fully charged, Beo6 must charge for four hours.
When fully charged, the battery will have enough capacity for approximately one week of standby time or two to four hours of intensive use.
A text in the display indicates when it is time to recharge your remote control.
Using 2-way communication reduces the battery run time. Note that if the remote control needs charging, problems with the wireless communication may arise.
Power consumption
Beo6 consumes power when switched on, in particular when the backlight is lit. Therefore your Beo6 will slowly power down when it is not in use:
- After 10 seconds, the backlight is dimmed
- After 30 seconds, Beo6 will go into standby mode and display a black screen
To change these settings, refer to page 8 in this Guide.
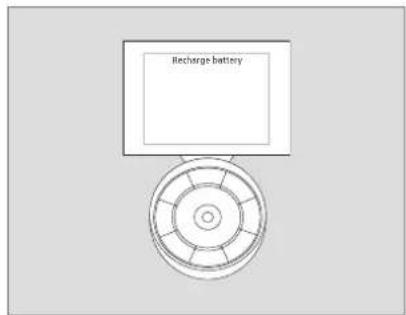
'Recharge Battery' is indicated in the display title when the battery needs charging.
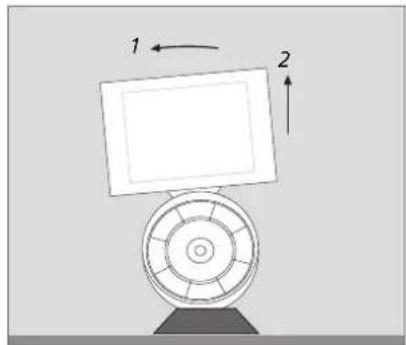
The charger has a magnet to hold Beo6 firmly in place. When you remove the remote control you have to tilt it slightly to release it from the charger.
Beo6 Setup menu
The remote control has a Setup menu that allows you to alter a number of settings yourself. To enter the Setup menu, press and hold the standby button while pressing the centre button on the ball.
Navigate in the Setup menu
You navigate and select items in the Setup menu directly on the screen and by means of the centre button and the arrow buttons (✗, ✗, ∧ and √) on the ball.
To select a menu item, move the line indicator to the button you wish to activate, then press the centre button. In the Edit menu press the button on the screen to bring up a submenu.
To back up one level in the Setup menu, press BACK on the ball or on the screen. Your changes will automatically be saved when you leave the Setup menu.
Options in the Setup menu ...
Edit ... Allows you to show or hide buttons in the Beo6 display and to change channel numbers associated with channel names in the channels or stations menu.
Wireless ... Allows you to set up Beo6 for your wireless network. See page 11 for more information.
Settings ... Allows you to change the settings for backlight dimming and display out*. You can also restore all Beo6 settings to the original settings made by your Bang & Olufsen retailer.
Config ... Allows you to set Beo6 to a default configuration.
Option Pgm ... Allows you to Option programme your Bang & Olufsen products. Info ... Contains information on Beo6 software version as well as battery status and the date of the latest configuration of your Beo6.
*Note that the longer the display backlight is lit, the more often the remote control needs charging.

In the Setup menu, two horizontal lines indicate which button is high lighted. Press the centre button to select.
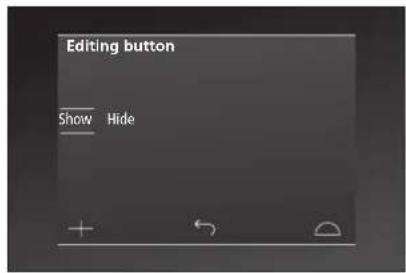
Edit buttons
In the Edit menu, you can remove buttons you do not use and show buttons that are currently hidden.
How to show or hide a button:
Select Edit in the Setup menu.
Use the touch screen buttons to select first the zone, then the source of the button you wish to edit.
Press the relevant touch button, then press the centre button to select the button you wish to edit; the buttons currently hidden are shown in grey.
Press the centre button again to edit the button. Your changes will automatically be saved when you leave the menu.
Change channel numbers
If your programme provider moves a channel, for example, from channel number 5 to channel number 6, the Beo6 must be set up to send the correct channel number when you press the logo.
How to assign a new channel number to a channel logo:
Select Edit in the Setup menu.
Use the touch screen buttons to select first the zone, then the source of the button you wish to edit.
Press Channel.
Use the navigation buttons to select the logo to be edited, then press the centre button.
Press Number.
Press Clear to delete the old number and enter the new one.
Press Store to save the number.
Press Back to leave the menu.
You may of course also contact your Bang & Olufsen retailer to make changes in your remote control.

Wireless setup
When configured for it, the Beo6 remote control is able to connect to a wireless network. This enables 2-way communication with the products, the Beo6 controls.
Connection can take place in different ways depending on your wireless network. Bang & Olufsen recommends specific Network Link access points. Contact your retailer for more information.
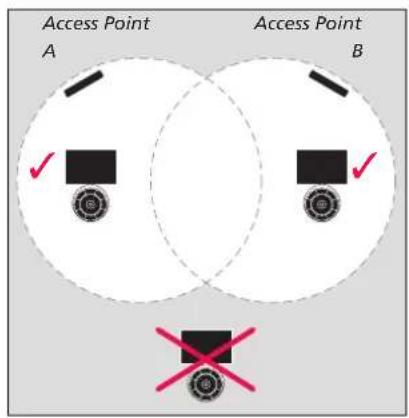
It is important that you are in close proximity to the access point you are connecting the Beo6 to, when making the setup.
Connections must be made to all access points in your Bang & Olufsen wireless network.
Note that only some Bang & Olufsen products support 2-way communication. See the Guides for the products for information about the functions and their operation.
Enable wireless communication
From the factory the wireless module in Beo6 is disabled. Therefore, before connecting to a wireless setup, you must enable the wireless module.
Enable the wireless module
Select Wireless in the Setup menu.
Press On/Off on Beo6.
Select Enable on Beo6 – the active setting is marked in red.
The wireless module in Beo6 uses power and reduces battery run time. Therefore, we recommend that you disable the wireless module, if you cannot or do not wish to use the wireless function.
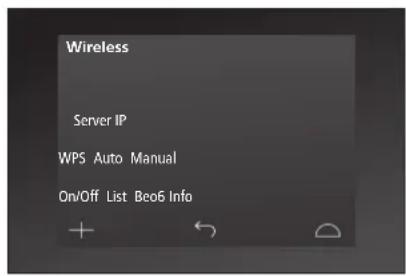
The wireless setup menu.
Automatic wireless connection
Bang & Olufsen recommended access points support automatic connection – also called Wi-Fi Protected Setup (WPS). There has to be a 'connect' button (WPS/ ) on the access point.
See the guide enclosed with your access point for more information.
Autoconnect to a wireless setup
Select Wireless in the Setup menu.
Press WPS on Beo6.
Press the 'connect' button on your access point.
Press OK on Beo6. Beo6 connects to the access point, this may take a while.
When connection is established, Connection OK appears in the Beo6 display.
Press OK to return to the Wireless menu.
If necessary, move on to the next access point and repeat the procedure with all access points in your wireless network.
Press Back to leave the menu.
If connection is not established Connection failed appears in the Beo6 display. Move closer to the access point and try to connect again or use the manual setup.
Search for wireless networks
Beo6 can scan for all networks in range, and you can connect to the one you want. This can, for example, be used if your access point does not support automatic setup.
Make Beo6 search for networks
Select Wireless in the Setup menu.
Press Auto. Beo6 starts searching for networks, this may take a while.
A list of networks within range appears in the Beo6 display. Press the one you wish to connect to.
If a network password is required, a display for entering your password appears.
Enter your password and press GO.
When connection is established, Connection OK appears in the Beo6 display.
Press OK to return to the Wireless menu.
If necessary, move on to the next access points and repeat the procedure with all access points in your wireless network.
Press Back to leave the menu.
The network at the top of the list is the one supplying the strongest signal to where the remote control is placed. This is most likely the access point you are closest to.

The wireless setup menu.

List of available wireless networks, the signal strength is shown for each connection.
Manual wireless setup
If your network is set up with a hidden SSID, you must make a manual connection. This means that you must enter the name of the network (SSID), a password and network authentication.
Make manual setup
Select Wireless in the Setup menu.
Press Manual on Beo6.
Enter the network name (SSID) in the display and press OK.
Choose the network authentication. Options are Open, WPA and WPA2.
A display for entering your password appears.
Enter your network password and press GO.
When connection is established, Connection OK appears in the Beo6 display.
Press OK to return to the Wireless menu.
If necessary, move on to the next access points and repeat the procedure with all access points in your wireless network.
Press Back to leave the menu.
Enter new IP address
If the product you want to operate gets a different IP address, you must enter the new IP address in Beo6 in order to enable 2-way communication. When you use Beo6 for 2-way communication with BeoSound 5, you must look up the IP address on BeoSound 5 first.
Enter new IP address
Find the IP address on BeoSound 5 by entering the NETWORK INFO menu and look up IP ADDRESS. The address could, for example, be 192.168.100.111.
Select Wireless in the Setup menu.
Press Server IP on Beo6.
Enter the IP address in the display and press GO.


List of networks
Beo6 automatically connects to the access points you have connected to as you move between them. However, you can bring up a list of networks to see their status and to remove connections, if you want. Removing connections may be useful if you move or replace your access point.
Remove a network connection
Select Wireless in the Setup menu.
Press List.
The list of connected networks appears in the Beo6 display. Press the one you wish to remove.
Press Remove to remove the network.
Press Back to leave the menu.
Network problems
The Beo6 is a portable device and the wireless function is dependent on the wireless setup and coverage in your house. A previously well-functioning setup may develop problems over time as surroundings change. If you experience problems with your setup or have any questions, contact your Bang & Olufsen retailer.
See network information on Beo6
Select Wireless in the Setup menu.
Press Status.
The status of the currently used wireless network is shown in the display.
Press Back to leave the menu.
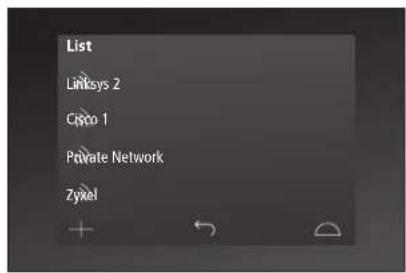
List of networks you have connected to.

While operating a product wirelessly, you can see the signal strength in the upper right corner. The signal strength must be at least two 'lines' to ensure operation.
Maintenance
We recommend that you switch off the remote control while you clean it. Press and hold the centre button to do so.
To switch the remote control back on, press and hold the centre button again.
Cleaning
Remove grease stains or persistent dirt with a soft, lint-free, firmly wrung cloth, dipped in a solution of water containing only a few drops of mild detergent, such as washing-up liquid.
To clean the remote control display, use a mild window cleaning fluid. To retain the optimum performance of the display, make sure that no traces of the cleaning fluid are left on the glass.
If the display glass is damaged, contact your retailer to have it replaced.
Beware that some types of micro-fibre cloths may harm the glass due to their strong abrasive effect.
Note! Never use alcohol or other solvents to clean any part of the remote control!
- PRODUCT DOCUMENTATION, 4
- USING BEO6, 5
- OPERATING NON-BANG & OLUFSEN PRODUCTS, 6
- USING THE CHARGER, 7
- BEO6 SETUP MENU, 8
- WIRELESS SETUP, 11
- MAINTENANCE, 15
- INTRODUCTION
- PRODUCT DOCUMENTATION
- USING BEO6
- OPERATING NON-BANG & OLUFSEN PRODUCTS
- USING THE CHARGER
- POWER CONSUMPTION
- BEO6 SETUP MENU
- NAVIGATE IN THE SETUP MENU
- OPTIONS IN THE SETUP MENU
- EDIT BUTTONS
- HOW TO SHOW OR HIDE A BUTTON
- CHANGE CHANNEL NUMBERS
- HOW TO ASSIGN A NEW CHANNEL NUMBER TO A CHANNEL LOGO
- WIRELESS SETUP
- ENABLE WIRELESS COMMUNICATION
- ENABLE THE WIRELESS MODULE
- AUTOMATIC WIRELESS CONNECTION
- AUTOCONNECT TO A WIRELESS SETUP
- SEARCH FOR WIRELESS NETWORKS
- MAKE BEO6 SEARCH FOR NETWORKS
- MANUAL WIRELESS SETUP
- MAKE MANUAL SETUP
- ENTER NEW IP ADDRESS
- LIST OF NETWORKS
- REMOVE A NETWORK CONNECTION
- NETWORK PROBLEMS
- SEE NETWORK INFORMATION ON BEO6
- MAINTENANCE
- CLEANING
Brand : BANG & OLUFSEN
Model : Beo6
Category : Remote control