
HKTS 9 - Loudspeaker HARMAN KARDON - Free user manual and instructions
Find the device manual for free HKTS 9 HARMAN KARDON in PDF.


| Product Type | 5.1-Channel Home Theater Speaker System |
| Brand | Harman Kardon |
| Model | HKTS 9 |
| Satellite Speaker Dimensions (H x W x D) | Approx. 10.2 x 2.8 x 3.9 inches (259 x 71 x 99 mm) |
| Center Speaker Dimensions (H x W x D) | Approx. 4.1 x 27.6 x 3.9 inches (104 x 701 x 99 mm) |
| Subwoofer Dimensions (H x W x D) | Approx. 15.7 x 14.2 x 14.2 inches (399 x 361 x 361 mm) |
| Satellite Speaker Weight | Approx. 4.4 lbs (2 kg) each |
| Center Speaker Weight | Approx. 8.8 lbs (4 kg) |
| Subwoofer Weight | Approx. 28.7 lbs (13 kg) |
| Power Handling (RMS) | 100W per channel (satellites), 200W (subwoofer) |
| Frequency Response | Satellites: 120 Hz – 20 kHz; Subwoofer: 35 Hz – 120 Hz |
| Impedance | 8 ohms (satellites) |
| Sensitivity | 86 dB (satellites) |
| Driver Configuration | Satellites: 3.5" woofer, 0.5" tweeter; Center: dual 3.5" woofers, 0.5" tweeter; Subwoofer: 10" driver |
| Connection Type | Spring clip terminals |
| Color | Black |
| Warranty | 2 years (varies by region) |
| Recommended Amplifier Power | 10 – 100W per channel |
| Cleaning Instructions | Wipe with a soft, dry cloth. Do not use solvents. |
| Safety Notes | Do not expose to moisture. Ensure proper ventilation. |
Frequently Asked Questions - HKTS 9 HARMAN KARDON
User questions about HKTS 9 HARMAN KARDON
0 question about this device. Answer the ones you know or ask your own.
Ask a new question about this device
Download the instructions for your Loudspeaker in PDF format for free! Find your manual HKTS 9 - HARMAN KARDON and take your electronic device back in hand. On this page are published all the documents necessary for the use of your device. HKTS 9 by HARMAN KARDON.
USER MANUAL HKTS 9 HARMAN KARDON
Home Theater Speaker System
Owner's Manual

harman/kardon®
by HARMAN
Important Safety Instructions
Read these instructions.1.
Keep these instructions.2.
Heed all warnings.3.
Follow all instructions.4.
Do not use this apparatus near water.5.
Clean only with a dry cloth.6.
Do not block any ventilation openings. Install in accordance with the manufacturer's instructions.7.
-
Do not install near any heat sources such as radiators, heat registers, stoves or other apparatus (including amplifiers) that produce heat.
-
Do not defeat the safety purpose of the polarized or grounding-type plug. A polarized plug has two blades with one wider than the other. A grounding-type plug has two blades and a third grounding prong. The wide blade or the third prong is provided for your safety. If the provided plug does not fit into your outlet, consult an electrician for replacement of the obsolete outlet.
-
Protect the power cord from being walked on or pinched, particularly at plugs, convenience receptacles and the point where they exit from the apparatus.
Only use attachments/accessories specified by the manufacturer.11.
- Use only with the cart, stand, tripod, bracket or table specified by the manufacturer or sold with the apparatus.
When a cart is used, use caution when moving the cart/apparatus combination to avoid injury from tip-over.
Unplug this apparatus during lightning storms or when unused for long periods of time.13.
-
Refer all servicing to qualified service personnel. Servicing is required when the apparatus has been damaged in any way, such as power supply cord or plug is damaged, liquid has been spilled or objects have fallen into the apparatus, the apparatus has been exposed to rain or moisture, does not operate normally, or has been dropped.
-
Do not expose this apparatus to dripping or splashing and ensure that no objects filled with liquids, such as vases, are placed on the apparatus.
-
To completely disconnect this apparatus from the AC Mains, disconnect the power supply cord plug from the AC receptacle.
-
The mains plug of the power supply cord shall remain readily operable.
-
Do not expose batteries to excessive heat such as sunshine, fire or the like.


harman kardon® HKTS 9/16
Typographical Conventions
We have employed certain conventions to help you use this manual:
① – (number in an oval) indicates a rear-panel control or connector on the illustration of the HKTS 210SUB subwoofer.
Example (bold type) – indicates the name of a specific control or rear-panel connector on the HKTS 210SUB subwoofer.
EXAMPLE (OCR type) – indicates a control or switch setting on the HKTS 210SUB subwoofer.
IMPORTAnT SAFeTy InSTRUCTIONs 2
InTRODUCTION 4
DeSCRIPTIOn AnD FeATUReS 4
InCIUDeD ITeMS 4
HKTS 210SUB ReAR-PAnel COnneCTIONS 5
SPeAKeR PIACeMenT 6
MOUnTIng OPTIONs 6
SPeAKeR COnneCTIONS 8
OPeRATIOn 10
TROUBLESHOOTIng 11
SPeCIFICATIONnS 12
Introduction
Thank you for purchasing the harman kardon ® HKTS 9/16 speaker system, with which you're about to begin many years of listening enjoyment. The HKTS 9/16 has been custom designed to provide all the excitement and power of the cinema experience in your own living room.
While sophisticated electronics and state-of-the-art speaker components are hard at work within the HKTS 9/16, hookup and operation are simple. Color-keyed cables and connections, and simple controls make the HKTS 9/16 easy to use.
To obtain maximum enjoyment from your new home theater speaker system, we urge you to take a few minutes to read through this manual. This will help ensure that the connections you make to your receiver (or preamp/processor), amplifier and other devices are correct. In addition, a few minutes spent learning the functions of the various controls will enable you to take advantage of all the power and refinement the HKTS 9/16 is able to deliver.
If you have any questions about this product, its installation or its operation, please contact your dealer, the best local source of information.
Description and Features
The HKTS 9/16 is a complete six-piece home theater speaker system that includes:
An 8-inch, 200-watt powered subwoofer
- Four identical two-way video-shielded satellite speakers (the HKTS 16 satellite speakers feature dual drivers) for the left and right front, and left and right rear (surround) speaker positions
A dedicated, voice-matched, video-shielded, dual-driver center speaker Shelf stands and wall-mount brackets for the satellite speakers and a wall-mount bracket for the center speaker.
All of the cables you need to connect all of the speakers to your receiver or • preamp/processor and amplifier.
The speaker cables all use a color-coding system to conform to the Consumer Electronics Association (CEA*) standard. This color-coding system minimizes confusion when connecting the speakers, especially when the HKTS 9/16 system is used with a harman kardon receiver.
Shelf stands and wall-mount brackets are included for the satellite and center speakers, and shelf stands are included for the satellite speakers. Optional HTFS 2 floor stands are available separately from your harman kardon dealer.
harman kardon invented the high-fidelity receiver fifty years ago. With state-of-the-art features and time-honored circuit designs, the HKTS 9/16 is a perfect complement to a harman kardon receiver, or any home theater system.
Included Items
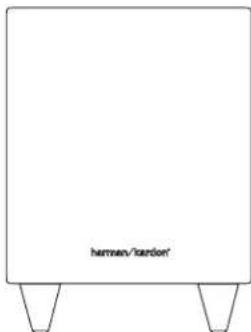
One HKTS 210SUB subwoofer
One center-channel speaker

Four satellite speakers: a front left speaker, a front right speaker and two rear surround-sound speakers, with color-keyed stickers (shown with included shelf stands attached) (HKTS 9 satellites shown)

Four wall-mount brackets for satellite speakers

One wall-mount bracket for center-channel speaker

One combination LFE (low-frequency effects) and trigger cable for connection to the subwoofer (LFE cable has purple connectors)

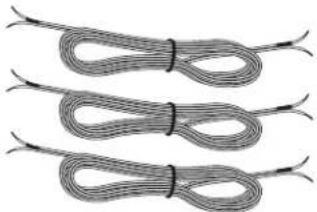
Three six-meter (19.7-foot) speaker cables for connection to front satellites (red and white) and to center speaker (green)
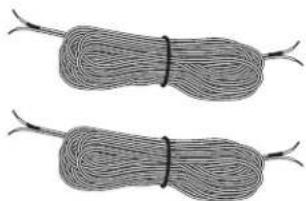
Two 12-meter (39.4-foot) speaker cables for connection from receiver to rear surround-sound satellites (gray and blue)
HKTS 210SUB Rear-Panel Connections
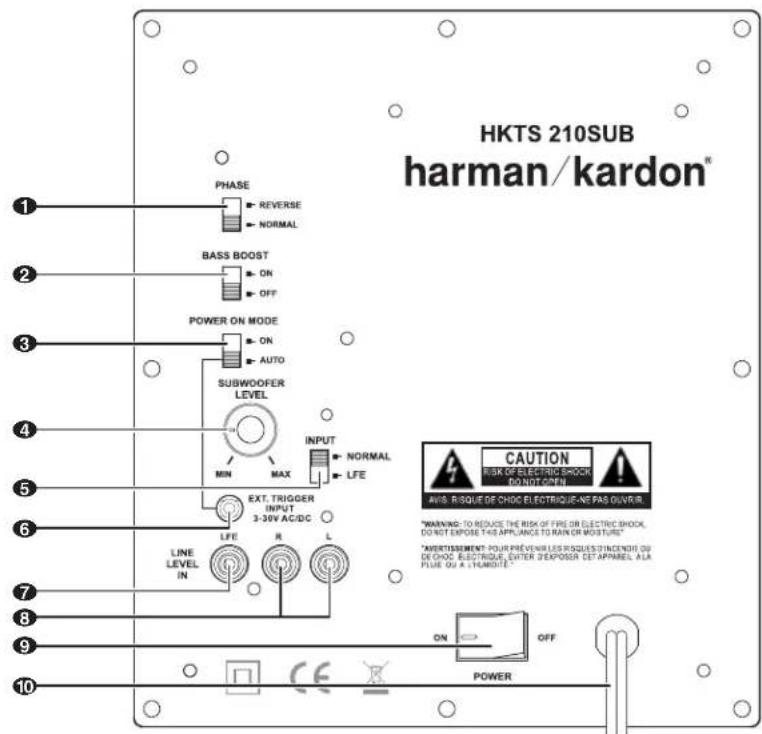
① Phase switch: The Phase switch ① determines whether the HKTS 210SUB's piston-like action moves in and out in phase with the satellite speakers. If the subwoofer were to play out of phase with the satellite speakers, the sound waves produced by the subwoofer could be canceled out, reducing bass performance and sonic impact. This phenomenon depends in part on the relative placement of all the speakers in the room. In most cases the Phase switch ① should be left in the NORMAL position. However, it does no harm to experiment, and you can leave the Phase switch ① in the position that maximizes bass response and impact.
② Bass Boost switch: Set this switch to ON to enhance the HKTS 210SUB's low-frequency performance. Set this switch to OFF for normal low-frequency performance.
③ Power On Mode switch If this switch is set in the AUTO position and the Power switch ⑨ is set to ON, the HKTS 210SUB will automatically turn itself on when it receives an audio signal and will enter the standby mode once no audio signal has been received for about 15 minutes. When this switch is set in the ON position, the HKTS 210SUB will remain on whether or not it is receiving an audio signal. An LED on the HKTS 210SUB's top panel indicates whether the subwoofer is in the on or standby state:
When the LED glows white, the • HKTS 210SUB is turned on.
- When the LED is not illuminated, the HKTS 210SUB is in standby mode.
When the Power switch ⑨ is set to OFF, the LED will not be illuminated, no matter what setting the Power On Mode switch ③ is in.
4 Subwoofer Level control: Use this control to adjust the HKTS 210SUB's volume. Turn clockwise to increase the volume; turn counterclockwise to decrease the volume.
⑤ Input Mode switch: When this switch is in the "Normal" setting, the input signal from the Line-Level L/R In connectors ⑧ is active. When this switch is in the "LFE" setting, the input signal from the Line-Level LFE In connector ⑦ is active.
6 External Trigger input Use the mini-plug of the supplied combination LFE and trigger cable to connect the External Trigger input to the trigger output of another compatible component. Whenever a trigger signal between 3V and 30V (AC or DC) is detected by the HKTS 210SUB, its amplifier will turn on. The HKTS 210SUB's amplifier will turn off after the trigger signal ceases. (This will occur even when the Power On Mode switch 3 is in the AUTO position.)
⑦ Line-Level LFE In connector: The signal from this connector bypasses the subwoofer's internal low-pass crossover. When you're connecting the subwoofer to the dedicated subwoofer output of a receiver/processor that has its own low-pass crossover network, use the Line-Level LFE In connector ⑦ and set the subwoofer's Input Mode switch ⑤ in the "LFE" position.
8 Line-Level L/R In connectors: The signals from these connectors pass through the subwoofer's internal low-pass crossover. When you're connecting the subwoofer to the preamp or subwoofer outputs of a receiver/processor that does not have its own low-pass crossover network, use both Line-Level L/R In connectors ⑧ and set the Input Mode switch ⑤ in the "Normal" position. If your receiver/processor has only one subwoofer output, you can use either the L or R connector.
⑨ Power switch Set this switch in the ON position to turn the HKTS 210SUB on. The subwoofer will then either be on or in standby mode, depending on the setting of the Power On Mode switch ③.
10 Power cord (non-detachable): After you have made and verified all subwoofer and speaker connections described in this manual, plug this cord into an active, unswitched electrical outlet for proper operation of the HKTS 210SUB. DO NOT plug this cord into the accessory outlets found in some audio components.
Speaker Placement
Color-Coding System
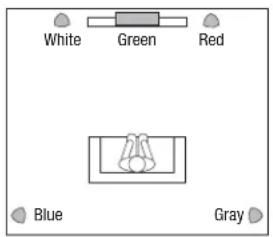
The HKTS 9/16 uses the CEA color-coding system to make setting up your home theater speaker system as easy as possible. Your system includes a set of colored stickers that may be placed near the speaker terminals of each of the four satellite speakers according to the key below. It doesn't matter which satellite speaker is used for any of the front or rear positions. (The center speaker and powered subwoofer are already color-coded for you.)
| Speaker Position Wire Color Band | |
| Front Left White | |
| Front Right Red | |
| Center Green | |
| Surround Left Blue | |
| Surround Right Gray | |
| Subwoofer Purple | |
Front Speakers
Place the front speakers the same distance from each other as they are from the listening position (the place where you'll be when you listen to the HKTS 9/16). They should be placed at about the same height from the floor as the listener's ears will be. They also can be angled toward the listener.
![graph TD A["White"] --> C["A"] B["Red"] --> C["A"] C["A"] --> D["Rectangle with a person at the bottom"]](/content/2026/06/1252877/images/3f4d6c46e725b7020872f7b17a0732aa6879be9b8da558680129df57d2bfed31.jpg)
Center Speaker
The center speaker should be placed slightly behind (farther away from the listener) the front left and right speakers. Its center should be no more than 55 cm (2 feet) above or below the tweeters of the front left and right speakers. It is often convenient to set the center speaker on top of the television set, as shown in the drawing.

Subwoofer
The low-frequency sound reproduced by the subwoofer is mostly omnidirectional, and this speaker may be placed in a convenient location in the room. However, the best reproduction of bass will be heard when the subwoofer is placed in a corner along the same wall as the front speakers. Experiment with subwoofer placement by temporarily placing the subwoofer in the listening position and moving around the room until the bass reproduction is best. Place the subwoofer in that location.

Surround Speakers
Place the two surround speakers slightly behind the listening position. Ideally, they should face each other and be at a level higher than the listeners' ears. If that is not possible, they may be placed on a wall behind the listening position, facing forward. The surround speakers should not call attention to themselves. Experiment with their placement until you hear a diffuse, ambient sound accompanying the main program material heard in the front speakers.

Mounting Options
You can place the satellite and center speakers on shelves using their built-in stands, or you can wall-mount them using the supplied hardware.
Wall-Mounting the Satellites
Remove the black shelf stand from the bottom of the speaker by unscrewing the 1. bolt. Store the shelf stand and bolt in a safe place in case you need them in the future.
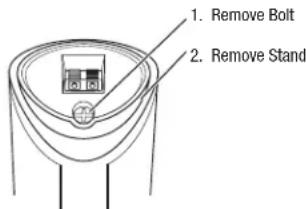
Determine the locations for the speakers. If possible, position the speakers so that 2. the mounting screws (not included; use size #8) can be installed directly into a wall stud. If that is not possible, use optional wall anchors that are rated to support at least 25 lb (11.3kg) and are appropriate for the construction and materials of your wall. The customer is responsible for the proper selection and use of mounting hardware, available through hardware stores, to wall-mount the speakers properly and safely.
Bring the speaker cable through the wall-bracket attachment plate, and mount the 3. attachment plate on the wall in the desired location.

Thread the speaker cable through the arc-shaped opening on the top of the 4. mounting bracket, not the screw hole.

Attach the mounting bracket to the wall plate by inserting the tab at the top of the 5. attachment plate into the slot on top of the bracket and snapping the bracket onto the attachment plate.

Fit the terminal cover onto the bracket as shown in the illustration 6. below, then connect the speaker leads to the terminals on the underside of the speaker. Remember to observe the correct polarity.

Fit the terminal cover into the opening on the underside of the speaker so that it is 7. flush against the speaker and covers the terminals. Insert the supplied long bracket bolt up through the bottom of the bracket and terminal cover, and screw it into the threaded insert on the underside of the speaker. The bolt should be snug but not so tight as to prevent the speaker from pivoting on the bracket.
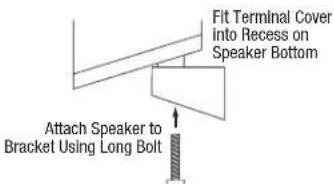
You can pivot the wall-mounted speaker from side to side; however, attempting to tilt it up or down will damage the bracket and possibly the wall, which would not be covered by your warranty.
Wall-Mounting the Center Speaker
Determine the location for the speaker. If possible, position the speaker so that one 1. of the mounting screws (not included; use size #10) can be installed directly into a wall stud. If that is not possible, use optional wall anchors that are rated to support at least 25 lb (11.3kg) and are appropriate for the construction and materials of your wall. The customer is responsible for the proper selection and use of mounting hardware, available through hardware stores, to wall-mount the speaker properly and safely.
Bring the speaker cable through the wall-bracket attachment plate as shown, and 2. mount the attachment plate on the wall in the desired location.

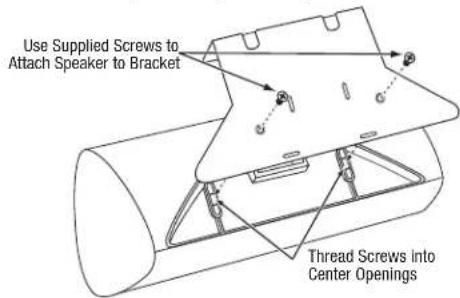
Remove the rubber pads from the foot rests on the bottom of the center speaker 3. and connect the speaker leads to the terminals on the underside of the speaker. Remember to observe the correct polarity.
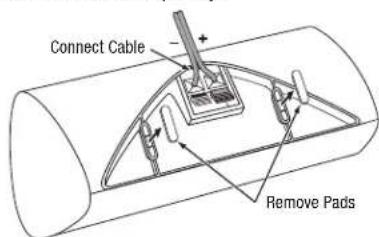
Use the supplied screws to attach the speaker to the wall-mount bracket. The 4. screws thread into the center foot-rest openings that were exposed when you removed the rubber pads in the previous step.
Speaker Connections
IMPORTANT NOTE: Before making speaker connections, be certain that your receiver or audio power amplifier is turned off and preferably unplugged from its AC power source. Do not connect the HKTS 210SUB subwoofer to an AC power source until you have made all speaker-wire connections.
Speakers and other electronics have corresponding (+) and (−) terminals. Most makers of electronics, including harman kardon engineers, use red to denote the (+) terminal and black for the (−) terminal.

Newer harman kardon receivers conform to the CEA standard and therefore use a color other than red or black for the (+) terminal to indicate some speaker positions: e.g., surround left.
Although the HKTS 9/16 system has red and black collars on the individual speaker terminals to denote the positive and negative connections, your system includes a colored band on the positive lead at both ends of every speaker cable and a matching colored sticker for each of the four satellite speakers, conforming to the key on page 6. The center
speaker has a green (+) terminal, and the subwoofer has a purple SUB input jack. This system is intended to help you ensure that the speaker in each location is connected to the correct terminals on your receiver or amplifier.
The (+) lead of the speaker wire is indicated with a stripe and has the colored band corresponding to the speaker's position. It is important to connect all speakers identically: (+) on the speaker to (+) on the amplifier and (−) on the speaker to (−) on the amplifier.
With the advent of multichannel surround-sound systems, connecting all of the speakers in your system with the correct polarity remains equally important in order to preserve the proper ambience and directionality of the sound.
To connect the supplied speaker wires to the satellite and center speaker terminals located on the bottom of each speaker, press the red or black tab, insert the bare end of the wire into the hole, and release the tab. Gently tug on the wire to make sure that it is fully inserted.
![graph TD subgraph_FrontLeftSpeakerCable["Front Left Speaker Cable (White Bands)"] A1[" "] --> B1[" "] A2[" "] --> C1[" "] A3[" "] --> D1[" "] A4[" "] --> E1[" "] A5[" "] --> F1[" "] A6[" "] --> G1[" "] A7[" "] --> H1[" "] A8[" "] --> I1[" "] A9[" "] --> J1[" "] A10[" "] --> K1[" "] A11[" "] --> L1["…](/content/2026/06/1252877/images/438528af1e4f3b8fff27f80d0e17a4207f5488192c240f1626539101b3d275c1.jpg)
Connecting the Subwoofer to a Receiver or Preamp/Processor with a Dedicated Subwoofer Output
Use this installation method for receivers and preamp/processors that have a dedicated subwoofer output with low-pass filtering (also called bass management). If the dedicated subwoofer output does not have low-pass filtering, follow the instructions in Connecting the Subwoofer to a Receiver or Preamp/Processor With Line Outputs, on page 9.
Use the LFE (purple) connector of the supplied combination LFE and trigger cable to connect the HKTS 210SUB's Line-Level LFE In connector ⑦ to the dedicated subwoofer output (or LFE output) of your receiver or preamp/processor. Set the subwoofer's Input Mode switch ⑤ to the "LFE" position.
Connect each satellite speaker and the center speaker to the corresponding speaker terminals on your receiver or amplifier.
In your receiver or preamp/processor's setup menu, configure the receiver or preamp/processor for "Subwoofer ON," and set the front, center and surround speakers to "Small." After you have made and verified all connections, plug the HKTS 210SUB's AC Power cord 10 into an active AC outlet.
![graph TD subgraph_FrontLeftSpeakerCable["Front Left Speaker Cable (White Bands)"] A1[" "] --> B1[" "] A2[" "] --> C1[" "] A3[" "] --> D1[" "] A4[" "] --> E1[" "] A5[" "] --> F1[" "] A6[" "] --> G1[" "] A7[" "] --> H1[" "] A8[" "] --> I1[" "] A9[" "] --> J1[" "] A10[" "] --> K1[" "] A11[" "] --> L1["…](/content/2026/06/1252877/images/7bb812f83af3e25c6c78d2c103c4f0e87966901187f8ef2e59718bde87c20283.jpg)
Connecting the Subwoofer to a Receiver or Preamp/Processor with Line Outputs
Use this installation method for receivers and preamp/processors that do not have a dedicated subwoofer output but do have preamp-level (volume-controlled) line outputs. If the receiver or preamp/processor has a dedicated subwoofer output with low-pass filtering, see Connecting the Subwoofer to a Receiver or Preamp/Processor with a Dedicated Subwoofer Output, on page 8.
If you're connecting to a receiver with left and right line outputs, connect the LFE (purple) connector of the supplied combination LFE and trigger cable to one of those outputs and to either of the HKTS 210SUB's Line-Level L/R In connectors 8. Use a second RCA cable (not supplied) to connect the other receiver or preamp line output to the other of the HKTS 210SUB's Line-Level L/R In connectors 8. Set the subwoofer's Input Mode switch 5 in the "Normal" position.
Connect each satellite speaker and the center speaker to the corresponding speaker terminals on your receiver or amplifier.
After you have made and verified all connections, plug the HKTS 210SUB's AC Power cord ⑩ into an active AC outlet.
Speaker Connections (continued)

Connecting to a Trigger-Voltage Source
If your preamp/processor or another audio/video component has a trigger-voltage connection that supplies between 3V and 30V (AC or DC), connect it to the HKTS 210SUB's
External Trigger Input connector ⑥. If the component's trigger-voltage connection has a 3.5mm mini jack, you can use the supplied combination LFE/trigger cable to make the connection.
NOTE: Please do not connect the subwoofer ON/OFF trigger cable to the Remote Control Output (IR Out) of your home cinema system or surround receiver. This could lead to malfunction.
Operation
Turning the Subwoofer On and Off
Set the HKTS 210SUB's Power switch ⑨ to the ON position.
If the • Power On Mode switch this set to AUTO, the HKTS 210SUB will automatically turn itself on when it receives an audio signal, and it will go into standby mode when it has received no audio signal for 15 minutes. The subwoofer's LED will glow white when the subwoofer is on and will not be illuminated when the subwoofer is in standby.
If the • Power On Mode switch is set to ON, the HKTS 210SUB will remain on at all times. The HKTS 210SUB's LED will glow white.
If the • External Trigger Input connectors is connected to a trigger-voltage source, the HKTS 210SUB will turn on whenever a trigger voltage is present and will turn off after the trigger voltage ceases, regardless of the position of the Power On Mode switch ③.
If you will be away from home for an extended period of time, or if you will not be using the subwoofer for an extended period, switch the Power switch ⑨ to the OFF Position.
Subwoofer Adjustments: Volume
Use the Subwoofer Level control 4 to set the HKTS 210SUB's volume. Turn the knob clockwise to increase the subwoofer's volume; turn the knob counterclockwise to decrease the subwoofer's volume.
Subwoofer Adjustments: Phase
The Phase switch 1 determines whether the HKTS 210SUB's piston-like action moves in and out in phase with the satellite speakers. If the subwoofer were to play out of phase with the satellite speakers, the sound waves produced by the subwoofer could be canceled out, reducing bass performance and sonic impact. This phenomenon depends in part on the relative placement of all the speakers in the room.
Although in most cases the Phase switch ① should be left in the NORMAL position, there is no absolutely correct setting for the Phase switch ①. When the HKTS 210SUB is properly in phase with the satellite speakers, the sound will be clearer and have maximum impact, making percussive sounds like drums, piano and plucked strings sound more lifelike. The best way to set the Phase switch ① is to listen to music that you are familiar with and set the switch in the position that gives drums and other percussive sounds maximum impact.
Subwoofer Adjustments: Bass Boost
When set to the ON position, the Bass Boost switch 2 enhances low-frequency performance, resulting in bass with more impact, which you may prefer while watching movies or listening to music. There is no harm in experimenting with this control – setting the switch to the OFF position will return normal low-frequency performance.
Troubleshooting
This unit is designed for trouble-free operation. Most problems users encounter are due to operating errors. So if you have a problem, first check this list for a possible solution. If the problem persists, consult your authorized harman kardon service center.
| If there is no sound from any of the speakers: | Check that the receiver/amplifier is on and a source is playing.Make sure that all wires and connections between the receiver/amplifier and the speakers are connected properly.Make sure none of the speaker wires is frayed, cut or punctured.Review the proper operation of your receiver/amplifier. |
| If there is no sound coming from one speaker: | Check that the balance control on your receiver/amplifier is not set all the way to one channel.Check your receiver/amplifier's speaker setup procedure to make sure that he speaker in question has been enabled and its volume level has not been turned all the way down.Make sure that all wires and connections between the receiver/amplifier and the speaker are connected properly.Make sure the speaker wires are not frayed, cut or punctured. |
| If there is no sound coming from the center speaker: | Check your receiver/amplifier's speaker setup procedure to make sure that the center speaker has been enabled and its volume level has not been turned all the way down.Make sure that all wires and connections between the receiver/amplifier and the center speaker are connected properly.Make sure the speaker wires are not frayed, cut or punctured.If your receiver is operating in Dolby® Pro Logic® mode, make sure that the center speaker is not set to Phantom. |
| If there is no sound coming from the surround speakers: | Check your receiver/amplifier's speaker setup procedure to make sure that the surround speakers have been enabled and their volume levels have not been turned all the way down.Make sure that all wires and connections between the receiver/amplifier and the surround speakers are connected properly.Make sure the speaker wires are not frayed, cut or punctured.Review proper operation of your receiver/processor and its surroundingsound features.Make sure the movie or TV show you're watching has been recorded in a surround-sound mode. If it is not, check to see if your receiver/amplifier has a different surround-sound mode that you can use.Review the operation of your DVD player and the DVD jacket to make sure the DVD features the desired Dolby Digital or DTS® surround-sound mode, and that you have properly selected that mode using both the DVD player's menu and the disc's menu. |
| If there is no sound coming from the subwoofer: | Check that the subwoofer's Power Cord 10 is plugged into a working AC outlet.Check that the subwoofer's Power Switch 9 is in the ON position.Check that the Subwoofer Level Control 4 is not turned all the way down (fully counterclockwise).Check the audio connection between your receiver/processor and the subwoofer.Check your receiver/amplifier's speaker setup procedure to make sure that the subwoofer has been enabled and its volume level has not been turned all the way down. |
| If the system plays at low volumes but shuts off as volume is increased: | Make sure that all wires and connections between the receiver/amplifier and the speakers are connected properly.Make sure none of the speaker wires is frayed, cut or punctured.If you have an additional pair of front speakers connected to your receiver/amplifier, make sure that you're not operating the system below the receiver/amplifier's minimum impedance requirements. Check the receiver/amplifier's documentation for more information. |
You can find additional troubleshooting information in the FAQs link on the Support page at www.harmankardon.com.
Specifications
HKTS 9 System
Frequency Response 45Hz - 20kHz (-6dB)
SAT-TS7 Satellites Cen-TS7 Center
| Recommended Power 10 ~ 80 watts 10 ~ 80 watts | ||
| Impedance 8 ohms nominal 8 ohms nominal | ||
| Sensitivity 86dB @ 1 watt/1 meter | 86dB @ 1 watt/1 meter | |
| Tweeter | One 1/2" (12mm) dome, video-shielded | One 3/4" (19mm) dome, video-shielded |
| Midrange | One 3" (75mm) driver, video-shielded | Dual 3" (75mm) drivers, video-shielded |
| Dimensions (H x W x D) | 167mm x 100mm x 92mm(6-5/8" x 3-5/16" x 3-5/8") | 102mm x 241mm x 92mm(4" x 9-1/2" x 3-5/8") |
| Weight | 6.0 kg (13.2 lb) | 1.0 kg (2.2 lb) |
HKTS 210SUB Subwoofer
| Power requirement AC 100–120V, 50/60 Hz, 200W (USA)AC 220–240V, 50/60 Hz, 200W (EU) |
| Amplifier Power 200 watts RMS |
| Woofer 8" (200mm) woofer, sealed enclosure |
| External Trigger Input Voltage 3 ~ 30 volts AC/DC |
| Dimensions (H x W x D) 353mm x 267mm x 267mm(13-29/32" x 10-1/2" x 10-1/2") |
| Weight 9.0 kg (19.8 lb) |
HKTS 16 System
Frequency Response 45Hz - 20kHz (-6dB)
SAT-TS11 Satellites
Cen-TS11 Center
| Recommended Power 10 ~ 120 watts | 10 ~ 120 watts | ||
| Impedance 8 ohms nominal 8 ohms nominal | |||
| Sensitivity 86dB @ 1 watt/1 meter | 86dB @ 1 watt/1 meter | ||
| Tweeter | One 1/2" (12mm) dome, video-shielded | One 3/4" (19mm) dome, video-shielded | |
| Midrange | Dual 3" (75mm) drivers, video-shielded | Dual 3" (75mm) drivers, video-shielded | |
| Dimensions (H x W x D) | 243mm x 100mm x 92mm(9-9/16" x 3-15/16" x 3-5/8") | 102mm x 241mm x 92mm(4" x 9-1/2" x 3-5/8") | |
| Weight | 6.0 kg (13.2 lb) | 1.0 kg (2.2 lb) | |
HKTS 210SUB Subwoofer
| Power requirement AC 100–120V, 50/60 Hz, 200W (USA)AC 220–240V, 50/60 Hz, 200W (EU) |
| Amplifier Power 200 watts RMS |
| Woofer 8" (200mm) woofer, sealed enclosure |
| External Trigger Input Voltage 3 ~ 30 volts AC/DC |
| Dimensions (H x W x D) 353mm x 267mm x 267mm(13-29/32" x 10-1/2" x 10-1/2") |
| Weight 9.0 kg (19.8 lb) |
HKTS 9/16

HARMAN
Harman Consumer, Inc.
8500 Balboa Boulevard, Northridge, CA 91329 USA
516.255.4545 (USA only)
Made in P.R.C.
© 2010 Harman International Industries, Incorporated. All rights reserved.
harman kardon is a trademark of HARMAN International Industries, Incorporated, registered in the United States and/or other countries. Dolby, Pro Logic and the double-D symbol are registered trademarks of Dolby Laboratories. DTS is a registered trademark of DTS, Inc. CEA is a registered trademark of the Consumer Electronics Association.
Features, specifications and appearance are subject to change without notice.
Part No 950-0333-001
harman/kardon
by HARMAN
www.harmankardon.com
- IMPORTANT SAFETY INSTRUCTIONS
- HARMAN KARDON® HKTS 9/16
- TYPOGRAPHICAL CONVENTIONS
- INTRODUCTION
- DESCRIPTION AND FEATURES
- INCLUDED ITEMS
- HKTS 210SUB REAR-PANEL CONNECTIONS
- SPEAKER PLACEMENT
- COLOR-CODING SYSTEM
- FRONT SPEAKERS
- CENTER SPEAKER
- SUBWOOFER
- SURROUND SPEAKERS
- MOUNTING OPTIONS
- WALL-MOUNTING THE SATELLITES
- WALL-MOUNTING THE CENTER SPEAKER
- SPEAKER CONNECTIONS
- CONNECTING THE SUBWOOFER TO A RECEIVER OR PREAMP/PROCESSOR WITH A DEDICATED SUBWOOFER OUTPUT
- CONNECTING THE SUBWOOFER TO A RECEIVER OR PREAMP/PROCESSOR WITH LINE OUTPUTS
- CONNECTING TO A TRIGGER-VOLTAGE SOURCE
- OPERATION
- TURNING THE SUBWOOFER ON AND OFF
- SUBWOOFER ADJUSTMENTS: VOLUME
- SUBWOOFER ADJUSTMENTS: PHASE
- SUBWOOFER ADJUSTMENTS: BASS BOOST
- TROUBLESHOOTING
- SPECIFICATIONS
- HKTS 9 SYSTEM
- HARMAN
Brand : HARMAN KARDON
Model : HKTS 9
Category : Loudspeaker