
HKTS 30 - Loudspeaker HARMAN KARDON - Free user manual and instructions
Find the device manual for free HKTS 30 HARMAN KARDON in PDF.


| Product Type | Home Theater Speaker System (5.1) |
| Speaker Configuration | 5 satellites + 1 powered subwoofer |
| Satellite Driver | 3.5" midrange, 1" tweeter |
| Subwoofer Driver | 8" long-throw |
| Subwoofer Type | Powered (built-in amplifier) |
| Frequency Response | 35 Hz – 20 kHz |
| Impedance (Satellites) | 8 ohms |
| Sensitivity (Satellites) | 86 dB |
| Power Handling (Satellites) | 100 W RMS |
| Subwoofer Power Output | 200 W RMS |
| Inputs | RCA line-level, speaker wire terminals |
| Satellite Dimensions (H x W x D) | 5.5" x 3.5" x 4" each |
| Subwoofer Dimensions (H x W x D) | 15" x 12" x 14" |
| Satellite Weight | 2.5 lbs each |
| Subwoofer Weight | 25 lbs |
| Finish | Black vinyl |
| Mounting Options | Wall-mountable (keyhole slots) |
| Included Accessories | 5 satellites, subwoofer, speaker wire, manual |
| Care Instructions | Wipe with soft dry cloth; avoid liquids |
| Safety Features | Auto standby, thermal protection |
| Repairability | Refer to qualified service center |
Frequently Asked Questions - HKTS 30 HARMAN KARDON
User questions about HKTS 30 HARMAN KARDON
0 question about this device. Answer the ones you know or ask your own.
Ask a new question about this device
Download the instructions for your Loudspeaker in PDF format for free! Find your manual HKTS 30 - HARMAN KARDON and take your electronic device back in hand. On this page are published all the documents necessary for the use of your device. HKTS 30 by HARMAN KARDON.
USER MANUAL HKTS 30 HARMAN KARDON
Home Theater Speaker System
User Guide English

harman/kardon®
Designed to Entertain:
Important Safety Instructions
Please read the following precautions before use:
- Read these instructions.
- Keep these instructions.
- Heed all warnings.
- Follow all instructions.
- Do not use this apparatus near water.
-
Clean only with a dry cloth.
-
Do not block any ventilation openings. Install in accordance with the manufacturer's instructions.
-
Do not install near any heat sources such as radiators, heat registers, stoves or other apparatus (including amplifiers) that produce heat.
-
Do not defeat the safety purpose of the polarized or grounding-type plug. A polarized plug has two blades with one wider than the other. A grounding-type plug has two blades and a third grounding prong. The wide blade or the third prong is provided for your safety. If the provided plug does not fit into your outlet, consult an electrician for replacement of the obsolete outlet.
-
Protect the power cord from being walked on or pinched, particularly at plugs, convenience receptacles and the point where they exit from the apparatus.
-
Only use attachments/accessories specified by the manufacturer.
-
Use only with the cart, stand, tripod, bracket or table specified by the manufacturer or sold with the apparatus. When a cart is used, use caution when moving the cart/apparatus combination to avoid injury from tip-over.



Pb
Instructions for users on removal and disposal of used batteries. Specification of included battery types.
These symbols shown on the product, the packaging or in the manual or separate information sheet mean that the product itself, as well as the batteries included or built into the product, should never be thrown away with general household waste. Take them to applicable collection points, where proper treatment, recycling and recovery takes place, in accordance with national or local legislation, or European Directives 2002/96/EC and 2006/66/EC.
Correct handling of the product and batteries to be disposed helps save resources and prevents possible negative effects on the environment or human health.
The batteries included with your equipment may be Alkaline, Carbon Zinc/Manganese or Lithium (button cells) type. All types should be disposed of according to the above instructions.
To remove the batteries from your equipment or remote control, reverse the procedure described for inserting batteries in the Owners Manual.
For products with a built-in battery that lasts for the lifetime of the product, removal may not be possible for the user. In this case, recycling or recovery centers handle the dismantling of the product and the removal of the battery. If, for any reason, it becomes necessary to replace such a battery, this procedure must be performed by authorized service centers.
- Unplug this apparatus during lightning storms or when unused for long periods of time.
- Refer all servicing to qualified service personnel. Servicing is required when the apparatus has been damaged in any way, such as power supply cord or plug is damaged, liquid has been spilled or objects have fallen into the apparatus, the apparatus has been exposed to rain or moisture, does not operate normally, or has been dropped.
- Do not expose this apparatus to dripping or splashing and ensure that no objects filled with liquids, such as vases, are placed on the apparatus.
- To completely disconnect this apparatus from the AC Mains, disconnect the power supply cord plug from the AC receptacle.
- The mains plug of the power supply cord shall remain readily operable.
- Do not expose batteries to excessive heat such as sunshine, fire or the like.

The lightning flash with arrowhead symbol, within an equilateral triangle, is intended to alert the user to the presence of uninsulated "dangerous voltage" within the product's enclosure that may be of sufficient magnitude
to constitute a risk of electric shock to persons.

The exclamation point within an equilateral triangle is intended to alert the user to the presence of important operating and maintenance (servicing) instructions in the literature accompanying the product.
WARNING: To reduce the risk of fire or electric shock, do not expose this apparatus to rain or moisture.
Declaration of Conformity

We, Harman Consumer, Consumer Division
3500 B/s b/a B/d.
Northridge, Dr. 91329
话6
As the manufacturer and through our representative
Shanghai Tire Co
Human Consumer, Consumer Division
- module of loss
To declare under our sole responsibility that the product listed
below conforms to the requirements of the bioactivity and
Standard: I stated here in.
Modell's: H37520 and H37530
Strutians to which Conformity is declared:
2004/108/EC - EVC Directy, as amended.
1999ST - ECL II Bucilar as granted
2006.95.57. Lyv Bélyan/Trinéty, v. yezerdé
2007/32/1- Lenvailing Industry Directive, as presented
Figure 1: The group's health condition, which
HAPPYAN, SANZENI SPAVA 01
21.559.3.2011.4.2013.1.6.2013.71.5520.257
(四)登记人:16
31(1997)3-2200 71(2222)3-2555-126557-137555
EN 1030-3-3:1995|A120
EN 6005X2012 | N11:2009
用6325-1207
LIS LM 300 328 11.7.1(2005-10)
ETS EN 301489-1 V12.1 (2008-04)

CAUTION
RISK OF ELECTRIC SHOCK
DO NOT OPEN
THE LIGHTING FLASH AND ARROWHEAD WITHIN THE BANCOIL IS A WARNING SIGN MERTING YOU TO DANGEROUS VOLTAGE INSIDE THE PRODUCT.
CAUTION: TO REDUCE THE RISK OF SUSCK, DO NOT IT NOW WITH NO USER-SERVICEABLE PARTS INSUL. BUTTER SURVicing TO QUALIFIED SERVICE PERSONNEL.

THE EXPLANATION POINT WITHIN THE TRIANGLE IS A WARRING SIGN ALERTING YOU TO IMPORTANT INSTRUCTIONS ACCOMPANYING THE PRODUCT.
SEE MARKING ON BACK OF PRODUCT
ATTENTION!
It is considered good practice to always reenect the power
supply to your Harman Kardon unit before plugging
the device into the wall or AC power outlet.
Important Note for All Electronic Products:
Before inserting or unplugging audio cables from the secure device's headphones or line-level output jacks, it is good practice to turn off the device first. This will prolong the life of your unit, help protect your device from static electricity and prevent potential damage.
WARNING: TO PREVENT FIRE OR ELECTRICAL SHOCK HAZARD, DO NOT EXPOSE THIS PRODUCT TO RAIN OR MOISTURE.
WARNING: THE APPARATUS SHOULD NOT BE EXPOSED TO DRIPPING ON SPLUSHING AND NO OBJECTS FILED WITH LIQUID, SUCH AS INSES, SHOULD BE PLACED ON THE APPARATUS.
Harman Kardon® HKTS 20 / HKTS 30
Typographical Conventions
We have employed certain conventions to help you use this manual:
① – (number in a circle) – Indicates a rear-panel control or connection on the illustration of the HKTS200SUB subwoofer Example (bold type) – Indicates the name of a specific control or rear-panel connection on the HKTS200SUB subwoofer
EXAMPLE (OCR type) – Indicates a control or switch setting on the HKTS200SUB subwoofer
Harman Kardon® HKTS 20 / HKTS 30
Introduction
Thank you for purchasing the Harman Kardon® HKTS20/HKTS30 speaker system, with which you're about to begin many years of listening enjoyment. The HKTS20/HKTS30 has been custom designed to provide all the excitement and power of the cinema experience in your own living room.
While sophisticated electronics and state-of-the-art speaker components are hard at work within the HKTS20 and HKTS30, hookup and operation are simple. Color-keyed cables and connections, and simple controls make the HKTS20/HKTS30 easy to use.
To obtain maximum enjoyment from your new home theater speaker system, we urge you to take a few minutes to read through this manual. This will help ensure that the connections you make to your receiver (or preamp/processor), amplifier and other devices are correct. In addition, a few minutes spent learning the functions of the various controls will enable you to take advantage of all the power and refinement the HKTS20/HKTS30 is able to deliver.
If you have any questions about this product, its installation or its operation, please contact your dealer, the best local source of information.
Description and Features
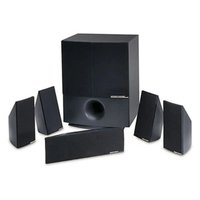
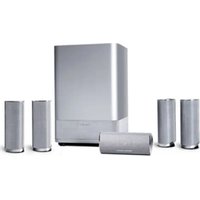
The HKTS20/HKTS30 is a complete six-piece home theater speaker system that includes:
• An 8-inch, 200-watt powered subwoofer
- Four identical two-way video-shielded satellite speakers (the HKTS30 satellite speakers feature dual drivers) for the left and right front, and left and right rear (surround) speaker positions
• A dedicated, voice-matched, video-shielded, dual-driver center speaker
- Removable bases and wall-mount brackets for the satellite speakers and a wall-mount bracket for the center speaker
- All of the cables you need to connect all of the speakers to your receiver or preamp/processor and amplifier.
The speaker cables all use a color-coding system to conform to the Consumer Electronics Association (CEA) standard. This color-coding system minimizes confusion when connecting the speakers, especially when you are connecting them to a Harman Kardon receiver.
The HKTS200SUB subwoofer is equipped with a special LFE input that simplifies connection to receivers and preamp/processors with dedicated subwoofer outputs that carry low-frequency signals. Other conveniences include a level control, a phase switch for fine-tuning bass response to suit your listening environment and taste, and an efficient switching system that senses the presence of an audio signal and automatically switches the subwoofer from standby mode to on.
Wall-mount brackets are included for the satellite and center speakers, and shelf stands are included for the satellite speakers. Optional HKFS3 floorstands are available separately from your Harman Kardon dealer. Harman Kardon invented the high-fidelity receiver fifty years ago. With state-of-the-art features and time-honored circuit designs, the HKTS20/HKTS30 is a perfect complement to a Harman Kardon receiver, or any home theater system.
Included
Four satellite speakers for front left/right and surround left/right (HKTS30 satellites shown)

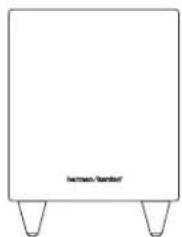
One powered subwoofer
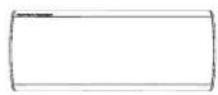
Four wall-mount brackets for satellite speakers
One wall-mount bracket for center speaker

Four metal stop plates and screws (for satellite speaker wall-mount brackets)


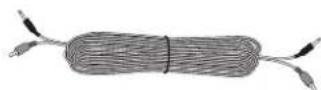
One combination LFE and trigger cable for connection to the subwoofer (LFE cable has purple connectors)

One 4-meter (13.1-foot) speaker cable for center speaker (green color bands)

Two 5-meter (16.4-foot) speaker cables for front satellites (red and white color bands)

Two 10-meter (32.8-foot) speaker cables for rear satellites (gray and blue color bands)
HKTS200SUB Rear-Panel Connections

① Subwoofer Level Control: Use this control to adjust the HKTS200SUB's volume. Turn clockwise to increase the volume; turn counterclockwise to decrease the volume.
② Bass Boost Switch: Set this switch to ON to enhance the HKTS200SUB's low-frequency performance. Set this switch to OFF for normal low-frequency performance.
③ Phase Switch: The Phase Switch determines whether the HKTS200SUB's piston-like action moves in and out in phase with the satellite speakers. If the subwoofer were to play out of phase with the satellite speakers, the sound waves produced by the subwoofer could be canceled out, reducing bass performance and sonic impact. This phenomenon depends in part on the relative placement of all the speakers in the room. In most cases the Phase Switch should be left in the NORMAL position. However, it does no harm to experiment, and you can leave the Phase Switch in the position that maximizes bass response and impact.
4 Power On Mode Switch: When set in the AUT O position and when the Power Switch ⑧ is set to ON, the HKTS200SUB will automatically turn itself on when it receives an audio signal, and will enter the standby mode once no audio signal has been received for about 15 minutes. When this switch is set in the ON position, the HKTS200SUB will remain on whether or not it is receiving an audio signal. An LED on the HKTS200SUB's top panel indicates whether the subwoofer is in the on or standby state:
- When the LED is illuminated white, the HKTS200SUB is turned on. - When the LED is not illuminated, the HKTS200SUB is in standby mode. When the Master Power Switch ⑧ is set to ◇ F F, the LED will not be illuminated, no matter what setting the Power On Mode Switch ④ is in.
⑤ External Trigger Input: Use the mini-plug of the supplied combination LFE and trigger cable to connect the External Trigger Input to the trigger output of another compatible component. Whenever a trigger signal between 3 and 30V (AC or DC) is detected, the HKTS200SUB's amplifier will turn on. The HKTS200SUB's amplifier will turn off after the trigger signal ceases. (This will occur even when the Power On Mode Switch ④ is in the AUTO position.)
⑥ Line-Level LFE In Connector: Use the LFE (purple) connector of the supplied combination LFE and trigger cable to connect the Line-Level LFE In to the dedicated subwoofer output of a receiver or preamp/processor. This input bypasses the HKTS200SUB's internal crossover circuitry, so it should only be used with a subwoofer output that has been low-pass filtered. If your receiver or preamp/processor does not have a dedicated subwoofer output that is low-pass filtered you should use the HKTS200SUB's Line-Level L/R In Connectors ⑦ instead.
7 Line-Level L/R In Connectors: Use these connectors if your receiver or preamp/processor does not have digital surround sound decoding or a subwoofer output that is low-pass filtered.
- If your receiver or preamp/processor has a separate subwoofer output, use the LFE (purple) connector of the supplied combination LFE and trigger cable to connect it to either one of the HKTS200SUB's Line-Level L/R In Connectors.
- If your receiver or preamp/processor does not have a separate subwoofer output, use two Y-adapters (not supplied). Connect an adapter's single end to the unit's preamp output for that channel. Connect one of the adapter's dual ends to the main amp input for that channel, and connect the adapter's other dual end to one of the HKTS200SUB's Line-Level L/R In Connectors. Repeat with the other Y-adapter, preamp channel, main amp input and HKTS200SUB Line-Level L/R In Connector.
⑧ Power Switch: Set this switch in the ON position to turn the HKTS200SUB on. The subwoofer will then either be on or in standby mode, depending on the setting of the Power On Mode Switch ④.
⑨ Power Cord (Non-Detachable): After you have made and verified all subwoofer and speaker connections described in this manual, plug this cord into an active, unswitched electrical outlet for proper operation of the HKTS200SUB. DO NOT plug this cord into the accessory outlets found in some audio components.
Speaker Placement
NOTE: The following speaker placement, mounting and connection instructions are identical for the HKTS20 and HKTS30 systems.
Color-Coding System
The HKTS20 and HKTS30 use the channel color-coding system established by the CEA to make setting up your home theater speaker system as easy as possible. The HKTS20/HKTS30 systems include speaker wires with color bands on each end.
| Speaker Position Wire Color Band | |
| Front Left White | |
| Front Right Red | |
| Center Green | |
| Surround Left Blue | |
| Surround Right Gray | |
| Subwoofer Purple | |
Placing the Front Speakers
![graph TD A["Left Front Speaker"] --> C["Central Object"] B["Right Front Speaker"] --> C["Central Object"]](/content/2026/06/1252876/images/357c89c23a11123286d9ab8f97097ca327d8d967fd3e3a2a791a02bf1da7824b.jpg)
The front speakers should be placed the same distance from each other as they are from the listening position. They should be placed at about the same height from the floor as the listener's ears will be. They also can be angled toward the listener.
Placing the Center Speaker
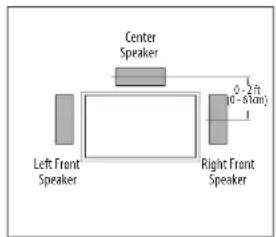
The center speaker should be placed slightly behind (farther away from the listener) the front left and right speakers. Its center should be no more than 2 feet (61cm) above or below the tweeters of the front left and right speakers. If you have a CRT television, it may be convenient to set the center speaker on top of the television set.
Placing the Subwoofer
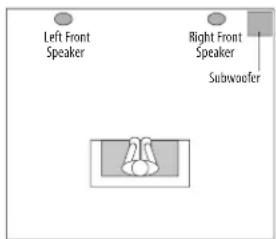
Since our ears do not hear directional sound at the low frequencies where the subwoofer operates, it will have good performance from just about any location in your room. However, the best bass reproduction is likely to be heard when the subwoofer is placed in a corner along the same wall as the front left and right speakers. You can experiment with subwoofer placement by temporarily placing it in the listening position and playing music with strong bass content. Move around to various locations in the room while the system is playing and listen until you find the location where the bass performance is best. Place the subwoofer in that location.
Placing the Surround Speakers

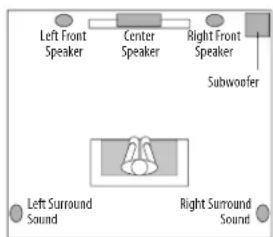
The two surround speakers should be placed slightly behind the listening position, facing each other and, ideally, should be 5–6 feet (1.5m–1.8m) from the floor. An alternate location would be on a wall behind the listening position, facing forward. The surround speakers should not call attention to themselves while they're playing. Experiment with their placement until you hear a diffuse, ambient sound accompanying the program material heard from the front left and right and center speakers.
Mounting Options for Satellite and Center Speakers
Shelf Placement
You can place the satellite and center speakers on shelves. The satellite speakers have built-in bases for shelf placement. You can also remove the bases if desired.
To remove a satellite speaker's base, pull it straight off the speaker, as shown in the illustration. Applying even pressure to both sides of the base will allow it to slide off smoothly.

Wall-Mounting: Satellite Speakers
IMPORTANT: Read the Speaker Connections section, on page 7, before wall-mounting the satellite speakers. You will need to insert the speaker wires through the wall mounts and connect the wires to the speakers during the process of installing the wall-mounts.
NOTE: If you are using your own speaker wire, it must be no thicker than the wire supplied with the speakers. Thicker wire will prevent the wall-mount bracket from sliding onto the speaker.
Decide on the location for the speaker 1.
(see Speaker Placement, opposite).
Remove the speaker's base as explained in 2. Shelf Placement, above.
Disassemble the wall-mount bracket by sliding the two sections apart, as shown in the 3. illustration.
Attach the wall portion of the wall-mount onto the wall using hardware that is 4. appropriate for the wall's construction and materials. We recommend first anchoring the mount using its keyhole, then attaching it with another anchor through its top opening, as shown in the illustration. Note that the satellite speakers weigh 3.3 lb (1.5kg). Be sure to use hardware that can support this weight.
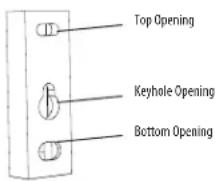
NOTE: If you're running the speaker wire through the wall you can bring it out directly behind the bracket location and insert it through the bottom opening in the wall portion of the wall-mount, as shown in the illustration. This will keep the wire completely hidden from view once the installation is complete.

- If you're not running the speaker wire through the wall, insert it through the wall portion of the wall-mount bracket as shown in the illustration.
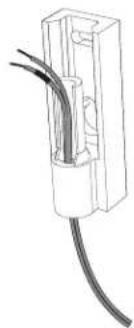
Pass the speaker wire through the speaker portion of the wall-mount as shown in the 6. illustration.

If you have not already removed the speaker's base, do so by pulling it straight off the 7. speaker, as shown in the illustration. Applying even pressure to both sides of the base will allow it to slide off smoothly.
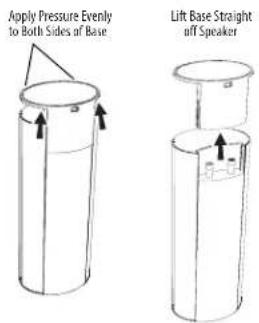
CAUTION: Before making speaker connections, be sure that your receiver or amplifier is turned OFF and preferably, its AC cord is unplugged from the AC outlet.
Connect the speaker wire to the speaker terminals as shown in the illustration: 8.
Press down on the top of the terminal to open the connection hole.a) Insert the wire's bare end all the way into the hole.b)
Release the terminal to secure the wire. c)
Insert the conductor with the colored band into the speaker's red (+) terminal, and insert the other conductor into the speaker's black (−) terminal.
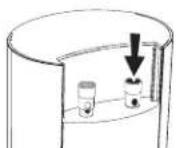
A. Push Down on Cap to Open Hole

B. Insert Bare Wire into Open Hole

C. Release Cap to Secure Wire
IMPORTANT: Make sure the (+) and (−) bare wires do not touch each other or the other terminal. Touching wires can cause a short circuit that can damage your receiver or amplifier.
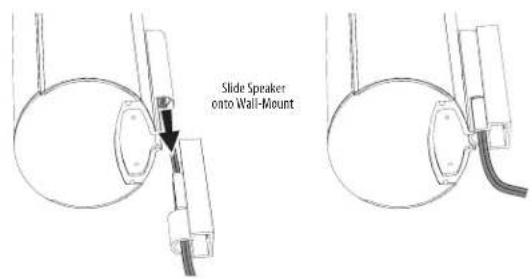
- Slide the speaker portion of wall-mount onto the speaker as shown in the illustration. Fit the grooves on the mount onto the rails in the speaker, and apply even pressure on both sides of the mount so it slides straight onto the speaker.
- Push the mount all the way onto the speaker until it snaps into place.
- Pull any slack speaker wire back through the mount as you slide the mount onto the speaker.
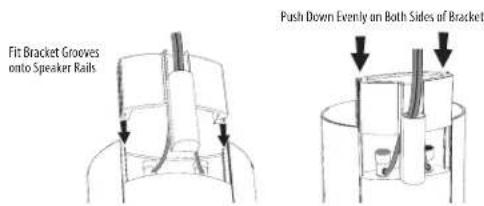
- Slide the speaker onto the mount's wall section as shown in the illustration. Pull any slack speaker wire back through the mount's wall section.
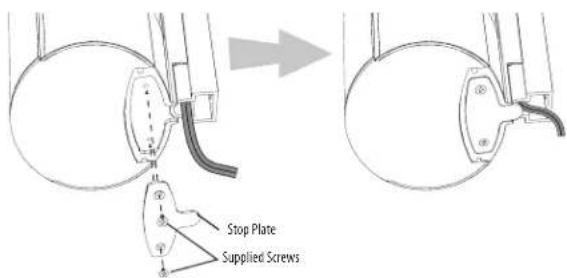
Fit the metal stop plate into the recess on the bottom of the mount with the pad facing 11. the mount, and fasten it to the mount using two of the supplied screws. This will prevent The speaker from detaching from the bracket and will hold the speaker's position as you rotate it on the mount.
Wall-Mounting: Center Speaker
Decide on the location for the speaker (see 1. Speaker Placement, on page 5).
Attach the center speaker wall-mount bracket to the wall using hardware that is 2. appropriate for the wall's construction and materials. Attach the anchors through the holes shown in the illustration.

NOTE: The center speaker weighs 3.2 lb (1.45kg). Be sure to use hardware that can support this weight.
CAUTION: Before making speaker connections, be sure that your receiver or amplifier is turned OFF and preferably, its AC cord is unplugged from the AC power source.
- Connect the speaker wire to the speaker terminals. Press down on the top of the terminal to open the connection hole, insert the wire's bare end all the way into the hole and release the terminal to secure the wire. Insert the conductor with the colored band into the speaker's red (+) terminal, and insert the other conductor into the speaker's black (−) terminal, as shown in the illustration.


IMPORTANT: Make sure the (+) and (−) bare wires do not touch each other or the other terminal. Touching wires can cause a short circuit that can damage your receiver or amplifier.
Using two of the supplied screws, attach the center speaker to the wall-mount 4. bracket, as shown in the illustration.

Speaker Connections
CAUTION: Before making speaker connections, be sure that your receiver or amplifier is turned OFF and preferably, its AC cord is unplugged from the AC power outlet.
Speakers and receivers/amplifiers have corresponding (+) and (−) connection terminals. Most electronics manufacturers, including Harman Kardon, use red to denote the (+) terminal and black for the (−) terminal. Newer Harman Kardon receivers conform to the CEA standard and therefore use a color other than red to denote the (+) terminal for some speaker positions. See the table in Color-Coding System, on page 5.
Each speaker wire included with your system has colored bands at both ends of the (+) conductor, and the subwoofer cable has purple connectors that correspond to the color of the HKTS200SUB's LFE jack. This system helps ensure that the speaker in each location is connected to the correct receiver or amplifier terminals. In addition to the colored bands at each end, each speaker wire's (+) terminal has ribs molded into its insulation to help identify it.
It is very important to connect each speaker identically: (+) on the speaker to (+) on the receiver or amplifier, and (−) on the speaker to (−) on the receiver or amplifier. Miswiring one or more speakers results in thin sound, weak bass and a poor stereo image. With the advent of multichannel surround-sound systems, connecting all of the speakers in your system correctly is very important to achieving the proper ambience and directionality of the program material.
To connect the speaker wire to the terminals on the satellite and center speakers, press down on the top of the terminal to open the connection hole, insert the wire's bare end all the way into the hole and release the terminal to secure the wire. Insert the conductor with the colored band into the speaker's red (+) terminal, and insert the other conductor into the speaker's black (−) terminal, as shown in the illustration.

A. Push Down on Cap to Open Hole

B. Insert Bare Wire into Open Hole
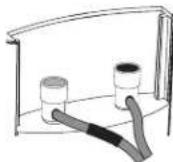
C. Release Cap to Secure Wire
IMPORTANT: Make sure the (+) and (−) bare wires do not touch each other or the other terminal. Touching wires can cause a short circuit that can damage your receiver or amplifier.
Connecting Satellite Speakers With Supplied Wall-Mount Brackets
Follow the instructions in Wall-Mounting: Satellite Speakers, on page 5, and Wall-Mounting: Center Speaker, opposite.
Connecting Satellite Speakers with Supplied Bases
Remove the speaker's base (see 1. Shelf Placement, on page 5).
Pass the speaker wire through the opening in the speaker base.2.
Connect the speaker wire as described above.3.
Reattach the speaker's base as shown in the illustration.4.

![graph TD A["Left Front"] --> B["Front Left Speaker Cable (White Bands)"] C["Center Right Front"] --> D["Center Speaker Cable (Green Bands)"] E["Receiver"] --> F["Left"] F --> G["Left"] G --> H["Right"] H --> I["Right"] I --> J["Subwoofer"] J --> K["External Trigger Input 3-30V AC/DC"] K --> L["LFE"]…](/content/2026/06/1252876/images/661ecb4385cf5bab1a189754c6d20ed9247bd7392f7cbe19f2c21ab63f8ade2b.jpg)
Connecting the Subwoofer to a Receiver or Preamp/Processor With a Dedicated Subwoofer Output
Use this installation method for receivers and preamp/processors that have a dedicated subwoofer output with low-pass filtering (also called bass management). If the dedicated subwoofer output does not have low-pass filtering, follow the instructions in Connecting the Subwoofer to a Receiver or Preamp/Processor With Line Outputs, on page 9.
Use the LFE (purple) connector of the supplied combination LFE and trigger cable to connect the HKTS200SUB's Line-Level LFE In Jack ⑥ to the dedicated subwoofer output (or LFE output) of your receiver or preamp/processor.
Connect each satellite speaker and the center speaker to the corresponding speaker terminals on your receiver or amplifier.
In your receiver or preamp/processor's setup menu, configure it for Subwoofer ON, and set the front left, front right, center, and surround speakers to Small. After you have made and verified all connections, plug the HKTS200SUB's AC Power Cord⑨ into an active AC outlet.
![graph TD A["Left Front"] --> B["Front Left Speaker Cable (White Bands)"] A --> C["Center Right Front"] A --> D["Receiver"] A --> E["Right Surround"] F["Center Right Front"] --> G["Center Speaker Cable (Green Bands)"] F --> H["Front Right Speaker Cable (Red Bands)"] I["Subwoofer"] --> J["External Tri…](/content/2026/06/1252876/images/9984dec85bc361a1cf2005d3aae6bc03b885ad2327642b9b35ea8f53a75780cd.jpg)
Connecting the Subwoofer to a Receiver or Preamp/Processor With Line Outputs
Use this installation method for receivers and preamp/processors that do not have a dedicated subwoofer output, but do have preamp-level (volume-controlled) line outputs. If the receiver or preamp/processor has a dedicated subwoofer output with low-pass filtering, see Connecting the Subwoofer to a Receiver or Preamp/Processor With a Dedicated Subwoofer Output, on page 8.
If you're connecting to a receiver with left and right line outputs that are not connected to amplifier inputs, connect the LFE (purple) connector of the supplied combination LFE and trigger cable to one of those outputs and to either of the HKTS200SUB's Line-Level L/R In Connectors 7. Use a second RCA cable (not supplied) to connect the other receiver or preamp line output to the other of the HKTS200SUB's Line-Level L/R In Connectors 7.
If you're connecting to a receiver or preamp/processor with left and right line outputs that are connected to amplifier front left and right inputs, connect the single ends of Y-adapters (not supplied) to the receiver's or processor's left and right line outputs. Connect one of the Y-adapter's double ends to the HKTS200SUB's Line-Level L/R In Connectors ⑦, and connect the other double end to your amplifier's front left and right inputs.
Connect each satellite speaker and the center speaker to the corresponding speaker terminals on your receiver or amplifier.
In your receiver or preamp/processor's setup menu, configure it for Subwoofer ON, and set the front left, front right, center, and surround speakers to Small.
After you have made and verified all connections, plug the HKTS200SUB's AC Power Cord ⑨ into an active AC outlet.

Connecting to a Trigger Voltage Source
If your preamp/processor or another audio/video component has a trigger voltage connection that supplies between 3 and 30V (AC or DC), connect it to the HKTS200SUB's External Trigger Input Connector. If the component's trigger voltage connection has a 3.5mm mini jack you can use the supplied combination LFE/trigger cable to make the connection.
TroubleshootingOperation
Turning the Subwoofer On and Off
Set the HKTS200SUB's Power Switch⑧ to the ON position.
- If the Power On Mode Switch ④ is set to AUTO, the HKTS200SUB will automatically turn itself on when it receives an audio signal, and it will go into standby mode when it has received no audio signal for 15 minutes. The HKTS200SUB's LED will illuminate white when the subwoofer is on, and will not be illuminated when the subwoofer is in standby.
- If the Power On Mode Switch ④ is set to ON, the HKTS200SUB will remain on at all times. The HKTS200 SUB's LED will illuminate white.
- If the External Trigger Input Connector ⑤ is connected to a trigger voltage source, the HKTS200SUB will turn on whenever a trigger voltage is present, and will turn off after the trigger voltage ceases, regardless of the position of the Power On Mode Switch ④.
If you will be away from home for an extended period of time, or if you will not be using the subwoofer for an extended period, switch the Power Switch Ⓐ to the ◊FF Position.
Subwoofer Adjustments: Volume
Use the Subwoofer Level Control ① to set the HKTS200SUB's volume. Turn the knob clockwise to increase the subwoofer's volume; turn the knob counterclockwise to decrease the subwoofer's volume.
Subwoofer Adjustments: Phase
The Phase Switch ③ determines whether the HKTS200SUB's piston-like action moves in and out in phase with the satellite speakers. If the subwoofer were to play out of phase with the satellite speakers, the sound waves produced by the subwoofer could be canceled out, reducing bass performance and sonic impact. This phenomenon depends in part on the relative placement of all the speakers in the room.
Although in most cases the Phase Switch ③ should be left in the NORMAL position, there is no absolute correct setting for the Phase Switch ③. When the HKTS200SUB is properly in phase with the satellite speakers, the sound will be clearer and have maximum impact. This will make percussive sounds like drums, piano and plucked strings sound more lifelike. The best way to set the Phase Switch ③ is to listen to music that you are familiar with and set the switch in the position that gives drums and other percussive sounds maximum impact.
Subwoofer Adjustments: Bass Boost
When set to the ON position, the Bass Boost Switch ② enhances low-frequency performance, resulting in bass with more impact, which you may prefer while watching movies or listening to music. There is no harm in experimenting with this control – setting the switch to the OFF position will return normal low-frequency performance.
If there is no sound from any of the speakers:
- Check that the receiver/amplifier is on and a source is playing.
- Make sure that all wires and connections between the receiver/amplifier and the speakers are connected properly.
- Make sure none of the speaker wires is frayed, cut or punctured.
- Review the proper operation of your receiver/amplifier.
If there is no sound coming from one speaker:
- Check that the balance control on your receiver/amplifier is not set all the way to one channel.
- Check your receiver/amplifier's speaker setup procedure to make sure that he speaker in question has been enabled and its volume level has not been turned all the way down.
- Make sure that all wires and connections between the receiver/amplifier and the speaker are connected properly.
• Make sure the speaker wires are not frayed, cut or punctured.
If there is no sound coming from the center speaker:
- Check your receiver/amplifier's speaker setup procedure to make sure that the center speaker has been enabled and its volume level has not been turned all the way down.
- Make sure that all wires and connections between the receiver/amplifier and the center speaker are connected properly.
- Make sure the speaker wires are not frayed, cut or punctured.
- If your receiver is operating in Dolby® Pro Logic® mode, make sure that the center speaker is not set to Phantom.
If there is no sound coming from the surround speakers:
- Check your receiver/amplifier's speaker setup procedure to make sure that the surround speakers have been enabled and their volume levels have not been turned all the way down.
- Make sure that all wires and connections between the receiver/amplifier and the surround speakers are connected properly.
• Make sure the speaker wires are not frayed, cut or punctured. - Review proper operation of your receiver/processor and its surroundsound features.
- Make sure the movie or TV show you're watching has been recorded in a surround-sound mode. If it is not, check to see if your receiver/amplifier has a different surround-sound mode that you can use.
- Review the operation of your DVD player and the DVD jacket to make sure the DVD features the desired Dolby Digital or DTS® surround-sound mode, and that you have properly selected that mode using both the DVD player's menu and the disc's menu.
If there is no sound coming from the subwoofer:
- Check that the subwoofer's Power Cord⑨ is plugged into a working AC outlet.
- Check that the subwoofer's Power Switch ⑧ is in the ON position.
- Check that the Subwoofer Level Control ① is not turned all the way down (fully counterclockwise).
- Check the audio connection between your receiver/processor and the subwoofer.
- Check your receiver/amplifier's speaker setup procedure to make sure that the subwoofer has been enabled and its volume level has not been turned all the way down.
If the system plays at low volumes but shuts off as volume is increased:
- Make sure that all wires and connections between the receiver/amplifier and the speakers are connected properly.
- Make sure none of the speaker wires is frayed, cut or punctured.
- If you're using more than one pair of main speakers, check to be sure that you're not operating the system below the receiver/amplifier's minimum impedance requirements.
Specifications
HKTS20 System HKTS30 System
| Frequency Response45Hz – 20kHz (-6dB) | Frequency Response45Hz – 20kHz (-6dB) | ||
| SAT-TS20 Satellites SAT-TS30 Satellites Cen-TS20/30 HKTS200SUB Subwoofer | |||
| Recommended Power10 ~ 80 watts | Recommended Power10 ~ 120 watts | Recommended Power10 ~ 120 watts | Input rating:AC 100–120V, 50/60 Hz, 200W or AC 220–240V, 50/60 Hz, 200W |
| Impedance8 ohms nominal | Impedance8 ohms nominal | Impedance8 ohms nominal | Amplifier Power200 watts RMS |
| Sensitivity83dB @ 2.83V/1 meter | Sensitivity86dB @ 2.83V/1 meter | Sensitivity86dB @ 2.83V/1 meter | Bass8" woofer, sealed enclosure |
| TweeterOne 3/4" (19mm) dome, video-shielded | TweeterOne 3/4" (19mm) dome, video-shielded | TweeterOne 3/4" (19mm) dome, video-shielded | External Trigger Input Voltage3 ~ 30 volts AC/DC |
| MidrangeOne 3" (75mm) driver, video-shielded | MidrangeDual 3" (75mm) drivers, video-shielded | MidrangeDual 3" (75mm) drivers, video-shielded | |
| Dimensions – including stands (H x W x D)8-1/2" x 4-11/32"x 3-15/32"(216mm x 110mm x 88mm) | Dimensions – including stands (H x W x D)11-25/32" x 4-11/32" x 3-15/32"(299mm x 110mm x 88mm) | Dimensions (H x W x D)4-11/32" x 10-11/32" x 3-15/32"(110mm x 272mm x 88mm) | Dimensions (H x W x D)13-29/32" x 10-1/2" x 10-1/2"(353mm x 267mm x 267mm) |
| Weight2.1 lb (0.95kg) | Weight3.3 lb (1.5kg) | Weight3.2 lb (1.45kg) | Gross Weight19.8 lb (9kg) |
© 2009 Harman International Industries, Incorporated. All rights reserved.
Features, specifications and appearance are subject to change without notice.
Harman Kardon is a trademark of Harman International Industries, Incorporated, registered in the United States and/or other countries. Designed to Entertain is a trademark of Harman International Industries, Incorporated.
Dolby and Pro Logic are registered trademarks of Dolby Laboratories.
DTS is a registered trademark of Digital Theater Systems, Inc.
H Harman International
Harman Consumer Group, Inc.
8500 Balboa Boulevard, Northridge, CA 91329 USA
516.255.4545 (USA only)
www.harmankardon.com
Made in China
Part No. 444020-001, 444021-001
- HOME THEATER SPEAKER SYSTEM
- IMPORTANT SAFETY INSTRUCTIONS
- PLEASE READ THE FOLLOWING PRECAUTIONS BEFORE USE
- INSTRUCTIONS FOR USERS ON REMOVAL AND DISPOSAL OF USED BATTERIES. SPECIFICATION OF INCLUDED BATTERY TYPES
- DECLARATION OF CONFORMITY
- CAUTION
- ATTENTION
- IMPORTANT NOTE FOR ALL ELECTRONIC PRODUCTS
- HARMAN KARDON® HKTS 20 / HKTS 30
- TYPOGRAPHICAL CONVENTIONS
- INTRODUCTION
- DESCRIPTION AND FEATURES
- INCLUDED
- HKTS200SUB REAR-PANEL CONNECTIONS
- SPEAKER PLACEMENT
- COLOR-CODING SYSTEM
- MOUNTING OPTIONS FOR SATELLITE AND CENTER SPEAKERS
- SHELF PLACEMENT
- WALL-MOUNTING: SATELLITE SPEAKERS
- WALL-MOUNTING: CENTER SPEAKER
- SPEAKER CONNECTIONS
- CONNECTING SATELLITE SPEAKERS WITH SUPPLIED WALL-MOUNT BRACKETS
- CONNECTING THE SUBWOOFER TO A RECEIVER OR PREAMP/PROCESSOR WITH A DEDICATED SUBWOOFER OUTPUT
- CONNECTING THE SUBWOOFER TO A RECEIVER OR PREAMP/PROCESSOR WITH LINE OUTPUTS
- CONNECTING TO A TRIGGER VOLTAGE SOURCE
- TROUBLESHOOTINGOPERATION
- TURNING THE SUBWOOFER ON AND OFF
- SUBWOOFER ADJUSTMENTS: VOLUME
- SUBWOOFER ADJUSTMENTS: PHASE
- SUBWOOFER ADJUSTMENTS: BASS BOOST
- IF THERE IS NO SOUND FROM ANY OF THE SPEAKERS
- IF THERE IS NO SOUND COMING FROM ONE SPEAKER
- IF THERE IS NO SOUND COMING FROM THE CENTER SPEAKER
- IF THERE IS NO SOUND COMING FROM THE SURROUND SPEAKERS
- IF THERE IS NO SOUND COMING FROM THE SUBWOOFER
- IF THE SYSTEM PLAYS AT LOW VOLUMES BUT SHUTS OFF AS VOLUME IS INCREASED
- SPECIFICATIONS
- H HARMAN INTERNATIONAL
Brand : HARMAN KARDON
Model : HKTS 30
Category : Loudspeaker