
CAB831HDU - Computer Accessories StarTech.com - Free user manual and instructions
Find the device manual for free CAB831HDU StarTech.com in PDF.


| Product Type | USB-C to HDMI Adapter |
| Model | CAB831HDU |
| Brand | StarTech.com |
| Dimensions (W x D x H) | 1.97 x 0.79 x 0.39 inches (50 x 20 x 10 mm) |
| Weight | 1.06 oz (30 g) |
| Power Source | Bus-powered via USB-C |
| Input Interface | USB-C (male) |
| Output Interface | HDMI (female) |
| Maximum Video Resolution | 3840x2160@30Hz (4K UHD) |
| Audio Support | Yes, pass-through via HDMI |
| Cable Length | 6.7 inches (17 cm) |
| Chipset | DisplayPort Alternate Mode compliant |
| Operating Temperature | 32°F to 104°F (0°C to 40°C) |
| Storage Temperature | -4°F to 140°F (-20°C to 60°C) |
| Humidity | 5% to 90% RH (non-condensing) |
| Compliance | RoHS, CE, FCC |
| Warranty | 2 years |
| Maintenance & Cleaning | Wipe with a soft, dry cloth. Do not use liquids or abrasive cleaners. |
| Safety Instructions | Avoid exposure to extreme temperatures and moisture. Do not modify or force connections. |
| Spare Parts & Repairability | No user-serviceable parts. Replacement only. Dispose of e-waste properly. |
| General Information | StarTech.com CAB831HDU USB-C to HDMI adapter. Ideal for connecting laptops or smartphones to external displays. |
Frequently Asked Questions - CAB831HDU StarTech.com
User questions about CAB831HDU StarTech.com
0 question about this device. Answer the ones you know or ask your own.
Ask a new question about this device
Download the instructions for your Computer Accessories in PDF format for free! Find your manual CAB831HDU - StarTech.com and take your electronic device back in hand. On this page are published all the documents necessary for the use of your device. CAB831HDU by StarTech.com.
USER MANUAL CAB831HDU StarTech.com
1U 8-Port KVM Module for 1UCABC CONS 1U 16-Port KVM Module for 1UCABC CONS
CAB831HDU
CAB1631HDU

natural_image
Back view of a black electronic device rear panel with multiple port connectors (no visible text or symbols)
natural_image
Back panel of a computer interface showing multiple VGA connectors and ports (no readable text or symbols)*actual product may vary from photos
For the most up-to-date information, please visit: www.startech.com
FCC Compliance Statement
This equipment has been tested and found to comply with the limits for a Class B digital device, pursuant to part 15 of the FCC Rules. These limits are designed to provide reasonable protection against harmful interference in a residential installation. This equipment generates, uses and can radiate radio frequency energy and, if not installed and used in accordance with the instructions, may cause harmful interference to radio communications. However, there is no guarantee that interference will not occur in a particular installation. If this equipment does cause harmful interference to radio or television reception, which can be determined by turning the equipment off and on, the user is encouraged to try to correct the interference by one or more of the following measures:
- Reorient or relocate the receiving antenna.
- Increase the separation between the equipment and receiver.
- Connect the equipment into an outlet on a circuit different from that to which the receiver is connected.
- Consult the dealer or an experienced radio/TV technician for help.
Use of Trademarks, Registered Trademarks, and other Protected Names and Symbols
This manual may make reference to trademarks, registered trademarks, and other protected names and/or symbols of third-party companies not related in any way to StarTech.com. Where they occur these references are for illustrative purposes only and do not represent an endorsement of a product or service by StarTech.com, or an endorsement of the product(s) to which this manual applies by the third-party company in question. Regardless of any direct acknowledgement elsewhere in the body of this document, StarTech.com hereby acknowledges that all trademarks, registered trademarks, service marks, and other protected names and/or symbols contained in this manual and related documents are the property of their respective holders.
Table of Contents
Introduction......1
Packaging Contents .... 1
System Requirements....1
Installation 2
Front View 2
Rear View....2
Hardware Installation 2
Cascade Configuration....3
Driver Installation....3
Operating Your KVM Switch ....4
Push Buttons....4
OSD Operations 4
Advanced Functions 6
Hot-key commands....9
Specifications....13
Technical Support 14
Warranty Information....14
Product Information
Packaging Contents
• 1 x 1U KVM Module for 1UCABCONS
System Requirements
• 1UCABCONS series Rackmount LCD Console
Installation
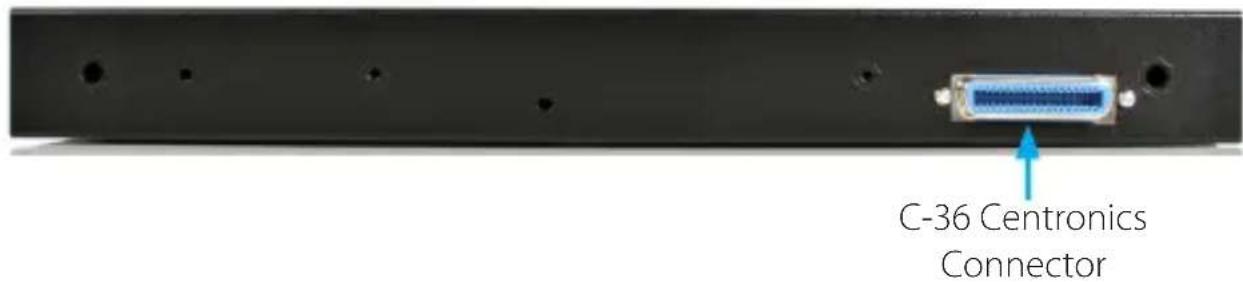
Front View
Rear View

Hardware Installation
This section will guide you through the hardware installation of your KVM Module. Please read through this section carefully and complete each step in the order listed.
- Make sure all computers and devices are powered off.
- Remove/disconnect any existing KVM Module from the rear of the 1UCABCONS series Rackmount Console.
- Connect the KVM Module to your 1UCABCNS series Rackmount Console as directed in it's user guide.
- Attach each of your managed computers to your KVM console's PC ports using StarTech.com KVM cables. Use the cables to connect one of the PC ports on the back of the KVM module to the computer's keyboard/mouse, and video ports.
NOTE: These instructions are for a single KVM switch only. For information on cascading multiple KVMs, see Cascade Configuration below.
- Turn on the 1UCABC CONS, followed by the computers.
NOTE: After the initial power up, you can hot-plug additional computers or slave KVM switches without having to power down your KVM.
NOTE: For any “CABxxxx” series KVM Module, the connectors (keyboard and mouse) for the Local Console port on the rear of the KVM module are not active while the module is connected to the LCD Console by the C-36 connector. When the C-36 connector is no longer connected to the LCD Console, the keyboard/mouse ports become active and the KVM module can act as a rear mounted standalone KVM switch. The Local VGA port can be connected to an external VGA monitor at any time.
Cascade Configuration
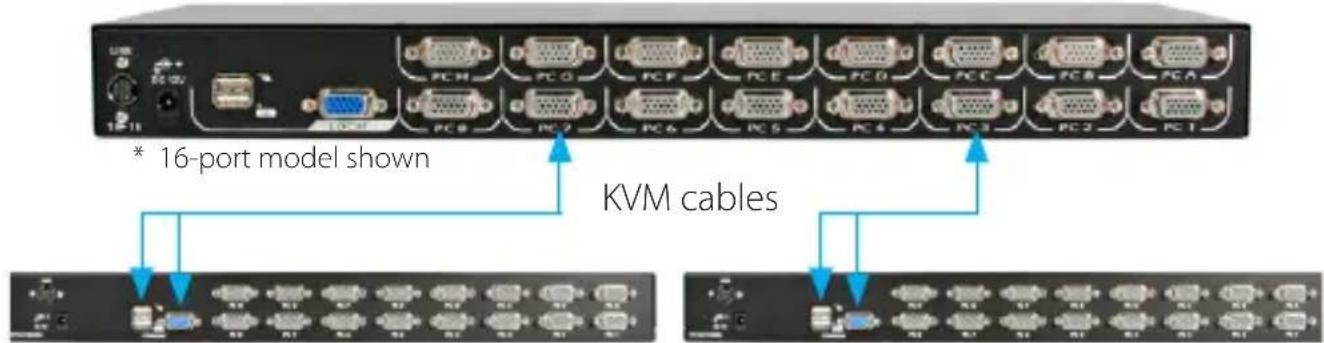
You can connect a second level of KVM switches to one or more of your Master KVM switch's PC ports. The KVM switches connected to the Master switch are known as Slaves. Once connected, the KVM switches will automatically configure themselves as either Master or Slaves. You can only connect an equal or "smaller" KVM to the Master KVM. For example, a 16-port Master KVM switch can have both 16-port and 8-port slaves. An 8-port Master KVM switch can only have 8-port KVM slaves or lower.
The 8-port KVM can support 64 PCs, with 8 8-port Slave KVMs, each connected to 8 PCs. The 16-port KVMs can support 136 computers, with 8 16-port Slave KVMs, each connected to 16 computers. The Slave KVMs must be connected to the 1\~8 ports, not the A\~H ports on the Master KVM.
To cascade your KVMs, use a StarTech.com KVM cable to connect one of your Master switch's PC ports to the Slave switch's Console ports.
A slave KVM module may be mounted to the rear vertical poles inside a rack cabinet by the rear brackets with the connectors facing out.
Driver Installation
The KVM Module uses generic keyboard/mouse/monitor drivers that are built into the operating system, so no additional drivers are required.
Operating Your KVM Switch
To toggle between computers, you can use the hot-key commands, OSD (On-Screen Display) menu or by using the push buttons built into the 1UCABCNS series LCD Rack Console.
Push Buttons
A solid red indicator reflects the port selected. The indicator flashes red when in Auto or Manual Scan mode. You can press any of the corresponding push buttons to select the active computer. On the 16 port models, Port 1 and Port A share the same push button, as do Port 2 and Port B, etc. To select Ports 1 through 8, press the push button once. To select Ports A through H, press and hold the push button for two seconds. Alternatively, if Port 1 is currently selected and you want to select Port A, you can press the push button once to switch to Port A.
The K/M Reset function reconfigures your system without powering down your computers or your KVM switch. To reset the switch, press and hold the front-panel 1 and 2 buttons simultaneously.
The Auto-Scan function automatically scrolls through your connected computers. Press and hold the front panel 7 and 8 buttons simultaneously to enter Auto Scan mode.
OSD Operations
A computer may be selected by issuing hot-key commands or by activating the OSD window. The Auto-Scan function automatically scrolls through your connected computers.
By hitting the left
The port number of the currently selected computer is displayed in red, at the right corner of the OSD menu.
The color of a device name is green if it has power and is ready for operation, or the color is white if it has no power. The OSD menu updates the color when it is activated.

Use the up <> and down <> arrow keys to highlight a computer and the
A triangle mark (▶) to the right of a name indicates the port is cascaded to a Slave; the number at the left of the triangle mark shows the number of ports the Slave has (i.e. 8 for an 8-port switch). The
An eye mark (☐) to the right of a name indicates the computer is selected to be monitored in Scan mode. In OSD, this mark can be switched on or off by function key
Editing Computer Name Assignments
Function key
Non-volatile memory stores all name entries until you change, even if the unit is powered down.
Selecting Computers for Autoscan
Function key
Locking Devices (Slave or computer)
Function key
If you want to access the locked device temporarily, simply highlight it and press
Advanced Functions
Function key
Auto Scan
In this mode, the Console automatically switches from one powered computer to the next, sequentially in a fixed interval. During Auto Scan mode, the OSD displays the name of the selected computer. When Auto Scan detects any keyboard or mouse activity, it suspends the scanning until activity stops; it then resumes with the next computer in sequence. To abort Auto Scan mode, press the left
Manual Scan
Scan through power-on computers one by one by keyboard control. Scan Type (
Audio Stick
An optional multimedia module can be linked to the back of each KVM Module for selecting microphone and stereo speaker signals. There are two options for Audio Stick: On and Off. When set to On, audio selection follows computer selection. When set to Off, audio selection stops following computer selection. It is useful if you want to listen to a particular computer's audio signal while operating other computers. The non-volatile memory stores the Audio Stick setting.
Scan Type
Ready PC + Ⓞ: In Scan mode, scan through power-on and eye mark selected computers. Ready PC: In Scan mode, scan through power-on computers.
only: In Scan mode, scans through any selected computer regardless of computer power status with an eye mark.
The non-volatile memory stores the Scan Type setting.
Scan Rate
Sets the duration of a computer displayed in Auto Scan mode. The options are 3 seconds, 8 seconds, 15 seconds and 30 seconds. The non-volatile memory stores the Scan Rate setting.
Keyboard Speed
The Console offers keyboard typematic settings that override similar settings in the BIOS and in Windows. Available speed options are Low, Middle, Fast and Faster as 10, 15, 20 and 30 characters/sec respectively. The non-volatile memory stores the Keyboard Speed setting.
Hotkey Menu
When you hit the left
CH Display
Auto Off: After you select a computer, the port number and name of the computer will appear on the screen for 3 seconds then disappear automatically. Always On: The port number and name of a selected computer and/or OSD status are displayed on the screen all the time. The non-volatile memory stores the CH Display setting.
Position
The position of the selected computer name and/or OSD status displayed on screen during operation. The actual display position shifts due to different VGA resolution, the higher the resolution the higher the display position. The nonvolatile memory stores the Position setting. UL as Upper Left, UR as Upper Right, LL as Lower Left, LR as Lower Right. MI as Middle.
Country Code for Sun
Sun keyboards of different languages have different layouts. The KVM switch is able to emulate a Sun keyboard for a specific language type or country such as Arabic, Belgian, US, Yugoslavia, etc. Select the proper country code that matches all of your Sun computers.
NOTE: The country code must be set prior to powering up the Sun computer. Not performing this step prior to power-up could cause the system to malfunction.
Max. Resolution: It supports widescreen, and you can adjust the monitor resolution under this sub-menu. The following selections are available: 1024x768, 1280x1024, 1600x1200, 1920x1440 Widescreen resolutions: 1920x1200, 1920x1080, 1440x900, 1360x768 and "DDC2B Disable".
Function Key

NOTE: It is unnecessary to switch the Sun mark ON or OFF if an authentic Sun keyboard is being used on the console. In other words, you must ensure that the Sun-marked port has not been selected if you are already using a Sun keyboard.
With different types of keyboard and computer, the Sun Mark must be set up in compliance with the following instruction:
Keyboard Type Computer Type Sun Mark
| USB (non-Sun) PC/Mac No | |
| USB (non-Sun) Sun Yes | |
| USB (Sun keyboard) PC/Mac No | |
| USB (Sun keyboard) Sun Yes |
ESC: To exit the OSD, press the
Hot-key commands
A Hot-key command is a short keyboard sequence used to select a computer, to activate computer scan, etc. The Console constantly interprets keystrokes for hot-keys. A hot-key sequence starts with two left
The short form hot-key menu can be turned on as an OSD function (
CTRL: is the
1\~8/A\~H: are the number keys '1' \~ '8' at the upper row of the keyboard and character keys 'A' \~ 'H' case insensitive. Do not use the keypad at the right of the keyboard.
To select a computer by hot-key command, you must know its port number, which is determined by the KVM Module connection. For a computer connected to a Master, its port is represented by the PC port label (1\~8 or A\~H). For a computer connected to a Slave, two characters represent its port. The first character is the port number of the Master unit (1\~8) and the second one is the port number of the Slave (1\~8 or A\~H). Please note that only Master's 'PC 1' \~'PC 8' ports can be connected to a Slave.
$$ \text { Left } < \text { CTRL } > + \text { left } < \text { CTRL } > + < 7 > $$
Selects a computer connected to port 7 of the Master.
$$ \text { Left } < \text { CTRL } > + \text { left } < \text { CTRL } > + < 6 > + < C > $$
Selects a computer connected to port C of a Slave connected to port 6 of the Master.
Auto Scan, automatically scans power-on computers one by one at a fixed interval:
$$ \text { Left } < \text { CTRL } > + \text { left } < \text { CTRL } > + < \text { F1 } > $$
When Auto Scan detects any keyboard or mouse activity, it suspends the scanning till activity stops; it then resumes with the next computer in sequence. The length of the Auto Scan interval (Scan Rate) is adjustable, see below. To abort the Auto Scan mode, press the left
NOTE: Scan Type determines whether an eye-marked computer is to be displayed during Auto Scan.
Manual Scan enables you to manually switch back and forth between power-on computers.
$$ \text { Left } < \text { CTRL } > + \text { left } < \text { CTRL } > + < \text { F2 } > $$
Press <> or <> to select the previous or the next computer in sequence. Press any other key to abort the Manual Scan.
NOTE: Scan Type determines whether an eye-marked computer is to be displayed during Auto Scan.
To adjust Scan Rate which sets the duration before switching to the next computer in Auto Scan:
$$ \text { Left } < \text { CTRL } > + \text { left } < \text { CTRL } > + < \text { F3 } > $$
The Rack Console sends one to four beeps indicating scan interval of 3, 8, 15 and 30 seconds respectively.
To adjust keyboard Typematic Rate (characters/sec), this setting over-rides that of BIOS and any operating system:
$$ \text { Left } < \text { CTRL } > + \text { left } < \text { CTRL } > + < \text { F4 } > $$
The Rack Console will generate 1 to 4 beeps corresponding to 10, 15, 20 and 30 characters/sec respectively.
Change Leading Hotkey
The default leading hotkey sequence involves pressing the left
To change the leading hotkey sequence to Right
Left
All hotkey commands that previously required pressing the Left
To change the leading hotkey sequence back to Left
Right
Sun/Mac Keyboard Mapping
The KVM Switch emulates a Sun Keyboard when a computer is marked with a Sun, in the OSD menu by Function Key
NOTE: For older Sun Operating Systems, the switch does not support the LowPower option under Power Off Select.
For keystroke emulation of Sun/Mac computers, please refer to the chart below and conduct the following two examples:
Stop A function in Sun: Press right
Help function in Sun: Press right
STANDARD KEYBOARD SUN KEYBOARD MAC KEYBOARD
| Press rightand release <1> | ∅ | |
| Press rightand release <2> | ∅- | |
| Press rightand release <3> | ∅+ | |
| Press rightand release <4> | ∅(note) | ◀power |
| Press rightand release | ||
| Press rightand release | ||
| Press rightand release | ||
| Press rightand release | ||
| Press rightand release | ||
| Press rightand release | ||
| Press rightand release | ||
| Press rightand release | ||
| Press rightand release | ||
| Press rightand release | ||
| Press rightand release | ||
| Press rightand release | ||
| Press rightand release | ||
| Press rightand release | ||
| Press rightand release | ||
| right | right | |
| left | left | |
| right | ||
| left |
Change Configuration while Running
A device (a computer or a KVM switch) at any 'PC x' port can be changed at any time after initial power-up. If you change any one of the PC 1 to PC 8 ports connection from a computer to a Slave or vice versa, or replace the devices of a port, the OSD will update this change the next time it is activated.
NOTE: Any new device must be turned off before it is connected to the Master.
Specifications
| CAB831HDU CAB1631HDU | ||
| Number of Ports 8 16 | ||
| Connectors | 8 x DE-15 PC connectors1 x VGA female output1 x DC PowerInactive:2 x USB female input (keyboard/mouse) | 16 x DE-15 PC connectors1 x VGA female output1 x DC PowerInactive:2 x USB female input (keyboard/mouse) |
| Maximum Resolution 1920x1440 | ||
| On Screen Display Yes | ||
| Port Switching Control Hot-keys, OSD, Push Button | ||
| Auto Scan Yes | ||
| Auto Scan Interval 3, 8, 15, 30 | ||
| Power Adapter Included No (included with 1UCABC CONS) | ||
| Operating Temperature 5°C ~ 40°C (41°F ~ 104°F) | ||
| Storage Temperature -20°C ~ 60°C (-4°F ~ 140°F) | ||
| Humidity 80% RH | ||
| Dimensions 404.0mm x 114.0mm x 45.0mm | ||
| Weight 1380g | 1580g | |
Technical Support
StarTech.com's lifetime technical support is an integral part of our commitment to provide industry-leading solutions. If you ever need help with your product, visit www.startech.com/support and access our comprehensive selection of online tools, documentation, and downloads.
For the latest drivers/software, please visit www.startech.com/downloads
Warranty Information
This product is backed by a three year warranty.
In addition, StarTech.com warrants its products against defects in materials and workmanship for the periods noted, following the initial date of purchase. During this period, the products may be returned for repair, or replacement with equivalent products at our discretion. The warranty covers parts and labor costs only. StarTech.com does not warrant its products from defects or damages arising from misuse, abuse, alteration, or normal wear and tear.
Limitation of Liability
In no event shall the liability of StarTech.com Ltd. and StarTech.com USA LLP (or their officers, directors, employees or agents) for any damages (whether direct or indirect, special, punitive, incidental, consequential, or otherwise), loss of profits, loss of business, or any pecuniary loss, arising out of or related to the use of the product exceed the actual price paid for the product. Some states do not allow the exclusion or limitation of incidental or consequential damages. If such laws apply, the limitations or exclusions contained in this statement may not apply to you.
Hard-to-find made easy. At StarTech.com, that isn't a slogan. It's a promise.
StarTech.com is your one-stop source for every connectivity part you need. From the latest technology to legacy products — and all the parts that bridge the old and new — we can help you find the parts that connect your solutions.
We make it easy to locate the parts, and we quickly deliver them wherever they need to go. Just talk to one of our tech advisors or visit our website. You'll be connected to the products you need in no time.
Visit www.startech.com for complete information on all StarTech.com products and to access exclusive resources and time-saving tools.
StarTech.com is an ISO 9001 Registered manufacturer of connectivity and technology parts. StarTech.com was founded in 1985 and has operations in the United States, Canada, the United Kingdom and Taiwan servicing a worldwide market.



- 1U 8-Port KVM Module for 1UCABC CONS 1U 16-Port KVM Module for 1UCABC CONS
- FCC Compliance Statement
- Use of Trademarks, Registered Trademarks, and other Protected Names and Symbols
- Table of Contents
- Introduction......1
- Installation 2
- Operating Your KVM Switch ....4
- Specifications....13
- Technical Support 14
- Warranty Information....14
- Product Information
- Packaging Contents
- System Requirements
- Installation
- Front View
- Rear View
- Hardware Installation
- Cascade Configuration
- Driver Installation
- Operating Your KVM Switch
- Push Buttons
- OSD Operations
- Editing Computer Name Assignments
- Selecting Computers for Autoscan
- Locking Devices (Slave or computer)
- Advanced Functions
- Auto Scan
- Manual Scan
- Audio Stick
- Scan Type
- Scan Rate
- Keyboard Speed
- Hotkey Menu
- CH Display
- Position
- Country Code for Sun
- Hot-key commands
- Change Leading Hotkey
- Sun/Mac Keyboard Mapping
- Change Configuration while Running
- Technical Support
- Warranty Information
- Limitation of Liability
Brand : StarTech.com
Model : CAB831HDU
Category : Computer Accessories