
SV431USBAE - Computer Accessories StarTech.com - Free user manual and instructions
Find the device manual for free SV431USBAE StarTech.com in PDF.


| Product Type | 4-Port USB VGA KVM Switch with Audio and USB 2.0 Hub |
| Brand | StarTech.com |
| Model | SV431USBAE |
| Number of Computers Supported | 4 |
| Maximum Video Resolution | 1920 x 1440, DDC2B |
| Console Connectors | 1x VGA (HDB-15 Female), 4x USB Type A, 1x Speaker Jack, 1x Mic Jack |
| Computer Connectors | 4x VGA (HDB-15 Male), 4x USB Type B, 4x Speaker Jack, 4x Mic Jack |
| USB Hub | Integrated USB 2.0 Hub (4 ports) |
| Audio Support | Yes, speaker and microphone switching |
| Chassis Material | Metal |
| Rack Mountable | Yes, with optional bracket kit (SV431RACK) |
| Dimensions (H x W x D) | 44 x 220 x 130 mm (1.7 x 8.7 x 5.1 in) |
| Weight | 1000 g (35.27 oz) |
| Power Supply | External power adapter (included) |
| Hot Plug and Play | Yes |
| Auto Scan Interval | 3, 8, 15, or 30 seconds (configurable) |
| Maximum Cable Length (VGA) | 30 m (100 ft) |
| Maximum Cable Length (USB) | 5 m (15 ft) |
| Compliance | FCC Class A, ICES-003 |
| Warranty | 3 years limited |
| Included Accessories | Power adapter, rubber feet, user manual |
| Cleaning | Use a dry, lint-free cloth; avoid liquids |
| Safety | Follow installation instructions; use only provided power adapter |
| Spare Parts and Repairability | Contact StarTech.com support for replacement parts and service |
| General Information | Designed for server rooms and desktop environments; supports DDC2B |
Frequently Asked Questions - SV431USBAE StarTech.com
User questions about SV431USBAE StarTech.com
0 question about this device. Answer the ones you know or ask your own.
Ask a new question about this device
Download the instructions for your Computer Accessories in PDF format for free! Find your manual SV431USBAE - StarTech.com and take your electronic device back in hand. On this page are published all the documents necessary for the use of your device. SV431USBAE by StarTech.com.
USER MANUAL SV431USBAE StarTech.com
4 Port Rack Mountable USB VGA KVM Switch with Audio & USB 2.0 Hub
SV431USBAE

*actual product may vary from photos
Forthemostup-to-dateinformation,pleasevisit:www.startech.com
FCC Compliance Statement
This equipment has been tested and found to comply with the limits for a Class A digital device, pursuant to part 15 of the FCC Rules. These limits are designed to provide reasonable protection against harmful interference in a residential installation. This equipment generates, uses and can radiate radio frequency energy and, if not installed and used in accordance with the instructions, may cause harmful interference to radio communications. However, there is no guarantee that interference will not occur in a particular installation. If this equipment does cause harmful interference to radio or television reception, which can be determined by turning the equipment off and on, the user is encouraged to try to correct the interference by one or more of the following measures:
- Reorient or relocate the receiving antenna.
- Increase the separation between the equipment and receiver.
- Consult the dealer or an experienced radio/TV technician for help.
- Connect the equipment into an outlet on a circuit different from that to which the receiver is connected.
Industry Canada Statement
This Class A digital apparatus complies with Canadian ICES-003.
This device complies with Industry Canada licence-exempt RSS standard(s). Operation is subject to the following two conditions:
(1) This device may not cause interference, and (2) This device must accept any interference, including interference that may cause undesired operation of the device.
Use of Trademarks, Registered Trademarks, and other Protected Names and Symbols
This manual may make reference to trademarks, registered trademarks, and other protected names and/or symbols of third-party companies not related in any way to StarTech.com. Where they occur these references are for illustrative purposes only and do not represent an endorsement of a product or service by StarTech.com, or an endorsement of the product(s) to which this manual applies by the third-party company in question. Regardless of any direct acknowledgement elsewhere in the body of this document, StarTech.com hereby acknowledges that all trademarks, registered trademarks, service marks, and other protected names and/or symbols contained in this manual and related documents are the property of their respective holders.
Table of Contents
Introduction....1
Packaging Contents .... 1
System Requirements....1
Installation 2
Console Connection....2
Connecting Slave Computers....3
Operation 4
Front Panel....4
Auto Scan....4
Optional: Rack Mount Installation 5
Specifications....6
Technical Support 7
Warranty Information....7
Introduction
This Rack Mountable USB KVM Switch supports high resolution video applications (up to 1920x1440 pixels supported) and audio switching between connected computers, and provides an integrated USB 2.0 hub that lets the selected computer have access shared high speed USB peripherals.
Providing control of up to four computers from a single USB keyboard and mouse peripheral set, the switch features a sturdy all metal chassis and can be rackmounted in a server rack/cabinet using an optional Rackmount Bracket kit (SV431RACK) - minimizing clutter and saving space.
Packaging Contents
• 1x 4 Port USB KVM Switch With Audio
- 1x Pack Rubber Feet
- 1x Power Adapter
- 1x Manual
System Requirements
Console Side
• One VGA, SVGA or Multisync monitor
- One USB keyboard
- One USB mouse
Computer Side
• One HDB15 male-to-female VGA cable for monitor
• One USB A-B cable with Type-A and Type-B plug for USB devices
Installation
PC BIOS Notice: The following BIOS setup changes are necessary for PC users but are not required for Mac users:
- In STANDARD CMOS, set HALT ON ERROR to ALL BUT KEYBOARD.
- In PNP AND PCI SETUP, set PNP OS INSTALLED to YES and set the USB IRQ to ENABLED.
Please Note: SV431USBAE is capable of switching between computers while maintaining USB mouse and keyboard control. If you plan to share other peripherals such as a CCD camera, printer or scanner, you must shut down the corresponding driver on the computer from which KVM control is being switched.
Because port switching is equivalent to unplugging the USB cable from one computer and plugging it in on another, some USB drivers continuously check attached USB peripherals and do not accept plug and play functionality.
Console Connection
Before installation, please ensure that all devices and computers to be connected to the KVM Switch have been turned off.
- Connect the monitor that will be used to the Console VGA port on the rear panel of SV431USBAE.
- Connect a USB keyboard and a USB mouse to any two of the Console USB ports as shown below:

Connecting Slave Computers
- Connect the VGA port located on the rear panel of SV431USBAE to the VGA port provided by the video connection on the desired computer, using an HDB15 male to female cable. Please note the PC Port number, for steps 2 and 3.
- Using a USB A-B Cable, connect the USB port that corresponds with the PC port used in step 1, to the USB port on the corresponding computer, as shown below.
- Optional: Using an audio cable (Speaker and Mic), connect the Speaker and Mic ports provided by the PC port used in step 1 on SV431USBAE to the Speaker and Mic ports located on the computer.

- Repeat steps 1-4 as necessary for each computer you wish to connect. Once all computers have been connected, you can turn on all devices and computers.
Operation
Front Panel
- Online and Selected LEDs: When the LED turns green, the connected computer is powered on. When a computer is selected, the corresponding (red) LED will illuminate.
- Pushbuttons: Each computer has a button associated with it on the front panel for selection
Auto Scan
Auto Scan automatically scans through the connected computers individually, in a fixed interval
Please note: Keyboard and Mouse are not operable during Auto Scan.
To activate Auto Scan, press down the 3 and 4 buttons (on the front panel) simultaneously. To exit Auto Scan, tap any one of the pushbuttons.
To change the Scan Time interval, press both front panel buttons 1 and 2 simultaneously.
The switch will beep 1, 2, 3 or 4 times for Scan Times of 3, 8, 15 or 30 seconds respectively.
Optional: Rack Mount Installation
The following illustration depicts how to attach optional mount brackets and cable support for rack mounting SV431USBAE. To do so, you may wish to use SV431RACK (please see Accessory Products from StarTech.com for further information).
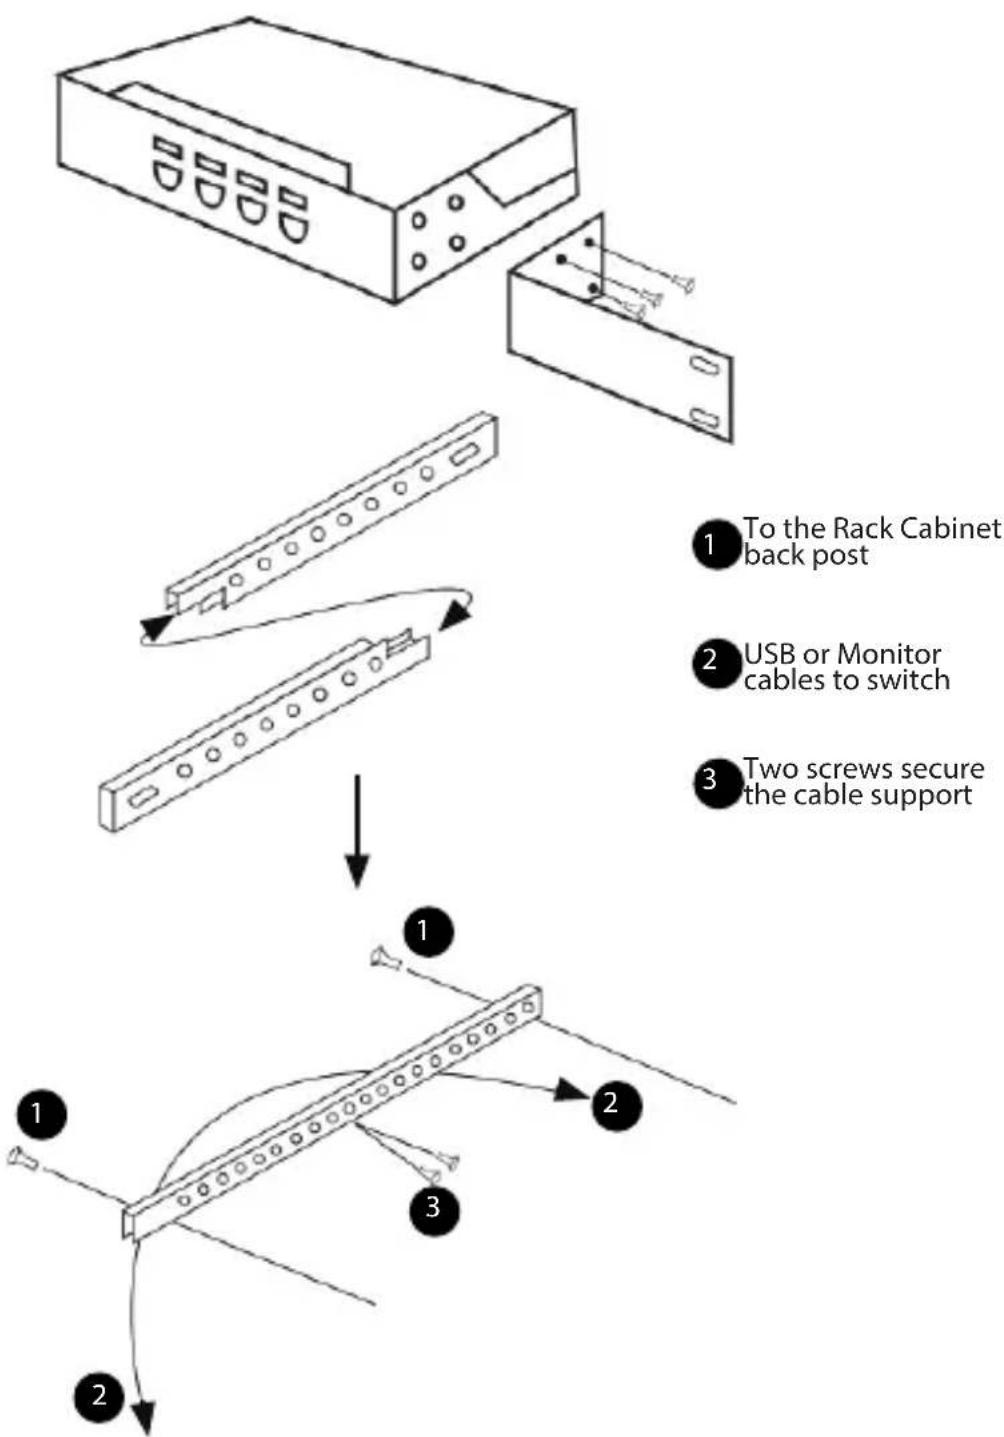
flowchart
graph TD
    A["To the Rack Cabinet back post"] --> B["USB or Monitor cables to switch"]
    B --> C["Two screws secure the cable support"]
Specifications
Computers Supported 4
Front Panel Push Buttons 4
Hot Plug-and-Play Supported Yes
Automatic Scan Interval 3, 8, 15, 30 seconds
Cable Length (Max) 30M (100ft) for VGA 5M (15ft) for USB
Computer ON-LINE LED 4
Computer Selected LED 4
Resolution Supported 1920 x 1440, DDC2B
Computer Peripheral Connector Monitor
USB Type B x 4
HDB-15 Male x 4
SPEAKER Jack x 4
MIC Jack x 4
Console Peripheral Connector Monitor
USB Type A x 4
HDB-15 Female x 1
SPEAKER Jack x 1
MIC Jack x 1
Weight (g) / (oz.) 1000 / 35.27
H x W x D (mm) / (in.) 44 x 220 x 130 / 1.7 x 8.7 x 5.1
Technical Support
StarTech.com's lifetime technical support is an integral part of our commitment to provide industry-leading solutions. If you ever need help with your product, visit www.startech.com/support and access our comprehensive selection of online tools, documentation, and downloads.
For the latest drivers/software, please visit www.startech.com/downloads
Warranty Information
This product is backed by a three year warranty.
In addition, StarTech.com warrants its products against defects in materials and workmanship for the periods noted, following the initial date of purchase. During this period, the products may be returned for repair, or replacement with equivalent products at our discretion. The warranty covers parts and labor costs only. StarTech.com does not warrant its products from defects or damages arising from misuse, abuse, alteration, or normal wear and tear.
Limitation of Liability
In no event shall the liability of StarTech.com Ltd. and StarTech.com USA LLP (or their officers, directors, employees or agents) for any damages (whether direct or indirect, special, punitive, incidental, consequential, or otherwise), loss of profits, loss of business, or any pecuniary loss, arising out of or related to the use of the product exceed the actual price paid for the product. Some states do not allow the exclusion or limitation of incidental or consequential damages. If such laws apply, the limitations or exclusions contained in this statement may not apply to you.
Hard-to-find made easy. At StarTech.com, that isn't a slogan. It's a promise.
StarTech.com is your one-stop source for every connectivity part you need. From the latest technology to legacy products — and all the parts that bridge the old and new — we can help you find the parts that connect your solutions.
We make it easy to locate the parts, and we quickly deliver them wherever they need to go. Just talk to one of our tech advisors or visit our website. You'll be connected to the products you need in no time.
Visit www.startech.com for complete information on all StarTech.com products and to access exclusive resources and time-saving tools.
StarTech.com is an ISO 9001 Registered manufacturer of connectivity and technology parts. StarTech.com was founded in 1985 and has operations in the United States, Canada, the United Kingdom and Taiwan servicing a worldwide market.



- Port Rack Mountable USB VGA KVM Switch with Audio & USB 2.0 Hub
- FCC Compliance Statement
- Industry Canada Statement
- Use of Trademarks, Registered Trademarks, and other Protected Names and Symbols
- Table of Contents
- Introduction....1
- Installation 2
- Console Connection....2
- Connecting Slave Computers....3
- Operation 4
- Specifications....6
- Technical Support 7
- Warranty Information....7
- Introduction
- Packaging Contents
- System Requirements
- Console Side
- Computer Side
- Installation
- Console Connection
- Connecting Slave Computers
- Operation
- Front Panel
- Auto Scan
- Optional: Rack Mount Installation
- Specifications
- Technical Support
- Warranty Information
- Limitation of Liability
Brand : StarTech.com
Model : SV431USBAE
Category : Computer Accessories