
dLAN 200 AVsmart+ - Network card DEVOLO - Free user manual and instructions
Find the device manual for free dLAN 200 AVsmart+ DEVOLO in PDF.


| Product Type | Powerline Network Adapter |
| Model | dLAN 200 AVsmart+ |
| Brand | Devolo |
| Data Transfer Rate | Up to 200 Mbps |
| Interface | 1x 10/100 Ethernet Port |
| Frequency Band | 2 - 30 MHz |
| Encryption | 128-bit AES |
| Power Consumption | Max 3 W (typical) |
| Standby Power Consumption | Less than 0.5 W |
| Dimensions (W x H x D) | 95 x 56 x 43 mm |
| Weight | Approx. 100 g |
| Operating Temperature | 0°C to 40°C |
| Operating Humidity | 10% to 90% (non-condensing) |
| Power Supply | Integrated mains plug (230 V, 50 Hz) |
| LED Indicators | Power and Network status |
| Pairing Button | Yes, for secure connection |
| Compliance | CE, RoHS |
| Package Contents | 1x dLAN 200 AVsmart+, 1x Ethernet cable, 1x Quick start guide |
| Cleaning Instructions | Disconnect from power, wipe with a dry cloth. Do not use liquids. |
| Safety Precautions | Do not open the device. Unplug during thunderstorms. Use only indoors. |
| Repairability | Not user-serviceable. No spare parts available. |
| Warranty | 2 years (depending on region) |
Frequently Asked Questions - dLAN 200 AVsmart+ DEVOLO
User questions about dLAN 200 AVsmart+ DEVOLO
0 question about this device. Answer the ones you know or ask your own.
Ask a new question about this device
Download the instructions for your Network card in PDF format for free! Find your manual dLAN 200 AVsmart+ - DEVOLO and take your electronic device back in hand. On this page are published all the documents necessary for the use of your device. dLAN 200 AVsmart+ by DEVOLO.
USER MANUAL dLAN 200 AVsmart+ DEVOLO
© 2009 devolo AG Aachen (Germany)
While the information in this manual has been compiled with great care, it may not be deemed an assurance of product characteristics. devolo shall be liable only to the degree specified in the terms of sale and delivery.
The reproduction and distribution of the documentation and software supplied with this product and the use of its contents is subject to written authorization from devolo. We reserve the right to make any alterations that arise as the result of technical development.
Trademarks
HomePlug ® is a registered trademark of HomePlug Powerline Alliance.
Linux ® is a registered trademark of Linus Torvalds.
Ubuntu ® is a registered trademark of Canonical Ltd.
Mac ® and Mac OS X ® are registered trademarks of Apple Computer, Inc.
Windows ® and Microsoft ® are registered trademarks of Microsoft, Corp.
dLAN ® , devolo and the devolo logo are registered trademarks of devolo AG.
All other names mentioned may be trademarks or registered trademarks of their respective owners.
Subject to change without notice. No liability for technical errors or omissions.
devolo AG
Charlottenburger Allee 60
52068 Aachen
Germany
www.devolo.com
Aachen, September 2009
Contents
1 Preface 4
1.1 Thank you for placing your trust in this devolo product. 4
2 Introduction 6
2.1 What exactly is dLAN? 7
2.2 devolo—Up to speed on green IT 7
2.3 dLAN 200 AVsmart+ at a glance 8
2.4 Sample applications 9
3 Initial use 12
3.1 Package contents 13
3.2 System requirements 13
3.3 Functions 14
3.3.1 dLAN screen 14
3.3.2 Network connection 18
3.3.3 Integrated electrical socket 18
3.3.4 Encryption button 18
3.4 Connecting the dLAN 200 AVsmart+ 18
3.4.1 Firmware update 19
3.5 Software installation 19
3.5.1 Software for Windows 19
3.5.2 Software for Mac OS X 20
3.5.3 Software for Linux (Ubuntu) 20
4 Security in the dLAN 22
4.1 dLAN 200 AV network encryption at the touch of a button ..... 22
4.2 Encrypting the dLAN 200 AV network with the dLAN Configuration Wizard ..... 26
4.3 devolo Informer 29
Contents
5 Appendix 30
5.1 Bandwidth optimization 30
5.2 Important safety instructions 30
5.3 Disposal of old devices 32
5.4 Warranty conditions 32
1 Preface
1.1 Thank you for placing your trust in this devolo product.
The dLAN 200 AVsmart+ allows you to set up your own home network with almost no effort. Because the clever dLAN technology transmits the data over the household electrical wiring, you do not have to lay any new cables. You do not even have to do without an electrical socket, as the dLAN 200 AVsmart+ provides an integrated socket to which you can connect your terminal devices or multiple sockets as usual. The integrated mains filter significantly improves data transmission in the home network.
The convenient LCD display makes it easy for the user to view the connection status of multiple dLAN 200 AV adapters in a network.
The fast transfer rate of up to 200 Mbps makes every bandwidth-intensive Internet application a real multimedia treat. The integrated "Quality of Service" function measures the bandwidth requirement, optimises the data flow and ensures excellent quality—particularly for voice and video data.
To protect your data, simply press a button on the dLAN 200 AVsmart+ to activate the convenient and secure 128-bit AES (Advanced Encryption Standard) encryption. In addition, the patented power saving mode, which comes standard, automatically decreases the device's power consumption by more than 60%.
About this manual
After a brief introduction to "dLAN" and "Green IT" basics in chapter 2, chapter 3 will cover successfully setting up your dLAN 200 AVsmart+. Chapter 4 explains how to configure your dLAN 200 AV network. Tips for bandwidth optimisation, safety notes and our warranty conditions can be found in chapter 5 and conclude the manual.
Description of the symbols
Here we briefly describe the meaning of the symbols used in this manual.

Very important note. Failure to observe this note may result in damage.

Important note that should be observed.

Additional information, background material and configuration tips for your device.
If you have any further ideas or suggestions related to our products, we would be delighted to hear from you at support@devolo.com!
devolo on the Internet
For detailed information on our products, visit www.devolo.com. The Service Centre area not only contains product descriptions and documentation, but also updates of devolo software and your device's firmware.
2 Introduction
dLAN is an intelligent, secure technology that lets you set up a home network easily, quickly and economically via your household electrical wiring, without the need for complex and expensive dedicated cabling. The available performance and effort required for the
installation also compares favourably to traditional methods—dLAN technology now attains speeds you would expect from other LAN technologies, and installing it is a breeze!

2.1 What exactly is dLAN?
dLAN (direct Local Area Network) uses the household power grid to transfer data between computers equipped with suitable adapters and other network components. As a result, any power outlet can be used as a network access point. The data is modulated prior to transfer and sent as a signal via household power lines. State-of-the-art technology ensures that the power and data networks do not interfere with one another. Networking via dLAN is fast and secure. The data is encrypted using a key to prevent easy interception by third parties.
2.2 devolo—Up to speed on green IT
The topic everyone is talking about is green IT. devolo has an easy solution: the power saving mode, which comes standard with the home network adapters, sets the company apart from many competitors in the IT industry. And that has been the case even before global warming and the scarcity of resources have become concerns on everyone's mind.
Developers at devolo, have for a long time kept a close eye on how much power dLAN adapters may consume. After all, a devolo network via electrical sockets should
not only be convenient, but also require as little energy as possible—particularly during times when it is not being used.
That devolo can satisfy the demand for energy efficiency is evidenced by the patented power saving mode in the devices. It automatically lowers energy consumption by more than 60 percent when the computers in the dLAN network or connected equipment are switched off.
The power saving mode in the adapters is not only a tribute to environmental protection but also a real service to the customer. Most people tend to forget to regularly press the standby button on the hardware. The patented technology in devolo adapters allows you to save energy without having to do anything. And if less energy is consumed, your electric meter will turn more slowly. In other words, every minute the adapter is in power saving mode, you will save money.

A dLAN adapter connected to a computer can only go into power saving mode if the network card of the switched-off computer is also inactive. If you are using a network card that remains active even when the computer is switched off, we recommend connecting the computer to an on/off switch using a multiple socket so that both the computer and the integrated network card are de-energised.
2.3 dLAN 200 AVsmart+ at a glance
- Easily monitor the connection status of multiple dLAN 200 AV adapters with the convenient dLAN screen.
●The dLAN 200 AVsmart+ quickly and easily establishes a network connection over the household electrical wiring.
● Simple plug-and-play connection between the routers, computers and other network-compatible devices!
●The integrated electrical socket enables additional terminal devices or multiple sockets to be connec-
ted to the adapter just as a normal wall socket—no power supply is lost.
● Safety—also for children! The power outlet of the dLAN 200 AVsmart+ has an integrated child-safety feature, so that no pointed objects can get into the power outlet.
●The integrated mains filter significantly improves data transmission in the home network.
● Easy data encryption at the touch of a button or via dLAN configuration software.
●Thanks to the intelligent Dynamic PowerSave technology, the dLAN 200 AVsmart+ reduces its energy consumption automatically by over 60 percent.
● With a high transfer rate of up to 200 Mbps, it is ideal for all multimedia content such as video clips, IPTV or gaming.
- Long data range of 300 m (656') between the adapters and reliable network speed for setting up a home network.
2.4 Sample applications
Internet standalone solution (Fig. 1)
Extending Internet over the electrical wiring
![graph TD A["Internet"] --> B["Modem/Router"] B --> C["Ethernet"] C --> D["dLAN® 200 AVsmart+"] D -.-> E["PC"] F["dLAN® 200 AVsmart+"] --> G["Ethernet"] G --> H["PC"] H --> I["PC"] style A fill:#f9f,stroke:#333 style F fill:#f9f,stroke:#333 style G fill:#f9f,stroke:#333 style H fill:#ccf,stroke:#333](/content/2026/06/1251535/images/ca5627fba7c63052b479a7792a52d4e5c843fe920ef674e3f7d822efe0d7ac38.jpg)
Networking two computers (Fig. 2)
![graph TD A["PC 1"] --> B["Router"] C["PC 2"] --> D["Router"] style A fill:#f9f,stroke:#333 style C fill:#f9f,stroke:#333 style B fill:#ccf,stroke:#333 style D fill:#ccf,stroke:#333 note right of A: Figure 2](/content/2026/06/1251535/images/51bb7cdfa74b9b456c348a31d977e937b38fec8781b0ba1eedda9ff3d960dd2e.jpg)
Distributed Internet access solution (Fig. 3)
Networking HD television and computer; extending online gaming via the power line.
![graph LR A["Internet"] --> B["Computer"] B --> C["Server"] C --> D["Desktop"] D --> E["Monitor"] E --> F["Server"] F --> G["Console"] style Internet fill:#f9f,stroke:#333](/content/2026/06/1251535/images/e1d0b2df0555263a243fdeae2bea8542dddd668f686ca11fe14ada5d5ce1fbb8.jpg)
11 Introduction
devolo dLAN 200 AVsmart+
3 Initial use
This chapter covers everything you need to know to set up your dLAN 200 AVsmart+. It will explain connecting the device and its functions. We will also briefly in-
troduce the included devolo software and then guide you through its installation.
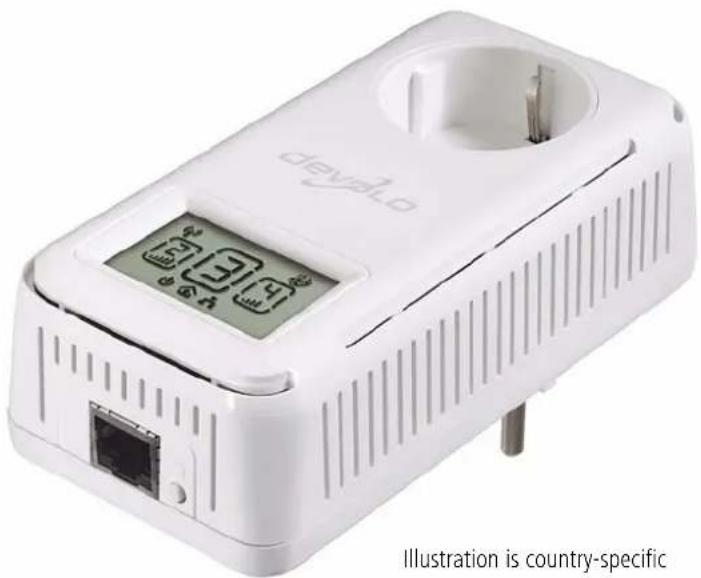
Illustration is country-specific
3.1 Package contents
Please ensure that the delivery is complete before beginning with the installation of your dLAN 200 AVsmart+.
Single Kit:
○dLAN 200 AVsmart+
○Network cable
○Hard copy of installation guide
○CD containing software and online documentation
or
Starter Kit:
○Two dLAN 200 AVsmart+
○Two network cables
○Hard copy of installation guide
○CD containing software and online documentation
or
Network Kit:
○Three dLAN 200 AVsmart+
○Three network cables
○Hard copy of installation guide
○CD containing software and online documentation
devolo AG reserves the right to change the package contents without prior notice.
3.2 System requirements
● Operating systems: Windows XP (32-bit), Windows Vista Home Premium (32-bit/64-bit), Windows 7 Home Premium (32-bit/64-bit), Linux (Ubuntu), Mac OS X and all operating systems with network support
Network connection

Please note that your computer or other device must feature a network adapter with a network port.

Please note that dLAN devices such as the devolo dLAN duo (14 Mbps) and devolo dLAN Highspeed Ethernet II (85 Mbps) can be used on the same household electrical wiring as dLAN 200 AV devices (200 Mbps) without interference, but they will not be able to communicate directly with one another. Hence, to set up a dLAN 200 AV network, you need two dLAN 200 AV devices (200 Mbps). More valuable information about dLAN or dLAN 200 AV is available in the Service Centre section of our website at www.devolo.com.
3.3 Functions
The dLAN 200 AVsmart+ has an LCD display, called the dLAN screen, an integrated power outlet, a network jack and the encryption button.
3.3.1 dLAN screen
The LCD display features various icons that indicate the connection status within your network by illuminating and/or flashing. For the meaning of the icons, please refer to figure 4 below.
![graph TD A["Adapter icon for dLAN 200 AVsmart+"] --> B["Wireless device"] A --> C["Connected dLAN 200 AV device"] A --> D["USB device"] A --> E["Power"] A --> F["dLAN"] A --> G["Ethernet"] A --> H["Multimedia device"] A --> I["Connected dLAN 200 AV device"]](/content/2026/06/1251535/images/efdcf7a1b6f9d2887aaf20dcf55d5e19691e5c05b6b354192a9a4d5fa732acc1.jpg)
Fig. 4
The centre adapter icon always refers to the respective device itself, while the adapter icons on the left and right in the dLAN 200 AV network symbolise connected devices. The dLAN screen can display up to 9 dLAN 200 AV devices (itself + 8 connected) total. The connected devices are numbered in sequence; beginning
with the fourth device, the devices are displayed by selecting "Scroll".

The numbering is maintained even if a dLAN 200 AV device is removed from the network (e.g. to change the power outlet). When the device is plugged back in, it is detected with the same number—as long as the encryption password has not been changed. For more information about "Encryption," refer to chapter 4 Security in the dLAN.
If the connected dLAN 200 AV adapters include wireless, multimedia and/or USB devices, this is indicated by the corresponding characters on the respective adapter icon.

Overview of icons and their functions
Power: Lit steady if the dLAN 200 AVsmart+ is ready to operate; flashes if the dLAN 200 AVsmart+ is in standby mode.
dLAN: Lit steady when a dLAN connection exists; flashes when data is being transmitted in the dLAN network.
Ethernet: Lit steady when a connection to the Ethernet network exists; flashes when data is being transmitted.
Centre adapter icon (device itself): Lit steady if the dLAN 200 AVsmart+ is ready to operate; the frame of the icon flashes if the dLAN 200 AVsmart+ is in standby mode.
Adapter icons (L/R) (connected adapters): The bar graph (1 to 5) symbolises the connection quality between the individual dLAN 200 AV devices. Here, the centre icon is always in relationship to the left or right icon.
Wireless: Lit steady if a supported wireless device is connected.
Multimedia: Lit steady if a supported multimedia device is connected.
USB: Lit steady if a supported USB device is connected.
The following is a description of the possible statuses of the dLAN 200 AVsmart+ and how they are displayed on the dLAN screen:
Test screen
After the device is plugged into the power outlet, the dLAN screen generates a test screen in which all icons appear briefly.
Factory default settings
In the factory default settings or if multiple dLAN 200 AVsmart+ are connected to a dLAN 200 AV network using the default password HomePlugAV, the entire LCD display flashes continuously. For security reasons, we recommend securely encrypting your dLAN 200 AV network using the encryption button or using the dLAN Configuration Wizard. For more information, refer to the chapter 4 Security in the dLAN.
Ready to operate
The power icon and the frame of the centre adapter icon are illuminated when the dLAN 200 AVsmart+ is ready to operate.
Standby mode
The power icon and the frame of the centre adapter icon flash when the dLAN 200 AVsmart+ is in standby mode.
3.3.2 Network connection
Connect the dLAN 200 AVsmart+ to a computer or another network device with the network cable (included).
3.3.3 Integrated electrical socket
If you connect additional network devices using a multiple socket, plug this multiple socket into the electrical socket of the dLAN 200 AVsmart+. The integrated mains filter eliminates any noise of connected devices and significantly improves data transmission in the home network.
3.3.4 Encryption button
Data encryption at the touch of a button; for a functional description of the encryption button, please continue reading in chapter 4.1 dLAN 200 AV network encryption at the touch of a button.

Please note that all dLAN 200 AV devices to be connected to your network are also connected to your household electrical wiring. A dLAN 200 AV device switches to Standby mode after a short while if no active network device such as a computer is connected to the network port. In Standby mode, the dLAN 200 AV device cannot be accessed via the power supply grid. As soon as the network device (e.g. computer) connected to the network interface is switched on again, your dLAN 200 AV device can also be reached again via the electrical wiring.
3.4 Connecting the dLAN 200 AVsmart+
This section describes how to connect your dLAN 200 AVsmart+ to a computer or other network device.

Ensure that your devices have up-to-date firmware (see 3.4.1 Firmware update).
①Use the included network cable to connect the dLAN 200 AVsmart+ to the network port of your running computer or other network device.
② Plug the dLAN 200 AVsmart+ into a wall socket.
③Additional network devices that are connected via a multiple socket are connected to the mains power supply by plugging the multiple socket into the integrated electrical socket of the dLAN 200 AVsmart+.
④Once you have connected at least two dLAN 200 AVsmart+ devices as described above, your dLAN 200 AV network has been set up. To secure your dLAN 200 AV network, continue with the configuration. For more information, refer to the chapter 4 Security in the dLAN.
3.4.1 Firmware update

If you would like to combine a dLAN 200 AVsmart+ with older devolo dLAN 200 AV devices in a network, please update the firmware of the dLAN 200 AV devices first. Directly connect each dLAN 200 AV individually to the computer and insert the included CD-ROM into your CD drive.
If autoplay is installed on your computer, the installation will start automatically. Otherwise, open the folder with the Windows Explorer by right-clicking on Start and selecting Explorer from the context menu. Now, select your CD-ROM drive. Double-click to start the installation wizard manually.
Select the Firmware update for dLAN 200 AV products item in the Install dLAN 200 AVsmart+ main menu to perform the update. When the update is complete, return the device to its usual location. The firmware updater application can also be found in the Service Centre of our website at www.devolo.com.
3.5 Software installation
3.5.1 Software for Windows
Use the installation wizard to set up the following software components for using the adapter with the Windows operating system:
- The devolo dLAN Configuration Wizard lets you set up custom encryption for your dLAN 200 AV network.
- The devolo Informer finds dLAN adapters in a dLAN network and displays information on the devices found.
To install the software, insert the included CD-ROM in the CD drive of your computer. If autoplay is installed on your computer, the installation will start automatically. Otherwise, open the folder with the Windows Explorer by right-clicking on Start and selecting Explorer from the context menu. Double-click to start the installation wizard manually.
During the installation process, you will be given the choice of installing all software components (Standard installation) or selecting individual ones (Custom installation).

To take full advantage of the functions of your device, we recommend installing all of the applications.
You will be asked for permission to transfer anonymous performance data related to your dLAN adapter to devolo. The data sent to devolo pertains only to the performance values of your dLAN devices. The data is anonymised and will be used exclusively for statistical purposes. By providing it, you can help us improve our products. You can find the installed software applications in the Start Programs devolo program group.
3.5.2 Software for Mac OS X
The software ♦ mac folder contains the dLAN configuration software.
3.5.3 Software for Linux (Ubuntu)
The software ↩ linux folder contains the dLAN configuration software.
21 Initial use
devolo dLAN 200 AVsmart+
4 Security in the dLAN
Data communication via the household electrical wiring is encrypted to ensure the privacy of your dLAN 200 AV network. The following section describes data encryption options—either using the encryption button or the dLAN Configuration Wizard.
Please note the following basic principle when choosing your encryption method:

In dLAN 200 AV networks, data encryption is as simple as touching a button, since all corresponding dLAN 200 AV devices are equipped with an encryption button.
- For dLAN 200 AV networks that include devices with and without encryption buttons, data encryption must be set up using the dLAN Configuration Wizard.
4.1 dLAN 200 AV network encryption at the touch of a button
To encrypt a dLAN 200 AV network, in which all associated devices are equipped with an encryption button, simply press the encryption button that is located on the device. Pressing this button will encrypt your dLAN 200 AV network with a randomly generated password.

Adapters cannot be configured while in Standby mode.
The following section contains exact instructions on the basis of possible network scenarios:
Encrypting a new dLAN 200 AV network with two dLAN 200 AVsmart+ (Fig. 5)
Once both adapters have been successfully connected, press each encryption button for approx. one second within two minutes of one another.
That's it! Your dLAN 200 AV network is now protected against unauthorised access.

For the description of the LCD display, refer to chapter 3.3.1 dLAN screen.
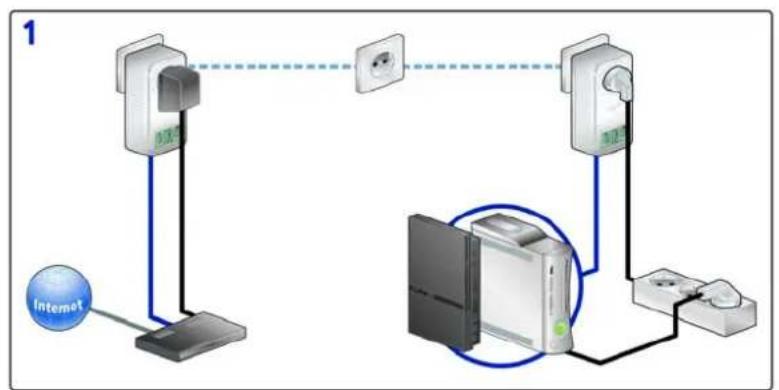
Fig. 5

Expanding an existing dLAN 200 AV network by adding a new dLAN 200 AVsmart+ (Fig. 6)
If you have already secured your existing dLAN 200 AV network using the encryption button, use the same method to integrate further adapters. Once you have successfully connected the new dLAN 200 AVsmart+, first press the encryption button (approx. one second) of one of your network's existing adapters, then press the encryption button (approx. one second) of your new dLAN 200 AVsmart+ within two minutes.
That's it! The new dLAN 200 AVsmart+ is now integrated in your network. To integrate additional adapters in your network, repeat the above steps.

For the description of the LCD display, refer to chapter 3.3.1 dLAN screen.
![graph LR A["Modem/Router"] -->|Ethernet| B["dLAN® 200 AVsmart+"] B --> C["PC"] C -->|Ethernet| D["dLAN® 200 AVsmart+"] D --> E["TV & Set-Top-Box"] E -->|Ethernet| D style A fill:#f9f,stroke:#333 style B fill:#ccf,stroke:#333 style C fill:#cfc,stroke:#333 style D fill:#fcc,stroke:#333 style E fill:#c…](/content/2026/06/1251535/images/a8d055431facaa63a9c5cbd4cc175e2a40b2d7ad7aaa763a49201ae55f4f5635.jpg)
Removing a dLAN 200 AVsmart+ from a network (Fig. 7)
To remove a dLAN 200 AVsmart+ adapter from an existing network, press its encryption button for at least ten seconds. The device will be assigned a new randomly generated password and will thus no longer be able to access the network. To integrate the device into
a different dLAN 200 AV network, follow the steps described above, depending on whether you are setting up a new network or adding the adapter to an existing one.
![graph TD A["dLAN® 200 AVsmart+"] -->|Ethernet| B["Modem/Router"] B --> C["Internet"] D["dLAN® 200 AVsmart+"] -->|Ethernet| E["PC"] E --> F["Modem/Router"] F --> G["Internet"] H["dLAN® 200 AVsmart+"] -->|Ethernet| I["TV & Set-Top-Box"] I --> J["Modem/Router"] style A fill:#f9f,stroke:#333 style D fil…](/content/2026/06/1251535/images/0568b2f987da115c6483b4a7db7c71ac7f11a466e3cf954bda36110f54b02713.jpg)
4.2 Encrypting the dLAN 200 AV network with the dLAN Configuration Wizard
When using other dLAN 200 AV devices (without encryption button), data encryption can only be set up using the dLAN Configuration Wizard. Start by updating the firmware (see 3.4.1 Firmware update) of the dLAN 200 AV adapters.
After successfully installing the devolo software, you can launch the dLAN Configuration Wizard via the Start ☐ Programs ☐ devolo program group and the Device ☐ Start dLAN Configuration Wizard menu in the devolo Informer.
Before beginning with this step, make a note of the security IDs of all existing dLAN adapters. This unique identifier of each dLAN device is located on the label on the housing. It consists of 4 x 4 letters separated by dashes (e.g. ANJR-KMOR-KSHT-QRUV). Ensure that all dLAN adapters are connected to the electrical wiring and computers or other network components as appropriate and are not in standby mode.

If the dLAN Configuration Wizard cannot find a dLAN device in your network even though one is plugged tightly into a power outlet,
follow the instructions for bandwidth optimisation in the Annex.
Configuring your dLAN using the Configuration Wizard consists of three steps:
Scan for local adapter
After launching the Wizard, it initially scans for a dLAN adapter connected directly to your computer.
Entering the network password (Fig. 8)
If your dLAN adapter has been found that is reachable directly from your computer, you can select a network password in the next step to be valid for this and all other specified adapters in your personal home network.

Fig. 8
You can choose between your own password, a random password and the default password. To define your own password with a length of at least eight characters, enter this into the Network password (min. 8 characters) text field. Alternatively, you can have a randomly selected, highly secure password assigned using the Random password button. Pressing the Default password key resets the password of the dLAN adapter to the factory setting. Normally, the display of the password is hidden for security reasons. If you enable the option Show characters, the current password is displayed in legible form in the text field.
The factory default password is HomePlugAV. Assigning a specific password to a single adapter will exclude it from the remaining dLAN network.
Configuring additional dLAN adapters (Fig. 9)
After setting up the local dLAN adapter, you can, if you want, assign the dLAN password selected to other
dLAN devices in your network in order to form a closed dLAN network.

Fig. 9
You will need the 16-character Security IDs of the various adapters from the label on the housing. password Enter the code without hyphens in the 4 text boxes and confirm by clicking Define password. If a security ID is correct and the device is reachable in the dLAN, the device is added to the list of already configured adapters.
When launching the dLAN Configuration Wizard again after a successful initial installation—when integrating a new adapter into the network, for example—the application will remember devices and security IDs entered in previous sessions if you have encrypted them with a personal network password or the default password. In this case, you do not need

enter the devices again. However, if the random password was used to encrypt the network during the last installation, if you want to integrate a new adapter into the network, you must re-register all previously entered dLAN adapters using the security ID.
Once you have entered the security IDs of your dLAN adapters, your dLAN network is complete. All computers and other network devices connected to the adapters by cable should now be able to communicate with one another in the network.
4.3 devolo Informer
devolo Informer can detect all available dLAN adapters in your home network and display device information in an overview. After installing the devolo software, it can be found in the Start Programs devolo program group. When the Informer is launched, it initially scans your home network for all available dLAN devices. This may take a moment. All found adapters are listed with their names and MAC addresses in the overview window. Their firmware versions are also displayed, as are the transfer speeds of active connections between the adapters. devolo Informer generally updates the list of found dLAN devices automatically. If newly-added adapters do not appear in the window, refresh the display with F5 or via the View menu. Use
the Device menu or the context menu that opens with a right-click on the name of the displayed dLAN device to rename the adapter or launch the dLAN Configuration Wizard.
Multiple instances of devolo Informer installed in your network can be set to exchange information about found dLAN adapters under View ▶ Options .... You may also specify whether information on the performance of your dLAN adapters will be transferred to devolo here. The data sent to devolo pertains only to the performance values of your dLAN devices. The data is anonymised and will be used exclusively for statistical purposes. By providing it, you can help us improve our products.
5 Appendix

For the permitted voltage range for operating the device and the power consumption, refer to the label on the rear side of the device.

For the CE declaration for this product, refer to the accompanying product CD under CE. Additional technical information is available in the download area at www.devolo.com.
5.1 Bandwidth optimization
To significantly improve the transmission capacity of the network, we recommend that you comply with the following "connection rules":
● Plug the device directly into a wall socket. Avoid multiple sockets.
- You should connect all additional network devices that are connected to a multiple socket to the mains power supply via the electrical socket integrated into the dLAN 200 AVsmart+. To take full advantage of the filter function of the dLAN 200 AVsmart+ and to improve data transmission in the network, always plug the multiple socket into the electrical socket of the dLAN 200 AVsmart+.

If you need to power more devices, use a remote wall socket.
5.2 Important safety instructions
All safety and operating instructions should be read and understood before using the device, and should be kept for future reference.
● Never open the device. There are no user-service-able parts inside the device.

Do not try to service this product yourself! Contact qualified technicians each and every time your device needs maintenance. There is a risk of electric shock!
- Use the device in a dry location only.
● Always use the included network cable to connect the device. - Do not insert any objects into the openings of the device.
●To disconnect the device from the power supply grid, pull the power plug. - Do not keep the device in direct sunlight.
● Slots and openings on the case serve as ventilation. Never block or cover them.

![graph TD A["Computer"] --> B["Server"] B --> C["Switch"] C --> D["Network Switch"] D --> E["Output"]](/content/2026/06/1251535/images/6d9f60e7c4b019f1c3811a77ba9123a4ef5815d4af40215ba3676dabe9346904.jpg)
31 Appendix
● Never set up the device near a heater or radiator.
●The device should be located only where sufficient ventilation can be ensured.
- Disconnect the device from the power supply grid before cleaning. Use a moist towel to clean the device. Never use water, paint thinner, benzene, alcohol or other strong cleaning agents when cleaning the device, as these could damage the case.
● Never use the device with a power supply that does not meet the specifications provided on the rating plate. If you do not know what type of power supply you have at home, contact your dealer or energy supplier.
- In the event of damage, disconnect the device from the power supply grid and contact customer service. This applies, for example, if
○the power cable or plug is damaged.
○liquid has been spilled on the device or objects have fallen into the device.
○the device has been exposed to rain or water.
○the device does not work, even though the operating instructions have been followed properly.
○the device's case is damaged.

5.3 Disposal of old devices
The icon with crossed-out wastebasket on the device means that this adapter is an electrical or electronic device that falls within the scope of application of the German Electrical and Electronic Equipment Act. Since 24 March 2006, these types of devices may no longer be disposed of with household waste. Rather, in Germany, they can be given to a municipal collection point free of charge. Contact your municipal government to find out the address and hours of the nearest collection point.
5.4 Warranty conditions
The devolo AG warranty is given to purchasers of devolo products in addition to the warranty conditions provided by law and in accordance with the following conditions:
1 Warranty coverage
a) The warranty covers the equipment delivered and all its parts. Parts will, at devolo's sole discretion, be replaced or repaired free of charge if, despite proven proper handling and adherence to the operating instructions, these parts became defective due to fabrication and/or material defects. Alternatively, devolo reserves the right to replace the defective product with a comparable product with the same specifications and features. Operating manuals and possibly supplied software are excluded from the warranty.
b) Material and service charges shall be covered by devolo, but not shipping and handling costs involved in transport from the buyer to the service station and/or to devolo.
c) Replaced parts become property of devolo.
d) devolo is authorized to carry out technical changes (e.g. firmware updates) beyond repair and replacement of defective parts in order to bring the equipment up to the current technical state. This does not result in any additional charge for the customer. A legal claim to this service does not exist.
2 W a r r a n t
The warranty period for this devolo product is three years. This period begins at the day of delivery from the devolo dealer. Warranty services carried out by devolo do not result in an extension of the warranty period nor do they initiate a new warranty period. The warranty period for installed replacement parts ends with the warranty period of the device as a whole.
3 W a r r a n t 5 y 0 p p r e o r c a e t d i
a) If defects appear during the warranty period, the warranty claims must be made immediately, at the latest within a period of 7 days.
b) In the case of any externally visible damage arising from transport (e.g. damage to the housing), the person carrying out the transportation and the sender should be informed immediately. On discovery of damage which is not externally visible, the transport company and the sender are to be immediately informed in writing, at the latest within 3 days of delivery.
c) Transport to and from the location where the warranty claim is accepted and/or the repaired device is exchanged, is purchaser's own risk and cost.
d) Warranty claims are only valid if a copy of the original purchase receipt is returned with the device. devolo reserves the right to require the submission of the original purchase receipt.
4 Suspension of the warranty
All warranty claims will be deemed invalid
a) if the label with the serial number has been removed from the device,
b) if the device is damaged or destroyed as a result of acts of nature or by environmental influences (moisture, electric shock, dust, etc.),
c) if the device was stored or operated under conditions not in compliance with the technical specifications,
d) if the damage occurred due to incorrect handling, especially to non-observance of the system description and the operating instructions,
e) if the device was opened, repaired or modified by persons not contracted by devolo,
f) if the device shows any kind of mechanical damage, or
g) if the warranty claim has not been reported in accordance with 3a) or 3b).
If it becomes apparent that the reported malfunction of the device has been caused by unsuitable hardware, software, installation or operation, devolo reserves the right to charge the purchaser for the resulting testing costs.
6 Additional regulations
The above conditions define the complete scope of devolo's legal liability.
a) The warranty gives no entitlement to additional claims, such as any refund in full or in part. Compensation claims, regardless
the of the legal basis, are excluded. This does not apply if e.g. injury to persons or damage to private property are specifically covered by the product liability law, or in cases of intentional act or culpable negligence.
b) Claims for compensation of lost profits, indirect or consequential detriments, are excluded.
c) devolo is not liable for lost data or retrieval of lost data in cases of slight and ordinary negligence.
d) In the case that the intentional or culpable negligence of devolo employees has caused a loss of data, devolo will be liable for those costs typical to the recovery of data where periodic security data back-ups have been made.
e) The warranty is valid only for the first purchaser and is not transferable.
f) The court of jurisdiction is located in Aachen, Germany in the case that the purchaser is a merchant. If the purchaser does not have a court of jurisdiction in the Federal Republic of Germany or if he moves his domicile out of Germany after conclusion of the contract, devolo's court of jurisdiction applies. This is also applicable if the purchaser's domicile is not known at the time of institution of proceedings.
g) The law of the Federal Republic of Germany is applicable. The UN commercial law does not apply to dealings between devolo and the purchaser.
Index
A
AES encryption (128 bit) 4
B
Bandwidth optimization 30
C
CE declaration 30
Connecting the adapter 18
Connection quality 17
D
Data encryption 22
Default password 27
devolo Informer 29
Disposal of old device 32
Disposal of old devices 32
dLAN 200 AV network 22
dLAN Configuration Wizard 26
dLAN screen 8, 14
E
Encryption button 18
F
Factory default settings 17
Firmware update 19
G
Green IT 7
|
Icons 17
Integrated electrical socket 18, 30
Integrated mains filter 4
L
LCD display 14
Linux 20
M
Mac OS X 20
N
Network connection 18
Network password 27
P
Package contents 13
Power saving mode 4, 7
Q
Quality of Service 4
R
Random password 27
Ready to operate 17
S
Safety instructions 30
Security ID 26
Software installation 19
Standby mode 17
System requirements 13
Index
T
Test screen 17
U
Ubuntu 20
W
Wall socket 30
Windows 19


- © 2009 DEVOLO AG AACHEN (GERMANY)
- TRADEMARKS
- DEVOLO AG
- CONTENTS
- 1 PREFACE 4
- 2 INTRODUCTION 6
- 3 INITIAL USE 12
- 4 SECURITY IN THE DLAN 22
- 5 APPENDIX 30
- 1 PREFACE
- 1.1 THANK YOU FOR PLACING YOUR TRUST IN THIS DEVOLO PRODUCT
- ABOUT THIS MANUAL
- DESCRIPTION OF THE SYMBOLS
- DEVOLO ON THE INTERNET
- 2 INTRODUCTION
- 2.1 WHAT EXACTLY IS DLAN
- 2.2 DEVOLO—UP TO SPEED ON GREEN IT
- 2.3 DLAN 200 AVSMART+ AT A GLANCE
- 2.4 SAMPLE APPLICATIONS
- NETWORKING TWO COMPUTERS (FIG. 2)
- DISTRIBUTED INTERNET ACCESS SOLUTION (FIG. 3)
- 3 INITIAL USE
- 3.1 PACKAGE CONTENTS
- SINGLE KIT
- STARTER KIT
- NETWORK KIT
- 3.2 SYSTEM REQUIREMENTS
- NETWORK CONNECTION
- 3.3 FUNCTIONS
- 3.3.1 DLAN SCREEN
- OVERVIEW OF ICONS AND THEIR FUNCTIONS
- TEST SCREEN
- FACTORY DEFAULT SETTINGS
- READY TO OPERATE
- STANDBY MODE
- 3.3.2 NETWORK CONNECTION
- 3.3.3 INTEGRATED ELECTRICAL SOCKET
- 3.3.4 ENCRYPTION BUTTON
- 3.4 CONNECTING THE DLAN 200 AVSMART
- 3.4.1 FIRMWARE UPDATE
- 3.5 SOFTWARE INSTALLATION
- 3.5.1 SOFTWARE FOR WINDOWS
- 3.5.2 SOFTWARE FOR MAC OS X
- 3.5.3 SOFTWARE FOR LINUX (UBUNTU)
- 4 SECURITY IN THE DLAN
- 4.1 DLAN 200 AV NETWORK ENCRYPTION AT THE TOUCH OF A BUTTON
- ADAPTERS CANNOT BE CONFIGURED WHILE IN STANDBY MODE
- ENCRYPTING A NEW DLAN 200 AV NETWORK WITH TWO DLAN 200 AVSMART+ (FIG. 5)
- EXPANDING AN EXISTING DLAN 200 AV NETWORK BY ADDING A NEW DLAN 200 AVSMART+ (FIG. 6)
- REMOVING A DLAN 200 AVSMART+ FROM A NETWORK (FIG. 7)
- 4.2 ENCRYPTING THE DLAN 200 AV NETWORK WITH THE DLAN CONFIGURATION WIZARD
- SCAN FOR LOCAL ADAPTER
- ENTERING THE NETWORK PASSWORD (FIG. 8)
- CONFIGURING ADDITIONAL DLAN ADAPTERS (FIG. 9)
- 4.3 DEVOLO INFORMER
- 5 APPENDIX
- 5.1 BANDWIDTH OPTIMIZATION
- 5.2 IMPORTANT SAFETY INSTRUCTIONS
- 31 APPENDIX
- 5.3 DISPOSAL OF OLD DEVICES
- 5.4 WARRANTY CONDITIONS
- 1 WARRANTY COVERAGE
- 4 SUSPENSION OF THE WARRANTY
- 6 ADDITIONAL REGULATIONS
- INDEX
- A
- B
- C
- D
- E
- F
- G
- L
- M
- N
- P
- Q
- R
- S
Brand : DEVOLO
Model : dLAN 200 AVsmart+
Category : Network card