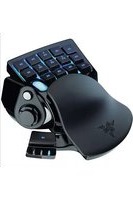
Nostromo Expert Gaming Keypad PC - Keyboard RAZER - Free user manual and instructions
Find the device manual for free Nostromo Expert Gaming Keypad PC RAZER in PDF.


| Product Type | Gaming Keypad |
| Brand | Razer |
| Model | Nostromo Expert Gaming Keypad PC |
| Connectivity | USB Wired |
| Dimensions (L x W x H) | 200 x 150 x 30 mm |
| Weight | 300 g |
| Power Source | USB Bus Powered |
| Number of Action Keys | 16 (programmable) |
| Directional Pad | 8-way thumb pad |
| Scroll Wheel | Yes, programmable |
| Backlighting | Blue LED backlit keys |
| Software | Razer Synapse (optional) |
| Compatibility | Windows PC (Windows 7 and later) |
| Ergonomics | Adjustable palm rest, contoured design |
| Cleaning Instructions | Wipe with a slightly damp, lint-free cloth; do not use solvents |
| Maintenance | Keep firmware updated via Razer Synapse |
| Safety | Use only with compatible USB ports; avoid liquid exposure |
| Spare Parts / Repairability | Not user-serviceable; contact Razer support for repairs |
| General Information | Designed for MMO and FPS gaming; customizable profiles |
Frequently Asked Questions - Nostromo Expert Gaming Keypad PC RAZER
User questions about Nostromo Expert Gaming Keypad PC RAZER
0 question about this device. Answer the ones you know or ask your own.
Ask a new question about this device
Download the instructions for your Keyboard in PDF format for free! Find your manual Nostromo Expert Gaming Keypad PC - RAZER and take your electronic device back in hand. On this page are published all the documents necessary for the use of your device. Nostromo Expert Gaming Keypad PC by RAZER.
USER MANUAL Nostromo Expert Gaming Keypad PC RAZER
Whether your passion lies in FPS, MMORPG, or RTS games, the Razer Nostromo® gaming keypad is designed to give you the upper hand with cung edge ergonomics designed for intuitive game control while you play in complete comfort. With an arsenal of tournament-grade controls including 16 fully programmable Hyperresponse™ keys, 8 keymaps that you can switch between on the y, and an 8-way direconal thumb pad all integrated into one dedicated gaming keypad, you're prepared to take on all challengers.
CONTENTS
- PACKAGE CONTENTS / SYSTEM REQUIREMENTS.... 3
- REGISTRATION / TECHNICAL SUPPORT.... 3
- DEVICE LAYOUT 4
- USING YOUR RAZER NOSTROMO....5
- INSTALLING YOUR RAZER NOSTROMO 6
- CONFIGURING YOUR RAZER NOSTROMO....7
- SAFETY AND MAINTENANCE.... 20
- LEGALESE....22
1. PACKAGE CONTENTS / SYSTEM REQUIREMENTS
PACKAGE CONTENTS
• Razer Nostromo Expert Gaming Keypad
- Quick Start Guide
- Master Guide
SYSTEM REQUIREMENTS
• PC/Mac with a free USB port
- Windows® 7 / Windows Vista® / Windows® XP (32-bit) / Mac OS X (10.6-10.7)
- Internet conneccon
• 200MB of free hard disk space
2. REGISTRATION / TECHNICAL SUPPORT
REGISTRATION
- Please visit www.razerzone.com/registraon for online product registraon.
TECHNICAL SUPPORT
What you'll get:
- 1 year limited manufacturer's warranty.
• Free online technical support at www.razersupport.com.
3. DEVICE LAYOUT
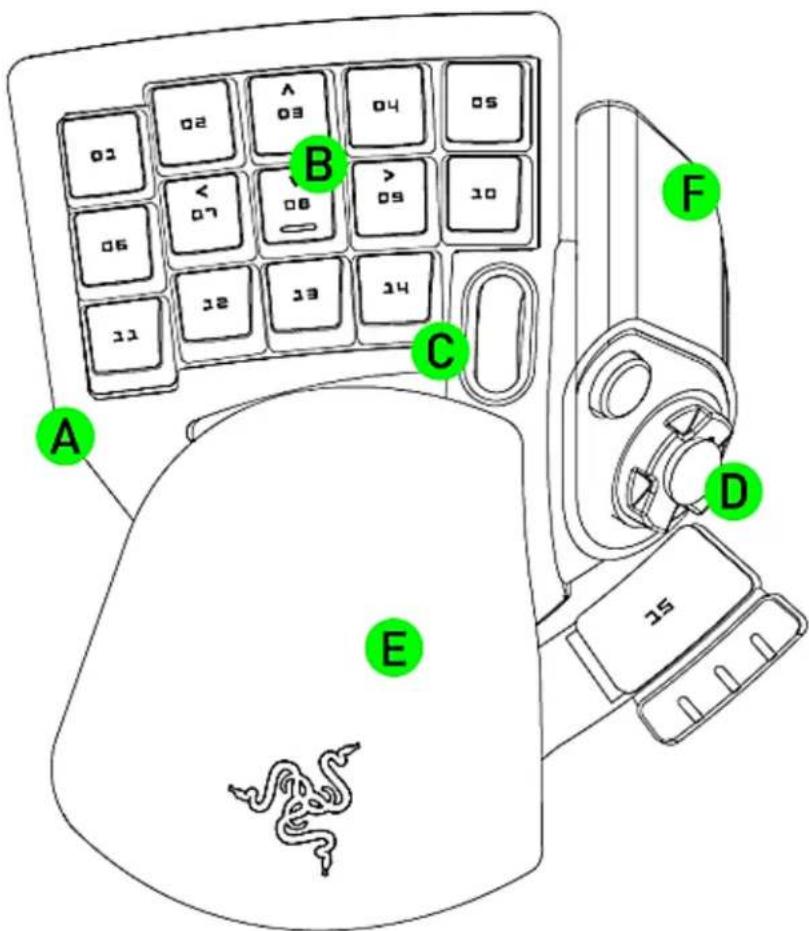
A. Ergonomic form factor and tournament-grade layout
B. 16 fully programmable Hyperresponse keys
C. Backlit keypad and scroll wheel
D. Programmable 8-way direconal thumb pad
E. Adjustable So-Touch Handrest Pad
F. 20 Dierent Game Proles
4. USING YOUR RAZER NOSTROMO
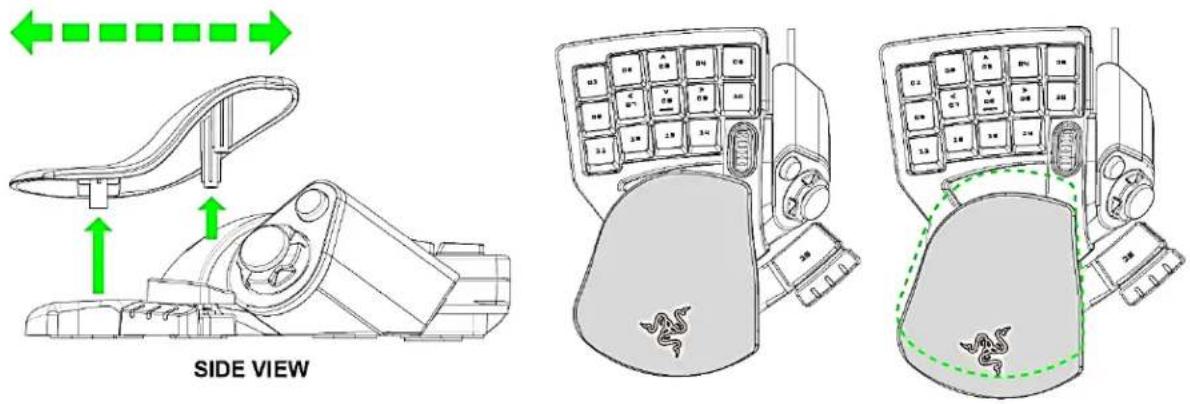
ADJUSTING the WRIST PAD
You can remove the wrist pad and adjust it accordingly to suit your palm grip.
USING THE BACKLIGHT SWITCH
Turn on/o the backlight on the Razer Nostromo.

5. INSTALLING YOUR RAZER NOSTROMO
![graph LR A["Laptop"] -->|Data Link| B["USB Cable"] B --> C["Server"] C --> D["Laptop"]](/content/2026/06/1251361/images/eb9fd683b39759c1c3f342a795433d41a31fe6ea1c89922c0f37aacc337fb415.jpg)
Note: You may skip Steps 2-4 if you already have a Razer Synapse 2.0 installed and an exisng account.
Step 1: Plug the Razer Nostromo into the USB port of your computer.
Step 2: Download the Razer Synapse 2.0 installer from www.razersupport.com.
Step 3: Run the installer and follow the onscreen instrucons.
Step 4: Register for a Razer Synapse 2.0 account and conrm your new account.
Step 5: Launch Razer Synapse 2.0 and login to your account.
Step 6: Wait unl the soware automacally downloads and installs.
6. CONFIGURING YOUR RAZER NOSTROMO
Disclaimer: The features listed here require you to log in to Razer Synapse 2.0. These features are also subject to change based on the current soware version and your Operang System.
KEYPAD TAB
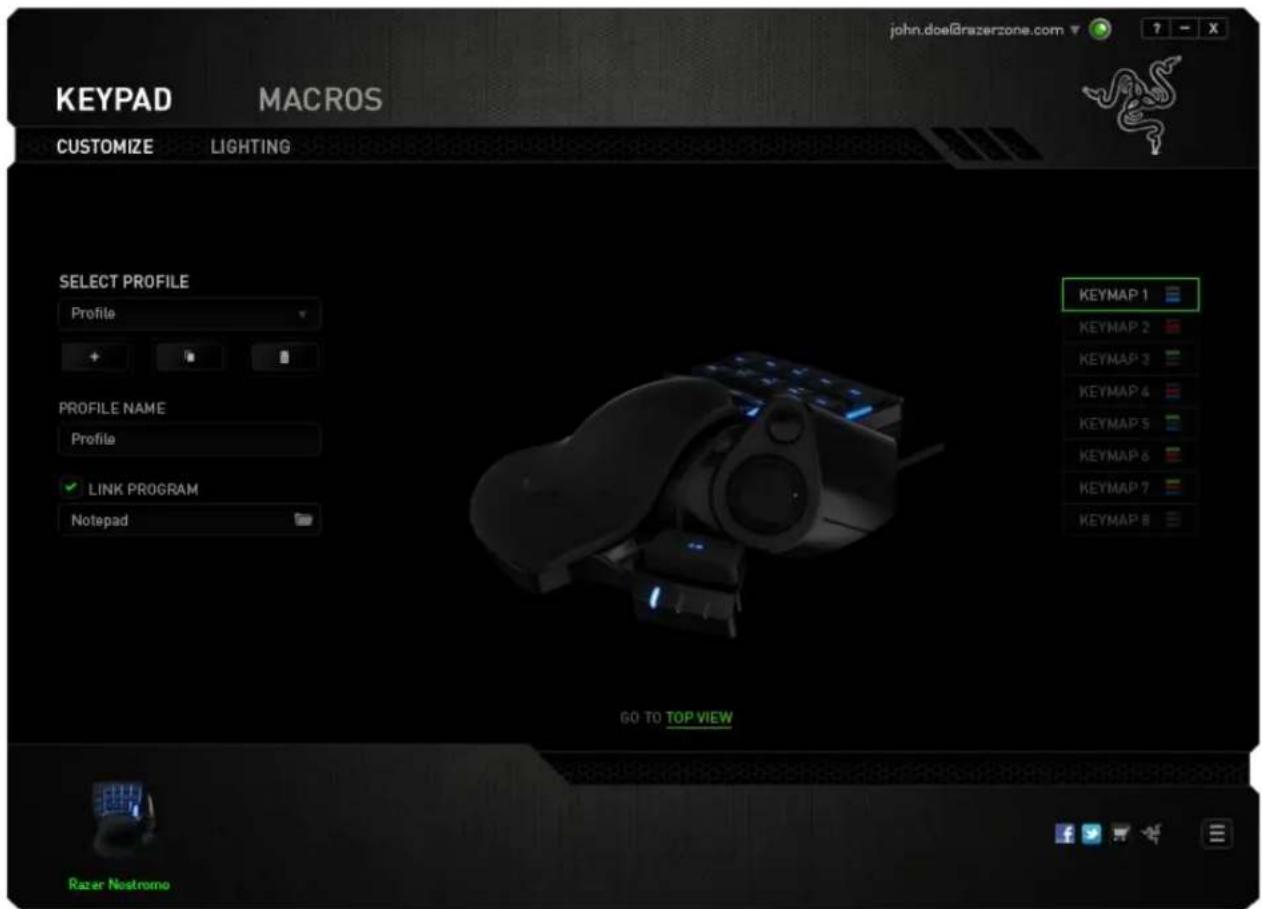
The Keypad Tab is your default tab when you rst install Razer Synapse 2.0. This tab allows you to customize your device's proles, key assignments and lighng.

PROFILE
A Prole is a convenient way of organizing all your custom sengs and you can have an innate number of proles at your disposal. Any changes made within each tab are automatically saved to the current prole and stored into the cloud servers.
![SELECT PROFILE Profile + [ ] [ ] PROFILE NAME Profile ✓ LINK PROGRAM Notepad](/content/2026/06/1251361/images/f305bb7fe1728aed9d8cf1d63f9bd0790d1c322104a8759f24602ba40b147468.jpg)
You can create a new prole by clicking the +buon or delete the current prole by clicking the buon allows you to Copy, Import, and Export proles.
Your current prole by default is named "Prole" however; you can rename it by typing on the text eld below PROFILE NAME.
Each prole can be set to automacally acvate when you run a program or applicaon through the use of the LINK PROGRAM opon.
KEYMAPS
Keymaps are especially useful for games which require dierent play-styles for dierent character classes. With Keymaps, you can have up to 8 sets of key assignments per prole. Each keymap has an equivalent color on the Keymap Indicator to make it easier to check your current keymap.

CUSTOMIZE TAB
The Customize Tab is where you can modify the basic funconalies of your device such as key assignments to suit your gaming needs. The changes made in this tab are automacally saved to your current prole.
Top View
The Top View is where you can customize the 14 fully programmable keys and the scroll wheel.

Side View
The Side View is where you can customize the Thumb Key, the Direconal Thumb Pad and the Spacebar Actuator.
KEY ASSIGNMENT MENU
Initially, each key is set to DEFAULT. However, you may change the funcon of this key by clicking the desired key to access the Key Assignment Menu.

Listed below are the customizaon opons and their descripon.

Default
This opon enables you to return the key to its original funcon. To choose the DEFAULT, simple select it from the Key Assignment Menu.

Keyboard Funcon
This opon enables you to change any key into another keyboard funcon. To choose a keyboard funcon, select KEYBOARD FUNCTION from the Key Assignment Menu and enter the key you wish to use on the given eld below. You may also include modier keys such as Ctrl, Shift, Alt or any of those combinaons.

Mouse Funcon
This opon allows you to change any key into a mouse buon funcon. To choose a mouse funcon, select MOUSE FUNCTION from the Key Assignment Menu and an ASSIGN BUTTON submenu will appear.
Listed below are the funcons which you can choose from the Assign Buon submenu:
Le Click - Performs a le mouse click using the assigned buon.
Right Click - Performs a right mouse click using the assigned buon.
Scroll Click - Acvates the universal scrolling funcon.
Double Click - Performs a double le click using the assigned buon.
Mouse Buon 4 - Performs a "Backward" command for most internet browsers.
Mouse Buon 5 - Performs a "Forward" command for most internet browsers.
Scroll Up - Performs a "Scroll Up" command using the assigned buon.
Scroll Down - Performs a "Scroll Down" command using the assigned buon.

Macro
A Macro is a prerecorded sequence of keystrokes and buon presses that is executed with precise ming. By seng a key to Macro, you can conveniently execute a chain of commands. When you select this opon from the Key Assignment Menu, a submenu will appear which allows you to choose a prerecorded macro command. See the Macros Tab to learn more about creang Macro commands.

Inter-device
Inter-device allows you to change the funconality of other Razer Synapse 2.0-enabled devices. Some of these funconalies are device-specific such as using your Razer gaming keyboard to change the Sensitivity Stage of your Razer gaming mouse. When you select Inter-device from the Key Assignment Menu, a sub-menu will appear.
DEVICE TO LINK allows you to choose which currently connected Razer device can be linked while FUNCTION allows you to choose which funconality you want to use for the linked device.

Switch Keymap
The Switch Keymap allows you to easily swap key assignments with a press of a key. When you select Switch Keymap from the Key Assignment Menu, a submenu will appear wherein you can choose which keymap to use. The LED on the thumb module will automatically change color to correspond with the keymap.

Switch Prole
The Switch Prole enables you to change proles on the y and immediately load all your pre-congured sengs. When you select Switch Prole from the Key Assignment Menu, a sub-menu will appear that will allow you to choose which prole to use. An on-screen display will automatically appear whenever you switch proles.

Launch Program
Launch Program allows you to launch a program or a website using the assigned key. When you select Launch Program from the Key Assignment Menu, two opons will appear which allow you to search for the specific program you want to open or write the address of the website you want to visit.

Joysck Funcon
With this opon you can change the funconality of any key into a joysck buon or an analog sck direcon. To choose a joysck funcon, select JOYSTICK FUNCTION from the Key Assignment Menu and an ASSIGN BUTTON submenu will appear.

Disable
This opon renders the assigned key unusable. Use Disable if you do not want to use the key or if it interferes with your gaming.
LIGHTING TAB
The Lighng Tab allows you to adjust the backlight by using the BRIGHTNESS slider.

This tab also allows you to turn o the backlighng whenever your screen enters sleep mode.
MACROS TAB
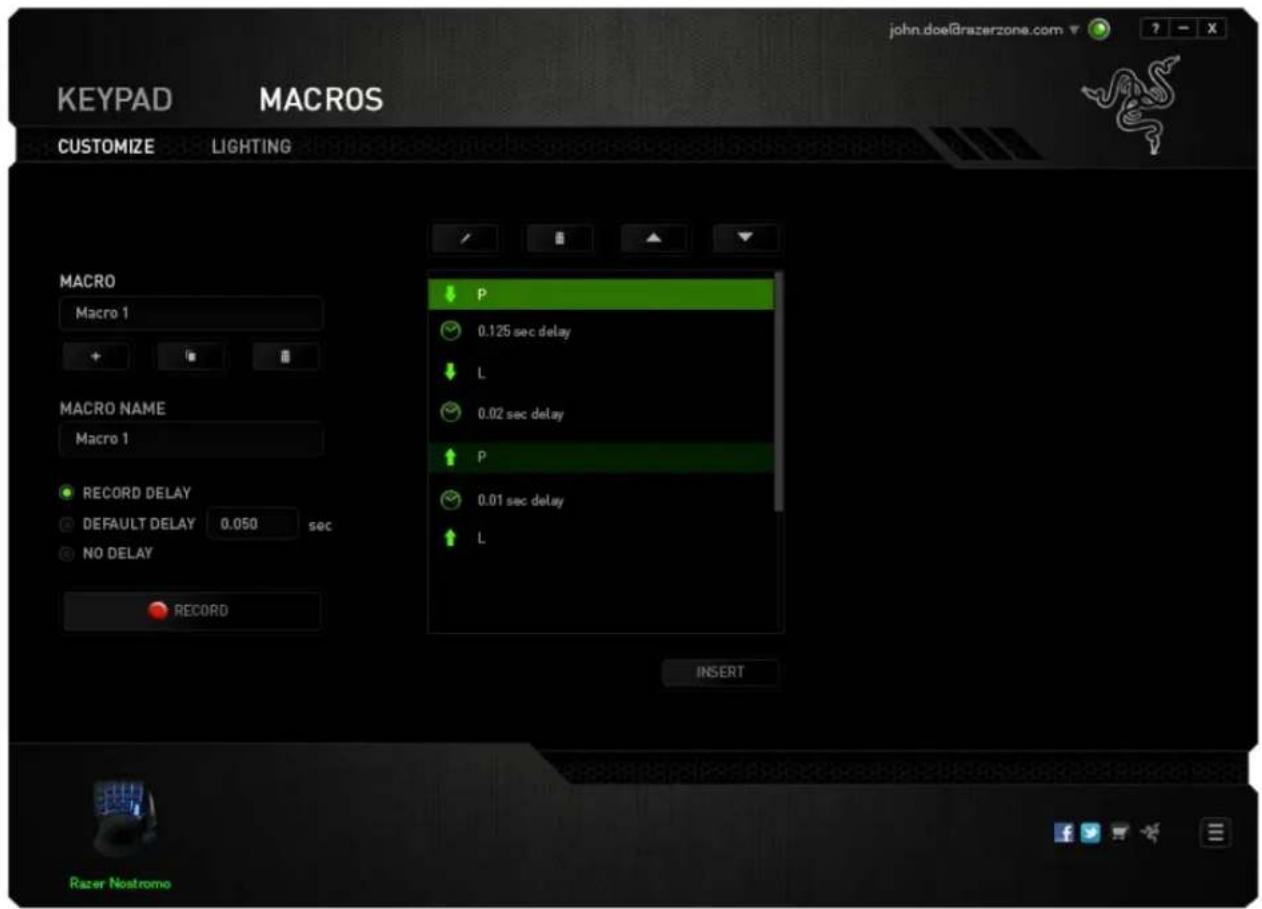
The Macros Tab allows you to create a series of precise keystrokes and buon presses. This tab also allows you to have numerous macros and extremely long macro commands at your disposal.
![MACRO + [ ] [ ] MACRO NAME ● RECORD DELAY ○ DEFAULT DELAY 0.050 sec ○ NO DELAY ● RECORD](/content/2026/06/1251361/images/5f61b699ffef6fa7a5eabbd160ca47ffbe42d843bc4b62526b394005a3998c81.jpg)
The Macro secon works similarly to Prole wherein you can rename a macro by typing on the eld below MACRO NAME. There are also other opons available in the
macro secon such as creang a new macro by clicking the buca, developing the current macro by clicking the buca, duplicang the current macro by
clicking the
To create a macro command, simply click the buon screen on your keystrokes and buon presses will automatically register on the macro screen. When
you are done recording your macro commands, click on the button to record the session.
The Macro secon allows you to input the delay in-between commands. In RECORD DELAY the delay in-between commands are registered as how it is entered. The DEFAULT DELAY uses a predened me (expressed in seconds) as the delay. And NO DELAY omits all the pauses in-between keystrokes and buon presses.

Note: You may use up to three decimal places when inserng values on the seconds (sec) eld.
Once you have recorded a macro, you may edit the commands you have entered by selecng each command on the macro screen. Each keystroke or buon press is arranged sequentially with the rst command shown at the top of the screen.
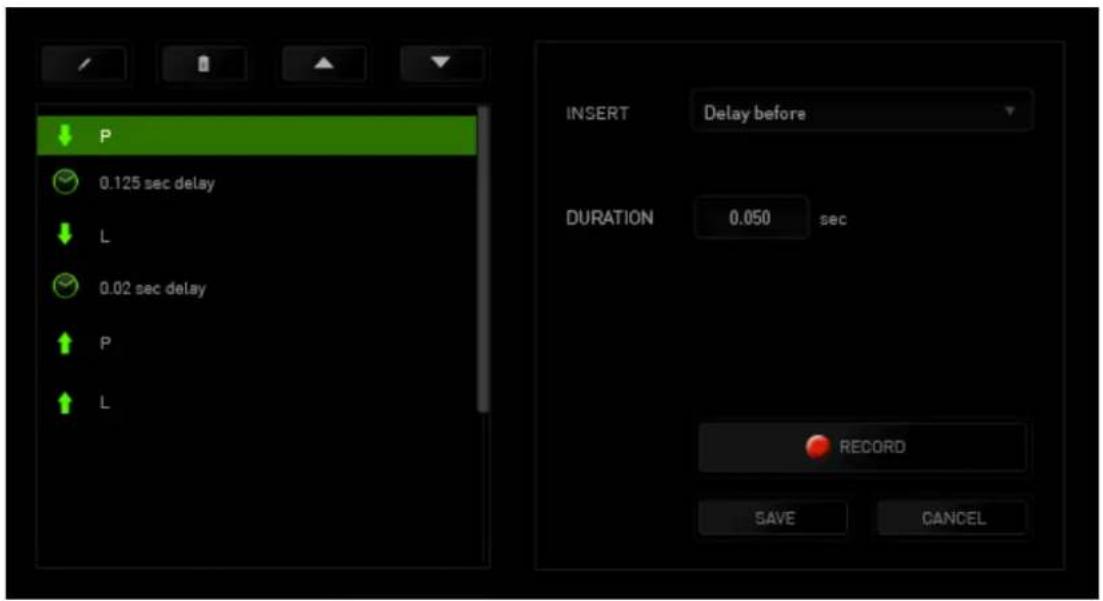
The buo allows you to edit a parcular command and the buon
enables you to delete a command. The open buttons given you the open to move the command up or down.
The INSERT allows you to put in additional keystrokes, buon presses or me delays either before or aer the selected command.
Once you have pressed the button, a new display window will appear beside the list of macro commands. The dropdown menu on this window allows you to choose a keystroke or a delay to be added in before or aer the highlighted macro command.


You may add in a new set of macro commands by clicking the button to the keystroke menu; or input me delays on the duraon eld using the delay menu.
7. SAFETY AND MAINTENANCE
SAFETY GUIDELINES
In order to achieve maximum safety while using your Razer Nostromo, we suggest that you adopt the following guidelines:
- Should you have trouble operang the device properly and troublesomeong does not work, unplug the device and contact the Razer hotline or go to www.razersupport.com for support. Do not aempt to service or x the device yourself at any me.
- Do not take apart the device (doing so will void your warranty) and do not aempt to operate it under abnormal current loads.
- Keep the device away from liquid, humidity or moisture. Operate the device only within the specific temperature range of 0° C ( 32° F) to 40° C ( 104° F). Should the temperature exceed this range, unplug and switch o the device in order to let the temperature stabilize to an opmal level.
COMFORT
Research has shown that long periods of repeve moon, improper posioning of your computer peripherals, incorrect body posion, and poor habits may be associated with physical discomfort and injury to nerves, tendons, and muscles. Below are some guidelines to avoid injury and ensure opmum comfort while using your Razer Nostromo.
- Posion your keypad and monitor directly in front of you with your mouse next to it. Place your elbows next to your side, not too far away and your keyboard within easy reach.
-
Adjust the height of your chair and table so that the keypad and mouse are at or below elbow height.
-
Keep your feet well supported, posture straight and your shoulders relaxed.
-
During gameplay, relax your wrist and keep it straight. If you do the same tasks with your hands repeatedly, try not to bend, extend or twist your hands for long periods.
-
Do not rest your wrists on hard surfaces for long periods. Use a wrist rest to support your wrist while gaming.
-
Customize the keys on your keypad to suit your style of gaming in order to minimize repeve or awkward moons while gaming.
-
Do not sit in the same posion all day. Get up, step away from your desk and do exercises to stretch your arms, shoulders, neck and legs.
-
If you should experience any physical discomfort while using your keypad, such as pain, numbness, or ngling in your hands, wrists, elbows, shoulders, neck or back, please consult a qualified medical doctor immediately.
MAINTENANCE AND USE
The Razer Nostromo requires minimum maintenance to keep it in opmum condion. Once a month we recommend you unplug the device from the computer and clean it using a so cloth or coon swab with a bit of warm water to prevent dirt buildup. Do not use soap or harsh cleaning agents.
8. LEGALESE
COPYRIGHT AND INTELLECTUAL PROPERTY INFORMATION
© 2010 Razer USA Ltd. Patent Pending. All Rights Reserved. Razer™, the Razer Triple-Headed Snake logo, the Razer distressed word logo and other trademarks contained herein are trademarks or registered trademarks of Razer USA Ltd and/or its aliated or associated companies, registered in the United States and/or other countries. Windows and the Windows logo are trademarks of the Microso group of companies. Mac OS, Mac and the Mac logo are trademarks or registered trademarks of Apple.
Razer USA Ltd (“Razer”) may have copyright, trademarks, trade secrets, patents, patent applicaons, or other intellectual property rights (whether registered or unregistered) concerning the product in this Master Guide. Furnishing of this Master Guide does not give you a license to any such copyright, trademark, patent or other intellectual property right. The Razer Nostromo (the “Product”) may dier from pictures whether on packaging or otherwise. Razer assumes no responsibility for such dierences or for any errors that may appear. Informaon contained herein is subject to change without noce.
LIMITED PRODUCT WARRANTY
For the latest and current terms of the Limited Product Warranty, please visit www.razerzone.com/warranty.
LIMITATION OF LIABILITY
Razer shall in no event be liable for any lost prots, loss of informaon or data, special, incidental, indirect, punive or consequential or incidental damages, arising in any way out of distribuon of, sale of, resale of, use of, or inability to use the Product. In no event shall Razer's liability exceed the retail purchase price of the Product.
COSTS OF PROCUREMENT
For the avoidance of doubt, in no event will Razer be liable for any costs of procurement unless it has been advised of the possibility of such damages, and in no case shall Razer be liable for any costs of procurement liability exceeding the retail purchase price of the Product.
GENERAL
These terms shall be governed by and construed under the laws of the jurisdicon in which the Product was purchased. If any term herein is held to be invalid or unenforceable, then such term (in so far as it is invalid or unenforceable) shall be given no eect and deemed to be excluded without invalidang any of the remaining terms. Razer reserves the right to amend any term at any me without noce.



- CONTENTS
- PACKAGE CONTENTS / SYSTEM REQUIREMENTS
- PACKAGE CONTENTS
- SYSTEM REQUIREMENTS
- REGISTRATION / TECHNICAL SUPPORT
- REGISTRATION
- TECHNICAL SUPPORT
- DEVICE LAYOUT
- USING YOUR RAZER NOSTROMO
- ADJUSTING THE WRIST PAD
- USING THE BACKLIGHT SWITCH
- INSTALLING YOUR RAZER NOSTROMO
- CONFIGURING YOUR RAZER NOSTROMO
- KEYPAD TAB
- PROFILE
- KEYMAPS
- CUSTOMIZE TAB
- TOP VIEW
- SIDE VIEW
- KEY ASSIGNMENT MENU
- DEFAULT
- KEYBOARD FUNCON
- MOUSE FUNCON
- MACRO
- INTER-DEVICE
- SWITCH KEYMAP
- SWITCH PROLE
- LAUNCH PROGRAM
- JOYSCK FUNCON
- DISABLE
- LIGHTING TAB
- MACROS TAB
- SAFETY AND MAINTENANCE
- SAFETY GUIDELINES
- COMFORT
- MAINTENANCE AND USE
- LEGALESE
- COPYRIGHT AND INTELLECTUAL PROPERTY INFORMATION
- LIMITED PRODUCT WARRANTY
- LIMITATION OF LIABILITY
- COSTS OF PROCUREMENT
- GENERAL
Brand : RAZER
Model : Nostromo Expert Gaming Keypad PC
Category : Keyboard