C40SFS - Television Cello - Free user manual and instructions
Find the device manual for free C40SFS Cello in PDF.


| Product Type | LED TV |
| Screen Size | 40 inches (102 cm) |
| Resolution | 1920 x 1080 (Full HD) |
| Refresh Rate | 60 Hz |
| Power Consumption | 65 W (typical) |
| Weight (without stand) | 6.2 kg |
| Dimensions (with stand) | 902 x 560 x 220 mm |
| Connectivity | 2 x HDMI, 1 x USB, RF In, AV In, Headphone Out |
| Sound Output | 2 x 8 W |
| Stand Type | Table-top (included) |
| VESA Mount Pattern | 200 x 200 mm |
| Energy Class | F (EU) |
| Remote Control | Included (batteries not included) |
| Cleaning Instructions | Wipe with a soft, dry cloth. Do not use liquids or abrasive cleaners. |
| Safety Features | Child lock, auto power off, ventilation slots |
| Spare Parts Availability | Remote control, stand, power cord available from Cello service centers |
Frequently Asked Questions - C40SFS Cello
User questions about C40SFS Cello
0 question about this device. Answer the ones you know or ask your own.
Ask a new question about this device
Download the instructions for your Television in PDF format for free! Find your manual C40SFS - Cello and take your electronic device back in hand. On this page are published all the documents necessary for the use of your device. C40SFS by Cello.
USER MANUAL C40SFS Cello
40" Super fast Android 7 Smart TV
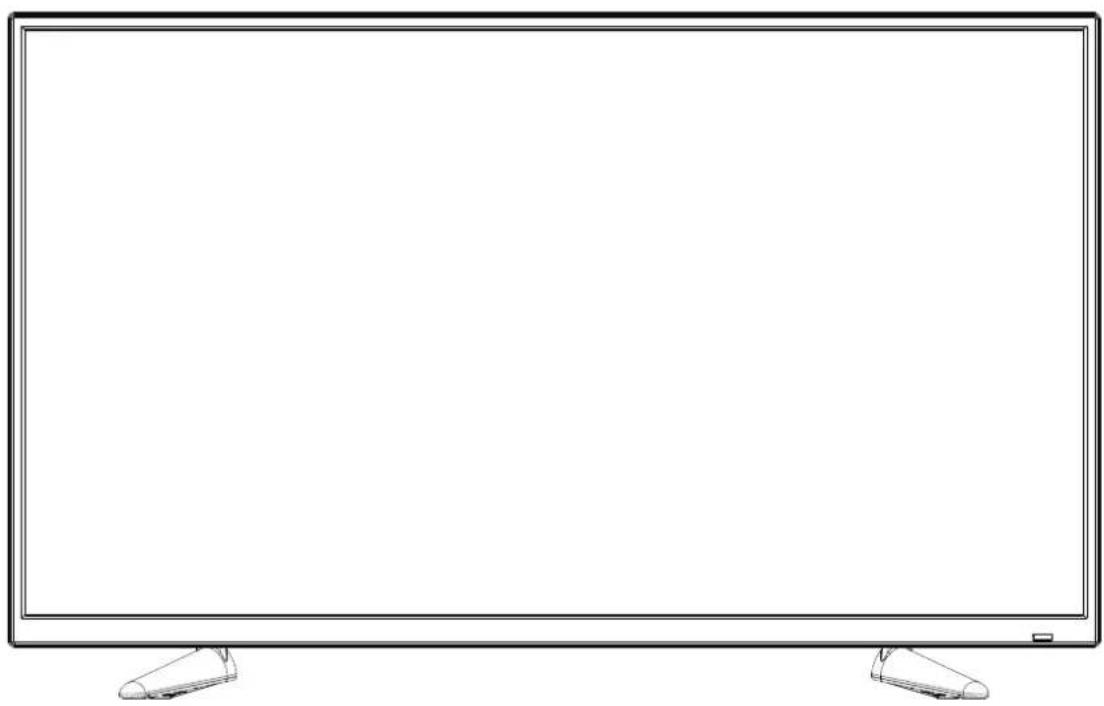
natural_image
Front view of a flat-screen monitor with blank screen area and stand (no text or symbols)INSTRUCTION MANUAL
Contents:
Preface/ Whats in the box/ Fixing the TV stand feet/ Wall mounting ....3
Front IR sensor & TV buttons / Rear view and connections ....4
Remote control/ Inserting batteries/ Operating range ....5
Video & Audio connections/ Connecting AV devices/ Connecting Digital Audio Receiver ....6
Powering on the TV for the first time/ First time install/ Smart TV tuning ....7
Factory reset/ Quick start function/ Source menu/ Channel selection options ....8
Various TV options/ Volume adjust/ TV picture settings/ TV Sound settings ....9
TV Timer/ Android Timer/ Smart TV settings ....10
External Storage 11
Apps & APKs 12
App Installer/ Appearance Icon/ Power key definition/ Recording 13
EPG timer record/ Instant record/ Pause live TV/ Maintenance ....14
How to Install new TV software online....15
Trouble shooting/ Technical specification/ Safety warnings ....16
Safety warnings ....16
Electronic waste recycling/ CE compliance 18
Preface:
Thank you for choosing our 40" Android 7 Smart TV.
This TV has many features and incorporates the latest technology to enhance your viewing experience. We recommend that you spend some time reading this instruction manual in order that you fully understand these features. Read all of the safety instructions carefully before use and keep this instruction manual for future reference.
Whats in the box:
• TV
• Stand & Stand fixing Screws ((M4 x 12) x 4)
- Power cable
- Remote control
- Batteries (2 x AAA)
- Quick start guide
- Warranty card
Fixing and the TV stand feet
Place the TV face down on a soft and flat surface (blanket, foam, cloth, etc.) to prevent any damage to the TV.
- Attach the stand feet in the positions shown below and secure them with supplied screws ((M4 x 12) x 4)

natural_image
Simple diagram of a blank rectangular board with two small foot icons at the bottom, no text or symbols present.Wall mounting: This TV is VESA-Compliant and has been designed to be wall mounted with a VESA-Compliant wall mounting kit. (Wall mounting kit and screws not included)

Front IR sensor and TV buttons

| 1 | Power LED Red = Standby Green = ON Orange = Active Standby | |
| 2 | IR receiver Receives infra-red signals from the remote | |
| 3 | Vol +/- Adjust the volume | |
| 4 | CH +/- | Select channels |
| 5 | Menu Displays the onscreen Menu options | |
| 6 | Source Select input source (HDMI1, HDMI2, HDMI3, HDMI4, AV) | |
| 7 | Standby Switches the TV ON/OFF from and to Standby mode | |
Rear View and Connections

| 1 | Network RJ45 connector | to connect between the TV and internet Router |
| 2 | IR IR Input | |
| 3 | Headphone Headphone | /Earphone connector |
| 4 | Mini AV Connect devices | with composite video and audio outputs |
| 5 | Digital Audio out Connect | an Optical audio cable |
| 6 | Audio out (RCA) Connect | to analogue audio receiver |
| 7 | HDMI x 4 | Connect HDMI sockets on devices such as game consoles and DVD player |
| 8 | TV Aerial | Connect the TV aerial |
| 9 | USB | Play video audio and text files and use as storage for recordings |
| 10 | Micro SD (SDXC) | Play video audio and text files and use as storage for recordings |
Remote control: Dependant on the model some keys will have no function
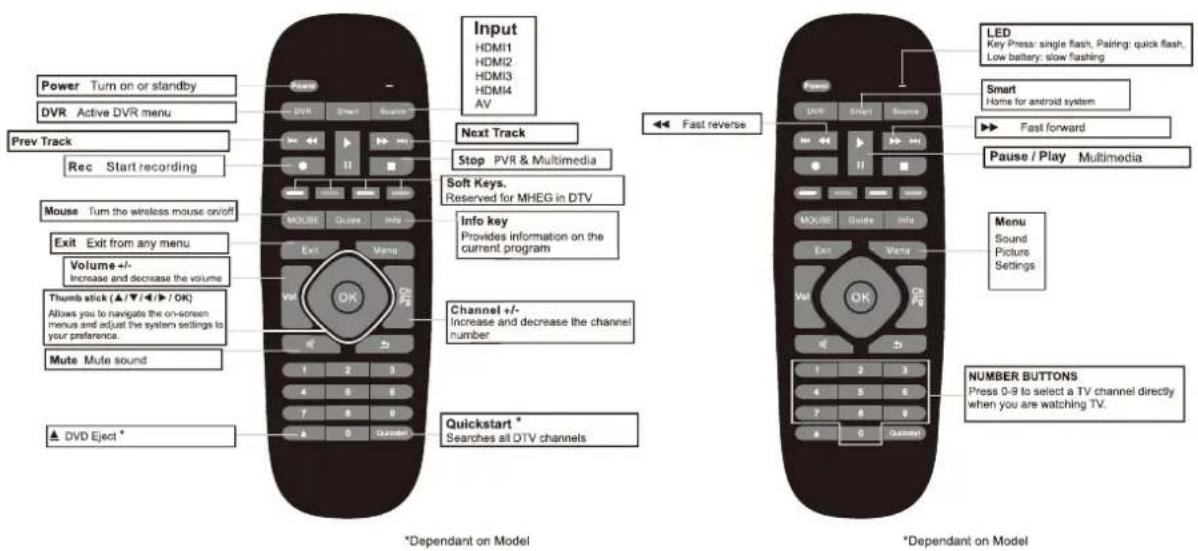
The sensitivity of the mouse cursor can be adjusted by pressing and holding the OK key and using the Volume +/- keys to regulate the sensitivity (Fast/Slow). During this procedure the mouse cursor must be activated. The Mouse cursor is turned on and off by pressing the Mouse key.
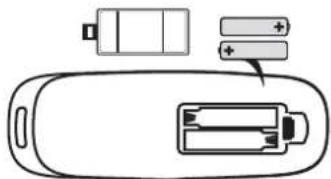
Installing Batteries into the Remote Control
Plug in the TV and wait for the TV to power on and show a picture on the screen before inserting the batteries. This enables the wireless remote control to pair correctly with the TV.
natural_image
Diagram of a battery pack with two batteries and one plug, no text or symbols present- Insert 2 x 1.5V AAA batteries making sure to match the (+) and (-) ends of the batteries with the (+) and (-) ends shown in the batterie compartment.
- Close the batterie compartment cover.
The Remote-Control Operation Range

- 5 Meters is the normal distance recommended between the Remote control and the TV IR sensor and within 60° in front of the TV (See diagram). The operating distance may vary depending on the brightness of the room.
Video and Audio Connections
This TV supports High-Definition Multimedia Interface (HDMI) and High-Bandwidth Digital Content Protection (HDCP) Protocol.
| Signal Types | Separate Audio connection required | |
| HDMI 2.0 | (480i/480P/576i/576P/720P/1080i/1080P) No | |
| Mini AV | Composite Video | No |
Always connect a device to the TV with the highest quality connection available. Also, use good quality cables to ensure a good transfer of picture and sound.
An HDMI connection has the best picture and sound quality. One HDMI cable combines video and audio signals.
Connecting an AV device with an HDMI cable
Audio Video devices:
![NETWORK HOME1 HOMBER MINI Digital AV auto out [reverter] Game Console Set-top Box Blu-ray Player / DVD Player / Recorder HDMI Cable (not included)](/content/2026/06/1250208/images/7a13d264e6871d23de45eff59892e6ec8bdb6d73348d19d81bd8001474eb9641.jpg)
After connecting to an external device (Blu-ray disc player, Game console, Set-top box, or personal computer) with the HDMI cable. Select the HDMI in the source menu and the TV will automatically detect the resolution coming from the device. For the best picture quality adjust the device output resolution up to 3840 x 2160p.
Connecting a Digital Audio Receiver

For a better sound quality, you may want to listen to the TV audio output through your Home Sound System or Sound bar. The TV is fitted with an Optical Digital Audio Output. When purchasing a cable, it must be an Optical cable. When the Optical cable is connected to both devices select the source mode optical on the Sound system or Sound bar.
Powering on the TV for the first time

Connect the TV aerial to the TV aerial (RF) connector on the TV and to the TV house aerial connector on the wall.
Connect the TV to house mains supply with the 3-pin plug. The TV will power on automatically and the initial First-time Installation Wizard will show on the screen.
Only at this stage should you point the Remote control towards the TV and insert the batteries and replace the batterie cover. The green LED on the Remote control will immediately begin to flash during the paring process.
After a few seconds the flashing will stop, and the mouse cursor will be visible on the screen. The mouse cursor can be turned on and off by pressing the mouse key on the remote control.
First-time Installation Wizard
It is recommended to turn the mouse cursor off and use the OK key and navigation keys on the remote control to quickly manoeuvre through the Wizard. The Wizard is defaulted to UK settings.
- Language
- Country
- Time zone
- View licence agreement press the exit key on the remote control and then select continue
- Setup WIFI (All WIFI options will be shown on the screen. Select the one you want and if applicable type in the password to activate). Once connected you will be prompted to sign into your Google account or create a new one. To gain access to all apps and features, it is essential that you log into a Google account. If you do not want to Setup WIFI or log into or open a Google account, select SKIP.
- Wizard Complete select OK
Smart TV tuning Wizard
Once the First-time Installation Wizard is completed the Smart TV tuning Wizard will start automatically.
- Welcome: Select Next
- Region: Select your region
- Downloading of resources will begin
- Terrestrial: Select Tuner Input disabled, then select Enabled DVB-T/T2/C
- Terrestrial: Select Search Filter, then choose from All channels or Only Free channels. Only Free channels is the recommended option
- Select Next
- Tuning will begin (3-5mins). All found channels can be seen on the right side of the screen
- Once tuning is finished select Next
- Cable: Select complete and your smart TV will start and show channel BBC1 on the screen
- Press the OK key on the remote control to view the channel list
Reset the TV to factory default
If at a later date you wish to reset the TV to factory default settings. (Please be aware that this option will delete all of your preloaded apps and settings)
Press the smart key on the remote control to return to the Android home screen then select the System Settings icon.
Scroll down and select the option Storage & Reset
Select Factory data reset
Select Reset everything
The TV will restart with the First-time Installation Wizard
Quick start function to reset the TV tuning
If at a later date you wish to re-tune the TV without having to do a Factory data Reset Press the Quickstart key on the Remote Control

Select Terrestrial and follow the tuning Wizard
Selecting the Source Menu
Press the Source key on the remote control to enter the source menu. Only sources that are in use will be highlighted in white and available for selection.
Source names: can be customised to fit your own personal preference by selecting the system settings Icon on the Android home screen and choosing Inputs. Now select the source name you wish to change i.e. HDMI1, another menu will open, now select custom name and type in the name of your choice i.e. XBOX S ONE, see below example. A list of other pre-set names are also available Blu-ray, DVD, Game Console and Cable for you to choose from if you prefer. Close all menus by pressing the EXIT key on the remote control.

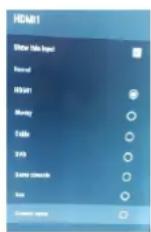
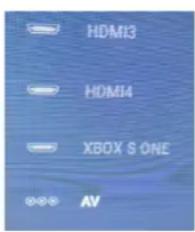

All input sources connected to a device and the device turned on is shown on the home screen and highlighted in white.
Channel selection options
There are 6 ways to select your TV channels.
- Press the Ch key up/down on the remote control
- Press the Thumb stick navigation keys up/down on the remote control
- Press the OK key to show the channel list on the screen then navigate up and down the list using the thumb stick on the remote control. Press the OK key to activate the chosen channel
- Press the Guide key to show the TV Guide, navigate up/down the Guide using the Thumb stick navigation keys and then press the OK key twice to activate the chosen channel
- Press the numeric keys on the remote control i.e. 101 for channel BBC1HD
- Press the CH+ / Ch- TV buttons on the TV
Display Channel Information and various options in TV mode
- Press the INFO key once on the remote control to see the channel information
- Press the INFO key twice on the remote control to see extended channel information
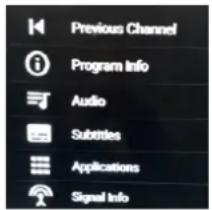
- Press the left side on the Thumb stick navigation keys, a menu will appear on the right side of the screen displaying various options including how to turn on Subtitles and TV signal (quality and strength) information, see below image
Volume adjustment and Audio Mute
- Press the VOL up/down key on the remote control. The VOL up also turns off the mute function
- Press the key on the remote control to turn on and off the mute function
TV Picture Settings
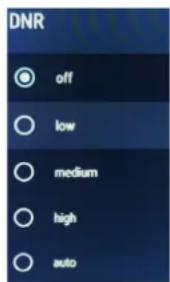
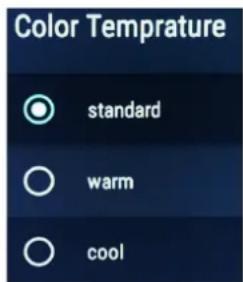
Press the Menu key on the remote control and select PICTURE. Options for Picture mode, Custom Settings, Colour Temperature and Noise Reduction (DNR) will be available. See below images for options available.
Press the EXIT key on the remote control to close menus

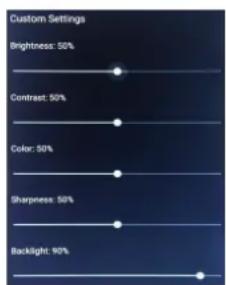
TV Sound Settings
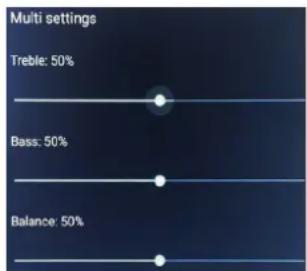
Press the Menu key on the remote control and select SOUND. Options for Sound mode, Multi Settings, SPDIF, Virtual Sound, Dialog Clarity and Bass boost will be available. See below images for options available. Press the EXIT key on the remote control to close menus



TV Timer settings within the TV app
Press the Menu key on the remote control and select Settings. Two Timer settings are available.
- Sleep Timer: This option turns the TV off after the time set has elapsed. The Default setting is OFF
- Menu Timer: This option dictates how long menus will stay on the screen after being activated. The Default setting is 10s
Timer Settings within the Android system
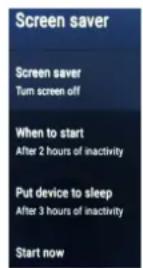
In the Android home screen, you can access this anytime by pressing the SMART key on the remote control. Press the MENU key and select Screen saver, there are 2 Timer options
- When to start (The Screen saver): This setting is defaulted to turn on the screen saver after 2 hours of inactivity in Android home mode only.
- Put device to sleep (Turn off the TV): This setting is defaulted to turn off the TV after 3 hours of inactivity.


Smart TV Settings
Press the EXIT key when In TV mode, this will activate the TV mode main user menu. To access settings, scroll down to the bottom line and select Settings.


- Language: Allows you to set the menu / Audio / Subtitle / EPG / Visually Impaired and Hearing-impaired languages.
- Channel Setup: Allows you to organise and modify the Channel list, Tune in Terrestrial (Freeview) TV and Tune in Cable TV.
- DVR: To be able to use the Digital Video Recording function you need to first enable a connected USB or SD device. Enable the device by selecting DVR and following the instructions.
FAT32 and NTSC formats can be used for storage devices. Only devices with 16GB or more can be used for recording. It is recommended that a minimum of 64GB SD card is used to get the best performance from your TV.
- Reset: Defaults the Smart TV app to its default settings. This option does not affect any other installed apps or settings.
External Storage
SD Card: (MAX 1TB)
You can safely insert the SD card into your Android TV any when the unit is on or off. Gently slide the card into the SD card slot until you feel it click into place. A removal storage SD icon will appear on the Android Home screen. You can safely remove the SD Card from your Android TV anytime the TV is turned off. If you need to remove the SD Card while your Android TV is on, you must (unmount)eject the SD Card from the device, this to prevent, corrupting or damaging the SD Card.
- Select Settings from the Home screen
- Select Storage & reset
- Select SD Card
- Select Eject
- SD card is safely Ejected
- Remove SD Card from the Android TV
USB: (Tested up to 1TB)
You can safely insert the USB device when the TV is on or off. Carefully insert the device into the USB port provided. A removable storage icon with the name of the USB will appear on the Android Home screen. You can safely remove the USB device from your Android TV anytime the TV is turned off. If you need to remove the USB device while your Android TV is on, you must (unmount)eject the USB device from the TV first, this is to prevent, corrupting or damaging the USB device.
- Select Settings from the Home screen
- Select Storage & reset
- Select USB name
- Select Eject
- USB name is safely Ejected
- Remove USB device from the Android TV
If two large storage devices are connected to the TV at the same time. You may experience that when powering on the TV the screen will be black/grey for a number of seconds before showing a picture. This is normal because on start-up, the TV will take some seconds to initialise the connected storage devices. Disconnect any storage devices if not in use if you want to prevent the above.
The USB output is 5V =500mA
Accessing the external storage device on the TV
After inserting the SD/USB device to your TV a "Removable Storage" icon will appear on the screen. Highlight and activate the Icon you wish to access. Then select "allow" from the pop-up window. Highlight the SD/USB icon again and press OK the file browser will open and show all files on the device for your listening or viewing.

Downloading Apps and games from Google Play Store
You can download apps and games from the Google Play store to the TV, just like you do with smartphones and tablets.
About paid apps
There are free apps and paid apps in the Google Play store. To purchase a paid app, a prepaid Google Play gift card code or credit card information is required. You can purchase a Google Play gift card from various retailers.
Enter Google play store by activating the Play Store icon on the Android home screen. Then select an app or game you want to download, then install the app. The app will start downloading. After downloading the app is automatically installed. Its icon appears in the Android home screen allowing you to launch it.

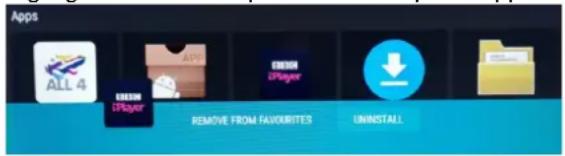
To delete an app
Highlight the app and press and hold the OK key on the remote control. The option to uninstall will appear. Highlight uninstall and press the OK key. The app will be deleted.
Internet Browser, APK Files & App Installer
This Android home screen does not come with a pre-installed Internet browser. To install a browser of your preference and choice go to the google app store where a number of different internet browsers are available to download to the TV.
What is an APK File
An APK file is an app created for Android. Some apps come pre-installed on Android devices, while other apps can be downloaded from Google Play. Apps downloaded from Google Play are automatically installed on your device, while those downloaded from other sources must be installed manually.
One of the differences between the Android operating system and other operating systems is that Android allows you to freely install third party apps. While apps downloaded from the Google Play store are installed automatically, app installers downloaded outside Google Play are saved as .APK files and must be installed manually.
When you download an APK file, it is automatically recognized by the Android operating system. However, in order to install an unverified app, you may need to change the default security settings on your Android device to allow the installation of third party apps. To do this in the Android home screen press the MENU key on the remote control to open the Android Settings. Scroll down to Security & restrictions and press OK on the remote control. Unknown sources will be highlighted, press OK to turn on. Press EXIT on the remote twice to get back to home screen.
If you've downloaded an APK file from the web, you can find it in your Downloads folder on the home screen.
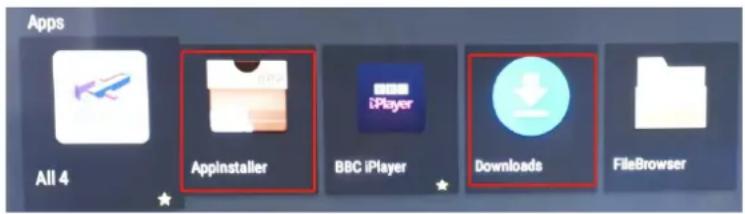
Highlight the downloads folder and press the OK key on the remote to open. Highlight the APK file and press OK. Select install at the bottom right of screen. The app will install and can be seen in the app list on the android home screen.
App Installer
Highlight the app installer icon in the Android home screen and press the OK key on the remote control. The option to scan for APKs will be shown on the screen. If you have external devices connected (SD/USB) they will also be available for scanning. Highlight the device you want to scan and press the OK key on the remote. Any APKs available will be shown on the screen. Highlight the file name and press OK to Install.
Appearance Icon
The Appearance app on the Android Home screen allows you to select the below options
Launch App on Start: Choose from the list of Sources or apps which you would like the TV to start with i.e.
HDMI1,2,3 or 4 If you are connected with a TV box (Sky, BT)
Hide Apps: Choose from the list of apps you wish to hide on the Apps row. If one of the apps, you have chosen is in the Favourite apps row this will not be hidden.
Suggested Favourites: Show or hide
Recent Apps Row: Show or hide

Powerkey Definition
This option determines in what power mode the TV will start
To access this option:
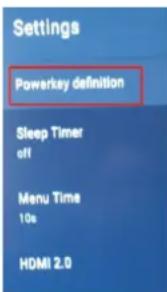
In the Android Home screen press the MENU key on the remote control to access SETTINGS then scroll down to TV and press the OK key. Activate Powerkey definition with the OK key.
Two options are available.
- Sleep now: This is the defaulted setting and keeps the Android system active for a quick TV start up.
- Shut down: Will shut the Android system down and a restart of the TV will re-boot the android system taking about 30 seconds.

If large external storage devices are connected to the TV. You may experience that when powering on the TV the screen will be black/grey for a number of seconds before showing a picture. This is normal because on start-up, the TV will take some seconds to initialise the connected storage devices. Disconnect any storage devices if not in use if you want to prevent this happening.
Recording
This TV only has one Tuner so can only record the channel that is being shown on the screen. If the TV is in active standby mode it will also record EPG set recordings while you are away from the TV.
EPG Timer Recording
Press the Guide key on the remote control to access the Electronic Programme Guide, highlight a programme you wish to record and press the OK key on the remote control. Options will appear on the screen, select the red circle recording symbol. Programme will highlight red and is ready to record. Prior and during recording the red circle recording symbol will be visible in the INFO bar. (Press Info key on the remote control)

Instant record
Press the red circle record key on the remote control to start the instant record.
Viewing recordings
Press the EXIT key while in TV mode to view the TV Settings menu and to view recordings

To delete recording scroll down from Channels to highlight Recordings. Press the OK key on the remote and choose the recording you wish to delete.
Pause live TV
Press the pause key on the remote control to pause. To restart the programme, press the play key on the remote control.
Maintenance
Be sure to disconnect the mains plug before cleaning the TV.

natural_image
Illustration of a hand holding a computer monitor (no text or symbols visible)- Use a soft dry cloth to wipe away the dust from the screen and plastic surfaces
- Use warm soapy water to get rid of stubborn marks. Soak the cloth then wring it until almost dry before wiping the TV.
- After cleaning allow any dampness on the screen to dry before switching on the TV
Important Note:
- Never use alcohol, benzine, paint-thinner, cleaning fluid or other chemicals
- Do not use compressed air to remove dust
How to upgrade your TV with new Software
Note: The TV must be connected to the internet before you can update your TV as described below. The updates described below will not delete any of your personal settings.
Every now and again a new update will be sent out over the internet to your device. If an update is available a prompt box as in the image below will show on your screen. Select install and the update will automatically be installed to your TV.

Manual search for new Software update
To manually check to see if a Software is available for your TV.
- Select the settings Icon on the Android launcher screen.
- Scroll down and select About
- Select System Update
- Select NETWORK in the update menu box
- If an update is available select UPDATE


Trouble shooting
Warning
Under no circumstances should you try to repair the TV by yourself, as this will invalidate the warranty. Do not remove the rear cabinet of the TV as there is a risk of electric shock. If a fault occurs, first check with the points listed below before calling the service help line (03334330312) for assistance.
| Problem Solution | |
| No power -Check if the power cable is connected | -Press the power key on the TV to turn on the power |
| TV does not respond to the remote control -Aim the remote directly at the sensor on the TV-Reduce the distance to the TV-Aim the remote at the TV sensor and remove and replace the batteries. | |
| TV freezes -The processor may have crashed, | turn the TV off at themains and re-start the TV. If freezing persists, call the help line. |
| TV turns itself off -Check that the sleep timer | is not set to turn off-Check that the screensaver option “Put device to sleep” is set to Never. Default setting is 3hrs |
Technical Specifications
| Screen size and system 40” LED | |
| Max Screen resolution 1920 (H) x 1080 (V) | |
| Screen Brightness 200 Nits | |
| Contrast Ratio 5000: 1 | |
| Power Source AC 100-240V | |
| Processor AM Logic 962, ARM Cortex | A53 quad core CPU @1.5GHz |
| RAM 1GB DDR4 | |
| GPU 5 core ARM Mali-450 | |
| Built in Flash memory 8GB | |
| Operating System Android 7.1 | |
| Energy Efficiency Class A | |
| Average Annual Energy Consumption | 85kWh |
| Speaker power | 8W + 8W |
| Vesa wall mounting size / Screw size | 200 x 200mm / M5 x 10 |
| Dimension (W x D x H) without stand feet | 908 x 86 x 528 mm |
| Dimension (W x D x H) with stand feet | 908 x 357 x 571 mm |
| Net Weight | 6.8 Kg |
Safety Warnings
- Read all the instructions carefully before using the TV and keep them for future reference
• If you pass the TV onto a third party make sure to include this instruction manual - Make sure that the voltage marked on the black rating label on the rear of the TV matches your mains voltage
Safety
- Always disconnect the unit from the mains supply before connecting / disconnecting other devices or moving the TV
• Unplug the TV from the mains socket during a lightning storm
Mains Cable
- If the mains cable is damaged it must be replaced by the manufacture, its service centre, or similarly qualified persons in order to avoid a hazard
Damage
- Inspect the TV for damage after unpacking
- Do not continue to operate the TV if you are in any doubt about it working normally, or if it is damaged in any way – switch off, disconnect from the mains supply and call the service help line
Interference
- Do not place the TV on or near appliances which may cause electromagnetic interference. If you do it may adversely affect the operating performance of the TV and cause distorted picture or sound
Optimum Viewing
- View the TV in moderate light to prevent eye strain. It is recommended to watch the TV from a distance 3 – 7 times the screen height
LED Screen
- The LED /QLED screens are manufactured using high precision technology. However, some tiny black dots/or bright dots (red, blue, or green in colour) may constantly appear on the screen. These points are generated in the LED Screen manufacturing process.
Location
• The TV must be placed on a flat stable surface and should not be subjected to vibrations
• The mains socket should be located close to the TV and should be easily accessible
• This TV is designed for indoor use only
Temperature
- Avoid extreme degrees of temperature, either hot or cold. Place the unit well away from heat sources such as radiators or gas / electric fires
- Avoid exposure to direct sunlight and other sources of heat
Naked Flames
- Never place any type of candle or naked flame on the top of or near the unit
Moisture
- To reduce the risk of fire, electric shock or product damage, do not expose to the TV to rain, moisture dripping or splashing. Keep containers such as cups or vases filled with liquids away from the TV.
Ventilation
- To prevent the risk of electric shock or fire hazard due to overheating, ensure that curtains and other materials do not obstruct the ventilation vents.
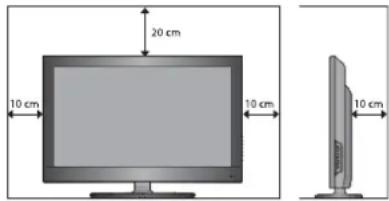
- Do not install or place this TV in a confined space. Ensure the TV is well ventilated
• Make sure that there is a gap of at least 10cm on both sides and a gap of 20cm at the top
Headphones
- Listening to loud sounds for prolonged periods of time may permanently damage your hearing
Batteries
- Please keep the batteries for the remote control away from young children
- Please dispose of the batteries correctly by following the guidance in this manual
Electronic waste recycling

This sign indicates that this product may not be disposed of with your regular household waste. The recycling and separate collection of such products is your responsibility. Please drop off the above-mentioned waste at a designated place for recycling electronic waste. If you do not know where to drop off, your electronic waste for recycling please contact your local council office or household waste collection service.

Hg Cd Pb The crossed out wheeled bin symbol indicates that batteries and / or accumulators must be collected and disposed of separately from household waste.
If the battery of accumulator contains more than the specified values of Lead (Pb), mercury (Hg), and/or cadmium (Cd) defined in the Battery directive (2006/66/EC), then the chemicals symbols for Lead (Pb), mercury (Hg), Cadmium (Cd) will appear below the crossed out wheeled dust bin symbol

Pb By participating in separate collection of batteries, you will help to assure the proper disposal of products and batteries thus help to prevent potential negative consequences for the environment and human health.
For more detailed information about the collection and recycling programmes available in your country, please contact your local city or council office.

This appliance complies with the European Safety and Electrical directives.
It fulfils the following EU regulations:
EMC Directive 2014/30/EU
Test Standards:
EN55032:2015
EN55035:2017
EN61000-3-2:2014
EN61000-3-3:2013
LVD Directive 2014/35/EU
Test Standards:
EN 60065:2014
- 40" Super fast Android 7 Smart TV
- INSTRUCTION MANUAL
- Contents:
- Preface:
- Whats in the box:
- Fixing and the TV stand feet
- Front IR sensor and TV buttons
- Rear View and Connections
- Remote control: Dependant on the model some keys will have no function
- Installing Batteries into the Remote Control
- The Remote-Control Operation Range
- Video and Audio Connections
- Connecting an AV device with an HDMI cable
- Connecting a Digital Audio Receiver
- Powering on the TV for the first time
- First-time Installation Wizard
- Smart TV tuning Wizard
- Reset the TV to factory default
- Quick start function to reset the TV tuning
- Selecting the Source Menu
- Channel selection options
- Display Channel Information and various options in TV mode
- Volume adjustment and Audio Mute
- TV Picture Settings
- TV Sound Settings
- TV Timer settings within the TV app
- Timer Settings within the Android system
- Smart TV Settings
- External Storage
- SD Card: (MAX 1TB)
- USB: (Tested up to 1TB)
- Accessing the external storage device on the TV
- Downloading Apps and games from Google Play Store
- About paid apps
- To delete an app
- Internet Browser, APK Files & App Installer
- What is an APK File
- App Installer
- Appearance Icon
- Powerkey Definition
- To access this option:
- Recording
- EPG Timer Recording
- Instant record
- Viewing recordings
- Pause live TV
- Maintenance
- Important Note:
- How to upgrade your TV with new Software
- Manual search for new Software update
- Trouble shooting
- Warning
- Technical Specifications
- Safety Warnings
- Safety
- Mains Cable
- Damage
- Interference
- Optimum Viewing
- LED Screen
- Location
- Temperature
- Naked Flames
- Moisture
- Ventilation
- Headphones
- Batteries
- Electronic waste recycling
Brand : Cello
Model : C40SFS
Category : Television