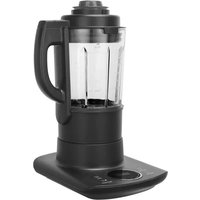
SB180 - Blender Lenoxx - Free user manual and instructions
Find the device manual for free SB180 Lenoxx in PDF.


| Product Type | Countertop Blender |
| Brand | Lenoxx |
| Model | SB180 |
| Power | 400 Watts |
| Capacity | 1.5 Liters |
| Material | Plastic Jar, Stainless Steel Blades |
| Dimensions | 6.5 x 6.5 x 15 inches (16.5 x 16.5 x 38 cm) |
| Weight | 3.5 lbs (1.6 kg) |
| Cord Length | 3 feet (0.9 m) |
| Speed Settings | 2 Speeds + Pulse |
| Ice Crushing | Yes |
| Pulse Function | Yes |
| Safety Lock | Yes, lock lid mechanism |
| Dishwasher Safe | Jar and lid (top rack only) |
| Warranty | 1 Year Limited |
| Care and Cleaning | Wipe base with damp cloth; jar and lid dishwasher safe |
| Parts and Reparability | Replacement jar and blade assembly available |
Frequently Asked Questions - SB180 Lenoxx
User questions about SB180 Lenoxx
0 question about this device. Answer the ones you know or ask your own.
Ask a new question about this device
Download the instructions for your Blender in PDF format for free! Find your manual SB180 - Lenoxx and take your electronic device back in hand. On this page are published all the documents necessary for the use of your device. SB180 by Lenoxx.
USER MANUAL SB180 Lenoxx
SOUPS, SMOOTHIES, COCKTAILS, PROTEIN SHAKES, JUICE, DIPS, SAUCES + MUCH MORE

natural_image
Black plastic blender with clear glass interior and control panel (no visible text or symbols)Model: SB180
Batch: PR4373
PLEASE READ AND RETAIN THESE INSTRUCTIONS FOR FUTURE REFERENCE. THIS APPLIANCE IS INTENDED FOR HOUSEHOLD USE ONLY.
The illustrations used in the manual are to illustrate the operation method and structure of the product. Where there is a small difference between the physical item and the illustrations, please take the physical as the standard.
ABOUT THIS PRODUCT:
Enjoy fresh soups, smoothies, cocktails, protein shakes, juice, dips, sauces and much more with this 2-in-1 Hot & Cold Blender.
Healthy living is a breeze with this hot and cold blender.
The 800W blending power plus powerful blades really packs a punch with the 12 in-built hot and cold blending programs. Hot blending programs run at 100^ C and include soy milk, boiled food, soup, baby food and corn juice as well as an intelligent 70^ C heated cleaning program for ease of use.
A 70°C keep warm program will keep the contents of your hot blended foods and drinks at the perfect temperature until ready to eat or serve, without any additional blending or over-mushing. Cold blending programs include juice, milk shake, crushed ice, smoothie and nut / oat milk.
With four simple touch control buttons on the power base, you can delay start the desired program, pulse blend, select one of the 12 in-built programs from the menu and start or cancel the selected program. Infuse and amplify flavours in the strong, reinforced glass pitcher complete with an easy pour spout. The large capacity of 1.4L for hot blending and 1.75L for cold blending will ensure there is plenty of blended quantities per use without having to blend in multiple batches.
We recommend the ingredients stacking order of first liquids, then powders and sweeteners, followed by leafy greens, then soft ingredients such as yoghurt and nut butters, then fresh fruit and nuts, followed by frozen fruit and topped with ice cubes, for the perfect blend, every time. The included measuring cup and cleaning brush provide all the essentials to flawlessly prepare and clean up your hot and cold contents.
Blend up a savoury, hearty soup or even blend up a delicious batch of creamy hummus – the possibilities are endless with this 2-in-1 Hot & Cold Blender.
IMPORTANT SAFEGUARDS:
When using electrical appliances, basic safety precautions should always be followed, including the following:
- Read the instructions carefully before use.
- Remove and safely disregard any packaging material and labels before using this product for the first time. Ensure children and babies do not play with plastic bags or any packaging materials.
- Before use, check that your local voltage corresponds with the specifications shown on the appliance nameplate located under the appliance.
- Always operate the appliance on a horizontal surface which is level, stable and non-combustible. Do not operate the appliance on or near combustible materials such as tablecloths or curtains.
- Do not place the appliance on or near a hot gas or electric burner, or in a heated oven.
- Never connect this appliance to an external timer or separate remote-control system.
- Never use this appliance with an extension cord or power board. Ensure it is plugged into a dedicated power point and without any other appliances on the same outlet.
- Do not turn on the power until the appliance and parts are in place as required.
- To protect against electrical shock, fire or personal injury, do not immerse power cord, plug, pitcher or blender base in water or other liquid. Do not expose the appliance to dripping or splashing and ensure that no objects filled with liquids such as vases are placed on the appliance.
- Do not immerse the base of the glass pitcher in water or any other liquid.
- Do not touch hot surfaces. Handle with care and always use the handle on the side of the pitcher for carrying. Extreme caution must be used when moving the appliance containing hot liquids.
- This appliance is NOT to be used by children or by persons with reduced physical, sensory or mental capabilities. Close supervision is necessary when any appliance is used near children and these individuals. Children should be supervised to ensure they do not play with the appliance.
- To disconnect, select Cancel, then unplug from outlet when not in use, before assembling or disassembling parts and before cleaning. To unplug, grasp the plug and pull from the outlet. Never pull from the power cord.
- Allow the appliance to cool before adding or removing parts, before cleaning, and before storage. Proper maintenance is recommended after each use.
- Do not operate any appliance with a damaged cord or plug, or after the appliance malfunctions or is dropped or damaged in any manner.
- Do not use any accessories or attachments not authorized. The use of attachments not recommended by the manufacturer, such as spatulas or tampers, may result in fire, electric shock or injury.
-
For household countertop use only. Do not use outdoors. Not for commercial use.
-
Do not let cord hang over edge of table or counter, or contact hot surface, including the stove.
- Do not use the appliance for other than intended use.
- Blades are sharp. Avoid contact with blades and moving parts. Handle with care.
- The blades are not removable from the pitcher. Do not attempt to disassemble the blade assembly. Failure to follow this direction may cause injury.
- Do not attempt to operate the blender with damaged blades.
- This product is not designed to deep fry.
- To avoid spill or splatter, do not fill the pitcher beyond 1750 ml as indicated on the pitcher.
- Pitcher will be hot after cooking. Allow sufficient cooling time before handling or serving. Keep hands away from hot glass and use side handle on pitcher for carrying to reduce the risk of scalding or serious injury.
- When making nut butters or oil-based foods, do not process for more than one minute after the mixture starts to circulate in the pitcher. Processing for longer periods can cause dangerous overheating.
- Never blend carbonated beverages. Built-up pressure from released gases can cause the pitcher to burst, resulting in possible injury.
- Always operate the blender with the lid in place.
- Spilled food can cause serious burns. Keep appliance and cord away from children. Never drape cord over edge of counter, and never use power outlet below counter.
- Do not attempt to repair, replace, alter or modify components of the appliance as this may cause electric shock, fire or injury, and will void the warranty.
- Do not tamper with any of the safety mechanisms.
- Never remove or rock the pitcher/lid during operation.
- Keep hands and utensils out of the pitcher while blending to reduce the risk of severe injury to persons or damage to the blender. A scraper may be used but must be used only when the blender is not running.
- Never put non-food items, such as metal, glass, plastic or wood, in the blender, as this may damage the blades and other components of the blender. Failure to remove foreign objects from blender may break the glass pitcher, or cause injury.
- The vented lid cap must be in place when using hot blending programs, or when blending hot contents. Spray, steam, or spatter may cause scalding burns. Do not overfill pitcher. Keep hands away from lid openings to prevent burns.
- Scalding may occur if the lid or lid cap is removed when blending hot contents.
- Do not operate the blender while the pitcher is empty.
- Do not leave the appliance unattended while in use.
- Lids and tampers are not interchangeable between different blenders.
- Prior to each use, inspect appliance for cracks or other damage. Do not use if the lid, lid cap, pitcher, or blender base is cracked or damaged. Contact Customer Service.
Special Cord Set Instructions:
Per safety requirement, a short power supply cord (0.75 m to 0.9 m) is provided to reduce the hazards resulting from grabbing, entanglement and tripping.
This appliance has a 3-prong grounding plug. To reduce the risk of electric shock, plug the power cord into a grounded (earthed) electrical outlet that is easily accessible.
Initial Setup:
- Read all the Important Safeguards before using the appliance. Failure to read and follow the Important Safeguards may result in damage to the appliance, property damage or personal injury.
- Remove all packaging material from in and around the blender.
- Do not remove any safety stickers from the blender base, pitcher or lid.
- Do not remove rating label from bottom of blender base.
- Place the blender on a stable, level surface. Do not block the air vents at the bottom of the blender base.
Cleaning Before First Use:
Before using the blender for the first time, follow the steps below to clean the pitcher
- Connect the power cord to a 220-240 V power source.
Then connect the power cord to the input socket on the base of the unit.
Note: The display will show "E2" until the pitcher is seated on the blender base and the lid is fully secured.
- Remove the lid and fill the pitcher with water to 1250 ml, as indicated on the pitcher.
- Place the lid on the pitcher firmly, then turn the lid clockwise until it clicks into place.
- Place the pitcher on the blender base by aligning the position indicator near the bottom of the pitcher to the position indicator near the top of the blender base.
- Press the Menu to select the cleaning function.
- Press Start/Pause to begin.
- When the program completes, the display indicates End.
- Lift the pitcher up and off the blender base.
- Ensuring the bottom of the pitcher remains dry, rinse the pitcher, lid and lid cap with warm, clear water.
You are ready to start using your blender.
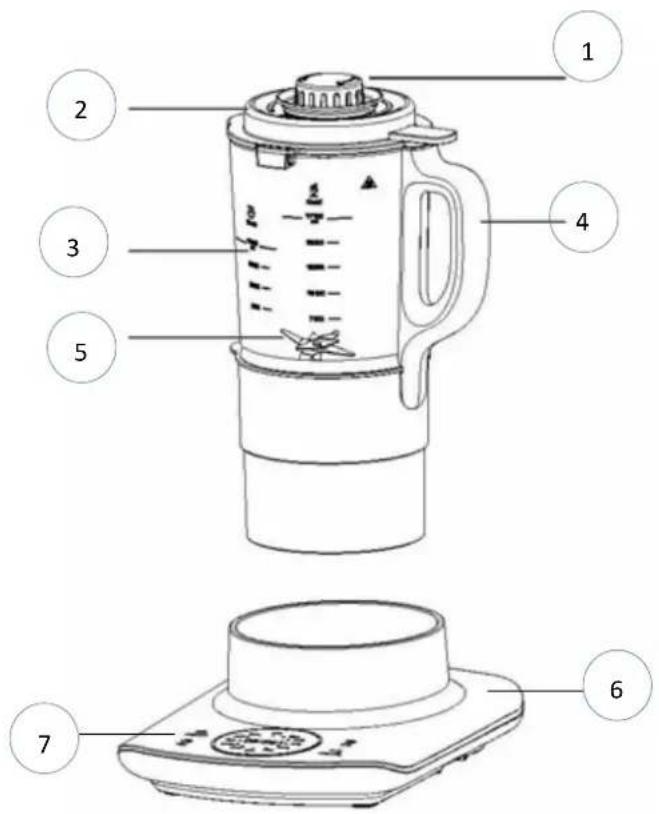
PRODUCT, PARTS AND ACCESSORIES:
The blender features a highly heat-resistant glass pitcher for boiling and precision ground blades for optimal crushing and grinding, making this multi-use appliance perfect for pros and new users alike.
Before using your blender, verify that all parts are accounted for:
- Lid Cap
- Blender Lid
- Glass Pitcher
- Handle
- Stainless Steel Blades
- Base
- Control panel
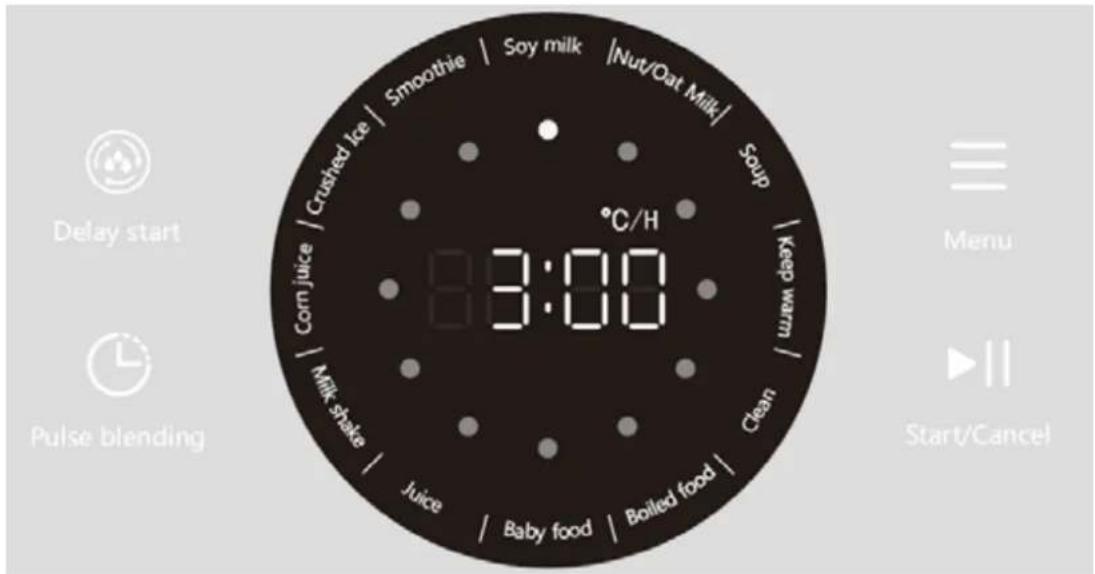
CONTROL PANEL:
To power on the blender:
Connect the power cord to a 220-240 V power source.
Then connect the power cord to the input socket on the base of the unit.
Note: The display will show "E2" until the pitcher is seated on the blender base and the lid is fully secured.
1. Display
The display includes the following:
Smart Program timer counts down
Pulse blending timer counts down
Real-time temperature shown on screen during keep warm function
2. Smart Programs
Cold Blending
- Crushed ice
- Smoothie
- Nut/Oat Milk
- Milk shake
- Juice
Hot Blending
- Soy milk
- Boiled food (no blending)
- Soup
- Clean
- Baby food
- Corn juice
- Keep warm (no blending)
3. OFF Mode
When the blender is plugged in but not in operation, the display reads “- - - -” to indicate OFF mode. This is when the lid is on.
If the lid is not on, it will show "E2".
4. Standby mode
Press "Start/Cancel" to enter into Standby mode, display will show "0 0 0 0".
Press "Start/Cancel" during a blending/cooking process to cancel that function. The display will show "0 0 0 0".
5. Menu
Press "Menu" repeatedly to choose between the 12 programs.
When your chosen programs indicator is illuminated, press "Start/Cancel" to start the program.
6. Delay Start
"Delay Start" function is only available for programs with heating involved.
Not working on cold blending programs.
A delay start timer can be set, at the end of the delay start countdown, the blender will begin operation.
Put the blender into standby mode, by pressing "Start/Cancel".
The display will show "0 0 0 0".
Press the Delay Start button repeatedly to set the countdown timer.
Every press of the Delay Start button will add 10 min, or long press it until the countdown timer you require is shown on the screen.
Press Menu repeatedly to select a program,—
Press "Start/Cancel".
Timer will start to countdown.
Maximum countdown time which can be set is 12 Hours. Minimum is 10 minutes.
7. Pulse blending
Put the blender into standby mode, by pressing "Start/Cancel".
The display will show "0 0 0 0".
Press and hold "Pulse blending", the blender will start up with a beep sound.
Timer starts to count down, from 00:60 down to zero.
Keep holding down on the "Pulse blending" button while it operates.
When the button is released, the pulse function will stop, and the display will show "0 0 0 0".
The "Pulse blending" button can be pressed and held again to repeat the function.
Note:
If no button is pressed within 30 seconds, the unit will beep, and the display will show “- - - -” to indicate OFF mode. The “Start/Cancel” button will need to be pressed to put the blender into standby mode again.
At the end of a hot blending program, the unit will automatically enter into keep warm mode for 2 hours. Unit will keep the contents warm at 70 degrees Celsius.
At the end of a no-heating program's operation, the blender will make an audible alert and the display will show "End".
Stacking Food Ingredients
When blending cold ingredients, the order in which ingredients are placed in the pitcher may affect the blender's performance. It is best to add liquid ingredients first and then add dry ingredients after.
Follow the stacking guide below for optimal blending results and to ensure the blender's longevity.
Stacking Order:
- Liquids
- Powders and sweeteners
(protein, fiber, etc.) - Leafy greens (remove spine, ribs/stems)
- Soft ingredients (yogurt, nut butter, tofu, etc.)
- Fresh fruit, nuts and seeds
- Frozen fruit and ice cubes
CAUTION
To prevent risk of injury or damage to the blender, do not attempt to grind hard, non-food items such as wood, glass, stone, plastic or metal.
Blending Programs Overview
| Smart Program | Default Time | Target Temperature |
| Smoothie | 2:20 | NA |
| Nut / Oat Milk | 4:50 | NA |
| Soy Milk | 35:00 | 100°C |
| Boiled food | 40:00 | 100°C |
| Soup | 40:00 | 100°C |
| Keep warm | 0:10—12:00 | 70°C |
| Clean | 2:00---15:00 | 70°C |
| Baby Food | 30:00 | 100°C |
| Juice | 2:30 | NA |
| Milk Shake | 2:30 | NA |
| Corn Juice | 35:00 | 100°C |
| Crushed Ice | 0:50 | NA |
Note:
Rolling signal i_-- means the blender is heating up.
The “Keep warm” and “Boiled food” program are the only programs which will not blend contents during it’s cooking process.
Each process (excluding boiled food and keep warm) will use a blending process which is preset on each program.
Each process (excluding boiled food) will use a combination of different heating times (if it is a heating mode) and different blending methods.
Cold blending: Do not fill the pitcher higher than 1750 ml
Hot blending: Do not fill the pitcher higher than 1400 ml
No times or temperatures on any programs can be adjusted.
Keep warm after hot blending programs:
- Soy milk
- Boiled food (no blending)
- Soup
- Clean
- Baby food
- Corn juice
At the end of a hot blending program, the unit will automatically enter into keep warm mode for 2 hours. Unit will keep the contents warm at 70 degrees Celsius.
The Start/Cancel button can be presed to end the keep warm mode.
CARE AND CLEANING:
Clean the blender after each use.
Always unplug the blender and let it cool to room temperature before cleaning.
Let all surfaces dry thoroughly before use or storage.
| Part / Accessory | Instruction & Tips | Cleaning Method |
| Lid Cap | Remove lid cap from lid when cleaning | Dishwasher Safe and Hand Washable |
| Lid | ||
| Measuring Cup | ||
| Glass Pitcher | Blades are not removableDo not store food in the pitcherDo not wet underside of pitcherEnsure bottom of pitcher is dry before placing it on blender baseUse the included cleaning brush if required | Damp Cloth Only |
| Blender Base | Wipe exterior clean with a soft, damp clothNever fold the power cord |
Auto clean function:
Use “Clean” program to remove superficial food debris and residue from the pitcher. Follow the steps in Cleaning Before First Use to clean the blender.
Tip: To clean and sharpen the blades, add 1–2 cups of water to the pitcher, then add 4–5 eggshells (shells only). Do not add dish soap. Discard the mixture after blending and rinse with clear, warm water. You can give this calcium-rich water to your plants!
Deep Cleaning
Minerals in hard and soft water may deposit at the bottom of the pitcher. Periodic deep cleaning will ensure the blender longevity.
- Connect the power cord to a 220-240 V power source.
- Remove the lid and add 1 cup (8 oz / 250 ml) white vinegar or citric acid, and 1 cup (8 oz / 250 ml) of water to the pitcher.
- Place the lid on the pitcher and press down firmly, then turn the lid clockwise until it clicks into place. Place the pitcher on the blender base.
- Allow the solution to sit for at least one hour.
- For regular deep cleaning, select Clean program.
If the food residue is especially stubborn, select Soup program. - Press Start/Cancel to begin.
WARNING:
The blender pitcher and base contain electrical components which may cause risk of shock if wet.
Do not immerse pitcher in water or other liquid, and do not cycle through dishwasher.
Do not immerse blender base in water or other liquid, and do not cycle through dishwasher.
Do not immerse power cord at any time.
Do not wet prongs of power cord.
Blades are sharp. To avoid the risk of severe injury, unplug the blender before inserting cleaning brush into pitcher.
TROUBLESHOOTING:
| Problems | Solutions |
| The unit is not working there is an error code E2 | 1. The jug is not fitted to the base carefully.2. The lid is not fitted correctly. |
| The unit is not working there is an error code E3 | E3 is dry boiled protection, allow the unit to cool down for 15 – 20 minutes. |
| The unit is not working there is an error code E5 | Blending function error, please contact customer service. |
| The unit has stopped in the mid-program (during the operation) | 1. The lid is loose.2. Liquid level is too low due to evaporation during cooking.3. The jug has a loose connection with the base. |
| Ingredients pieces are still too large after the cycle is complete (food is not well blended.) | 1. Pieces were possibly too large initially-use the pulse button after the cooking program has ended.2. Wrong function was selected: try a different program3. Not enough water: add in sufficient water. |
| The ingredients are hard after the cooking cycle. (food cooked not well) | 1. Chop the ingredients into small pieces before adding.2. The wrong program was used for the volume added.3. Some foods require longer cooking: select Any program with a heating function until food fully cooked. |
| Food is burnt, and stuck to the bottom | 1. Caused by high sugar, starch: use food with less sugar, starch.2. Too much food and too little liquids. |
SPECIFICATIONS:
220-240V 50Hz
Motor speed: 2400rpm
Motor: 800W (Full load)
Heater: 800W
1.75L glass pitcher, borosilicate glass
Blade: Stainless steel SUS304
Lid seal: silicon
Lid and lid cap material: PP
BPA free: lid, lid cap, lid seal
LENOXX
www.lenoxx.com.au

1300 666 848

LenoxxElectronics

LenoxxElectronics

@LenoxxAustralia
RECIPE TIPS:
When making soy milk, oat milk, almond milk:
Homemade soy milk can taste quite beany. Try to remove some of the skin.
The simplest way is to add your pre-soaked beans into a bowl of warm water and rub the beans between your hands. Swirl the water so that the skins float to the top and can easily be skimmed off.
You could add a drop of vanilla essence to help disguise the beany taste during the cooking process. Vanilla essence can be added to flavour other milk drinks.
A nut milk bag (not included) can be used as a very fine filter when straining homemade milks.
Pre--made flavoured liquid stock allows for an easy way to add stock to a soup recipe.
When called for, add liquid stock up to the 1400ml mark on the pitcher when making a recipe which use a hot blending function.
Those programs are Soy Milk, Boiled food, Soup, Keep warm, Clean, Baby food and Corn juice.
Cold blending: Do not fill the pitcher higher than 1750 ml
Hot blending: Do not fill the pitcher higher than 1400 ml
The lid must be added to the pitcher and locked into the correct position before use.
RECIPES:
SOY MILK
INGREDIENTS:
2/3 cup of soybeans, soaked in water overnight
750 ml water
METHOD:
Rinse beans in water and then place in a bowl of water.
Rub between your hands to remove skins.
Rinse thoroughly.
Place the drained beans and water to the pitcher, put the lid on and lock to the correct position, select the Soy milk program.
At the end of the program, place a fine mesh strainer over a bowl. Line the strainer with a cloth such as a cheese cloth and pour the soy milk into the strainer to remove the soy pulp. A spoon can be used to stir and press the soy pulp, so it speeds up the process and allows the milk to drain thoroughly.
Allow to cool to room temperature, then transfer to airtight bottles/containers. It can be stored in the fridge for 3 to 4 days.
ALMOND MILK
INGREDIENTS:
110 g raw almonds, soaked in water overnight
200 ml water
Pinch of salt
METHOD:
Rinse and drain almonds.
Add all ingredients to the pitcher, put the lid on and lock to the correct position, select the Nut/Oat milk program.
At the end of the program, place a fine mesh strainer over a bowl. Line the strainer with a cloth such as a cheese cloth and pour the almond milk into the strainer to remove the pulp. A spoon can be used to stir and press the pulp, so it speeds up the process and allows the milk to drain thoroughly.
Allow to cool to room temperature, then transfer to airtight bottles/containers.
It can be stored in the fridge for 3 to 4 days.
Shake before drinking.
OAT MILK
INGREDIENTS:
90 g rolled oats
950 ml water
Pinch of salt
METHOD:
Add all ingredients to the pitcher, put the lid on and lock to the correct position, select the Nut/Oat milk program.
At the end of the program, place a fine mesh strainer over a bowl. Line the strainer with a cloth such as a cheese cloth and pour the almond milk into the strainer to remove the pulp. A spoon can be used to stir and press the pulp, so it speeds up the process and allows the milk to drain thoroughly.
Allow to cool to room temperature, then transfer to airtight bottles/containers.
It can be stored in the fridge for 3 to 4 days.
Shake before drinking.
MACADAMIA MILK
INGREDIENTS:
135 g raw macadamia nuts, soaked in water for 2 hours
750 – 950 mls water
Pinch of salt
METHOD:
Rinse and drain macadamia nuts.
Add all ingredients to the pitcher, put the lid on and lock to the correct position, select the Nut/Oat milk program.
At the end of the program, place a fine mesh strainer over a bowl. Line the strainer with a cloth such as a cheese cloth and pour the almond milk into the strainer to remove the pulp. A spoon can be used to stir and press the pulp, so it speeds up the process and allows the milk to drain thoroughly.
Allow to cool to room temperature, then transfer to airtight bottles/containers.
It can be stored in the fridge for 3 to 4 days.
Shake before drinking.
CORN JUICE
INGREDIENTS:
2 ears of corn, peeled
500 ml milk
30 g caster sugar
50 g plain white rice
METHOD:
Slice the corn off the cob
Add all ingredients to the pitcher, put the lid on and lock to the correct position, select the Corn juice program.
At the end of the program, place a fine mesh strainer over a bowl and pour the soy milk into the strainer to remove the soy pulp. A spoon can be used to stir and press the soy pulp, so it speeds up the process and allows the milk to drain thoroughly.
DETOX VEGETABLE JUICE
INGREDIENTS:
1 orange, peeled and segmented
12 an apple, peeled and chopped
1 small handful of baby spinach
12 a banana, peeled and chopped
12 a cucumber, chopped
1 small piece of ginger, chopped
METHOD:
Place all the ingredients into the pitcher, put the lid on and lock to the correct position, and blend until smooth and creamy using the Juice program.
MANGO-ROCKMELON MILKSHAKE
INGREDIENTS:
1 mango, peeled and chopped
1 rockmelon, peeled and chopped
300 g plain yoghurt
3 tablespoons thickened cream
1 small piece fresh ginger, finely grated
METHOD:
Place all ingredients into the pitcher, put the lid on and lock to the correct position, blend using the Milkshake program.
Pour into glasses and chill in the fridge for 2 hours before serving.
BLUEBERRIES FOR BREAKFAST SMOOTHIE
Note:
Psyllium seed husks can be found in the health food section of your supermarket INGREDIENTS:
1/2 of a large banana
1/3 cup of soy protein
1/2 tablespoon of flaxseed oil
1/4 cup of frozen blueberries
1/2 tablespoon of apple juice concentrate or honey
1 teaspoon of Psyllium seed husks
1 cup of water
METHOD:
Break the banana into pieces, place all the ingredients into the pitcher, put the lid on and lock to the correct position, blend until smooth and creamy using the smoothie program.
STRAWBERRY BANANA SMOOTHIE
INGREDIENTS:
1/4 cup of strawberries
1 banana
1/2 cup of low-fat yogurt or milk
5 ice cubes
1/2 of a sliced orange
METHOD:
Place all the ingredients in the pitcher, put the lid on and lock to the correct position, blend until smooth and creamy using the smoothie program.
GREEN TEA SMOOTHIE
Serves 1-2
INGREDIENTS:
1 frozen banana
1/2 large honeydew melon, cut into chunks
3/4 cup strong brewed green tea (Use two tea bags and seep for ten minutes)
1 teaspoon honey
1/4 cup almond milk
METHOD:
Place all the ingredients in the pitcher, put the lid on and lock to the correct position, blend until smooth and creamy using the smoothie program.
MANGO SMOOTHIE
Serves 1-2
INGREDIENTS:
1 ripe mango
1/3 cup (85 g) plain low-fat yogurt, chilled
200 ml skim milk, chilled
1 teaspoon honey
Seeds from 6 green cardamom pods
METHOD:
Peel the skin off the mango and cut the flesh away from the stone.
Chop the flesh roughly and place it in at the pitcher, put the lid on and lock to the correct position, blend until smooth using the Pulse blending button.
Add in the yogurt and milk by removing the lid cap from the centre of the lid.
Add the lid cap back to the blender lid.
Continue to process with the Pulse Blending button until well mixed and frothy.
Sweeten with honey.
Pour into glasses and sprinkle with cardamom seeds over the top.
MIXED BERRY SMOOTHIE
INGREDIENTS:
1 cup of frozen berries
1/2 cup of non-fat vanilla or plain yogurt or 1/2 cup of low-fat milk Ice (optional)
METHOD:
Place all the ingredients in the pitcher, put the lid on and lock to the correct position, blend until smooth and creamy using the smoothie program.
PEACH SMOOTHIE
INGREDIENTS:
1 cup of skim milk
1 cup of frozen, unsweetened peaches
2 teaspoons of flaxseed oil
METHOD:
Place the milk and peaches in the pitcher, put the lid on and lock to the correct position, blend until smooth and creamy using the smoothie program.
Stir in the flaxseed oil at the end.
KIWI AND HONEYDEW SMOOTHIE
INGREDIENTS:
1 cups of honeydew, cubed
1 Granny Smith apple, chopped
1 kiwi fruit, peeled and chopped
2 tablespoons of sugar
1 tablespoon of lemon juice
1/2 cup of ice cubes
METHOD:
Place all the ingredients in the pitcher, put the lid on and lock to the correct position, blend until smooth and creamy using the smoothie program.
LEMON-ORANGE CITRUS SMOOTHIE
INGREDIENTS:
1/2 cup of skim milk or soy milk
3 ounces of lemon yogurt
1 medium-sized orange in sections
1 tablespoon of flaxseed oil
6 ice cubes
METHOD:
Place all the ingredients in the pitcher, put the lid on and lock to the correct position, blend until smooth and creamy using the smoothie program.
Stir in the flaxseed oil at the end.
BANANA ALMOND SMOOTHIE
INGREDIENTS:
1 banana, sliced and frozen
1 tablespoon of almond butter
2 teaspoons of flaxseed
1/2 cup of almond milk or non-fat yogurt
A drizzle of honey
Half a teaspoon of almond or vanilla extract
METHOD:
Place all the ingredients in the pitcher, put the lid on and lock to the correct position, blend until smooth and creamy using the smoothie program.
TROPICAL SLUSHY
INGREDIENTS:
440 ml water
75 g granulated sugar
330 ml concentrated orange juice
550 ml milk or coconut milk
2 teaspoons vanilla extract
METHOD:
Add water and sugar to the pitcher and stir until sugar is completely dissolved.
Stir in remaining ingredients.
Put the lid on and lock to the correct position, blend until thick and slushy using the juice program.
At the end of the program, use the Pulse blending button to blend for a smoother consistency if desired.
REAL HOT CHOCOLATE
INGREDIENTS:
800 ml milk
4 teaspoons cocoa powder
200 g milk chocolate, broken into small pieces
To Serve:
Mini marshmallows, Whipped cream
METHOD:
Place all ingredients in the pitcher, put the lid on and lock to the correct position and select the keep warm program. The unit will begin to heat to 70 degrees Celsius.
Once it has reached temperature and the temperature is shown on the screen, allow it to simmer for 5 x minutes. As the unit will display the temperature and not a timer, please monitor the time yourself.
Press Start/Cancel to stop the program.
Use the Pulse blending button to blend until contents are mixed.
Serve in mugs with whipped cream and marshmallows on top.
CREAM OF SWEETCORN SOUP
INGREDIENTS:
40 g butter
1 onion, chopped
300 g sweet potato, diced
900 ml milk
2 x 325 g cans sweetcorn, drained
6 tablespoons double cream
Dash of salt and pepper to season
METHOD:
Add the butter and onion to the pitcher, put the lid on and lock to the correct position and select the boiled food program. Allow the butter to melt and onion to 'fry' slightly.
Press Start/Cancel to stop the program.
Remove the lid and add the rest of the ingredients except the double cream.
Put the lid on and lock to the correct position and cook using the soup program.
When done, add the double cream and seasoning to taste by removing the lid cap from the center of the lid.
Add the lid cap back to the blender lid.
Use the Pulse blending button to blend until smooth.
PUMPKIN SOUP
INGREDIENTS:
500 g pumpkin, peeled and de-seeded, chopped into small cubes
2 small potatoes, cubed
Chicken or vegetable liquid stock
Dash of salt and pepper to season
METHOD:
Add pumpkin and potato to the pitcher.
Fill with liquid stock to the 1400 ml mark on the pitcher.
Put the lid on and lock to the correct position.
Select the soup program.
At the end of the program, add seasoning to taste by removing the lid cap from the center of the lid.
Add the lid cap back to the blender lid.
Use the Pulse blending button to blend until smooth.
POTATO AND LEEK SOUP
INGREDIENTS:
2 medium potatoes, cubed
2 medium or 3 small leeks sliced
1 tablespoon olive oil
1 onion, diced
1 clove of garlic, crushed
Chicken or vegetable liquid stock
3 tablespoons double cream (optional)
Sea salt and freshly ground black pepper to season
METHOD:
Add the chopped potatoes and chopped leek to the pitcher.
Fill with liquid stock to the 1200 ml mark on the pitcher.
Put the lid on and lock to the correct position.
Select the boiled food program.
Allow the potatoes and leek to cook in the stock for 8 minutes.
Remove the lid cap from the center of the lid. Do not remove the blender lid, otherwise cooking will stop.
Add the olive oil, followed by the onion and garlic.
Add the lid cap back to the blender lid.
At the end of the program, add seasoning to taste.
Then add the double cream.
Use the Pulse blending button to blend until smooth.
TOMATO SOUP
INGREDIENTS:
2 x 400 g cans chopped tomatoes, drained.
1 clove garlic, peeled and chopped
1 small onion, peeled and chopped
1 carrot, peeled and chopped
1 stalk celery, trimmed and chopped
Chicken or vegetable liquid stock
1 bay leaf
Pinch dried basil
Pinch thyme
METHOD:
Add the tomatoes, garlic, carrot, celery, bay leaf basil and thyme in the pitcher.
Fill with liquid stock to the 1400ml mark on the pitcher.
Put the lid on and lock to the correct position.
Select the Soup program.
At the end of the program, use the Pulse blending button to blend for a smoother consistency if desired.
CARROT AND GINGER SOUP
INGREDIENTS:
6 large carrots, peeled and chopped into cubes
1 onion, peeled and chopped into cubes
2cm piece fresh ginger, peeled
1 tbsp olive oil
Chicken or vegetable liquid stock
20g fresh coriander
METHOD:
Add the carrots, onion, ginger, olive oil and coriander to the pitcher.
Fill with liquid stock to the 1400 ml mark on the pitcher.
Put the lid on and lock to the correct position.
Select the soup program.
At the end of the program, use the Pulse blending button to blend for a smoother consistency if desired.
CELERY AND CHICKPEA SOUP
INGREDIENTS:
1 small onion, peeled and chopped into cubes
3 sticks celery chopped into cubes
2 x 400 g tins of chickpeas
Chicken or vegetable liquid stock
15 - 30 g butter
METHOD:
Add the onion, celery, chickpeas and butter to the pitcher.
Fill with liquid stock to the 1400 ml mark on the pitcher.
Put the lid on and lock to the correct position.
Select the Soup program.
At the end of the program, use the Pulse blending button to blend for a smoother consistency if desired.
CREAM OF VEGETABLE SOUP
INGREDIENTS:
1 large carrot, peeled and chopped into cubes
1 large turnip, peeled and chopped into cubes
1 large potato, peeled and chopped into cubes
2 sticks of celery, chopped into cubes
5 or 6 savoy cabbage leaves
Chicken or vegetable liquid stock
50 g butter
25 g plain flour
METHOD:
Add the vegetables to the pitcher.
Add the flour and butter.
Fill with liquid stock to the 1400 ml mark on the pitcher.
Put the lid on and lock to the correct position.
Select the Soup program.
At the end of the program, use the Pulse blending button to blend for a smoother consistency if desired.
CREAM OF CAULIFLOWER SOUP
INGREDIENTS:
1 medium onion, peeled and chopped into cubes
1 medium potato, peeled and chopped into cubes
1 medium cauliflower, chopped into 5 cm pieces
25 g butter
1 tablespoon dried parsley
Pinch of ground nutmeg
Chicken or vegetable liquid stock
100 ml double cream
METHOD:
Add the vegetables to the pitcher.
Add the butter, parsley and nutmeg.
Fill with liquid stock to the 1400 ml mark on the pitcher.
Put the lid on and lock to the correct position.
Select the Soup program.
At the end of the program, allow the contents to cool slightly.
Remove the lid cap from the center of the lid.
Add the cream, add the cap back to the lid.
Use the Pulse blending button to blend until all ingredients are combined.
PEA AND HAM SOUP
INGREDIENTS:
1 medium onion, peeled and finely chopped
1 clove garlic, crushed
200 g ham off the bone, roughly chopped
200 g green split peas, washed
1 bay leaf
2 sprigs thyme
1 carrot, peeled and diced
1 stalk celery, diced
1 teaspoon black pepper
12 cup white wine
Chicken or vegetable liquid stock
METHOD:
Add all ingredients excluding the stock to the pitcher.
Fill with liquid stock to the 1400 ml mark on the pitcher.
Put the lid on and lock to the correct position.
Select the Soup program.
SPICY POTATO SOUP
INGREDIENTS:
1 medium onion, peeled and chopped into cubes
1 large potato, peeled and chopped into cubes
2 teaspoon curry powder
Chicken or vegetable liquid stock
1 teaspoon mango chutney
1 tablespoon butter
1 tablespoon fresh coriander
METHOD:
Add all ingredients except the stock and coriander to the pitcher.
Fill with liquid stock to the 1400 ml mark on the pitcher.
Put the lid on and lock to the correct position.
Select the Soup program.
At the end of the program, remove the lid cap from the center of the lid.
Add the coriander. Add the cap back to the lid.
Use the Pulse blending button to blend until all ingredients are combined.
ROAST CHICKEN SOUP
INGREDIENTS:
1 medium onion, peeled and chopped into cubes
1 medium carrot, peeled and chopped into cubes
100 g frozen peas
150 g leftover roast chicken
12 teaspoon dried sage
Chicken or vegetable liquid stock
3 tablespoon Greek yoghurt
1 clove garlic, crushed
2 tablespoons lemon juice
METHOD:
Add all ingredients to the pitcher except for the liquid stock, Greek yoghurt, garlic and lemon juice.
Fill with liquid stock to the 1400 ml mark on the pitcher.
Put the lid on and lock to the correct position.
Select the Soup program.
In a bowl, combine the crushed garlic, yoghurt and lemon juice.
Serve the soup in bowls with the yoghurt mixture swirled in.
CREAM OF MUSHROOM SOUP
INGREDIENTS:
1 medium onion, peeled and chopped into cubes
1 clove garlic, crushed
200 g mushrooms, quartered
12 teaspoon dried thyme
50 g butter
Chicken or vegetable liquid stock
Add all ingredients to the pitcher excluding the liquid stock and crème fraiche.
Fill with liquid stock to the 1400 ml mark on the pitcher.
Put the lid on and lock to the correct position.
Select the soup program.
At the end of the program, remove the lid cap from the center of the lid.
Add the crème fraiche. Add the cap back to the lid.
Use the Pulse blending button to blend until all ingredients are combined.
RED LENTIL AND CHICKPEA SOUP
INGREDIENTS:
1 medium red onion, peeled and finely chopped
400 g tin diced tomatoes
70 g red lentils
100 g tinned chickpeas
1 teaspoon cumin seeds
Chicken or vegetable liquid stock
Small handful fresh coriander
METHOD:
Add all ingredients except the liquid stock and coriander to the pitcher.
Fill with liquid stock to the 1400 ml mark on the pitcher.
Put the lid on and lock to the correct position.
Select the Boiled Food program.
The Boiled Food program is the only program which does not blend food during its process.
At the end of the program, remove the lid cap from the center of the lid.
Add the coriander. Add the cap back to the lid.
Use the Pulse blending button to blend until all ingredients are combined.
HOT SWEET POTATO SOUP
INGREDIENTS:
1 medium onion, peeled and finely chopped
1 large sweet potato, peeled and cubed into small pieces
1 red chili (chopped very fine)
12 teaspoon ground coriander
1 clove garlic, crushed
Chicken or vegetable liquid stock
METHOD:
Add all ingredients to the pitcher except the liquid stock.
Fill with liquid stock to the 1400 ml mark on the pitcher.
Put the lid on and lock to the correct position.
Select the Boiled Food program.
The Boiled Food program is the only program which does not blend food during its process.
Use the Pulse blending button to blend until all ingredients are combined if desired.
SMOKED SALMON AND LEEK SOUP
INGREDIENTS:
1 large leek, sliced into your preferred size
1 large potato, peeled and cubed into small pieces
100 g smoked salmon, sliced into your preferred size
1 bay leaf
Chicken or vegetable liquid stock
100 ml double cream
1 tablespoon butter
METHOD:
Add all ingredients to the pitcher except the liquid stock, cream and butter.
Fill with liquid stock to the 1400 ml mark on the pitcher.
Put the lid on and lock to the correct position.
Select the Boiled Food program.
The Boiled Food program is the only program which does not blend food during its process.
At the end of the program, remove the lid cap from the center of the lid.
Add the butter and cream. Add the cap back to the lid.
Stir well before serving or use the Pulse blending button to blend until all ingredients are combined if desired.
CHEDDAR AND CELERIAC SOUP
INGREDIENTS:
1 medium onion, peeled and finely chopped
1 medium potato, peeled and diced
1 small celeriac, diced
2 sage leaves
Chicken or vegetable liquid stock
1 Tbsp butter
100 g mature cheddar, diced
METHOD:
Add all ingredients to the pitcher except the liquid stock and cheese.
Fill with liquid stock to the 1400 ml mark on the pitcher.
Put the lid on and lock to the correct position.
Select the Boiled Food program.
The Boiled Food program is the only program which does not blend food during its process.
At the end of the program, remove the lid cap from the center of the lid.
Add the diced cheddar. Add the cap back to the lid.
Use the Pulse blending button to blend until all ingredients are combined if desired, or just stir all ingredients together before serving.
BACON AND SWEETCORN SOUP
INGREDIENTS:
1 medium onion, peeled and finely chopped
1 small potato, peeled and diced
2 rashers streaky bacon, grilled
Small tin sweetcorn, drained
200 ml milk
Chicken or vegetable liquid stock
METHOD:
Add all ingredients to the pitcher except the liquid stock.
Fill with liquid stock to the 1400 ml mark on the pitcher.
Put the lid on and lock to the correct position.
Select the Boiled Food program.
The Boiled Food program is the only program which does not blend food during its process.
Use the Pulse blending button to blend until all ingredients are combined if desired, or just stir all ingredients together before serving.
MEXICAN CHICKEN SOUP
INGREDIENTS:
1 medium onion, peeled and finely chopped
2 cloves garlic, crushed
1 red chilli, chopped very fine
400 g tin diced tomatoes
14 teaspoon ground cumin
1 cooked chicken breast, shredded
Chicken or vegetable liquid stock
2 teaspoons lime juice
METHOD:
Add all ingredients to the pitcher except the liquid stock and the lime juice.
Fill with liquid stock to the 1400 ml mark on the pitcher.
Put the lid on and lock to the correct position.
Select the Boiled Food program.
The Boiled Food program is the only program which does not blend food during its process.
At the end of the program, remove the lid cap from the center of the lid.
Add the lime juice. Add the cap back to the lid.
Use the Pulse blending button to blend until all ingredients are combined if desired, or just stir all ingredients together before serving.
VEGETABLE AND PESTO SOUP
INGREDIENTS:
1 small leek, sliced to your preferred size
50 g green beans
1 medium zucchini, sliced
1 tomato, deseeded and chopped
400 g tin cannelloni beans, drained
20 g dry spaghetti, in small pieces
Chicken or vegetable liquid stock
2 heaped teaspoons of pesto
METHOD:
Add all ingredients to the pitcher except the liquid stock and pesto.
Fill with liquid stock to the 1400 ml mark on the pitcher.
Put the lid on and lock to the correct position.
Select the Boiled Food program.
The Boiled Food program is the only program which does not blend food during its process.
At the end of the program, remove the lid cap from the center of the lid.
Add half of the pesto. Add the cap back to the lid.
Use the Pulse blending button to blend until all ingredients are combined if desired, or just stir all ingredients together before serving.
Serve with the remaining pesto on the top of the soup.
AIOLI
INGREDIENTS:
1 tablespoon lemon juice
2 egg yolks
Pinch chili powder
2 cloves garlic, peeled and crushed
Pinch salt
1 liter olive oil
METHOD:
Place the lemon juice, egg yolks, chili, garlic and salt into the pitcher.
Put the lid on and lock to the correct position.
Select the Nut/Oat Milk program.
Remove the lid cap from the centre of the lid. Do not remove the blender lid, otherwise blending will stop.
While mixing, gradually add the oil.
Add the cap back to the lid.
Process until the end of the program.
At the end of the program, transfer to airtight bottles/containers.
It can be stored in the fridge for 3 to 4 days.
GAZPACHO
INGREDIENTS:
2 tomatoes, de-seeded and chopped
12 a red capsicum, de-seeded and chopped
12 a yellow capsicum, de-seeded and chopped
12 a cucumber, chopped
12 a red onion, peeled and chopped
1 tablespoon tabasco sauce
2 tablespoon olive oil
1 slice of bread, broken up into pieces
1 teaspoon fine salt
METHOD:
Place the vegetables into the pitcher.
Put the lid on and lock to the correct position.
Use the pulse button and pulse for up to two minutes.
Remove the lid cap from the centre of the lid.
Add the tabasco sauce, olive oil, bread and salt.
Add the cap back to the lid.
Use the pulse button and pulse until ingredients are combined.
At the end of the program, pour directly into bowls.
Refrigerate for 5 hours before serving.
2 carrots, peeled and diced
1 tablespoon butter
200 ml water
METHOD:
Add carrot and water to the pitcher.
Put the lid on and lock to the correct position.
Select the baby food program.
At the end of the program, add the butter and stir it through.
Allow to cool before serving.
BROCCOLI AND POTATO BABY FOOD
INGREDIENTS:
1 medium sized potato, peeled and cubed
12 a small broccoli, cubed
200 ml water
METHOD:
Add all ingredients to the pitcher.
Put the lid on and lock to the correct position.
Select the Baby food program.
At the end of the program, add some additional water if desired to thin the mixture out.
Allow to cool before serving.
SUPERGREEN VEGETABLE PUREE BABY FOOD
INGREDIENTS:
50 g pear, peeled, cored and chopped into medium sized pieces
50 g broccoli, chopped
50 g peas
40 g zucchini, peeled and chopped into medium sized pieces
10 g spinach
200 ml water
METHOD:
Add all ingredients to the pitcher.
Put the lid on and lock to the correct position.
Select the Baby food program.
At the end of the program, add some additional water if desired to thin the mixture out.
Allow to cool before serving.
CHICKEN AND VEGETABLE PUREE BABY FOOD
INGREDIENTS:
50 g diced chicken breast, pre cooked
50 g carrot, peeled and chopped
50 g parsnip, peeled and chopped
50 g broccoli, chopped
200 ml water
METHOD:
Add all ingredients to the pitcher.
Put the lid on and lock to the correct position.
Select the Baby food program.
At the end of the program, add some additional water if desired to thin the mixture out.
Allow to cool before serving.
BEEF AND VEGETABLE PUREE BABY FOOD
INGREDIENTS:
200 g cubed beef, pre-cooked
14 quarter of an onion, peeled and chopped
1 carrot, peeled and chopped
1 medium sized potato, peeled and chopped
200 ml water
METHOD:
Add all ingredients to the pitcher.
Put the lid on and lock to the correct position.
Select the Baby food program.
At the end of the program, add some additional water if desired to thin the mixture out.
Allow to cool before serving.
APPLE PUREE BABY FOOD
INGREDIENTS:
1 large apple, peeled, cored and chopped into medium sized pieces
200 ml water
METHOD:
Add all ingredients to the pitcher.
Put the lid on and lock to the correct position.
Select the Baby food program.
At the end of the program, add some additional water if desired to thin the mixture out.
Allow to cool before serving.
PEAR AND BLUEBERRY PUREE BABY FOOD
INGREDIENTS:
1 large pear, peeled, cored and chopped into med sized pieces
25 g blueberries
METHOD:
Add all ingredients to the pitcher.
Put the lid on and lock to the correct position.
Select the Baby food program.
At the end of the program, add some additional water if desired to thin the mixture out.
Allow to cool before serving.
APPLE AND RAISIN PORRODGE BABY FOOD
INGREDIENTS:
1 large apple, peeled, cored and chopped into med sized pieces
25 g raisins
Pinch of cinnamon
1 tablespoon of porridge oats
200 ml water
METHOD:
Add all ingredients to the pitcher.
Put the lid on and lock to the correct position.
Select the Baby food program.
At the end of the program, add some additional water if desired to thin the mixture out.
Allow to cool before serving.
STRAWBERRY COULIS
INGREDIENTS:
500 g strawberries, remove green stems chopped in half
500 g caster sugar
1 x lemon, peeled and sliced
METHOD:
Add all ingredients to the pitcher.
Put the lid on and lock to the correct position.
Select the Baby food program.
At the end of the program, pour directly into sauce pots.
Leave to cool until the coulis is firm.
PANCAKE BATTER
INGREDIENTS:
600 ml milk
3 eggs
300 g plain flour
50 g melted butter
3 x tablespoons icing sugar
METHOD:
Add the melted butter, milk and sugar into the pitcher.
Crack the eggs into the pitcher.
Put the lid on and lock to the correct position.
Use the Pulse blending button to blend until all ingredients are combined.
Remove the lid cap from the center of the lid. Do not remove the blender lid, otherwise blending will stop.
Gradually add the flour through the hole in the lid.
Use the Pulse blending button to blend until all ingredients are combined while continually adding the flour.
When all the ingredients are combined, remove the batter from the pitcher.
Cook the pancake batter using a fry pan on a stovetop.

- ABOUT THIS PRODUCT:
- IMPORTANT SAFEGUARDS:
- When using electrical appliances, basic safety precautions should always be followed, including the following:
- Special Cord Set Instructions:
- Initial Setup:
- Cleaning Before First Use:
- PRODUCT, PARTS AND ACCESSORIES:
- CONTROL PANEL:
- To power on the blender:
- Display
- Smart Programs
- OFF Mode
- Standby mode
- Menu
- Delay Start
- Pulse blending
- Note:
- Stacking Food Ingredients
- Stacking Order:
- CAUTION
- Keep warm after hot blending programs:
- CARE AND CLEANING:
- Auto clean function:
- Deep Cleaning
- WARNING:
- SPECIFICATIONS:
- LENOXX
- RECIPE TIPS:
- RECIPES:
- SOY MILK
- ALMOND MILK
- INGREDIENTS:
- METHOD:
- OAT MILK
- MACADAMIA MILK
- CORN JUICE
- DETOX VEGETABLE JUICE
- MANGO-ROCKMELON MILKSHAKE
- BLUEBERRIES FOR BREAKFAST SMOOTHIE
- STRAWBERRY BANANA SMOOTHIE
- GREEN TEA SMOOTHIE
- MANGO SMOOTHIE
- MIXED BERRY SMOOTHIE
- PEACH SMOOTHIE
- KIWI AND HONEYDEW SMOOTHIE
- LEMON-ORANGE CITRUS SMOOTHIE
- BANANA ALMOND SMOOTHIE
- TROPICAL SLUSHY
- REAL HOT CHOCOLATE
- CREAM OF SWEETCORN SOUP
- PUMPKIN SOUP
- POTATO AND LEEK SOUP
- TOMATO SOUP
- CARROT AND GINGER SOUP
- CELERY AND CHICKPEA SOUP
- CREAM OF VEGETABLE SOUP
- CREAM OF CAULIFLOWER SOUP
- PEA AND HAM SOUP
- SPICY POTATO SOUP
- ROAST CHICKEN SOUP
- CREAM OF MUSHROOM SOUP
- RED LENTIL AND CHICKPEA SOUP
- HOT SWEET POTATO SOUP
- SMOKED SALMON AND LEEK SOUP
- CHEDDAR AND CELERIAC SOUP
- BACON AND SWEETCORN SOUP
- MEXICAN CHICKEN SOUP
- VEGETABLE AND PESTO SOUP
- AIOLI
- GAZPACHO
- BROCCOLI AND POTATO BABY FOOD
- SUPERGREEN VEGETABLE PUREE BABY FOOD
- CHICKEN AND VEGETABLE PUREE BABY FOOD
- BEEF AND VEGETABLE PUREE BABY FOOD
- APPLE PUREE BABY FOOD
- PEAR AND BLUEBERRY PUREE BABY FOOD
- APPLE AND RAISIN PORRODGE BABY FOOD
- STRAWBERRY COULIS
- PANCAKE BATTER
Brand : Lenoxx
Model : SB180
Category : Blender