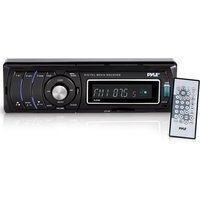
PLR38I - Subwoofer Pyle - Free user manual and instructions
Find the device manual for free PLR38I Pyle in PDF.


| Product Type | Subwoofer |
| Brand | Pyle |
| Model | PLR38I |
| Impedance | 4 Ohms |
| Peak Power Handling | 800 Watts |
| RMS Power Handling | 400 Watts |
| Sensitivity | 92 dB |
| Frequency Response | 20 Hz - 200 Hz |
| Cone Material | Polypropylene |
| Voice Coil Type | Dual 4 Ohm |
| Magnet Type | Ferrite |
| Overall Diameter | 12.5 inches (31.75 cm) |
| Mounting Depth | 6.5 inches (16.5 cm) |
| Cutout Diameter | 11.125 inches (28.26 cm) |
| Weight | 14.5 lbs (6.6 kg) |
| Recommended Sealed Enclosure Volume | 1.0 - 1.5 cubic feet |
| Recommended Ported Enclosure Volume | 1.5 - 2.0 cubic feet |
| Cleaning Instructions | Wipe with a dry, soft cloth. Avoid moisture and solvents. |
Frequently Asked Questions - PLR38I Pyle
User questions about PLR38I Pyle
0 question about this device. Answer the ones you know or ask your own.
Ask a new question about this device
Download the instructions for your Subwoofer in PDF format for free! Find your manual PLR38I - Pyle and take your electronic device back in hand. On this page are published all the documents necessary for the use of your device. PLR38I by Pyle.
USER MANUAL PLR38I Pyle
Remarks: Any information subject to change without further notice
Trouble Shooting
Before going through the check list, check wiring connection. If any of the problems persist after check list has been made, consult your nearest service dealer.
| Symptom | Cause | Solution |
| No power | The car ignition is not on. | If the power supply is properly connected to the car accessory terminal, switch the ignition key to "ACC" |
| The fuse is blown. | Replace the fuse. | |
| No sound | Volume is at minimum. | Adjust volume to a desired level. |
| Wiring is not properly connected. | Check wiring connection. | |
| The radio does not work.The radio station automatic selection does not work. | The antenna cable is not connected. | Insert the antenna cable firmly. |
| The signals are too weak. | Select a station manually. |
Front Panel Controls
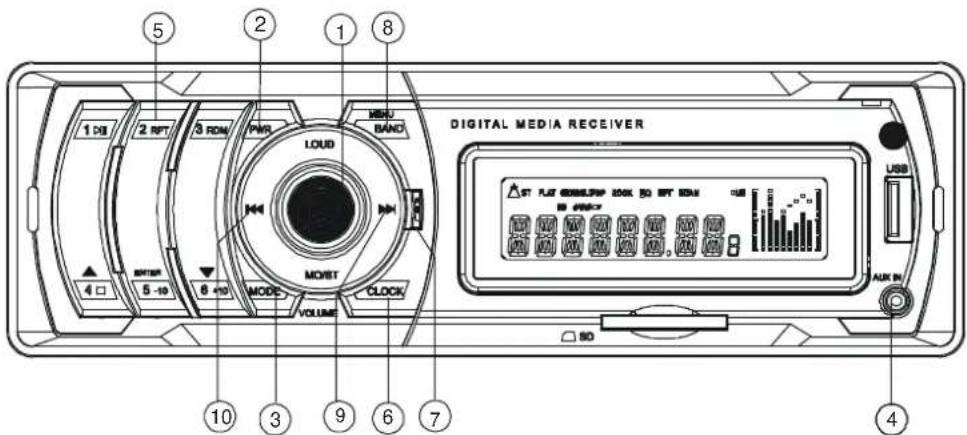
1. VOLUME UP/DOWN KNOB (turn)& AUDIO MODE SELECTOR (push)
In normal mode, use this knob to increase or decrease the volume level.
To access the various sound parameters push the knob (like a button) to cycle through the following adjustable settings:
VOLUME -> BASS -> TREBLE -> BALANCE -> FADER
Use the knob to increase or decrease the settings for Volume, Bass, Treble, Balance and Fader.
In each mode, the waiting time is about 5 seconds, and when the waiting time is over, it returns to the last display mode.
The control mode of E.VOL is operated with following numeric display.
- VOL: (MIN)00, 01,.....46, 47(MAX).
- BASS/TRE: -07, -06,...,00,...+06,+07
- BAL: 0LR9, 1LR9, ..., 9LR9, ..., 9LR1, 9LR0
- FAD: 0FR9,1FR9, ..., 9FR9,..., 9FR1, 9FR0
Push and hold the knob (like a button) for more than 2 seconds to turn on TA ON/TA OFF, then push it repeatedly to select TA SEEK/TA ALARM, PI SOUND/PI MUTE, RETUNE S/RETUNE L, MASK DPI/MASK ALL, BEEP ON /BEEP OFF, USER SET(FLAT, CLASSIC, ROCK, POP), VOL LAST/ VOL DEFA, STEREO/MONO(in RADIO mode), LOUD ON/LOUD OFF, DX/LOCAL(in RADIO mode), CLK ON/CLK OFF, CLK 12/CLK 24 mode. Use the knob to increase or decrease the settings for these functions.
2. POWER/MUTE
Press POWER to turn unit on. Press the button to MUTE the audio. Press and hold POWER to turn it off.
3. MODE (Input Select)
Press this button repeatedly to cycle through the audio input sources: BLUETOOTH > AUX > TUNER > USB > CARD > IPOD
Please note:
iPod Mode can only be selected if an iPod is present in the dock.
4. AUX IN JACK
This jack is a convenient way to play music from an MP3 music player such as an ipod through your car audio. Simply connect the headphone output of the MP3 player to this input jack, and press MODE button to select AUX as input source and begin playing music on the MP3 player.
Please note:
AUX IN Mode can only be selected if it is enabled in the system Settings. If you are having problems with AUX IN mode, please check the setting.
5. RADIO REPEAT
These buttons are used to store the presets for radio stations. To set a preset, turn to the desired radio sasstation. Then press and hold the preset to which you wish to assign that station for more than one second and release. To replace it with a different station, repeat the process and the new setting will override the previous one.
6.CLOCK BUTTON
Press the mode button briefly to display time for 5 seconds on the display, and then returns to its previous display unless the button is pressed again. Then press the CLK button and hold for more than 1 second until the real time flashes on the display. Then you can adjust HOUR or MINUTE by pressing the VOL-or VOL+buttonn.
7.RELEASE BUTTON
Press the REL button to release the front control panel from the unit chassis, then pull it up to remove from the unit chassis.
When the front panel is removed the LCD indicator flashes.
8.BAND
Press briefly, repeatedly to cycle between the five radio bands:
$$ \mathrm{FM1} > \mathrm{FM2} > \mathrm{FM3} > \mathrm{AM1} > \mathrm{AM2} $$
9&10. TUNE/SEEK UP/DOWN BUTTONS
Press these buttons briefly to step up or down the radio dial in single step increments.
Press and hold for more than one-haf second and the tuner will enter the SEEK mode. In this mode the tuner will stop at the next strong station available.
USB/SD Card (MP3 Playback) Controls
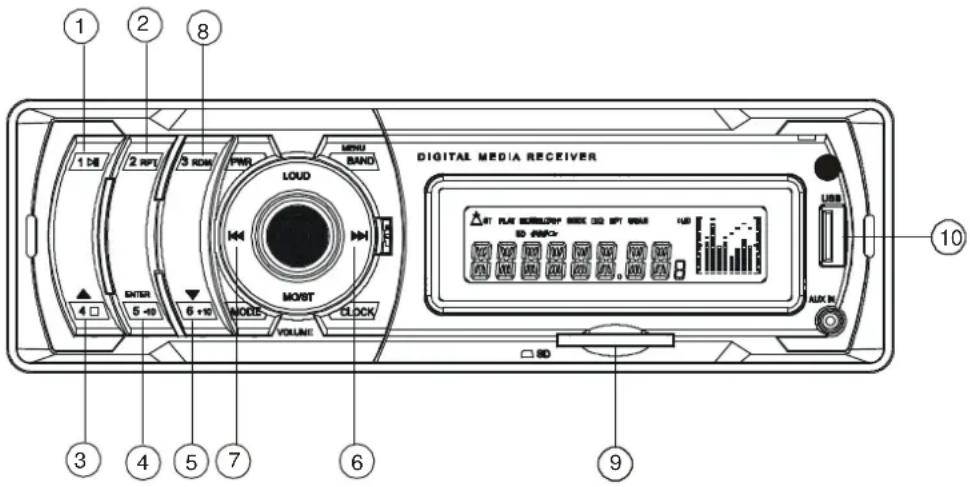
To play tracks from a USB drive or SD card, insert the drive into the appropriate port/slot on the faceplate. The display will show "USB" or "CARD", indicating that the drive is being read.
The unit will display tracks when ready by file name (or, if created with ID3-tag information, with Song Title, Artist and Album information) and will begin playing the first track in the directory.
1. PLAY/PAUSE
Files will begin playback automatically upon insertion. To pause playback, press this button. Press again to resume playback.
2.RPT(Repeat Play Mode)
Press this button to repeat the playback of all the files in the current folder automatically. "RPT ON/OFF "will be displayed. Press again to cancel.
3. STOP
Pressing STOP will stop playback. To restart playback, press PLAY/PAUSE.Playback will begin with the first song of the current folder directory (NOT the track that was last playing).
4&5. -10 BUTTON +10 BUTTON
To skip back or ahead 10 tracks in the current folder, press this button.
6&7.I<< and >>I (Skip back/skip forward, Fast rewind/fast forward)
Press these buttons to skip back or ahead one track.
8.RDM (Random Play Mode)
Press this button for playback of all the files in the current folder in a random order. "RDM ON/OFF "will be displayed. Press again to cancel.
- SD CARD slot
Insert SD card in this slot for playback. Please note icon on panel which shows you how to orient card (angled corner goes to left side of slot).
- USB port
Insert USB drive in this slot for playback.
iPod Playback Controls
Before removing the iPod from the dock, be sure to pause playback OR use the MODE switch to change to another mode.

To play tracks from a iPod, first be sure you have the proper dock adaptor inserted in the docking drawer. Then insert the iPod. The display will show "iPod RMT" indicating that the iPod unit has been recognized. Press PLAY/PAUSE to begin playback.
Most of the iPod's menu functions can be displayed and controlled by the PLR38I-IPOD. However, you can always control the iPod playback from the iPod itself if that is more convenient for you.
Please note that the PLR38I-IPOD is compatible with almost all of the available iPod units.
If it is not, you can still use the AUX input to connect the headphone output to the PLR38I-IPOD, but you will not be able to control the iPod playback this way.
IPod not recognized? Is iPod Enabled in the System Setting?
An iPod in the dock will only be recognized if the iPod function is enabled in the System Settings. If the PLR38I-IPOD does not recognize that an iPod is present, check the System Settings to make sure that the iPod function is enabled.
1.PLAY/PAUSE
Press to begin playback. To pause, press again. Press again to resume playback.
2.RPT (Repeat Play Mode)
Press this button to repeat the playback of the current track.
3.RDM (Shuffle Mode)
Press this button for shuffle playback of all the files in your iPod playlist.
4&5.l<< and >>l (Skip back/skip forward, Fast rewind/fast forward)
Press these buttons to skip back or ahead one track. Press and hold for fast rewind or fast Forward.
iPod Dock adaptors
The PLR38I-IPOD comes with a set of special iPod adaptors which fit a wide rangeof iPod models. These are specially designed for use with the PLR38I-IPOD, and hold the iPod firmly to the dock connector when the vehicle is in motion.
Please install the appropriate dock adaptor as described below.
PLEASE NOTE:
"official"Apple Universal Dock Adaptors can not be used in the PLR38I-IPOD.
Do not attempt to connect you iPod to the dock without the appropriate, specially-designed adaptor provided with the PLR38I-IPOD.
We can not accept any responsibility for any damage or date loss that may result from using your iPod in the PLR38I-IPODI and the specially-designed
dock adaptors.

natural_image
Diagram of a device rear panel with a black arrow pointing to the front panel (no text or symbols present)-
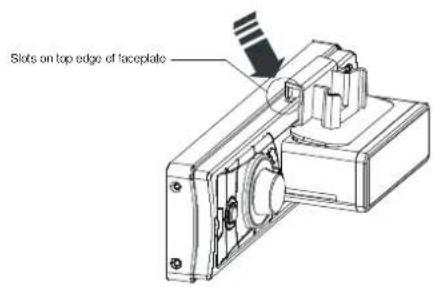
Push on the face of the LCD to release and open the iPod docking drawer.
-
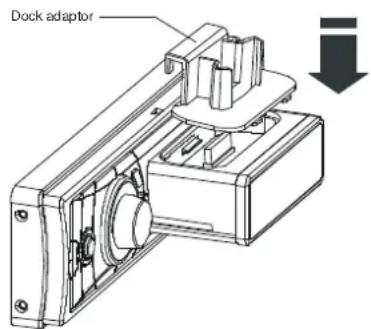
Select the appropriate size dock adaptor for your iPod. Lower it into the recess in the drawer, aligning the notches/tabs on the FRONT edge first.
-
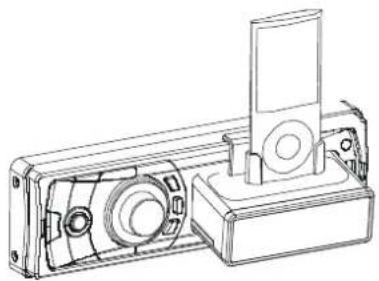
As you lower the dock into the recess, be sure to align the tabs on the REAR edge of the dock adaptor with the slots on the top edge of the faceplate, and slide it down securely into place.
-
Insert your iPod into the dock adaptor. Press PLAY/PAUSE to begin playback.
natural_image
Technical line drawing of a mechanical device housing with no visible text or symbolsiPod compatibility
The JMB-IPOD and its specially-designed, included dock adaptors are compatible with a wide range of iPod types. The compatible models are shown below:

iPod Mini

iPod Classic
80GB/120GB

iPod Nano
2GB/4GB/8GB
(2nd generation)

iPod Touch
8GB/16GB
(1st generation)

iPod Nano (5th generation)

iPod Nano
1GB/2GB/4GB
(1st generation)

iPod video
30GB and iphone
(5th generation)

iPod Nano
4GB/8GB
(3rd generation)

iPod Nano (4th generation)
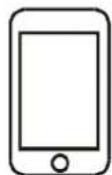
iPhone ^® 4
If your iPod is not one of those compatible models shown above......you can still use the headphone out jack on the iPod and connect it to the AUX input on the faceplate. Use the MODE switch to select AUX IN and use the controls on your iPod to play music through the PLR38I-IPOD.
PLEASE NOTE:
"official"Apple Universal Dock Adaptors con not be used in the PLR38-IPOD.
Do not attempt to connect your iPod to the dock without the appropriate, specially-designed adaptor provided with the PLR38IIPOD.
We can not accept any responsibility for any damage or date loss that may result from using your iPod int the JPLR38I-IPOD and the specially-designed dock adaptors.
iPod charging
The PLR38I-IPOD circuitry is designed to recharge your iPod, giving you many additional hours to enjoy listening to your library of music and Podcasts.
Operation of Remote Control
- POWER Use to turn receiver on/off
2.EQ(Preset Equalizer Curves)
Press repeatedly to cycle through these modes: FLAT, CLASSIC, ROCK, POP, USER SET.
3.MUTE
Press this button to silence the audio. Press again to restore the previous audio volume level.

4.RDM
Press this button for playback of all the files in the current folder in a random order .RDM ON/OFF will be displayed. Press again to cancel.
5.AMS
In Radio mode, press this button to play each preset number for several seconds; press and hold this button to search from the current frequency and check the signal strength level until 6 stations are found. And then the 6 station frequencies are preset to the corresponding preset memory numbered bank. The auto-storage operation is implemented in each selected band.
When the auto-storage operation is complete, the radio executes Preset scan.
6.VOLUME -/VOLUME +
Use to increase or decrease volume level.
7.LOC
Press and hold this button briefly to select Local /DX mode:
In some areas ,reception of an AM station may be weak.Changing the reception mode to LOC by pressing tbhis button allows the receiver to skip the weaker signals.Press again to return to DISTANT mode.
8&9.TUNE/SEEK & I<< and >>I (Skip back/skip forward, fast back/fast forward)
In radio mode, Press this button briefly to step up or down the radio dial in single step increments. Press and hold for a second to enter SEEK mode.
In this mode the tuner will stop at the next strong station available.
In MP3/SD/MMC mode, press those buttons to skip back or ahead one track.
Press and hold for fast back or fast forward.
10.SOURCE (Input select, same as MODE on head unit)
Press the button repeatedly to cycle through the 5 audio input sources in order to select either USB or SD modes.
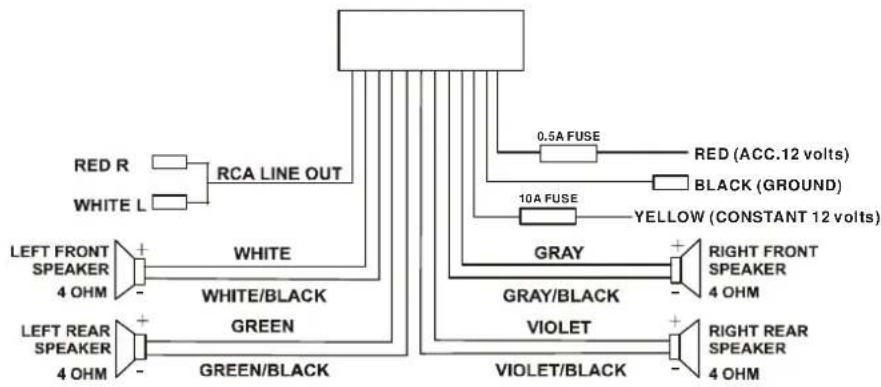
Wiring connection diagram
Installation

Figure 1 Bending the support tabs


Figure 2 Forming the support bracket
Figure 3 Insert levers until "click" occurs, then use levels to pull out head unit.
Specifications
Supply voltage : 12V DC(11V-15V)
Current consumption : 10A
Power Output : 4 X 25 Watts
Audio Signal Output : 2ch line out
Characteristics : (1) Frequency Response: 20Hz-20KHz
(2) S/N Ratio: 50 dB(JIS)
(USA)
FM
Frequency Coverage: 87.5 to 107.9Mhz
IF 10.7Mhz
Sensitivity (S/N = 30dB) : 20dBu
AM
Frequency Coverage: 530 to 1710Khz
IF 450Khz
Sensitivity (S/N = 20dB) : 45dBu
NOTE:
Specifications and design are subject to modification, without notice, due to improvements in technology.
Setting Mode
You can make changes to the system setting in the following area: Radio Frequency Range + Enable/Disable AUX In+ Clock Format
- Radio Settings
The unit can operate on several different frequency ranges. Please see the following for these ranges. To enter setting mode, input the following command by pressing remote keys" 8, DOWN DIRECTION KEY,9, ENTER "
The display will show "TEST MOD" briefly to indicate you are in system setting area and then automatically change to Radio Frequency selection mode. At anytime, you can press the DOWN ARROW to step through the above areas. When you are ready to leave the System Setting area, press ENTER. The unit will reboot to initialize with the new setting.
| BAND NAME | FREQUENCY RANGE | |
| AMERICA 1 | FM:87.5-107.9MHz | AM:530-1710kHz |
| AMERICA 2 | FM:87.5-108MHz | AM:520-1620kHz |
| AMERICA 3 | FM:87.5-107.9MHz | AM:530-1620kHz |
| EUROPE | FM:87.5-108MHz | AM:522-1620kHz |
| MIDEAST | FM:87.5-108MHz | AM:531-1602kHz |
| AUST(AUSTRALIA) | FM:87.5-108MHz | AM:522-1710kHz |
| RUSSIA | FM:65.0-108MHz | AM:522-1620kHz |
To change the range to suit your location, press DOWN ARROW until the desired frequency range is hight lighted. The press ENTER to save it and move to next setting area.
- AUX Input Enable/Disable
Press DOWN ARROW to move between Enable and Disable modes.
When the selection has been made, press ENTER to save it and move to next setting area.
If AUX Input is disabled in System Settings, any input connected will not be played.
- Clock Format (12-hour or 24-hour)
Press DOWN ARROW to move between 12-hour or 24-hour format, press ENTER to save it and turn off this unit.
- Trouble Shooting
- Front Panel Controls
- VOLUME UP/DOWN KNOB (turn)& AUDIO MODE SELECTOR (push)
- POWER/MUTE
- MODE (Input Select)
- Please note:
- AUX IN JACK
- RADIO REPEAT
- 6.CLOCK BUTTON
- 7.RELEASE BUTTON
- 8.BAND
- 9&10. TUNE/SEEK UP/DOWN BUTTONS
- USB/SD Card (MP3 Playback) Controls
- PLAY/PAUSE
- 2.RPT(Repeat Play Mode)
- STOP
- 4&5. -10 BUTTON +10 BUTTON
- iPod Playback Controls
- 1.PLAY/PAUSE
- 2.RPT (Repeat Play Mode)
- 3.RDM (Shuffle Mode)
- 4&5.l<< and >>l (Skip back/skip forward, Fast rewind/fast forward)
- iPod Dock adaptors
- iPod compatibility
- iPod charging
- Operation of Remote Control
- Wiring connection diagram
- Installation
- Specifications
- NOTE:
- Setting Mode
Brand : Pyle
Model : PLR38I
Category : Subwoofer