
DBH1200S - Range hood Schweigen - Free user manual and instructions
Find the device manual for free DBH1200S Schweigen in PDF.


| Product Type | Range Hood |
| Brand | Schweigen |
| Model | DBH1200S |
| Width | 1200 mm |
| Depth | 500 mm |
| Height (min-max) | 800 - 1100 mm |
| Weight | 25 kg |
| Power Supply | 230-240 V / 50 Hz |
| Motor Power | 250 W |
| Maximum Extraction Rate | 1200 m³/h |
| Noise Level (max speed) | 55 dB(A) |
| Number of Speeds | 4 + Boost |
| Filter Type | Stainless steel baffle filters |
| Filter Cleaning | Dishwasher safe |
| Lighting | 2 x 3W LED |
| Control Type | Touch controls with remote |
| Ducting | Top or rear outlet (200mm) |
| Energy Efficiency Class | A |
| Material | Stainless steel |
| Warranty | 2 years parts and labour |
| Wall Mounted | Yes |
| Includes chimney | Yes (telescopic) |
Frequently Asked Questions - DBH1200S Schweigen
User questions about DBH1200S Schweigen
0 question about this device. Answer the ones you know or ask your own.
Ask a new question about this device
Download the instructions for your Range hood in PDF format for free! Find your manual DBH1200S - Schweigen and take your electronic device back in hand. On this page are published all the documents necessary for the use of your device. DBH1200S by Schweigen.
USER MANUAL DBH1200S Schweigen
RANGEHOOD & INSTALLATION GUIDE
DBH1200S
Index
1. Welcome 3
Your State Regulatory Authority 3
2. Important Safety Information 4
Before Installation 5
Product Use 6
Electrical Cord 6
3. Description 7
Rangehood 7
4. Operation 8
Remote Control 8
Synchronisation of the Remote Control with the Rangehood 9
Generating a New Transmission Code 9
5. Cleaning & Maintenance 10
Cleaning the Interior 10
Cleaning the Exterior 10
Replacing the Lights 10
Baffles 11
6. Installation 12
Rangehood Size vs BBQ Size 12
BBQ Installation 12
Mounting Instructions - Outdoor/Alfresco 13
Wall Mount Installation 14
Faulty Installation 15
Ducting 17
Isodrive® Motor Setup 17
Single Isodrive® Motor Installation 18
Twin Isodrive® Motor Installation 19
Optional Wall Mounted Motor Installation 20
7. Troubleshooting 21
Troubleshooting 21
Service 21
8. Specifications 22
Dimensions 22
Technical Specifications 22
9. Disclaimer 23
Thank you for purchasing your new Schweigen rangehood.
To get the maximum output from this unit, please read through this guide before use.
The guide contains important information on the use and maintenance of the unit, as well as important safety notes. This will ensure your personal safety and the lasting value of your rangehood.
We trust that you will enjoy your new Schweigen rangehood.
Please always retain your proof of purchase to aid in any warranty queries.
If you are unable to locate your warranty card, one is available to download from our website www.schweigen.com.au.
This appliance and its packaging are produced by processes that minimise waste and respect the environment.
Please help us to continue this effort to protect the environment by using the appliance efficiently and dispose of the packaging in a responsible manner.
Your State Regulatory Authority
Different Australian states have varying legislative requirements for the installation of rangehood ducting. Some will insist on ducting being vented externally (i.e. not in to the ceiling cavity); others will not. It is imperative that you check with your state building authority and/or private certifier to confirm their position.
2. Important Safety Information

WARNING
Please read this section thoroughly before attempting to operate the appliance. Inspect your product upon receipt. Any damage or defects MUST be reported within 48 hours, or no claim will be recognised.
DO NOT INSTALL THIS APPLIANCE IF YOU FIND IT DAMAGED.
If this product is installed damaged, neither the supplier, nor the retailer, will be responsible for the costs associated with the repair, replacement, removal or re-installation of the appliances.
- To be installed in an undercover alfresco area only.
- If the unit is not adequately covered or sheltered from the outside elements the warranty will be null and void.
- There shall be adequate ventilation in the room when the rangehood is used at the same time as appliances burning gas or other fuels.
- There is a fire risk if cleaning is not carried out in accordance with the instructions.
- Do not flambé under the rangehood. This will damage the rangehood and will not be covered by warranty.
- Do not ignite burners that give off intense, uncontrolled flames beneath the rangehood.
- Make sure that no flames emerge from the sides of pans.
- Do not leave packaging materials (bags, corner brackets, etc.) within reach of children.
- This appliance is not intended for use by person/s (including children) with reduced physical, sensory or mental capabilities, or lack of experience and/or knowledge. Unless the person has been given supervision or instruction concerning the use of the appliance by a person responsible for their safety. Children should be supervised to ensure that they do not play with the appliance, it is not a toy.
- Exhaust air must not be discharged into an existing flue that is used for exhausting fumes from appliances burning gas or other fuels.
- Air exhaust must be installed in accordance with local laws. Regulations concerning the discharge of air have to be fulfilled.
- Accessible parts may become hot when used with cooking appliances.
- Before performing any cleaning or maintenance operation, disconnect the rangehood from the mains using the respective mains or sector switch or by unplugging it.
- Do not use the rangehood without the grease s.
- Keep the grease's clean and respect the recommended cleaning frequencies.
- Turn the rangehood motor on before starting to cook.
- Turn the rangehood motor off about 10-15 minutes after you finish cooking.
- It is forbidden to use the rangehood as an aspirator.
- Never cook foodstuff directly over the flame or have the gas burners on under the rangehood without using cookware.
2. Important Safety Information
Before Installation
- We recommend this appliance be installed or repaired by an experienced Home Appliance technician.
- Please see our website www.schweigen.com.au for experienced installers.
- It is dangerous to modify any part of this appliance. Modification of any kind, will immediately void the warranty.
- The manufacturer declines all responsibility in case of failure to adopt proper safety measures.
- Ensure that the location in which this appliance is installed, has good and permanent ventilation.
- Please consult local laws and regulations and install in accordance.
- Use an electrical connector with earth that is correct for your location.
- Check that the voltage in your area corresponds to the appliance as indicated on the rating label.
- This appliance must be connected to an electricity supply with a ground connection.
- Check that the installation and electrical connections are made by a qualified technician and that the indicated instructions and local regulations in force are met, using materials that are compliant with the applicable legislation.
- The company will not be responsible for installations executed by non-qualified staff and installations that fail to heed the applicable legislation on electrical safety (with regard to both modes and materials).
- The electrical technical data can be found inside the rangehood, after removing the grease s.
- The flexible power cable supplied is already connected internally and emerges from the rangehood near the air outlet tube.
- Before installing the electrical connections, you should:
- Verify that the indicated electrical data coincide with the voltage values and frequency of the electrical circuit in the house where the rangehood is to be installed;
- Check that the premises has electrical protection against short circuits and electrocution, pursuant to the applicable legislation;
- Always switch off the current using the double-pole switch before maintenance and turn the power on again for normal use only when the operation has been completed.
2. Important Safety Information
Product Use
This product is designed for household use and should not be used for commercial applications.
After use, always ensure that all controls are in the "OFF" position.
When frying with a gas flame, take particular care not to allow the oil or grease in the pan to catch fire. (Flambé)
Rangehoods and other cooking fume extractors may adversely affect the safe operation of appliances burning gas or other fuels (including those in other rooms) due to back flow of combustion gases. These gases can potentially result in carbon monoxide poisoning. After installation of a range hood or other cooking fume extractor, the operation of flued gas appliances should be tested by a competent person to ensure that back flow of combustion gases does not occur.
Electrical Cord
Ensure the supply cord is not exposed to heat, chemicals or sharp objects. If the supply cord is damaged, it must be replaced by the manufacturer.
Rangehood
- Mounting Bracket
- Flue
- Socket lead for Isodrive motor
- Main Power Cord
- Rangehood Body
- Baffles
- Lights
- Remote Control
NOTE: Baffle and light quantity may vary from model to model.

4. Operation
Remote Control
Starting the rangehood for the first time using the remote control:
Put the safety switch ON (this switch is inside the main rangehood). Wait about 5 seconds for the circuit to test the memory.

The rangehood has a 4-speed remote control device. The buttons have the following functions (valid for all rangehood models with remotes):
A. ON / OFF button: This button turns the rangehood on and off. The rangehood will always be turned on at minimum speed.
B. High-speed button: This button increases the aspiration speed.
C. Low-speed button: This button decreases the aspiration speed.
NOTE: When increasing and decreasing the speed of aspiration always wait for 2 seconds after you have changed the speed to do so again.
D. Timer button: Activates the deferred stop function (after 10 minutes the rangehood will automatically stop).
E. Light button: Turns the rangehood lighting on or off.
If the remote control fails or the batteries run out, disconnect the rangehood using the safety switch inside the rangehood (which can be accessed from one of the s) and replace the batteries.
Note: To obtain the best performance, turn on the rangehood a few minutes prior to cooking and leave it on for at least 10–15 minutes after you have finished cooking
Synchronisation of the Remote Control with the Rangehood
If the remote control fails or the batteries run out, disconnect the rangehood using the safety switch inside the rangehood (which can be accessed from one of the s) and replace the batteries, then synchronise the remote.
- Switch OFF the circuit breaker.
- Switch ON the circuit breaker.
- Within the first 20 seconds of switching the circuit breaker back ON, please direct the remote control to the rangehood and hold the light or "E" button, until the rangehood lights switch on.

Generating a New Transmission Code
In the unlikely event that the remote control interferes with other appliances. You can assign a new transmission code to prevent this happen. There are 8 different transmission codes for you to choose from.
-
Press and simultaneously hold buttons A, B and C until all lights on the remote control flicker at the same time.
-
After all lights light up, press the B and C buttons and the lights will flash 3 times to indicate that the process has been completed.
5. Cleaning & Maintenance

Warning
Always switch off and disconnect power before cleaning.
Cleaning the Interior
Clean the interior of the rangehood with a damp cloth and a neutral detergent.
NOTE: Do not use denatured alcohol on the exterior of the rangehood. Do not clean the electric parts or the motor with liquids or solvents.
Cleaning the Exterior
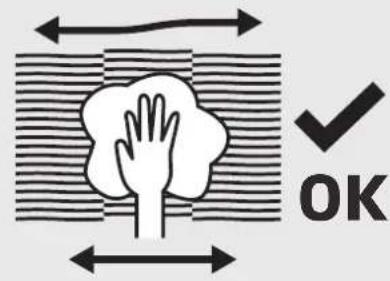
We recommended using a soft cloth, water and a liquid soap, rinsing it well and then drying it thoroughly. For better results, you can use high quality cleaning and protection products to clean your rangehood.

natural_image
Diagram showing a hand holding a cloud within a circular frame, surrounded by curved arrows indicating rotation or cycle (no text or symbols)- The recommended detergent is a solution of water and a neutral liquid soap.
- It is very important for the liquid soap to not contain granules that could scratch the surface.
- First apply the solution to a soft cloth and then rub the cloth over the rangehood. It is important to follow the direction of the stained surface with the cloth (refer to figure on left).
- Do not pour any liquid directly on to the rangehood.
- The cloth must have no buttons, zips or fasteners that could scratch the surface.
- It is strictly forbidden to use chemical solvents, aggressive, grainy or abrasive products, naphtha, alcohol or similar products that could damage the surface of the rangehood.
- The manufacturer will not be held responsible for functional or aesthetic damage caused by cleaning with products which are not suitable or using inadequate cleaning methods.
Replacing the Lights
Never attempt to replace the lights by yourself, always get a qualified service technician.
Baffles
For this appliance to function effectively, regular maintenance is a must.
- The function of the baffle is to collect the grease particles given off during cooking.
- Clogged heavy oil deposits restrict airflow and may cause the motor to overheat and become a fire hazard.
- Baffles should be cleaned every 3-6 weeks or after 40 hours of use.
- For induction cooktop, please aim to clean them at least every 10 days, depending on use.
• The baffles can be washed by hand or in the dishwasher.
- Washing by hand - Immerse the baffle in hot water and a suitable detergent and when clean, rinse with plenty of hot water.
- Dishwasher - Put the in the dishwasher and select a short program at low temperature. NOTE: The colour of the metal mesh s may change after several washes. This is normal and it is not necessary to change the baffles.
Please ensure the baffles are completely dry before placing them back in position and operating the rangehood.
Ensure the baffles are cool before removing them. Take care as there may be excess oil within the baffles.
To remove the baffle lift up the lever and pull towards you. Then lower the to remove from the cavity. To replace, perform the same operation but in reverse.

natural_image
Diagram showing three document sheets with horizontal lines and a curved arrow indicating rotation (no text or symbols)
Warning
- If the baffles are very dirty, the motor will extract only a small quantity of air, which reduces its efficiency:
- The grease deposits that build up on the baffles are highly flammable and COULD EASILY CATCH FIRE.
- The manufacturer is exonerated from all responsibility in the event of fire due to poor maintenance of the grease baffles.
6. Installation
Rangehood Size vs BBQ Size
In addition to the size, the height of the rangehood above the BBQ is important to obtain the best performance.

natural_image
Diagram of a mechanical or optical setup with arrows pointing upward from a central platform and a base, no text or symbols present.INADEQUATE Rangehood smaller than cooking zone

natural_image
Diagram of a mechanical or electrical setup with a central block and two vertical red arrows pointing downward, mounted on a base (no text or symbols)ADEQUATE Rangehood same size as cooking zone

natural_image
Diagram of a mechanical or optical setup with two beams and a central platform, no text or symbols presentOPTIMAL Rangehood larger than cooking zone
BBQ Installation
When installing the rangehood over a BBQ, please be aware that the lid will obstruct the rangehoods effectiveness to extract smoke, steam and odours. Where possible, remove the lid of the BBQ unit when in use, so as to allow for effective rangehood extraction. Alternatively, install the rangehood on an extension, to move the rangehood further out.

Mounting Instructions - Outdoor/Alfresco
When installing in an outdoor kitchen or alfresco area, the rangehood MUST NOT be installed where it is directly exposed to the elements.
It is STRONGLY RECOMMENDED that the rangehood be installed centrally over the cooktop.
This will greatly improve its performance.
Minimum legal height from the BBQ surface to the underside face of the rangehood:
- 1200mm
Any installation above 1200mm will compromise the extraction performance.

natural_image
Technical line drawing of a kitchen oven with open lid and ventilation duct (no text or symbols)Measurements are from the top of the trivets to the lowest part of the rangehood, including the button controls.
*IMPORTANT: If the user decides to install the rangehood at a distance of less than minimum height above the cooking surface, Schweigen declines responsibility for damages suffered by the rangehood due to excess heat or damage to objects, people and others caused directly or indirectly by a malfunction, breakage or fire.
*Important: In addition to the information in this manual, please check all relevant state requirements for minimum-maximum heights, as well as regulations regarding the expelling of air. Schweigen is not liable if your rangehood is not installed in accordance with these legal requirements.
6. Installation
Wall Mount Installation
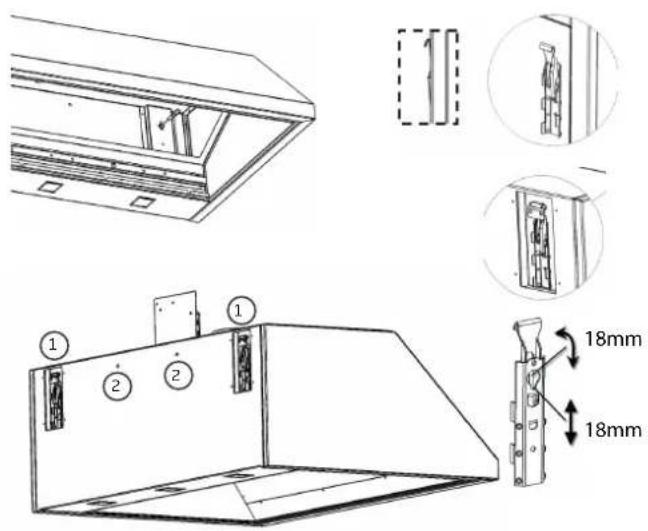
There are two primary mounting points and several secondary mounting points to firmly fix the rangehood in place.
Suitable fixing screws must be used to mount the appliance on a secure surface.
Please ensure that the holes for the two primary mounting points are level before installation.
- Primary Mounting Points
- Secondary Mounting Points


WARNING
Please remove baffles before installation. Failure to do so may damage the clips.

DANGER
Always switch off and disconnect the power supply before installing the rangehood. Failure to do so may cause serious injury.
Step 1
Secure rangehood to the wall using only primary mounting points (1). Check the level of the rangehood and adjust accordingly if necessary. Once level, continue to secure the rangehood via the secondary mounting points (2).
Step 2
Feed through and secure the ducting from the rangehood outlet to the Isodrive motor.

natural_image
Isometric line drawing of a mechanical component with three cylindrical holes and a stepped base (no text or symbols)Faulty Installation
It is not the responsibility of Schweigen to rectify any incorrect installations. A service call out fee will be charged for any Schweigen technician that attends a call, whereby it is established that the fault is due to an incorrect installation or non-manufacturing fault. Should the appliance be installed in such a way that the service agent is unable to gain access to the appliance, the person/s who own the premises or the property where the appliance resides – will be responsible to provide access to the appliance at their expense.
6. Installation
Step 3
Place flue covers on the rangehood. (Be careful not to scratch the top of the rangehood).
PLEASE NOTE: Only a standard length of stainless steel flue is provided. Any additional length will need to be sourced and manufactured by a sheet metal fabricator.

natural_image
Technical line drawing of a mechanical assembly with a downward arrow indicating motion (no text or symbols present)Step 4
Attach the flue wall mounting bracket to the wall. Slide the flue piece up to the wall mounting bracket and secure.

natural_image
Technical line drawing of a mechanical assembly with a component and tool, no text or symbols present
IMPORTANT
Please ensure all plastic protection on the rangehood and baffles is removed before use.
Ducting
Please DO NOT crush or kink the ducting.
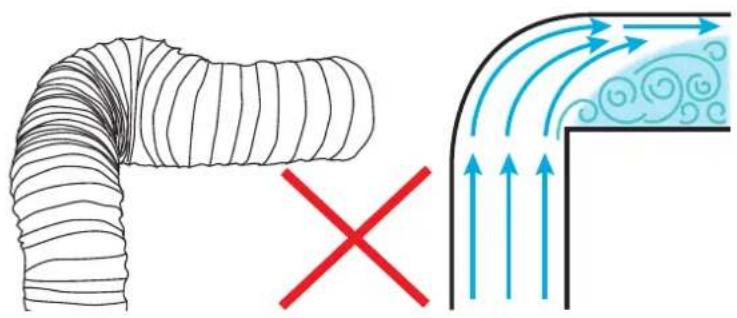
- Crushed or kinked ducting creates sharp corners that creates turbulence. This reduces the size and efficiency of the ducting, lowers extraction and may cause excessive noise.

- Sweeping curves and taut ducting reduces resistance and turbulence. The airflow and extraction will be more efficient and stronger.
Isodrive® Motor Setup

Note
Please refer to the Isodrive ^® motor installation guide for more details on ducting and Isodrive ^® motor installation.
6. Installation
Single Isodrive® Motor Installation

- Isodrive ^® Motor
- Roof Seal Kit (Dektite) (Not supplied)*
- Support Straps (Not supplied)*
- Isodrive ^® Motor Power Lead (Plug)
- Rangehood to Isodrive ^® Motor Lead (Socket)
- Multi-fit Y-Joint, cut to 250 x 200 x 200mm
- Mains power
- Ducting must be pulled taut. DO NOT crush or kink the ducting.
- Connect ducting to the outlet on rangehood using ring clamp. Please DO NOT rip the ducting.

NOTE
The Isodrive® motor system does not include the roof seal kit, cable ties or the support straps.

NOTE
The general power outlet for the rangehood should be located in an easy to access area.

DANGER
All electrical wiring from the motor to the rangehood should be kept inside the roof space.
Twin Isodrive® Motor Installation
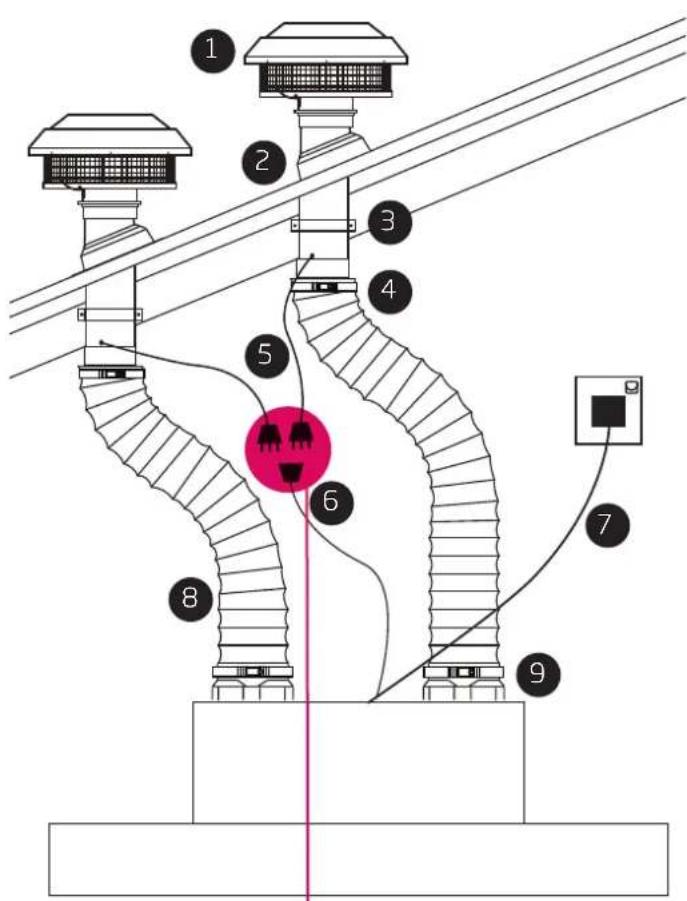
Rangehood to Motor power leads are to be hard wired by an electrician.
- Isodrive ^® Motors
- Roof Seal Kit (Dektite) (Not supplied)*
- Support Straps (Not supplied)*
- Attach Duct to pipe using ring clamp. Please DO NOT rip the ducting.
- Isodrive ^® Motor Power Lead (Plug)
- Rangehood to Isodrive ^® Motor Lead (Socket)
- Mains power
- Ducting must be pulled taut. DO NOT crush or kink the ducting.
- Connect ducting to the outlet on rangehood using ring clamp. Please DO NOT rip the ducting.

NOTE
The Isodrive ^® motor system does not include the roof seal kit, cable ties or the support straps.

NOTE
The general power outlet for the rangehood should be located in an easy to access area.

DANGER
All electrical wiring from the motor to the rangehood should be kept inside the roof space.
6. Installation
Optional Wall Mounted Motor Installation
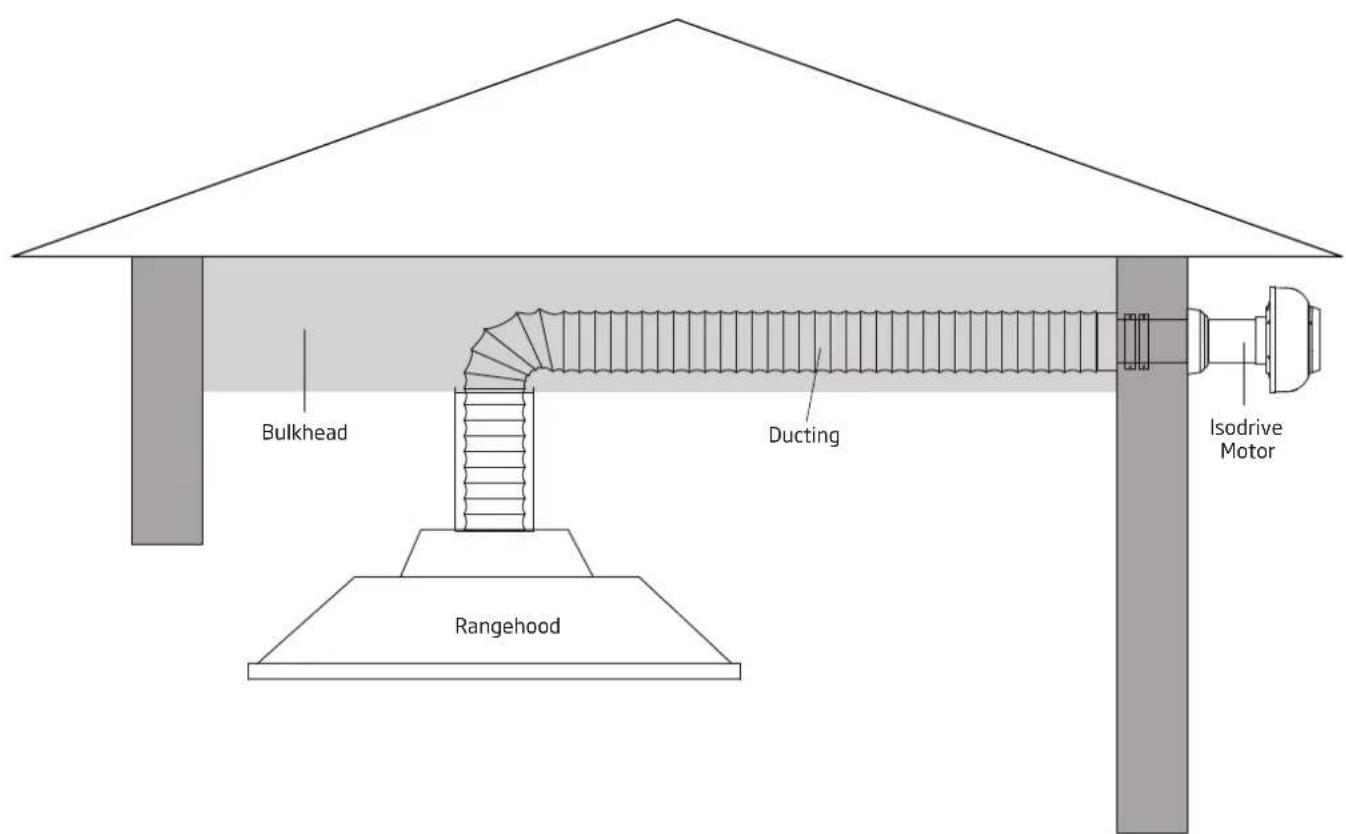
The Isodrive motor can optionally be installed mounted to a wall if a roof mount is not possible. The construction of a bulkhead is also recommended. The position of the motor can be to an external wall as shown above, or to the same external wall as the rangehood is mounted, as shown below.
For all wall installation options, please refer to the Isodrive® Motor manual. Avoid sharp bends and kinked ducting as this will affect extraction performance.

natural_image
Technical line drawing of a pipe system with a valve and support structure (no text or symbols)Top view for wall mounted installations on the same wall as the rangehood.
Before you contact the technical service department, make sure that the product is plugged in and electric wiring is connected. Weak air suction may be caused by back draft fins remaining closed.
- Do not take any action that will damage the product.

IMPORTANT
Never attempt to repair this appliance by yourself. Always refer to a qualified Service Technician.
| Check electric connection. Voltage of the electric network should be between 220 - 240V, rangehood should be connected to grounded plug and turned on. | Check motor switch. Please ensure that there is power to the rangehood and the rangehood is switched on. | Check light switch. Light switch should be at on position. | Check baffles. The baffles should be washed regularly, see baffle cleaning. | Lights should be firmly in position. | Check light bulbs. Make sure they are not broken or faulty. | Please make sure there is no obstruction in ducting or with the back draft fins. | Check the outlet, make sure it is not blocked and you have the correct diameter ducting installed. | Check Isodrive® installation manual, make sure the ducting is installed correctly, e.g. Length of ducting used, keep the ducting taut. | Check the ducting has not come off the rangehood outlet or has been eaten through by rodents. | |
| Rangehood does not work | X | X | ||||||||
| Light does not work | XXXXX | |||||||||
| Rangehood air exaction is weak | XXXXX | |||||||||
| Rangehood does not direct air out (through chimney) | X | X | ||||||||
| Loud noise from the rangehood | X | X |
Service
Lodging an Online Service Request
In the event that the failure is not due to the faults mentioned in the Troubleshooting section, you can lodge an online Service Request. To lodge an online Service Request, visit our website www.schweigen.com.au/service-and-warranty and click on the link and complete the service request form.
A service request will require the following information:
- The purchase date
- The rangehood model and motor type (e.g. Isodrive® 1600)
- The serial number or batch number (this number is on a sticker inside the rangehood).
- A copy of the purchase receipt (without a receipt your service request cannot be processed).
Alternatively, you can call Customer Service:
Australia 1300 881 693 or New Zealand 0800 200 510
8. Specifications
Dimensions
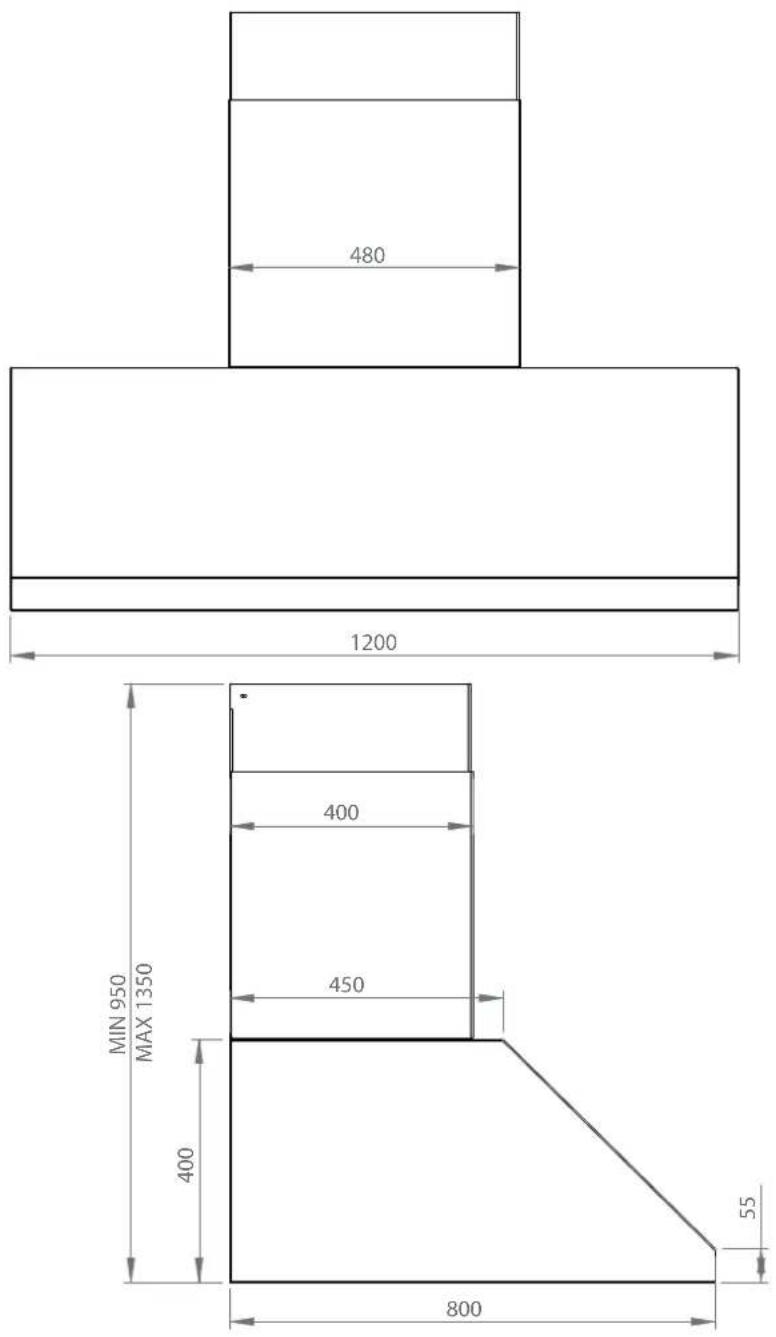
*All dimensions are in millimetres
Technical Specifications
| Model DBH1200S | |
| Feeding Voltage 220-240V 50Hz | |
| Light Power (W) 3 x 2.1W |
Disclaimer
Under our policy of continuous product development, product specifications may change without notice. Prospective purchasers should therefore check with the retailer to ensure this publication correctly describes the products being offered for sale. All information supplied is to be used for general reference purposes only and is on the understanding that Schweigen Home Appliances will not be liable for any loss, liability or damage of whatever kind arising as a result of any reliance upon such information. All pictures used in the guide are for illustrative purposes only.
Although our information and marketing states the term 'Silent' for certain models, the following applies to various models that are sold with certain Isodrive® Systems and baffle s. When a model with the larger motored Isodrive® System is operated at the higher speed/s air movement may be heard. For example, while operating on speed 4 & 5 (For 5 speed models) the rangehood may be audible due to the large amount of air movement moving through the .
* Please make sure that the rangehood and motor have been installed as per the corresponding instruction guides in order for optimal performance (the Isodrive® Motor Manual can be found with the Isodrive® Motor, or online at schweigen.com.au).
Schweigen Home Appliances has presented this information in good faith to all their retailers and distributors to convey before any/all purchase/s. Information is supplied upon the condition that the person/s receiving the information will make their own determination as to its suitability for their purpose/s prior to use. In no event will Schweigen Home Appliances be responsible for damages of any nature whatsoever resulting from the use of, or reliance upon, information from their website or the products to which the information refers.
DISPOSAL OF OLD APPLIANCES
Electronic waste (or e-waste) including kitchen appliances are banned from direct disposal to landfill. E-waste contains hazardous materials, which can harm the environment and human health. Valuable materials contained in e-waste are lost when appliances, computers and other household electrical goods are sent to landfill.
Recycle your e-waste to:
- reduce landfill
- protect the air and waterways from harmful materials
- minimise consumption of raw materials to produce electronic products
- reduce greenhouse gases created in the production of new materials.
Kitchen appliances including Rangehoods and Ovens can only be disposed at approved recycling centres. Visit www.recyclingnearyou.com.au/whitegoods for more information, or contact your local council or the store you purchased this appliance, for a list of approved recyclers.
schweigen
Australia Unit 4/1-5 Lake Drive, Dingley Village, Victoria 3172. Phone 1300 881 693
Email sales@schweigen.com.au Web www.schweigen.com.au
New Zealand 5 Tolich Place, Henderson, Auckland 0610. Phone 0800 200 510
Email info.parex@emerson.com Web www.parex.co.nz


- RANGEHOOD & INSTALLATION GUIDE
- DBH1200S
- Index
- Welcome 3
- Important Safety Information 4
- Description 7
- Operation 8
- Cleaning & Maintenance 10
- Installation 12
- Troubleshooting 21
- Specifications 22
- Disclaimer 23
- Please always retain your proof of purchase to aid in any warranty queries.
- Your State Regulatory Authority
- Important Safety Information
- WARNING
- DO NOT INSTALL THIS APPLIANCE IF YOU FIND IT DAMAGED.
- Before Installation
- Product Use
- Electrical Cord
- Rangehood
- Operation
- Remote Control
- Synchronisation of the Remote Control with the Rangehood
- Generating a New Transmission Code
- Cleaning & Maintenance
- Cleaning the Interior
- Cleaning the Exterior
- Replacing the Lights
- Baffles
- Please ensure the baffles are completely dry before placing them back in position and operating the rangehood.
- Installation
- Rangehood Size vs BBQ Size
- BBQ Installation
- Mounting Instructions - Outdoor/Alfresco
- Wall Mount Installation
- DANGER
- Step 1
- Step 2
- Faulty Installation
- Step 3
- Step 4
- IMPORTANT
- Ducting
- Please DO NOT crush or kink the ducting.
- Isodrive® Motor Setup
- Note
- Single Isodrive® Motor Installation
- Twin Isodrive® Motor Installation
- Optional Wall Mounted Motor Installation
- Service
- Lodging an Online Service Request
- Specifications
- Disclaimer
- DISPOSAL OF OLD APPLIANCES
- schweigen
Brand : Schweigen
Model : DBH1200S
Category : Range hood