
LIVE Connect LW2031AC1 - Security Camera Lorex - Free user manual and instructions
Find the device manual for free LIVE Connect LW2031AC1 Lorex in PDF.


| Product Type | Security Camera |
| Brand | Lorex |
| Model | LIVE Connect LW2031AC1 |
| Connectivity | Wi-Fi (2.4 GHz) |
| Video Resolution | 1080p (1920 x 1080) |
| Field of View | 110 degrees |
| Night Vision | Infrared up to 30 ft |
| Power Supply | DC 12V / 1A (adapter included) |
| Weatherproof Rating | IP65 |
| Dimensions (W x D x H) | 2.8 x 2.8 x 5.1 inches |
| Weight | 0.9 lbs (408 g) |
| Audio | Two-way audio with built-in microphone and speaker |
| Storage | MicroSD card up to 128 GB (not included) |
| Motion Detection | Active with push notifications |
| App Compatibility | Lorex Secure app (iOS & Android) |
| Mounting | Wall or ceiling mountable (bracket included) |
| Operating Temperature | -22°F to 122°F (-30°C to 50°C) |
| Certifications | FCC, CE, RoHS |
| Warranty | 1 year limited |
Frequently Asked Questions - LIVE Connect LW2031AC1 Lorex
User questions about LIVE Connect LW2031AC1 Lorex
0 question about this device. Answer the ones you know or ask your own.
Ask a new question about this device
Download the instructions for your Security Camera in PDF format for free! Find your manual LIVE Connect LW2031AC1 - Lorex and take your electronic device back in hand. On this page are published all the documents necessary for the use of your device. LIVE Connect LW2031AC1 by Lorex.
USER MANUAL LIVE Connect LW2031AC1 Lorex
This video monitor is compliant with all relevant standards regarding electromagnetic fields and is, when handled as described in the User's Guide, safe to use. Therefore, always read the instructions in this User's Guide carefully before using the device.
- Adult assembly is required. Keep small parts away from children when assembling.
- This product is not a toy. Do not allow children to play with it.
- This video monitor is not a substitute for responsible adult supervision.
- Keep this user's guide for future reference.
- Keep the cords out of reach from children.
- Do not cover the video monitor with a towel or blanket.
- Never use extension cords with power adapters.
- Only use the power adapters provided.
- Test the video monitor before use. Become familiar with its functions.
- Do not use the video monitor near water.
- Do not install the video monitor near a heat source.
- Only insert batteries/battery pack of the same type.
- Do not touch the plug contacts with sharp or metal objects.
- Only use the chargers and power adapters provided. Do not use other chargers or power adapters as this may damage the device and battery pack.
CAUTION
Risk of explosion if battery is replaced by an incorrect type.
- DISPOSE OF OR RECYCLE BATTERIES PROPERLY IN ACCORDANCE WITH APPLICABLE LAWS, which may vary by location.
- Insert batteries with the correct polarity.
- Do not mix new and used batteries.
- Remove exhausted batteries from the product.
- Keep all batteries away from children.
Using this product as a baby monitor
If you intend to use this wireless video monitor as a baby monitor, we advise you to take the following precautions to avoid possible injury to infants:
- DO NOT place baby audio and video camera monitors too close to cribs, bassinets, play yards and other safe sleep environments for infants.
- MAKE SURE all power adapter cords are out of arms reach of your infant. Keep them at least 3ft/1m away
- MAKE SURE baby audio and video camera monitors are on a stable footing so they cannot be easily knocked over
- Use the included cable clips to keep the power cord out of reach from infants and young children.
NOTE: These precautions are important even if your infant is not yet standing or mobile.

Table of Contents
Contents.... 1
System Requirements.... 2
Gateway Overview 3
Camera Overview 4
Handheld Monitor (LW2030 Series only).... 6
How the Gateway Works 16
Setting up the Gateway 18
Gateway Control Panel.... 31
Configuring Gateway menus 34
Appendix A: Enabling UPnP.... 43
Appendix B:
Troubleshooting the handheld monitor.... 45
Appendix C:
Replacing the handheld monitor battery.... 46
Notices 47
Contents
The system comes with the following components:

natural_image
Line drawing of a closed box with wavy top and bottom edges, labeled 'LOREX' at bottom (no other text or symbols)Gateway

Antenna

Camera*
natural_image
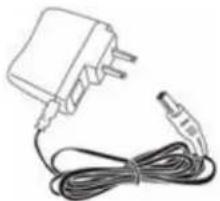
Simple line drawing of a battery with a cord and plug, no text or symbols presentCamera & Handheld monitor power adapter x2

Gateway power adapter

microSD card

microSD card adapter

Handheld monitor
The handheld monitor is included with the LW2030 Series only.
Additional Contents
- Network cable
- Instruction manual
- Quick Start Guide
*Number of cameras and accessories may vary.
CHECK YOUR PACKAGE TO CONFIRM THAT YOU HAVE RECEIVED THE COMPLETE SYSTEM, INCLUDING ALL COMPONENTS SHOWN ABOVE.
System Requirements
Your system must meet the minimum system requirements.
PC Requirements
- Skype for Windows version 4.2 and above
- Windows 7, Windows Vista, Windows XP SP3
• 1 GHz or greater processor
Mac
• 1GHz Intel processor
• Mac OS 10.6 or later (Intel processors only)
• 100 MB free disk space.
- Either USB or regular headset if your Mac does not have a built-in microphone.
iPhone, iPad, iPod touch Requirements
- Skype for iPhone 3.0 and above
- iPhone 4 / 3GS (iOS 4.0 and above)
- iPod touch (3rd generation and above)
- iPad (1st generation and above)
General requirements
• High-speed broad connection of 512kbps down/128kbps up and a computer
• Home network with router
For further details, visit www.skype.com.
Gateway Overview

Front View

Rear View
1 Antenna: Transmits the video signal to the camera.
2 On/Off button: Press to turn the Gateway on or off.
3 mi croSD card slot: For future use.
4 Cam era LED indicators:
- S: Glows to indicate the Gateway is connected to Skype.
- 1\~4: Glows to indicate the camera that is connected.
5 Powe r Port: Connect a power adapter to the power port.
6 Ethe rnet port: Connect an ethernet cable from your internet router to the Gateway's ethernet port.
7 Reset port: Res tores the Gateway settings to factory defaults. Use a paperclip, and gently press and hold the Reset port for 10 - 15 seconds to reset the unit.
Camera Overview
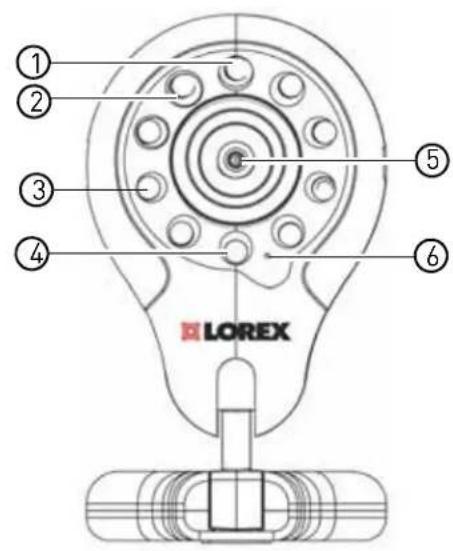

1 Status LED: Glows green to indicate camera is active. Glows red if camera is inactive. Flashes red to indicate low battery power.
2 Ch arguing LED: Glows red to indicate camera is charging.
3 Infrared LEDs: Allows the camera to view in the dark. Glows red during night time viewing.
4 Light Se nsor: Detects the light level in the room to automatically turn on/off the night time LEDs.
5 Cam era lens
6 Mi crophone
7 A C adapter port: Connects to the included AC adapter to charge the camera.
8 ON/OFF Switch: Tu rns camera on/off.
Charging the camera

AC adapter port
To charge the camera:
1 Plug the AC power connector from the power adapter into the AC adapter port on the camera.
2 Connect the power adapter to a power outlet.
3 The charging LED glows red to indicate the camera is charging.
NOTE: The Status LED on the camera flashes when there is approximately 30 minutes of battery life left. Charge the camera for 6 consecutive hours to charge completely.
NOTE: Only use the included power adapter to charge the camera.
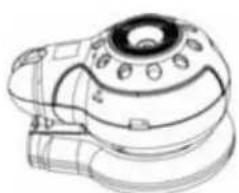
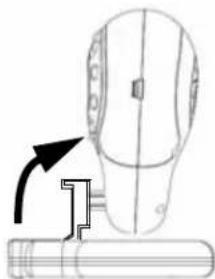
Adjusting the camera
- Place the camera in a location where it cannot be easily reached or knocked over
- Place the camera on a flat surface (i.e. table).
- Proceed to step 3 to improve camera balance when positioning on a flat surface
• The camera head swivels 360 degrees
Table top setup
natural_image
Line drawing of a mechanical device with no visible text or symbolsStep 1

natural_image
Diagram of a medical device with an arrow indicating rotation or change (no text or symbols present)Step 2
natural_image
Diagram of a mechanical assembly with a cylindrical component and an arrow indicating motion (no text or symbols)Step 3
Handheld Monitor (LW2030 Series only)
The handheld monitor allows you to view video and listen to audio transmitting from the camera. You can view up to four connected cameras, one at a time.
NOTE: The handheld monitor has priority over a user connecting to the Gateway. When a user attempts to connect to the Gateway, a message on the handheld prompts you to accept or decline the incoming user.

How it works


The camera securely transmits video and audio to the handheld monitor. You can view up to 4 connected cameras, one at a time.
Charging the handheld monitor
Before connecting to the camera, it is recommended to charge the handheld monitor for 6 consecutive hours to ensure a full charge on the battery.
To charge the handheld monitor:
1 Con nect the power adapter to the handheld monitor. Connect the other end of the power adapter to a power outlet.

Connecting to the camera
To connect to your camera:
1 Tu rn on a camera.
2 Pr ess the power button on the handheld monitor. The camera image should automatically appear.

NOTE: If you have more than one camera, you must pair them to the handheld receiver. See page 8 for details.
Pairing
By default, the camera is pre-paired to channel 1 on the handheld monitor. If you purchase additional cameras, you will have to pair them to the handheld monitor. You can pair a maximum of 4 cameras.
To pair a camera to the handheld monitor:
1 Tu rn off the camera that you wish to pair.
2 S elect the channel that you wish to pair up the camera by pressing 1, 2, 3 or 4 on the handheld monitor. Place the camera that you wish to pair one feet apart from the handheld receiver.
![Channel buttons [1~4] Place 1 ft apart](/content/2026/06/1249119/images/e9b51ab99931513375d0594442270b2d5b08be59569cbc532468f1fdda6f9a4a.jpg)
3 Pr ess the Menu button on the monitor.

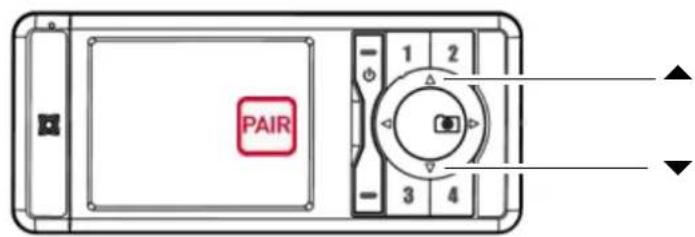
4 Press ▲ or ▼ and select Pair, and then press the OK button.

5 Turn on the camera and wait 15 seconds for the camera to pair up. When the camera has been successfully paired with the monitor, a "Device Found" message appears.
Interface Overview

Reading the battery indicator

Reading the signal indicator

Changing camera views
To change between cameras:
1 Pr ess 1,2,3 or 4 to view the desired camera.
![Channel buttons [1~4]](/content/2026/06/1249119/images/6e3081c629d4a308223933563a89cbc074cd4d042546ac99db1462674c1839b8.jpg)
Adjusting the volume
You can listen to audio captured by the camera.
To adjust the handheld monitor volume:
1 Pr ess ▲ or ▼ to increase or decrease the volume.
Adjusting monitor brightness
To adjust the monitor brightness:
1 Pr ess the Menu button
2 Pr ess ▲ or ▼ and select
3 Pr ess ◀ or ▶ to select the desired brightness level.

natural_image
Front view of a device control panel with a red square icon and numbered buttons (no text or symbols)Configuring the Power Save feature
Power Save mode allows the monitor display to be turned off while continuing audio monitoring. This allows you to conserve battery power for extended handheld monitor operation. You will still be able to listen to your cameras during Power Save mode. Press any button to turn the display back on.
To enable Power Save mode:
1 Pr ess the Menu button.

3 Pr ess ◀ or ▶ to change the duration of how long the monitor display remains on before turning off.
4 Pr ess the Menu button to exit and save your settings.
After the selected duration (i.e. 15 seconds), the monitor's display turns off. The monitor will continue to broadcast audio. Press any button on the monitor to turn on the display. The displays shuts off after the pre-set period of time.
Taking a picture
The Snapshot function lets you take pictures of what you see on screen. The pictures are stored on a microSD memory card. See label on product box for microSD card size. Note that one (1) microSD card is included.
To take a picture:
1 Select the desired channel you want to take a Snapshot picture from by pressing 1, 2, 3, or 4 on the monitor.
2 Pr ess the ▶ / ( ) button to take a picture.
- A icon momentarily appears on the display when a picture is being taken.

Recording live video
You can record live video onto a microSD card.
To record live video:
1 Press and hold the ▶ / ( [IMAGE] ) button until a timer appears in the top-left corner of the screen.
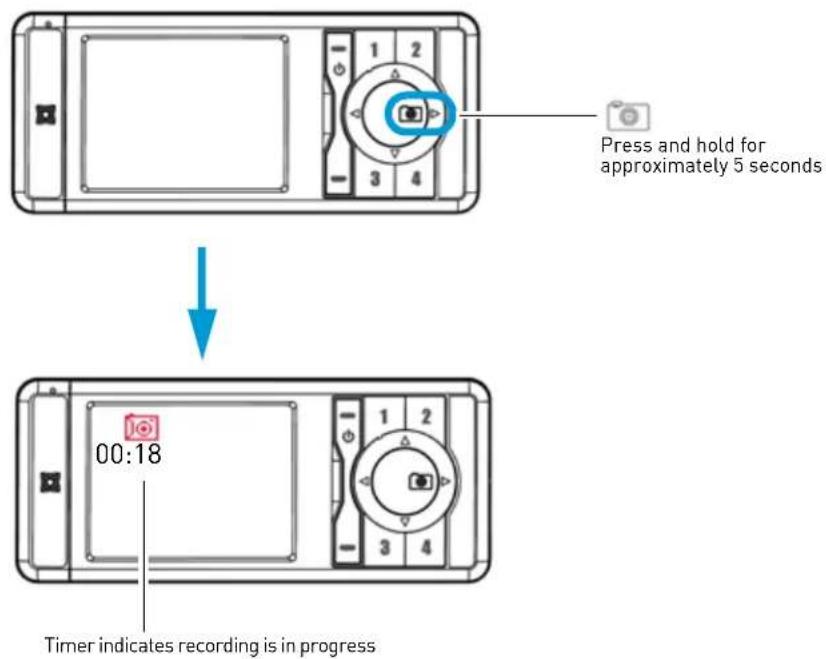
2 Press and hold the ▶ / ( ) button to stop recording.
Viewing pictures and videos on your handheld monitor
You can view images and videos recorded on your handheld monitor.
To view pictures or video on your handheld monitor:
1 Pr ess the Menu button.
2 Select Memory ( MEMORY ), and press the OK button.

3 Press ◀ or ▶ to select a desired video or image to view.
• Videos will have a time stamp on the top left corner.

- Pictures will display the order that the picture was taken (e.g. Picture 1 is 1/1, picture 2 is 2/2 etc.)

4 If vie wing video, press the OK button to begin playback.
Inserting or removing the microSD card
To insert a microSD memory card:
1 Orient the microSD card as shown below. Push the microSD card into the slot until the card clicks into place.
NOTE: The microSD card goes in one way only. Do not force the microSD card into the slot.

To remove a microSD memory card:
1 Pr ess the microSD card with a small, rigid object (i.e. paper clip or finger nails). The microSD card should eject from the slot.

Retrieving images and videos
To retrieve images or videos from the microSD card:
1 Remove the microSD card from the monitor by pressing on the microSD card with a small, rigid object (i.e. paper clip or finger nails).
2 Insert the e microSD card into a memory card reader (not included) that is connected to your computer. An SD memory card adapter is included in case the microSD card is not compatible with your memory card reader.

natural_image
Diagram showing a card slot with an arrow pointing to it, no text or symbols presentUse the included SD card adapter if your memory card reader does not support microSD memory cards.
3 On your computer, browse for the memory card directory and locate the folder named LOREX.
4 Doubl e-click the LOREX folder to access your pictures or videos.
How the Gateway Works
Overview
Your computer or mobile device connects to the Skype server. The Skype server connects to your home router. Your home router connects to the Gateway, which captures video from the camera.

flowchart
graph LR
    A["Laptop"] --> B["Skype server"]
    B --> C["Home Router"]
    C --> D["Gateway"]
    D --> E["Camera"]
Overview: Connecting to the Gateway
To connect to the Gateway, you will need two Skype accounts.
- You will need a "Personal" Skype account—this is where you typically have your friends and family in the Skype contact list.
NOTE: If you are already a Skype user, you will already have a "personal" account.
- You will need a "Gateway" Skype account. The Gateway Skype account is specifically for the Gateway.
Step 1: Create Skype Accounts
"Personal" Skype Account

"Gateway" Skype Account
Step 2: Add the Gateway to your "Personal" Skype account's contact list


Step 3: Call the Gateway to view video.
Basic Setup
Step 1: Connect the Gateway
1 Scr ew the antenna clockwise onto the antenna jack on the Gateway until it is secure.
2 Con nnect the power cord and ethernet cable to the Gateway. Connect the other end of the power cord to a power outlet. Connect the other end of the ethernet cable to your internet router.
3 Press the power button on the Gateway to turn it on.

Step 2: Power on the Camera
1 Con nnect the power cable to the camera's AC adapter port. Connect the power adapter to a power outlet.

2 Slide the power switch to the ON position.

Setting up the Gateway
Pre-requisites
- Connect the Gateway to your local router.
- Make sure UPnP is enabled if you run Windows XP or Windows Vista. For details, see "Appendix A: Enabling UPnP" on page 43.
Step 1: Log in to the Gateway
Once you have connected the Gateway to your network, you can browse the Gateway on your Local Area Network (LAN). Note that if you are on a PC, your operating system must have UPnP enabled.
Windows 7 / Vista
1 Click Start ( )→Computer→Network.
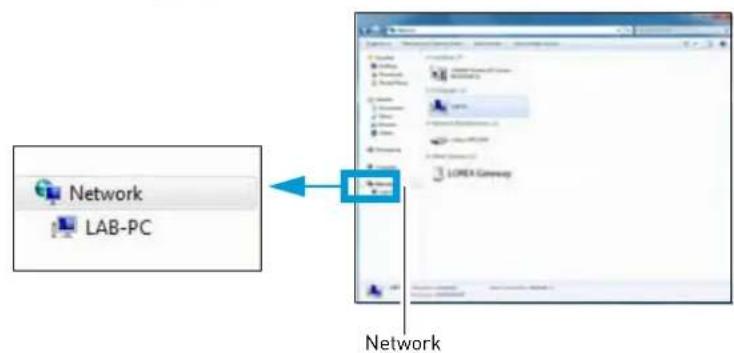
2 Under "Other Devices", double-click LOREX Gateway ( ).

Windows XP
1 Double-click the My Network Places icon on the desktop (MyNetworkPlaces).
2 Doubl e-click on the LOREX Gateway icon ( ).

Mac
1 Launch Safari.
2 Cl ick the Open all bookmarks button ( [ ] .

3 Click Bonjour on the left column. Double-click the LOREX Gateway icon.

Step 2: Assign a Skype account to the Gateway
1 In the Time zone drop-down menu, select your local time zone and click Next.
NOTE: If you cannot find your region's time zone, select a city with the identical time zone as your own.

2 Click Don't have a Skype Name?

3 Fill in the appropriate fields. Write down your Gateway information. You will need this information to complete the setup process.

Gateway Skype Account Information
E-mail:
Skype Name:
Password:
4 Click Next to continue.
- If your name has been taken, the Gateway prompts you to re-enter another user name.
NOTE: Your user name and password must contain letters and numbers.
5 If you have an existing Skype Account:
OPTIONAL: If you plan to control multiple cameras, please download the Lorex Gateway Control Panel Software (PC only). Mac users: to control multiple cameras, please see "Changing camera view" on page 28.
Note that you cannot view cameras in quad mode.

a. Click Next. A confirmation window appears. Click Next to continue.


If you DO NOT have a Skype Account:
a. Click to download one of the following:
- Skype (Windows): Click to download the latest version of Skype for PC.
- Skype (Mac): Click to download the latest version of Skype for Mac
OPTIONAL: If you plan to control multiple cameras, please download the Lorex Gateway Control Panel Software (PC only). Mac users: to control multiple cameras, please see "Changing camera view" on page 28.
Note that you cannot view cameras in quad mode.

a. Click Next. A confirmation window appears. Click Next to continue.
ATTENTION: Users of Internet Explorer 9 (IE9) may experience security measures when downloading the pop-up software. When attempting to Run or Save the software, IE9 will warn you of security risks to your PC. Click Actions → More Options → Run Anyway.

6 Locate the setup file(s) you downloaded on your computer's desktop. Double-click the file, and follow the on-screen instructions to install the software.
NOTE: Install Skype before installing the Gateway Control Panel software.
If you have a Skype account already:
- Go to page 26.
If you do not have a Skype Account:
Create a personal Skype account (this is different from your Gateway account).
To create a personal Skype account:
1 Launch Skype.
2 Click Don't have a Skype Name?

3 Follow the on-screen instructions to create your personal Skype account. Upon account creation, you will automatically be logged in to Skype.

Personal Skype Account Information
Email:
Skype Name:
Password:
4 Click Add a contact.
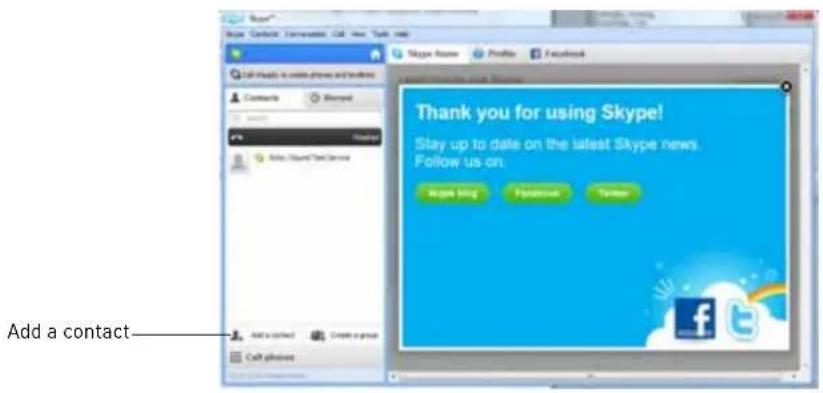
5 Enter your Gateway account's Skype name or email recorded in page 21, and click Add. This will send a friend request from your Personal Account to the Gateway account.

6 Click Skype→Signout to log off.
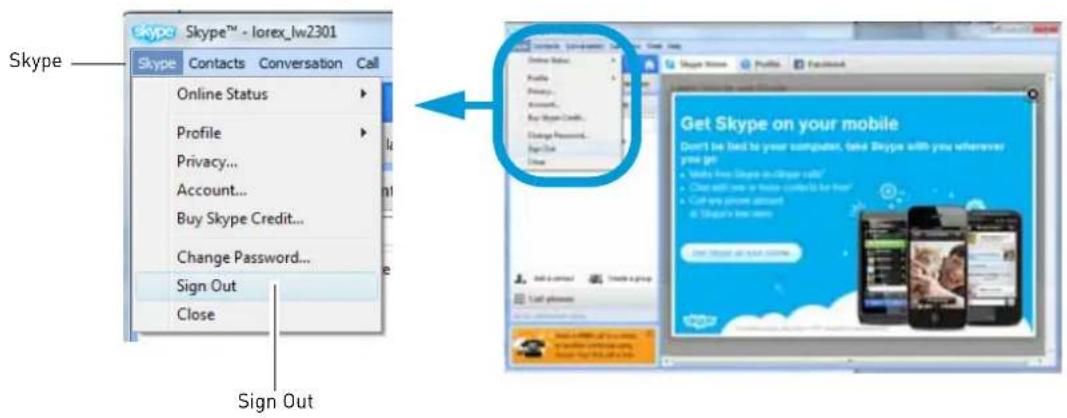
7 Log-in to your Gateway Account, using the information recorded on page 21.

8 Cl ick Contact Request, then click Add to Contacts to accept the friend request from the Gateway.
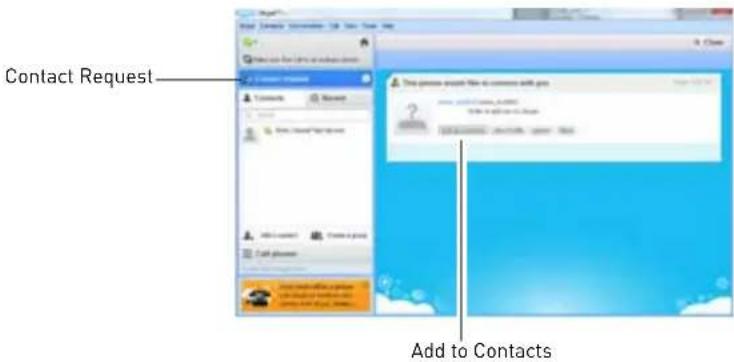
9 Click Skype→Signout to log off your Gateway account.

10 Log in to your Personal Skype account using the information recorded on page 23.
11 Next, see "Step 3: Call your Gateway" on page 27.
If you have a Skype Account:
1 Log-in to your Gateway Account, using the information recorded on page 21.
2 Cl ick Add a contact.
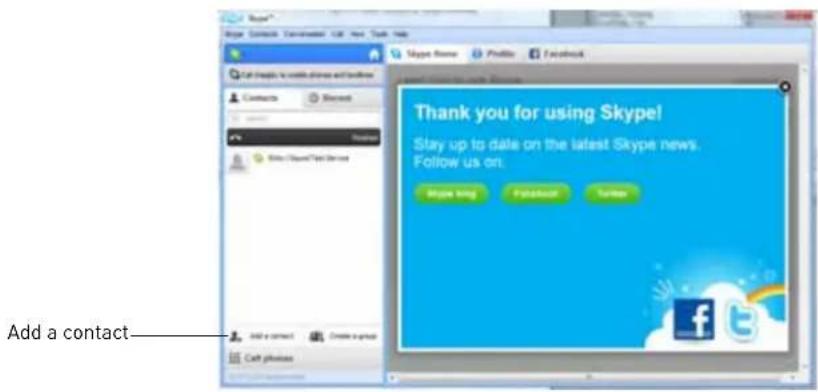
3 Enter your Personal Skype account's email address or Skype name. Click Add.

Send a friend request from the Gateway account to your personal account.
4 Click Skype→Signout to log off.
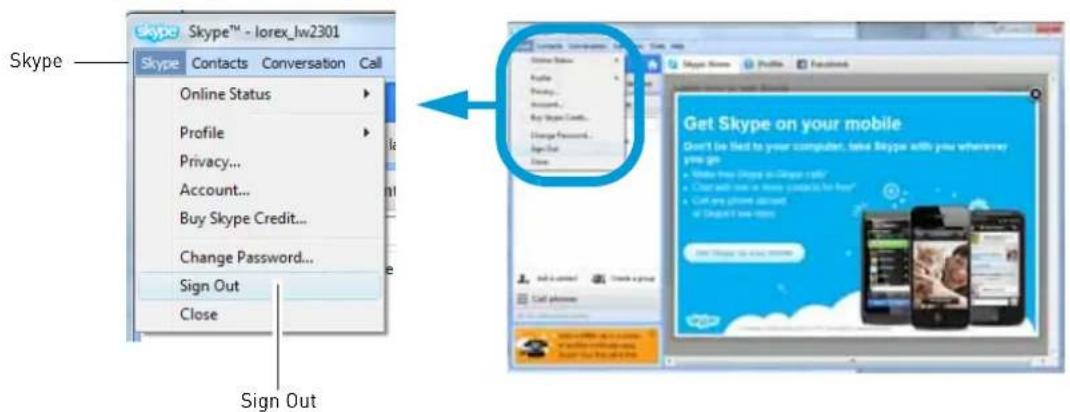
5 Log in to your Personal Skype account.
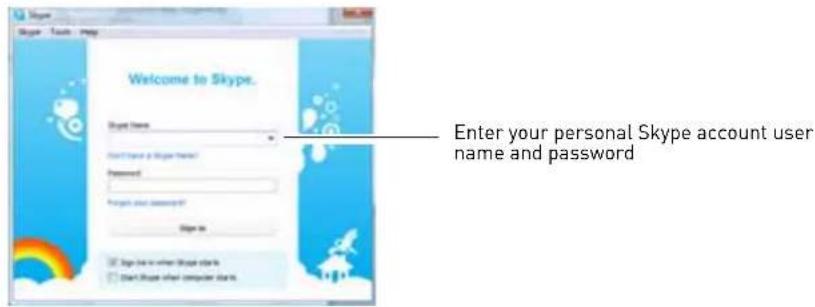
6 Next, see "Step 3: Call your Gateway" on page 27.
Step 3: Call your Gateway
You're now ready to make your first call!
Pre-requisite:
- Log in to your Personal Skype account.
To connect to the Gateway:
1 From your Personal Skype account, right-click on the name of your Gateway on the contact list, and click Call.
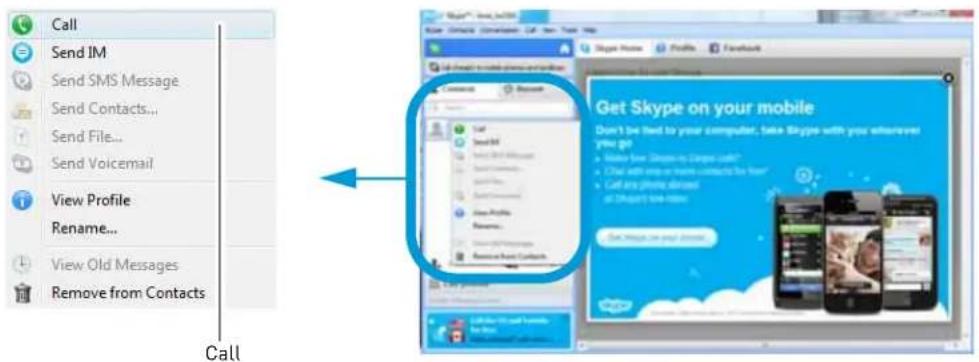
• Live video appears in the Skype window.
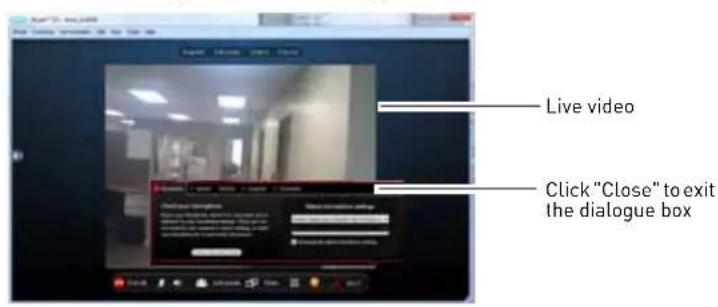
Image Pixilation
During the initial connection, the images may appear pixilated, and unclear. The image improves after a few seconds.
This is normal, and is caused by the system configuring the bandwidth settings.
Changing camera view
If you have multiple cameras connected to the Gateway, you can change the camera view manually (Mac and PC), or by using the Gateway Control Panel software (PC only). For details, see "Gateway Control Panel" on page 31.
To change cameras using the chat menu:
1 Right-click on the video window, and click Send IM.
2 In the instant message chatbox, type cam2 and press enter to change to camera 2, cam3 to change to camera 3 etc.
NOTE: "cam1" is typed as one word with no spaces.

Mobile Viewing on the iPhone/iPad
Go to www.lorextechnology.com for the latest device compatibility list.
- iPhone users: Download the "Skype" app from the App store
- iPad users: Download the "Skype for iPad" app from the App store
To change camera view on the iPhone:
1 Log in t o Skype using your Personal account.
2 T ap the name of the Gateway

3 Tap Chat.

4 Type Cam1 for camera 1, Cam2, for camera 2 etc. Next, tap Send.
NOTE: There are no spaces when typing Cam1, Cam2 etc.

5 Tap Done, and then Tap Contacts.

6 Tap Call to connect to the camera.
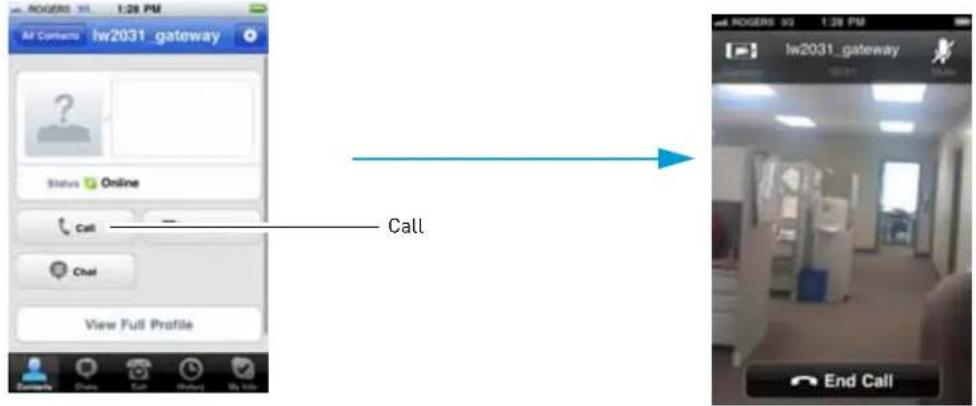
NOTE: You may see a "Stopped sending video" message. This is normal.

7 To change camera view, tap End Call, and repeat steps 3\~6.
Changing camera view on the iPad:
1 During live e view, tap the button to open the chat window.
2 Type "Cam2" (with no quotations or spaces) to change to camera 2; "Cam3" for camera 3 etc.
3 Ta pSend. Wait for the camera to change.

Type cam2 to switch to camera 2, cam3 for camera 3 etc.
Gateway Control Panel
What is the Gateway Control Panel?
The Gateway Control Panel is a software that allows you to:
- Change camera view when connected to multiple cameras
Pre-requisites
• Install Skype on your computer
- Download the Gateway Control Panel during the initial Gateway setup. For details, see page 22.

Gateway Control Panel
To install the Gateway Control Panel:
1 Doubl e-click on the Gateway Control Panel setup file on the desktop ( )
2 F follow the on-screen instructions to install the Gateway Control Panel (Lorex Video Plug-in).

Initial Setup
1 Log-in to Skype using your Personal account.
2 Doubl e-click the Lorex Video icon on the desktop (LorexVideo).
3 Cl ick the Allow access button.
• The Gateway Control Panel appears.
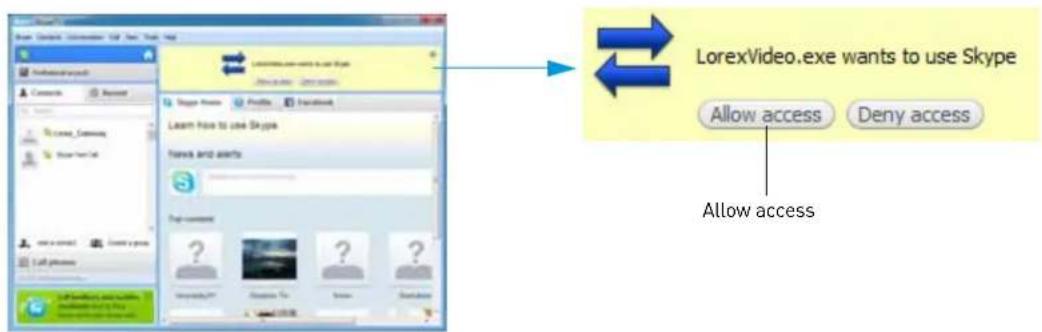
4 Click to open the account management window.
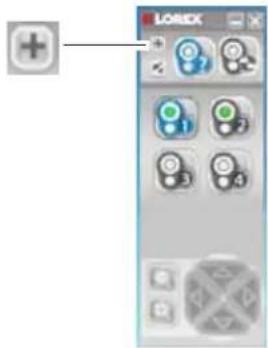
5 Select the checkbox beside the Gateway's Skype name, and click OK. This allows the Gateway Control panel to automatically "pop-up" when Skype launches.
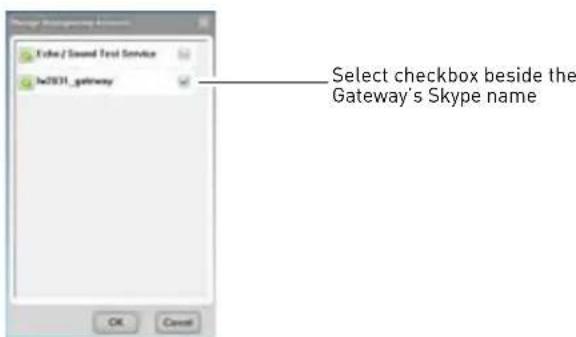
6 Right-click on the name of your Gateway, and click Call to connect to your camera.

Gateway Control Panel Overview
Use the control panel to change cameras.
![LOREX Add accounts to control panel Pair Change camera [For future use] Colored icon indicates camera is online Greyed-out icon indicates camera is offline](/content/2026/06/1249119/images/7909bb24896898148e85732ee9b70bb3bc523afca0e956f3656df98c1bfcc797.jpg)
To change camera view:
1 Cl ick the buttons to change between cameras 1\~4.
NOTE: When changing channels, the live view window temporarily closes, and opens again. This is normal.
Configuring Gateway menus
The Gateway menu allows you to configure different Gateway menus and options.

To connect to the Gateway menu on a PC:
1 Click Start ( )→Computer→Network.
2 Under "De vices", double-click LOREX Gateway ( ).
3 Enter admin in the username and password fields. Click Log-in.
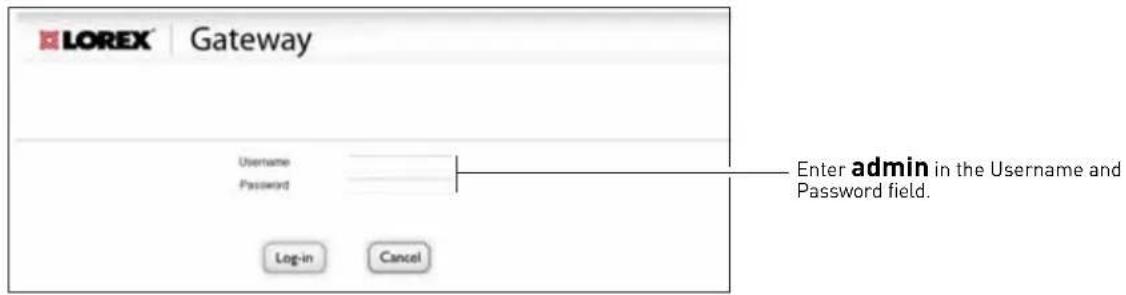
4 Click Advance to enter the setting menu.

To connect to the Gateway menu on a Mac:
1 Launch Safari.
2 Cl ick the Open all bookmarks button ( ).
3 Cl ick Bonjour on the left column. Double-click the LOREX Gateway icon.
4 Enter admin in the username and password fields. Click Log-in.
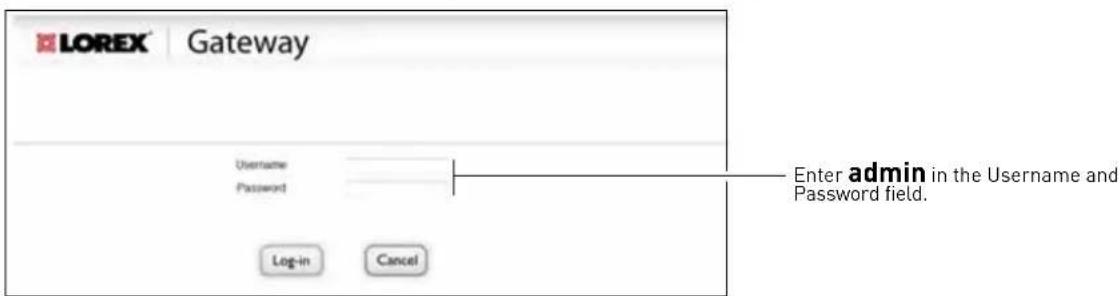
5 Click Advance to enter the setting menu.

Signing-on & Signing-off the Gateway
To sign-on / sign-off the Gateway:
1 Cl ick the Camera tab (selected after initial login).
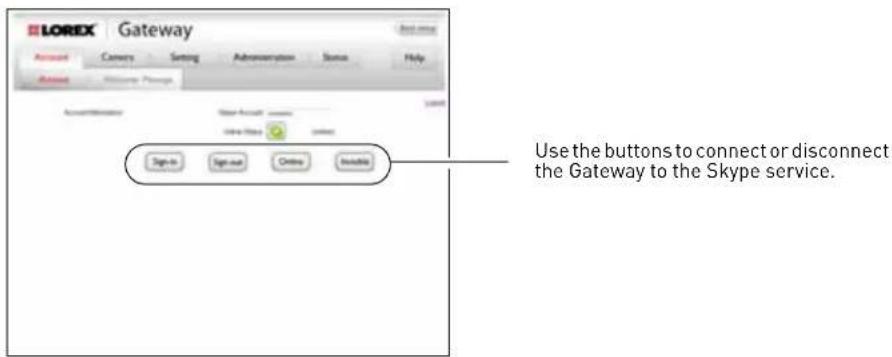
2 Cl ick the following:
- Sign-in button: Click Sign-in to log in to Skype. This allows you to connect to your Skype Gateway Remotely.
- Sign-out button: Click Sign-out to log off of Skype. When you are logged off of Skype, you will not be able to connect to the Gateway Remotely.
- Invisible button: Click to make your Gateway status appear as offline to others. You will still have access to the Gateway when you are in Invisible mode. To go back online, click the Online button.
Changing the welcome message
You can change the initial welcome message when you first connect to your cameras. This welcome message appears when you log in to the Gateway through Skype.
To change the welcome message:
1 Cl ick on Account→Welcome Message.
2 Enter your welcome message in the text box.

3 Cl ick Save to update your changes.
Changing the camera name
To change the camera name:
1 Cl ick the Camera tab.
2 Under the "New Camera Name" fields, enter the desired camera name.

3 Click Save update the camera names.
Changing the default camera
You can change the default camera that appears when you connect to the Gateway.
To assign the default camera:
1 Cl ick the Camera tab.
2 Under "Default", select the checkbox beside the camera that you wish to appear when you first connect to the Gateway.

3 Click Save.
Pairing additional cameras
By default, the camera comes pre-paired with the Gateway. If you purchase additional cameras, you must pair them to the Gateway.
Pre-requisites:
- Ensure the camera has power, and is turned on.
- Camera must be within 1 foot of receiver during pairing process.
To pair additional cameras:
1 Cl ick the Camera tab.
2 T urn on the camera that you wish to pair.
3 Under "Default", select the checkbox beside the channel that you wish to pair the camera to.

4 Click the Pairing button. When the camera icon glows green ( ), the camera has been paired. When viewing cameras within Skype, type the following within the message box: "Cam1" to change to camera 1, "Cam2" to change to camera 2 etc.
NOTE: Adding cameras through the Gateway automatically adds the camera to the handheld monitor.
Changing the time and time zone
To change the Gateway's time and time zone:
1 Cl ick the Setting tab.
2 In the "Time/Zone" drop-down menu, select your local time zone. Click Save to update your Gateway's time.

Changing the Gateway Log-in Password
To change the log-in password for the Gateway:
1 Log-in to the Gateway, and click the Administrator tab.

My new password:
2 Enter your new password in the "New Password" field.
3 Re-ent er your new password in the "Confirm New Password" field.
4 Cl ick Save to update your Gateway password.
Restoring Factory defaults
Restoring the Gateway to factory defaults deletes your custom settings, and restores the default settings. You will have to re-enter all your settings after restoring the Gateway to factory defaults.
To restore factory defaults:
1 Cl ick Administration→Factory defaults.

2 Click the Restore Factory Defaults button.
3 W ait for the Gateway to restart. This may take several minutes.
Upgrading the firmware
Upgrading the firmware improves product stability, and may introduce new features.
Pre-requisites
- Search for the Gateway (LW2031) product page on www.lorexcctv.com
- Download and extract the latest firmware to your computer
To upgrade the Gateway's firmware:
1 Cl ick Administration→Firmware Upgrade.
2 Click Browse, and locate the firmware file on your computer.
NOTE: The firmware file ends in a .bin extension.

3 Cl ick Apply to start the firmware upgrade. The firmware takes several minutes to upgrade. Do not turn off the Gateway during the firmware update process.

4 Wait for the Gateway to return to the log-in window. Once you see the log-in window, the firmware update is complete.
Viewing system status
To view the Gateway system information:
1 Cl ick the Status tab.

Help Menu
To view the Gateway's Help menu:
1 Click the Help button.

Basic Setup
You can re-assign a new Gateway Skype name, or go through the basic installation of the Gateway using the Basic setup menu.
To open the Basic setup menu:
1 Cl ick the Basic setup button.

Appendix A: Enabling UPnP
About UPnP
UPnP (Universal Plug and Play) allows your Windows operating system to automatically detect new devices connected to the network.
In order for your network to detect the Gateway once it is connected to your router, UPnP must be enabled. If you run Windows XP or Windows Vista, you may have to enable UPnP if your network isn't detecting the Gateway.
Enabling UPnP on Windows XP

1 Double-click the My Network Places icon on the desktop (mynetworkplaces).
2 Click Show icons for networked UPnP devices.
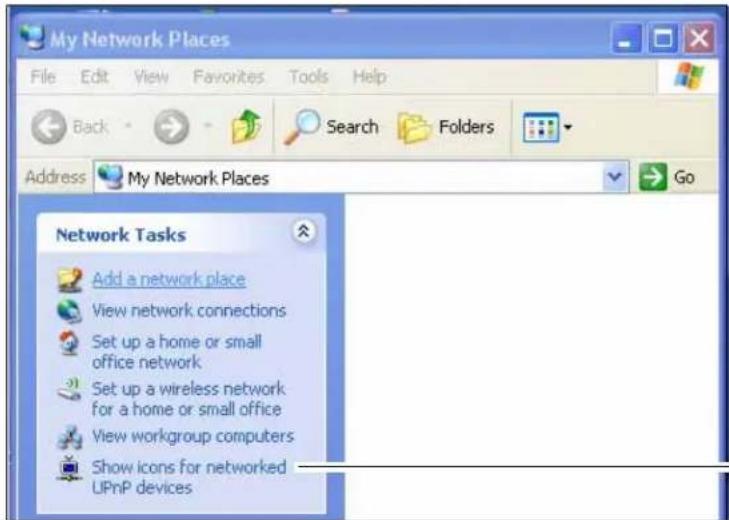
Show icons for networked UPnP devices.
3 F follow the on-screen instructions to complete the UPnP process.
Enabling UPnP on Windows Vista
By default, UPnP is turned off in Windows Vista.
To enable UPnP on Windows Vista:
1 Cl ick Start (

)→Control Panel→Network and Sharing Center( Sharing Center ).
2 Click to open the Sharing and Discovery menu.


3 Click Turn on network discovery and then click Apply.
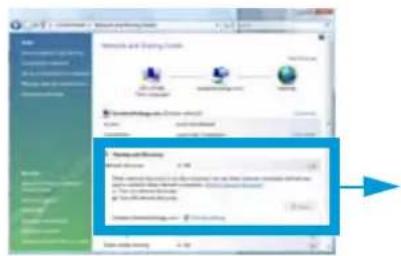

Appendix B:
Troubleshooting the handheld monitor
No video displayed on the monitor
- Ensure the monitor is powered on (check for green power LED on monitor).
- If the power LED is off:
- Press and hold the button for 5 seconds to power on the monitor.
- Recharge the battery in the monitor.
- Reset the monitor and camera by removing the battery from the monitor. Turn the camera power off. Wait for 60 seconds and power the units back on.
- If the power LED is on:
- The monitor may be in Power Save mode. Press any button to turn on the display.
- If the power LED is blinking
- The monitor is charging. Press the button to turn on the monitor.
The camera and monitor are not detecting each other
- Ensure you have selected the correct camera channel.
- Make sure the camera is turned on.
- Make sure the camera is charged.
- The camera and monitor may be out of range. Move the monitor and camera closer together.
Feedback/Squealing noise coming from the monitor
- Your camera and monitor may be too close. Move them further apart.
- Make sure the monitor and camera are not near televisions, computers, cordless/mobile phones or other electrical equipment.
Appendix C:
Replacing the handheld monitor battery
To install the monitor battery:
1 Slide the cover off of the back of the monitor.
2 Align the metallic contact points on the battery with the metallic contact points on the monitor by
ensuring the ⊙ ⊕ symbols are shown in the bottom right corner.
3 Pr ess down on the battery so it is held firmly in place inside the compartment.
4 Replac e the cover on the monitor.
The monitor automatically turns on once the battery is inserted. It is recommended to charge the monitor before use.
NOTE: Remove battery during long periods of non-use.

Notices
FCC Notice
This device complies with Part 15, subpart C, of the FCC Rules. Operation is subject to the following two conditions: (1) this device may not cause harmful interference, and (2) this device must accept any interference received, including interference that may cause undesired operation. The manufacturer is not responsible for any radio or TV interference caused by unauthorized modifications to this equipment. Such modifications could void the user's authority to operate the equipment.
However, it is imperative that the user follows the guidelines in this manual to avoid improper usage which may result in damage to the unit, electrical shock and fire hazard injury. In order to improve the feature functions and quality of this product, the specifications are subject to change without notice from time to time.
IC Notice
This device complies with Industry Canada license-exempt RSS standard(s).
Operation is subject to the following two conditions: (1) this device may not cause interference, and (2) this device must accept any interference, including interference that may cause undesired operation of the device.
Cleaning and Disposal
Cleaning
Clean the monitor and camera with a slightly damp cloth or an anti-static cloth. Never use cleaning agents or abrasive solvents.
- Do not clean any part of the product with cleaners with thinners or other solvents and chemicals. This may cause permanent damage to the product which is not covered by the Warranty. When necessary, clean it with a damp cloth.
- Keep your camera and monitor away from hot, humid areas or strong sunlight, and do not get it wet.
- Every effort has been made to ensure high standards of reliability for your video monitor. However, if something does go wrong, please do not try to repair it yourself. Contact Customer Service for assistance.
Disposal of the device
At the end of the product life-cycle, you should not dispose of this product with normal household waste, but take the product to a collection point for the recycling of electrical and electronic equipment.
The symbol on the product, user's guide and/or box indicates this. Some of the product materials can be re-used if you take them to a recycling point.
By reusing some parts or raw materials from used products you make an important contribution to the protection of the environment.
Please contact your local authorities in case you need more information on the collection points in your area. Dispose of the battery pack in an environmentally-friendly manner according to your local regulations.
Notices
LIVE CONNECT LW2020/LW2030 SERIES
Version 2.0
www.lorextechnology.com
- CAUTION
- Using this product as a baby monitor
- Table of Contents
- Contents
- Handheld monitor
- Additional Contents
- System Requirements
- PC Requirements
- Mac
- iPhone, iPad, iPod touch Requirements
- General requirements
- Gateway Overview
- Camera Overview
- Charging the camera
- To charge the camera:
- Adjusting the camera
- Table top setup
- Handheld Monitor (LW2030 Series only)
- Charging the handheld monitor
- To charge the handheld monitor:
- Connecting to the camera
- To connect to your camera:
- Pairing
- To pair a camera to the handheld monitor:
- Changing camera views
- To change between cameras:
- Adjusting the volume
- Adjusting monitor brightness
- To adjust the monitor brightness:
- Configuring the Power Save feature
- To enable Power Save mode:
- Taking a picture
- To take a picture:
- Recording live video
- To record live video:
- Viewing pictures and videos on your handheld monitor
- To view pictures or video on your handheld monitor:
- Inserting or removing the microSD card
- To insert a microSD memory card:
- To remove a microSD memory card:
- Retrieving images and videos
- To retrieve images or videos from the microSD card:
- How the Gateway Works
- Overview
- Overview: Connecting to the Gateway
- Basic Setup
- Step 1: Connect the Gateway
- Step 2: Power on the Camera
- Setting up the Gateway
- Pre-requisites
- Step 1: Log in to the Gateway
- Windows 7 / Vista
- Click Start ( )→Computer→Network.
- Under "Other Devices", double-click LOREX Gateway ( ).
- Windows XP
- Step 2: Assign a Skype account to the Gateway
- Gateway Skype Account Information
- If you have an existing Skype Account:
- If you DO NOT have a Skype Account:
- If you have a Skype account already:
- Personal Skype Account Information
- Click Add a contact.
- Enter your Gateway account's Skype name or email recorded in page 21, and click Add. This will send a friend request from your Personal Account to the Gateway account.
- Click Skype→Signout to log off.
- If you have a Skype Account:
- Step 3: Call your Gateway
- Pre-requisite:
- To connect to the Gateway:
- Image Pixilation
- Changing camera view
- To change cameras using the chat menu:
- Mobile Viewing on the iPhone/iPad
- To change camera view on the iPhone:
- Tap Chat.
- Changing camera view on the iPad:
- Gateway Control Panel
- What is the Gateway Control Panel?
- To install the Gateway Control Panel:
- Initial Setup
- Gateway Control Panel Overview
- To change camera view:
- Configuring Gateway menus
- To connect to the Gateway menu on a PC:
- To connect to the Gateway menu on a Mac:
- Signing-on & Signing-off the Gateway
- To sign-on / sign-off the Gateway:
- Changing the welcome message
- To change the welcome message:
- Changing the camera name
- To change the camera name:
- Changing the default camera
- To assign the default camera:
- Pairing additional cameras
- Pre-requisites:
- To pair additional cameras:
- Changing the time and time zone
- Changing the Gateway Log-in Password
- Restoring Factory defaults
- To restore factory defaults:
- Upgrading the firmware
- To upgrade the Gateway's firmware:
- Viewing system status
- Help Menu
- Appendix A: Enabling UPnP
- About UPnP
- Enabling UPnP on Windows XP
- Enabling UPnP on Windows Vista
- Cl ick Start (
- Click to open the Sharing and Discovery menu.
- Click Turn on network discovery and then click Apply.
- Appendix B:
- Troubleshooting the handheld monitor
- No video displayed on the monitor
- The camera and monitor are not detecting each other
- Feedback/Squealing noise coming from the monitor
- Appendix C:
- Replacing the handheld monitor battery
- To install the monitor battery:
- Notices
- FCC Notice
- IC Notice
- This device complies with Industry Canada license-exempt RSS standard(s).
- Cleaning and Disposal
- Cleaning
- Disposal of the device
- LIVE CONNECT LW2020/LW2030 SERIES
Brand : Lorex
Model : LIVE Connect LW2031AC1
Category : Security Camera