
JE1483 - Juicer Salton - Free user manual and instructions
Find the device manual for free JE1483 Salton in PDF.


| Product Type | Juicer |
| Brand | Salton |
| Model | JE1483 |
| Dimensions (approx.) | 30 x 20 x 40 cm |
| Weight (approx.) | 3.2 kg |
| Power Supply | 220-240 V, 50/60 Hz |
| Power Consumption | 800 W |
| Juice Container Capacity | 1.5 L |
| Pulp Container Capacity | 1.2 L |
| Feeding Tube Diameter | 55 mm (whole apple) |
| Speed Settings | 2 speeds (low/high) |
| Main Functions | Centrifugal juicing, pulp separation, safety lock |
| Safety Features | Non-slip feet, overload protection, locking arm |
| Cleaning & Maintenance | Dishwasher-safe filter and juice jug; cleaning brush included |
| Detachable Parts | Juice jug, pulp container, filter basket, lid, pusher |
| Spare Parts Available | Filter basket, container set, pusher |
| Repairability | Replaceable parts; motor brush accessible |
| General Information | Salton JE1483 Juicer, stainless steel finish, 1-year warranty |
Frequently Asked Questions - JE1483 Salton
User questions about JE1483 Salton
0 question about this device. Answer the ones you know or ask your own.
Ask a new question about this device
Download the instructions for your Juicer in PDF format for free! Find your manual JE1483 - Salton and take your electronic device back in hand. On this page are published all the documents necessary for the use of your device. JE1483 by Salton.
USER MANUAL JE1483 Salton
natural_image
Abstract grayscale graphic with a stylized 'S' shape, no text or symbols present.salton®
wide mouth
low speed juicer

natural_image
Black and white photo of a modern kitchen brush unit with clear glass and handle (no visible text or symbols)Instruction Booklet
Model JE1483
IMPORTANT SAFEGUARDS
When using electrical appliances, basic safety precautions should always be followed including the following:
- Read all instructions.
- Always use this appliance on a dry, level surface.
- To protect against electrical hazards, do not immerse cord, plugs, or the appliance in water or other liquid. Do not place on a wet surface.
-
Close supervision is necessary when any appliance is used by or near children. Children should be supervised to ensure that they do not play with the appliance.
-
This appliance is not intended for use by persons (including children) with reduced physical, sensory or mental capabilities or lack of experience and knowledge, unless they have been given supervision or instruction concerning the use of the appliance by a person responsible for their safety.
-
Unplug from outlet when not in use before putting on or taking off parts and before cleaning.
-
Do not operate any appliance with a damaged cord or plug or after the appliance malfunctions, or is dropped or damaged in any manner. Return appliance to Salton for examination, repair or electrical or mechanical adjustment. See Warranty.
-
The use of accessories or attachments not recommended or sold by Salton may cause fire, electric shock or injury.
-
Do not use outdoors.
-
Do not let cord hang over edge of table or counter, or touch hot surfaces.
-
Extreme caution must be used when moving an appliance containing hot liquids.
-
This appliance is for Household Use Only.
-
Do not use appliance for other than intended use.
-
Do not leave unit unattended while in use.
-
Always turn the appliance off and unplug from the outlet when left unattended or finished using.
-
Check to be sure that the switch is in the OFF position after each use. Make sure the motor is stopped before disassembling.
-
Avoid contacting moving parts. Make sure that the motor stops completely before disassembling.
-
Always make sure the juicer is fully assembled and the juicer cover is locked securely in position before the motor is turned on. Do not attempt to remove parts when the juicer is in operation.
-
Do not either operate or plug and unplug the unit with wet hands.
-
Do not use the appliance continuously for more than 30 minutes.
- Do not turn the appliance on for more than 2 minutes without adding food. This may damage the auger.
- Do not use this appliance if the strainer basket is damaged.
- Do not put your fingers or other objects into the food chute while it is operating. Always use the food pusher provided.
- During operation feed the food slowly to avoid clogging. If the unit gets clogged turn the appliance off immediately. Press the reverse function on the on/off switch. If this does not work, press the on/off switch to the off position, unplug the appliance, remove the cover and remove the stuck food.
- Cut ingredients into small pieces and take out the core as it may cause a blockage.
- Do not place on or near a hot gas or electric burner, or in a heated oven.
- Always attach plug to appliance first, then plug cord into the wall outlet. To disconnect, turn any control to 'OFF', then remove plug from wall outlet.
- Do not attempt to override the safety features.
SAVE THESE INSTRUCTIONS
HOUSEHOLD USE ONLY
POLARIZED PLUG
This appliance has a polarized plug (one blade is wider than the other). To reduce the risk of electric shock, this plug will fi t in a polarized outlet only one way. If the plug does not fi t fully in the outlet, reverse the plug. If it still does not fi t, contact a qualifi ed electrician. Do not modify the plug in any way.
How does the Juicer Work
The Juicer is a juice extractor that uses low speed technology. It is called low speed because it operates at only 80 – 90 RPM. The Juicer actually juices faster than a typical juicer and expels a much drier pulp with a much higher yield. An auger extracts the juice by masticating and slowly squeezing like a mortar & pestle compared to 1,000 to 24,000 RMP's in the typical centrifuge juicer which cuts and damages the food. The low speed action crushes and squeezes the food releasing the deep-seated nutrients and enzymes. It also breaks up more of the phytonutrients and results in a richer coloured juice that retains more
vitamins and minerals. The slower RPM's ensures that it does not disturb the cellular structure of fruits and vegetables, reducing oxidation and juice separation and preserving the enzymes and nutrients of the food that are in its natural form.
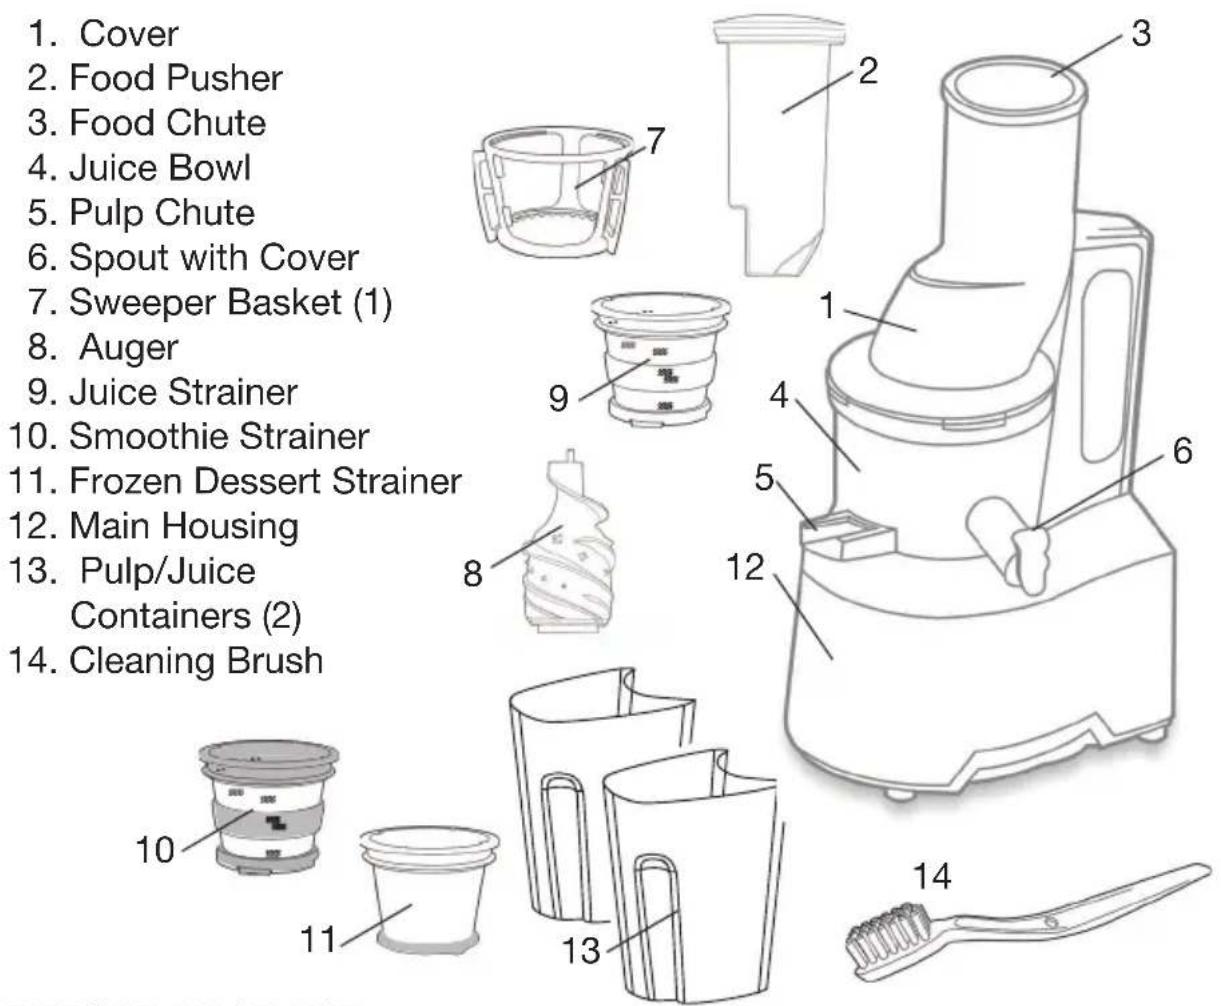
DESCRIPTION OF PARTS
BEFORE FIRST USE
- Carefully unpack the Juicer.
- Follow the disassembly instructions.
- Wash all the removable parts including the Cover, Food Pusher, Sweeper Basket, Juice, Smoothie and Frozen Dessert Strainers, Auger, Juice Bowl and Containers in warm soapy water. Rinse and dry.
NOTE: Use care when handling the Juice and Smoothie Strainers. Hold by the rim only to avoid damaging the delicate stainless steel foil.
DISASSEMBLING THE JUICER
- Remove the Cover by turning it counterclockwise until the tab on the Cover releases from the slot in the main housing.
- Lift the Juice Bowl from the main housing.
- Place on fl at surface. While holding bowl with one hand lift Strainer with other parts out of Juice Bowl. Disassemble.
ASSEMBLING THE JUICER
-
Assemble the Juice Bowl on the Base by lining up the arrow on the main housing and the arrow on the Juice Bowl.
-
Place the Sweeper Basket inside the Juice Bowl.
-
Place either the Juice Strainer or the Smoothie Strainer inside the Juice Bowl so that the red dot on the Strainer lines up with the red dot on the Juice Bowl.
-
If using the Frozen Dessert Strainer, remove the Sweeper Basket and place
only the Frozen Dessert Strainer inside the Juice Bowl. Align the red dot on the Strainer with the red dot on the Juice Bowl.
-
Place the Auger in the center of the Juice Bowl. Gently push the Auger down and twist until you hear it click into position.
-
Place the Cover onto the Juice Bowl.
IMPORTANT: Line up the red dot on the Cover with the red dot on the Juice Bowl.
Turn the Cover clockwise until you hear it lock into position.


natural_image
Diagram of a mechanical component with a downward arrow indicating force or direction (no text or symbols)

HOW TO USE
-
Ensure that all parts are securely in place then plug into the wall outlet.
-
Place one Container under the Pulp Chute and one of the containers or a glass under the Juice Spout.
-
There are three settings on the Switch:
ON - this starts the motor for juicing
OFF – Stops the motor and operation
REVERSE – Moves the Auger in the opposite direction
JUICING
- Wash all food to be juiced. If necessary, cut fruits or vegetables into wedges to fit into the Food Chute. Fruits with hard pits such as peaches, nectarines, apricot, plum, mango, avocados, cherries, etc must have the hard pit removed before juicing. Fruits with hard or
inedible skins such as pineapple, melon, mango, orange, etc, must be peeled before juicing.
HINT: For best results, fi brous and tough leafy vegetables such as kale or celery should be juiced with fruits or vegetables that have a high water content.
NOTE:
(a) When making carrot juice the length should be no more than 152mm (6"), width 25mm (1"). Feed at intervals of 5 seconds.
(b) Do not put frozen fruit, vegetables or ice into the appliance when using the Juice Strainer.
- Place food into the Food Chute and the Juicer will pull in the food and start juicing immediately. Use the Food Pusher if necessary to dislodge food that is stuck in the Food Chute. NOTE: Do not allow the Juicer to run longer than 2 minutes without adding food.
IMPORTANT: Never place your fingers in the food chute.
-
For best results insert food slowly to allow pulp to be extracted. Do not over stuff or rush the juicing process.
-
The Juicer has a unique simple rinsing process to switch between different kinds of juice. Simply pour water through the Food Chute. This will rinse out most of the residue and you are ready to keep juicing.
-
When you have completed juicing, press the switch to the OFF position, unplug from the wall outlet and follow the directions in the Care and Cleaning section.
IMPORTANT: Never use ice in the appliance this will damage the auger.
SMOOTHIES
-
The smoothie strainer can be used with both fresh and frozen fruit.
-
Salton recommends that you use berries, peaches, nectarines, bananas, papaya, mango and other fruits that do not contain seeds.
-
Use approximately 2 cups (500 ml) of fruit to 1 cup (250 ml) of liquid. Adjust the ratio of fruit to liquid depending on the smoothie thickness you prefer.
-
Mix fruit with milk, juice or other liquid.
-
Close the spout cover.
-
Place one container under the pulp chute and the other under the juice spout.
-
Turn on the Juicer. NOTE: Do not allow the Juicer to run without food for more than a few seconds.
-
Pour the fruit/liquid mixture into the Food Chute. Push the mixture down with the Food Pusher, if necessary. NOTE: It is possible that a small amount of the liquid may come out of the pulp chute.
-
Allow the Juicer to work for 2-3 minutes.
-
Open the spout cover and collect the smoothie in the provided container or a glass.
-
When you are done, press the switch to the OFF position, unplug from the wall outlet and follow the directions in the Care and Cleaning section.
IMPORTANT: Never use ice in the appliance this will damage the auger.
FROZEN DESSERTS
- The Frozen Dessert Strainer is used with frozen fruit.
- Freeze desired fruit for 24 hours. Hard seeds and inedible skins should be removed prior to freezing.
- Remove from freezer and allow to thaw slightly (approximately 7-10 minutes depending on the type of fruit).
- Place a container or a serving bowl under the pulp chute and close the spout cover.
IMPORTANT: Unlike the Juice and Smoothie function, the Frozen Dessert is extruded from the Pulp Chute.
-
Turn on the Juicer. NOTE: Do not allow the Juicer to run without food for more than a few seconds.
-
Place food in the Chute and the Juicer will pull in the food. Use the food pusher is necessary. Do not overfi ll the Chute.
IMPORTANT: Never place your fingers in the Food Chute.
-
If using more than one type of fruit, add the different fruits alternately to allow them to mix properly.
-
When you are done, press the switch to the OFF position, unplug from the wall outlet and follow the directions in the Care and Cleaning section.
IMPORTANT: Never use ice in the appliance this will damage the auger.
CARE AND CLEANING
- Follow the directions in the 'Disassembling the Juicer'.
- Using the Cleaning Brush provided, clean the Strainers. For the Juice and Smoothie Strainers, hold by the top rim only and use the brush to clean the mesh.
- Wash the other disassembled parts in warm soapy water. Do not use abrasive cloths or cleansers.
NOTE: There is a silicone pad under the Juice Bowl that prevents juice from exiting through the pulp ejector. When using the Juicer ensure that the silicone pad is firmly in place in the slot. You may slide the pad out and use the opposite end of the Cleaning Brush if food is caught in the slot.
-
Wipe the Main Housing of the Juicer with a damp cloth. NEVER IMMERSE THE MAIN HOUSING OR PLUG IN WATER OR ANY OTHER LIQUID.
-
Dry all parts thoroughly before assembling the Juicer.
-
Cleaning the Juicer immediately after each use will reduce the stains on the Juice Bowl, Sweeper, and Cover but carrots or other strong colours in food may still stain the Juicer. We suggest using one of the following cleaning procedures:
a) Soak in mild soapy water
b) Equal parts warm water to cider vinegar
c) Soak in 12 box of baking soda and warm water
d) 12 cup bleach in a sink full of warm water
TROUBLESHOOTING
| PROBLEM SOLUTION | |
| Appliance does not operate • Check power cord and power source.• Check the Assembly section to ensure that all parts have been assembled correctly. | |
| Appliance jams/clogs or stops operating | • Check for a blockage in the food chute.• Look in the food chute to see if pits or hard seeds are stuck in the appliance.• Turn the appliance off then switch to reverse for 3 seconds.• Disassemble the upper section and clear the remaining pulp. NOTE: do not remove the cover until the appliance has been unplugged from the wall outlet |
| Squeaking noise when juicing • This is normal.NOTE: The juicer should not be run without food. | |
| Leaking from underneath the juice bowl | • Ensure that the silicone pad is tightly in place after cleaning. |
| Strainer Damage • Contact our service department. | |
| Too much pulp • Cut food into smaller pieces, especially foods with a lot of fi bre.• Insert food at a slower pace and allow food pulp to eject from the unit before adding more food. | |
| Bowl is stuck and will not detach from the base | • This is caused by excess food in the bowl. Press the reverse button for 3 – 5 seconds. Repeat this 2 or 3 times. Push the bowl upward when turning. |
| Cover is stuck • Press the reverse button for 3 – 5 seconds. Repeat 2 – 3 times. Press down on Cover while turning. | |
A short supply cord is provided to reduce the hazards of becoming entangled in or tripping over a long cord. Extension cords may be used if care is exercised in their use. If an extension cord is used, the marked electrical rating of the detachable power-supply cord or extension cord should be at least as great as the electrical rating of the appliance. If the appliance is of the grounded type, the extension cord should be a grounded 3-wire cord. The extension cord should be arranged so that it will not drape over the counter top or table top, where it can be pulled on by children or tripped over.
LIMITED WARRANTY
**The original sales receipt is the only acceptable proof of purchase**
Salton Canada warrants that this appliance shall be free from defects in material and workmanship for a period of fi ve (5) years from the date of original purchase. Salton Canada, at its sole discretion during this warranty period, will repair or replace a defective product or issue a refund. Any refund to the purchaser will be at a pro-rated value based on the remaining period of the warranty. All liability is limited to the amount of the purchase price. This warranty covers normal domestic usage and does not cover damage which occurs in shipment or failure which results from alteration, accident, misuse, abuse, glass breakage, neglect, improper maintenance, use contrary to the operating instructions or commercial use. This warranty is not available to retailers or other commercial purchasers or owners.
This warranty does not include the cost of shipping, which is to be borne by the customer.
TO OBTAIN PROMPT WARRANTY SERVICE:
Contact one of our many Service Centers found on our website www.salton.com/customer-care
or
Securely package and return the appliance to us. Please enclose:
• Original proof of purchase
- The completed form below with a \$12.50 Return Shipping & Handling fee – either a cheque, money order or credit card (A personal cheque will delay return shipping by 2-3 weeks)
For added protection, we suggest that you use an insured delivery service with tracking information when returning your product. Salton Canada will not be held responsible for in-transit damage or for packages that are not received.
Name
Address
City
Prov/State
Postal/Zip
Code
Daytime
Phone
No.
Product defect:
Type of payment
Cheque/Money Order
Visa □
MasterCard □
Name on card
Expiry Date CSV No
Card No.
To contact our Customer Service Department:
SALTON CANADA
Telephone: 514-685-3660 (Ext. 226)
81A Brunswick,
E-mail: service@salton.com
Dollard-des-Ormeaux, Quebec H9B 2J5
Fax: 514-685-8300
Canada
www.salton.com
- salton®
- wide mouth
- low speed juicer
- IMPORTANT SAFEGUARDS
- SAVE THESE INSTRUCTIONS
- HOUSEHOLD USE ONLY
- POLARIZED PLUG
- How does the Juicer Work
- DESCRIPTION OF PARTS
- BEFORE FIRST USE
- DISASSEMBLING THE JUICER
- ASSEMBLING THE JUICER
- IMPORTANT: Line up the red dot on the Cover with the red dot on the Juice Bowl.
- HOW TO USE
- JUICING
- NOTE:
- SMOOTHIES
- FROZEN DESSERTS
- CARE AND CLEANING
- LIMITED WARRANTY
- TO OBTAIN PROMPT WARRANTY SERVICE:
Brand : Salton
Model : JE1483
Category : Juicer