
FSU6808U - Environmental Monitoring Server Dahua Technology - Free user manual and instructions
Find the device manual for free FSU6808U Dahua Technology in PDF.


| Product Type | Environmental Monitoring Server |
| Brand | Dahua Technology |
| Model | FSU6808U |
| Dimensions (W x D x H) | 440 x 300 x 44 mm (19-inch rackmount, 1U) |
| Weight | Approx. 4.5 kg |
| Power Supply | AC 100-240V, 50/60Hz, redundant option |
| Power Consumption | ≤ 50W (typical) |
| Network Interface | 2x Gigabit Ethernet (RJ-45) |
| Sensor Ports | 8x RJ-45 for external sensors (temperature, humidity, etc.) |
| Supported Sensors | Temperature, humidity, smoke, water leak, door contact, etc. |
| Data Logging | Built-in storage for up to 1 year of logs |
| Alarm Outputs | 2x dry contact relay outputs (NO/NC) |
| Management Interface | Web GUI, SNMP v1/v2c/v3, email alerts |
| Operating Temperature | 0°C to 50°C |
| Operating Humidity | 10% to 90% non-condensing |
| Mounting | Rack mount (19-inch, 1U) with included brackets |
| Maintenance | Dust filter cleaning every 3 months; firmware updates via web |
| Safety Certifications | CE, FCC, UL |
| Spare Parts | Power supply unit, sensor cables, mounting brackets |
| Repairability | Modular design; hot-swappable power supply and fan modules |
Frequently Asked Questions - FSU6808U Dahua Technology
User questions about FSU6808U Dahua Technology
0 question about this device. Answer the ones you know or ask your own.
Ask a new question about this device
Download the instructions for your Environmental Monitoring Server in PDF format for free! Find your manual FSU6808U - Dahua Technology and take your electronic device back in hand. On this page are published all the documents necessary for the use of your device. FSU6808U by Dahua Technology.
USER MANUAL FSU6808U Dahua Technology
Environment Surveillance Server Quick Start Guide

natural_image
Abstract geometric composition with gray and blue color blocks (no text or symbols)Foreword
General
This manual introduces the functions and operations of the Environment Surveillance Server (hereinafter referred to as the "Device").
Safety Instructions
The following signal words might appear in the manual.
| Signal Words Meaning | |
 DANGER DANGER | Indicates a high potential hazard which, if not avoided, will result in death or serious injury. |
 WARNING WARNING | Indicates a medium or low potential hazard which, if not avoided, could result in slight or moderate injury. |
 CAUTION CAUTION | Indicates a potential risk which, if not avoided, could result in property damage, data loss, reductions in performance, or unpredictable results. |
 TIPS TIPS | Provides methods to help you solve a problem or save time. |
 NOTE NOTE | Provides additional information as a supplement to the text. |
Revision History
| Version | Revision Content | Release Time |
| V1.0.0 | First release. | September 2021 |
Privacy Protection Notice
As the device user or data controller, you might collect the personal data of others such as their face, fingerprints, and license plate number. You need to be in compliance with your local privacy protection laws and regulations to protect the legitimate rights and interests of other people by implementing measures which include but are not limited: Providing clear and visible identification to inform people of the existence of the surveillance area and provide required contact information.
About the Manual
- The manual is for reference only. Slight differences might be found between the manual and the product.
- We are not liable for losses incurred due to operating the product in ways that are not in compliance with the manual.
● The manual will be updated according to the latest laws and regulations of related jurisdictions.
For detailed information, see the paper user's manual, use our CD-ROM, scan the QR code or visit our official website. The manual is for reference only. Slight differences might be found between the electronic version and the paper version.
- All designs and software are subject to change without prior written notice. Product updates might result in some differences appearing between the actual product and the manual. Please contact customer service for the latest program and supplementary documentation.
- There might be errors in the print or deviations in the description of the functions, operations and technical data. If there is any doubt or dispute, we reserve the right of final explanation.
- Upgrade the reader software or try other mainstream reader software if the manual (in PDF format) cannot be opened.
- All trademarks, registered trademarks and company names in the manual are properties of their respective owners.
- Please visit our website, contact the supplier or customer service if any problems occur while using the device.
- If there is any uncertainty or controversy, we reserve the right of final explanation.
Important Safeguards and Warnings
This section introduces content covering the proper handling of the device, hazard prevention, and prevention of property damage. Read carefully before using the device, comply with the guidelines when using it, and keep the manual safe for future reference.
Operation Requirements

● Make sure that the power supply of the device works properly before use.
- Do not pull out the power cable of the device while it is powered on.
- Only use the device within the rated power range.
● Transport, use and store the device under allowed humidity and temperature conditions.
- Prevent liquids from splashing or dripping on the device. Make sure that there are no objects filled with liquid on top of the device to avoid liquids flowing into it.
- Do not disassemble the device.
Installation Requirements

WARNING
- Connect the device to the adapter before power on.
- Strictly abide by local electrical safety standards, and make sure that the voltage in the area is steady and conforms to the power requirements of the device.
- Do not connect the device to more than one power supply. Otherwise, the device might become damaged.

- Observe all safety procedures and wear required protective equipment provided for your use while working at heights.
- Do not expose the device to direct sunlight or heat sources.
- Do not install the device in humid, dusty or smoky places.
• Install the device in a well-ventilated place, and do not block the ventilator of the device. - Use the power adapter or case power supply provided by the device manufacturer.
- The power supply must conform to the requirements of ES1 in IEC 62368-1 standard and be no higher than PS2. Note that the power supply requirements are subject to the device label.
- Connect class I electrical appliances to a power socket with protective earthing.
Table of Contents
Foreword....I
Important Safeguards and Warnings.... III
1 Overview....5
1.1 Introduction....5
1.2 Features ....5
2 Structures....7
2.1 Dimensions....7
2.2 Front Panel....7
2.3 Rear Panel 7
3 Installation and Wiring....9
3.1 Installation Preparations 9
3.1.1 Tools....9
3.1.2 Requirements....9
3.1.3 Selecting Installation Position....10
3.2 Installing the Device and Peripherals....10
3.3 Connecting Wires....10
3.3.1 Alarm Input Port Wiring....10
3.3.2 Analog Input Port Wiring....11
3.3.3 RS-485 Port Wiring....12
3.3.4 RS-232 Port Wiring....12
3.3.5 Power Port Wiring....13
4 Web Operations....14
4.1 Logging in to Web Manager ....14
4.2 Quick Configuration....14
4.3 Device Configuration....19
4.3.1 Setting Threshold....19
4.3.2 Linkage 20
4.3.3 Alarm Linkage Filter 22
4.3.4 Assets Configuration 23
4.3.5 Accessing the Platform....24
4.3.6 Alarm Strategy ....25
4.3.7 Test 25
4.3.8 Air Conditioner Control 26
4.4 Other Configurations....26
4.4.1 System Update....26
4.4.2 Peripheral Management ......27
4.5 Monitoring....28
4.5.1 Overview....28
4.5.2 Viewing Peripherals....29
Appendix 1 Cybersecurity Recommendations....30
1 Overview
1.1 Introduction
This Device, generally installed in central machine rooms, features live view and dynamic environment surveillance based on Internet of Things networking. Innovative technologies such as high-definition audio and video decoding, environmental perception and data collection, and network are integrated. The Device has functions such as analog input acquisition with current/voltage conversion, Modbus bus connection, signal acquisition, warning, alarm generation from network sensors, linkage management, high-definition video access, two-way audio, and information overlay. Combined with UPS, switching power supply, access control devices, smart meters, and environmental data, a comprehensive surveillance solution is formed for plants, central machine stations, smart substations, and IDC data centers.
1.2 Features
Environmental Data Collection
Support analog input acquisition with 4 mA–20 mA or 0–5 VDC, and environmental data collection with RS–485 bus control.
Environmental Data Management
Real-time monitoring and over-threshold alarm linkage for environment event detection.
Remote Monitoring
Remotely monitor the Device and linked peripherals on the Web Manager.
Local Configurations
View the status of the Device and peripherals on local monitor.
Storage
Store the data in the dedicated format which cannot be falsified to ensure the data security.
Backup
Download the file from HDD through network as backup with local PC.
Alarm Linkage
- Alarm output from multi-channel relays, convenient for alarm linkage and on-site lighting
control.
● Protective circuit for alarm input and output ports to prevent the Device from damage.
Communication Port
- RS–485 port for environmental data input with RS–485 bus.
- Standard Ethernet port and SFP optical port for remote access through network.
- 4G network transmission.
- GPS positioning.

Only some devices support 4G network transmission and GPS positioning.
Intelligent Operation
Mouse operation is available.
UPnP (Universal Plug and Play)
Establish mapping connection between LAN and WAN through UPnP protocol.
2 Structures
2.1 Dimensions
Figure 2-1 Dimensions (mm[inch])
![42.0[1.65] 312.0[12.28] 440.0[17.32]](/content/2026/06/1247831/images/c4fb53186c39298f80fb642a8a2fb29b9319a38c86c6630746ea9cb836cac729.jpg)
2.2 Front Panel
Front panel includes indicator lights, USB port, and power button. The USB port can be connected to a USB mouse or an external hard disk.
Table 2-1 Indicator light descriptions
| Icon | Indicator Light | Function |
 | Power | On solid blue after the Device is powered on normally. |
 | Running status | On solid red when problems occur such as IP or MAC conflict, HDD absence, and HDD error. |
 | HDD | ● Flashes blue during HDD reading and writing. ● Turns off when the HDD is not in use or is disconnected. |
 | Network | On solid blue when the network connection is normal. |
| 4G | 4G | On solid blue after the 4G network connection succeeded. |
2.3 Rear Panel

The figure below is for reference only, and might differ from your actual device.
Figure 2-2 Rear panel ports

Table 2-2 Port descriptions of rear panel
| No. | Name | No. | Name |
| 1 | 4G antenna | 11 | RS-485 port |
| 2 | Expansion port (Differs in some models) | 12 | RS-232/RS-485 port |
| 3 | Alarm input port | 13 | BELL port |
| 4 | Audio output port | 14 | Auxiliary power output port |
| 5 Network port 15 | Alarm output port | ||
| 6 | GPS antenna | 16 | Alarm output port |
| 7 | Grounding screw | 17 | Analog input port |
| 8 | -48 VDC power port | 18 | HDMI port |
| 9 | 12-48 VDC power port | 19 | Audio input port |
| 10 | 12 VDC power port | — | — |
3 Installation and Wiring
3.1 Installation Preparations
3.1.1 Tools
Select glue gun, adhesive tape, electric hand drill, rivet gun and rivets, multimeter, soldering iron, and other commonly used tools as needed.
3.1.2 Requirements
Cutting Wires
The power or signals must be cut off when cutting wires. In order to prevent short circuit or interference, cut the wire one by one. Multiple cutting is not allowed.

Insulate the plier, and the cut wires cannot be thrown away randomly to prevent short to ground.
Stripping Wires
Spin the diagonal plier around the wire at a distance of at least 1.5 cm (0.59") from the end of the wire to cut through the entire insulation. Slide the stripper off the wire to pull off the insulation.

Be careful not to cut the wire too deep, otherwise the metal cores might be scratched.
Wiring
When wiring, twist two metal cores tightly together, and then add the solder wire. Wrap the soldered wire tightly with insulating tape, and then wrap the two wires together.

Short burrs cannot be exposed; otherwise it might puncture the insulating tape and cause a short circuit. Wrap the wires uniformly, and the thickness is no less than two layers of the insulating tape.
Terminal
Strip the wire for about 1 cm (0.39") and fold it (multi-stranded cotton-covered wire needs to be twisted together by hand), insert the wire into the terminal, and then tighten the terminal screw.

Tighten the terminal screw firmly, and pull the inserted wire to confirm it is installed solidly.
Soldering
When soldering, be careful about the soldering iron. Do not damage other devices.
3.1.3 Selecting Installation Position
- Do not affect the normal operation of the Device. As far as possible away from heat or radiation sources, locations prone to leakage, power inlets and outlets.
- Do not install in rooms with corrosive acid and alkaline gases.
- Do not affect the normal operation and maintenance of other devices, and do not occupy maintenance and exit corridors, and reserved places for other devices.
- To facilitate wire deployment, the Device is recommended to be placed in a room or an area where the data collection devices are gathered. The intelligent device using serial communication (RS-232) is not far away than 15 m (49.21 ft).
- To facilitate Device wiring and installation, it is recommended that the installation height from the bottom to the ground is 1.4 m (4.59 ft) or the installation height aligns with the AC power distribution box to maintain the overall beauty of the site.
- Cut a small notch for each of the wire outlet on the trunking. Do not make a large notch on the entire outlet position.
- Wires in the trunking near devices are concentrated. Distribute the excess wires, wrap them with tape and put them in the trunking.
3.2 Installing the Device and Peripherals
The Device is wall-mounted. Install hangers onto the Device, and then fix the Device on the wall with screws through the hanger.
For peripherals installation, refer to the respective user's manuals.
3.3 Connecting Wires
3.3.1 Alarm Input Port Wiring
The Device has 16 alarm input ports (can be expanded to 24), which can be connected to peripherals with digital input such as passive IR detectors, smoke detectors, and flooding detectors.
Figure 3-1 Alarm input wiring

Table 3-1 Alarm input port wiring descriptions
| No Name | |
| 1 Alarm | input port: Z1–Z16 |
| 2 VCC: | Connect to power port |
| 3 GND: | Grounding |
| 4 Flooding detector | |

If there are many connected peripherals with digital input, supply power for each peripheral separately.
3.3.2 Analog Input Port Wiring
The Device has 8 ports (can be expanded to 16) for analog input with 4 mA–20 mA or 0–5 VDC, which can be connected to peripherals such as temperature and humidity sensors.
Figure 3-2 Analog input wiring
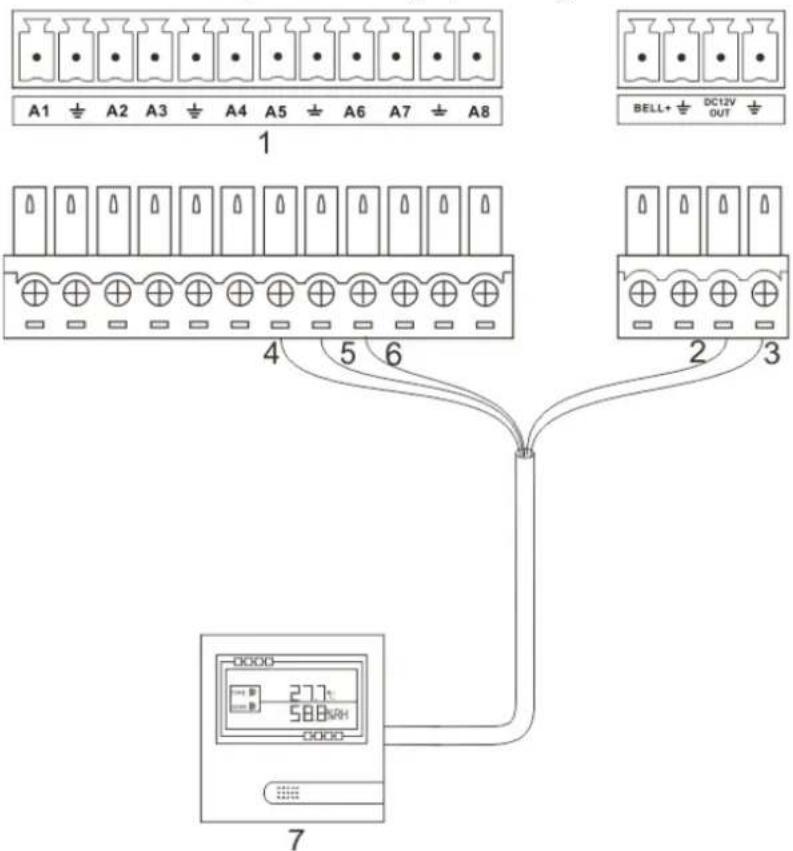
Table 3-2 Descriptions of analog input port wiring
| No Name | |
| 1 Analog input port: A1–A8 | |
| 2 VCC: Connect to power port | |
| 3 GND: Grounding | |
| 4 | Temperature value input to A1–A8 |
| 5 GND: Grounding | |
| 6 Humidity value input to A1–A8 | |
| 7 Temperature and humidity sensor | |
3.3.3 RS-485 Port Wiring
The device has 8 RS-485 ports, which can be connected to power meters/smart meters, flooding detectors, access control devices, power distribution switches, smart air conditioners, battery testers, and more.
Figure 3-3 RS-485 port wiring
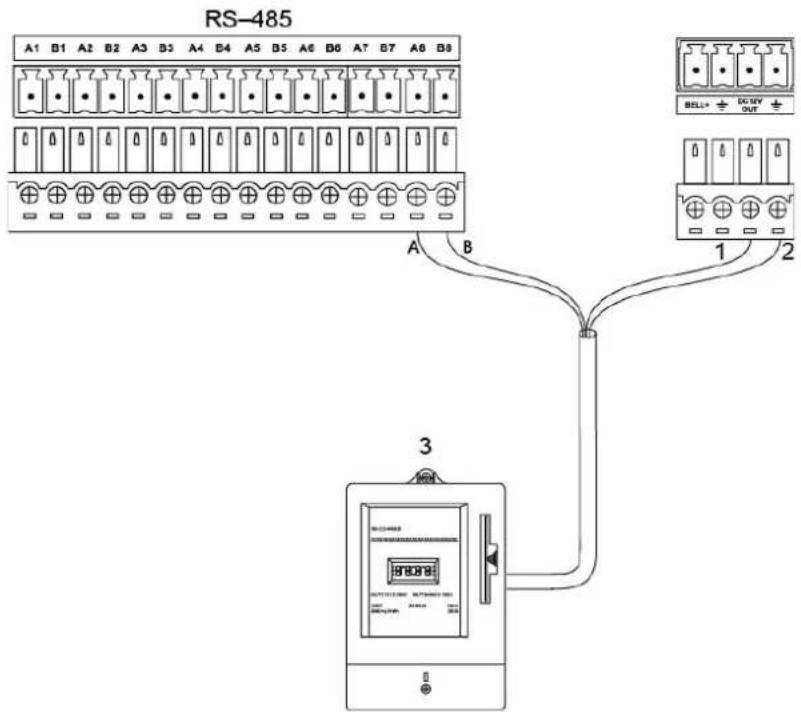
Table 3-3 Descriptions of RS-485 port wiring
| No Name |
| 1 VCC: Connect to power port |
| 2 GND: Grounding |
| 3 Smart meter |

The peripherals' RS-485 address on Web Manager must be consistent with the connected RS-485 port on the Device.
3.3.4 RS-232 Port Wiring
The Device has 2 RS-232 ports, which can be connected to 2 sets of UPS (Uninterruptible Power Supply).
Figure 3-4RS-232 port wiring

Table 3-4 Descriptions of RS-232 port wiring
| No. Name |
| 1 UPS (Uninterruptible Power Supply). |
3.3.5 Power Port Wiring
The Device has three power ports: -48 VDC, 12 VDC, and 12-48 VDC.
Figure 3-5 Power port wiring

4 Web Operations
4.1 Logging in to Web Manager

● Make sure that the PC and the Device are on the same network segment.
● The default Device IP address is 192.168.1.108.
We recommend using Google Chrome 41.0 or later, IE 9.0 or later, or Firefox 50.0 or later.
Step 1 Enter the Device IP address in the address bar of the browser, and then press Enter key.
Step 2 Enter the username and password, and then click Login.
Figure 4-1 Login

4.2 Quick Configuration
The Device provides a configuration wizard to quickly set parameters, connect to network, access platforms and peripherals, and more.
Click at the upper-right corner to go to the Config Wizard. For first-time login, the wizard will pop up.
Figure 4-2 Config wizard

Adding Peripherals
Step 1 On the Config Wizard window, click Next.
Step 2 Configure parameters.
Figure 4-3 Protocol configuration

Table 4-1 Parameters descriptions
| Parameter Description | |
| Device Type | The types of peripherals supported by the Device need to be corresponded with the types of Channel Protocol. |
| Manufacturer By default. | |
| Protocol | Corresponds with the peripherals to be connected. The protocol name is the peripheral model. |
| Channel Protocol | Protocol type of the interface to which the selected peripheral is connected. |
| Address | Different interface protocol types have different addresses.The Channel Protocol is selected as Local Digital Input (Z1– Z16), and the corresponding address is 1–16.The Channel Protocol is selected as Local Analog Input (A1– A8), and the corresponding address is 1–8.The Channel Protocol is selected as RS–485/RS–232, and the corresponding address is the actual communication address of the peripheral.The Channel Protocol is selected as NET, and the address remains the default. |
| NO/NC | When the Channel Protocol is selected as Local Digital Input (Z1–Z16), select NC (Normally Closed) or NO (Normally Open) according to the connected peripheral type. Tamper alarm and short circuit alarm are supported if you select the Alarm Type as Four Types. |
| Analog Input Type | When the Channel Protocol is selected as Local Analog Input (A1– A8), select analog input type as current or voltage according to the connected peripheral type. |
| Upper Limit | Set according to the connected peripheral. |
| Lower Limit | Set according to the connected peripheral. |
Step 3 Click OK to save settings, and then return to the Config Wizard.
Step 4 Enable peripherals.
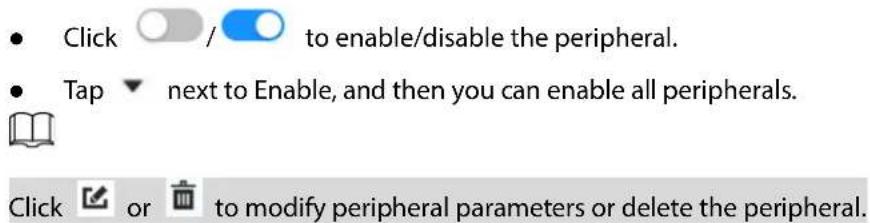
Accessing Platform
Access the platform to the Device and collect data from the platform for monitoring.
Step 1 After adding peripherals, on the Config Wizard window, click Next.
Step 2 Click Skip.
Step 3 Enter the IP and port of the platform server.
Figure 4-4 Access the platform

Formatting Storage Medium

The storage medium needs to be formatted for the first-time use. Ignore the following operations if it has been formatted.
Step 1 On the Config Wizard window, enter the IP and port of the platform server, and then click Next.
Step 2 Select the storage medium that needs to be formatted, and then click Format. The device will restart automatically after formatting is completed.
Figure 4-5 Format the HDD

4.3 Device Configuration
4.3.1 Setting Threshold
Set the alarm threshold for the added peripherals for alarm monitoring and detection.
Step 1 Select Config > Threshold Setting.
Figure 4-6 Threshold setting

Step 2 Click to select Device and Monitoring Event Type so as to filter out unwanted monitoring events. Monitoring Event Type includes:
- Telemetering: Remotely collect analog data of peripherals such as temperature, humidity, voltage, and current.
- Remote Signaling: Remotely collect digital signals of peripherals such as alarm signals from smoke detectors.
- Remote Control: Remotely control peripherals such as turning on or turning off the air conditioner.
- Remote Adjustment: Remotely adjust peripherals such as adjusting the temperature value of an air conditioner.
Step 3 Modify monitoring event parameters.
1) Click .
2) Modify parameters.

Figure 4-7 Modify parameters

Table 4-2 Parameters descriptions
| Parameter Description | |
| Threshold | The alarm will be triggered by the peripheral when the collected data of Remote Signaling exceeds the threshold. |
| Delay | When the alarm is triggered, it will not be prompted by the system. After the defined delay period, if the alarm still exists, the system will prompt the alarm. |
| Alarm Difference | Used to limit frequent alarms.For over-threshold alarms, the alarm stops after the alarm value is below the value that the alarm threshold minus the alarm difference.For under-threshold alarms, the alarm stops after the alarm value is beyond the value that the alarm threshold plus the alarm difference. |
| Absolute Threshold | When the difference between the collected data of Telemetering and the threshold exceeds the absolute threshold, the log will be saved. |
| Relative Threshold | When the difference between the collected data of Telemetering and the threshold exceeds the multiplied value of the last collected data and the relative threshold, the log will be saved. |
3) Click OK to save settings.
Step 4 (Optional) On the Threshold Settings window, switch to under the Display item to display the peripheral information on the LED display connected to the Device.
Step 5 (Optional) Click / under the Enable item to disable/enable monitoring.
4.3.2 Linkage
After setting the linkage, linkage action performs such as recording and capturing when the linked peripheral triggers the alarm. 16 linkage groups can be added, and each group can add 16 peripherals.
Step 1 Select Config > Linkage Config.
Figure 4-8 Linkage settings

Step 2 (Optional) Select a linkage group and double-click the group to modify the group name.
Step 3 Set linkage.
1) Click Add Linkage Device.
Figure 4-9 Add linkage device

2) Select device name and monitoring event.
3) Click OK to save settings.
Step 4 On the Linkage Config section, set alarm linkage parameters.
Table 4-3 Parameter descriptions
| Parameter Description | |
| PTZ Linkage | Enable it. Select the linked channel and linkage mode.Before setting the linkage parameters, set PTZ mode. For details, refer to the Device user's manual. |
| Record | Enable it. Select the channel to record videos when an alarm occurs. |
| Record Delay | The video recording keeps running for the defined time after the alarm is ended. |
| Snapshot | Enable it. Select the channel to capture images when an alarm occurs. |
| Alarm Output | Enable it. Select the alarm output channel to link the external alarm device when an alarm occurs. |
| Alarm Output Delay | The alarm keeps running for the defined time after the alarm ends. |
| Voice Prompts | Enable it. Select the audio file from the drop-down list, and the file will be played when an alarm occurs. |
| Buzzer | Enable it. The connected buzzer will beep when an alarm occurs. |
| Siren | Enable it. The connected siren will sound when an alarm occurs. |
| Message | Enable it. Select the group from the drop-down list to receive alarm messages when an alarm occurs. Alarm message receivers can be added in Personnel Settings. Alarm message receivers can be added in Personnel Settings. |
| Send Email | Enable it. Select the group from the drop-down list to receive alarm emails when an alarm occurs. |
Step 5 Click Apply.
4.3.3 Alarm Linkage Filter
When an alarm is triggered due to power failure, high voltage, low voltage, or phase loss, and more, related alarm also occurs from linked peripherals. You can set to show the major monitoring event alarm and filter minor alarms.
For example, the air conditioner is power off due to the main electricity failure. Power failure alarms of the electricity and the air conditioner both occur. Set the outage as Show Monitoring Event and the air conditioner power failure as Filter Monitoring Event, then only the blackout alarm will be prompted, and power failure from the air conditioner will not.
Step 1 Select Config > Alarm Linkage Filter.
Figure 4-10 Alarm linkage filter
| Threshold Setting LinkageConfig | Delies | Refresh | |||||
| No | Show Monitoring Event | Filter Monitoring Event | Edit | Delete | |||
| Alarm Linkage Filter | ☐ | 1 | # | # | |||
| Asset Config | ☐ | 2 | # | # | |||
| Platform Access | ☐ | 3 | # | # | |||
| ☐ | 4 | # | # | ||||
| Alarm Strategy | ☐ | 5 | # | # | |||
| Test | ☐ | 6 | # | # | |||
| AC Control | ☐ | 7 | # | # | |||
| ☐ | 8 | # | # | ||||
| ☐ | 9 | # | # | ||||
| ☐ | 10 | # | # | ||||
Step 2 Click.

Figure 4-11 Show and filter alarms
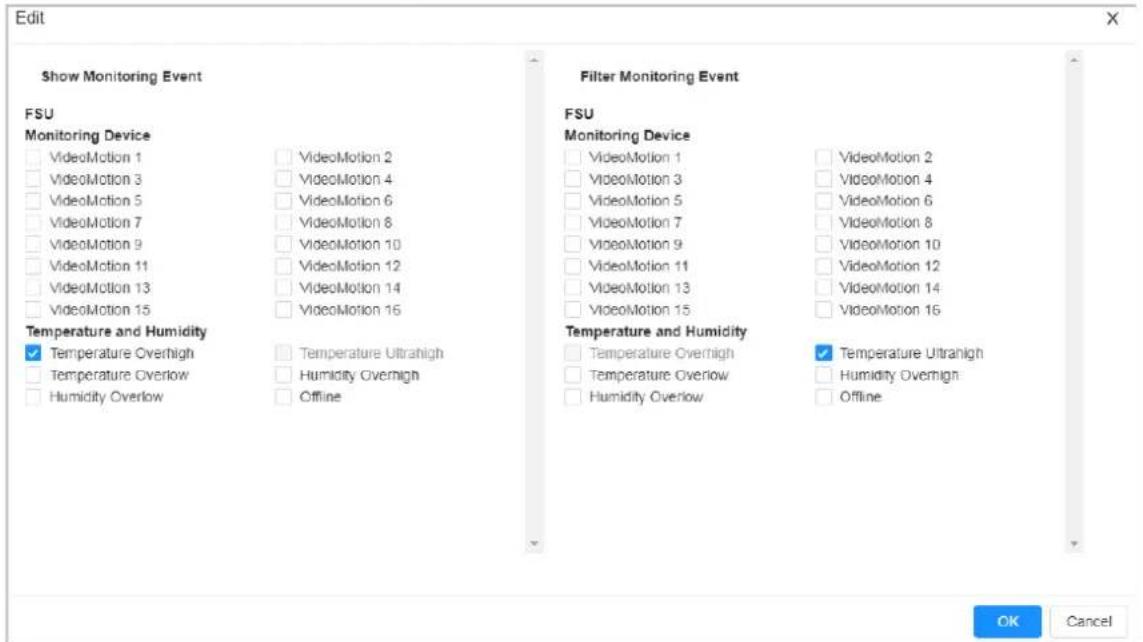
Step 3 Select Show Monitoring Event and Filter Monitoring Event according to the connected peripherals.
Step 4 Click OK.
Click 📄 to delete the configured item.
4.3.4 Assets Configuration
Upload Assets
Upload threshold configuration files and platform asset code files of peripherals.
Step 1 Select Config > Asset Config.
Figure 4-12 Asset configuration
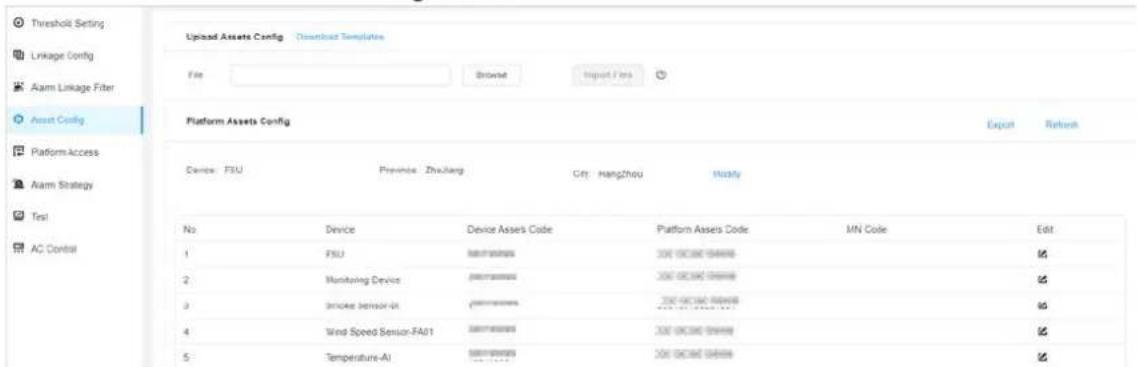
Step 2 Click Browse, and then select .cvs or .pointDB files from the dialogue box. .cvs is the file of platform asset code and .pointDB is the database for monitoring events.
Step 3 Upload the files.
Platform Assets Code Management
You can modify assets code of the peripherals added on the platform.
Step 1 Select Config > Asset Config.
Step 2 Click ☑ to enter the new platform assets code.
Step 3 Click OK.
4.3.5 Accessing the Platform
You can access platform to the Device so as to collect platform data for monitoring.
Step 1 Select Config > Platform Access.
Step 2 Select 1 or 2 to access platform 1 or platform 2.

You can access both platforms at the same time. Configure parameters for platform 1 first, and then for platform 2.
Step 3 Select Access Mode from Interface B Protocol, IEC 60870-5-104 or Environment Monitoring System.
Step 4 Enable Middleware Connection and Accessing Base to access the platform.
Step 5 Enter the Server Address, Server Port of the platform, and the Registration Interval.

The access mode and interface might differ depending on the platform. This section uses selecting Interface B Protocol as an example.
Figure 4-13 Access the platform

Step 6 Click Apply.
Step 7 Click Refresh to check whether the connection was successful.
4.3.6 Alarm Strategy
Set the statistical cycle and the maximum alarm times. When the alarm times exceed the upper limit within the defined period, it is considered as high-frequency, and the alarm will be marked and shielded. If later the upper limit is not reached, the alarm returns to normal status.
Step 1 Select Config > Alarm Strategy.
Figure 4-14 High-frequency alarm settings

Step 2 Enable Alarm Strategy.
Step 3 Set the Statistical Cycle and Max Alarm Count.
• Statistical Cycle: The time interval for counting the alarm times. It is 1800 s by default.
- Max Alarm Count: The maximum number of alarms logs that the system can receive within the statistical period. It is 6 by default.
Step 4 Click Apply.
4.3.7 Test
You can test whether the Device is running normally and the connection status of peripherals.
Step 1 Select Config > Test.
- Local Digital Input: When there is local digital input manually, the corresponding spot will be yellow.
- Local Analog Input: When there is local analog input, the corresponding values are displayed.
- Serial Port Communication Status: Green means communication succeeded, and red means failure.
- Alarm Mode: Manual means triggering alarms manually and corresponding tick will show in the Status checkbox; Close means disabling alarm; Auto means applying the last-set alarm mode. Click Apply after you set the alarm mode each time.
Step 2 Click Refresh to get the latest running and connection status.
Figure 4-15 Test

4.3.8 Air Conditioner Control
The air conditioner controller can be linked to the Device to adjust the indoor temperature. When the indoor temperature is higher than the high temp threshold, the air conditioner turns on automatically. When the temperature is lower than the low temp threshold, the air conditioner turns off automatically.
Step 1 Select Config > AC Control.
Figure 4-16 Air Conditioner Control
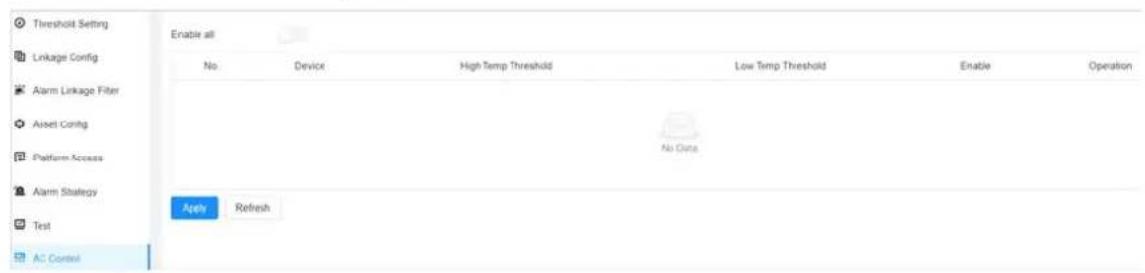
Step 2 Enable AC Control.

The function is disabled by default.
Step 3 Click ☑ to set High Temp Threshold and Low Temp Threshold.
The temperature threshold range is from -99^ to +99^ (-146.2°F to +210.2°F).

By default, the temperature threshold to turn on the air conditioner is +30 °C (+86 °F), and +16 °C (+60.8 °F) to turn off it.
Step 4 Click Apply.
4.4 Other Configurations
4.4.1 System Update

- During upgrade, do not disconnect the power supply, network, and do not restart or shut down the Device.
- Select correct upgrade files; otherwise the Device cannot work normally.
Step 1 Select > System > Update.
Step 2 Click Browse, and then select the update file (.bin) to be imported.
Figure 4-17 System update

Step 3 Click Update to update the system. After the update is complete, the Web Manager will restart.
4.4.2 Peripheral Management
Link peripherals with the added protocol, and then the peripherals can be monitored by the Device.
4.4.2.1 Adding Peripherals
For details on adding peripherals, see "4.2 Quick Configuration".
4.4.2.2 Adding Protocols
Add peripheral-related protocols to link the Device to peripherals.
Step 1 On the home page, click Peripheral Management.
Step 2 Click Add Protocols.
Figure 4-18 Add protocols

Step 3 Click Browse to select a protocol file.

Protocol files suffixed .lua support multiple peripherals of the same model, and you can just upload a single protocol file.
Step 4 Enter the Protocol Name.
Step 5 Click OK to add the protocol to the list.
Step 6 On the Peripheral Management, find the protocol in the list and switch

to

to enable the protocol.
4.5 Monitoring
After finishing the Device configurations, you can view the working status and alarm status of the peripherals on the integrated monitoring interface.
4.5.1 Overview
On the home page, click Monitoring.
Figure 4-19 Overview
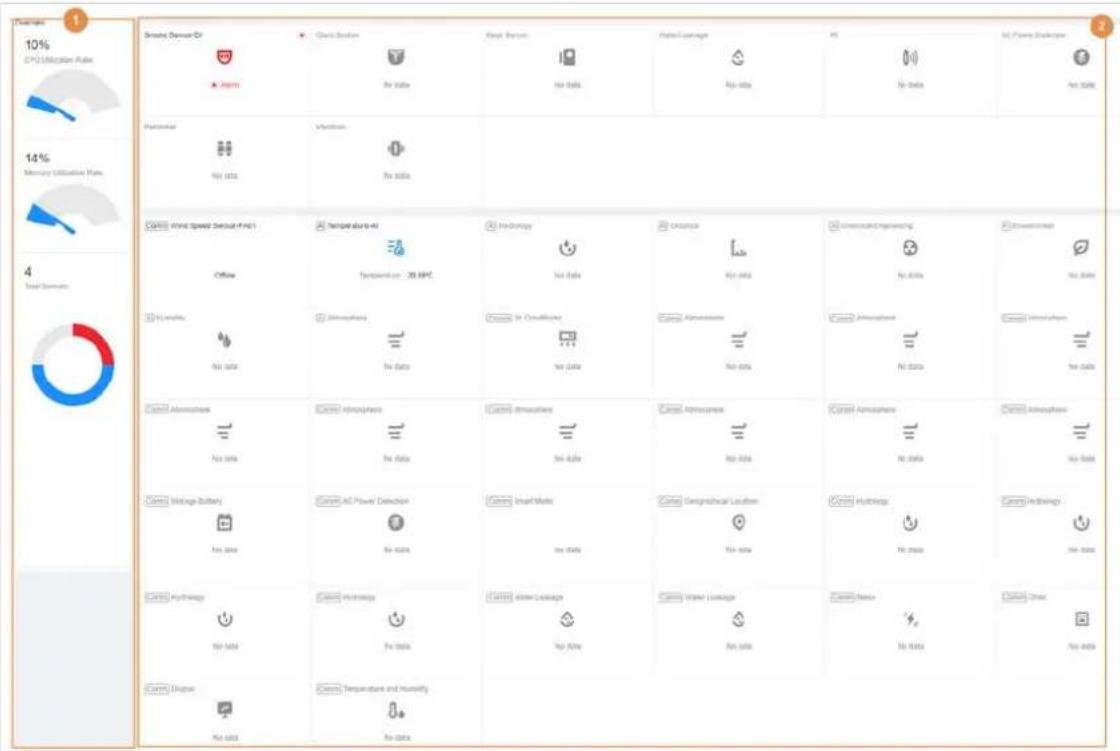
Table 4-4 Interface description
| No. | Parameter | Description |
| 1 | Overview | You can view the CPU usage, memory usage, and peripheral status. |
| 2 Peripherals | ● You can check if peripherals are running normally, offline, or give alarms.● Click the peripheral as needed to view its specific monitoring information. For details, see "4.5.2 Viewing Peripherals." | |
4.5.2 Viewing Peripherals
On the home page, click Monitoring, and then click the peripheral on the right as needed.
The type of peripheral is displayed on the left, and specific monitoring and alarm information is displayed on the right.

A red dot indicates the peripheral has an alarm.
Figure 4-20 Peripheral details

Appendix 1 Cybersecurity Recommendations
Mandatory actions to be taken for basic device network security:
1. Use Strong Passwords
Please refer to the following suggestions to set passwords:
● The length should not be less than 8 characters.
- Include at least two types of characters; character types include upper and lower case letters, numbers and symbols.
- Do not contain the account name or the account name in reverse order.
- Do not use continuous characters, such as 123, abc, etc.
- Do not use overlapped characters, such as 111, aaa, etc.
2. Update Firmware and Client Software in Time
- According to the standard procedure in Tech-industry, we recommend to keep your device (such as NVR, DVR, IP camera, etc.) firmware up-to-date to ensure the system is equipped with the latest security patches and fixes. When the device is connected to the public network, it is recommended to enable the "auto-check for updates" function to obtain timely information of firmware updates released by the manufacturer.
- We suggest that you download and use the latest version of client software.
"Nice to have" recommendations to improve your device network security:
1. Physical Protection
We suggest that you perform physical protection to device, especially storage devices. For example, place the device in a special computer room and cabinet, and implement well-done access control permission and key management to prevent unauthorized personnel from carrying out physical contacts such as damaging hardware, unauthorized connection of removable device (such as USB flash disk, serial port), etc.
2. Change Passwords Regularly
We suggest that you change passwords regularly to reduce the risk of being guessed or cracked.
3. Set and Update Passwords Reset Information Timely
The device supports password reset function. Please set up related information for password reset in time, including the end user's mailbox and password protection questions. If the information changes, please modify it in time. When setting password protection questions, it is suggested not to use those that can be easily guessed.
4. Enable Account Lock
The account lock feature is enabled by default, and we recommend you to keep it on to guarantee the account security. If an attacker attempts to log in with the wrong password several times, the corresponding account and the source IP address will be locked.
5. Change Default HTTP and Other Service Ports
We suggest you to change default HTTP and other service ports into any set of numbers between 1024–65535, reducing the risk of outsiders being able to guess which ports you are using.
6. Enable HTTPS
We suggest you to enable HTTPS, so that you visit Web service through a secure communication channel.
7. MAC Address Binding
We recommend you to bind the IP and MAC address of the gateway to the device, thus reducing
the risk of ARP spoofing.
8. Assign Accounts and Privileges Reasonably
According to business and management requirements, reasonably add users and assign a minimum set of permissions to them.
9. Disable Unnecessary Services and Choose Secure Modes
If not needed, it is recommended to turn off some services such as SNMP, SMTP, UPnP, etc., to reduce risks.
If necessary, it is highly recommended that you use safe modes, including but not limited to the following services:
- SNMP: Choose SNMP v3, and set up strong encryption passwords and authentication passwords.
- SMTP: Choose TLS to access mailbox server.
- FTP: Choose SFTP, and set up strong passwords.
● AP hotspot: Choose WPA2-PSK encryption mode, and set up strong passwords.
10. Audio and Video Encrypted Transmission
If your audio and video data contents are very important or sensitive, we recommend that you use encrypted transmission function, to reduce the risk of audio and video data being stolen during transmission.
Reminder: encrypted transmission will cause some loss in transmission efficiency.
11. Secure Auditing
- Check online users: we suggest that you check online users regularly to see if the device is logged in without authorization.
- Check device log: By viewing the logs, you can know the IP addresses that were used to log in to your devices and their key operations.
12. Network Log
Due to the limited storage capacity of the device, the stored log is limited. If you need to save the log for a long time, it is recommended that you enable the network log function to ensure that the critical logs are synchronized to the network log server for tracing.
13. Construct a Safe Network Environment
In order to better ensure the safety of device and reduce potential cyber risks, we recommend:
- Disable the port mapping function of the router to avoid direct access to the intranet devices from external network.
- The network should be partitioned and isolated according to the actual network needs. If there are no communication requirements between two sub networks, it is suggested to use VLAN, network GAP and other technologies to partition the network, so as to achieve the network isolation effect.
- Establish the 802.1x access authentication system to reduce the risk of unauthorized access to private networks.
- Enable IP/MAC address filtering function to limit the range of hosts allowed to access the device.
- Environment Surveillance Server Quick Start Guide
- Foreword
- General
- Safety Instructions
- Revision History
- Privacy Protection Notice
- About the Manual
- Important Safeguards and Warnings
- Operation Requirements
- Installation Requirements
- WARNING
- Table of Contents
- Foreword....I
- Important Safeguards and Warnings.... III
- Overview....5
- Structures....7
- Installation and Wiring....9
- Web Operations....14
- Other Configurations....26
- Monitoring....28
- Appendix 1 Cybersecurity Recommendations....30
- Overview
- Introduction
- Features
- Environmental Data Collection
- Environmental Data Management
- Remote Monitoring
- Local Configurations
- Storage
- Backup
- Alarm Linkage
- Communication Port
- Intelligent Operation
- UPnP (Universal Plug and Play)
- Structures
- Dimensions
- Front Panel
- Rear Panel
- Installation and Wiring
- Installation Preparations
- Tools
- Requirements
- Cutting Wires
- Stripping Wires
- Wiring
- Terminal
- Soldering
- Selecting Installation Position
- Installing the Device and Peripherals
- Connecting Wires
- Alarm Input Port Wiring
- Analog Input Port Wiring
- RS-485 Port Wiring
- RS-232 Port Wiring
- Power Port Wiring
- Web Operations
- Logging in to Web Manager
- Quick Configuration
- Adding Peripherals
- Accessing Platform
- Formatting Storage Medium
- Device Configuration
- Setting Threshold
- 3) Click OK to save settings.
- Linkage
- Step 1 Select Config > Linkage Config.
- Alarm Linkage Filter
- Step 1 Select Config > Alarm Linkage Filter.
- Assets Configuration
- Upload Assets
- Platform Assets Code Management
- Accessing the Platform
- Alarm Strategy
- Step 1 Select Config > Alarm Strategy.
- Step 2 Enable Alarm Strategy.
- Step 3 Set the Statistical Cycle and Max Alarm Count.
- Step 4 Click Apply.
- Test
- Step 1 Select Config > Test.
- Step 2 Click Refresh to get the latest running and connection status.
- Air Conditioner Control
- Other Configurations
- System Update
- Peripheral Management
- Adding Peripherals
- Adding Protocols
- Monitoring
- Overview
- Viewing Peripherals
- Appendix 1 Cybersecurity Recommendations
- Mandatory actions to be taken for basic device network security:
- Use Strong Passwords
- Update Firmware and Client Software in Time
- "Nice to have" recommendations to improve your device network security:
- Physical Protection
- Change Passwords Regularly
- Set and Update Passwords Reset Information Timely
- Enable Account Lock
- Change Default HTTP and Other Service Ports
- Enable HTTPS
- MAC Address Binding
- Assign Accounts and Privileges Reasonably
- Disable Unnecessary Services and Choose Secure Modes
- Audio and Video Encrypted Transmission
- Secure Auditing
- Network Log
- Construct a Safe Network Environment
Brand : Dahua Technology
Model : FSU6808U
Category : Environmental Monitoring Server