
SV411KA - KVM switch StarTech.com - Free user manual and instructions
Find the device manual for free SV411KA StarTech.com in PDF.


| Product Type | 4-Port USB KVM Switch with Audio |
| Number of Connected Computers | 4 |
| User Console | 1 (single user) |
| Video Interface | VGA (HD-15) per port |
| Video Resolution Support | Up to 1920x1440 @ 60Hz |
| Keyboard/Mouse Interface | USB Type-A |
| Audio Support | Yes (microphone and speaker switching) |
| Switch Method | Front panel push buttons, hotkeys, and RS-232 (optional) |
| Power Source | USB bus-powered (5V DC) or optional DC adapter |
| Dimensions (L x W x H) | 10.2 x 3.0 x 1.2 inches (259 x 76 x 30 mm) |
| Weight | 1.1 lbs (0.5 kg) |
| Material | Metal enclosure |
| Operating Temperature | 32°F to 122°F (0°C to 50°C) |
| Humidity | 0% to 80% RH (non-condensing) |
| Certifications | FCC, CE |
| LED Indicators | Port selection (green LEDs per port) |
| Cable Length (included) | Not included (requires separate KVM cable kit) |
| Repairability | No user-serviceable parts; contact support for warranty |
| Maintenance | Clean with dry cloth; avoid liquids |
| Warranty | 2-year limited warranty |
Frequently Asked Questions - SV411KA StarTech.com
User questions about SV411KA StarTech.com
0 question about this device. Answer the ones you know or ask your own.
Ask a new question about this device
Download the instructions for your KVM switch in PDF format for free! Find your manual SV411KA - StarTech.com and take your electronic device back in hand. On this page are published all the documents necessary for the use of your device. SV411KA by StarTech.com.
USER MANUAL SV411KA StarTech.com
StarView KVM with Audio

SV211KA
SV411KA
Instruction Guide

* SV411KA shown
* Actual product may vary from photo
StarTech.com

The Professionals' Source For Hard-to-Find Computer Parts
FCC COMPLIANCE STATEMENT
This equipment has been tested and found to comply with the limits for a Class B digital device, pursuant to part 15 of the FCC Rules. These limits are designed to provide reasonable protection against harmful interference in a residential installation. This equipment generates, uses and can radiate radio frequency energy and, if not installed and used in accordance with the instructions, may cause harmful interference to radio communications. However, there is no guarantee that interference will not occur in a particular installation. If this equipment does cause harmful interference to radio or television reception, which can be determined by turning the equipment off and on, the user is encouraged to try to correct the interference by one or more of the following measures:
- Reorient or relocate the receiving antenna.
- Increase the separation between the equipment and receiver.
- Connect the equipment into an outlet on a circuit different from that to which the receiver is connected.
- Consult the dealer or an experienced radio/TV technician for help.
Table of Contents
Introduction 2
Installation 3
Using Your KVM Switch ....4
Troubleshooting 5
Product Specifications 6
Technical Support 7
Warranty Information 7
Introduction
Thank you for purchasing a StarTech.com two or four port StarView KVM switch with audio. You can now connect your computers to a single keyboard, mouse, monitor, microphone, and speakers, sparing you the clutter of extra consoles or peripherals. The switch is up and running with only a few simple cable connections, and switching between computers is as easy as a push button or hot-key combination.
Features
• Supports most microphones and speakers
• Supports hot-plugging of PS/2 keyboards or mice
- Works with M/S Intellimouse (Pro), Explorer, optical mice
- Performs sequential auto-scan of all computers
- Saves and restores keyboard states when switching computers
- Acts independently of operating system
• Supports high VGA resolution of 1920x1440 (DDC2B compatible)
- Backed by StarTech.com's one year warranty
Before You Begin
Toensure a quick and easy switch installation, please read through this section carefully before attempting to install the switch.
System Requirements
• I BM compatible computers
- One monitor (must be capable of synchronizing with each computer's video signal. Check your monitor's user manual for more information)
• One PS/2 keyboard and mouse
- One set of speakers
- One microphone
Contents
This package should contain:
• 1 x KVM switch
- SV211KA: 2 x 6 ft (1.8m) 3-in-1 cable set, 4 x 6 ft (1.8m) custom audio cable set
• SV411KA: 4 x 6 ft (1.8m) 3-in-1 cable set, 8 x 6 ft (1.8m) custom audio cable set
Installation
This section will guide you through the installation of your KVM switch. Please read through the instructions carefully and complete each step in the order listed.
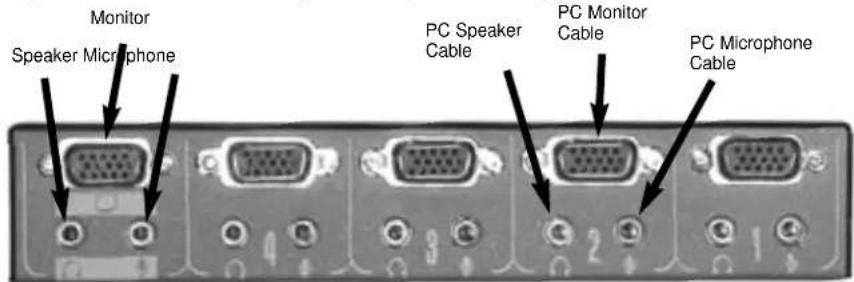
Back

NOTE: Make sure that all devices are turned off before beginning installation.
Connecting the switch
- Plug your monitor into the labeled HDB-15 port on the left side of the back of the switch.
- Plug your PS/2 keyboard and mouse into the labeled mini-DIN-6 ports on the right side of the switch.
- Plug your speakers and microphone into the labeled ports on the left side of the back of the switch.
Connecting the computers
- Connect the single end of the 3-in-1 cable into an open HDB-15 port on the back of the switch.
- Plug the blue monitor, purple keyboard, and green mouse cables into the ports on the back of the computer.
- Plug one end of the pink microphone cord into the mic port on the switch and the other end into the mic port on your computer.
- Plug one end of the green speaker cord into the speaker port on the switch and the other end into the speaker port on your computer.
Repeat steps 1-4 for any other computers you want to connect to the switch. Your KVM switch is now ready for use.
Using Your KVM Switch
NOTE: Only the LEFT Control key works for hot-key sequences.
Switching Computers
The LEDs on the front panel of the switch indicate which computer is active. To switch between computers, either use the push-button on the front of the switch to scroll through the computers, or hit the left Control key twice followed by the port number (for example, to select the computer plugged into port 2, type left Ctrl + left Ctrl + 2).
Using Auto Scan
When auto scan mode is started, the switch will automatically scan through the attached computers at user-defined intervals. Any keyboard or mouse activity will suspend the auto scan, but once the activity ceases, auto scan will begin again.
• T o start auto scan, type left Ctrl + left Ctrl + F1.
• To end auto scan, type left Ctrl + left Ctrl.
- To adjust the scan rate, type left Ctrl + left Ctrl + F3 and choose between 3 (default), 8, 15, or 30 seconds.
Manual Scan
Tomanually scan back and forth between computers, type left Ctrl + left Ctrl + F2. Use the up and down arrow keys to select the previous or next computer. Pressing any other key will abort the manual scan.
Keyboard Rates
Toadjust the keyboard typematic rate, type left Ctrl + left Ctrl + F4 and select from 10 (default), 15, 20, or 30 characters/second.
NOTE: This will override the typematic rate set in your BIOS or operating system.
Troubleshooting
If you encounter any problems, first make sure all cables are firmly seated at both ends and connected to their proper ports.
Problem: Keyboard or mouse doesn't work.
Cause: Improper power-up sequence. Keyboard or mouse has not initialized properly.
Solution: Press and hold the push-button for 3 seconds. This switch will reinitialize the device. If the problem persists, unplug the device, wait a few seconds, and plug it back in. Also remember that the switch does not support serial mice.
Problem: Keyboard error while booting up.
Cause: Loose keyboard connection.
Solution: Make sure keyboard cables are well-seated and in its proper ports.
Problem: Keyboard strokes are shifted.
Cause: The computer was in a shifted state when last switched.
Solution: Press both Shift keys.
Problem: The switch occasionally fails to function.
Cause: Computers are not supplying enough power.
Solution: Connect a DC 9V 500mA power adapter (not included) to output jack.
Problem: Scan or Typematic rate has changed.
Cause: All connecting computers were turned off and the switch has reset to default
settings
Solution: Manually set the rates again and keep at least one computer on at all times.
Product Specifications
| SV211KA SV411KA | ||
| Console ports 1 1 | ||
| Computer ports 2 4 | ||
| Port selection button 1 | 1 | |
| Hot plug-and-play Yes | Yes | |
| Hot-key control Yes Yes | ||
| VGA 1920 x 1440, DDC2B 1920 x 1440, DDC2B Computer connector HDB-15 x 2, Stereo jack x 4 HDB Console connector Keyboard: PS/2 Keyboard: PS/2 Mouse: PS/2 Monitor: HDB15 Speaker/Mic: Stereo jack x 2 | 15 x 4, Stereo jack x 8 Mouse: PS/2 Monitor: HDB15 Speaker/Mic: Stereo jack x 2 | |
| Auto scan interval | 3, 8, 15, 30 seconds | 3, 8, 15, 30 seconds |
| KVM cable length | 6 ft (1.8m) | 6 ft (1.8m) |
| Audio cable length | 6 ft (1.8m) | 6 ft (1.8m) |
| Power free operation | Yes Yes | |
Technical Support
The following technical resources are available for this StarTech.com product:
On-line help:
We are constantly adding new information to the Tech Support section of our web site. To access this page, click the Tech Support link on our homepage, www.startech.com. In the tech support section there are a number of options that can provide assistance with this card.
Knowledge Base - This tool allows you to search for answers to common issues using key words that describe the product and your issue.
FAQ - This tool provides quick answers to the top questions asked by our customers.
Downloads - This selection takes you to our driver download page where you can find the latest drivers for this product.
Call StarTech.com tech support for help: 1-519-455-4931
Support hours: Monday to Friday 9:00AM to 5:00PM EST (except holidays)
Warranty Information
This product is backed by a one-year warranty. In addition StarTech.com warrants its products against defects in materials and workmanship for the periods noted below, following the initial date of purchase. During this period, the products may be returned for repair, or replacement with equivalent products at our discretion. The warranty covers parts and labor costs only. StarTech.com does not warrant its products from defects or damages arising from misuse, abuse, alteration, or normal wear and tear.
Limitation of Liability
In no event shall the liability to StarTech.com Ltd. (or its officers, directors, employees or agents) for any damages (whether direct or indirect, special, punitive incidental, consequential, or otherwise), loss of profits, loss of business, or any pecuniary loss, arising out of related to the use of the product exceed the actual price paid for the product.
Some states do not allow the exclusion or limitation of incidental or consequential damages. If such laws apply, the limitations or exclusions contained in this statement may not apply to you.


- Instruction Guide
- FCC COMPLIANCE STATEMENT
- Table of Contents
- Introduction
- Features
- Before You Begin
- System Requirements
- Contents
- Installation
- Connecting the switch
- Connecting the computers
- Using Your KVM Switch
- Switching Computers
- Using Auto Scan
- Manual Scan
- Keyboard Rates
- Troubleshooting
- Technical Support
- On-line help:
- Warranty Information
- Limitation of Liability
Brand : StarTech.com
Model : SV411KA
Category : KVM switch