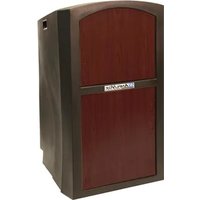
Pinnacle SN3250 - Loudspeaker AmpliVox - Free user manual and instructions
Find the device manual for free Pinnacle SN3250 AmpliVox in PDF.


| Product Type | Portable PA Speaker |
| Dimensions (H x W x D) | 12.5 x 9.8 x 8.2 inches |
| Weight | 15.4 lbs (7.0 kg) |
| Power Source | AC 100-240V, 50/60Hz or rechargeable battery |
| Amplifier Power | 50W RMS |
| Speaker Configuration | 8-inch woofer with 1-inch tweeter |
| Frequency Range | 60 Hz - 20 kHz |
| Maximum SPL | 110 dB |
| Inputs | XLR/1/4" combo, RCA, 3.5mm aux, Bluetooth |
| Outputs | 1/4" speaker out, RCA line out |
| Battery Life | Up to 8 hours at moderate volume |
| Charging Time | 4-5 hours |
| Mounting Options | Floor stand (1-3/8" pole), tabletop, or tripod |
| Included Accessories | Wireless handheld microphone, AC power cord, user manual |
| Material | High-impact ABS plastic with metal grille |
| Color | Black |
| Operating Temperature | 14°F to 104°F (-10°C to 40°C) |
| Certifications | CE, FCC, RoHS |
| Warranty | 2 years limited |
| Country of Origin | China |
Frequently Asked Questions - Pinnacle SN3250 AmpliVox
User questions about Pinnacle SN3250 AmpliVox
0 question about this device. Answer the ones you know or ask your own.
Ask a new question about this device
Download the instructions for your Loudspeaker in PDF format for free! Find your manual Pinnacle SN3250 - AmpliVox and take your electronic device back in hand. On this page are published all the documents necessary for the use of your device. Pinnacle SN3250 by AmpliVox.
USER MANUAL Pinnacle SN3250 AmpliVox
MODEL SW3240 / SW3250 USER GUIDE
Pinnacle Full Height and Tabletop Lectern with Internal 16 Channel UHF Wireless Receiver and Amplifier
NEED HELP? CALL 800-267-5486 OR 847-498-9000 EMAIL: CUSTOMERSERVICE@ AMPLI.COM
SW3250
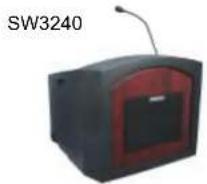

natural_image
Exterior view of a wooden and brown portable electronic device with a screen (no visible text or symbols)Thank you for choosing the SW3240 / SW3250 Pinnacle Lectern from AmpliVox Portable Sound Systems.
We are excited in introducing this truly unique system. Our system combines flexibility with functionality. Please refer to this user guide as you enjoy the unique capabilities of another quality product from AmpliVox Portable Sound Systems.
We encourage you to visit our website www.ampli.com to register your product for its warranty coverage, sign up to receive our newsletter, download our catalog, and learn more about the complete line of AmpliVox audio visual products, including portable PA systems, and lecterns.
INCLUDES:
• Built-in Flush Mount Amplifier w/Internal 16 Channel UHF Wireless Receiver
• Electret Gooseneck Microphone
• Wireless headset and lapel mic with transmitter
• 25 Foot XLR Cable
• 16 Foot Power Cord
The SW3240 / SW3250 Pinnacle Lectrms come with a Gooseneck Mic. that installs in the cable mounted in the shock mount on the reading table. That cable is prewired to the XLR connector at the lower side of the unit where you plug in an XLR cable to the house PA system.
BATTERY INSTALLATION / SET-UP
INSTALL POWER SUPPLY IN ALL COMPONENTS
IMPORTANT! Do not mix battery types or attempt to recharge alkaline batteries. Equipment damage, safety hazard or fire could result. Remove batteries if the unit is not going to be used for long periods of time to prevent leakage.
SW3240 / SW3250: Both lectems run on AC power or battery power. The battery carriage holds 10 D-cell alkaline batteries or Amplivox optional S1465 NiCad
Battery Pack (Fig.1) which also requires a S1460 AC adapter for recharging. (Fig.2). Or runs on a 12 Volt DC adapter (automotive cigarette lighter plug-in, not included).
Locate amplifier (A). Loosen four thumbscrews (B) and remove battery door. Remove battery carriage (C). Insert 10 D-cell alkaline batteries, observing polarity, or replace with fully charged S1465 NiCad battery pack. Carefully replace the battery carriage. Reposition battery door and fasten the thumbscrews.
Transmitter Bodypack: The transmitter bodypack (S1690T) is operated by 1 - "AA" alkaline battery. Before use, install battery as shown (Fig. 3). Make certain the battery is fully sealed in its compartment so the cover slides in place easily. Battery life with alkaline batteries is approximately 8 hours of operating time.
Select channel (1-16) on front panel (A). Channel number should match channel number on wireless transmitter. Use supplied screwdriver to select channel number.
Frequency Range: 584-608 MHz
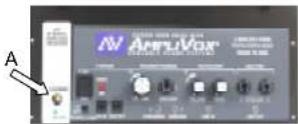
CONTROL PANEL
(A) ON-OFF: POWER SWITCH is located on left of front panel. When turned on, the red LED will light.
(B) INTERNAL WIRELESS ON-OFF SWITCH
(C) DC IN: Connection for optional power adapter: • S1460 International AC Adapter/Recharger (110/220V, 50/60Hz) • S1462 12 Volt DC (automotive cigarette lighter) Adapter
(D) AUX POWER OUT: Connection for 12 to 15V DC accessory
(E) MICROPHONE INPUTS:
There are three microphone inputs, which can be used simultaneously
DYNAMIC - for standard dynamic cartridge microphones. 1/4" jack CONDENSER - for electret or condenser microphones, which require phantom power (supplied from the amplifier). 3.5mm jack WIRELESS - accepts line-level output from wireless microphone receiver. 3.5mm jack
(F) AUX - AUXILIARY: To play pre-recorded music, connect the LINE OUT of your CD player, tape player, MP3 or Smartphone (cable with 3.5mm plug will be needed) into the LINE IN jack. Separate VOLUME and TONE control knobs let you balance the program source with the live microphones. Can also be used for an external wireless microphone receiver.
(G) OUTPUT - LINE OUT : To record your speech or program, connect the LINE OUT on the amplifier (cable with 3.5mm plug will be needed) to the input of a recorder.
(H) VOLUME CONTROL - MAIN: Rotate clockwise to increase amplification of Microphone inputs and internal wireless.
(I) SPEAKERS: Two separately amplified speaker jacks allow you to use one or two speakers (S1201, S1290) for additional sound power or true stereo output. Note: when using a stereo AUX source with a single speaker, only one of the stereo channels will be heard. However, all MIC inputs are heard equally on both channels.
TO OPERATE: Insure the speaker is plugged into Left SPEAKER jack. Turn amplifier on. Turn on wireless receiver (if using wireless microphone). LED on front of cabinet will light. Insure both transmitter and receiver are on same frequency. Turn on power switch located on wireless transmitter (body pack or handheld microphone). Rotate main VOLUME control knob to obtain desired loudness level throughout the coverage area.

FEATURES
READING LAMP
The lectern is equipped with a bright, adjustable 6-LED reading lamp that aluminates the entire reading surface. To use the reading lamp located on the panel in front of the reading surface, the main power on the electronics panel must be turned on. The knob located to the right of the reading lamp turns it on and controls the brightness. Turn it clock-wise to make it brighter and counterclockwise to dim or turn off completely.
CLOCK / TIMER
The jumbo LCD display has backlighting for easy reading for the presenter to be able to track time and length of presentation.
HELPFUL HINTS
A) If the selected channel is noisy, switch both the transmitter and receiver to another channel.
B) Low ceiling fluorescent lighting, overhead telephone lines, or close proximity to metal fences can all cause static. If this occurs, try a slight change of position and/or try changing frequencies.
C) When the battery voltage drops below 6V, the L*D indicator will go out. This means you need new batteries.
D) Be sure to turn off the power whenever the units are not in use, and remove the battery if the transmitter will be out of service for a long time.
*) Cellular telephones cause interference. Ask your audience to turn off their cell phones.
NOT*: There are no user-adjustable parts inside the transmitter. Do not attempt to open or make any adjustments
FEEDBACK
Feedback is the howl or screech often heard in sound reinforcement systems. It is caused by sound from the loudspeaker returning to the microphone. AmpliVox systems utilize proven acoustical principles to minimize this; however, there is no way to completely eliminate feedback under conditions of high amplification. If feedback occurs check the following:
-
User's hand covering the head of the microphone. (Hold microphone under head slots.)
-
Sound can easily re-enter microphone. Keep loudspeaker turned toward audience. Note: sound can be reflected from a hard surface back through the microphone. (Turn speaker.)
-
User holding microphone in a reflecting position. (Turn microphone.)
-
Volume setting too high. (Reduce microphone channel volume; compensate by speaking louder or closer to the microphone.)
WARRANTY
Limited One (1) -Year Warranty
AmpliVox warrants this product to be free from defects in materials and workmanship (subject to the terms set forth below) for a period of one (1) year from the date of purchase ("Warranty Period").
During the Warranty Period, AmpliVox will repair or replace (at AmpliVox's discretion) this product or any defective parts ("Warranty Service").
Repair or replacement under the terms of this warranty does not give right to any extension or a new beginning of the period of warranty.
CLAIMS UNDER THE WARRANTY
To obtain Warranty Service, contact AmpliVox (800-267-5486) to be assigned a Return Authorization number (RA#). After receiving a RA#, the defective unit is to be returned to AmpliVox in either its original packaging or packaging affording an equal degree of protection. You will bear the cost of shipping the product to AmpliVox. If the product is covered by the warranty, AmpliVox will bear the cost of shipping product back to you after the completion of service under this warranty.
Return shipping will be charged to you for products not covered by the warranty or requiring no warranty repair.
The following information must be presented to obtain Warranty Service: (a) the RA# must be clearly and legibility marked on the outside of shipping carton, (b) proof of purchase, which clearly indicates the name and address of the seller, the date of purchase and the product type, which is evidence that this product is within the Warranty Period. Please further include (c) your return address, (d)

Brand : AmpliVox
Model : Pinnacle SN3250
Category : Loudspeaker