
CSA - Video capture device BZBGear - Free user manual and instructions
Find the device manual for free CSA BZBGear in PDF.


| Brand | BZBGear |
| Model | BG-CSA |
| Category | Video Capture Device |
| Interface | USB 3.1 Gen 1 (USB 3.0) Type A |
| Video Input | 1x 3G-SDI (BNC 75Ω) |
| Video Output | 1x USB 3.1 and 1x SDI Loopout |
| Audio Input | 1x 3.5mm stereo analog, SDI embedded audio |
| Maximum Video Resolution | 1080p60 |
| Audio Format | 2-channel PCM, 44.1/48 kHz, 16-bit |
| Recording Format | YUY2 (USB 3.1), MJPG (USB 2.0/3.1) |
| Recording Mode | Software Compression (H.264) |
| Input Video Bandwidth | 2.970 Gbit/s |
| Output Video Bandwidth | Up to 350 MBps (USB) |
| Latency | Low (not quantified) |
| ESD Protection | ±15kV air, ±8kV contact |
| Firmware Update | Via USB |
| Operating System Support | Windows 7/8.1/10, macOS, Linux |
| Software Compatibility | OBS Studio, AMCap, Potplayer, Skype, etc. |
| Dimensions (approx.) | 10.5 x 6.5 x 2.0 cm |
| Weight (approx.) | 100 g |
| Power Supply | USB powered (5V, 500mA) |
| Maintenance | Keep dry; clean with soft cloth |
| Safety Warnings | Do not expose to liquids or static discharge |
| Spare Parts | Contact support for replacement |
| Repairability | Not user-serviceable |
| Warranty | 1-year limited, free 2nd year upon registration |
Frequently Asked Questions - CSA BZBGear
User questions about CSA BZBGear
0 question about this device. Answer the ones you know or ask your own.
Ask a new question about this device
Download the instructions for your Video capture device in PDF format for free! Find your manual CSA - BZBGear and take your electronic device back in hand. On this page are published all the documents necessary for the use of your device. CSA by BZBGear.
USER MANUAL CSA BZBGear
USB 3.1 Gen 1 3G-SDI Capture Device with Scaler and Audio
User Manual

natural_image
Exterior view of a black electronic device with visible ports and labels (no readable text or symbols beyond branding)TABLE OF CONTENTS
INTRODUCTION....1
FEATURES 1
PACKAGE CONTENTS....1
SPECIFICATIONS 2
PANEL DESCRIPTIONS 3
CONNECTION DIAGRAM 3
VIDEO STREAMING....4
TROUBLESHOOTING....13
USB PIN DEFINITION 14
WARRANTY 15
MISSION STATEMENT 16
INTRODUCTION
The BG-CSA USB 3.1 Gen 1 3G-SDI Capture Device with Scaler and Audio provides a professional way to capture 3G/HD/SD-SDI signals. It utilizes the USB 3.1 Gen 1 (USB 3.0) interface to achieve high-speed transmission. With this device users can capture 3G/HD/SD-SDI signals. Additionally, BG-CSA can capture and display original uncompressed 3G/HD/SD-SDI with realistic color rendition. BG-CSA also uses large volume image buffer technology which effectively avoids video tearing. The high sampling rate and high sampling accuracy assure images with high sharpness, rich details, and fewer color edges.
FEATURES
- SDI output resolution scaler with audio embedding
• SDI video and audio streams over USB 3.1 Gen 1 - Supports UVC1.0
• Supports input and output video resolution up to 1080p 60Hz
• Supports SDI loop through - Auto-detection on video format to ensure plug-play operations
• Recording Video Format: H.264 (Software Compression)
• Works on multiple operating system platforms (Windows 7/8.1/10, Mac and Linux OS)
• Compatible with most 3rd party software such as OBS Studio and AMCap
• Supports USB 3.1 (MJPG/YUY2) and USB 2.0 (MJPG) - Low Latency
• System Requirements (Recommended)
(1) - 1.... 8.7654 / 119-1.... 6.6 / 119-1.... 40
SPECIFICATIONS
| Model Name | BG-CSA |
| Technical | |
| Role of usage | Video Capture Device |
| Input Video bandwidth | 2.970 Gbit/s, 2.970/1.001 Gbit/s |
| Output Video bandwidth | Up to 350MBps (USB) |
| Video support | Up to 1080p60 |
| Audio Input | SDI Embedded Audio & Stereo audio Input |
| Audio Format | 2 Channel, 44.1 and 48KHz sample rate, up to 16bit PCM |
| Recording Mode | Software Compression |
| Recording Video Format | YUY2 (USB3.1 Gen 1), MJPG (USB2.0/3.1 Gen 1) |
| ESD protection | Human body model — ±15kV [air-gap discharge] & ±8kV [contact discharge] |
| PCB stack-up | 6-layer board [impedance control — differential 100_ ; single 50_ ] |
| Firmware update | Via USB Port |
| Input | 1x SDI + 1x 3.5mm |
| Output | 1x USB + 1x SDI (Loopout) |
| BNC connector | 3G 75Ω inter-locked socket |
| USB connector | USB 3.1 Type A (SuperSpeed USB) |
| Software compatibility (not complete list) | OBS Studio (Windows, Linux), AMCap (Windows), Potplayer (Windows), Skype (Windows, OS X), Hangout (Windows), TeamViewer (Windows) |
| OS Support | Windows 7 /8.1 /10, Mac and Linux OS |
PANEL DESCRIPTIONS


natural_image
Close-up of two metallic circular connectors with a blue indicator light, labeled 4, 5, and 6 (no text or symbols on the connectors themselves)- USB OUT: Connect to a USB host (PC, NB, MAC...)
- STEREO AUDIO IN: Connect to analog stereo audio source
- AUDIO SWITCH: [left] Audio from stereo audio in, [right] Audio from SDI
- SDI IN: Connect to a 3G/HD/SD-SDI source
- LED INDICATOR: Input signal indicator LED
- SDI LOOPOUT: Connect to a 3G/HD/SD-SDI display
CONNECTION DIAGRAM
VIDEO STREAMING
Create a Video Stream
Users can create video streams on their streaming service platform of choice. The below steps show how to complete the video streaming settings from Twitch and YouTube.
Twitch
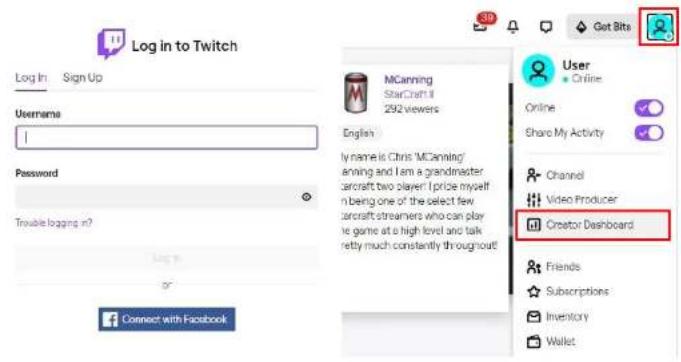
- Browse the Twitch website (https://www twitch.tv/) and log in, then select "Creator Dashboard" from your account drop-down menu at the top right of the screen.
-
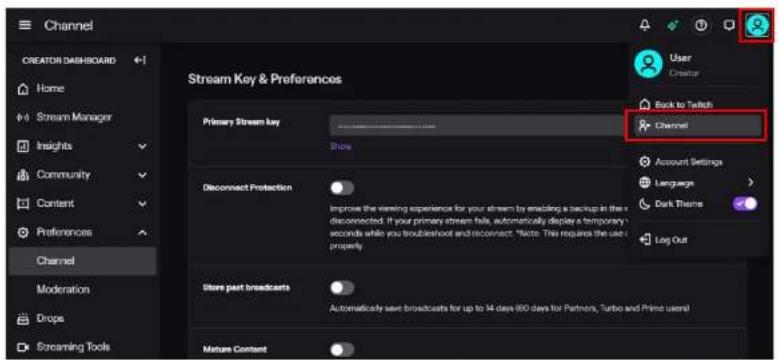
Find "Preferences" in the left menu, and click "Channel", then you will see "Primary Steam key" on the screen. Copy the "Primary Steam key" and paste it into the "Stream Key" field in the OBS, then click "Start Streaming"
-
Go back to Twitch and select "Channel" from your account drop-down menu.
- At this point, you will see the player start live streaming.

YouTube
- Browse the YouTube website (https://www.youtube.com/) and log In, then lick "Go live" from the "Create" icon menu at the top right of the screen.
* If your account is using YouTube for the first time to create a video stream, you need to wait 24 hours to enable the function.

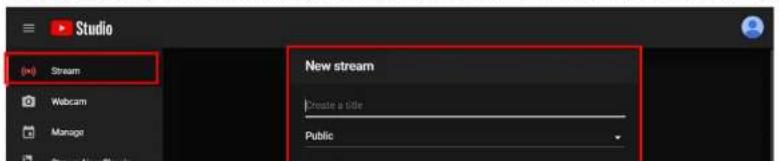
- Click "Stream" in the left menu, and fill in the relevant information of the live video to create a new stream.
- You will see "Stream key" from the "STREAM SETTINGS" below. Copy the "Stream key" and paste it into the "Stream Key" field in the OBS, then click "Start Streaming" in the software.
* Please refer to steps 4-6 of the OBS software control program.
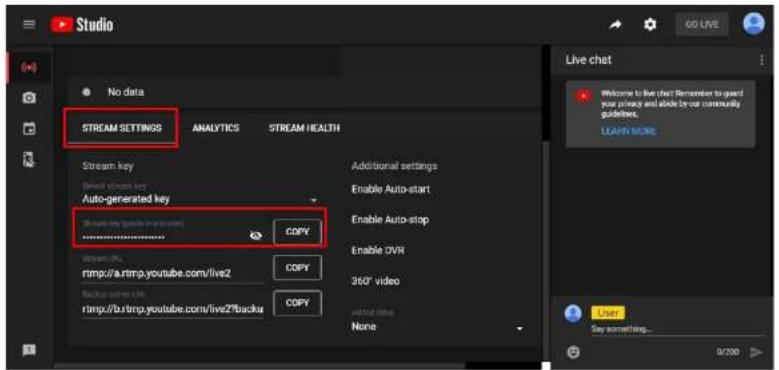
- Next, go back to YouTube, and then wait for 30-60 seconds, the player will display the live preview. At the same time, the "GO LIVE" button at the top right will turn blue, please press this button.

- The player on YouTube will start live streaming.

Stream and record videos with OBS
OBS is a popular USB capture freeware and has excellent compatibility. Please start with OBS if users are not familiar with USB capture devices.
Download the software
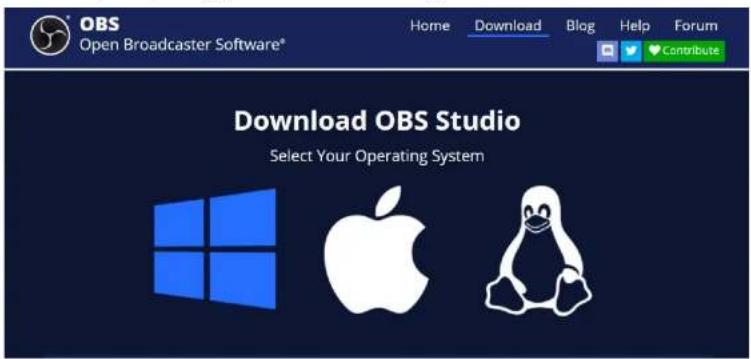
Browse the download page of the OBS official website (https://obsproject.com/download), then select the suitable computer operating system and start downloading.
Start the software control program
After downloading the software, please open it and follow the below steps to complete the video streaming settings.

- First, find the "Scenes" window, click "+" in the lower left corner, and then enter the name of the scene to create a new scene.


- Find the "Source" window, click "+" in the lower left corner, and then select "Display Capture" or "Video Capture Device" to create a new source.


-
Next you can get display capture properties. If you select "Display Capture" in step 2, you can select the image
-
Click "Settings" and then select "Stream" to perform streaming settings. Users can choose service providers, including Twitch, YouTube, etc.

- Paste the stream key provided by the service provider into the "Stream Key" field, then click "Apply" and "OK" after setting. In addition, users can lick "Get Stream Key" at this step to open the service provider website.

- On the other hand, users can also click "Start Recording" to record videos with OBS. Besides, you can click "Settings" and then select "Output" to set "Recording Path" and "Recording Format".

The procedures the manual demonstrates are based on the interface that each website provides at the time when the manual is written. The most current method of live streaming should be similar to the above procedures but is subject to change by the website interface update by the social media platform.
TROUBLESHOOTING
Our USB device has been subjected to rigorous tests before shipping. Most of the incompatibilities we have experienced are not from the USB capture device itself, but from the sophisticated software and hardware combinations of PCs or laptops. Please try the following suggestions-
- OBS is a popular USB capture freeware and has excellent compatibility with most devices. Please download it and start with OBS if users are not familiar with USB capture devices.
https://obsproject.com/download - Due to the complexities of OS and computer hardware, different USB ports on PCs or laptops may have different performance or limitations. Please try all USB ports to see if there are any differences.
- Please use the included USB cable. We do not guarantee the overall performance when the USB capture box is connected with other USB cables.
- SDI cable quality may also play an essential role when capturing. Please be sure the SDI cable is capable of 1080P@60 SDI signal transmission or better. Try different cables when the device is not able to work as expected.
- If audio has noise, please adjust sampling frequency setting on PC or laptop. If the default sampling rate is 48000 Hz, please select 44100 Hz and vice versa. The path of setting sampling frequency on windows 10 is:
Start → Setting → System → Sound → Device properties → Additional device properties → Advanced
USB PIN DEFINITION

| P1 | P2 | ||
| VBUS | 1 | ←→ | 1 |
| D- | 2 | ←→ | 2 |
| D+ | 3 | ←→ | 3 |
| GND | 4 | ←→ | 4 |
| SSRX- | 5 | ←→ | 5 |
| SSRX+ | 6 | ←→ | 6 |
| GND | 7 | ←→ | 7 |
| SSTX- | 8 | ←→ | 8 |
| SSRX+ | 9 | ←→ | 9 |
| Shield | SHELL | ←→ | SHELL |
WARRANTY
BZBGEAR wants to assure you peace of mind. We're so confident in the quality of our products that along with the manufacturer's one-year limited warranty, we are offering free second-year warranty coverage upon registration*.
Taking advantage of this program is simple, just follow the steps below:
-
Register your product within 90 days of purchase by visiting BZBGEAR.com/warranty.
-
Complete the registration form. Provide all necessary proof of purchase details, including serial number and a copy of your sales receipt.
For questions, please call 1.888.499.9906 or email support@bzbgear.com.
For complete warranty information, please visit BZBGEAR.com/warranty or scan the QR code below.

MISSION STATEMENT
BZBGEAR manifests from the competitive nature of the audiovisual industry to innovate while keeping the customer in mind. AV solutions can cost a pretty penny, and new technology only adds to it. We believe everyone deserves to see, hear, and feel the advancements made in today's AV world without having to break the bank. BZBGEAR is the solution for small to medium-sized applications requiring the latest professional products in AV.
We live in a DIY era where resources are abundant on the internet. With that in mind, our team offers system design consultation and expert tech support seven days a week for the products in our BZBGEAR catalog. You'll notice comparably lower prices with BZBGEAR solutions, but the quality of the products is on par with the top brands in the industry. The unparalleled support from our team is our way of showing we care for every one of our customers. Whether you're an integrator, home theater enthusiast, or a do-it-yourselfer, BZBGEAR offers the solutions to allow you to focus on your project and not your budget.
Brand : BZBGear
Model : CSA
Category : Video capture device