
XDPF10B - Digital photo frame XD Enjoy - Free user manual and instructions
Find the device manual for free XDPF10B XD Enjoy in PDF.


| Product Type | Digital Photo Frame |
| Brand | XD Enjoy |
| Model | XDPF10B |
| Display Size | 10 inches (diagonal) |
| Display Type | LCD |
| Resolution | 1024 x 768 pixels |
| Aspect Ratio | 4:3 |
| Supported Image Formats | JPEG, BMP, PNG |
| Internal Memory | 512 MB (expandable via SD/MMC/MS card) |
| Card Slots | SD/MMC/MS |
| USB Port | USB 2.0 (for connection to PC) |
| Remote Control | Yes, included |
| Slideshow Modes | Multiple transition effects, adjustable speed |
| Clock & Calendar | Built-in, can be displayed on screen |
| Power Supply | DC 5V, 1A (adapter included) |
| Dimensions (W x H x D) | 260 x 180 x 20 mm |
| Weight | Approx. 500 g |
| Stand | Detachable, allows vertical and horizontal orientation |
| Cleaning | Wipe gently with a soft, dry cloth; avoid liquids |
| Safety | Use only supplied adapter; keep away from moisture and heat |
| Spare Parts / Repairability | Contact XD Enjoy support; frame not user-serviceable |
Frequently Asked Questions - XDPF10B XD Enjoy
User questions about XDPF10B XD Enjoy
0 question about this device. Answer the ones you know or ask your own.
Ask a new question about this device
Download the instructions for your Digital photo frame in PDF format for free! Find your manual XDPF10B - XD Enjoy and take your electronic device back in hand. On this page are published all the documents necessary for the use of your device. XDPF10B by XD Enjoy.
USER MANUAL XDPF10B XD Enjoy
Digital Picture Frame
User's Guide

Important: Please read all instructions carefully before using and keep for future reference !
Files Format Support:
1.Picture format support: .jpg / .bmp / .png / (pictures in format of .gif are occasionally not supported, please save your pictures in the formats above)
2. Music /audio format support: .mp3/.wma/.wav
3. Video format support: .mp4/.rm/.rmvb/.wmv/.asf/.avi/.mov
Main Features:
- Support external memory card including USB flash drive / SD/MS/MMC/SDHC card (32GB or less)
- Support picture display with background music
- Support pictures display on multiple windows
- Support thumbnail browsing
- Support picture flash in different effects.
- Support HD videos in 1080P/1080i/720P
- Support file deletion from the external memory card
- Built-in Calendar clock with Alarm
- Brightness、Contrast、Grayscale adjustment
- Automatic Power On/Off (Refer to System setup "Power off/on")
- 6 Languages: English / Français / Deutsch / Italiano / Español / Chinese
- Remote Control
Buttons & Ports on the Back:

Power on Your Digital Picture Frame
- Plug the DC connector on the power cable of the AC adaptor into the port of DC on the back of your digital picture frame.
- Insert the AC adaptor into mains electricity socket. Your digital picture frame will turn on after connecting to the power, the main menu is as follows:

◀ Image #2
Note: your digital picture frame is not battery operated, therefore you will need to connect the power adaptor to the mains to function.

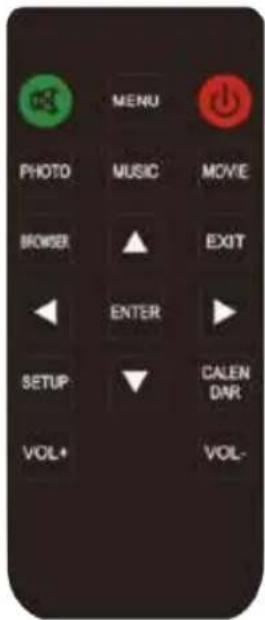
▲ AC power adaptor
▲ remote controller
To Personalize the Setting
Select Setting icon on the main menu and press ENTER button on the remote controller or ENTER button on the back. you will see two columns on the screen.
One column shows Photo Setup/ Calendar Setup/ Video Setup/ Music Setup/ System Setup on the left, the other one shows details of those setup on the right.
| System Setup | Language | English | English / Français / Deutsch / Italiano / Español / Chinese |
| Photo Setup | Grayscale | 50 | increase or decrease screen grey scale <1 to 100> |
| Calendar Setup | Brightness | 55 | increase or decrease screen brightness <1 to 100> |
| Video Setup | Contrast | 50 | increase or decrease screen contrast <1 to 100> |
| Music Setup | Power Off | Off | set the time of automatic power-off |
| Power On | Off | set the time of automatic power-on | |
| Auto-Power Frequency | Everyday | set the frequency of automatic power on/off | |
| Start up Mode | Photo&Music | choose display of photo / music/ video/ photo &background music/ calendar when booting up the media player | |
| Version | 1.1.10.180928 | system version | |
| Reset Setting | press ENTER on the remote controller to refresh setting all over |
Image #3 ▲
| System Setup | Display | PHOTO | play photo / view thumbnail |
| Photo Setup | Background Music | On | turn on or turn off background music when photo playing |
| Calendar Setup | Display Ratio | Original Size | set photos in full screen/ original size/ scale up to fit the screen |
| Video Setup | Slide Speed | 3 seconds | set the duration of each photo display |
| Music Setup | Slideshow repeat | On | set to repeat all photos or once off |
| Slideshow Effect | Random | transition effects of one picture into another one | |
| Slide Mode | Single Window | screen split in multiple parts to view more photos at once | |
| Photo Order | Sequence | display photos in random order or in sequence | |
Image #4 ▲
| System Setup | Date | 2018-11-14 | set date |
| Photo Setup | Clock Time | 01:13 | set time |
| Calendar Setup | Set Time Format | 24 | select 12 / 24 time mode |
| Video Setup | Alarm Status | Off | set alarm on/ off |
| Music Setup | Alarm Time | 00:00 | set time of alarm |
| Alarm Frequency | Once | set alarm once off / Everyday / at Workday/ at Weekend | |
| Volume | Off | set alarm volume |
▲ Image #5
| System Setup | Play Mode | Random | play your videos once off in random order/ in sequence/ repeat |
| Photo Setup | Display Ratio | Original Size | set the video in original size/ full screen / or scale up to fit the screen |
| Calendar Setup | |||
| Video Setup | |||
| Music Setup |
▲ Image #6
| System Setup | Play Mode | Random | play your music once off in random order/ in sequence/ repeat |
| Photo Setup | |||
| Calendar Setup | |||
| Video Setup | |||
| Music Setup | |||
▲ Image #7
View Your photos
- Once digital picture frame is powered on, plug your USB flash drive or SD card in USB or SD slot.
2.1> Press the PHOTO key of the remote controller to display the photos directly.
2.2> Or press MENU key on the remote controller or MENU key on the back to go to the main menu, choose Photo icon on the screen and then press ENTER key on the remote controller or on the back to check the photos.
-
If Thumbnails of Photos are displayed, you can use the navigation keys ◀ ▶ ▲ ▼ on the remote controller or on the back to select a thumbnail, press ENTER key on remote controller or on the back to display the photo.
-
You can set up the photos while they are displayed, just press SETUP key on the remote controller, you will see setup menu on the right side of the screen.
-
You have more photo setup options in setting, please refer to the section of To personalize the setting
| Rotate | rotate a photo at an angle of 90°/ 180°/ 270°, but rotation will not be stored and need to rotate again in the next round |
| Zoom > | Zoom in/out |
| Slide Speed | set the duration of display for each photo |
| Slideshow Effect > | various effects in transition from one picture to another |
| Display Ratio > | set photos in full screen/ original size/ scale up to fit the screen |
| Delect | delect the photo from your USB flash drive or SD card |
| Information > | information of the picture including file name,resolution,size and created date |
| Gamma Correction | adjust the color /gray scale /brightness/ contrast of the screen |
▲ Image #8
Important: Photos may fail to display due to format unsupported or oversize, our advice is to change the format to proper format or change the photos in smaller sizes (3000 pixels or less both in width and height). Please keep your USB flash driveor SD card inserted in your digital picture frame when you need to view your photos
Enjoy Your Music
- Once digital picture frame is powered on, plug your USB flash drive or SD card in USB or SD slot.
2.1> Press the MUSIC key on the remote controller to play the music directly.
2.2> Or press MENU key on the remote controller or MENU key on the back to go to the main menu, choose Music icon on the screen and then press ENTER key on the remote controller or on the back to play the music.
- You can set up the music while you listen to it, just press SETUP key on the remote controller, you will see setup menu on the right side of the screen.
Select EQ
Play Mode
EQ Setting
play the music in its normal(original) type, or in Pop/ Classic/ Soft/ Jazz/ Rock/ DBB style, or set tones at your preference (check User EQ in EQ Setting as below)
display music in random order or in sequence
set tones of the music at your preference
▲ Image #9
Important: Music may fail to display due to format unsupported, our advice is to change the format to proper format
Please keep your USB flash drive or SD card inserted in your digital picture frame when you need to enjoy your music.
Watch Your Videos
- Once digital picture frame is powered on, plug your USB flash drive or SD card in USB or SD slot.
2.1> Press the MOVIE key on the remote controller to display the videos directly.
2.2> Or press MENU key on the remote controller or MENU key on the back to go to the main menu, choose Video icon on the screen and then press ENTER key on the remote controller or on the back, choose the video from the file list and press ENTER key on the remote controller or on the back to check the video.
- You can set up the videos while they are displayed, just press SETUP key on the remote controller, you will see setup menu on the right side of the screen.
| Play Mode | display videos in random order or in sequence |
| Screen Size > | display the videos in Full Screen / Original Size/ Scale up to fit the screen |
| Delect | delect the video file from your USB flash drive or SD card |
| Track > | sound track |
| Subtitle > | display the external subtitle of the video |
| Information > | information about the video including file name, resolution, frame rate, bite rate, time and file size |
▲ Image #10
Important: Videos may fail to display due to format unsupported, our advice is to change the format to proper format. Please keep your USB flash drive or SD card inserted in your digital picture frame when you need to watch your videos.
Calendar & Clock
1.1> Press the CALENDAR key of the remote controller to display the calendar clock directly.
1.2> Or press MENU key on the remote controller or MENU key on the back to go to the main menu, choose Calendar icon on the screen and then press ENTER key on the remote controller or ENTER key on the back to check the video.
-
Your digital picture frame is able to display part of your pictures from your inserted USB flash drive or SD card. But you may not adjust the photo ratio or slideshow effect. The display duration of each photos in the calendar mode is exactly the same as that in the photo mode.
-
You can set up the calendar clock ONLY in the Setting mode (refer to image# 5)
Browse Your Files
1.1> When both USB flash drive and SD card are inserted in your digital picture frame, you will need to select either of their icon on the screen and press the BROWSER key of the remote controller to display the folders or files in root directory of the USB flash drive or SD card.
1.2> Or press MENU key on the remote controller or MENU key on the back to go to the main menu, choose Browser icon on the screen, and then press ENTER key on the remote controller or ENTER key on the back to check the folders or files in root directory of the USB flash drive or SD card.
2. You can not set up the Browser mode.
3. To enter any folder or display any file, choose the folder or file in the root directory of USB flash drive or SD card, then press ENTER key on the remote controller or ENTER key on the back.
4. How to mix your photos and videos in the same slideshow?
Choose Browser mode to display these files, you can view photos and videos in an alternate way without switching the display modes.
What you need to do is to put all your photos and videos in the root directory of the USB flash drive or SD card, or creat a folder in the USB flash drive or SD card and drop the photos and videos in the same folder.
Remember, videos and photos cannot mix in the same slideshow if they are put in the different folders.
Finding the Right Place for Your Digital Picture Frame
Your digital picture frame includes a back stand for displaying on flat surfaces and a recess for wall hanging. Please ensure the fixing method is strong enough to bear the weight of the item to reduce the risk of any impact hazard.
Don't place your digital picture frame close to a heat source such as a radiator or fire.
Maintenance and Cleaning
Unplug before cleaning.
Clean the display screen by gently wiping it with a special screen cloth or a soft, damp cloth moistened with a glass cleaning liquid. Do not use excessive liquid as this can be hazardous if it enters the inside of the product.
Important Safety Warnings
- This device has an integral CR2032 lithium button cell and a CR2025 lithium button cell battery in the remote controller. Do not attempt to access it and do not subject it to excessive heat such as direct sunlight, fire etc.
- Discard this digital picture frame (including the integral CR2032 lithium button cell and CR2025 lithium button cell battery in the remote controller) in accordance with recycling regulations in your area.
- Use this appliance only with the AC adaptor supplied.
- Unplug the appliance before cleaning.
- Keep the mains cord out of the reach of children.
- Keep the unit, mains cord and plug away from water.
- Do not attempt to repair the unit as this can be hazardous.
- The unit is for indoor use only.
Waste electrical products and their batteries can be harmful to the environment and should not be disposed of with household waste. The integral battery should be removed by an independent professional. Separate disposal facilities exist. Contact your local authority to find details of your closest recycling centre.
Troubleshooting
| Problems | Potential Cause | Solutions |
| Screen display is blank | power lead has become disconnected. | connect power lead. Screen should switch on after 5 seconds |
| screen is switched off. | press the power button on the rear of the item. Screen should switch on after 5 seconds. | |
| File open failed | file format is not supported or is oversized | change the format to proper format or edit the photos in smaller sizes (3000 pixels or less in both width and height). |
| Remote controller doesnot function | the thin plastic insulator in the remote controller is not removed | remove the thin plastic insulator before use |
| the power runs out in the battery of the remote controller over time | buy one CR2025 battery in the market and change it | |
| Photos displayed in false orientation | the photo has been shot in portrait orientation but display in landsacpe orientation | adjust the size of photo in a smaller pixels (3000 pixels or less in both width and height) |
* Please contact our sales team for help when you have further troubles
If you have any further trouble when using your digital picture frame, just simply get in touch and we'll see how we can help.

- DIGITAL PICTURE FRAME
- FILES FORMAT SUPPORT
- MAIN FEATURES
- BUTTONS & PORTS ON THE BACK
- POWER ON YOUR DIGITAL PICTURE FRAME
- TO PERSONALIZE THE SETTING
- VIEW YOUR PHOTOS
- ENJOY YOUR MUSIC
- WATCH YOUR VIDEOS
- CALENDAR & CLOCK
- BROWSE YOUR FILES
- FINDING THE RIGHT PLACE FOR YOUR DIGITAL PICTURE FRAME
- MAINTENANCE AND CLEANING
- IMPORTANT SAFETY WARNINGS
Brand : XD Enjoy
Model : XDPF10B
Category : Digital photo frame