
XA-MP102W - Mp3 player JVC - Free user manual and instructions
Find the device manual for free XA-MP102W JVC in PDF.


| Product Type | MP3 Player |
| Brand | JVC |
| Model | XA-MP102W |
| Storage Capacity | 1 GB |
| Supported Audio Formats | MP3, WMA |
| Display | LCD Screen |
| Connectivity | USB 2.0 |
| Battery Type | Built-in Rechargeable Lithium-ion |
| Battery Life | Up to 15 hours (playback) |
| Charging Time | Approx. 2 hours |
| Dimensions | 70 x 30 x 12 mm |
| Weight | 28 g |
| Color | White |
| FM Radio | Yes |
| Voice Recording | Yes |
| Controls | Play/Pause, Volume, Next/Previous, Menu |
| Power Source | USB charging or AC adapter (optional) |
| Accessories Included | USB Cable, Earphones, User Manual |
Frequently Asked Questions - XA-MP102W JVC
User questions about XA-MP102W JVC
0 question about this device. Answer the ones you know or ask your own.
Ask a new question about this device
Download the instructions for your Mp3 player in PDF format for free! Find your manual XA-MP102W - JVC and take your electronic device back in hand. On this page are published all the documents necessary for the use of your device. XA-MP102W by JVC.
USER MANUAL XA-MP102W JVC
natural_image
Line drawing of a JVC medical device connected to a handheld device (no text or symbols visible)
natural_image
Abstract black-and-white striped pattern with no text or symbolsINSTRUCTIONS
Thank you for purchasing this JVC product.
Please read these instructions carefully before starting operation to be sure to obtain optimum performance and a longer service life from the unit.
LVT1510-002A
[B, US]
CAUTIONS
CAUTION:
- Do not place any naked flame sources, such as lighted candles, on the apparatus.
- When discarding batteries, environmental problems must be considered and local rules or laws governing the disposal of these batteries must be followed strictly.
- Do not expose this apparatus to rain, moisture, dripping or splashing.
Dry cell batteries
To prevent damage to the batteries and electrolyte leakage, heed the following points.
- Align the and polarities properly when inserting the battery.
- Remove the battery if you do not plan to use the player for a long period of time.
- Do not throw batteries into a fire, and do not short-circuit, disassemble or subject them to excessive heat.
- Do not attempt to recharge dry cell batteries.
Carrying dry cell batteries around
When putting dry cell batteries in a pocket or bag, ensure that no other metal objects such as a necklace are placed together with them. Contact with any metal may cause short-circuiting which may cause a fire.
Listening precautions
- Do not play your Headphones at a high volume.
• Hearing experts advise against continuous extended play. - If you experience a ringing in your ears, reduce volume or discontinue use.
- Do not use while operating a motorized vehicle. It may create traffic hazard and is illegal in many areas.
- You should use extreme caution or temporarily discontinue use in potentially hazardous situations.
- Even if your Headphones are an open-air type designed to let you hear outside sounds, do not turn up the volume so high that you cannot hear what is around you.
- Once you have established a comfortable sound level, leave the level there.
Player
- No altering or remodeling
This can cause malfunctioning.
- No dropping or strong impacts
This may damage the player.
- Locations to be avoided
Avoid using the player in the following locations since they can cause malfunctioning.
- Bathrooms and other moisture-prone places
- Warehouses and other dusty places
- Very hot places near heating appliances, etc.
Do not leave the player exposed to direct sunlight for long periods of time
This may deform or discolor the player and may also cause malfunctioning.
- We have no responsibility for any improper recording or playback incurred by equipment malfunction.
- It is recommended to store backup copy of your important data in your PC or the like.
TABLE OF CONTENTS
CAUTIONS 2
TABLE OF CONTENTS 5
GETTING STARTED....6
INSTALLING BATTERY 6
INSTALLING USB DRIVER (FOR WINDOWS 98SE ONLY) ...... 7
CONNECTING TO PC....8
PARTS OF THE DIGITAL AUDIO PLAYER 10
LOCKING BUTTONS (HOLD) 35
TROUBLESHOOTING 36
SPECIFICATIONS.... 37
ACCESSORIES 38
GETTING STARTED
INSTALLING BATTERY
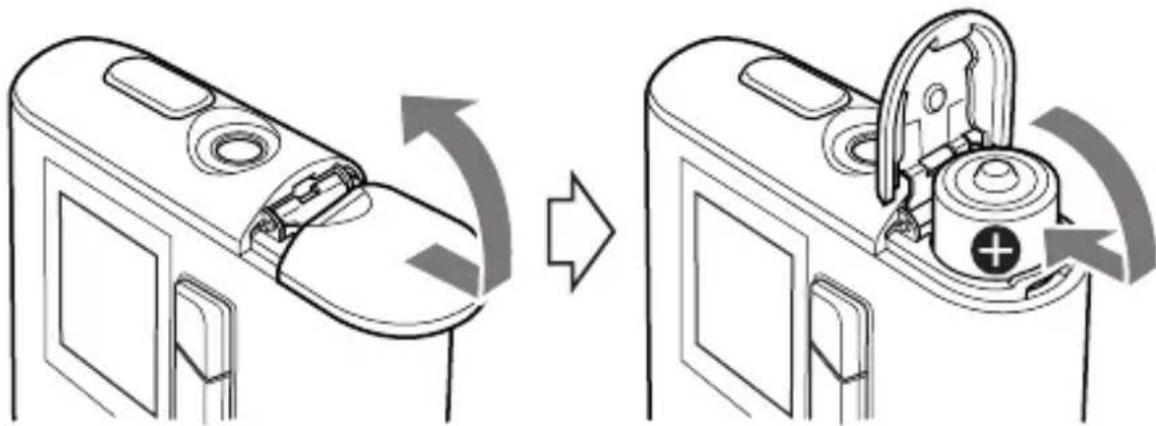
Remove the battery compartment cover and insert one LR03 (AAA) alkaline battery (not supplied) matching the polarities (+ and -) indicated on the rear side of the player, then replace the compartment cover.
natural_image
Diagram showing two stages of battery charging process: one with internal circuit break and arrow indicating rotation, the other with battery plug and switch (no text or symbols)Battery indicator
The battery indicator shows the remaining battery level. When the battery level becomes low, “Low Battery” appears on the display. In this case, you need to replace the battery with a new one.
Low Battery
Important Battery Information
- Dispose of batteries in the proper manner, according to federal, state, and local regulations.
- Discard leaky batteries immediately. They can cause skin burn or other personal injury.
- Use only alkaline batteries. Do not use manganese dioxide batteries or a charger since the battery life becomes extremely short or the player may malfunction.
INSTALLING USB DRIVER (FOR WINDOWS 98SE ONLY)
Follow these instructions to load software that enables a computer to recognize the Digital Audio Player.
Make sure that no programs, such as games or anti-virus software, are running on the PC. If programs are open, close and exit from the programs before proceeding.
- Insert the CD-ROM into the CD-ROM drive of your PC.
- Turn off the Digital Audio Player and connect it to your PC with the USB connector.
- Follow the on-screen instructions to install the driver from the CD-ROM.
On a screen to search for the location of the Digital Audio Player's driver, click the [Browse] button and select the CD-ROM drive and then proceed to the next screen: - Be sure that the installation completion screen appears.
- Reboot the PC.
CONNECTING TO PC
You can transfer MP3 and WMA format music files from the PC to your Digital Audio Player through USB port.
For Windows 98SE user:
Before connecting your player to the computer for the first time, you need to install the USB driver from the supplied CD-ROM into your computer. For details, see "INSTALLING USB DRIVER" on page 7.
Connecting Digital Audio Player to PC
- Open the rubber cap of the USB connector.
- Connect the player to the USB port on your PC using USB cable.

Transferring music files from PC to Digital Audio Player
- Open the player's folder (removable disk or device) from My Computer or Explorer.
- Copy and paste or drag and drop the music files from the PC to the player's folder. During copying files, "WRITING" appears on the player's display. After completion, "READY" continuously appears.
NOTE
- When you transfer a WMA-DRM file from the PC, use Windows Media© Player 9 or later. If you transfer it by drag and drop, it cannot be played with the player.
Disconnecting from PC
For Windows 2000/Me/XP users:
Left-click the icon in the task bar, and follow the on-screen instructions.
For Windows 98SE users
Open “My Computer” and select “Removable Disk”, then right-click to select “EJECT”.
- Microsoft, Windows and Windows Media are either trademarks or registered trademarks of Microsoft Corporation in the United States and other countries.
- Other names of systems and products mentioned in these instructions are usually registered trademarks of the manufacturers who developed the system or product concerned.
NOTES
- The player supports MP3 ID3 V1.0, 1.1 tags, ID3 V2.3 tags and WMA tags. ID3 tags and WMA tags are the data including music names and artist names recorded in MP3 files and WMA files.
- When the player is connected to the PC, it is recognized as an external USB memory (removal disk) and shown on the PC. You can treat the player as an external USB memory.
PARTS OF THE DIGITAL AUDIO PLAYER


①Headphone jack
②VOL+/- (Volume) buttons
③Display
④▶/■ (Play/Pause) button
⑤▶▶I (Forward) button
⑥■ (Stop) button
⑦◀◀ (Reverse) button
⑧REC button
⑨MENU button
⑩Hold switch
⑪Battery compartment cover
⑫Line input jack
⑬USB connector

natural_image
Line drawing of a medical device connected to two earphones (no text or symbols)Connect the headphones to the Ⓞ (headphones) jack on the player.
natural_image
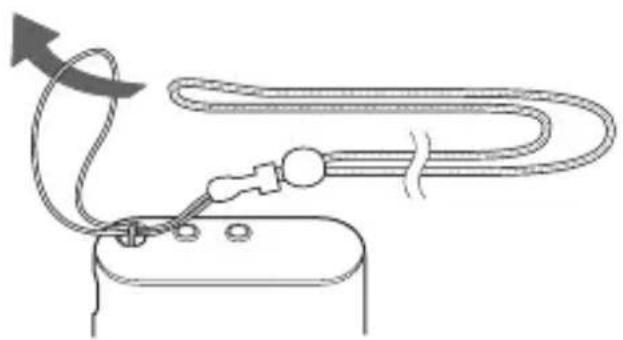
Simple line drawing of a medical or electrical device with tubing and connectors (no text or symbols)You can use the neck strap for easy carrying.
Press and hold ▶/■ button till “welcome” appears. After a while, the following screen appears.
DIGITAL AUDIO PLAYER
To turn power OFF
Press and hold ■ (Stop) button.
SEE YOU
NOTES
- When the player is turned on, it resumes the mode it was in when it was last turned off.
- The settings you have made are stored in the player when you turn off the player. (If you remove the battery before turning off the player, these settings are not stored.) It is recommended to turn off the player once when you change the setting.
DISPLAY OVERVIEW
MUSIC mode

①Play indicator
⑦②Volume level
③Play mode indicator
④EQ (sound mode)
⑤Lock icon
⑥Sleep Timer icon
⑦Battery indicator
⑧Track number/Total number of tracks
⑨File information*
⑩Mode indicator
⑪Track time
* If the file information is long and displayed over two lines, it scrolls. During scrolling, the file name may not be correctly displayed.
BASIC OPERATIONS
USING THE MAIN MENU
There are number of modes you can operate using MAIN MENU.

Types of modes

MUSIC mode
Select to play music. (See page 14.)
LINE IN mode
Select to record music (MP3 file) from external audio equipment. (See page 16.)

SET mode
Select to set advanced settings. (See pages 19 to 30.)

DELETE mode
Select to delete files. (See page 18.)

ABOUT mode
Select to display about the player. (See page 31.)
RESET mode
Select to reset the settings you have made. (See page 32.)

NAVIGATE mode
Select to easily search for the desired music. (See page 33.)
PLAYING MUSIC
You can play the music files.
Before playing music, adjust the volume level with the volume +/- buttons.

Track time (in stop mode) Playback time (during playing)
To play music
- After turning on the player, press MENU button and ▶▶/I◀◀ button to select MUSIC mode from Main Menu, and then press ▶/Ⅱ button to enter that mode.
- Press ▶/Ⅱ button
To stop: Press ■ button.
To pause: Press ▶/Ⅱ button.
To select track:
During playback or in stop mode, press ▶▶/ |◀◀ button.
To fast-forward/reverse track:
During playback, press and hold ▶▶▶/ |◀◀ button.
To exit MUSIC mode: Press MENU button.
NOTES
- If no audio files are stored, "NO FILES" appears.
- When the player is turned off in stop mode or during playback and then turned on again, it will resume playback from the beginning of the track lastly played when you start playback.
- The menu mode returns to the previous display before this menu is displayed if no operation is made for approx. 10 seconds.
- When the track reaches the WMA-DRM file which was transferred using the Copy & Paste during playback, “DRM PROTECTED” appears and the file is skipped over to the next track.
You can record the music played back on external audio equipment. Make sure that the audio cable is connected between the LINE IN terminal of this audio player and the external audio equipment.
RECORD:REC CANCEL:MENU
To record music from external audio equipment
- After turning on the player, press MENU button and ▶▶/◀◀ button to select LINE IN mode from Main menu, and then press ▶/|| button to enter that mode.
- Press and hold REC button until "Recording" appears. The player is paused (the counter is stopped).
- Play the music source on the external audio equipment. The player automatically detects the sound, starts recording of the music and numbers each track. The default recording setting is as follows. Bit rate: 128kbps, A.TRK: ON. For details, See pages 27 to 28.
To stop: Press ■ button.
To exit LINE IN mode: Press MENU button.
NOTES
- The “LINE” folder is automatically generated, the recorded music files are stored in it as MP3 files. The “LINE” folder can be displayed using NAVIGATE mode. (See page 33.)
- If “LOW BATTERY” appears when you press and hold REC button, it is recommended to replace the battery with a new one.
- The player consumes an enormous amount of power for recording the music stored in the external audio equipment. To prevent malfunction due to low battery, the player is designed to stop faster in this mode. It is recommended to use a new battery if you continue to record the music for many hours in this mode.
• AUTO LEVEL CONTROL (ALC)
- The player is equipped with Auto Level Control (ALC) to control distortion during recording. When the output level from external audio equipment is too high, the ALC automatically activates to control the recording level, which can reduce distortion.
- When you perform test recording beforehand or check and control the output level by inserting the headphone to the jack of the player during recording, more proper level setting can be obtained.
- The recorded files can be copied to the computer connected to the player by USB.
DELETING FILES


(DELETE submenu) (File deletion)
To delete files
- After turning on the player, press MENU button and ▶▶/I◀◀ button to select DELETE mode from Main Menu, and then press ▶/II button to enter that mode.
- Press ▶▶/I◀◀ button to select types of files you want to delete from the DELETE menu.
- Press ▶/Ⅱ button.
- Press ▶▶/ |◀◀ button to select a file you want to delete.
- Press ■ button to select "YES". To cancel the operation, select "NO".
- Press ▶/Ⅱ button to delete the file. "File Deleted" appears. If you try to delete a read-only file, "Operation Failed" appears.
(Each time you press ■ button, the status switches between "YES" and "NO".)
To return to DELETE menu: Press MENU button once.
To exit DELETE mode:
Press MENU button again (or select "EXIT" and press ▶/Ⅱ button in DELETE submenu).
NOTE
- When all files in a folder are deleted, the folder disappears from the player. However, it is not erased and remains in the player. You can erase this folder by PC through USB.
ADVANCED FEATURES
SET MENU ITEMS
In SET mode, you can set the following SET MENU items:
EQ SET (Equalization Set), PLAYMODE, SLEEP TIMER, A.POWER OFF
(Auto Power OFF), BACKLIGHT, CONTRAST, RECORD SET, MENU
LANG (Menu Language) and FONTS
To set each item, see the relevant later page.
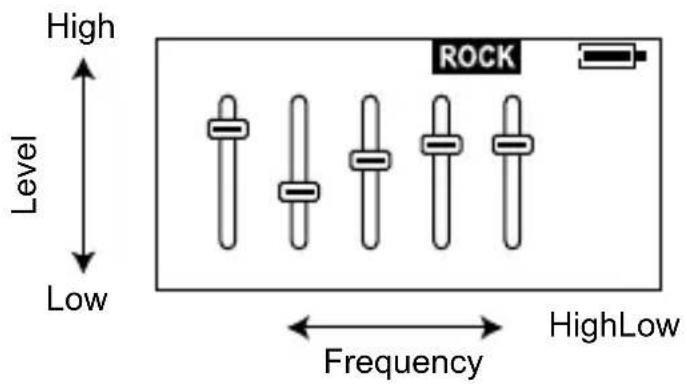
EQUALIZER
You can select from one of 6 different preset sound modes or one customized sound mode.
Types of sound modes
NORM NORMAL
No sound effect applies.
CLASS CLASSICAL
Good for classical music
JAZZ JAZZ
Good for jazz music
ROCK ROCK
Boosts low and high frequency.
POP POP
Good for vocal music
BASS BASS
Empowers bass sound.
CUSTOMIZED
You can create your own sound mode.
To select sound mode
- After turning on the player, press MENU button and ▶▶/◀◀ button to select SET mode from Main Menu, and then press ▶/■ button to enter that mode.
- Press ▶▶/◀◀ button to select "EQ SET".
- Press ▶/■ button.
- Press ▶▶/|◀◀ button to select the sound mode.
- Press ▶/Ⅱ button to return to SET MENU.
To create sound mode (CUST)
- After turning on the player, press MENU button and ▶▶/◀◀ button to select SET mode from Main Menu, and then press ▶/■ button to enter that mode.
- Press ▶▶/◀◀ button to select "EQ SET".
- Press ▶/■ button.
- Press ▶▶/◀◀ button to select "CUST".
- Press MENU button briefly to start editing. The indicator of the lowest frequency is highlighted.
- Press ▶▶/◀◀ button to select the frequency you want to edit.
- Press ▶/Ⅲ button. The indicator starts to blink.
- Press ▶▶/ |◀◀ button to set the level up or down and then press ▶/|| button to store it.
- Repeat Steps 6 through 8 to edit for other frequencies.
- Press MENU button briefly. The highlight disappears and the setting is completed.
- Press ▶/Ⅱ button to return to SET MENU.
To exit SET mode:
Press MENU button (or select "EXIT" and press ▶/Ⅲ button) in the SET MENU.
PLAYMODE
You can select various play modes. However, for voice file playback, only NORMAL, REPEAT ONE and REPEAT ALL are selectable.

Types of playback modes

NORMAL
Normal play

REPEAT ONE
Repeats one track.

REPEAT ALL
Repeats all tracks.

RANDOM
Plays all tracks in random order.

RANDOM RPT
Repeats all tracks in random order.

INTRO
Plays first 10 seconds for each tracks.
To select play mode
- After turning on the player, press MENU button and ▶▶/◀◀ button to select SET mode from Main Menu, and then press ▶/Ⅱ button to enter that mode.
- Press ▶▶/◀◀ button to select "PLAYMODE".
- Press ▶/Ⅱ button.
- Press ▶▶/◀◀ button to select the play mode.
- Press ▶/Ⅱ button to return to SET MENU.
To exit SET mode:
Press MENU button (or select "EXIT" and press ▶/Ⅱ button) in the SET MENU.
SLEEP TIMER
Use the sleep timer to turn off the player after a certain period of time during playback. You can set the period of time to 15, 30, 45, 60 minutes, or OFF (default). The sleep timer works temporarily. Once it has worked, it is canceled. When the sleep timer is set, the sleep timer icon ( ) appears on the upper right of the display.

- After turning on the player, press MENU button and ▶▶/◀◀ button to select SET mode from Main Menu, and then press ▶/Ⅲ button to enter that mode.
- Press ▶▶/◀◀ button to select "SLEEP TIMER".
- Press ▶/■ button.
- Press ▶▶/◀◀ button to select the time.
- Press ▶/Ⅱ button to return to SET MENU.
To exit SET mode:
Press MENU button (or select "EXIT" and press ▶/Ⅱ button) in the SET MENU.
AUTO POWER OFF
Use the auto power off to turn off the player after a certain period of time when no operation is made. You can set the period of time to 2, 5, or 10 minutes, or OFF (default).
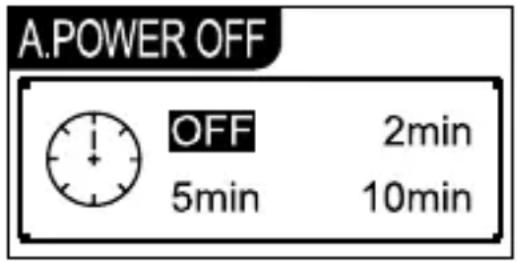
To set auto power off
- After turning on the player, press MENU button and ▶▶/◀◀ button to select SET mode from Main Menu, and then press ▶/Ⅱ button to enter that mode.
- Press ▶▶/◀◀ button to select "A.POWER OFF".
- Press ▶/II button.
- Press ▶▶/◀◀ button to select the time.
- Press ▶/Ⅱ button to return to SET MENU.
To exit SET mode:
Press MENU button (or select "EXIT" and press ▶/Ⅱ button) in the SET MENU.
BACKLIGHT

Use to adjust the backlighting extension time (0 to Max) after finishing the last operation. (Default: 5 seconds) When “Max” is set, the backlighting remains on for approx. two hours.

To set back light
- After turning on the player, press MENU button and ▶▶/◀◀ button to select SET mode from Main Menu, and then press ▶/Ⅱ button to enter that mode.
- Press ▶▶/◀◀ button to select "BACKLIGHT".
- Press ▶/■ button.
- Press ▶▶▶/◀◀ button to select the time.
- Press ▶/Ⅱ button to return to SET MENU.
To exit SET mode:
Press MENU button (or select "EXIT" and press ▶/Ⅱ button) in the SET MENU.
NOTE
- When “Low Battery” appears, backlighting goes out and, after that, it does not light again.
CONTRAST
Use to adjust the contrast of the display.

To set contrast
- After turning on the player, press MENU button and ▶▶/◀◀ button to select SET mode from Main Menu, and then press ▶/|| button to enter that mode.
- Press ▶▶/◀◀ button to select "CONTRAST".
- Press ▶/Ⅱ button.
- Press ▶▶/◀◀ button to select the level.
- Press ▶/Ⅱ button to return to SET MENU.
To exit SET mode:
Press MENU button (or select "EXIT" and press ▶/Ⅱ button) in the SET MENU.
RECORD SET
For external equipment input (LINE), set bit rate, A.TRK, etc. during recording.
| Source LINE | |
| Encode (MP3 Stereo) | |
| Bit Rate 96kbps, 128kbps, 160kbps | |
| A. TRK ON, OFF | |
| Source : LINE |
| Encode : MP3 Stereo |
| BitRate : 128kbps |
| A.TRK : ON |
To set recording
- After turning on the player, press MENU button and ▶▶/◀◀ button to select SET mode from Main menu, and then press ▶/■ button to enter that mode.
- Press ▶▶/|◀◀ button to select "RECORD SET".
- Press ▶/■ button.
- Press ▶▶/◀◀ button to select item (Bit Rate or A.TRK).
- Press ▶/Ⅱ button to select the desired content from the selected item.
- Repeat the steps from 4 to 5, as necessary.
- Press MENU button to return to the SET mode.
To exit SET mode:
Press MENU button (or select "EXIT" and press ▶/Ⅲ button) in the SET MENU.
Bit Rate:
Indicates information content of the compressed data per second. As the bit rate is higher, the audio quality becomes higher, but the data amount increases.
Auto Track (A.TRK):
You can select ON or OFF of the A. TRK when you record music from the input of the external audio equipment. When ON is selected, the A. TRK detects each track automatically and numbers each track. When the music starts, the A. TRK starts recording and when the music stops, the A. TRK detects silence and the player pauses. When OFF is selected, no track is detected and recording doesn't stop if the player is in silent state. When silent state continues for 3 seconds or more in LINE-IN mode, the A. TRK judges this state as a turn of the track and the track is divided. The track, therefore, is not divided in this mode if the interval of two tracks is too short, or noise continuously occurs in the interval. In addition, if a track has very low sound or silent part, the track is divided.
In such cases, select OFF for A. TRK from “RECORD SET” in the SET mode and record each track manually.
MENU LANGUAGES Dpc
Use to set the language for the menu. You can select English (default), simplified Chinese or traditional Chinese.

- After turning on the player, press MENU button and ▶▶/◀◀ button to select SET mode from Main Menu, and then press ▶/■ button to enter that mode.
- Press ▶▶/◀◀ button to select "MENU LANG".
- Press ▶/■ button.
- Press ▶▶/ |◀◀ button to select the language.
- Press ▶/Ⅱ button to return to SET MENU.
To exit SET mode:
Press MENU button (or select "EXIT" and press ▶/Ⅱ button) in the SET MENU.
FONTS ICB
Use to set the language for the file name and ID3 tags. You can select one of 27 languages (default: English).

To set fonts
- After turning on the player, press MENU button and ▶▶/◀◀ button to select SET mode from Main Menu, and then press ▶/|| button to enter that mode.
- Press ▶▶▶/◀◀ button to select "FONTS".
- Press ▶/Ⅱ button.
- Press ▶▶/◀◀ button to select the fonts.
- Press ▶/Ⅱ button to return to SET MENU.
To exit SET mode:
Press MENU button (or select "EXIT" and press ▶/Ⅱ button) in the SET MENU.
NOTE
- For details of ID3 tags, see page 9.
ABOUT
Use to display firmware version and status of the player.
About
VER: X.XXXX
INT: 1 GB
FREE: 52 MB
Amount of memory installed
Available memory space to store further music files
To display:
After turning on the player, press MENU button and ▶▶/I◀◀ button to select ABOUT mode from Main Menu, and then press ▶/II button to enter that mode.
To exit ABOUT mode: Press MENU button.
Upgrading firmware version:
To upgrade the firmware of your player, please visit our website.
RESETTING THE UNIT 1⇒0
Use to reset all the settings you have made to default.
RESET?
Menu: Cancel Play: sure
To reset the unit
- After turning on the player, press MENU button and ▶▶/I◀◀ button to select RESET mode from Main Menu, and then press ▶/II button to enter that mode.
- Press ▶/Ⅱ button to reset the unit. All the settings are reset and "RESET OK!" appears.
To cancel and exit RESET mode: Press MENU button.
Default value of each SET MENU item:
| EQ SET Normal | |
| PLAYMODE Normal | |
| SLEEP TIMER OFF | |
| A.POWER OFF OFF | |
| BACKLIGHT 5 Sec | |
| CONTRAST Factory-set level | |
| RECORD SET | Bit Rate : 128kbpsA.TRK : ON |
| MENU LANG ENGLISH | |
| FONTS ENGLISH | |
NAVIGATE

Use to display the hierarchical tree structure of music folders and files (♪) From this tree structure, you can easily locate a desired music file and play it back.
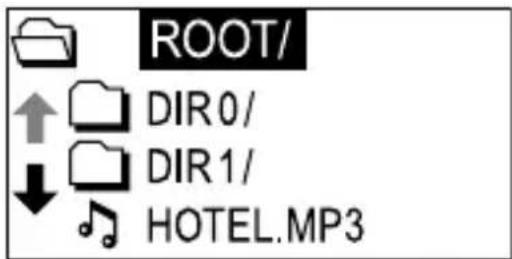
To locate a music file
- After turning on the player, press MENU button and ▶▶▶/▶◀◀ button to select NAVIGATE mode from Main Menu, and then press ▶/▶◀ button to enter that mode.
- Press ▶▶/ |◀◀, ▶/|| / ■ buttons to locate the desired file.
▶▶/◀◀: Moves the cursor (highlight) vertically. The cursor scrolls through the files and folders in the selected folder.
▶/■ / ■ : 1) Move the cursor to the desired folder and press ▶/■ button to open it. Then, the files in the folder can be selected.
2) When the cursor is inside the folder, press ■ button to close the folder. Then, the hierarchical structure appears including that folder.
- Press ▶/■ button to play it back. (Press ▶/■ button to pause and ■ button to stop.)
To exit NAVIGATE mode: Press MENU button.
NOTE
- When you search the WMA-DRM file which was transferred using the Explorer in NAVIGATE mode, the track names appear. But when you try to playback the music, “DRM PROTECTED” appears, and then the file is skipped over to the next track.
Music file playing order in Music mode:
From the hierarchical tree structure, you can easily understand the playing order of music files when you normally play them in Music mode. You will see that the music files are played back in the order from the higher hierarchy to the lower one.

flowchart
graph TD
    A[" "] --> B[" "]
    A --> C["①"]
    B --> D["②"]
    B --> E["③"]
    C --> F["④"]
    C --> G["⑤"]
NOTES
• Maximum number of folders that can be recognized by the player is 50.
- Maximum number of hierarchies that can be recognized by the player is 8, including the highest-order folders.
- You can change the playback order of music files by adding numbers at the head of folder names or file names on PC.
(For example, add numbers like 01xxxx, 02yyyy, ...)
- The maximum number of files (WMA, MP3 and WAV files) that can be displayed or operated is 550. On a file exceeding 550, its operation is not guaranteed.
LOCKING BUTTONS (HOLD)
Slide the HOLD switch to the right to lock all controls.
When the hold function is activated, the 🔒 appears in the upper right of the display.
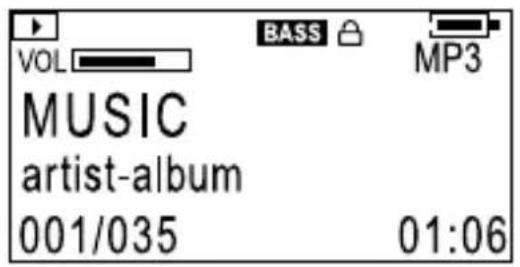
To unlock: Slide the HOLD switch to the left.
NOTE
- When the player is turned on with the HOLD switch set to ON position, "HOLD" appears after the initial message "DIGITAL AUDIO PLAYER". Then, the player automatically shuts off. To use the player, set the HOLD switch to OFF position and turn on the player again.
TROUBLESHOOTING
| Problem Solution | |
| The player does not function. | Make sure the HOLD switch is off.This player provides versatile operations under microcomputer control. If the player cannot be properly operated by pressing any button, remove the battery and insert it again after a while.Battery may be drained. Replace the battery. |
| There is no sound or a lot of noise. | Make sure the Headphone is correctly connected to the player.Wipe the Headphone plug with a clean cloth.Keep the player away from other equipment, such as mobile phones or televisions.Turn the volume up. |
| The player suddenly stops working. | Take the battery out for about 10 seconds and re-insert it. |
| The display is too dark or too bright. | Adjust the contrast. |
| The player automatically shuts off. | Auto power off function is set in effect. See page 24.(This is not a malfunction.) |
| Your computer does not recognize the player. | If your operating system is Windows 98SE, be sure to install the USB driver from the supplied CD-ROM in your computer. |
SPECIFICATIONS
| Model Name XA-MP | 102 XA-MP52 | |
| Type Digital audio player | ||
| Built-in memory size 1 G B | 512 MB | |
| Display LCD with backlighting (4-line display) | ||
| Music playback format | MP3/WMA/WMA-DRM*1 | |
| Bit rate | MP3: 8 kbps to 320 kbps, WMA: 32 kbps to 192 kbps | |
| Maximum number of tracks*2 | Approx. 500 Approx. 250 | |
| Frequency response 60 Hz | to 20 kHz, +0 dB to -3 dB (Audio) | |
| Output terminal Headphone | ||
| Input terminal Line in (stereo mini jack) | ||
| Power supply | DC 1.5V “LR03” or “AAA” size battery × 1 | |
| Continuous playback time | Approx. 17 hours (Audio playback)*3 | |
| Dimensions (Approx.) | 50 (L) × 15 (W) × 50 (H) mm (excluding protruding parts) | |
| Mass (Approx.) | 30 g (without battery), 42 g (with battery) | |
*1 WMA-DRM: A WMA file with reproduction restriction for copyright protection of digital data.
*2 Condition: WMA: 64 kbps, 1 track: 4 minutes.
*3 Condition: MP3 (128 kbs, fs=44.1 kHz) file playback, backlighting OFF, Equalization: normal
Design and specifications are subject to change without notice.
■ OS supported: Microsoft® Windows® XP (Home Edition/Professional), Windows® Me, Windows® 2000 Professional, Windows® 98SE* (* Installation of USB driver is necessary using CD-ROM supplied)
ACCESSORIES
Headphones
USB CABLE
CD-ROM (USB Driver for Windows 98SE)
NECK STRAP
AUDIO CABLE
Information for Users on Disposal of Old Equipment
[European Union]
![JVC XA-MP102W - [European Union] - 1](/content/2026/06/1246419/images/390bbfed64223498bc3bd0a5531f577d3cf366294ad8666daf396a3b9a75fc81.jpg)
![JVC XA-MP102W - [European Union] - 2](/content/2026/06/1246419/images/524da5d2609323888302ea5caaa9925a69ea153a4426079c6f40e1daf5b9d28e.jpg)
Attention:
This symbol is only valid in the European Union.
This symbol indicates that the electrical and electronic equipment should not be disposed as general household waste at its end-of-life. Instead, the product should be handed over to the applicable collection point for the recycling of electrical and electronic equipment for proper treatment, recovery and recycling in accordance with your national legislation.
By disposing of this product correctly, you will help to conserve natural resources and will help prevent potential negative effects on the environment and human health which could otherwise be caused by inappropriate waste handling of this product. For more information about collection point and recycling of this product, please contact your local municipal office, your household waste disposal service or the shop where you purchased the product.
Penalties may be applicable for incorrect disposal of this waste, in accordance with national legislation.
(Business users)
If you wish to dispose of this product, please visit our web page www.jvc-europe.com to obtain information about the take-back of the product.
[Other Countries outside the European Union]
If you wish to dispose of this product, please do so in accordance with applicable national legislation or other rules in your country for the treatment of old electrical and electronic equipment.
JVC
- INSTRUCTIONS
- Thank you for purchasing this JVC product.
- CAUTIONS
- CAUTION:
- Dry cell batteries
- Carrying dry cell batteries around
- Listening precautions
- Player
- Do not leave the player exposed to direct sunlight for long periods of time
- TABLE OF CONTENTS
- CAUTIONS 2
- TABLE OF CONTENTS 5
- GETTING STARTED....6
- TROUBLESHOOTING 36
- SPECIFICATIONS.... 37
- GETTING STARTED
- INSTALLING BATTERY
- Battery indicator
- Low Battery
- Important Battery Information
- INSTALLING USB DRIVER (FOR WINDOWS 98SE ONLY)
- CONNECTING TO PC
- For Windows 98SE user:
- Connecting Digital Audio Player to PC
- Transferring music files from PC to Digital Audio Player
- NOTE
- Disconnecting from PC
- For Windows 2000/Me/XP users:
- For Windows 98SE users
- NOTES
- PARTS OF THE DIGITAL AUDIO PLAYER
- To turn power OFF
- DISPLAY OVERVIEW
- BASIC OPERATIONS
- USING THE MAIN MENU
- Types of modes
- MUSIC mode
- LINE IN mode
- SET mode
- DELETE mode
- ABOUT mode
- RESET mode
- NAVIGATE mode
- PLAYING MUSIC
- To play music
- To select track:
- To fast-forward/reverse track:
- To record music from external audio equipment
- DELETING FILES
- To delete files
- To exit DELETE mode:
- ADVANCED FEATURES
- SET MENU ITEMS
- EQUALIZER
- Types of sound modes
- NORM NORMAL
- CLASS CLASSICAL
- JAZZ JAZZ
- ROCK ROCK
- POP POP
- BASS BASS
- CUSTOMIZED
- To select sound mode
- To create sound mode (CUST)
- To exit SET mode:
- PLAYMODE
- Types of playback modes
- NORMAL
- REPEAT ONE
- REPEAT ALL
- RANDOM
- RANDOM RPT
- INTRO
- To select play mode
- SLEEP TIMER
- AUTO POWER OFF
- To set auto power off
- BACKLIGHT
- To set back light
- CONTRAST
- To set contrast
- RECORD SET
- To set recording
- Bit Rate:
- Auto Track (A.TRK):
- MENU LANGUAGES Dpc
- FONTS ICB
- To set fonts
- ABOUT
- To display:
- Upgrading firmware version:
- RESETTING THE UNIT 1⇒0
- RESET?
- To reset the unit
- NAVIGATE
- To locate a music file
- Music file playing order in Music mode:
- LOCKING BUTTONS (HOLD)
- TROUBLESHOOTING
- SPECIFICATIONS
- ACCESSORIES
- Information for Users on Disposal of Old Equipment
- [European Union]
- Attention:
- (Business users)
- [Other Countries outside the European Union]
- JVC
Brand : JVC
Model : XA-MP102W
Category : Mp3 player