
MX406 - Car radio MCINTOSH - Free user manual and instructions
Find the device manual for free MX406 MCINTOSH in PDF.

| Brand | McIntosh |
| Model | MX406 |
| Product Type | Car Stereo / Audio Control Center |
| Dimensions (W x H x D) | 7-3/8" (188 mm) x 2-1/4" (58 mm) x 6-1/2" (167.8 mm) |
| Weight | 10 lbs (3.9 kg) with DC-DC Converter |
| Power Supply Voltage | 14.4V DC (10.8V to 15.6V allowable) |
| Ground | Negative Ground |
| Current Consumption | 1.0A |
| Fuse Ratings | Memory back-up: 3A; Remote turn-on: 0.5A |
| CD Player System | Compact disc audio system, non-contacting laser reading |
| CD Frequency Response | 20Hz to 20kHz ±0.5 dB |
| CD Signal-to-Noise Ratio | 110dB (EIAJ) |
| CD Dynamic Range | 100dB |
| CD THD | 0.004% (1kHz) |
| CD Channel Separation | 98dB |
| FM Tuning Range | 87.9 MHz to 107.9 MHz (US) / 87.5 to 108 MHz (outside US) |
| FM Usable Sensitivity | 10dBf |
| FM Signal-to-Noise Ratio | 70dB (at 100% modulation) |
| AM Tuning Range | 530 kHz to 1,710 kHz (US) / 531 to 1629 kHz (outside US) |
| AUX Input Sensitivity | AUX H: 1V, AUX L: 2V (at 3V output) |
| Security System | Password protection (4-digit, numbers 1-6) with anti-theft flashing indicator |
| Key Features | FM diversity circuit, ground isolation input circuit, Power Guard, 8x oversampling 20-bit DAC |
Frequently Asked Questions - MX406 MCINTOSH
User questions about MX406 MCINTOSH
0 question about this device. Answer the ones you know or ask your own.
Ask a new question about this device
Download the instructions for your Car radio in PDF format for free! Find your manual MX406 - MCINTOSH and take your electronic device back in hand. On this page are published all the documents necessary for the use of your device. MX406 by MCINTOSH.
USER MANUAL MX406 MCINTOSH
Audio Control Center

MX406
Owner's Manual
IMPORTANT SAFETY INSTRUCTIONS
THESE INSTRUCTIONS ARE TO PROTECT YOU AND THE McINTOSH INSTRUMENT. BE SURE TO FAMILIARIZE YOURSELF WITH THEM.
Copyright © 1996, 2011 by McIntosh Laboratory, Inc.
- Read all instructions - Read the safety and operating instructions before operating the instrument.
- Retain Instructions - Retain the safety and operating instructions for future reference.
- Heed Warnings - Adhere to warnings and operating instructions.
- Follow instructions - Follow all operating and use instructions.
WARNING: TO REDUCE THE RISK OF FIRE OR ELECTRICAL SHOCK, DO NOT EXPOSE THIS INSTRUMENT TO RAIN OR MOISTURE. - Power Sources - Connect the power supply only to the type described in the operating instructions or as marked on the unit.
- Cleaning - Clean the instrument by dusting with a dry cloth. Clean the panel with a cloth moistened with a window cleaner.
- Object and Liquid Entry - Do not permit objects to fall and liquids to spill into the instrument through enclosure openings.
- Damage Requiring Service - Service must be performed by qualified service personnel when:
A. Objects have fallen, or liquid has been spilled into the instrument; or
B. The instrument has been exposed to rain; or
C. The instrument does not appear to operate normally or exhibits a marked change in performance; or
D. The instrument has been dropped, or the enclosure damaged. - Servicing - Do not attempt to service beyond that described in the operating instructions. All other service should be referred to qualified service personnel.
- Installation of automobile stereo components requires experience with a variety of mechanical and electrical procedures. This manual explains the installation flexibility not the exact installation methods to be used in any given case. If you do not have the experience that those procedures require, we strongly suggest consulting your McIntosh dealer about professional installation.
Thank you for choosing McIntosh. You have acquired a component of sophisticated design matchless construction quality, outstanding performance, and extreme reliability.
McIntosh Laboratory, Inc. has taken the technologies and acoustics fostered for years in McIntosh Home Audio Systems and designed an exclusive car audio sound with clear, natural and undistorted tone which will allow you to enjoy superb musical reproduction while you drive.
The owner's manual for the Audio Control Center MX406 consists of the Operation Manual and the Installation/Wire Connection Manual.
Please take a few minutes to read through this manual before you install or operate this unit. Understanding its unique design and operating features will make it easier for you to enjoy all the performance benefits this precision McIntosh instrument can provide you.
Your MX406 is accompanied by a warranty card and this manual. Please fill out the warranty card and mail to:
McIntosh Laboratory, Inc.
2 Chambers Street
Binghamton, New York 13903-2699
After reading the manual, keep it with the enclosed warranty card for future reference.
Note: This Owner's Manual explains how to use the Audio Control Center MX406 and the CD Auto Changer MCD4000. (Note that Owner's manual of the MCD4000 does not provide its operations procedures.)
Immediately after unpacking your MX406, carefully inspect the unit for any signs of defects or shipping damage. If any imperfection is visible, DO NOT ATTEMPT TO INSTALL OR USE THE UNIT: return it immediately to your authorized dealer.
BEFORE YOU BEGIN
The serial number and purchase date are important to you for possible insurance claim or future service. Record this information here.


Serial Number

natural_image
Empty white rectangle with black border (no text or symbols)Purchase Date

natural_image
Empty white rectangle with black border (no text or symbols)Authorized Dealer Location
Installed By
TABLE OF CONTENTS
FEATURES OF SYSTEM EQUIPMENT....6,7
PRECAUTIONS....8
HANDLING COMPACT DISCS.... 9, 10
NAME AND FUNCTION OF PARTS....10 - 14
OPERATION
TURN ON THE POWER AND ADJUSTING THE VOLUME....15
SWITCHING TO A DESIRED MODE....15
ADJUSTMENT OF THE TONE, BASE AND TREBLE....15
ADJUSTMENT OF BALANCE/FADER....16
CLOCK DISPLAY....17
SETTING THE CLOCK....17
RADIO MODE OPERATIONS.... 18
SELECTING RADIO MODE....18
SELECTING A STATION....19
STORING STATIONS (PRESET MEMORY)....19
STORING STATIONS AUTOMATICALLY (AUTO STORE FUNCTION)....20
SELECTING A STATION IN MEMORY.... 21
SETTING FM DIVERSITY....22
SWITCHABLE FREQUENCY STEPPING....22
LISTENING TO THE RADIO OUTSIDE THE UNITED STATES.... 22
CD MODE OPERATIONS.... 23
INSERTING A CD.... 23
LISTENING TO A LOADED CD....24
EJECTING A CD....24
SELECTING A TRACK....24
REPEATING A TRACK.... 25
CD AUTO CHANGER MODE OPERATIONS.... 25
SELECTING THE CD AUTO CHANGER MODE....25
SELECTING A CD....26
SELECTING A TRACK.... 26
REPEATING A TRACK....27
SWITCHING A MAGAZINE....27
LOCKING A MAGAZINE TO BE PLAYED....27
LISTENING TO AUDIO FROM THE CONNECTED AUXILIARY INPUT....28
SELECTING THE AUXILIARY INPUT (AUX) MODE....28
SWITCHING THE SENSITIVITY OF THE AUXILIARY INPUT....28
SECURITY SYSTEM....29
REGISTERING A PASSWORD....29
RELEASING THE LOCK....30
SECURITY SYSTEM....30
CLEARING THE PASSWORD....30
CHANGING THE PASSWORD....31
FLASHING THE ANTI-THEFT SIGNAL....31
TROUBLE SHOOTING....32
ERROR DISPLAYS....33
SPECIFICATIONS....34, 35
MX406 BLOCK DIAGRAM....36
INSTALLATION/WIRE CONNECTIONS.... 37
BEFORE STARTING....37
CAUTIONS ON INSTALLATION....37
PREPARATIONS....38
INSTALLING THE AUDIO CONTROL CENTER UNIVERSAL MOUNT.... 39
REMOVING THE MX406 INSTALLED WITH THE UNIVERSAL MOUNTING BRACKET....40
FIXED INSTALLATION....40
NOTES FOR PROCESSING THE INSTRUMENT PANEL.... 42
WIRE CONNECTIONS....43
CAUTIONS ON WIRING....44
ANTENNAS....45
OPTICAL FIBER DIGITAL CABLE....45
RCA CABLE CAUTION....46
CD AUTO CHANGER CONTROL BUS CABLE CAUTION....46
TABLE OF CONTENTS
FEATURES OF SYSTEM EQUIPMENT
Audio Control Center MX406
Centralized Control System
The centralized control system is used for receiving AM/FM broadcasts and playing a CD in either the Audio Control Center or the CD Auto Changer. The control switches are designed to allow easy and variable operation.
FM diversity circuit
The diversity circuit is incorporated in the MX406. When driving, this circuit prevents sudden changes in radio waves from affecting good reception and reduces the effect of multipath noise by selecting the most effective antenna.
FM Diversity Circuit
The diversity circuit is incorporated in the MX406. When driving, this circuit prevents sudden changes in radio waves from affection good reception and reduces the effect of multi-path noise by selecting the most effective antenna.
Ground Isolation Input Circuit
The ground isolation circuit is incorporated in the preamplifier to which the signals are input via the auxiliary equipment and CDs. This circuit, having a high common mode signal rejection ratio and low distortions minimizes the effects of common mode noise and especially reproduces low signal level sound sources effectively.
MX406 Power Guard
This circuit is incorporated in the McIntosh power amplifiers. When the amplifier generates high output of clipping distortion, the power guard signal is sent from the amplifier to the Audio Control Center. This signal lowers the audio signal level automatically in the Audio Control Center and limits distortion and damage to the speakers caused by the clipping.
Auxiliary input terminal
The MX406 has RCA auxiliary input terminals which connects to audio output of auxiliary equipment such as video equipment for cars, etc.
High Performance Digital/Audio Interface
The low jitter clock recovery circuit is incorporated in the digital input. By reproducing digital signals with a low jitter clock, the digital to analog conversion can be made with high precision and stability.
High Accuracy 8 Times Oversampling, 20bit Digital To Analog Converter
The Digital To Analog Converter uses signmagnitude type 20bit Digital To Analog Converter which theoretically suppresses zero-crossing distortion. This converter performs with high linearity in limited output space during digital to analog conversion, and maintains low distortion and high S/N ratio.
Low-Noise, High-Speed Analog section
In the analog section of the IV conversion and lowpass filter, feature dynamic devices with superior sound quality having low noise, low distortion, and high through rate produces superb musical sound of high quality and high performance.
FEATURES OF SYSTEM EQUIPMENT
- When it is very cold in the car, and the CD player is used soon after turning on the car heater, the disc and the player optical components may become fogged and not operate properly. Wipe any fogged discs with a soft dry clean cloth. Fogged optical components will naturally return to normal when the head unit is left on for about one hour, allowing the player to operate normally.
- When the MX406 is installed, a special stabilizing bracket is bolted from the rear panel of the head unit case to a rigid section of the car structure behind the dash. However, if the car is driven over very rough and bumpy roads, the CD player may skip occasionally. This will not harm the player or the discs.
- The CD player in the MX406 is a precision mechanism and will provide musical entertainment for a very long time. In the rare event that trouble should occur, immediately contact your authorized McIntosh dealer or Service Agency. Never attempt to disassemble the unit. There are no user serviceable parts inside.
- This equipment has been tested and found to comply with the limits for a Class B digital device, pursuant to Part 16 of the FCC Rules. These limits are designed to provide reasonable protection against harmful interference in a residential installation. This equipment generates, uses, and can radiate radio frequency energy and, if not installed and used in accordance with the instructions, may cause harmful interference to radio communications. However, there is no guarantee that interference will not occur in a particular installation. If this equipment does cause harmful interference to radio or television reception, which can be determined by turning the equipment off and on, the user is encouraged to consult the dealer or an experienced radio/TV technician for help.
CAUTION
Use of controls, adjustments, or performance of procedures other than those specified herein, may result in hazardous radiation exposure.
The compact disc player should not be adjusted or repaired by anyone except properly qualified service personnel.

INFORMATION FOR USERS:
Changes or modifications to this product not approved by the manufacturer void the warranty and will violate FCC approval.
This unit has been designed specifically for reproduction of compact discs bearing the mark. No other discs can be played.
To remove the compact disc Changer from its storage case, press down on the center of the case and lift the disc out, holding it carefully by the edges.
A. Removing the disc
B. Proper way to hold the compact disc


Always handle the compact disc by the edges. Never touch the surface.
To remove finger marks and dust, use a soft cloth, and wipe in a straight line from the center of the compact disc to the circumference.

New discs may have some roughness around the edges. If such discs are used, a malfunction or sound skip may occur. Use the edge of a ballpoint pen, etc. to remove roughness from the edge of the disc.
a. Ballpoint pen
b. Roughness

Note on Compact Discs Never stick labels on the surface of the compact disc or mark the surface with a pencil or pen.

Do not use any solvents such as commercially available cleaners, anti-static spray, or thinner to clean compact discs.

HANDLING COMPACT DISCS
Do not use compact discs that have large scratches, are misshapen, or cracked, etc. Use of such discs will cause misoperation or damage.

Do not expose compact discs to direct sunlight or any heat source.

natural_image
Simple line drawing of a solar panel emitting heat from a CD to a sun (no text or symbols)Note:
Do not use commercially available CD protection sheets or discs equipped with stabilizers, etc. These may get caught in the internal mechanism and damage the disc.
NAME AND FUNCTION OF PARTS
NAME AND FUNCTION OF PARTS
The numbers refer to the drawing on the next page
- Mode Display
* Radio Reception Frequency Display
* CD Play Track No. Display
* CD Auto Changer Magazine/Disc No. Display
-
CD Insertion Slot
-
"Disc In" Indicator
-
Bass/Treble Adjustment Knob
-
Fader Adjustment Knob (for Front and Rear Speakers)
-
Power On/Off Knob
* Volume Adjustment Knob
* Balance Adjustment Knob (for Left and Right Speakers)
-
Power Guard Indicator
-
* Radio Auto Store Button
* CD Track Repeat Play Button
- * Radio Reception Preset Buttons
* CD Auto Changer Disc Selection Buttons
- * Radio Reception Preset Indicators
* CD Auto Changer Disc Indicators
- * Radio Band Switch Button
* CD Auto Changer Magazine Switch/Magazine Lock button
-
Reset Button
-
* Radio Tuning Knob (Auto/Manual)
* CD Play Track Selection Knob
-
Mode Switch Knob
-
CD Eject Button

NAME AND FUNCTION OF PARTS
1. Mode Display
☐ In radio mode, the frequency and band (AM or FM) of a received station is displayed.
☐ In CD mode, the played track number of a CD is displayed.
☐ In CD Auto Changer mode, the played track number and its CD number are displayed. The CD Auto Changer can store a multiple number of magazines. When it is used, the played magazine number is also displayed.
2. CD Insertion Slot
☐ A CD can be automatically inserted into this slot.
3."Disc In" Indicator
☐ When a CD is inserted into the MX406, this indicator lights and when the CD is ejected, it goes off. When the power is turned off, this indicator flashes as a warning of theft.
NAME AND FUNCTION OF PARTS
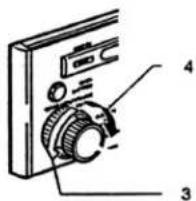
4. Bass/Treble Adjustment Knob
☐ Bass adjustment knob. Pressing the knob gently makes it come up. Then, the bass can be adjusted by rotating it.
☐ Treble adjustment knob Pulling the knob out beyond the bass position, allows the treble to be adjusted by rotating it.
5. Fader Adjustment Knob (for Front and Rear Speakers)
☐ Emphasis from the front and rear speakers can be adjusted by rotating this knob. NAME AND FUNCTION OF INDICATORS AND CONTROLS
6. Power On/Off Knob, Volume Adjustment Knob, Balance Adjustment Knob (for Left and Right Speakers)
☐ Power on/off knob, volume adjustment knob. This knob is used to turn on and off the power and adjust the volume.
☐ Balance adjustment knob (for left and right speakers) this knob is used to adjust volume for the left and right speakers.
7. Power Guard Indicator
☐ This indicator lights when the power guard circuit is functioning.
To use the power guard circuit, connect the designated lead of the MX406 to the McIntosh power amplifier terminal (PG).
8. Radio Auto Store Button/CD Track Repeat Play Button
☐ Radio auto store button
In radio mode this button is used to automatically store the strongest signals in selected radio bands.
☐ CD track repeat play button
In CD mode and CD Auto Changer mode, this button is used to play a current track of a CD repeatedly.
9. Radio Reception Preset Buttons/CD Auto Changer Disc Selection Buttons
☐ Radio reception preset buttons In radio mode, these buttons are used to select and store a station directly.
☐ CD Auto disc selection buttons In CD Auto Changer mode, these buttons are used to select a CD to be played.
10. Radio Reception Preset
Indicators/CD Auto Changer Disc Indicators
☐ Radio reception preset indicators
In radio mode, the indicator No. of a selected preset station lights up.
☐ CD Auto Changer Disc Indicators. In CD Auto Changer mode, the indicator No. of the disc stored in a selected magazine lights up.
11. Radio Band Switch Button, CD Auto Changer Magazine Switch/Magazine Lock button
☐ Radio Band Switch Button In radio mode, this button is used to switch a reception band.
☐ CD Auto Changer magazine switch/magazine lock button When the CD Auto Changer which can store a multiple number of magazines is used, this button switches or locks a magazine (magazine lock) to be played.
12. Reset Button
☐ This button is used when the microcomputer in the MX406 malfunctions due to noise or other factors.
13. Radio Tuning Knob (Auto/Manual)/CD Play Track Selection Knob
☐ Radio tuning knob (auto/manual) In radio mode, this knob is used to tune in to a desired station.
☐ CD play track selection knob. In CD mode or CD Auto Changer mode, this knob is used to select a desired track.
14. Mode Switch Knob
☐ This knob is used to switch the operation mode.
15. CD Eject Button
☐ This button is used to eject a CD.
NAME AND FUNCTION OF CONTROLS
Using the Knobs
Each knob effects in the following range.
- Rotation range: 300
- On/off
- Rotation range: 180
- <Balance Adjustment Knobs
- Effective range
-
Rotation range: 70
-

CAUTION:
Do not rotate each knob forcefully out of its rotation range as shown above. Rotating the knob with excessive force may cause damage. * While driving, keep the volume to a level at which sounds outside the car can be heard.
Turning on the power and adjusting the volume:
1) Start the engine of the car (set the key at ACC or engine ON position).
2) Rotate the Power On/Off knob (6) clockwise to turn the power on and continue to rotate to increase the volume. When turning off the power, rotate the Power On/Off knob (6) counterclockwise until the indication on the mode display goes off.
- Power on/off
Volume adjustment knob.
- Volume up
- Volume down


Switching to a desired mode
Rotate the Mode Switch knob (14) counter clockwise or clockwise and release it immediately to select a mode. Mode switches as follows:
- Mode switch knob
- Each time you rotate the knob counterclockwise and release it immediately, mode changes from Radio > Auxiliary
input (AUX)> CD Auto Changer > CD > Radio.

- Each time you rotate the knob clockwise and release it immediately, mode changes from Radio > CD > CD Auto Changer > Auxiliary input (AUX) > Radio.
* When no CD is inserted in CD mode, the next mode is selected after 4 seconds.
* CD Auto Changer mode is selected only when it is connected to the MX406.
* When no magazine is set or no CD is loaded in a magazine in CD Auto Changer mode, "DISC" flashes on the Mode Display (1).
Adjustment of the Tone Adjusting the bass and treble
1) Press the Bass Adjustment knob (4) to make it come up.
2) Rotate the Bass Adjustment knob (4) clockwise from the center position to emphasize the bass. Rotate the knob counterclockwise from the center position to attenuate the bass.
1)
- Press. 1)
2)
2) 9. Bass adjustment knob
10. Center position
11. Bass is emphasized.
12. Bass is attenuated.


OPERATION
3) Pull the Bass Adjustment knob (4) more from the position in step 2 above to use it as the Treble Adjustment knob (4).
4) Rotate the Treble Adjustment knob (4) clockwise from the center position to emphasize the treble. Rotate the knob counterclockwise from the center position to attenuate the treble.
3)
- Pull.
3)

4)

4)
- Treble adjustment knob
- Treble is emphasized.
- Treble is attenuated.
- Center Position
5) After adjustment, push the knob back to the original position.
Adjustment of Balance/Fader.
Adjusting the volume for the right and left speakers
1) Pull the Balance Adjustment knob (6).
-
Balance adjustment knob
-
Pull.

2) Rotate the Balance Adjustment knob (6) clockwise from the center position to emphasize the volume from the right speaker. Rotate the knob counterclockwise from the center position to emphasize the volume from the left speaker.
-
Volume from the left speaker is emphasized.
-
Volume from the right speaker is emphasized.
3) After adjustment, push the knob back to the original position.
Adjusting the fader of the front and rear speakers
Rotate the Fader Adjustment knob (5) clockwise from the center position to emphasize the volume from the front speaker.
Rotate the knob counterclockwise from the center position to emphasize the volume from the rear speaker.
- Fader adjustment knob
- Volume from the front speaker is emphasized.
- Volume from the rear speaker is emphasized.
Clock Display

Displaying the clock
1) While pressing and holding the Radio Band Switch button (11), press [4] of the Radio Reception Preset buttons (9) (double press)
- [4] of the radio reception preset buttons
- Radio band switch button

2) Each time you repeat the operation of step 1), the Mode Display (1) switches between the mode and clock.
Clock Display

natural_image
Line drawing of a portable electronic device with ports and control knobs (no text or symbols)

Setting the clock
1) While pressing and holding the Radio Band Switch button (11), press [4] of the Radio Reception Preset buttons (9) (double press). The display switches to the clock.
2) While pressing and holding the Radio Band Switch button (11), press and hold [4] of the Radio Reception Preset buttons (9) for 2 seconds or longer (double press).
* Clock display flashes.
3) Rotate the Radio Tuning knob (13) clockwise and release it immediately. The minute display increments by one.
1. Radio tuning knob


* If you do not release the knob, the minute increases continually.
OPERATION
4) Rotate the Radio Tuning knob (13) counterclockwise and release it immediately. The hour display increments by one.
- Radio tuning knob
* If you do not release the knob, the hour increases continually.


5) Set the correct time by repeating steps 3) and 4).
6) Press the Radio Band Switch button (11). The second is reset to zero and the clock is set.
- Radio band switch button


* If you select another operation while you are setting the clock, the clock setting operation will be canceled.
* If you remove the battery for a check or repair, set the clock again.
Radio Mode Operations
Selecting radio mode
Rotate the Mode Switch knob (14) and release it immediately. Then radio mode is selected to tune in to a desired station.
- Mode switch knob


* A selected band and frequency lights up in the Mode Display (1).
Selecting a station
1) Press the Radio Band Switch button (11) to select FM1, FM2, FM3, or AM. Each time you press the Radio Band Switch button (11), the band changes in the following order:
- Radio band switch button FM1 > FM2 > FM3 > AM > FM1


* The band in the mode display switches. * When listening to the radio in stereo mode, "ST" indicator lights up in the Mode Display (1).
2) Rotate the Radio Tuning knob (13) to tune in to a desired station.
- Radio tuning knob


* Rotating the knob and releasing it within 1 second changes the frequency by 1 step, which is manual tuning. * Rotating the knob for 1 second or longer, tuning automatically stops when a station is found, which is seek tuning.
Radio Mode Operations
Storing stations (preset memory)
A total of 24 stations (6 each for the FM1, FM2, FM3, and AM) can be stored and selected directly by pressing the Radio Reception Preset buttons (9).
1) Press the Radio Band Switch button (11) and select a band to be stored (FM1, FM2, FM3, or AM).
- Radio band switch button


2) Rotate the Radio Tuning knob (13) to tune in to a station.
- Radio tuning knob


* Rotating the knob and releasing it within 1 second changes the frequency by 1 step, which is the manual tuning.
* Rotating the knob for 1 second or longer, tuning automatically stops when a station is found, which is seek tuning.
3) When tuned in to a desired station, press 1 through 6 of the Radio Reception Preset buttons (9) for 2 seconds or longer for which preset you want to store the station. The Radio Reception Preset indicator (10) corresponding to the pressed preset button lights up. When a station is stored, sound of the radio is muted for 2 seconds.

* When a station is preset, the station previously stored in the memory at that position is erased.
Radio Mode Operations
Storing stations automatically (auto store function)
Stations with good reception can be automatically stored to the radio reception preset buttons.
1) Press the Radio Band Switch button (11) and select a band to be stored (FM1, FM2, FM3, or AM).
- Radio band switch button


2) Press and hold the Radio Auto Store button (8) for 2 seconds or longer. Then, "AS" lights up in the Mode Display (1), and stations with good reception will be stored automatically to the Radio Reception Preset buttons (9).
3. Radio auto store button

* After storing stations by the auto store function, the stations previously stored are erased from memory.
* Test frequency and the auto store starts again. If the auto store is repeated twice and still there is a button at which no station is preset, the station previously stored at the button is not erased.
* A station previously stored to a radio reception preset button cannot be stored to a different one.
Selecting a station in memory
1) Press the Radio Band Switch button (11) to select a band (FM1, FM2, FM3, or AM).
1. Radio band switch button

2) Press either 1 through 6 of the Radio Reception Preset buttons (9) to select a stored station directly. The Radio Reception Preset indicator (10) corresponding to the pressed preset button lights up.

* If the radio reception preset button is pressed and held for 2 seconds or longer, the currently selected station is automatically stored to that button.
* For the operation above, see the section "Storing stations."
Radio Mode Operations
Setting FM diversity
Set "DIV On" for two antennas and "DIV OFF" for one antenna. (The initial setting of the FM diversity is "DIV On".) Noise may occur if the setting is incorrect.
1) Select an FM band in radio mode.
- Radio band switch button


2) While pressing and holding the Radio Band Switch button (11), press [5] of the Radio Reception Preset buttons (9) (double press).
- Radio band switch button
- [5] of the radio reception preset buttons


3) Each time you repeat the operation in step 2) above, the Mode Display (1) switches between "DIV On" and "DIV OFF" and turns on and off the diversity.
Switchable Frequency Stepping
Listening to the radio outside the United States
Switchable Frequency Setting
This audio control center is initially set to tune in frequency intervals of 10 kHz for AM and 200 kHz for FM, the standard calibrations in the U.S. When using the MX406 outside the U.S., use the following procedure to switch the frequency range.
| 1. | Initial Setting (US. standard) | 7. | 200 kHz |
| 2. | New Setting (outside U.S.) | 8. | 87.9 to 107.9 MHz |
| 3. | Frequency spacing | 9. | 9 kHz |
| 4. | Frequency range | 10. | 531 to 1629 kHz |
| 5. | 10 kHz | 11. | 50 kHz |
| 6. | 530 to 1710 kHz | 12. | 87.5 to 108 MHz |
In radio mode, while pressing and holding the Radio Band Switch button (11), rotate the Radio Tuning knob (13) clockwise and release it immediately. The mode changes to the outside U.S. While pressing and holding the Radio Band Switch button (11), rotate the Radio Tuning knob (13) counterclockwise and release it immediately. The mode changes back to the U.S. standard.
CD Mode Operations
Inserting a CD
Insert a CD into the CD Insertion Slot (2) with the labeled side facing up. The "Disc In" indicator (3) lights up and playback begins automatically.
1. "Disc in" indicator

* The No. of a track currently played is displayed in the mode display.
* Listening to a single CD:
Insert a single CD straight in from the center of the slot.
Load it without any adapter.
During the playback,
CAUTION:
* If a CD is already inserted, another CD cannot be loaded. Do not insert it forcefully.
* MX406 cannot play a CD without indication.
Listening to a loaded CD
Rotate the Mode Switch knob (14) and release it immediately to select CD mode. Then, playback begins automatically.
- Mode switch knob


* When a CD is already inserted, the Disc In Indicator (3) lights up.
* While no CD is inserted, the next mode is selected after 4 seconds.
Ejecting a CD
Press the CD Eject button (15) to eject
- CD eject button

natural_image
Technical diagram of a mechanical device with labeled parts (no readable text or symbols)

* CDs can be ejected while the power is turned off. (THIS LINE DOESN'T APPEAR IN THE OWNERS MANUAL.)
* In CD mode, if a CD is left in the ejected position, it is automatically inserted into the MX406 after 15 seconds and the playback starts automatically. In other modes, the CD is reloaded after 15 seconds but cannot be played, unless CD mode is selected.
CAUTION: Single CDs are not reloaded. Be sure to remove them.
CD Mode Operations
Selecting a track
1) Select the next track
Rotate the CD Play Track Selection knob (13) clockwise and release it immediately. The Track number increments by one and playback starts from the beginning of the next track.
- CD play track selection knob


* If you do not release the knob, track number increases. Therefore, release the knob when a desired track is selected.
2) Select the previous track
Rotate the CD Play Track Selection knob (13) counterclockwise and release it immediately. Then, playback starts from the beginning of the current track. If rotated again and released immediately, the track No. decrements and the previous track is played.
- CD play track selection knob


* If you do not release the knob, track number decreases. Therefore, release the knob when a desired track is selected.
Repeating a track
1) If you press the CD Track Repeat Play button (8) when a CD is played, "RPT" lights up in the Mode Display (1) and the current track is played repeatedly.
- CD track repeat play button


2) To cancel the repeat play, press the CD Track Play button (8) to turn off "RPT" in the Mode Display (1).
CD Auto Changer Mode Operations
Selecting the CD auto changer mode
MX406 can be controlled by connecting the CD Auto Changer MCD4000. Up to 6 CDs can be set in the magazine.
Rotate the Mode Switch knob (14) and release it immediately to select CD auto changer mode. A CD in the CD Auto Changer is played.
- Mode switch knob


The Nos. of a track and CD currently playing in the CD Auto Changer are displayed in the Mode Display (1). The CD Auto Changer Disc indicators (10) indicate the No. of disc loaded in the magazine.
* When no magazine is set in the CD Auto Changer, or no CD is loaded in the magazine, "DISC" flashes in the Mode Display (1).
Selecting a CD
Press the CD Auto Changer Disc Selection buttons (9) to select a desirable CD.

* Note: Nothing will happen when a disc number is pressed and there is no disc in that slot of the cartridge.
Selecting a track
1) Select the next track
Rotate the CD Play Track Selection knob (13) clockwise and release it immediately. Then, the track number increases by one and the next track is played.
- CD play track selection knob


* If you do not release the knob, the track numbers continue to increase. Release the knob when a desired track is selected.
2) Select the previous track
Rotate the CD Play Track Selection knob (13) counterclockwise and release it immediately. Then the playback starts from the beginning of the current track. Rotate the knob again and release it immediately. The track number decreases and the previous track is played.
- CD play track selection knob.


* If you do not release the knob, track numbers continue to decrease. Release the knob when a desired track is selected.
CD Auto Changer Mode Operations
Repeating a track
1) Press the CD Track Repeat Play button (8) during playback of a CD, "RPT" lights up on the Mode Display (1) and the current track is played repeatedly.
- CD track repeat play button


2) To cancel, press the CD Track Repeat Play button (8) again and turn off the "RPT" on the Mode Display (1).
Switching a magazine
This function is available with the CD Auto Changer when using multiple magazines. In this case, a magazine number is displayed in the Mode Display (1). Each time you press the CD Auto Changer Magazine Switch button (11) the next magazine is selected.
- CD auto changer magazine switch button


Locking a magazine to be played
This function is available with the CD Auto Changer when using multiple magazines. In this case, a magazine number is displayed in the Mode Display (1).
1) Press and hold the CD Auto Changer Magazine Lock button (11) for 2 seconds or longer. Track number in the Mode Display (1) changes from "T01" to "L01" and only the CD in the currently selected magazine is played.
-
CD auto changer magazine lock button
-


2) To cancel, press and hold the CD Auto Changer Magazine wazzu Lock button (11) for 2 seconds or longer.
* When a magazine is locked, after the last track of the CD in the magazine is played, playback resumes from the first track (track No. 1) of the same CD.
* Even when a magazine is locked, it can be switched and the new magazine will also be locked.
Listening to audio from the connected Auxiliary Input
Selecting the auxiliary input (AUX) mode
The MX406's auxiliary input terminal enables you to listen to the audio from other auxiliary equipment available on the market such as video equipment for cars, etc.
* Note: When plugging and unplugging the auxiliary equipment, turn off the power of the MX406 or minimize the volume.
Rotate the Mode Switch knob (14) and release it immediately to switch to auxiliary input (AUX) mode. Then you can listen to the audio from the equipment connected to the auxiliary input terminal.
- Mode switch knob


AU:
* Turn on the power and adjust the volume of the connected auxiliary equipment.
Switching the sensitivity of the auxiliary input
If the audio level from the connected auxiliary equipment is not appropriate within any volume settings of the MX406, switch the input sensitivity by the following procedure:
When the audio is too loud, lower the sensitivity by setting mode at "AUX L" and if the audio is too soft, raise the sensitivity by setting mode at "AUX H". (The initial setting is "AUX H".)
While pressing and holding the Radio Band Switch button (11) in auxiliary input (AUX) mode, press [6] of the Radio Reception Preset buttons (9) (double press).
-
[6] of the radio reception preset buttons
-
The radio band switch button


AU:L
* Each time you repeat the above operation, Mode Display (1) switches between "AUX L" and "AUX H"
Security System
Registering a password
When you set a password following the procedure below, the MX406 cannot be operated unless the password is entered. This prevents the MX406 from being used when stolen and installed in another car.
1) While pressing and holding the CD Eject button (15), turn the power on using the Power On/Off knob (6).
1. CD eject button
2. Power on/off knob
3.

2) Register a 4 digit number (consisting of numbers between 1 and 6) using the Radio Reception Preset buttons (9).
4.

3) For confirmation, enter the same password you entered in step 2) again when "COdE" flashes on the Mode Display (1).
5.

* The password cannot be registered unless it is entered twice.
* Once the password is registered, each time you turn on the power of the MX406, "COdE" flashes on the Mode Display (1) approximately for 2 seconds and confirms that the password has been registered.
CAUTION: The registered password is not cleared when the battery is disconnected. It is important not to forget the password. Write it down and hide it carefully in a safe place. The MX406 cannot be operated without the password.
Releasing the lock
* If the MX406 is disconnected from the battery or installed in another car after the password has been registered, the password should be entered when turning on the power the first time. Otherwise, the MX406 cannot be operated. In this case, release the lock in the following procedure.
1) Turn the power on by rotating the Power On/Off knob (6).
- Power on/off knob


Security System
2) Enter the registered password using the Radio Reception Preset buttons (9), then the lock is released.

* The registered password remains as it is.
* If a password other than the registered one is entered, “—” lights on the Mode Display (1) and the system will not accept further input as a password for a specified period. In this case, confirm and enter the correct password again after the specified period passes and "COdE" starts flashing on the Mode Display (1). The specified period while “—” lights depends on the number of incorrect inputs. (For 1 to 6 incorrect inputs, the specified period is 15 seconds, and for 7 or more incorrect inputs, the specified period is 15 minutes.)
Clearing the password
1) While pressing and holding the CD Eject button (15), turn on the power using the Power On/Off knob (6).
- CD eject button
- Power on/off knob

* If no password has been registered, this procedure enables you to register a password.
2) Enter the registered password to clear it.
4.

* As the registered password is cleared, "COdE" does not flash on the Mode Display (1) when turning on the power.
* In step 2) above, if a password other than the registered one is entered, " lights on the Mode Display (1) and the system will not accept further input as a password for a specified period. In this case, confirm and enter the correct password again after the specified period passed and "COdE" starts flashing on the Mode Display (1). The specified period while " lights depends on the number of wrong inputs. (For 1 to 6 incorrect inputs, the specified period is 15 seconds, and for 7 or more incorrect input, the specified period is 15 minutes.)
Changing the password
1) Clear the password. * See the section "Clearing the password".
2) Enter a new password. * See the section "Registering a password".
Flashing the antitheft signal
Flashing the "Disc In" indicator (3) while the power is turned off protects the MX406 from theft.
Press and hold the CD Eject button (15) for 2 seconds or longer while the power is turned off. To cancel, press and hold the CD Eject button (15) for 2 seconds or longer again.
- Disc in indicator
- CD eject button

TROUBLE SHOOTING
| Symptom | Cause | Measure |
| Power does not switch on. (there is no sound produced.) | The fuse of the power lead has blown. | Replace the fuse with one of the same rating. The rating of each fuse is as follows:Remote turn-on lead 0.5A.Memory back-up lead of the DC/DC converter 3A |
| Wiring is incomplete. | Check the wiring of each piece of equipment and wire properly referring to the "Installation/Wire Connection Manual" (especially, Section 3. Wire Connections). | |
| The compact disc is rejected when inserted. | The compact disc has been inserted upside down. | Insert the compact disc with the labeled side facing up. |
| Sound skipping noises and other sounds are heard. | The compact disc is dirty. | Wipe the compact disc with a soft cloth. |
| The compact disc is severely scratched or warped. | Replace the compact disc with one that is in good condition. | |
| The pickup is dirty. | Clean the pickup with a lens cleaner. | |
| The sound is poor immediately after switching on the power. | When the car is parked in a humid place, dew may form on the pickup lens. | Turn on the power of the MX4000 and wait for about 1 hour before operating. |
| Nothing happens when buttons are pressed. (The display is not accurate.) | The microprocessor has malfunctioned due to noise, etc. | Decrease the volume to its minimum level and press and hold the reset button for approximately 2 seconds with a thi |
ERROR DISPLAYS
☐ For protection of the system, the MX406 is equipped with the following selfdiagnosis functions.
If an error occurs, the error status is displayed. Take the appropriate measure according to the error display following the instructions in the table below. When the error is eliminated, the MX406 returns to the normal state.
| Error Display | Cause | Measure |
| Err 2 | Displayed when the CD is stuck and cannot be ejected, or when the CD in the CD changer cannot be loaded. | Mechanism of the CD deck or the CD changer could be damaged. Contact the store at which you purchased the produce. |
| Err 3 | Displayed when the CD in the CD deck or the CD changer is scratched, etc. and cannot be played. | Replace the CD with one in good condition. |
| Err 6 | Displayed when the CD is inserted upside down into the CD changer and cannot be played. | Reload the CD properly. |
| HHHH | Displayed when the temperature in the CD deck or CD changer is too high and playback has stopped automatically | Lower the temperature and wait for a while to cool off the CD deck and the cd changer. |
* If an error other than the above occurred, see the section "TROUBLESHOOTING" and press the reset button.
SPECIFICATIONS
CD Player section
System
Compact disc audio system
Usable discs
Compact disc
Reading system
Non-contacting laser reading
(semiconductor laser used)
Number of revolutions
Approx. 500 rpm to 200 rpm (CLV)
Error correction system
CIRC
Frequency Response
20Hz to 20kHz +/-0.5 dB
Signal to noise ratio
110dB (EIAJ)
Dynamic Range
100dB
Wow and flutter
Below measuring limit
(0.001%W at peak) (EIAJ)
Channel separation
98 dB
THD
0.004% (1 kHz)
AUX Section
Input sensitivity
AUX H 1V (at 3 V output)
AUX L 2 V (at 3 V output)
AM Tuner Section
Tuning range
530 kHz to 1,710 kHz
Tuning system
PLL synthesizer system
Frequency characteristic
20Hz to 4kHz +0, -15dB
Usable sensitivity
20 μV
Signal to noise ratio
50dB (IHF A)
THD
1.0%
Image interference ratio:
65dB
IF Interference
65dB
FM tuner section
Tuning range
87.9 MHz to 107.9 MHz
FM receiving system
Tuning system
PLL synthesizer system
Frequency characteristic
30Hz to 17kHz +, -3dB
Usable sensitivity
10dBf
50dB Quieting sensitivity
17dBf
Signal to noise ratio
70dB (at 100% modulation)
THD
0.3% (at 1kHz)
Image interference
45dB
IF Interference
80dB
Stereo Separation (1kHz)
35dB
Alternate Channel Selectivity
75dB
Audio
Bass Control Action (50Hz)
12dB
Treble Control Action (10kHz)
12dB
Line Output (CD)
3V
Digital Input
Sampling Frequency
44.1kHz
Format
Digital Audio Interface (EIAJ CP-1201)
General
Power supply voltage
14.4V DC (10.8V to 15.6V allowable)
Ground
Negative Ground
Current Consumption
1.0A
Fuse Rating
Memory back-up, 3A
Remote turn-on, 0.5A
Dimensions
7-3/8" (188 mm) Width × 12-1/4" (58mm)
Height x 6-1/2" (167.8 mm) Depth
Weight
10 lbs. (3.9 Kg) with DC-DC Converter
MX406 BLOCK DIAGRAM

flowchart
graph TD
    A["SUB ANT"] --> B["DIVER SELECTOR"]
    C["MAIN ANT"] --> D["FM/AM TUNER"]
    D --> E["SELECTOR"]
    E --> F["MAIN VOLUME"]
    F --> G["BLANCE VOLUME"]
    G --> H["BASS/TREBLE VOLUME"]
    H --> I["FADER VOLUME"]
    I --> J["4-CHANNEL (FRONT/REAR) OUTPUTS"]
    K["AUX 2-CHANNEL INPUTS"] --> L["ISOLATION AMP"]
    L --> M["6dB/PASS ATT"]
    M --> N["DC/DC CONVERTER"]
    N --> O["-15V"]
    N --> P["+15V"]
    Q["CD MECHANISM MODULE"] --> R["DIGITAL AUDIO INTERFACE RECEIVER"]
    R --> S["8 TIMES OVERSAMPLING DIGITAL FILTER"]
    S --> T["20 BIT DIGITAL TO ANALOG CONVERTER"]
    T --> U["LPF"]
    U --> N
    V["PHASE LOCKED LOOP"] --> D
    W["OPG"] --> I
    X["OB/U 14V"] --> N
1. Before Starting
Installation/Wire Connection Manual
Disconnecting the battery's " - " terminal
- This set is exclusively for use in cars with a 12V power supply, negative ground.
- Read these instruction carefully.
- Be sure to disconnect the battery's " - " terminal before starting. This is to prevent short-circuiting during installation
(Figure 1).
a. Car battery
Figure 1

natural_image
Simple line drawing of a battery with anode, power cord, and terminal connections (no text or symbols)CAUTIONS ON INSTALLATION
- Install the MX406 within 30 degrees of the horizontal plane (Figure 2).
- If you have to do any work on the car body, such as drilling holes, etc., consult your car dealer beforehand.
- Use the enclosed screws for installation. Using other screws can result in damage (Figure 3).

INSTALLATION/WIRE CONNECTIONS
INSTALLATION/WIRE CONNECTIONS
Preparation for installation and checking the package contents
- Prepare all parts necessary for installing the Audio Control Center.
- Check all the package contents of the MX406.

- Audio Control Center MX406
- DC/DC Converter x 1
- Warranty Card x 1
- Owner's Manual x 1
- Trim Remover x 1
-
Sems Hexagonal Bolt x 1
-
Clamp x 1
- Hook Plate x 2
- Universal Mounting Bracket x 1
- Strap x 1
- Power Supply Load x 1
2. Installing the Audio Control Center Universal mount
- Insert the universal mounting bracket into the opening of the audio system on the instrument panel.
* The MX406 requires the opening of the following dimensions.

- Bend the stoppers of the universal mounting bracket outwards and fix the bracket to the opening.
- Insert the Audio Control Center into the bracket, push it in until it is locked in position.
- Fix the back side of the Audio Control Center to the car with the attached strap and hexagonal bolt.
a. Screwdriver
b. Instrument Panel
c. Stoppers
d. Audio Control Center MX406
e. 2-springs
f. Stoppers
g. Universal Mounting Bracket
h. Strap
I. Hexagonal bolt
j. Note: refer to notes for processing the
Instrument panel on the vehicle

INSTALLATION/WIRE CONNECTIONS
Removing the MX406 installed with the Universal Mounting Bracket
- Hook the side trims on both sides of the escutcheon of the MX406 with the trim remover and pull them toward you.
a. Escutcheon
b. 2 Side trims
c. Pull
d. Trim remover
e. Instrument panel

- Insert the two hook plates attached to the MX406 into the clearance between the springs and each bracket and push the plates until it clicks. Then, pull both plates evenly.
f. Universal Mounting Bracket
g. Instrument Panel
h. Hook plate

Fixed Installation
(For TOYOTA, NISSAN, and other ISO/DIN vehicles)
The MX406 is designed for fixed installation in the dashboard. If the vehicle is equipped with a factory installed radio, factory mounting brackets may need to be obtained.
- Remove the two springs on both sides of the MX406.
a. Audio Control Center MX406
b. 2 springs
c. 2-screws
d. screw driver

- Fix the Audio Control Center using the mounting brackets attached to the vehicle.
e. Mounting bracket (attached to the vehicle)
f. Opening
g. MX406
h. Pocket
i. Escutcheon
j. 4 Hexagonal screws (M5 x 8)
k. The parts with this mark are attached to the vehicle
I. Dashboard
m. The parts and screws with this mark are used to install radio or included in the installation kit.

INSTALLATION/WIRE CONNECTIONS
Notes for processing the instrument panel on the vehicle
- In case of the fixed installation, the opening on the instrument panel may not fit the escutcheon of the MX4046.
a. Front of Escutcheon
b. 7-3/8" (188mm)
c. 2-1/4" (58mm)

* Dimensions of the escutcheon are shown below. Processing the instrument panel requires expertise. Ask a reliable store for help.
2. Do not touch the shaded part of the MX406 (see the illustration below) to the instrument panel. Inadvertent contact may cause sound skip, etc.
Rear view of the MX406

natural_image
Line drawing of a computer internal unit with visible wiring and ports (no text or symbols)3. Wire Connections
* The MX406 should be used in combination with the McIntosh power amplifier.
* If you connect other equipment to the MX406 see the wiring instruction attached to the equipment.

flowchart
graph TD
    A["SUB ANTENNA"] --> B["MX406"]
    C["MAIN ANTENNA"] --> B
    B --> D["FIBER OPTIC CABLE"]
    D --> E["AUX. EQUIPMENT"]
    E --> F["(MCD4000)"]
    G["BATTERY (+) YELLOW"] --> H["MX406'S DC/DC Converter"]
    I["GND BLACK"] --> H
    J["BUS CABLE"] --> K["POWER AMP"]
    L["BLUE/WHITE"] --> M["AMP ON"]
    N["ORANGE"] --> O["POWER GUARD"]
    P["ORANGE/WHITE"] --> Q["ILLUMINATION (CONNECT TO HEAD LIGHT CONTROL CIRCUIT OF VEHICLE)"]
    R["BROWN"] --> S["PHONE MUTE"]
    T["RED"] --> U["ACCESSORY +12v"]
    V["GND"] --> W["(SPEAKERS)"]
INSTALLATION/WIRE CONNECTIONS
INSTALLATION/WIRE CONNECTIONS
4. Cautions on Wiring
- Be sure to turn the power off when wiring.
-
Terminals for each lead
-
Use the low voltage lead for vehicles AV 0.5sq (AWG No. 20) or the equivalent available on the market for the remote turnon connection lead connected to the Digital To Analog Converter MDA4000 and the power guard connection lead connected to the McIntosh power amplifier.
CAUTION: The remote turn-on lead of the MX406 should be connected to the power amplifier and the Digital To Analog Converter. Otherwise, noise can be heard when the power is turned on.
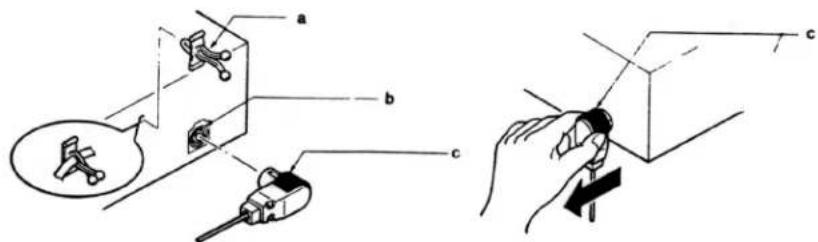
- Push the male plug into the female jack until they are locked in position.
a. Female jack
b. Male plug
c. Sleeve

CAUTION: If a sleeve is not provided with the lead purchased on the market, attach a sleeve or wrap with high quality insulation tape to prevent short circuiting.
- Designated terminals are used for the phone mute lead, illumination power supply lead, and power guard lead. Thus, if the terminals are not used, wrap high quality insulation tape around them to prevent shorting to metal.
3. Fuses
When the fuse blows, check that the wiring is correct. If it is wired correctly replace it with a new one of the same capacity.
* Memory backup lead (yellow wire) 3 A
* Remote turnon lead (blue/white wire) 0.5 A
a. Fuse
b. Fuse holder
c. Rotate in this direction to disconnect.

4. Antennas
When the vehicle has the diversity sub antenna, connect both the main and sub antennas.
If the vehicle has only one antenna terminal, connect to the main antenna only. In this case, mode setting of the Audio Control Center is required.
For details, see "Setting FM diversity" in the "Operation Manual."
□ Connecting the main antenna
a. Audio Control Center MX406
b. Main antenna terminal
c. To the vehicle
* If the antenna terminal of the vehicle does not fit the main antenna recessed terminal, an antenna conversion lead available on the market is required.
5. Optical fiber digital cable
* The optical fiber digital cable should be inserted securely to its base.
Connect the cable terminal with the black slide cap to the MX406 and connect the one with the gray slide cap to the CD Auto Changer MCD4000.
* If the terminals with black and gray slide caps are not connected properly, audio will not be heard. After connecting the cables, secure them to the MX406 with the attached clamps.
* The optical fiber digital cable should not be rolled into a circle of radius smaller than 13/16" (3 cm). Doing so lowers the performance significantly.
* When the optical fiber digital cable is to be disconnected, pinch the slide cap lightly and pull it.
a. Clamp
b. Optical fiber digital output
c. Optical fiber digital cable (terminal with gray slide cap)
d. Slide cap
INSTALLATION/WIRE CONNECTIONS
6. RCA cable
CAUTION
* To prevent short circuiting do not remove the RCA cable insulation caps from unused cables.
* When the RCA cable is connected use high quality insulation tape to hold the connection intact.
e. Insulation tape

natural_image
Diagram of a medical or surgical tool with a coiled tube and labeled component 'e' (no text or symbols beyond label)7. CD Auto Changer Control BUS Cable
CAUTION
When connecting the CD Auto Changer BUS Input terminal to the CD Auto Changer Control BUS extension cable, use high quality insulation tape to hold the connection intact.
a. Insulation tape
b. To the Audio Control Center MX406
c. CD Auto Changer Control BUS extension cable


McIntosh Laboratory, Inc.
2 Chambers Street
Binghamton, NY 13903
The continuous improvement of its products is the policy of McIntosh Laboratory Incorporated who reserve the right to improve design without notice. Printed in the U.S.A.

- IMPORTANT SAFETY INSTRUCTIONS
- THESE INSTRUCTIONS ARE TO PROTECT YOU AND THE McINTOSH INSTRUMENT. BE SURE TO FAMILIARIZE YOURSELF WITH THEM.
- BEFORE YOU BEGIN
- TABLE OF CONTENTS
- FEATURES OF SYSTEM EQUIPMENT
- Audio Control Center MX406
- Centralized Control System
- FM Diversity Circuit
- Ground Isolation Input Circuit
- MX406 Power Guard
- Auxiliary input terminal
- High Performance Digital/Audio Interface
- High Accuracy 8 Times Oversampling, 20bit Digital To Analog Converter
- Low-Noise, High-Speed Analog section
- CAUTION
- INFORMATION FOR USERS:
- HANDLING COMPACT DISCS
- NAME AND FUNCTION OF PARTS
- The numbers refer to the drawing on the next page
- Mode Display
- CD Insertion Slot
- 3."Disc In" Indicator
- Bass/Treble Adjustment Knob
- Fader Adjustment Knob (for Front and Rear Speakers)
- Power On/Off Knob, Volume Adjustment Knob, Balance Adjustment Knob (for Left and Right Speakers)
- Power Guard Indicator
- Radio Auto Store Button/CD Track Repeat Play Button
- ☐ Radio auto store button
- ☐ CD track repeat play button
- Radio Reception Preset Buttons/CD Auto Changer Disc Selection Buttons
- Radio Reception Preset
- Indicators/CD Auto Changer Disc Indicators
- Radio Band Switch Button, CD Auto Changer Magazine Switch/Magazine Lock button
- Reset Button
- Radio Tuning Knob (Auto/Manual)/CD Play Track Selection Knob
- Mode Switch Knob
- CD Eject Button
- NAME AND FUNCTION OF CONTROLS
- Using the Knobs
- CAUTION:
- Turning on the power and adjusting the volume:
- Switching to a desired mode
- Adjustment of the Tone Adjusting the bass and treble
- OPERATION
- Adjustment of Balance/Fader.
- Adjusting the volume for the right and left speakers
- Adjusting the fader of the front and rear speakers
- Clock Display
- Displaying the clock
- Setting the clock
- Radio tuning knob
- Radio Mode Operations
- Selecting radio mode
- Selecting a station
- Storing stations (preset memory)
- Storing stations automatically (auto store function)
- Radio auto store button
- Selecting a station in memory
- Setting FM diversity
- Switchable Frequency Stepping
- Listening to the radio outside the United States
- Switchable Frequency Setting
- CD Mode Operations
- Inserting a CD
- "Disc in" indicator
- Listening to a loaded CD
- Ejecting a CD
- CAUTION: Single CDs are not reloaded. Be sure to remove them.
- Selecting a track
- Repeating a track
- CD Auto Changer Mode Operations
- Selecting the CD auto changer mode
- Selecting a CD
- Switching a magazine
- Locking a magazine to be played
- Listening to audio from the connected Auxiliary Input
- Selecting the auxiliary input (AUX) mode
- Switching the sensitivity of the auxiliary input
- Security System
- Registering a password
- Releasing the lock
- Clearing the password
- Changing the password
- Flashing the antitheft signal
- TROUBLE SHOOTING
- ERROR DISPLAYS
- SPECIFICATIONS
- CD Player section
- System
- Usable discs
- Reading system
- Number of revolutions
- Error correction system
- Frequency Response
- Signal to noise ratio
- Dynamic Range
- Wow and flutter
- Channel separation
- THD
- AUX Section
- Input sensitivity
- AM Tuner Section
- Tuning range
- Tuning system
- Frequency characteristic
- Usable sensitivity
- Image interference ratio:
- IF Interference
- FM tuner section
- FM receiving system
- 50dB Quieting sensitivity
- Image interference
- Stereo Separation (1kHz)
- Alternate Channel Selectivity
- Audio
- Bass Control Action (50Hz)
- Treble Control Action (10kHz)
- Line Output (CD)
- Digital Input
- Sampling Frequency
- Format
- General
- Power supply voltage
- Ground
- Current Consumption
- Fuse Rating
- Dimensions
- Weight
- MX406 BLOCK DIAGRAM
- Before Starting
- Installation/Wire Connection Manual
- CAUTIONS ON INSTALLATION
- INSTALLATION/WIRE CONNECTIONS
- Preparation for installation and checking the package contents
- Installing the Audio Control Center Universal mount
- Removing the MX406 installed with the Universal Mounting Bracket
- Fixed Installation
- Wire Connections
- Cautions on Wiring
- Fuses
- Antennas
- Optical fiber digital cable
- RCA cable
- CD Auto Changer Control BUS Cable
Brand : MCINTOSH
Model : MX406
Category : Car radio