WFREPEAT300N - Wi-Fi repeater StarTech.com - Free user manual and instructions
Find the device manual for free WFREPEAT300N StarTech.com in PDF.

User questions about WFREPEAT300N StarTech.com
0 question about this device. Answer the ones you know or ask your own.
Ask a new question about this device
Download the instructions for your Wi-Fi repeater in PDF format for free! Find your manual WFREPEAT300N - StarTech.com and take your electronic device back in hand. On this page are published all the documents necessary for the use of your device. WFREPEAT300N by StarTech.com.
USER MANUAL WFREPEAT300N StarTech.com
300Mbps Wireless-N Access Point/Repeat
WFREPEAT300N

text_image
SanTech.com 2008/01 Wireless Interface Processor 01-01-01-2008*actual product may vary from photos
For the most up-to-date information, please visit: www.startech.com
FCC Compliance Statement
This equipment has been tested and found to comply with the limits for a Class B digital device, pursuant to part 15 of the FCC Rules. These limits are designed to provide reasonable protection against harmful interference in a residential installation. This equipment generates, uses and can radiate radio frequency energy and, if not installed and used in accordance with the instructions, may cause harmful interference to radio communications. However, there is no guarantee that interference will not occur in a particular installation. If this equipment does cause harmful interference to radio or television reception, which can be determined by turning the equipment off and on, the user is encouraged to try to correct the interference by one or more of the following measures:
• Reorient or relocate the receiving antenna.
- Increase the separation between the equipment and receiver.
- Connect the equipment into an outlet on a circuit different from that to which the receiver is connected.
- Consult the dealer or an experienced radio/TV technician for help.
Use of Trademarks, Registered Trademarks, and other Protected Names and Symbols
This manual may make reference to trademarks, registered trademarks, and other protected names and/or symbols of third-party companies not related in any way to StarTech.com. Where they occur these references are for illustrative purposes only and do not represent an endorsement of a product or service by StarTech.com, or an endorsement of the product(s) to which this manual applies by the third-party company in question. Regardless of any direct acknowledgement elsewhere in the body of this document, StarTech.com hereby acknowledges that all trademarks, registered trademarks, service marks, and other protected names and/or symbols contained in this manual and related documents are the property of their respective holders.
Table of Contents
Introduction ....1
Packaging Contents ....1
System Requirements....1
Diagram 2
Front....2
Back....2
Installation ....3
Repeater Mode Setup: 3
Access Point Mode Setup: 6
Advanced Configuration 8
Wireless....9
Wireless Cont'd....10
LAN Interface 11
Management 11
Save/Reload Settings....12
Reboot....12
Specifications ....13
Technical Support 14
Warranty Information ....14
Introduction
The WFREPEAT300N 300Mbps Wireless-N WiFi Access Point and Repeater has two selectable modes for extending the range of existing wireless networks or adding wireless capabilities to a non-wireless network. Using a wall plug design, this allows for convenient or hidden placement anywhere there is an available AC outlet. As a wireless repeater, the effective range of any 802.11n WiFi network can be increased, while still providing up to 300Mbps of data bandwidth. This WiFi signal booster can help eliminate dead spots and provide a stronger signal in areas with obstructions that can reduce the range of a wireless signal. The WiFi range extender is also backward compatible with 802.11b/802.11g networks. As a wireless access point (AP), any non-wireless router can be given wireless-N capabilities. Built in wireless security (WEP/WPA/WPA2) will help to keep the network private. Backed by a StarTech.com 2-year warranty and free lifetime technical support.
Packaging Contents
• 1x Wireless-N Repeater
• 1x RJ45 Ethernet Cable
• 3x Interchangeable Wall Socket Plug (NA/UK/EU)
• 1x Instruction Manual
System Requirements
• Available AC electrical outlet
Repeater Mode:
• IEEE 802.11B or G or N compliant wireless access point (AP)
Access Point Mode:
• IEEE 802.3i/802.3u (10/100 Mbps) compliant network router
• RJ45 terminated UTP Ethernet cable
Diagram
Front

text_image
SesTech.com Power Wireless Link/Activity Ethernet Link/Activity RJ45 Ethernet port Reset ButtonBack
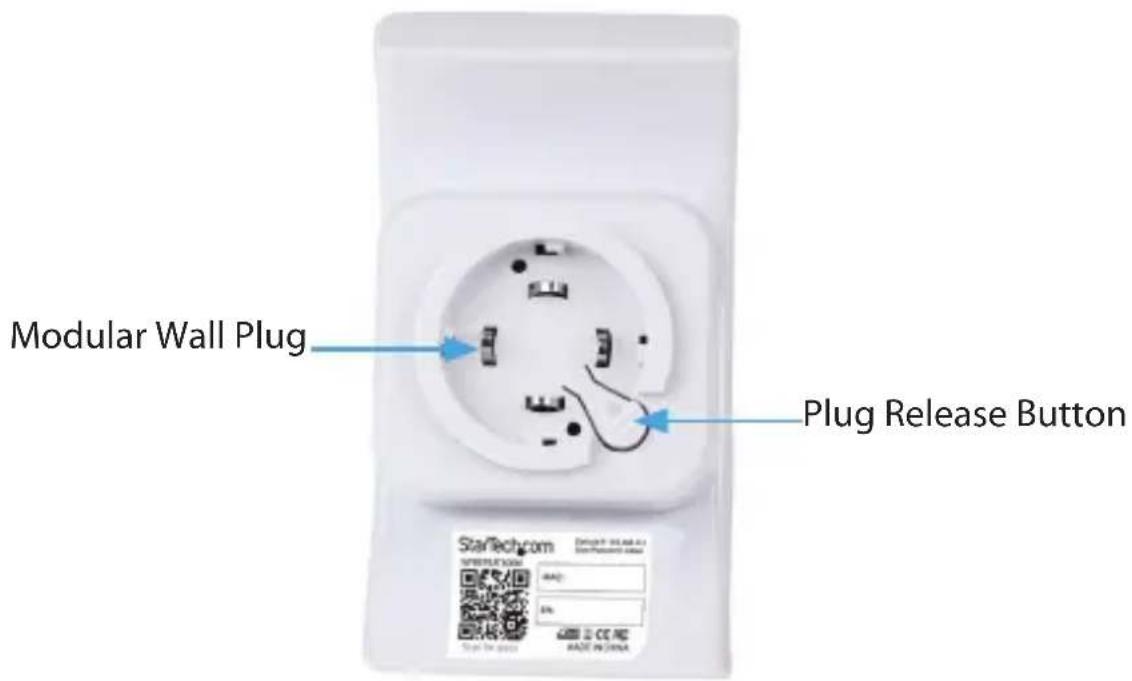
text_image
Modular Wall Plug Plug Release Button StarTech.com SINTELCOM AIR: 5% Start for next DATE: 01/02/04 ISSN: 937-862-01 HOLD IN CHINAInstallation
Repeater Mode Setup:
- Connect the Repeater to an available AC electrical outlet.
- Wired Setup: Connect an RJ45 Ethernet cable from the Repeater to your computer. Wireless Setup: Connect to the wireless network 'WiFi-Repeater'.
- The default IP address on the Repeater is 192.168.10.1; configure your computer to a matching network address (192.168.10.x, where 'x' is between 2\~255) with subnet set to 255.255.255.0 and gateway to 192.168.10.1.
- Open a web browser window and enter 192.168.10.1 into the address bar. This will bring up the login prompt for the Repeater. The default user name and password are 'admin' (without quotes).
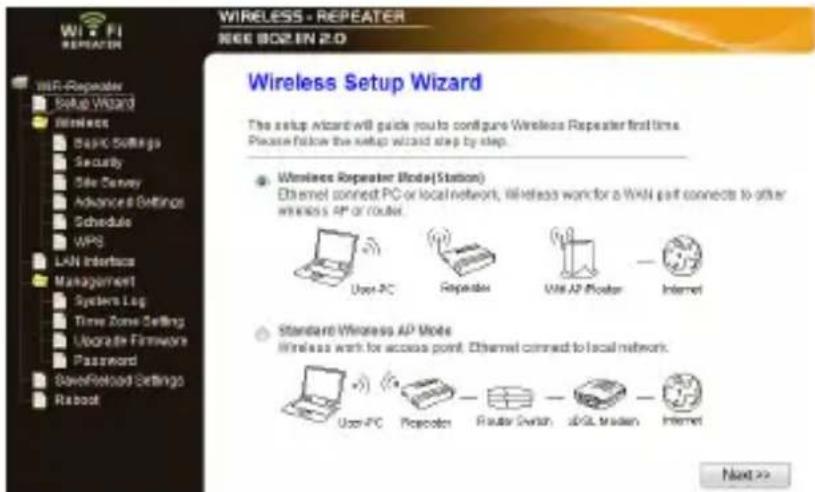
- From the main menu on the left side of the web interface, click the 'Setup Wizard' link followed by the 'Wireless Repeater Mode (Station) option. Click 'Next' to continue.
text_image
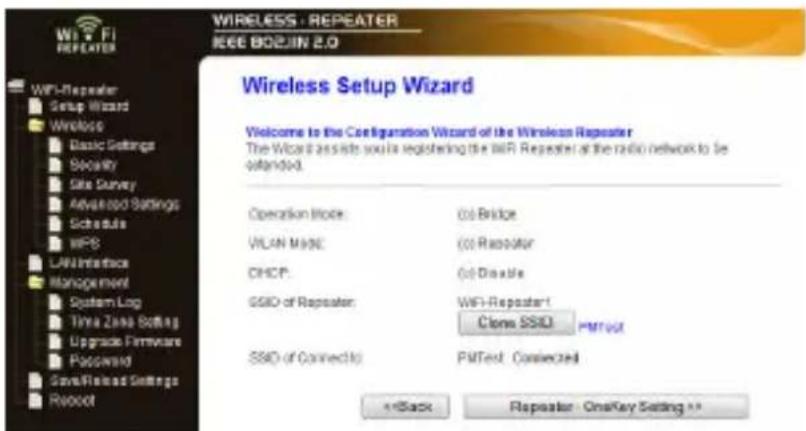
WIRELESS - REPEATER IEEE 802.8N 2.0 Wireless Setup Wizard The setup wizard will guide you to configure Wireless Repeater first time. Please follow the setup wizard step by step. ● Wireless Repeater Mode(Station) Ethernet connect PC or local network, wireless want for a WAN part connects to other wireless AP or router. User-PC Repeater WiFi AP Router Internet Standard Wireless AP Mode Wireless work for access point. Ethernet connect to local network. User-PC Repeater WiFi Switch 36LS triaden Internet Next >>- The next screen will list some basic configuration information, so click the 'Repeater – OneKey Setting' button to continue, followed by the 'Wireless Network Selection' button
text_image
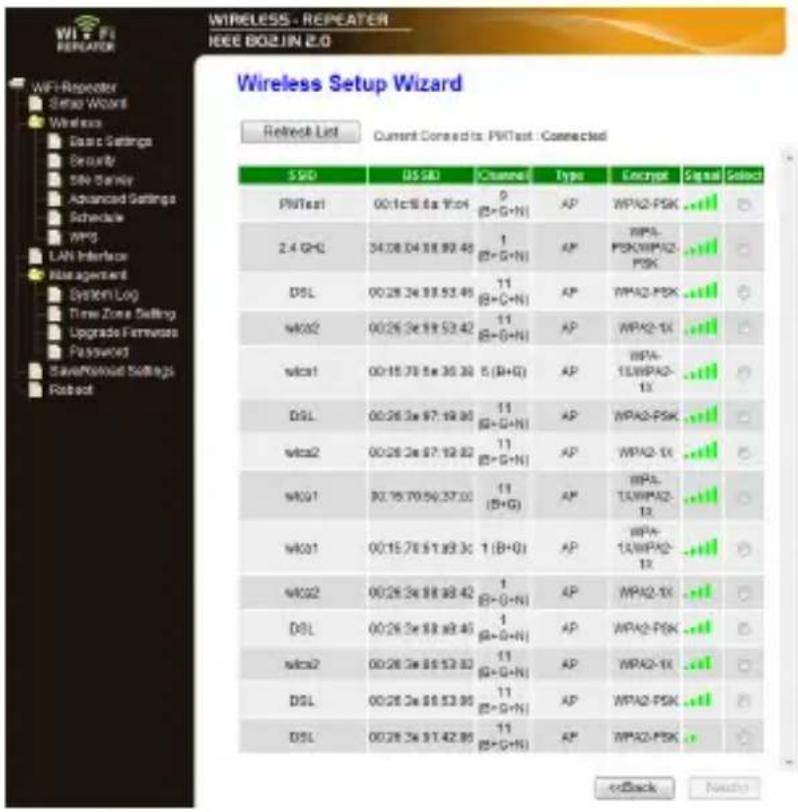
WIRELESS - REPEATER IEEE BOSJIN 2.0 Wireless Setup Wizard Welcome to the Configuration Wizard of the Wireless Repeater The Wizard assists you to registering the Wi-Fi Repeater at the radio network to be extended. Operation Mode: (c) Bridge VLAN Mode: (c) Repeater CHCP: (c) Disable SSID of Reposter: WiFi-Repeatant! Clone SSID PMText SSID of Connectio: PMText Connected ←Back Reposter OneKey Setting **- The next screen will display a list of detected wireless networks. Click the 'Refresh List' button to rescan. Select the desired wireless network and then click the 'Next' button.
text_image
WIRELESS - REPEATER IEEE BOLZIN 2.0 Wireless Setup Wizard Refresh List Current Connect to WiFi Test : Connected SSD US SD Channel Type Encrypt Signal Select PitTest 00:1c:56:54:54 9 (B+G+N) AP WPA2-PSK ..... 2.4 GHz 34:08:04:18:09:48 1 (B+G+N) AP NIPA- PSK/WPA2- PSK ..... DSL 00:28:3e:18:53:48 11 (B+G+N) AP WPA2-PSK ..... MCA2 00:26:3e:18:53:42 11 (B+G+N) AP WPA2-IX ..... wica1 00:15:76:5e:36:30 5 (B+G) AP NIPA- 1/18WPA2- IX ..... DSL 00:26:3e:97:19:30 11 (B+G+N) AP WPA2-PSK ..... wica2 00:28:2e:97:19:32 11 (B+G+N) AP WPA2-IX ..... wQ1 90:16:70:56:37:00 11 (B+G) AP NIPA- 1/18WPA2- IX ..... wQ1 00:15:76:51:49:30 1 (B+G) AP NIPA- 1/18WPA2- IX ..... wQ2 00:26:3e:18:49:42 1 (B+G+N) AP WPA2-IX ..... DSL 00:26:3e:18:49:46 1 (B+G+N) AP WPA2-PSK ..... wica2 00:28:3e:18:53:33 11 (B+G+N) AP WPA2-IX ..... DSL 00:26:3e:18:53:36 11 (B+G+N) AP WPA2-PSK ..... DSL 00:26:3e:17:42:85 11 (B+G+N) AP WPA2-PSK .... < Back Next >- Wireless encryption settings will be automatically detected and listed on the following screen. If the wireless network has a password, then enter this into the 'Pre-Shared Key' field. You should not need to change any other settings on this screen. Click 'Apply and Reboot' and you will receive a confirmation prompt. Click 'OK' to proceed.

text_image
WIRELESS - REPEATER IEEE 802JIN 2.0 Wireless Setup Wizard Encryption: WPA2 Authentication Mode: Enterprise (RADIUS) Personal (Pre-Shared Key) WPA2 Cipher Suite: TKIP AES Pre-Shared Key Format: Passphrase Pre-Shared Key: <text_image
WIRELESS - REPEATER IEEE BOS/IN 2.0 Access Point Status This page above the current status and some basic settings of the device. Systems Update 8day 06:13m:37s Pre Slovenia Version 12.51 P2 Edit Time Wed Nov 28 10:38:28 CST 28:11 Operative Made Bridge Wireless Configurations Mode Repeater (Infrastructure Client) Read 2.4 OHE, BIS+OHS SSID PMTest Channel Number IPNA2 ESSID 88.16@ 6x 96c4 State Connected Wireless Router Interface Configuration Mode AP Repeater SSD BPS-Router1 Encryption BPSA2 ESSID 88.23.13 @ 76:68 Associated Clients 1 TCP/IP Configuration Address IP Protocol P####1P IP Address 182.158.90.1 Submit Mark 265.265.265.4 Default Gateway 182.108.90.1 DHCP Server Disabled MAC Address 88.23.13 @ 76:68Access Point Mode Setup:
1. Connect the Repeater to an available AC electrical outlet. 2. Wired Setup: Connect an RJ45 Ethernet cable from the Repeater to your computer. Wireless Setup: Connect to the wireless network 'WiFi-Repeater'. 3. The default IP address on the Repeater is 192.168.10.1; configure your computer to a matching network address (192.168.10.x, where 'x' is between 2\~255) with subnet set to 255.255.255.0 and default gateway to 192.168.10.1. 4. Open a web browser window and enter 192.168.10.1 into the address bar. This will bring up the login prompt for the Repeater. The default user name and password are 'admin' (without quotes). 5. From the main menu of the Repeater configuration utility, click the 'Setup Wizard' link followed by the 'Standard Wireless AP Mode' option. Click 'Next' to continue. text_image
WIRELESS - REPEATER IEEE 802.0 IN 2.0 Wireless Setup Wizard The setup wizard will guide you to configure Wireless Repeater first time. Please follow the setup wizard step by step. ● Wireless Repeater Mode(Station) Ethernet connect PC or local network. Wireless work for a WAN port connects to other wireless AP of router. User PC Repeater VISAF Router Internet Standard Wireless AP Mode Wireless work for access point. Ethernet connect to local network. User PC Repeater Router Switch sDSL Modem Internet Next >>text_image
WIRELESS - REPEATER IEEE 802JIN 2.0 Wireless Setup Wizard Welcome to the Configuration Wizard of the Wireless Station The Wizard assists you in registering the Wireless Station at the radio network to be extended. Operation Mode: (a) Bridge WLAN Mode: (b) Repeater DHCP: (c) Disable SSID of Wireless AP: << Black AP - OneKey Setting >>text_image
WIRELESS - REPEATER IEEE 802.IIN 2.0 Access Point Status This page shows the current status and some basic settings of the device. System Uptime 0day:0h:14m:49s Firmware Version v2.51 R2 Build Time Wed Nov 30 10:38:39 CST 2011 Operation Mode Bridga Wireless Configuration Mode AP Band 2.4 GHz (B+G+N) SSID WiFi-Repeater Channel Number 11 Encryption WPA2 BSSID 00:23:13:0e:76:e0 Associated Clients 0 TCP/IP Configuration Attain IP Protocol Fixed IP IP Address 192.168.10.1 Subnet Mask 255.255.255.0 Default Gateway 192.168.10.1 DHCP Server Disabled MAC Address 00:23:13:0e:76:e0Advanced Configuration
Advanced configuration options for the Repeater can be accessed via the web interface. 1. Connect an RJ45 Ethernet cable from the Repeater to your computer. 2. The default IP address on the Repeater is 192.168.10.1; configure your computer to a matching network address (192.168.10.x, where 'x' is between 2\~255) with subnet set to 255.255.255.0 and default gateway to 192.168.10.1. 3. Open a web browser window and enter 192.168.10.1 into the address bar. This will bring up the login prompt for the Repeater. The default user name and password are 'admin' (without quotes). text_image
WiFi-Repeated Setup Wizard Wireless Basic Settings Security Site Survey Advanced Settings Schedule WPS LAN Interface Management System Log Time Zone Setting Upgrade Firmware Password Save/Reload Settings RebootWireless
Click the link for 'Wireless' on the main menu, followed by 'Basic Settings'. This will present the basic wireless configuration options for the current mode and also allow for manually changing the Mode type. Other options are available on the main menu, such as encryption settings (Security), list of detected WiFi networks (Site Survey), time of use scheduling (Schedule) and WiFi Protected Setup (WPS).Wi-Fi Protected Setup
This page allows you to change the setting for WPS (WIFI) Protected Setup. Using this feature could let your wireless client automatically synchronize its setting and connect to the Access Point in a minute without any hand.  Disable WPS Apply Changes Reset \- Repeater Client. Sell PIN Number: PIN Configurations Pencil Format-Configurations 00218326t Star PIN StartPBC \- Reposter AP WP'S Status ② Configured UnConfigured Rosset to UnConfigured Pass to 5000x Configuration 5tw1PBC 广力云智慧零售收银系统 CHEN PH MINDIC Carrion Navy India Jahthe location Editorial Kiy g mboat12Wireless Security Setup
This page allows you to setup the wireless security. Turn on IWP or WPA by using Encryption Keys could prevent any unauthorized access to your wireless network. Select SSID: Root Client - PMTest  Encryption: WPA2 802.1x Authentication:  Authentication Mode: Enterprise (RADIUS) WPA2 Cipher Suite: Personal (Pre-Shared Key) Pre-Shared Key Format TKIP AES Pre-Shared Key: Passphrase ●●●●●●●● Apply Changes ResetWireless Cont'd
Wireless Basic Settings
This page is used to configure the parameters for wireless LAN clients which may connect to your Access Point. Here you may change wireless exception settings as well as wireless network parameters. text_image
Disable Wireless LAN Interface Mode: Repeater Network Type: Infrastructure SSD of Connect to: PMTect Connected Enable Universal Doppler Mode (Acting as AP and client sensitivities) SSD of Extended Interface: WiFi-Responder1text_image
Band: 2.4 GHz (B+G+N) Channel Width: 40MHz Control Sideband: Upper Channel Number: 11 Broadcast SSIE: Enabled Width: Enabled Data Rate: Auto Associated Clients: Show Active Clients Enable Mac Clone (Single Ethernet Client) Apply Changes ResetWireless Site Survey
This page provides help to scan the wireless network. If any access point or 2008 is found, you would choose to contact if manually when Reposider mode is enabled. Except in this list the radio network you would link to extend.| S.NO | 85540 | Chromosome | Gene | Parameter | Signet | Color |
| PMTest | 06:13:05:06:17:04 | 9 (B+G+I) | AP | AFA2-PSK | ... | ○ |
| S.6 Gln | 06:08:06:08:09:49 | 1 (B+G+I) | AP | MIP4 PSK/MP42- PSK | ... | ○ |
| mho2 | 06:29:3e08:53:42 | 11 (B+G+I) | AP | WPA2-1X | ... | ○ |
| DSL | 06:29:3e08:53:45 | 11 (B+G+I) | AP | AFA2-PSK | ... | ○ |
| mho1 | 06:15:73:5e30:30 | 5 (D>G) | AP | MIP4 SWPA2- 1X | ... | ○ |
| mho1 | 06:15:76:5e37:00 | 11 (B+G) | AP | MIP4 SWPA2- 1X | ... | ○ |
| DSL | 06:28:3e08:19:05 | 11 (B+G+I) | AP | AFA2-PSK | ... | ○ |
| mho2 | 06:29:3e07:19:02 | 11 (B+G+I) | AP | WPA2-1X | ... | ○ |
| mho1 | 06:18:72:81:48:36 | 1 (B>C) | AP | MIP4 SWPA2- 1X | ... | ○ |
| mho2 | 06:29:3e08:53:63 | 11 (B+G+I) | AP | WPA2-1X | ... | ○ |
| DSL | 06:29:3e08:45:45 | 1 (B+G+I) | AP | AFA2-PSK | ... | ○ |
| DSL | 06:29:3e08:53:65 | 11 (B+G+I) | AP | WPA2-PSK | ... | ○ |
| mho2 | 06:29:3e08:48:42 | 1 (B+C+I) | AP | WPA2-1X | ... | ○ |
| mho2b | 06:13:48:7a+03:45 | 5 (B>C) | AP | WIP4 | ... |
Wireless Schedule
This page allows you setup the wireless schedule rule. Please do not forget to configure system time before enable this feature. Enable Wireless Schedule| Enable | Day | From | To | ||||||
| Sun▼ | 00 | (hour) | 00 | (min) | 00 | (hour) | 00 | (min) | |
| Sun▼ | 00 | (hour) | 00 | (min) | 00 | (hour) | 00 | (min) | |
| Sun▼ | 00 | (hour) | 00 | (min) | 00 | (hour) | 00 | (min) | |
| Sun▼ | 00 | (hour) | 00 | (min) | 00 | (hour) | 00 | (min) | |
| Sun▼ | 00 | 00 | (min) | 00 | (hour) | 00 | (min) | ||
| Sun▼ | 00 | (hour) | 00 | (min) | 00 | (hour) | 00 | (min) | |
| Sun▼ | 00 | (hour) | 00 | (min) | 00 | (hour) | 00 | (min) | |
| Sun▼ | 00 | (hour) | 00 | (min) | 00 | 00 | (min) | ||
| Sun▼ | 00 | (hour) | 00 | (min) | 00 | (hour) | 00 | (min) | |
| Sun▼ | 00 | (hour) | 00 | (min) | 00 | (hour) | 00 | (min) | |
| Sun▼ | 00 | (hour) | 00 | (min) | 00 | (hour) | 00 | (min) | |
LAN Interface
The 'LAN Interface' options allow for configuration of settings for the LAN port (RJ45), when used in Access Point mode. The Unit's IP address, DHCP settings and other related settings can be customized to match your needs. LAN Interface Setup text_image
This page is used to configure the parameters for local area network which connects to the LAN port of your Access Point. Here you may change the setting for IP addresses, subnet mask, DHCP, etc. IP Address: 192.168.10.1 Subnet Mask: 255.255.255.0 Default Gateway: 192.168.10.1 DHCP: Disabled ▼ DHCP Client Range: 192.168.10.100 - 192.168.10.200 Show Client Static DHCP: Set Static DHCP Domain Name: Repeatee 802.1d Spanning Tree: Disabled ▼ Clone MAC Address: 000000000000 Apply Changes ResetManagement
The 'Management' sections contain settings for various administrative functions for the unit. An important section to note is the 'Password' screen. It is recommended that the default password for the Unit be changed before you finish configuration. To prevent unauthorized access, please update the user name and password. Upgrade Firmware This page allows you upgrade the Access Point firmware to new version. Please note, do not power off the device during the upload because it may crash the system. text_image
Firmware Version: v2.51 R2 Select File: Browse... Upload Resettext_image
This page can be created as create log server and store the system log. Enable Log system off settings No 6 Enable Microsoft Log Log Server IP Address Apply Changes Refresh Downtext_image
You can make the system time by synchronizing with a public time server over the Internet. Current Time : Yr 2011 Mon 11 Day 30 Hr 30 Ma 47 Sec 33 Copy Computer Time Time Zone Select : (GMT-95.97)Eastern Time (US & Canada) Enable NTP client update Automatically Adjust Daylight Saving NTP server : @ 192/5.41.41 - North America - (Merical P* Setting) Apply Change Reset Refreshtext_image
User Name: New Password: Confirmed Password: Apply Changes ResetSave/Reload Settings
The current settings for the unit can be saved to a file on your computer and reloaded onto the Repeater at any time. The Repeater can be reset to factory defaults from this screen, by clicking the 'Reset' button. The Repeater can also be reset to factory defaults by pressing and holding the 'Reset' button, located next to the RJ45 port, for 10 seconds.Save/Reload Settings
This page allows you save current settings to a file or reload the settings from the file which was saved previously. Besides, you could reset the current configuration to factory default. text_image
Save Settings to File: Save... Load Settings from File: Browse... Upload Reset Settings to Default: ResetReboot
This provides a remote method of soft restarting the Unit. Specifications| Supported Wireless Standards | IEEE 802.11b/g/n |
| Chipset ID Realtek RTL8196C | |
| Connectors 1 x RJ45 Ethernet female | |
| LEDs | 1 x Power1 x Wireless Link/Activity1 x Ethernet Link/Activity |
| Antenna Configuration 2x2:2 (TxR:S) | |
| Antenna Type 2dBi (internal) | |
| Wireless Frequency Range 2.4 GHz ~ 2.485 GHz | |
| Wireless Bandwidth 20/40MHz | |
| Wireless Encryption Supported | WEP, WPA, WPA2 |
| Maximum Wireless Distance 300m (950ft) | |
| Maximum Data Transfer Rate | 802.11n: 300 Mbps802.11g: 54 Mbps802.11b: 11 MbpsRJ45 Ethernet: 10/100 Mbps |
| Enclosure Material Plastic | |
| Operating Temperature 0°C ~ 40°C (32°F ~ 104°F) | |
| Storage Temperature -40°C ~ 70°C (-40°F ~ 158°F) | |
| Humidity 10% ~ 90% RH | |
| Dimensions 100.0mm x 60.0mm x 50.0mm | |
| Weight 120g | |