Movie Cube S700 - Media player EMTEC - Free user manual and instructions
Find the device manual for free Movie Cube S700 EMTEC in PDF.

User questions about Movie Cube S700 EMTEC
0 question about this device. Answer the ones you know or ask your own.
Ask a new question about this device
Download the instructions for your Media player in PDF format for free! Find your manual Movie Cube S700 - EMTEC and take your electronic device back in hand. On this page are published all the documents necessary for the use of your device. Movie Cube S700 by EMTEC.
USER MANUAL Movie Cube S700 EMTEC
Home Multimedia Center
Movie Cube S700/S800
User's Manual
(Version 1.0.0)
Table of Contents
1. Introduction...... 4
1.1 Preface....4
1.2 Packing List....5
1.3 Caution....5
1.4 Connection....7
1.5 First Time Usage....13
2. About the Player 15
2.1 Remote Control....15
2.2 Front Panel....20
2.3 Rear Panel....21
3. Getting Started.... 22
3.1 Selecting DVB-T TV....22
3.2 Selecting Analog TV 22
3.3 Selecting A/V In - Signal from the A/V IN jack....22
3.4 Selecting Playback – Playback and Edit Recorded Titles....22
3.5 Selecting Browser – Playback Multimedia Files....23
3.6 Selecting Media Library....23
3.7 Selecting Internet Radio....23
4. Watching Analog & DVB-T TV programs (only S800).... 23
4.1 Watching Analog TV programs....24
4.2 Watching DVB-T TV programs....24
5. The Title List Menu for Recorded Videos.... 27
5.1 Title List Menu....28
5.2 Playing Back Titles....28
5.3 Deleting Titles....29
5.4 Renaming Titles....29
5.5 Sorting Files....30
5.6 Title Edit Menu....31
5.7 Tools....33
5.8 Saving Your Recorded Titles 34
6. Timer Record Menu 34
6.1 Create a New Schedule....34
6.2 Editing Schedule....35
6.3 Deleting Schedules....36
6.4 Viewing Schedule Status 36
6.5 Viewing Recording History....37
7. Setup Menu 38
7.1 Changing DVB-T TV settings....38
7.2 Changing Analog TV settings....40
Analog TV Region....41
7.3 Changing Video Settings....42
Brightness....44
7.4 Changing Audio Settings....44
7.5 Changing Record Settings....45
7.6 Changing Network Settings....48
7.7 Changing System Settings....50
7.8 Miscellaneous....54
8. Browser Menu.... 56
8.1 Browsing All....57
8.2 Browsing Music....57
8.3 Browsing Photos....58
8.4 Browsing Movies....58
8.5 Browsing via Network....59
8.6 Renaming / Deleting Files....62
8.7 Managing the Playlist....63
9. Media Library.... 65
9.1 Music Library....65
Update....65
9.2 Photo Library....67
Update....68
9.3 Movie Library....70
Update....70
10. File Copy Menu.... 73
11. NAS Function.... 75
12. Listening to Internet Radio.... 76
12.1 Station List Menu....77
12.2 Genre List Menu....78
12.3 My Favorite Station....78
13. Upgrading the Firmware.... 79
14. Appendixes.... 81
14.1 Specifications....81
14.2 Frequently Asked Questions....83
14.3 Copyrights and Trademarks....86
14.4 Warranty....86
1. Introduction
1.1 Preface
Dear Customer,
Thank you very much for purchasing the Movie Cube S800. In the digital era, this product is a great home entertainment partner. With the outstanding design, you can enjoy movies and music, view photos of precious moments, and record your favorite TV or movie programs and view them in your own time. The editing function provides you with an easy way to save these. It's easy to use this product as a portable external storage device with its built-in HDD and high-speed USB 2.0.
This player has the following functionality:
Video Recording - supports one button recording and scheduled recording, can easily record programs from DVB-T / Analog TV, DVD player, DV, etc., and save as MPEG-2 (.mpg, or .ts) format; also can edit the recorded titles;
- Time shifting function.
Movie Playback - supports VOB (DVD), IFO (DVD), MPG (MPEG-2/1), AVI (MPEG-4 ASP: XviD), DAT (VCD), and MPEG-2 TS files; resolution up to 1080i.
Music Playback - supports MP3, OGG, and WMA files; - supports one button playlist music playback.
Photo Playback - supports digital camera JPEG, and BMP files. Data Storage - works as a portable hard disk using USB 2.0 port. USB HOST - supports two USB 2.0 host ports.
Network Function - Ethernet & WLAN streaming playback and NAS function (Wireless function supported by the optional Wireless LAN USB Adapter);
HDMI - High-Definition Multimedia Interface transmits the highest quality digital video and audio via a single cable, simplifies cabling and provides high quality home theater experience.
SCART - supports Euro SCART output.
Analog TV - supports analog PAL B/G, D/K, I, SECAM L and L' reception.
DVB-T TV - supports Digital Video Broadcasting Terrestrial (DVB-T) TV reception; - supports Electronic Program Guide (EPG) and Teletext.
Tuners are only available on the S800 Movie Cube
We hope that this product will bring you a lot of enjoyment. We are committed to apply multimedia technology in your work, entertainment, family, daily life, car and everywhere! Welcome to EMTEC. Thank you again for choosing our Movie Cube S700/S800.
Note: WMA Pro & Advanced Profile and WMA with DRM are not supported.
1.2 Packing List
| Part Quantity | |
| Player 1 | |
| A/V cable 1 | |
| SCART in adapter 1 (no need for USA) | |
| USB cable 1 | |
| Remote Control 1 | |
| Remote Control Battery 2 | |
| AC/DC adaptor 1 | |
| AC/DC adaptor Power Cord 1 | |
| English User Manual (printed) 1 | |
| Quick Installation Guide 1 | |
| Warranty card 1 | |
| Driver CD (with User Manual) | 1 |
| Wireless LAN USB Adapter | 1 (optional) |
| DVB-T Antenna 1 (optional) |
Note:
The actual contents in the package might be different from the packing list in this manual
1.3 Caution
This player's design and manufacture has your safety in mind. In order to safely and effectively use this player, please read the following before usage.
1.3.1 Usage cautions
User should not modify this player. If commercial hard disk is being used, the environmental temperature should be within +5^ +35^ .
1.3.2 Power
The player's power voltage: DC 12V.
When using this player, please connect the supplied AC adapter or AC adapter cable to the player's power jack. When placing the adapter cable, make sure it can not get damaged or be subject to pressure. To reduce the risk of electric shock, unplug the adapter first before cleaning it. Never connect the adapter to the player in a humid or dusty area. Do not replace the adapter or cable's wire or connector.
1.3.3 Radio interference/compatibility
- If not properly shielded, almost all electronic devices will get radio interference. Under some conditions, your player might get interference.
- The design of this player has followed the FCC/CE standard, and has followed the following
rules:
(1) This player may not cause harmful interference;
(2) This player could accept some interference received including interference that may cause undesired operation.
1.3.4 Repair
If the player has a problem, you should take it to an appointed repair center and let the specialists do the repair, never repair the player yourself, you might damage the player or endanger yourself or your data.
1.3.5 Disposing of the player
When you dispose of the player, be sure to dispose it appropriately. Some countries may regulate disposal of electrical device, please consult with your local authority.
1.3.6 Hard disk cautions
The player uses an internal hard disk for data storage, in normal case, format or repair is not required.
You should carefully read the < Frequently Asked Questions > chapter, and check our website for latest information before formatting the hard disk.
- Physical impact may create bad sector in the hard disk, you can use CHKDSK to fix the problem.
- All data stored in the player may be lost due to physical impact, electrical shock, power lost, HDD format etc. Please backup your data.
- It is suggested to do defragment after a long period of usage.
- Regularly backup the data in the hard disk so that it can be recovered in the event of data corruption or loss. Our company takes no responsibility for loss of data stored on the hard disk.
1.3.7 Others
When using this player, please do not let the player come into contact with water or other liquid, if water is accidentally spilled on the player, please use a dry cloth to absorb the spillage.
Electronic products are vulnerable, when using please avoid shaking or hitting the player, and do not press the buttons too hard.
Do not let the player come into contact with water or other liquid.
Do not disassemble the player, repair the player or change the design of the player, any damage done will not be included in the repair policy.
Do not press the buttons of the player too hard.
Avoid hitting the player with hard object, avoid shaking the player, and stay away from magnetic fields.
During electrostatic discharge and the strong electromagnetic field, the product will malfunction, then unplug the power cable and the product will return to normal performance next time it is powered on.
1.4 Connection
1.4.1 Connect to Computer
(1) Make sure the player is powered on;
(2) Plug in the squarish connector of the USB cable to this player's USB DEVICE port;
(3) Plug in the rectangular connector of the USB cable to computer.

text_image
Diagram showing connection between a desktop computer and an ATM device via USB drive, with labeled ports and connectors.1.4.2 USB Mass Storage Device (like USB stick, MP3, USB HDD etc.) Connection
(1) Make sure the player is powered on;
(2) Plug in the USB stick or USB HDD etc. to one of the USB host ports of this player.

text_image
Diagram showing USB port connection to a device with USB port and connected ports labeled V2, L2, L1, etc.1.4.3 TV connection
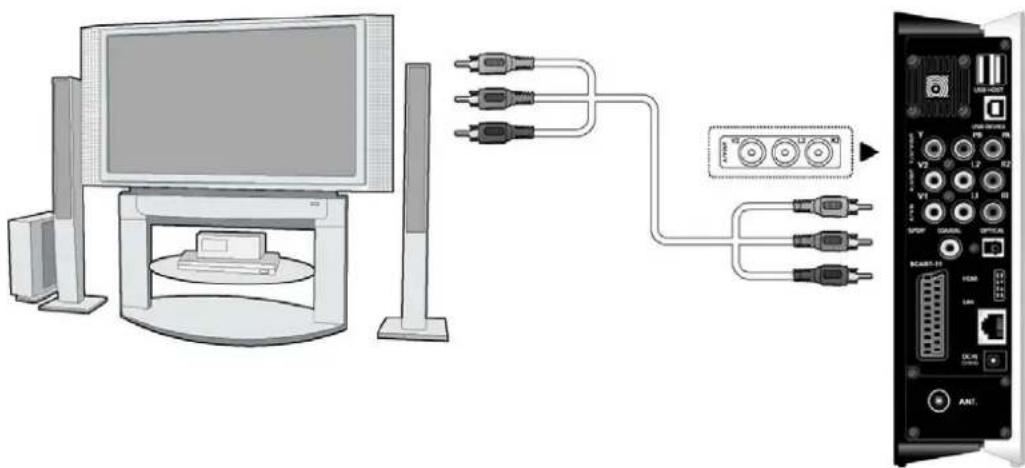
1.4.3.1 A/V IN
(1) Follow the picture and plug in the 3 color connector to the player's A/V IN jack;
(2) Follow the picture and plug in the 3 color connector to the A/V OUT jack of the TV/IPTV Set-Top Box (STB).
In this way, you can record TV programs from the TV/IPTV Set-Top Box.

text_image
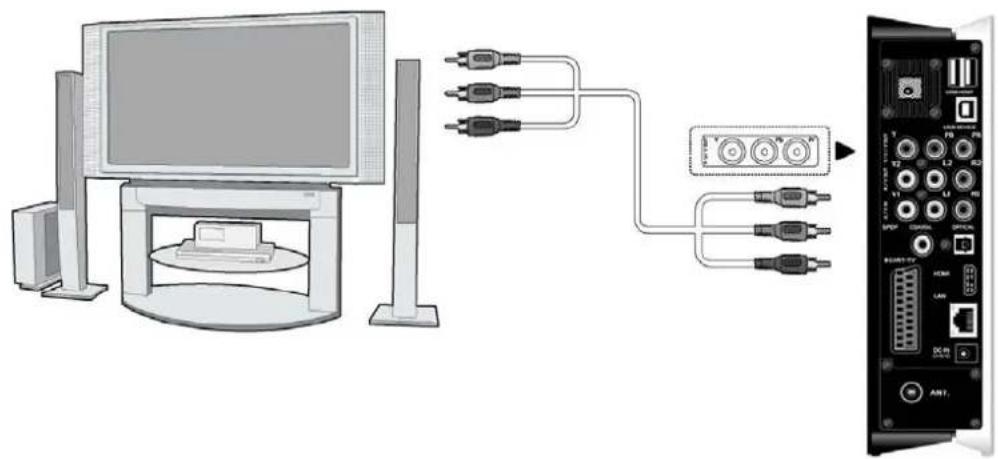
STB V2 L2 H3 STB L2 AHT1.4.3.2 A/V OUT
(1) Follow the picture and plug in the 3 color connector to the player's A/V OUT jack; (2) Follow the picture and plug in the 3 color connector to the TV's A/V IN jack. In this way, you can enjoy the content in the player on TV or other display devices.
text_image
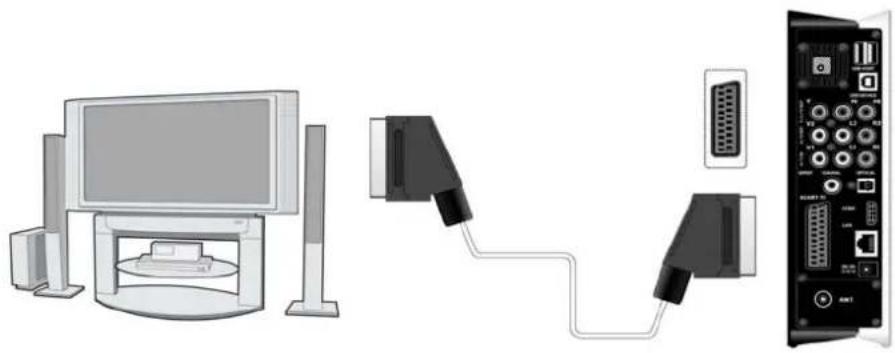
Diagram showing connection between a desktop computer and an audio output device, with labeled ports and cables.1.4.3.3 SCART OUT
(1) Follow the picture and plug one connector on the SCART cable to the player's SCART socket;
(2) Follow the picture and plug the other connector on the SCART cable to the TV's SCART socket.
natural_image
Diagram showing connections between a computer monitor, cable connectors, and an external network device (no text or symbols present)1.4.3.4 Y/Pb/Pr Component OUT
(1) Follow the picture and plug in the 3 color connector to the player's Y/Pb/Pr jack;
(2) Follow the picture and plug in the 3 color connector to the TV's Y/Pb/Pr jack.
Audio Connection while using Y/Pb/Pr Video out:
First method: use the audio output from the A/V OUT jack;
Second method: use the audio output from the S/PDIF Coaxial or Optical jack.
natural_image
Diagram showing connections between a computer monitor, server, and a network device (no text or symbols present)In this way, you can also enjoy videos, music, and photos in the player on TV.
1.4.3.5 HDMI OUT
(1) Follow the picture and plug one connector on your HDMI cable to the player's HDMI jack;
(2) Follow the picture and plug the other connector on your HDMI cable to the TV's HDMI jack.

natural_image
Diagram showing connection between a computer monitor and an ABC TV interface via USB cable (no text or symbols present)In this way, you can have the highest quality video and audio via a single cable.
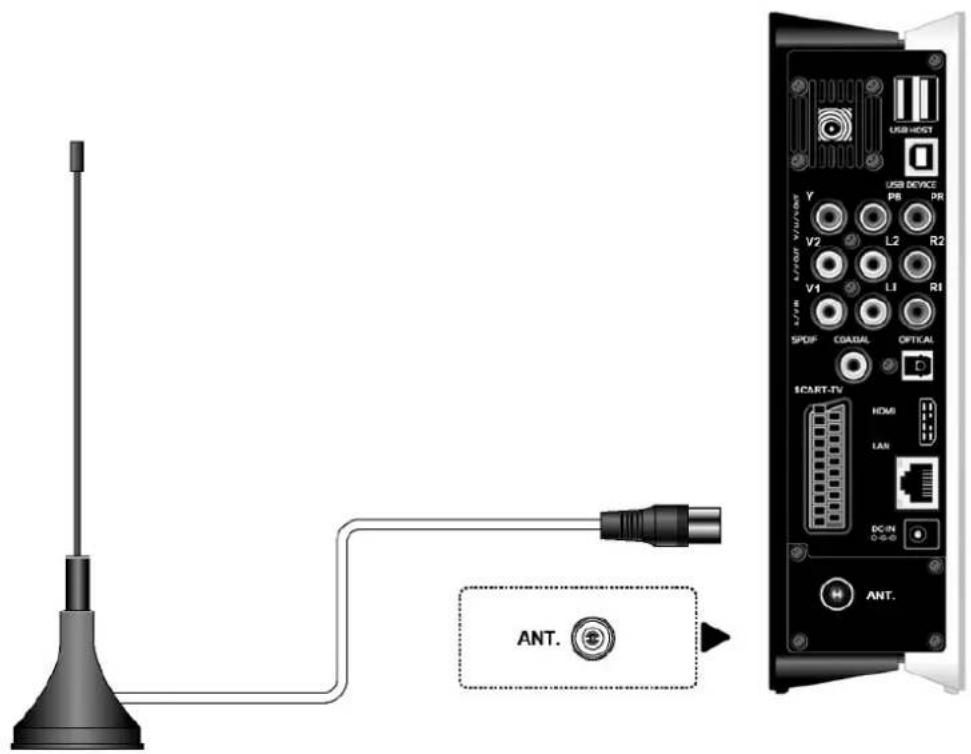
1.4.3.6 ANT. / RF IN
Follow the picture and plug a TV Aerial or analog TV cable to the ANT. / RF IN socket;
text_image
USB HEST USB DEVICE PB PR Y V2 L2 R2 V1 L1 RI SPDIF COADAL OPTICAL SCART-TV HDMI LAN DC-IN 0-6-0 ANT. ANT.1.4.4 Digital Audio Device connection
(1) Follow the picture and plug in the RCA connector on your coaxial cable to the player's S/PDIF Coaxial jack. Or if you use optical fiber, please plug in the Toslink connector on your optical fiber to the player's S/PDIF Optical jack; (not supplied)
(2) Follow the picture and plug in the other connector on your coaxial cable or optical fiber to the digital audio device.(not supplied)

natural_image
Diagram showing connections between audio equipment and a computer interface (no text or symbols present)1.4.5 Power connection
(1) Follow the picture and connect the AC adaptor to the player's DC IN jack;
(2) Follow the picture and plug in the AC adaptor to the power outlet.

text_image
Diagram showing connections between a power outlet, cable, and an electronic device with labeled ports and connectors.1.4.6 Ethernet connection
To connect to a LAN (Local Area Network) you require a cat5, cat5e or cat6 network cable (not supplied).
(1) Connect one of the crystal plugs on the cable to the player's RJ45 LAN socket;
(2) Connect the other crystal plug on the cable to a RJ45 LAN port on your router, switch, or hub devices.

flowchart
graph TD
    A["Computer"] -->|USB| B["HUB"]
    B --> C["Server Unit"]
    style A fill:#f9f,stroke:#333
    style B fill:#ccf,stroke:#333
    style C fill:#cfc,stroke:#333
1.4.7 WLAN connection
(1) Make sure the player is powered on;
(2) Plug the Wireless LAN USB Adapter (i.e. Wi-Fi USB Dongle) to the USB HOST port of the player.

text_image
USB HOST USB HOST USB DEVICE PD PR Y V2 L2 R2 V1 LI RI SPDIF COAXIAL OPTICAL SCART-TV HDMI LAN DC-IN D-8-D ANT.1.5 First Time Usage
1.5.1 Firmware Installation
For users who bought the player without a HDD inside, and want to install a SATA HDD, please see 'HDD Format' in '7.7 Changing System Settings' for details.
1.5.2 Remote Control
First time usage of Remote control
Install the batteries before using the remote control, installation steps are as the picture shows:

natural_image
Three identical grayscale diagrams showing a traffic light inside a container, with arrows pointing downward and upward (no text or symbols)1.5.3 Power on/off, language control
1. Power on
After connecting the power supply cord and turning on the POWER switch, the player will soon enter the main interface, and the POWER indicator on the front panel will turn blue.
2. Power off
When the system is running, press the power / standby button on the front panel or remote
control, the player will enter standby mode.
3. Language control
The system language of this player can be set to English or other languages. In the setup interface is language setup, the selected language will take effect immediately.
2. About the Player
2.1 Remote Control
All procedures in this manual can be carried out using the remote control buttons. See the following for details on each button and its function:
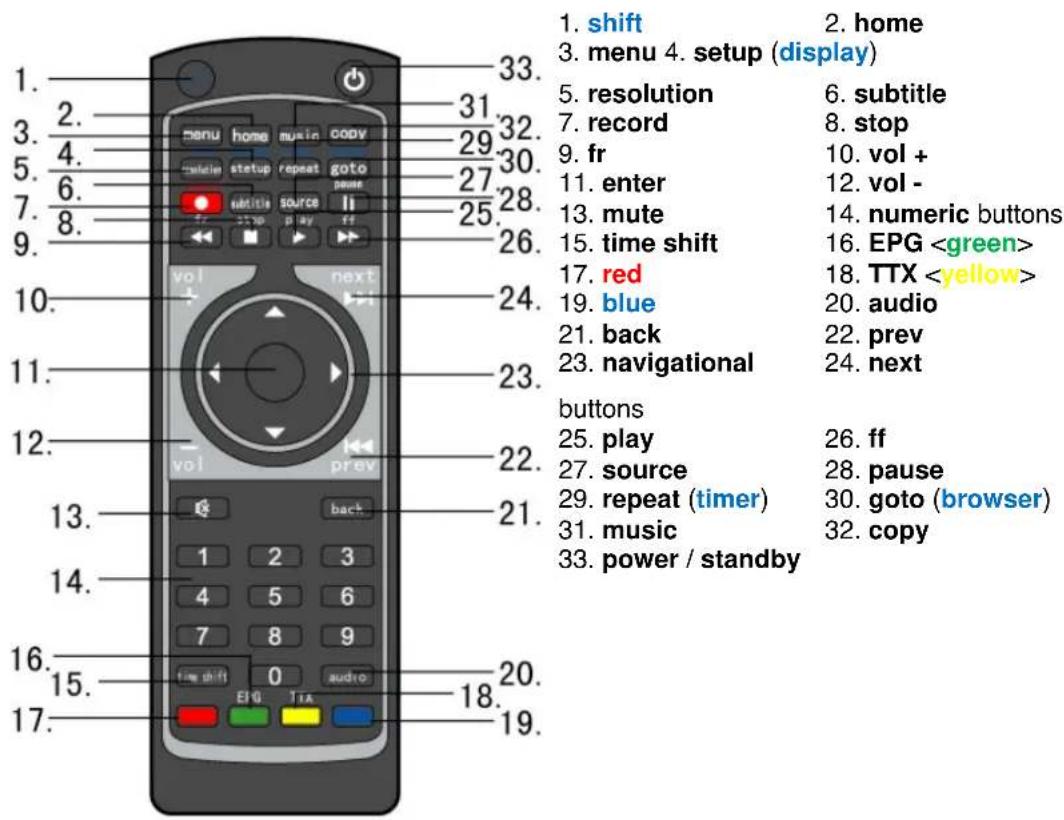
text_image
1. shift 2. home 3. menu 4. setup (display) 5. resolution 6. subtitle 7. record 8. stop 9. fr 10. vol + 11. enter 12. vol - 13. mute 14. numeric buttons 15. time shift 16. EPG| No. Name Function | |
| 1 shift shift button: | Press to shift theresolution, setup, repeat, and goto buttons to bezoom, display, timer, and browser. |
| 2 home | home button: | Press to view the main interface. |
| 3 menu | menu button: | Press to activate tools menus:●Press in the browser menu to rename and delete files.●Press in My_Shortcuts in NET of the browser menu to add shortcuts for network access. |
| 4 setup | (display) setup button: | Press to enter the setup menu.display button:Press to display current status.●Press during playback and an on-screen display appears, showing track number and time elapsed/remaining.●Press during recording and an on-screen display appears, showing the recording quality setting and time elapsed.●Press during live TV and an on-screen display appears, showing the current channel number and time.●Press during time shifting to turn the time shifting bar on/off. |
| 5 resolution | (zoom) resolution button: | Press to switch between NTSC, PAL, 480P, 576P, 720P, and 1080I.zoom button:Press to zoom in/out the image (photo or video). |
| 6 subtitle | subtitle button: | Press to set subtitle options. |
| 7 record | record button: | Press to begin recording or to resume when recording has been paused.Press repeatedly to set one touch recording (OTR) length (30 MIN. / 60 MIN. / 90 MIN. / 120 MIN. / 180 MIN. / 240 MIN. / Off). |
| 8 stop stop | stop button: | Press to stop playback. |
| 9 fr fast | rewind button: | Press to fast rewind the current playback.Press repeatedly to select speeds. |
| 10 vol + | vol + button: | |
| Press to increase the volume. | ||
| 11 enter | enter button: | Press to select options in menus. |
| 12 vol - vol - button: | Press to decrease the volume. | |
| 13 mute | mute button: | Press to mute audio output, and press again to resume. |
| 14 numeric | buttons numeric | buttons:Press to enter channel numbers or numeric input when changing settings. |
| 15 time shift | time shift button: | While in the DVB-T / Analog TV or A/V IN mode, press to activate the time shift function, which allows you to pause live TV and resume the program from the point you left it. While paused, the program is recorded to the internal HDD as long as the space is available.Press to activate the time shift function and wait for the play arrow to appear on the screen.Press thepausebutton and the program will be paused.Press theplaybutton to resume viewing the program.Time shift mode remains active until you press thestopbutton. |
| 16 EPG | EPG button: | Press to enter the Electronic Program Guide which displays an on-screen list of programs for the coming week when watching Digital Terrestrial TV. |
| 17 red red | button: | Reserved button. No function has been assigned to it yet. |
| 18 TTX | TTX button: | Press to open Teletext OSD if it is available in the broadcasted stream of Digital Terrestrial TV. |
| 19 blue blue | button: | Reserved button. No function has been assigned to it yet. |
| 20 audio | audio button: | Press to select an audio track. |
| 21 back | back button: | Press to go back to the previous screen when navigating menus. |
| 22 prev | previous button: | Press to go to the previous file or the previous chapter on a title. |
| 23 navigational buttons | navigational button:Press the arrow buttons to select menu options. | |
| 24 next next button: | Press to go to the next file or the next chapter on a title. | |
| 25 play p play button: | Press to begin the playback of a title. | |
| 26 ff fast forward button: | Press to fast forward the current playback.Press repeatedly to select speeds. | |
| 27 source source button: | Reserved button. No function has been assigned to it yet. | |
| 28 pause pause / step button: | Press to pause the current playback.Press again to step to the next frame.Press the play button to resume the playback. | |
| 29 repeat (timer) repeat 1/all | button:Press to set repeat option - Chapter, Title or Off.timer button:Press to enter the timer menu to add, edit and delete recording schedules. See '6.1 Creating a New Schedule' for more details. | |
| 30 goto (browser) goto button: | Press to jump to a specific point on a title. Specify the point using Title, Chapter and Time.browser button:Press to browse music, photo, and movie files on USB, HDD, and NET. | |
| 31 music | music button:Press to start playing music in the playlist. | |
| 32 copy copy button: | Press to enter the file copy menu. | |
| 33 power / standby power / standby button: | Press to enter standby mode or wake up. | |
2.2 Front Panel

text_image
EMTEC 1 2 3 4| No. Name Function | ||
| 1 LCD screen | Menu & icon information will be displayed on the screen. | |
| 2 Infrared | receiver window Receiving IR | signals from the remote control. |
| 3 REC indicator | Indicator Indicator (blue) turns on | when the system is alive;Indicator (red) turns on when recording starts. |
| 4 power / | standby button Press to enter | standby mode or wake up. |
2.3 Rear Panel

text_image
1 2 3 4 5 6 7 8 9 Y USB HOST USB DEVICE PB PB V2 L2 R2 V1 L1 R1 GRIDIC COASTAL OPTICAL SCART-TV HDMI LAN DCIN (UNIDAD) ANT. 17 16 15 14 13 12 11 10- Air Flow hole 2. Y/Pb/Pr OUT jack
- V2: Video OUT jack 4. L2: Audio OUT jack (Left Channel)
- V1: Video IN jack 6. L1: Audio IN jack (Left Channel)
- S/PDIF COAXIAL jack 8. SCART - TV socket
- ANT. / RF IN socket 10. DC-IN jack
- RJ45 LAN socket 12. HDMI jack
- S/PDIF OPTICAL jack 14. R1: Audio IN jack (Right Channel)
- R2: Audio OUT jack (Right Channel) 16. USB DEVICE port
- USB HOST port x 2
3. Getting Started
Power on the system, and after a few seconds, the system will enter the main interface. To return to this menu, you can also press the home button on the remote control.
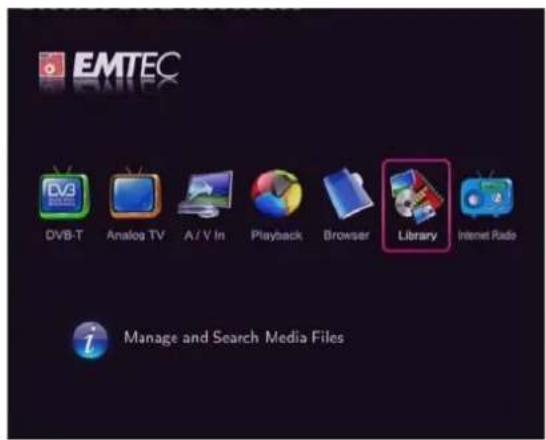
text_image
EMTEC DVB-T Analog TV A / V In Playback Browser Library Internet Radio i Manage and Search Media Files3.1 Selecting DVB-T TV
In this menu, you can watch and record Digital Terrestrial TV programs, or have the time shift function.
Select the DVB-T icon on the main interface to enter this menu.
3.2 Selecting Analog TV
In this menu, you can watch and record Analog TV programs, or have the time shift function.
Select the Analog TV icon on the main interface to enter this menu.
3.3 Selecting A/V In - Signal from the A/V IN jack
In this menu, you can watch and record audio-visual signal from the A/V IN jack on the rear panel of the unit, or have the time shift function.
Select the A/V In icon on the main interface to enter this menu.
3.4 Selecting Playback – Playback and Edit Recorded Titles
A clip recorded on HDD or USB device is called a Title.
In this menu, you can playback the recorded video or TV programs; you can also Merge/Split/Delete/Edit all the recorded titles.
Select the Playback icon on the main interface to access the title list menu.
3.5 Selecting Browser – Playback Multimedia Files
You can browse all the multimedia (Videos/Music/Photos) files on the internal HDD, USB or Network, and playback them on TV.
Press the browser button on the remote control or select the Browser icon on the main interface to browse movie, photo, and music files stored either on a HDD, USB device, or Network.
3.6 Selecting Media Library
In this menu, you can search multimedia files stored on the internal HDD.
Select the Library icon on the main interface to enter this menu.
3.7 Selecting Internet Radio
In this menu, you can listen to the SHOUTcast free radio programs on the Internet.
Select the Internet Radio icon on the main interface to enter this menu.
4. Watching Analog & DVB-T TV programs (only S800)
Equipped with an internal Hybrid TV Tuner, this player integrates Analog and Digital Terrestrial TV receiving. Please refer to '7.1 Changing DVB-T TV settings' and '7.2 Changing Analog TV settings' in order to make correct settings before reading the following chapters.
4.1 Watching Analog TV programs
To enter the Analog TV mode, select the Analog TV icon on the main interface.
The following are some functional buttons on the remote control available when watching Analog TV programs.
| Name Function | |
| up / down | Press to switch channels. (Channels cannot be switched in the recording mode.) |
| prev / next | |
| numeric buttons | Press to input channel numbers. Press the enter button to confirm. |
| record Press to start recording the current TV program. | |
| time shift Press to activate the time shift function. | |
| timer Press to edit scheduled recordings. | |
| zoom Press to zoom out the image. | |
4.2 Watching DVB-T TV programs
To enter the DVB-T TV mode, select the DVB-T icon on the main interface.
The following are some functional buttons on the remote control available when watching Digital TV programs.
| Name Function | |
| enter Press to view the program list menu. | |
| up / down | Press to switch channels. (Channels cannot be switched in the recording mode.) |
| prev / next | |
| numeric buttons | Press to input channel numbers. Press the enter button to confirm. |
| goto Press to switch between the last two viewed channels. | |
| record Press to start recording the current TV program. | |
| time shift Press to activate the time shift function. | |
| timer Press to edit scheduled recordings. | |
| subtitle Press to activate the subtitle list menu if available. | |
| EPG Press to activate the EPG menu if available. | |
| TTX Press to activate the Teletext menu if available. | |
| zoom Press to zoom out the image. | |
4.2.1 Program List Menu
Press the enter button when watching DVB-T TV programs, and the program list menu where you can see the program number and name will be displayed.

text_image
PR TV 9 BBC FOUR 71 -CBeebies 61 BBC Parliament 87 Community 301 301 302 302 303 303 305 305Press the left / right button to select from TV and Radio. Press the prev / next button to page up /down. Press the up / down button to select channels, and press the enter button to confirm.
4.2.2 Info Bar
While switching channels by the up / down button, an info bar will be displayed to show the channel information.

text_image
Info Bar 2008-04-04 09:01:02 71 CD/DVDEN N/A ENG SS TT 460 Big Cook Little Cook 19:30 20:20There're 4 strings displayed on the bar. Taking the info bar in the above photo for example:
N/A – Stands for TV rating;
ENG – Stands for the voice language;
SS – Stands for subtitle;
TT – Stands for Teletext;
480 - Stands for resolution (SD - Standard Definition, HD - High Definition).
When the string looks concave, the option will be available.
4.2.3 Electronic Programming Guide
Press the EPG button when watching DVB-T TV programs, the Electronic Programming Guide will be displayed.
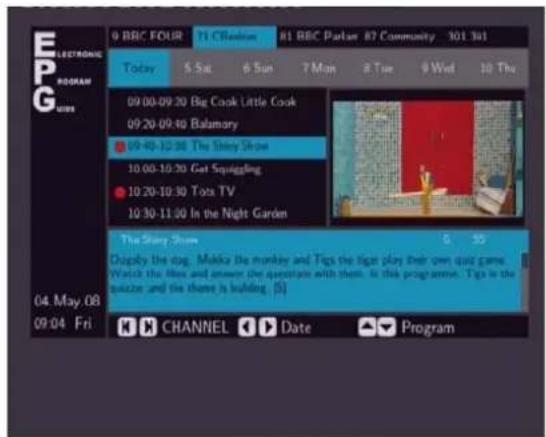
text_image
ELECTRONIC PROGRAM 9 BBC FOUR 71 Cibbing 81 BBC Parler 87 Community 301 301 Today 5 Sat 6 Sun 7 Mon 8 Tue 9 Wed 10 Thu 09:00-09:30 Big Cook Little Cook 09:20-09:40 Balamory 19:40-12:30 The Shiny Shope 10:00-10:30 Get Squiggling 10:20-10:30 Tota TV 10:30-11:00 In the Night Garden The Shiny Shope 5 30 Display the dog. Mukka Big monkey and Tips the ligp play their own quiz game. Watch the lion and answer the episode with them. At this programme. Tips is the puzzle and the there is building. (S) 04 May 08 09:04 Fri CHANNEL Date ProgramPress the prev / next button to change channels. Press the left / right button to change date. Press the up / down button to change program. Press the timer button to add / delete scheduled recording.
4.2.4 Teletext Menu
If the broadcasted stream supports Teletext, press the TTX button to enter the Teletext menu.
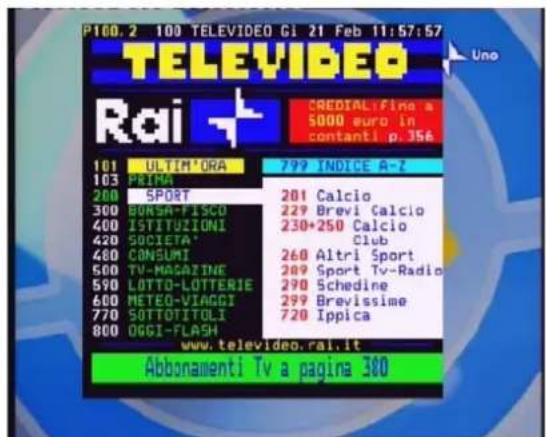
text_image
P100.2 100 TELEVIDEO GI 21 Feb 11:57:57 TELEYVIDEO Rai + CREDIAL Fine a 5000 euro in contanti p.356 101 ULTIM'ORA 103 PRIMA 200 SPORT 300 BURSA-FISCO 400 ISTITUZIONI 420 SOCIETA' 480 CONSUMI 500 TV-MAGAZINE 590 LOTTO-LOTTERIE 600 METEO-VIAGGI 770 SOTTOTITOLI 800 OGGI-FLASH 799 INDICE A-Z 201 Calcio 229 Brevi Calcio 230+250 Calcio Club 260 Altri Sport 289 Sport Tv-Radio 290 Schedine 299 Brevlissime 720 Ippica www.televideo.rai.it Abbonamenti Tv a pagina 380Press the navigational and numeric buttons to view the content in the Teletext menu.
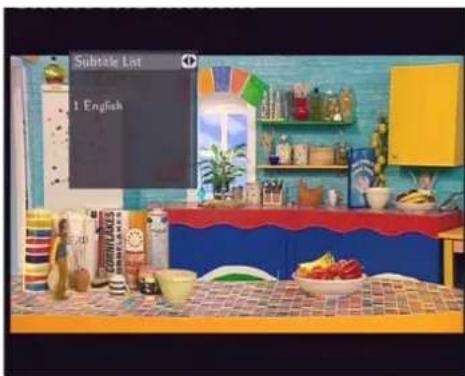
4.2.5 Subtitle List Menu
Press the subtitle button when watching DVB-T TV programs, the Subtitle List menu will be displayed. Press the left / right button to switch between Subtitle List and TTX Subtitle List
text_image
Subtitle List 1 English
natural_image
Interior view of a colorful kitchen with a blue table, ceramic bowl, and food items (no visible text or symbols)Press the up / down button to select the subtitle, and press the enter button to confirm.
5. The Title List Menu for Recorded Videos
The Title List menu allows you to play and edit all saved titles. To enter the menu, select the Playback icon on the main interface.

text_image
DVB-T Analog TV/EA/V INPress the up / down button on the remote control to select from DVB-T and Analog TV &
A/V IN to view and edit recorded DVB-T or Analog TV programs.
5.1 Title List Menu

text_image
Play TITLE 05 HQ LENGTH: 00.05.00 Video1 05/29/2001 03:31:23 TITLE 05 HQ LENGTH: 00.02.09 Video1 05/29/2001 01:28:08 TITLE 04 LP LENGTH: 00.05.00 Video1 05/29/2001 01:18:14 TITLE 03 LP LENGTH: 00.05.01 Video1 05/29/2001 03:00:31 TITLE 02 HQ LENGTH: 00.05.02 Video1 05/29/2001 02:55:17 1 / 6 TITLE 06 00:00:00 / 00:05:00 HDD Free Space 6GB HQ: 1N, SP: 2N, LP: 4N, EP: 5N, SLP: 8N| Number Function Description | ||
| 1 Menu Bar Press the left / right | button to scroll through the menu.Here you can Play / Delete / Rename / Sort / Edit a recorded title. | |
| 2 Title Lists Here lists all recorded titles. Here you can see thumbnail / length / quality / recorded channel / recorded date & time of a title.A sign shows this recorded title has not been watched.A sign shows this title is being recorded now. | ||
| 3 Information Here you can see a playback progress bar of a title, the remained free space of HDD, and remained recording time of each quality. | ||
| 4 Preview Shows the preview window. | ||
5.2 Playing Back Titles
To play a recorded title, do the following:
- Press the left / right button on the remote control to select the Play tab from the menu bar.
- Press the up / down button on the remote control to select the title you wish to play.
- Press the enter button on the remote control to play the file.
- Press the stop or the back button on the remote control to stop playback and return to the Title List menu screen.
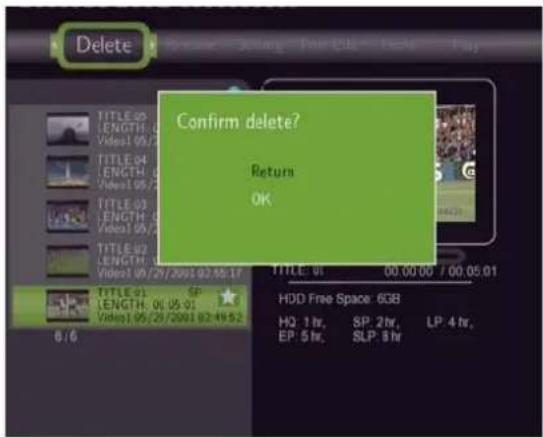
5.3 Deleting Titles
To delete a title, do the following:
-
Press the left / right button on the remote control to select the Delete tab from the menu bar.
-
Press the up / down button on the remote control to select the title you wish to delete.
-
Press the enter button to confirm and delete the file.
-
A confirmation message appears. Press the up / down button and select OK.
text_image
Delete Confirm delete? Return OK TITLE: 01 00.00.00 / 00.05.01 TITLE: 01 SP HDD Free Space: 6GB HQ: 1 hr, SP: 2 hr, LP: 4 hr, EP: 5 hr, SLP: 8 hr 6/6- Press the enter button to delete the selected file. To cancel delete, select Return.
5.4 Renaming Titles
To rename a title, do the following:
-
Press the left / right button on the remote control to select the Rename tab from the menu bar.
-
Press the up / down button on the remote control to select the file you wish to rename.
-
Press the enter button on the remote control. The name entry screen appears.

text_image
Rename New Name 1 2 3 4 5 OK 6 7 8 9 0 q w e r t CAPS y u i o p a s d f g <- h j k l - z x c v b -> n m .-
Press the navigation buttons to select letters and numbers. Select CAPS to toggle between uppercase and lowercase letters. Press <- to delete a letter. Press -> to insert a space. Press the enter button to input each letter or number.
-
Once you have entered the new name, select OK and press the enter button to confirm all changes.
If you want to cancel the renaming during the process, press the back button.
5.5 Sorting Files
Press the left / right button on the remote control to select the Sorting tab from the menu bar.
Press the enter button, and the menu appears.

text_image
Sorting Automatically sorting by: Return Title Number Recording Time Title Name Fresh Titles TITLE 01 00:00:00 / 00:05:01 TITLE 01 SP LENGTH 01 05 01 Video1 05 29/2001 02:49:52 HDD Free Space 6GB HQ: 1 Nv, SP: 2 Nv, LP: 4 Nv, EP: 5 Nv, SLP: 8 Nv | Return Select to return to the main screen. |
 | Title Number Select to sort all files according to title numbers. |
 | Recording Time Select to sort all files according to the length of the recordings |
 | Title Name Select to sort all files alphabetically, according to title name. |
 | Fresh Titles Select to sort all files according to freshness (i.e. the most recent recordings), listing the most recent recording first. |
5.6 Title Edit Menu
Press the left / right button on the remote control to select the Title Edit tab from the menu bar. Press the enter button, and the menu appears.

text_image
Title Edit Return Set Thumbnail AB Erase Split Title Merge Title Add Chapter Mark Remove Chapter Mark Copy to FAT32 partitionMenu only available with the Analog & AV IN TV, not with the DVB-T
| Return Select to return to the main screen. | |
Set Thumbnail Select to change a thumbnail of the selected video.Press the up / down button on the remote control to select Set Thumbnail, an editing screen appears.You can press the ff / fr button to fast forward or fast rewind when searching a proper point. When you reach the point at which you wish to insert a thumbnail, press the left / right button to select CONFIRM and press the enter button. | |
| AB Erase Delete a specified clip in a title. |
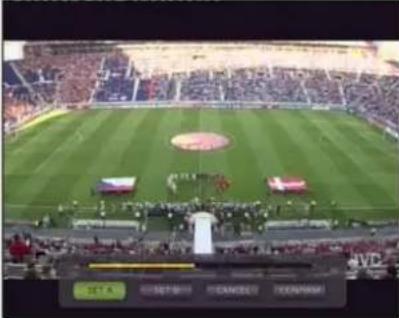 Select SET A and press the enter button to mark the start for the section to be deleted. Select SET B and press the enter button to mark the end of the section to be deleted. Select CONFIRM and press the enter button to delete the section. Select SET A and press the enter button to mark the start for the section to be deleted. Select SET B and press the enter button to mark the end of the section to be deleted. Select CONFIRM and press the enter button to delete the section. | ||
Split Title Select a title and divide it into sections.When you reach the point at which you wish to split the track, press the enter button to confirm. | ||
Merge Title Select more than two titles and combine them into one title. A confirmation message appears. Select CONFIRM to merge the files.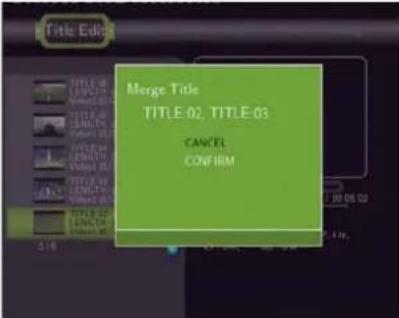 | ||
| Add Chapter Mark | Add a chapter mark to the selected file.A chapter mark is a marker inserted into the title. You can jump between marked sections by pressing theprev / next button on the remote control.An editing screen appears. When you reach the point at which you wish to add the mark, press the enter button to confirm.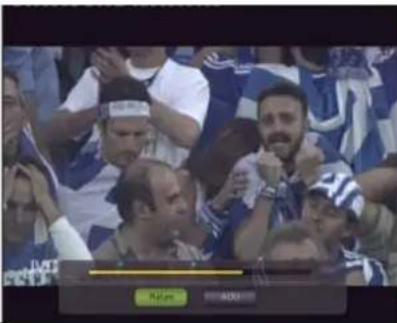 | |
| RemoveChapter Mark | Remove a chapter mark that you have inserted. An editing screen appears. Use the prev / next button to select the mark you wish to remove and press the enter button to delete.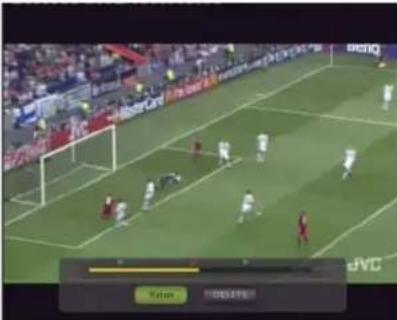 | |
| Copy to FAT32 partition | Copy function.In the Title List Menu, press the up / down button on the remote control to select which title you want to copy from the UDF partition to the FAT32 partition. | |
5.7 Tools
Press the left / right button on the remote control to select the Title Edit tab from the menu bar. Press the enter button and the menu appears.

text_image
Tools TITLE: 01 LENGTH: 02 Video1: 05/29/2021 02:49:52 6/6 TITLE: 01 SP LENGTH: 02 05 01 Video1: 05/29/2021 02:49:52 TITLE: 01 SP: 2 hr, LP: 4 hr, HDD Free Space: 6GB HQ: 1 hr, SP: 2 hr, LP: 4 hr, EP: 5 hr, SLP: 8 hr| Return Select to return to the main screen. | |
| Delete All Title Select to delete all titles. |
5.8 Saving Your Recorded Titles
All the recorded titles are stored temporarily in a recording disc partition (UDF format) which cannot be identified by personal computers. If you want to share the recorded titles on your computer, please copy the titles from the recording disc to the multimedia disc which is in FAT32 format first. See Copy to FAT32 partition in '5.6 Title Edit Menu' for more details.
6. Timer Record Menu
The Timer Record menu allows you to create, edit and delete recording schedules and view all schedule status and history. Press the timer button on the remote control to enter the menu.
6.1 Create a New Schedule
Press the left / right button on the remote control to select the Edit tab from the menu bar. Select Add a New Schedule and press the enter button. The schedule setting screen appears.
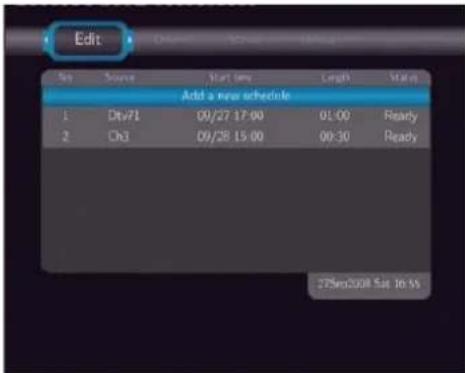
text_image
Edit Reg Source Start time Length Status Add a new schedule 1 Dtv71 09/27 17:00 01:00 Ready 2 Ch3 09/28 15:00 00:30 Ready 27Sep2008 Sat 10:55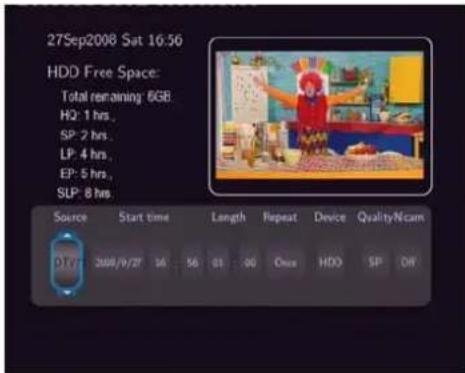
text_image
27Sep2008 Sat 16:56 HDD Free Space: Total remaining 6GB HQ: 1 hrs. SP: 2 hrs. LP: 4 hrs. EP: 5 hrs. SLP: 8 hrs. Source Start time Length Repeat Device Quality/NCam 01:77 2009/9/2F 36 56 03 00 Once HDD SP OffUse the left / right button on the remote control to move between fields and press the up / down button to adjust each setting.
| Source Select | the video source or TV channels for the recording. |
| Start Time Enter | ter the date and time of the recording. |
| Length Enter | the length of the recording |
| Repeat Select | how often you want the schedule to record. Choose fromOnce, Everyday, Mon-Fri, Mon-Sat or for an individual day of the week. |
| Quality Select | the recording quality. Choose from HQ, SLP, EP, LP and SP.The higher the quality, the more space required on the hard drive. See HDD Free Space on the left of the screen for details of how long you can record for using each setting. |
| Preview This | small preview window will show the current program of the selected channel. |
6.2 Editing Schedule
Press the left / right button on the remote control to select the Edit tab from the menu bar.
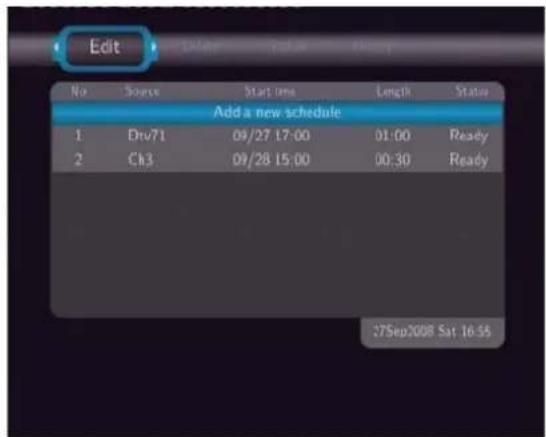
text_image
Edit No Source Start time Length Status Add a new schedule 1 Dru71 09/27 17:00 01:00 Ready 2 Ch3 09/28 15:00 00:30 Ready 27Sep2008 Sat 16:55Select the schedule you want to edit from the list and press the enter button. The schedule setting screen appears. Modify the schedule as described in '6.1 Creating a New Schedule'.
6.3 Deleting Schedules
Press the left / right button on the remote control to select the Delete tab from the menu bar.
Select the schedule you want to delete and press the enter button. A confirmation message appears.

text_image
Delete Delete one or all schedule? CANCEL Delete the selected schedule Delete all schedules. 27Sep 2008 Sat 16:59Select CANCEL, Delete the selected schedule, or Delete all schedules. Press the enter button to confirm.
6.4 Viewing Schedule Status
Press the left / right button on the remote control to select the Status tab from the menu bar.
The schedule list is displayed. Select a schedule and press the enter button.

text_image
Status Change the selected schedule status: Enable the timer by VPS. Enable the timer by user's setting Pause the selected scheduleSelect Enable the timer by VPS, Enable the timer by user's setting or Pause the selected schedule. Press the enter button to confirm.
6.5 Viewing Recording History
Press the left / right button on the remote control to select the History tab from the menu bar.
Here you can view a complete history of all recordings that were set.

text_image
Result OK Source Dtv71 Start time 09/27 17:00 Length 01:00 Device HDD7. Setup Menu
The Setup Menu allows you to configure DVB-T / Analog TV, video, audio, record, network and system settings. To enter the menu, press the setup button on the remote control.
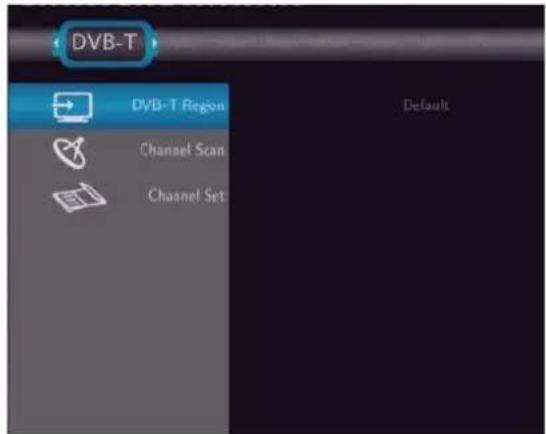
7.1 Changing DVB-T TV settings
Press the left / right button on the remote control to select the DVB-T tab from the menu bar.
text_image
DVB-T DVB-T Region Channel Scan Channel Set DefaultDVB-T Region Select to set the region for Digital Terrestrial TV.

text_image
DVB-T DVB-T Region Channel Scan Channel Set 1 other 2 Taiwan 3 Italy 4 France 5 Germany 6 UKPress the up / down button to select, and the enter button to confirm.
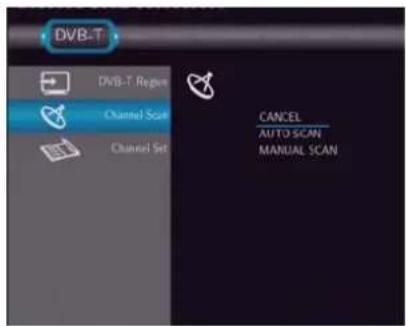
Channel Scan Select to scan for available Digital Terrestrial TV channels.
text_image
DVB-T DVB-T Region Channel Scale Channel Set CANCEL AUTO SCAN MANUAL SCANPress the up / down button to select from AUTO SCAN and MANUAL SCAN, and press the enter button to confirm.
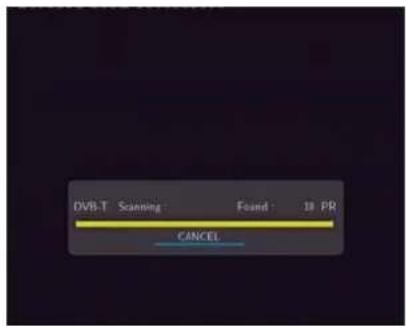
AUTO SCAN
text_image
DVB-T Scanning Found 18 PR CANCELIn AUTO SCAN mode, the system will automatically scan for available DVB-T TV channels.
MANUAL SCAN

text_image
Manual Scan Oh Oh IS Bandwidth 7 MHz Total Frequency LLT 5 MHz Frequency 11100000 Hz Status Scanning_ Bandwidth 1 MHz Count 0 Quality 0 percentIn MANUAL SCAN mode, you can select the CH name, Bandwidth, and Input Frequency. Use the navigational and numerical buttons on the remote control to select or input. Press the enter button to confirm.
Channel Set Select
to edit channel information.

text_image
DVB-T DVB-T Region Channel Scan Channel Set CANCEL DVB-TPress the up / down button to select DVB-T, and press the enter button to confirm.
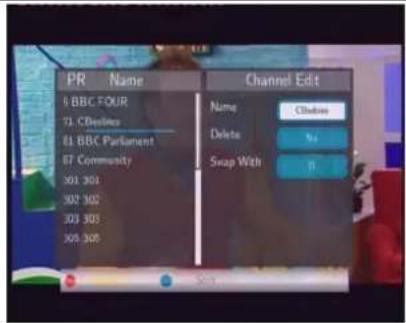
text_image
PR Name Channel Edit 0 BBC FOUR 72 CDebico 61 BBC Parliament 87 Community 301 301 302 302 303 303 305 305 Name CDebico Delete %4 Swap With #1In this menu, you can edit the Name, and sequence for the DVB-T TV channels. Use the navigational buttons to select and modify the settings, and press the enter button to confirm. You can also press the red button to select Default, and press the blue button to select Sort.
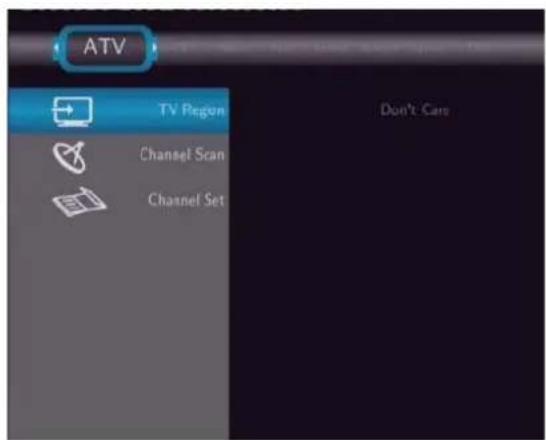
7.2 Changing Analog TV settings
Press the left / right button on the remote control to select the ATV tab from the menu bar.
text_image
ATV TV Region Channel Scan Channel Set Don't Care| Analog TVRegion | Select to set the region for Analog TV. Press the up / down button to select, and the enter button to confirm. Press the up / down button to select, and the enter button to confirm. |
Channel Scan Select to scan for available Analog TV channels. Press the up / down button to select from AUTO SCAN, and press the enter button to confirm. Press the up / down button to select from AUTO SCAN, and press the enter button to confirm. | |
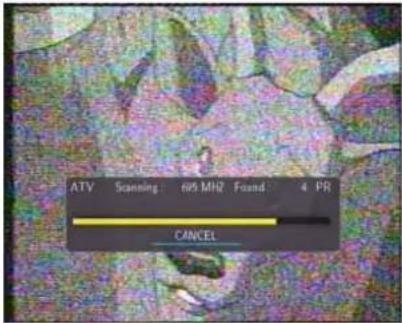 In this menu, the system will automatically scan for available Analog TV channels. In this menu, the system will automatically scan for available Analog TV channels. | |
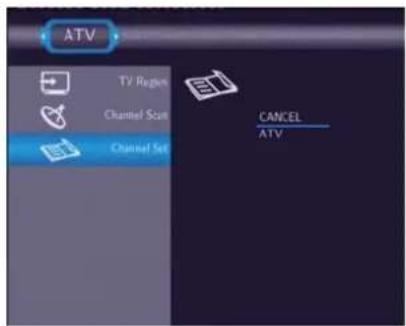
Channel Set Select to edit channel information.
text_image
ATV TV Region Channel Scan Channel Set CANCEL ATVPress the up / down button to select Analog TV.

text_image
PR Name Channel Edit CCTV Status Cx Name CCTV Fine Tone 1 TV System RAIL ON Soap With 1In this menu, you can edit the Status, Name, Fine Tune, TV System, and sequence for the Analog TV channels. Use the navigational buttons to select and modify the settings, and press the enter button to confirm.
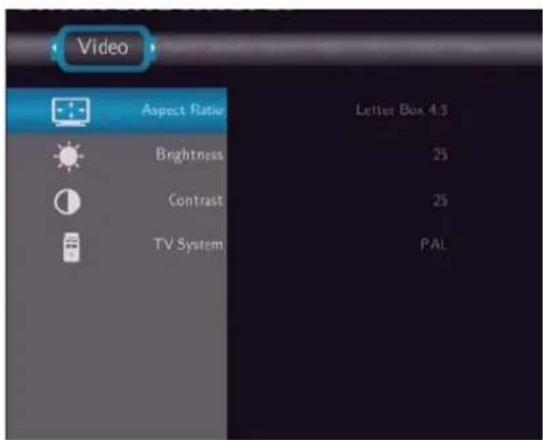
7.3 Changing Video Settings
Press the left / right button on the remote control to select the Video tab from the menu bar.
text_image
Video Aspect Ratio Letter Box 4.3 Brightness 25 Contrast 25 TV System PAL| Aspect Ratio Select to set aspect ratio. | |
 | |
| Press the up / down button to select from Pan Scan 4:3, Letter Box 4:3, or 16:9. Press the enter button to confirm. | |
| Pan Scan 4:3: Display a wide picture on the entire screen and cuts off the redundant portions. Select when a standard 4:3 TV is connected. | |
| Letter Box 4:3: Display a wide picture with two black borders on the top and bottom of 4:3 screen. Select when a standard 4:3 TV is connected. | |
| Brightness Select to | 16:9: Compress the image to convert the whole image. Select when a 16:9 TV is connected.set brightness levels. |
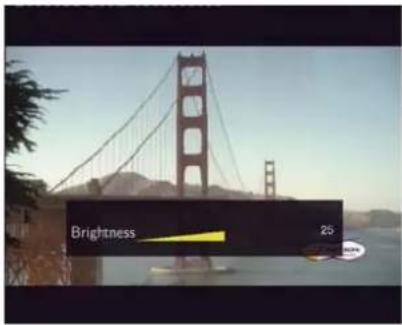 | |
| Press the up / down button to adjust brightness. The new setting is previewed on screen. Press the enter button to confirm. | |
| Contrast Select to set contrast levels. | |
| TV System Select to | adjust TV system. |
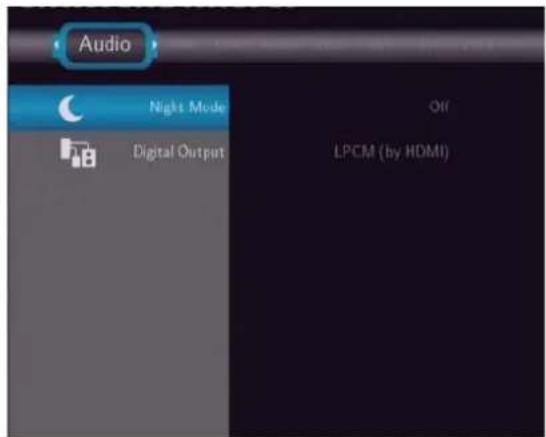
7.4 Changing Audio Settings
Press the left / right button on the remote control to select the Audio tab from the menu bar.
text_image
Audio Night Mode Off Digital Output LPCM (by HDMI)| Night Mode Select to set night mode. | |
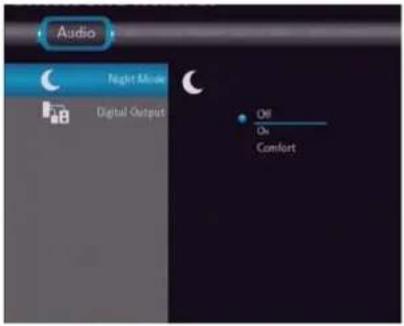 | |
| Press the up / down button to select from Off, On, and Comfort. Press the enter button to confirm. | |
| Digital Output Select to set Digital Output (S/PDIF) mode. | |
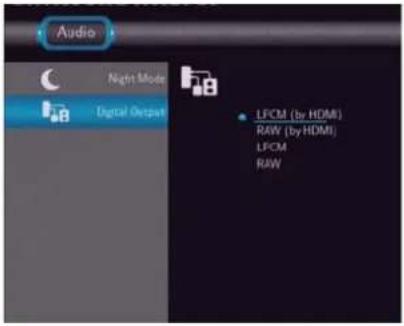 | |
| Press the up / down button to select from RAW, and LPCM. Press the enter button to confirm. | |
7.5 Changing Record Settings
Press the left / right button on the remote control to select the Record tab from the menu bar.

text_image
Record Quality SP Auto Chapter 20 Minutes Permanent Timeshift Off Record Device HDDQuality Select to set the default recording quality setting.

text_image
Record Quality Auto Chapter Permanent Timethift Record Device HQ SP LP EP SLPPress the up / down button to select the quality setting you require.
The highest quality setting is HQ which requires the most storage space. The other settings reduce recording quality sequentially but also require less storage space. Press the enter button to confirm.
| Auto Chapter Select to add chapter marks automatically at set intervals. | |
 Press the up / down button to select the interval you require. An automatic chapter mark will be added at each interval, allowing you browse titles easily after recording. Press the enter button to confirm. Press the up / down button to select the interval you require. An automatic chapter mark will be added at each interval, allowing you browse titles easily after recording. Press the enter button to confirm. | |
| Permanent Timeshift Select to set Time Shift mode. | |
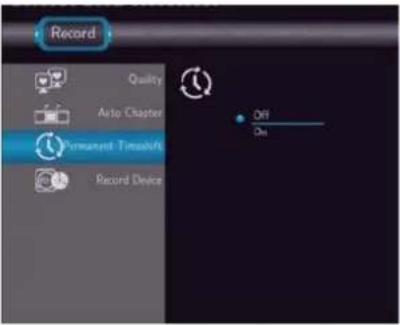 Press the up / down button to select from On and Off. Press the enter button to confirm. If On, the time shift will start automatically while in Video In mode. Press the up / down button to select from On and Off. Press the enter button to confirm. If On, the time shift will start automatically while in Video In mode. | |
| Record Device Select to set device to restore the recorded files. | |
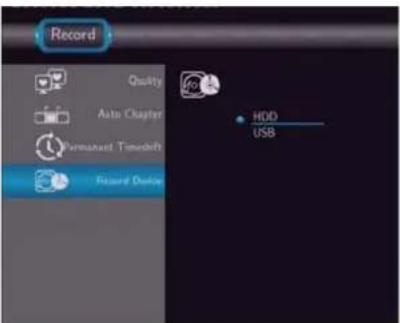 | |
| Press the up / down button to select from HDD and USB. Press the enter button to confirm. | |
7.6 Changing Network Settings
Press the left / right button on the remote control to select the Network tab from the menu bar.

text_image
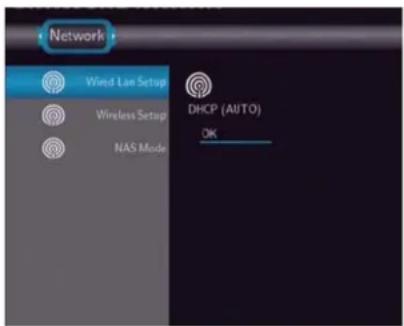
Network Wired Lan Setup ON : DHCP Not ready!! Wireless Setup OFF : DHCP Not ready!! NAS Mode OFFWired LAN Setup Select to set the Ethernet settings.
Before using the network functions, please check following items:
1) Connect the player to network first;
2) Please enable NetBIOS of TCP/IP on computer;
3) Please turn off your PC's firewall;
4) Please enable your PC's 'Guest' account;
5) Please share the folders which you wish to browse on your PC, and make sure that 'Everyone' or 'Guest' has the right to access.

text_image
Network Wind Lan Setup Wireless Setup NAS Mode CANCEL DHCP IP (AUTO) FIX IP (MANUAL)Press the up / down button to select DHCP (AUTO) or FIXED IP (MANUAL). Press the enter button to confirm.
DHCP (AUTO)
Set the IP address by auto.
text_image
Network Wind Line Setup Wireless Setup NAS Mode DHCP (AITO) OKPress the enter button to confirm.
FIX IP (MANUAL)
Using Fixed IP, it is required to enter the followings: IP Address, Subnet Mask, and Default Gateway. For further assistance to the
| Wireless Setup Please | refer to the user's guide to wireless function in the package of EMTEC Wi200 USB adapter for more details about these settings. |
| NAS Mode Select to turn | the NAS mode on / off.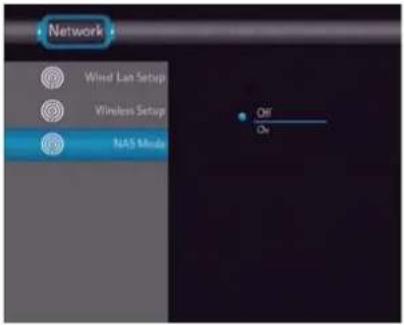 Press the up / down button to select from Off, and On. Press the enter button to confirm. Press the up / down button to select from Off, and On. Press the enter button to confirm. |
7.7 Changing System Settings
Press the left / right button on the remote control to select the System tab from the menu.

text_image
System Menu Language English Text Encoding Time Parental Control Hdd Format Restore Default Lcd Direction Unicode| Menu Language | Select to choose the OSD (On Screen Display) language. |
 Press the up / down button to select the language. Press the enter button to confirm. Press the up / down button to select the language. Press the enter button to confirm. | |
| Text Encoding | Select to set text encoding. Press the up / down button to select from Unicode, Chinese GBK, BIG5, and etc. Press the enter button to confirm. Press the up / down button to select from Unicode, Chinese GBK, BIG5, and etc. Press the enter button to confirm. |
| Time | Select to set the system time. Press the up / down button to select from Manual and Auto (via TV). Press the enter button to confirm. Press the up / down button to select from Manual and Auto (via TV). Press the enter button to confirm. |
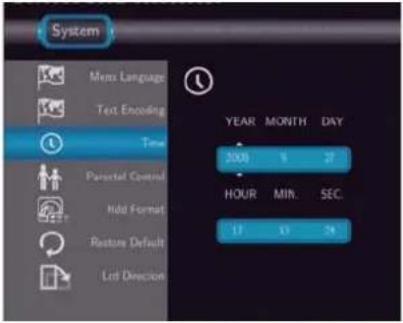 Press the left / right button to select each field and the up / down button to adjust each setting. Press the enter button to confirm. Press the left / right button to select each field and the up / down button to adjust each setting. Press the enter button to confirm. |
Parental Control
Select to set the TV parental control options.
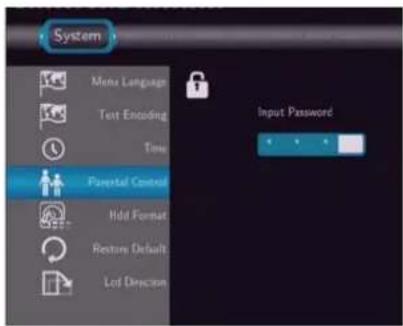
text_image
System Menu Language Text Encoding Time Parental Control Hold Format Restore Default Lot Direction Input PasswordA password will be needed for the modification. The default one is '0000'. Press the numerical buttons to input, and the enter button to confirm.
Lock System
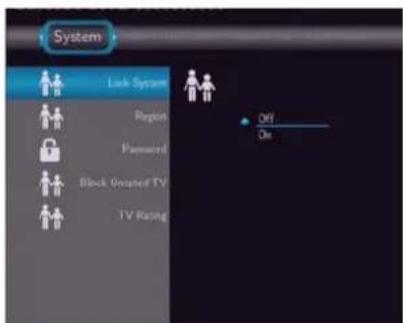
text_image
System Lock System Region Password Block Onated TV TV Rating Off OnPress the up / down button to turn on or off the parental system. Press the enter button to confirm.
Region
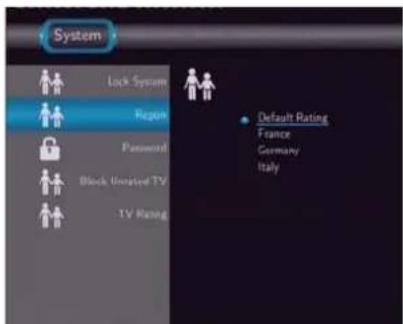
text_image
System Lock System Region Password Block Unrated TV TV Rating Default Rating France Germany ItalyPress the up / down button to select the region. Press the enter button to confirm.
Password
HDD Format
Select to format the HDD.

text_image
System Menu Language Text Encoding Time Parental Control Hold Format Restore Default Lnd Direction HDD Format CANCEL Hold Format Auto FormatPress the up / down button to select HDD Format. Press the enter button to confirm.

text_image
You are going to enter the hard disc formatting procedures. Please refer to user manual before you start all data in the hard disk will be removed as you press 'OK' in below OK CANCELPress the left / right button to select OK. Press the enter button to confirm.

text_image
Step1: Timeshift buffer disk capacity Press '▲' & ▼ key to adjust the capacity Total hard disk free space: 487G 1.0 Hour Back NextPress the up / down button to adjust the capacity of time shift buffer. Press the left / right button to select Next, and the enter button to confirm.

text_image
Step2: Recording & Multimedia disc capacity Press '▲' & '▼' key to adjust the partition Total hard disk free space: Total hard disk free space: Recording 20% Multimedia disk 80% Min. = 10% Min. = 10% Back Next| Restore Default | Select to restore factory defaults.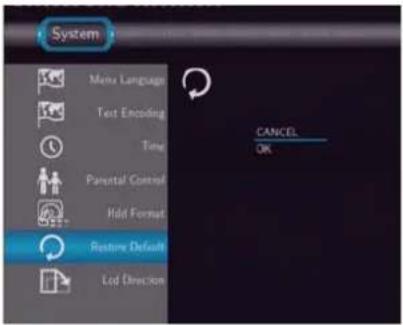 A confirmation message appears. Select OK and press the enter button to restore all settings to defaults. A confirmation message appears. Select OK and press the enter button to restore all settings to defaults. |
| LCD Direction | Select to set the direction of the LCD screen on the front panel.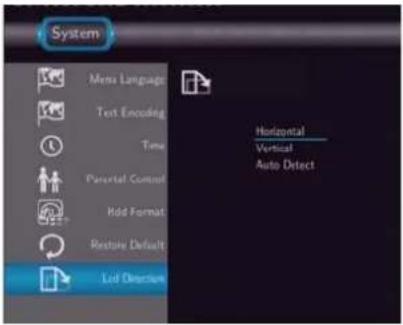 Press the up / down button to select from Horizontal, Vertical, and Auto Detect. Press the enter button to confirm. Press the up / down button to select from Horizontal, Vertical, and Auto Detect. Press the enter button to confirm. |
7.8 Miscellaneous
Press the left / right button on the remote control to select the MISC tab from the menu.

text_image
MISC Slide Show Timing Transition Effect Background Music Hold Information Information Off Off Folder| Slide Show Timing | Select to set the interval time for photo slide show.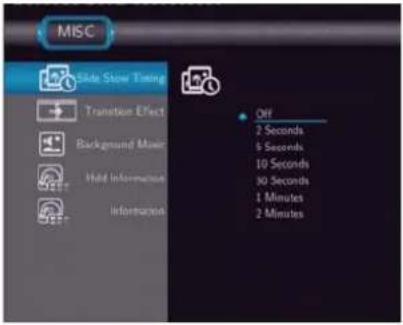 Press the up / down button to select. Press the enter button to confirm. Press the up / down button to select. Press the enter button to confirm. |
| Transition Effect | Select to set the transition effect for photo slide show.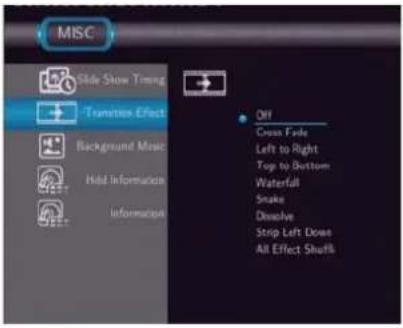 Press the up / down button to select. Press the enter button to confirm. Press the up / down button to select. Press the enter button to confirm. |
| Background Music | Select to set the background music options while view pictures.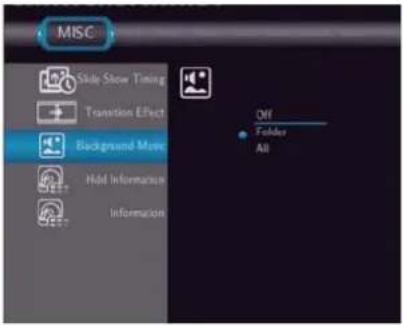 Press the up / down button to select from off, Folder, and All. Press the enter button to confirm. Press the up / down button to select from off, Folder, and All. Press the enter button to confirm. |
| HDD Information | Select to view the HDD capacities.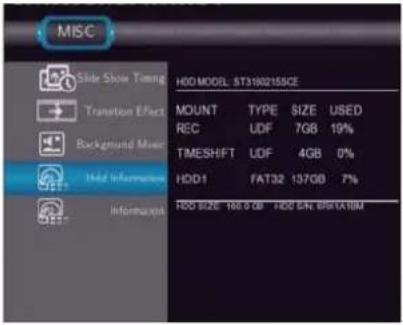 The capacities of the recording, time shift and multimedia partitions are listed here. Press theenterbutton to confirm. The capacities of the recording, time shift and multimedia partitions are listed here. Press theenterbutton to confirm. |
| Information | Select to view the system information. The version of the firmware, BIOS, and the MAC Address, etc. are listed here. Press theenterbutton to confirm. The version of the firmware, BIOS, and the MAC Address, etc. are listed here. Press theenterbutton to confirm. |
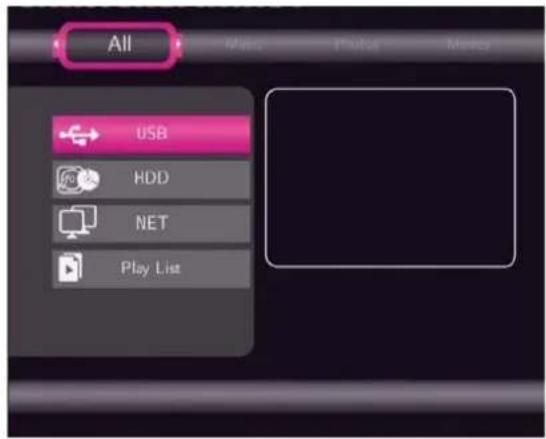
8. Browser Menu
The Browser menu allows you to browse and play music, photo and movie files stored on a HDD, an external USB device, and Network. To enter the menu, select the Browser icon from the main interface.
text_image
All USB HDD NET Play ListPress the up / down button to select the device on which the media is stored. Choose from HDD, USB, NET, and press the enter button.
When data on HDD, USB device is connected or connect the system to Network, you can also browse photos, listen to music, and watch movies.
8.1 Browsing All
Use the left / right button on the remote control to select the All tab.

text_image
All HDD MULTIMEDIA UPPER DJR 004.jpg 006.jpg Dana Winner - Moonell Jason Mraz - bella Io... MPEG1_Stan_352x2... MPEG2_MP@HL_10... 4/7 artist: Dana Winner title: Moonlight shadow album: Unforgettable gene: Love Songs track: 1 Name: Dana Winner - Moonlight shadow.mp3 Size: 4 MBytesAll directories and supported contents will be displayed. Press the up / down button to select the directory or file you wish to browse, and press the enter button to confirm.
8.2 Browsing Music
Use the left / right button on the remote control to select the Music tab.

text_image
Music HDD MULTIMEDIA UPPER DIR Winner - Moonlight s Jason Mraz - bella lu... 2/3 artist: Dana Winer title: Moonlight shadow album: Unforgettable gene: Love Songs track: 1 Name: Dana Winer - Moonlight shadow.mp3 Size:4 MBytesAll directories and supported audio files in current directory will be displayed. Press the up / down button to select the file you want to play and press the enter button.
8.3 Browsing Photos
Use the left / right button on the remote control to select the Photos tab.

text_image
Photos HDD MULTIMEDIA UPPER DIR 004.jpg 006.jpg 2/3 Name: 004.jpg Size: 735 KBytesAll directories and supported image files in current directory will be displayed. Press the up / down button to select the photo you want to view and press the enter button. The photo will be displayed full screen.
Note:
- When the photo is displayed in full screen mode, the slide show starts automatically.
- While listening to music files, you can browse the photos at the same time.
While browsing a photo, you can press the left / right button to rotate a photo in any angle. Besides rotating a photo, you can press the zoom button to zoom in/out that photo. Three zoom levels are available.
8.4 Browsing Movies
Use the left / right button on the remote control to select the Movies tab.

text_image
Movies HDD MULTIMEDIA UPPER DIR MPEG1_Stan_152x2 MP4HL_1020x1080_6 3/3 00 : 00 : 06 / 00 : 00 : 16 Name: MPEG2_MPI4HL_1920x1080_GoldenGa Size: 36 MBytesAll directories and supported video files in current directory will be displayed. Press the up / down button to select the movie you want to view and press the enter button. The movie will be played in full screen mode.
This browsing movies function supports DAT, VOB, IFO, MPG, AVI, and TS file formats.
While browsing a movie in full screen mode, you can press the zoom button to zoom in/out the image. Four zoom levels are available.
8.5 Browsing via Network
You can streaming playback the multimedia files shared on the local area network (Ethernet or WLAN).
Before viewing the following, please make sure that you have read 7.6 Changing Network Settings and made the right settings.
When selecting NET in the Browser menu, there are two ways to locate the multimedia files shared on your local network. One way is to browse through workgroup; the other way is to browse through 'My_Shortcuts'.

text_image
All NET UPPER DIR /My_Shortcuts/ /My_Neighbors/ /WORKGROUP/ /MSHOME/ /C2/ 2%8.5.1 Browsing through Workgroup
You can choose the workgroup which your PC belongs to from the workgroup list, find your PC name, and press the enter button to confirm.
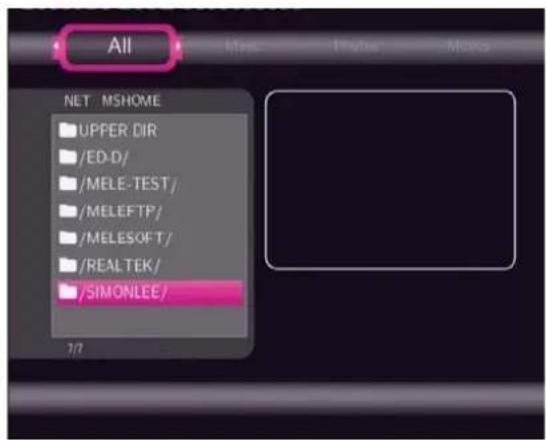
text_image
All NET MSHOME UPPER DIR /ED-D/ /MELE-TEST/ /MELEFTP/ /MELESOFT/ /REALTEK/ /SIMONLEE/Then select the shared multimedia file that you want to browse.

text_image
All NET MSHOME/SIMONLET UPPER DIR Stan_352x288_MP2_C MPEG2_MPQHL_12.. MPEG2_MPQHL_19.. MPEG2_MPQHL_10.. MPEG2_MPQML_72.. MPEG2_MPQML_72.. 3/7 00 : 00 : 07 / 00 : 03 : 52 Name MPEG1_Stan_352x288_MP2_Girlfriend. Size:38 MBytesNote:
- While browsing high definition video files (resolution up to 720p / 1080i / 1080p) via Ethernet or WLAN, the video might be buffering. It is normal due to the limit of network speed or signal strength.
- Due to different network conditions, sometimes the workgroup might not be accessed or shown in the list. And then you need to use 'My_Shortcuts' to browse shared files.
8.5.2 Browsing through 'My\_Shortcuts'
You can also set 'Specific File Server IP' and access it from 'My_Shortcuts' in the menu. Press the menu button and a tools menu appears.
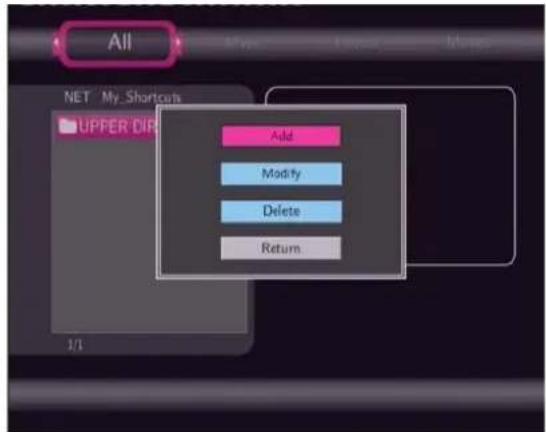
text_image
All NET My Shortcuts UPPER DROP Add Modify Delete ReturnNetwork Browser Seled
t to set Net User ID, Net Password, and Specific File Server IP, which enables to browse files on NET through 'My_Shortcuts'.
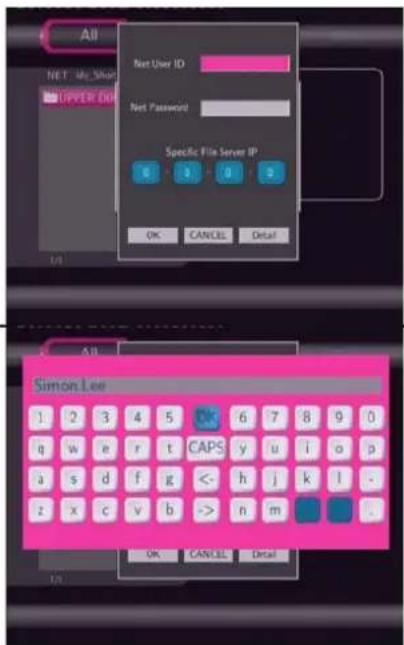
text_image
All NET User ID UPPER OK Net Password Specific File Server IP OK CANCEL Detail All Simon Lee 1 2 3 4 5 6 7 8 9 0 q w e r t CAPS y u i o p a s d f g <- h j k l - z x c v b -> n m . OK CANCEL Detail 1/3Select Net User ID and the entry screen will appear.
Press the navigation buttons to select letters and numbers. Select CAPS to toggle between uppercase and lowercase letters. Press <- to delete a letter. Press -> to insert a space. Press the enter button to input each letter or number. Select OK and press the enter button to confirm all changes.
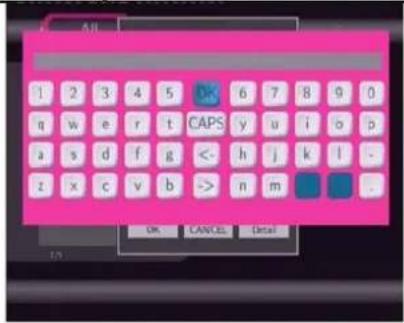
text_image
All 1 2 3 4 5 6 7 8 9 0 n w e r t CAPS y u i o p a s d f g < h j k l - z x c v b > n m OK CANCEL DetailSelect Net Password and the entry screen will appear. See above.

text_image
All Net User ID Screen Line 1 2 3 q w e a s d z x c Net Password 8 9 0 i o p k l - Specific File Server IP 192 168 1 163 OK CANCEL DetailSelect Specific File Server IP, and use navigational and numeric buttons to enter IP address.
Select the shortcut you added and press the enter button to confirm.
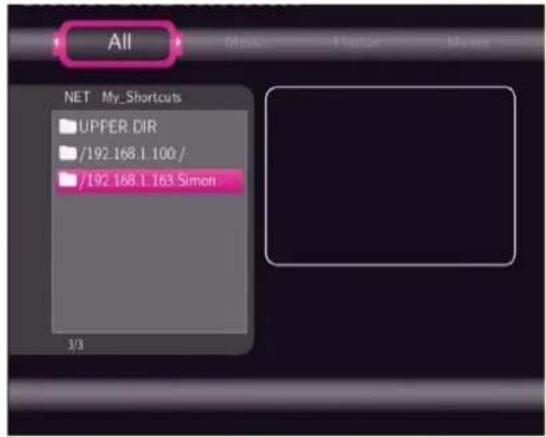
text_image
All NET My_Shortcuts UPPER DIR /192.168.1.100 / /192.168.1.163 Simon 3/3Then select the shared multimedia file that you want to browse.
8.6 Renaming / Deleting Files
When navigating in the browser menu, you can press the menu button to activate a popup menu where you can rename and delete files or folders.
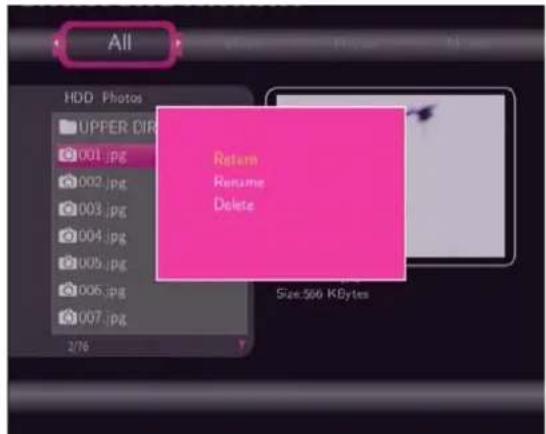
text_image
All HDD Photos UPPER DIR 001.jpg 002.jpg 003.jpg 004.jpg 005.jpg 006.jpg 007.jpg 276 Return Rename Delete Size:506 KBytesPress the up / down button to select from Return, Rename, and Delete. And press the enter button to confirm.
8.6.1 Renaming Files
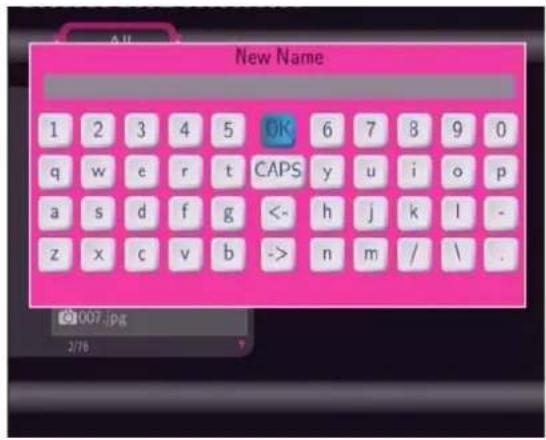
text_image
New Name 1 2 3 4 5 OK 6 7 8 9 0 q w e r t CAPS y u i o p a s d f g <- h j k l - z x c v b -> n m / \ . ©007.jpg 2/76Press the navigation buttons to select letters and numbers. Select CAPS to toggle between uppercase and lowercase letters. Press <- to delete a letter. Press -> to insert a space. Press the enter button to input each letter or number. Select OK and press the enter button to confirm all changes.
8.6.2 Deleting Files

text_image
All HDD Photos UPPER DIR 001.jpg 002.jpg 003.jpg 004.jpg 005.jpg 006.jpg 007.jpg 278 Confirm delete? Return OK Size:556 KBytesPress the up / down button to select OK. And press the enter button to confirm the deleting operation. Or select Return to cancel.
Note: Partitions of NTFS file system format on the hard disc drive might be read-only.
8.7 Managing the Playlist
This player supports the playlist function, which allows you to add your favorite content to the playlist, and enjoy them at any time.
8.7.1 Adding files to the playlist
Select the favorite file you wish to add, press the red button on the bottom of the remote control, and the file will be ticked. Press the green button on the bottom of the remote control to confirm, and then an on-screen message 'Add selects to list' will be shown. Multiple
selections are allowed. See photo below.
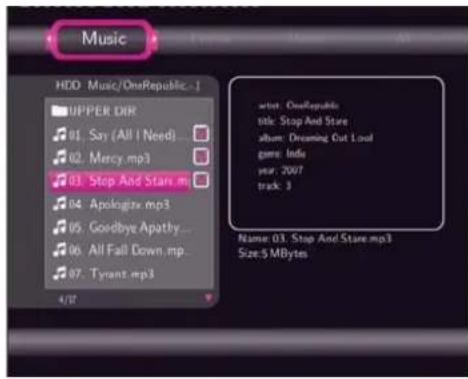
text_image
Music HDD Music/OoneRepublic-1 UPPER DIR 04. Say (All I Need) 02. Mercy mp3 03. Stop And Stare in 04. Apokgits mp3 05. Goidbye Apathy... 06. All Fall Down, mp. 07. Tyrant mp3 4/8 Enter: OneRepublic title: Stop And Store album: Dreaming Cut Loud game: Info year: 2007 track: 3 Name: 03. Stop And Stare.mp3 Size: 5 MBytes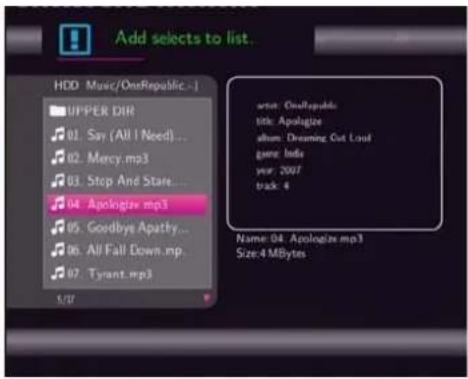
text_image
Add selects to list. HDD Music/OmsRepublic -] UPPER DIR 01. Say (All I Need)... 02. Mercy.mp3 03. Stop And Stare... 04. Apologiz.mp3 05. Goodbye Apathy... 06. All Fall Down.mp. 07. Tyrant.mp3 5/7 actor: OmsRepublic title: Apologiz album: Dreaming Cut Lost game: lada year: 2007 track: 4 Name: 04. Apologiz.mp3 Size: 4 MBytes8.7.2 Browsing the playlist
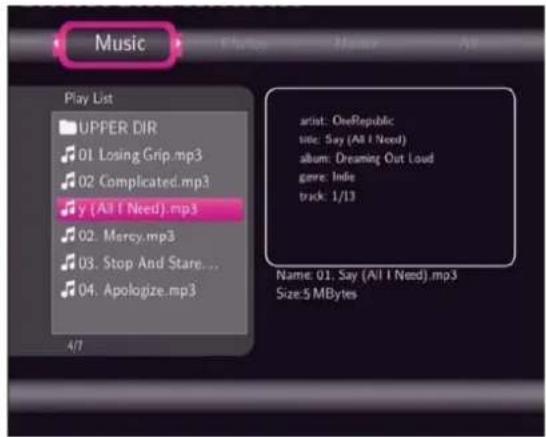
Press the up / down button to select Play List in the browser menu. And press the enter button to confirm. Then you will enter the playlist.
text_image
Music Play List UPPER DIR 01 Losing Grip.mp3 02 Complicated.mp3 y (All I Need).mp3 02. Mercy.mp3 03. Stop And Stare... 04. Apologize.mp3 4/7 artist: OneRepublic: title: Say (All I Need) album: Dreaming Out Loud genre: Indie track: 1/13 Name: 01, Say (All I Need).mp3 Size:5 MBytesIf you wish to delete a file from the playlist, press the red button to select, and then press the green button to confirm.

text_image
Music Play List UPPER DIR Say (All I Need) mp3 02. Mercy mp3 03. Stop And Stars ... 04. Apologizs mp3 2/3 music: OneRepublic title: Say (All I Need) album: Dreaming Cut Load game: India track: 1/11 Name: 01. Say (All I Need) mp3 Size: 5 MBytes
text_image
Delete selects from list. Play List UPPER DIR 01. Say (All 1 New 02. Mercy.mp3 03. Stop And Stand 04. Apology.mp3 x86. Or Usable Leasing... Long Cut Lost Name: 02. Mercy.mp3 Size: 5 MBytes9. Media Library
Owning to a powerful search engine, the library menu allows you to search and browse multimedia files stored on the internal HDD in most easy ways. To enter this menu, select the Library icon on the main interface.
9.1 Music Library
Use the left / right button on the remote control to select the Music tab.

text_image
Music Update Search All Artist Genre Album 1/6Press the up / down button to select from Update, Search, All, Artist, Genre, and Album. And press the enter button to confirm.
| Update Select to update and synchronize all the music stored on the internal HDD to the library. | |
 | |
| Search Select to search for music files by their names. | |
 | |
| Use thenavigationalbuttons to select, and press theenterbutton to confirm. Select OK and press theenterbutton, and then the files you desired will be displayed on the screen. | |
All Select to list all the music files in the library. | |
Artist Select to search for music files by artist. Press theup / downbutton to select the artist, and press theenterbutton to confirm. Press theup / downbutton to select the artist, and press theenterbutton to confirm. | |
Genre Select to search for music files by genre. Press theup / downbutton to select the genre, and press theenterbutton to confirm. Press theup / downbutton to select the genre, and press theenterbutton to confirm. | |
| Album Select to search for music files by album. | |
 Press the up / down button to select the album, and press the enter button to confirm. Press the up / down button to select the album, and press the enter button to confirm. | |
| Quick-Search | You can also press the right button to turn on a Quick-Search bar while browsing music files in the library.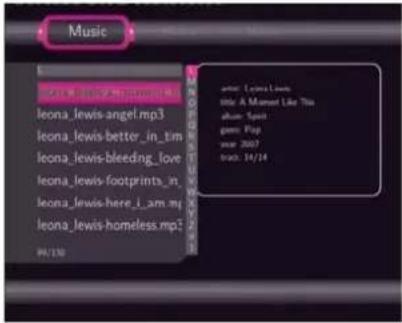 Press the up / down button to select characters on the Quick-Search bar, and press the enter button to confirm. And then music files with name starting with the specific characters will be displayed onto the top. Press the left button to delete characters, and press the back button to close the Quick-Search bar. Press the up / down button to select characters on the Quick-Search bar, and press the enter button to confirm. And then music files with name starting with the specific characters will be displayed onto the top. Press the left button to delete characters, and press the back button to close the Quick-Search bar. |
9.2 Photo Library
Use the left / right button on the remote control to select the Photos tab.

text_image
Photos Update Search All Date 1/4Press the up / down button to select from Update, Search, All, and Date. And press the enter button to confirm.
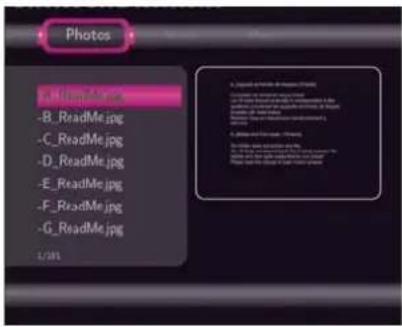
Update Select to update and synchronize all the photos stored on the internal HDD to the library.
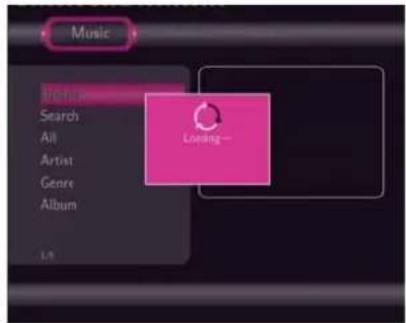
text_image
Music Search All Artist Genre Album Locking—Search Select to search for photos by their names.
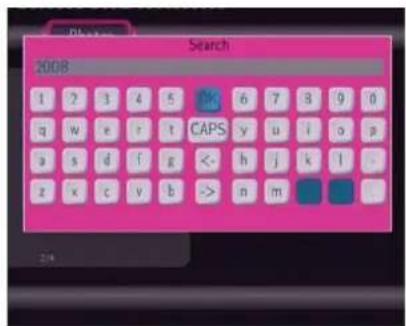
text_image
Search 2008 1 2 3 4 5 K 6 7 8 9 0 q w e r t CAPS y u i o p a s d f g < h j k l . z x c y b > n mUse the navigational buttons to select, and press the enter button to confirm. Select OK and press the enter button, and then the files you desired will be displayed on the screen.
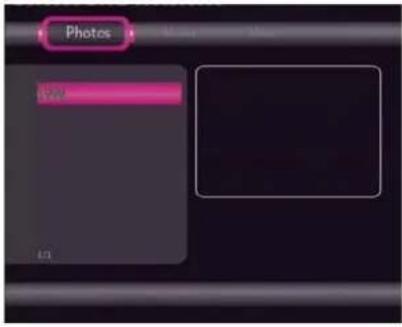
| All Select to list all the photos in the library. | |
 | |
| Date Select to search for photos by date. | |
 | |
| Press the up / down button to select the date, and press the enter button to confirm. | |
| Quick-Search | You can also press the right button to turn on a Quick-Search bar while previewing photos in the library. |
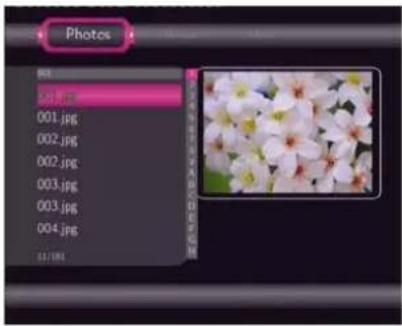 | |
| Press the up / down button to select characters on the Quick-Searchbar, and press the enter button to confirm. And then photos with name starting with the specific characters will be displayed onto the top. Press the left button to delete characters, and press the back button to close the Quick-Search bar. | |
9.3 Movie Library
Use the left / right button on the remote control to select the Movies tab.

text_image
Movies Update Search All Actor Genre Year 1/6Press the up / down button to select from Update, Search, All, Actor, Genre, and Year. And press the enter button to confirm.
| Update Select to update and synchronize all the movies stored on the internal HDD to the library. | 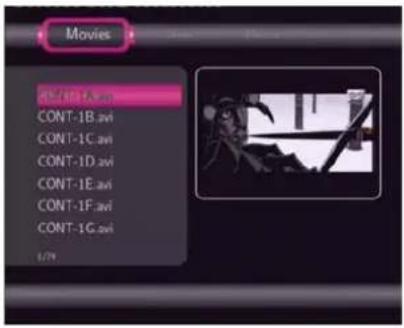 |
| Search Select to search for movies by their names. | |

text_image
Search shorek 1 2 3 4 5 6 7 8 9 0 q W e r t CAPS y u i o p a s d f g < h j k l . z x c v b -> n m .Use the navigational buttons to select, and press the enter button to confirm. Select OK and press the enter button, and then the files you desired will be displayed on the screen.
All Select to list all the movies in the library.

text_image
Movies CONT-1B.avi CONT-1C.avi CONT-1D.avi CONT-1E.avi CONT-1F.avi CONT-1G.aviActor Select to search for movies by actor.

text_image
Movies Jeff Bridges Naomi Watts Johnny Depp Mike Myers Edward Norton Amy Adams| Press the up / down button to select the actor, and press the enter button to confirm. | |
| Genre Select to search for movies by genre. | |
 | |
| Press the up / down button to select the genre, and press the enter button to confirm. | |
| Year Select to search for movies by year. | |
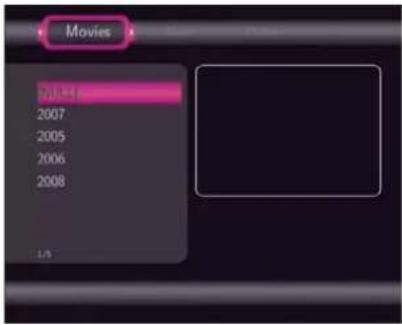 | |
| Press the up / down button to select the year, and press the enter button to confirm. | |
| Quick-Search | You can also press the right button to turn on a Quick-Search bar while previewing movies in the library. |
 | |
| Press the up / down button to select characters on the Quick-Search bar, and press the enter button to confirm. And then movies with name starting with the specific characters will be displayed onto the top. Press the left button to delete characters, and press the back button to close the Quick-Search bar. | |
Note:
In order to use the search function more efficiently, you are encouraged to use the following rules to name the movies stored on the internal HDD.
Syntax: [Name][Actor][Genre][Year].extension
Examples: [Enchanted.CD1][Amy Adams][Love][2007].avi, [The.Dark.Knight.CD1][Christian Bale][Action][2008].avi, etc.
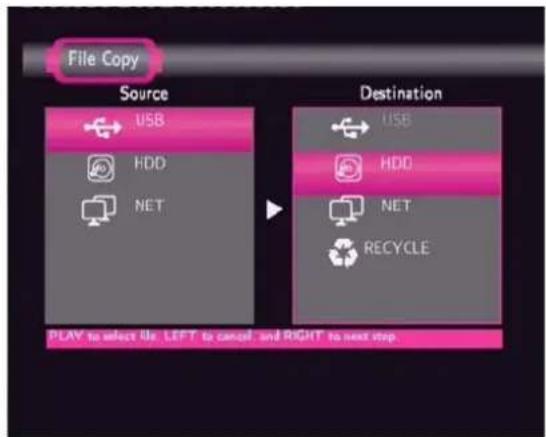
10. File Copy Menu
Press the copy button on the remote control to enter the File Copy menu, which allows you to copy files between HDD, USB devices and Network.

text_image
File Copy Source USB HDD NET Destination USB HDD NET RECYCLE PLAY to select file. LEFT to cancel. and RIGHT to next step.Step 1: Select the source device and destination device.
text_image
File Copy Source USB HDD NET Destination USB HDD NET RECYCLE PLAY to select file, LEFT to cancel, and RIGHT to next stepPress the up / down button to select device. Press the left button to cancel, and the right button for next step.
Step 2: Select the source files you want to copy.

text_image
File Copy Source /tmp/ramfs/volumes/C:\ /../ /Avel Lavigne - Innocer /Black Eyed Peas - Wh /Data Winner - Mocini /Tonya mitchell - Stay.mp Destination /tmp/holdmedia /NEW-DIRECTORY/ /MTVs/ /MULTIMEDIA/ /Movies/ /Music/ /Photos/ PLAY to select file, LEFT to cancel and RIGHT to next step.Press the play button to select files, the left button to cancel, and the right button to next step.
Step 3: Select the destination folder to store the above files.

text_image
File Copy Source /tmp/ramfs/volumes/C:) /../ /Avril Lavigne - Innocer /Black Eyed Peas - Wh /Data Winner - Mocni /Tonya mitchell - Stay.mp Destination /tmp/hddmedia/Music/ /../ /NEW-DIRECTORY/ /Avril Lavigne - [Let.Go] /Avril Lavigne - [The.Best /Avril.Lavigne - [Under.M. /Craig.David - [Trust.Me], PLAY to select file. LEFT to cancel and RIGHT to next step.Press the up / down button to select folder. Press the left button to cancel, and the right button for next step.
Step 4: Proceed to copy selected files.

text_image
File Copy Source /tmp/ramfsVolume/C-8 /.../ /Avril Lavigne /Black Eyed P /Dana Winner - Moonl /Toeya mitchell - Stay.mj Destination Proceed to copy selected files OK No RECTORY/ Avril Lavigne - [Let.Go] /Avril Lavigne - [The.Best /Avril Lavigne - [Under.My /Craig David - [Trust.Mo], PLAY to select file. LEFT to cancel and RIGHT to next step.Press the up / down button to select OK, press the enter button to confirm. And the copy will start.
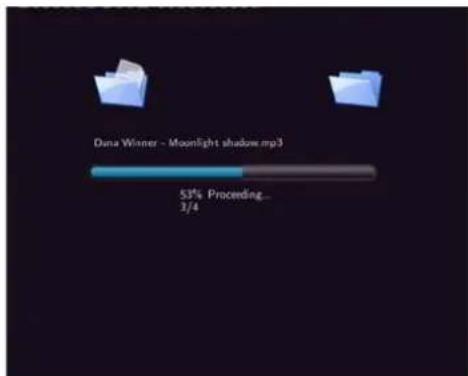
text_image
Duna Wiener - Moonlight shadow.mp3 53% Proceeding... 3/4
text_image
FileCopy Completed! Press OK to browser files. OK No.11. NAS Function
This player can be used as a NAS (Network-Attached Storage) device. It can be attached to the home network via either Ethernet or WLAN. This feature allows homes to store and retrieve large amounts of data more affordably than ever before.
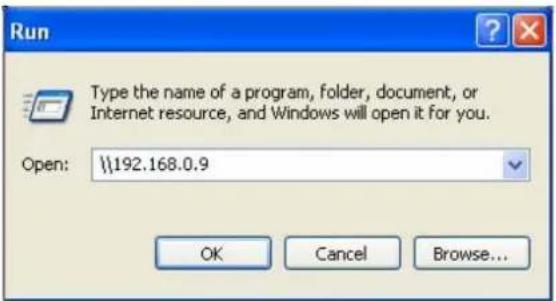
When the network connection is done correctly and ready for use, please activate the NAS mode in the setup menu in advance (refer to 7.6 Changing Network Settings for more details), and then type: \NAS or \IP Address in the Run window (click Run in the start menu) or the address bar of Internet Explorer on your PC (For example, if the IP address of the player is 192.168.0.9, please type: \192.168.0.9 or \NAS), and click OK or press the Enter button on the keyboard.
text_image
Run Type the name of a program, folder, document, or Internet resource, and Windows will open it for you. Open: \\192.168.0.9 OK Cancel Browse...Then you can view, and edit the files stored on the hard disk installed on the player. In this way, you can also playback and copy files via network between your PC and the player.
Note:
- Partitions of NTFS file system format on the hard disc drive might be read-only;
- Please turn on the NAS mode in the setup menu before using this function
12. Listening to Internet Radio
This player integrates the SHOUTcast free Internet radio function. Select the Internet Radio icon on the main interface to enter this menu.

text_image
STATION GENRE FAVORTENote:
- Make sure the player is connected properly to a LAN or WLAN with Internet access, please refer to '7.6 Changing Network Settings' for more details;
- When you enter the Internet Radio menu at the first time, it will take several seconds to download data from the Internet, please be patient to wait;
- For more about SHOUTcast, please refer to the website: www.shoutcast.com
12.1 Station List Menu
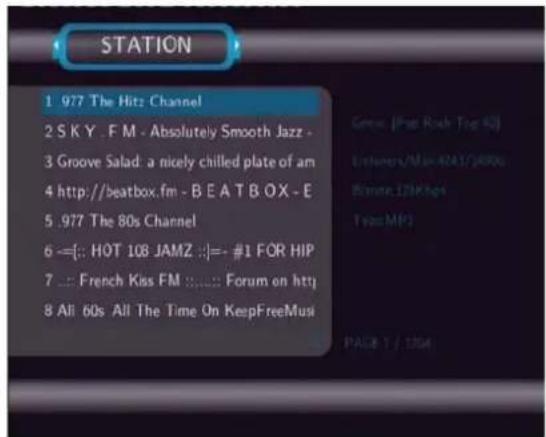
Press the up / down button to select STATION, and press the enter button to confirm.
text_image
STATION 1 977 The Hitz Channel 2 S K Y , F M - Absolutely Smooth Jazz - 3 Groove Salad: a nicely chilled plate of am 4 http://beatbox.fm - B E A T B O X - E 5 .977 The 80s Channel 6 =[: HOT 108 JAMZ :]:= #1 FOR HIP 7 :: French Kiss FM :: Forum on http 8 All 60s All The Time On KeepFreeMusi Genre: (Par Rock Top 6) Linkers/Max ADAT/ARPO Bamata 12M/Box Trev MP3 PAGE 1 / 1004Press the up / down button to select the station you wish to visit from the list. Press the enter button to confirm. You can also press the prev / next button to page up and down.
When a station is selected, then you will enter the CHANNEL List menu. Press the up / down button to select the channel you wish to listen to.

text_image
CHANNEL 1 http://scfire-dtc-aa03.stream.aol.com:8C 2 http://scfire-dll-aa01.stream.aol.com:8C, 3 http://scfire-dll-aa05.stream.aol.com:8C, 4 http://scfire-dtc-aa04.stream.aol.com:8C 5 http://scfire-ntc-aa06.stream.aol.com:8C 6 http://scfire-dll-aa04.stream.aol.com:8C, 7 http://scfire-chi-aa02.stream.aol.com:8C 8 http://scfire-dtc-aa05.stream.aol.com:8C Play Break Cuterture, Topline Station SAY F.M. Apology Storage ShipAge Type: audio/mage Camera Soft Semisheet Java ITEM 1 / 21Press the enter button or the play button to start listening to the channel. And press the stop button or the back button to stop.
When a station is highlighted, you can press the menu button to add it to the favorite.

text_image
add favorite success! 1.977 The Hitz Channel 2 S K Y F M - Absolutely Smooth Jazz - 3 Groove Salad: a nicely chilled plate of am 4 http://beatbox.fm - B E A T B O X - E 5 .977 The 80s Channel 6 =[: HOT 108 JAMZ ::]= - #1 FOR HIP 7 ...: French Kiss FM :...... Forum on http 8 All 60s All The Time On KeepFreeMusi Genre [Sun Smooth Jazz] Listening/Max 10W/10X21 Bitrate SEKbps Type MP3 PAGE 1 / DGA12.2 Genre List Menu
Press the up / down button to select GENRE, and press the enter button to confirm.

text_image
GENRE 1 Top 25 Streams 2 Alternative 3 Classical 4 Comedy 5 Country 6 Dance/House 7 Funk 8 JazzPress the up / down button to select the genre you wish to visit from the list. Press the enter button to confirm. You can also press the prev / next button to page up and down. In this way, you can search your favorite stations via genre.
12.3 My Favorite Station
Press the up / down button to select FAVORITE, and press the enter button to confirm.

text_image
FAVORITE 1 S K Y . F M - Absolutely Smooth Jazz - 2 .977 The Hitz Channel 3 .977 The 80s Channel Genre: [Shift Smooth Jazz] Listeners/Max 13/9/ 15/23 Bluests 96Kbox Type MP2 ITEM 1 / 3All the favorite stations you added from the station list menu can be found and managed here.
When a station is highlighted, you can press the menu button to delete it from the favorite.

text_image
.del favorite success! .977 The Hitz Channel .977 The 80s Channel Genre: [Pop-Rock Top 80] 1st play: [Live-47] (20K) 6th play: [20K Top] Type: MP3 ITEM 1 / 2.Note: You can have a maximum of 20 favorite stations in the list.
13. Upgrading the Firmware
The firmware is the operating system (OS) installed on the device. Firmware upgrades can bring new features, improvements and bug fixes.
To check whether you have the latest version of firmware:
- Select MISC in the Setup menu;
- The firmware version number is displayed behind SW Version;
- Compare it with the latest firmware released.

text_image
MISC Slide Show Timing Transition Effect Background Music Hide Information Information SW Version: 6.2.1262UO(258) BIOS: 0000.1116.019PE MAC Addr: 00.CE: 39.01.A4 B4 **********Download the latest firmware from our official website.
Step 1: Prepare the USB Pen Drive
You will need a USB Pen Drive for firmware upgrade. Copy the files for upgrade to the root directory of your USB Pen Drive.

text_image
arial.ttf TrueType Font file 140 KB crc32.txt Text Document 1 KB install.flash.img IMG File 14,157 KB install_a File 2,653 KB logo_pal.bmp 720 x 576 Bitmap Image video_firmware.bin BIN File 1,217 KBStep 2: Connect the USB Pen Drive
Plug the USB Pen Drive into one of the USB HOST ports of the player.
Step 3: Hold the power / standby button
Press and hold the power / standby button on the front panel, and do not loosen.
Step 4: Connect the power cable
Plug the power cable into the DC IN jack, wait for about 3 seconds or more, and then loosen your finger on the power / standby button;
Firmware installation will start in about 30 seconds. The LED indicators on the front panel will be enlightened and flashing during installation. If it is connected to a TV set, a blue install page will appear on the TV screen.
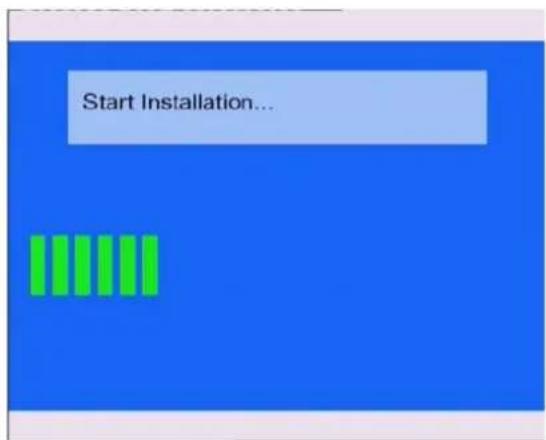
text_image
Start Installation...Please wait for several minutes, the installation will be completed, the LED indicators will go off, and the player will be powered off automatically. Then you can press the power / standby button to turn on the player and enjoy.
Note:
Do not turn off the power during installation;
The USB Pen Drive is not allowed to be unplugged during installation.
14. Appendixes
14.1 Specifications
USB SUPPORTED:
USB HDD
● Other USB Mass Storage Devices
USB 2.0 Interface
CONTENT FORMATS SUPPORTED:
● DAT/VOB/IFO/MPG/AVI/MPEG-2 TS
MP3/OGG/WMA
● Compression rate: between 32 kbps and 320 kbps
JPEG/BMP
VIDEO CODECS SURPORTED:
- MPEG-1/MPEG-2
- MPEG-4 ASP: XviD
AUDIO CODECS SURPORTED:
- MP2/MP3 /OGG Vorbis/WMA Standard (DRM, Pro & Advanced Profile not supported)/PCM
SUBTITLE FORMATS SURPORTED:
● SRT, SMI, SSA, IDX/SUB, SUB
RECORDABLE DEVICES SUPPORTED:
Built in HDD
USB HDD
HQ 16hrs 24hrs 33hrs
SP 32hrs 48hrs 66hrs
LP 48hrs 72hrs 99hrs
EP 64hrs 96hrs 132hrs
SLP 96hrs 144hrs 198hrs
HQ/SP/LP/EP/SLP mode: MPEG-2 MP@ML
HQ/SP/LP/EP/SLP mode: MP2 2-chanel
AD Converter 24-bit/96kHz
Signal-Noise (1kHz) ≥ 95dB
Dynamic Range ≥90dB
(1kHz)
Channel ≥95dB
Separation
Total Harmonic
Distortion (1kHz) ≤-85dB
NETWORK FEATURE
Ethernet 10/100Mbps Auto-Negotiation
WLAN
IEEE 802.11b/g, up to 54Mbps (supported by the optional WLAN USB Adapter)
ANALOG TV SYSTEM
| Frequency Range | 44.25MHz~863.25MHz (VHF I/III / UHF) |
| Video | PAL B/G, D/K, I, SECAM L and L' |
| Audio | Stereo, Mono |
| Analog TV Tuner | 75 Ohm (VHF / UHF) TV Analog Antenna or cable |
DIGITAL TERRESTRIAL TV SYSTEM
| Frequency Range | 44.25MHz~863.25MHz (VHF I/III / UHF) |
| COFDM | 2K FFT or 8K FFT COFDM demodulator(Fully DVB-T compliant : ETS 300-744) |
| Code Rate | 1/2, 2/3, 3/4, 5/6, and 7/8 |
| Guard Interval | 1/4, 1/8, 1/16, 1/32 |
| Constellation QPSK | 16QAM, 64 QAM |
| Bandwidth | 6, 7 or 8MHz |
| Digital TV Tuner | 75 Ohm (VHF / UHF) TV Digital Antenna |
GENERAL
| Power Supply | AC 100~240V | 50~60Hz |
| Power Consumption | Approx. 35 W | |
| Operating Temperature | +5°C to +35°C (+36°F to +95°F) | |
| Operating Humidity | 5% to 80% RH | |
| Hard Disk | 3.5” SATA HDD | |
| Dimensions (W/H/D) | 211.5x57x152mm | |
| Net Weight | Approx 1.2 kg | |
Note: The specifications and design of this product are subject to change without notice.
14.2 Frequently Asked Questions
Question 1. My computer does not recognize my player.
Answer:
(1) Make sure the player is powered on. If it is off, the computer will not be able to find the player;
(2) Make sure the player is connected to computer. (Refer to 1.4.1 for connecting player to computer);
(3) When using Windows 98SE, install the USB driver first. After installation, restart the computer. Then reconnect the player to the computer. (Refer to 1.4.1 for connecting player to computer);
(4) If you installed the Windows 98SE driver over your Windows® XP, 2000, or ME edition, problems might occur;
(5) It is not recommend using the USB ports in the front of your computer, try to use the USB ports in the rear, because the USB ports in the front are often from non-powered hubs.
Question 2. When I try to disconnect the USB device, I keep on getting “The device ‘Generic volume’ cannot be stopped right now. Try stopping the device again later.” message, what should I do?
Answer:
Close any program that might be accessing data on the player, including Windows® Explorer. If it does not work, close all programs and wait for another 20 seconds, then try the green arrow icon again. If it still does not work, you should shut down the player and disconnect the USB cable.
Question 3. I find new file names and folder names that I never created before or they have strange gibberish names.
Answer:
Most likely, the player's file allocation table (FAT) has been corrupted. This might be due to the player shutting down (due to low battery power) while reading or writing to your computer by the USB connection. Windows and Macintosh often write extra files to the hard disk such as finder.def or System volume info. These are normal and will not do any harm to the player.
Question 4. I used my player to transfer files back and forth between different computers. Will defragmenting the player hard disk do any harm to it?
Answer:
Defragmenting the player hard disk may be useful after having transferred many files to and from the player. It is never harmful to use the defragment on the player. Make sure no other programs are running while using the Windows® defragment utility. Make sure you have connected the player with the external power adapter during this procedure.
Question 5. My files have disappeared from the player.
Answer:
Make sure that you browse your files via the correct Browser mode which means correct filtered views such as Photos, Music, or Movies.
Question 6. Why do some supported photo formats, cannot be shown in the photo function?
Answer:
In the JPEG format there are different modes. The player doesn't support all the modes. So you have to change your photo format first as follow:
(1) Use Photoshop to open the photo;
(2) Choose "File" then "save as" from the menu, as the picture on the left hand side shows, select the picture format as JPEG, input the file name and click the "save" icon;
(3) After click on the "save" icon, a new window will appear as the picture on the right hand side shows, select "Baseline (standard)" or "Baseline optimized";
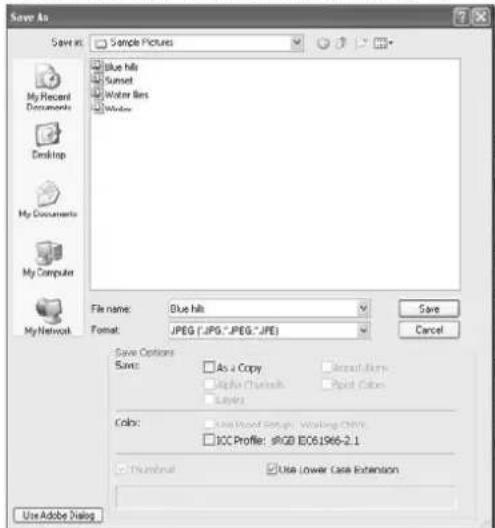
text_image
Save As Sample Pictures Blue hits Sunset Water Bars Window File name: Blue hits Format: JPEG ("JPG","JPEG","JPE) Save Cancel Save Options Save: □ As a Copy □ Insert them □ Alpha Channels □ Print Colors Layers Colors: □ Save Image Color: Washing Chrom: □ ICC Profile: sRGB ISO8.1966-2.1 □ Thumbnail □ Use Lower Case Extension Use Adobe Dialog
text_image
JPEG Options Matte: None Image Options Quality: 10 Maximum small file Large file Format Options ○ Baseline ("Standard") ○ Baseline Optimized ○ Progressive Scan: 3 Size ~59.97K / 10.5Ks 56.6Kbps CK Cancel Preview(4) Click the "OK" icon.
Question 7. During power on, why does the TV will have a short flashing, blue screen or screensaver?
Answer:
This is normal, when the system initializes, it will setup the corresponding parameters so it can output the correct video signal to the TV, during the initializing time, the TV will receive incorrect signals or the signals will not be stable and will cause the TV screen to flash, some TV's will treat this as no signal, and will display a blue screen or screensaver.
Question 8. Why when I switch to Y/Pb/Pr 480P, 576P, 720P, 1080I, does the TV screen display an unwatchable picture?
Answer:
Please check if your TV supports Y/Pb/Pr 480P, 576P, 720P, 1080I output, if your TV does not support, please use the A/V signal display instead, press the TV SYSYEM button on the remote control, then switch the TV's video input to NTSC or PAL.
Question 9. Why is there no sound on movie or music playback when using Y/Pb/Pr component output?
Answer:
Y/Pb/Pr output is a video output only, and does not include sound signals, when using Y/Pb/Pr output, please plug the A/V OUT or the S/PDIF jack to output sound.
Question10. Why couldn't the player find the hard disc?
Answer:
Make sure the firmware is installed correctly, and no system partitions on the HDD were deleted. If hard disc failure occurs, please backup your data and reinstall the firmware.
Question11. Some functions like recording, time shift etc. do not work. What should I do?
Answer:
If you find some functions do not work properly on the player, please change system settings to the default (Refer to 6.6 for changing system settings).
Question12. While playing movies in the multimedia partition, buttons like PREV, NEXT, A-B, etc. sometimes could not be used.
Answer:
The above functions are designed for recorded video titles and IFO (DVD) files only.
14.3 Copyrights and Trademarks
Copyrights
All rights reserved. No part of this manual may be reproduced, stored in a retrieval system, or transmitted in any form or by any means, electronic, mechanical, photocopying, recording or otherwise, without the prior written permission from the copyright holder.
According to copyright law, no recorded data may be used for purposes other than personal enjoyment without permission from the copyright holder.
Trademarks
Microsoft and Windows are registered trademarks of Microsoft Corporation.
All other trademarks are property of their respective holders.
14.4 Warranty
What your warranty does not cover:
-Acts of nature, such as fire, static discharge.
-Damage from unauthorized repair, alteration or accident.
-Damage from misuse or neglect.
-Loss of customer's software, firmware, information, or memory data.
-Improper handling or installation.
-A unit that has been modified or incorporated into other products or is used for institutional or other commercial purposes.
For complete information regarding EMTEC Movie Cube warranty and customer support please visit our website: www.emtec-international.com