
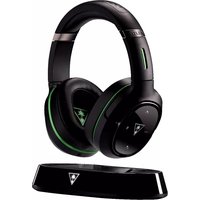
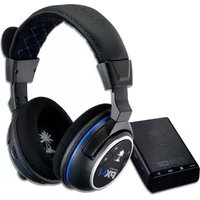
Ear Force X42 - Headset TURTLE BEACH - Free user manual and instructions
Find the device manual for free Ear Force X42 TURTLE BEACH in PDF.

| Product Type | Wireless Gaming Headset |
| Brand | Turtle Beach |
| Model | Ear Force X42 |
| Platform Compatibility | Xbox 360 |
| Wireless Technology | Dual-Band WiFi RF (2.4GHz / 5GHz) |
| Wireless Range | Up to 30 feet (9.1 meters) |
| Surround Sound | Dolby Digital 5.1 |
| Speaker Size | 50mm with neodymium magnets |
| Frequency Response (Audio) | 20Hz - 20kHz |
| Sound Pressure Level | >120dB @ 1kHz |
| Microphone Type | Removable condenser microphone |
| Microphone Frequency Response | 50Hz - 15kHz |
| Headphone Amplifier | Stereo 27mW/ch, THD <1% |
| Power Source (Headset) | 2 x AAA batteries (alkaline or NiMH rechargeable) |
| Battery Life | Up to 15 hours |
| Auto Shutoff | After approx. 5 minutes of no audio or carrier loss |
| Transmitter Audio Inputs | Optical TOSLINK digital, 3.5mm analog |
| Transmitter Audio Output | Optical TOSLINK pass-through |
| Transmitter Power | USB (5V DC @ 350mA max) |
| EQ Presets | 4: Flat, Bass Boost, Treble Boost, Bass & Treble Boost |
| Chat Boost | Dynamic talkback expander |
| Surround Sound Angles | 6 presets for virtual speaker positioning |
| Accessories Included | Transmitter, optical cable, talkback cable, AAA batteries, sticker |
| Safety Warning | Risk of hearing damage at high volumes; use moderate levels |
Frequently Asked Questions - Ear Force X42 TURTLE BEACH
User questions about Ear Force X42 TURTLE BEACH
0 question about this device. Answer the ones you know or ask your own.
Ask a new question about this device
Download the instructions for your Headset in PDF format for free! Find your manual Ear Force X42 - TURTLE BEACH and take your electronic device back in hand. On this page are published all the documents necessary for the use of your device. Ear Force X42 by TURTLE BEACH.
USER MANUAL Ear Force X42 TURTLE BEACH
natural_image
Black and white R3G Headsets with green accent, displayed against a green abstract background (no text or symbols visible)User Guide


What's in the Box

natural_image
Line drawing of a pair of hardcover headphones with earplands (no text or symbols)X42 Headset with Removable Microphone

natural_image
Simple line drawing of a medical or electrical device with no text, numbers, or symbolsXbox 360 Talkback Cable

(2) AAA Batteries

X42 Wireless Digital RF Transmitter

natural_image
Coiled black cable with two connectors at the ends (no text or symbols)Digital Optical Cable

Turtle Beach Sticker
Table of Contents
| X42 Headset pg 1 |
| X42 TransmitterOverview pg 2Using the Transmitter pg 3 |
| Pairing the Headset and Transmitter pg 4 |
| SetupXbox 360® pg 5Home Theater pg 10Digital Music Players pg 11 |
| Dolby® Digital Processing pg 12 |
| Surround Sound Angles pg 13 |
| Effects (EQ) Presets pg 14 |
| Chat BoostTM pg 14 |
| Technical Specifications pg 15 |
| Troubleshooting pg 16 |
Important Safety Information
X42 Headset


natural_image
Technical line drawing of a mechanical device with a labeled component (7), no text or symbols present.① Power Button: To turn on the headset, press and hold the power button for a couple of seconds, then release. You will hear 2 beeps and the power LED should start flashing. Turn off the headset by pressing the button until the LED stays on and you hear 2 beeps, then release. To enter Pairing Mode, power off the headset, then press and hold the power button for about 6 seconds until you hear the second double beep and the LED begins to flash rapidly (see pg 4). The headset will turn off after several minutes if there's no audio detected or if the transmitter is turned off.
② Xbox Controller Jack: Insert the straight connector on the Talkback Cable here. (see pg. 8)
③ Effects Button: Press this button to activate the different EQ presets. A beep will indicate which preset is selected. (see pg. 14)
④ Game Volume: Turn to adjust the game sound level. The Xbox LIVE chat volume may be independently set by the volume control on the Talkback Cable.
⑤ Power LED: Flashes about once per second when power is on. Flashes quickly (twice per second) when in Pairing Mode (see pg. 4).
⑥ Microphone jack: Insert the removable mic boom here. The jack is notched to prevent the boom from rotating after insertion.
⑦ To properly position the mic: To properly position the mic: Remove the foam cover, then insert the boom into the jack so the holes on the mic casing are facing your mouth. Then replace the foam cover. The boom plug also has a marker to indicate the proper mic position.
X42 Transmitter


① Digital Input LED: This LED turns on when a digital input signal is detected. When this LED is ON, the analog input is turned off.
② Surround Sound LED: The LED will light whenever the digital input is being processed by the surround sound decoder.
③ Dolby Digital LED: The LED will light whenever a Dolby Digital encoded signal is detected on the digital input.
4 Power/Link LED: The LED is on solid when the transmitter is communicating with the headset. A slowly pulsing LED indicates that the transmitter can't communicate with the headset. This could happen when the headset is turned off, out of range or not paired with the transmitter. (see pgs. 3-4)
5 Digital Input and Output: Connect the digital input to the Xbox 360 digital output using the included digital optical cable. The digital input is passed through to the digital output so you can connect the X42 transmitter and your home theater system to hear the Xbox sound on the headset and speakers at the same time. When a digital signal is detected by the optical input, the Digital Input LED will be lit.
⑥ Analog Input Jack: Provides a 3.5 mm input for digital music players or additional audio sources. (3.5 mm cable sold separately)
NOTE: The analog input is deactivated whenever a digital input is active, so both the digital and analog inputs cannot be used at the same time.
⑦ Pair Button: Press and hold to activate pairing mode. (See pg. 4)
⑧ Surround Sound Angles Button: Press to select different HRTF surround angles. (See pg. 13)
⑨ Surround Sound On/Off Button: Pressing this button toggles between surround sound and stereo sound. When surround sound is active, the Surround Sound LED will be lit.
Basic Stereo Mode: Downmixes the audio to stereo and disables all audio effects. To enter Basic Stereo Mode, press and hold Surround ON/OFF + Speaker Angles while powering on the transmitter.
Using the Transmitter
Transmitter Range
The transmitter sends game audio from your Xbox 360 ^ to the headset via digital radio frequency (RF) signal, so a direct line of sight is not required. When you're out of range, you may hear popping or clicking sounds if the headset loses the RF signal. For best performance, place the transmitter in an open area that is unobstructed by objects that might absorb RF signals from the internal antenna. Avoid placing it on a metal surface, such as the top of a home theater A/V receiver.

Range up to 30 ft.
Dual-Band WiFi
The X42 uses advanced “Dual-Band WiFi” radio technology to help eliminate interference with additional wireless devices and WiFi networks. The Dual-Band radio uses either 5 GHz and 2.4 GHz signals to transmit high fidelity digital audio and help eliminate interference with other wireless devices. Unlike the RF technology used in most other wireless headsets, this Dual-Band WiFi radio technology coexists with wireless networks for optimum performance.

Pairing the Headset and Transmitter
The headset and transmitter in this package are “paired”, which means they’re synchronized to ensure they work together. When the headset and transmitter are communicating, the POWER LED on the front panel of the transmitter will be on solid. If this LED is instead pulsing slowly, it means the transmitter can’t communicate with the headset. This could happen if the headset is turned off or out of range. If the LED is pulsing slowly when the headset is on and within range, then they might need to be “paired” as described below.
The headset and transmitter are paired out of the box, so the following instructions are necessary only if pairing appears to have been lost.


- Make sure the headset and transmitter are turned off and they are at least 2 feet away from each other.
- Power on the transmitter by connecting it to a free USB port on your gaming console. Then press and hold the PAIR button on the transmitter for about 5 seconds. Release the PAIR button when the transmitter's Power/Link LED begins to flash rapidly (twice per second). NOTE: If you hold the transmitter's PAIR button for too long (over 20 seconds), the light will blink extremely quickly, and you will need to start over from step 1.
-
Press and hold the headset Power button for about 6 seconds until you hear the second double beep, then release the Power button. At this point, the headset LED will flash rapidly (twice per second).
-
Wait for the headset and transmitter to pair. This process could take up to 30 seconds.
If pairing is successful, the Power/Link LED on the transmitter should be on solid and the headset LED should be flashing about once per second, indicating that the units are paired.
If pairing fails, repeat steps 1-4. It may take up to 5 attempts to pair successfully.
NOTE: Only one headset can be paired with the transmitter. If you pair two headsets with the same transmitter, they'll interfere with each other as they compete for the transmitter RF signal. This will cause one headset to shut off. So don't try to pair two headsets with the same transmitter!
Xbox 360® Setup
Xbox 360 (Newer Models)
- Connect the Digital Optical Cable
NOTE: Remove the protective caps from each end of the optical cable before inserting it into the jacks.
- Connect the Transmitter Power

Xbox 360 (Older Models)\*
- Connect the Digital Optical Cable*
(Requires Xbox 360 Audio Adapter, sold separately)
NOTE: Remove the protective caps from each end of the optical cable before inserting it into the jacks.
- Connect the Transmitter Power

* Xbox 360 Audio Adapter required (sold separately, available on Turtle Beach.com). If your HDTV has an optical AUDIO OUT jack, you can use it to connect the optical cable to the transmitter.
- Insert the Headset Batteries as shown:
Right Ear Cup:
To remove the battery cover, slide downward.
CAUTION: Be sure to insert batteries as shown.

- Turn on the headset by pressing and holding the power button until you hear a tone, then release.

- Insert the Microphone Boom:
Insert the boom so that the holes in the mic casing and the marker on the plug are facing your mouth.

Ear Force HD Audio Converter Setup

flowchart
graph TD
    A["FRONT"] -->|to HDMI IN port| B["HDMI"]
    C["*Ear Force HD Audio Converter"] --> D["TV"]
    D -->|to HDMI OUT port to Optical| E["HDMI Cable"]
    F["BACK"] --> G["OUT jack"]
    G --> H["to DIGITAL IN jack"]
    I["Wall Plug"] --> J["to DIGITAL IN jack"]
    K["Wall Outlet"] --> L["IN-DIGITAL-OUT ANALOG"]
    M["Xbox 360 E Console"] --> N["HDMI"]
    N --> O["USB"]
*Ear Force HD Audio Converter is available for purchase at Turtlebeach.com/HDAC
Xbox 360® Chat Setup
- Insert the right angle plug into the headphone jack on the Xbox 360 controller.
- Insert the straight plug into the controller jack on the left ear cup of the headset.

Configure Xbox 360® Settings
- From the Xbox 360 Dashboard, go to Settings > System Settings > Console Settings > Audio > Digital Output.
Set "Digital Output" to "Dolby Digital 5.1".

- From the Xbox 360 Dashboard, go to Settings > Preferences > Voice.
Set Voice Volume to 10, set Game Volume to 10, and set "Voice Output" to "Play Through Headset".

Home Theater Setup
Setting up the transmitter as illustrated below lets you listen to your console or TV with the X42 headset. You can also hear your console on your home theater speakers without disconnecting the optical cable from the transmitter.
Connecting the X42 transmitter digital output to your home theater system will pass your console's game audio from the transmitter's digital input to the home theater A/V receiver digital input, so you can hear the game audio on your X42 headset and your surround sound speakers at the same time. To hear the game audio only on the X42 headset, turn down or mute your speakers.
NOTE: Whenever a DIGITAL INPUT is detected, the ANALOG INPUT is turned OFF. So if you have your TV plugged into the ANALOG IN jack, you won't hear it if your Xbox is transmitting digital audio to the transmitter.

flowchart
graph TD
    A["Device"] -->|Transmitter Digital Out| B["Optional 3.5 mm to RCA Cable (sold separately)"]
    A -->|Digital OUT| C["Additional Digital Optical Cable (sold separately)"]
    A -->|Digital Optical Cable (included)| D["Home Theater Digital In"]
    A -->|USB Power Cable (included)| E["USB Power Cable (included)"]
Connecting a Digital Music Player
The X42 features an analog input for connecting digital music players or other analog sources. The Analog Input volume can be adjusted directly from the digital music player or analog source.
NOTE: The Analog Input is deactivated whenever a digital input is active, so both the digital and analog inputs cannot be used at the same time.

Dolby® Digital Processing
The X42 uses Dolby Digital 5.1 surround processing technology – the industry-standard format for encoding multi-channel game audio. Dolby Digital processing recreates 5.1 channel surround sound using the X42 headset so you can hear the sound all around you, as if you were listening to a 5.1 speaker system.

natural_image
Illustration of a person wearing headphones with two speakers nearby (no text or symbols)Stereo Sound Field

natural_image
Diagram of a human head with headphones surrounded by six speakers (no text or symbols)Sound field with Dolby® Digital 5.1 Surround Sound Processing
Here's how the Dolby Digital mode operates:
- When the digital input signal is active, the Digital Input LED turns on and the analog inputs are turned off.
- If the Surround LED is ON, surround sound processing is activated. If the LED is OFF, surround sound processing is deactivated and the signal will be heard as stereo.
- If a Dolby Digital encoded signal is detected by the digital input, the front LED turns on and Dolby Digital processes the channels to create surround sound in the headset. The surround sound must be turned on to enable the Dolby Digital processing.

Surround Sound Angles
The X42 allows you to alter the virtual positioning of the Front and Surround speakers for the best surround sound experience. Press the Surround Angles Button on the transmitter to cycle through 6 different presets, as illustrated below:

Surround Sound Angle Presets:

flowchart
graph TD
    A["User"] --> B["RR 105°"]
    A --> C["RL 105°"]
    A --> D["FR 30°"]
    A --> E["FL 30°"]

flowchart
graph TD
    A["Head"] --> B["RR 120°"]
    A --> C["RL 120°"]
    A --> D["FR 45°"]
    A --> E["FL 45°"]

flowchart
graph TD
    A["User Head"] --> B["RR"]
    A --> C["RL"]
    A --> D["FR"]
    A --> E["FL"]
    style A fill:#f9f,stroke:#333
    style B fill:#ccf,stroke:#333
    style C fill:#ccf,stroke:#333
    style D fill:#cfc,stroke:#333
    style E fill:#cfc,stroke:#333
○ Front Angle; 45 degrees
Rear Angle; 120 degrees
○ Front Angle; 45 degrees
Rear Angle; 135 degrees
⑫ Front Angle; 30 degrees
Rear Angle; 105 degrees

flowchart
graph TD
    A["User Head"] -->|120°| B["RR"]
    A -->|60°| C["FR"]
    A -->|120°| D["RL"]
    A -->|60°| E["Mobile Device"]


45 Front Angle; 60 degrees Rear Angle; 120 degrees
○ Front Angle; 60 degrees
Rear Angle; 135 degrees
○ Front Angle; 60 degrees
Rear Angle; 150 degrees

The transmitter's LEDs will blink the same number of times as the preset selected.
The X42 features multiple Equalizer presets to enhance your gaming audio experience. Press the Effects button on the X42 headset to cycle through the EQ presets as illustrated below:
- Flat
- Bass Boost
- Treble Boost
- Bass and Treble Boost

Press the Effects Button to cycle through the EQ Presets
Chat Boost™
Chat Boost is a dynamic talkback expander built into the X42 headset that automatically increases chat volume during loud moments in your game, so you can always hear your teammates or other players, regardless of the game volume.
Typically, if you turn up a headset's game volume, the incoming chat level from other players could become difficult to hear over the game sound. However, with Chat Boost, as the game audio increases, the chat volume also increases. When the game volume quiets down again, Chat Boost automatically returns the chat level to your original volume setting.
To properly set the Chat Boost function:
- Turn down the volume control on the headset so there's no game audio.
- Adjust the volume control on the Talkback Cable so you can hear the chat voices at a comfortable level.
- Turn up the headset game volume and the chat volume will increase whenever the game gets louder, just as if the talkback volume control is being automatically turned up along with the game level. Note that if the volume on the Talkback Cable is set too loud, Chat Boost might increase the volume so much that the voices will distort. If that happens, turn down the talkback volume on the Talkback Cable.
X42 Headset Technical Specifications
- 50mm diameter speakers with neodymium magnets
· Game audio frequency response: 20Hz - 20kHz, >120dB SPL @ 1kHz - Condenser microphone frequency response: 50Hz - 15kHz
· Game audio Dual Band Digital 2.4GHz/5GHz RF wireless reception - Headphone amplifier: Stereo 27mW/ch, THD <1%
- Operates on (2) AAA batteries or (2) AAA rechargeable NiMH batteries
· Automatic shut down after approx 5 minutes of carrier loss or audio silence to conserve battery power - Battery booster circuit extends battery life for up to 15 hours
X42 Transmitter Technical Specifications
· Dual Band Digital 2.4GHz/5GHz RF wireless transmission with up to 30 foot range
· Frequency response: 20Hz - 20kHz
· Optical TOSLINK digital audio input compatible with 48kHz digital audio stream
· Optical TOSLINK digital audio output pass-through of digital input stream
- Stereo 3.5mm analog input jack
• Maximum analog input level: 2Vpp (700mV rms)
- USB Power – (5V DC @ 350mA max)
Troubleshooting
No sound
- Check that the headset volume control is turned up.
- Check that the transmitter power and optical cables are properly connected.
- Check that the headset is powered on. The LED on the left ear cup should be flashing.
- Check if the Power LED on the transmitter is on solid. If the LED is slowly pulsing, it indicates that the transmitter isn't communicating with the headset. If the headset is on solid and the transmitter LED is slowly pulsing, then the headset and transmitter need to be "paired" as described in the section "Pairing the Headset and Transmitter" (see pg 4).
Audio Drops, Popping or Clicking Sounds
Audio dropouts, popping or clicking sounds on the headset are caused by poor reception. This can occur when:
- The headset and transmitter are out of range. For best performance, move within 20 feet from the transmitter.
- There's a wall or other large object between the headset and transmitter.
- The transmitter is in a bad location that is interfering with the antenna.
- A wireless base station or wireless LAN are causing a lot of RF activity that's blocking the RF signal from the transmitter. The transmitter should be moved at least 5 feet away from a wireless router or gaming console.
Voice Chat Drops
- Most in-game voice chat drops are simply caused by network performance or "lag". Usually they subside after a few moments so please be patient. In extreme cases, you may have to leave a game and return to reset the chat function.
- If you use a wireless internet connection, low signal strength from your modem/router can make the voice chat malfunction. A wired connection from your modem/router to your console is recommended for best results.
Safety Notice
To avoid potential damage to the device, always disconnect all cables before transporting it.
WARNING: Permanent hearing damage can occur if a headset is used at high volumes for extended periods of time, so it is important to keep the volume at a safe level. Over time, your ears adapt to loud volume levels, so a level that may not cause initial discomfort can still damage your hearing. If you experience ringing in your ears after listening with the headset, it means the volume is set too loud. The louder the volume is set, the less time it takes to affect your hearing. So, please take care to listen at moderate levels.
- Before placing a headset on your ears, turn the volume down completely, then slowly increase it to a comfortable level.
- Turn down the volume if you can't hear people speaking near you.
- Avoid turning up the volume to block out noisy surroundings.
EC Declaration of Conformity
Manufacturer: Voyetra Turtle Beach
Manufacturers Address: 100 Summit Lake Drive, Suite 100, Valhalla, NY 10595
Product Name: Ear Force X42
Type of Product: Wireless Headset
Model Number(s): TBS-2270-01
Year of Manufacture: 2011
We, Voyetra Turtle Beach, Inc. of Elmsford, New York, declare under our own responsibility that the above-referenced product complies with the following directives and standards:
Low Voltage Directive 2006/95/EC
EN 50332-2:2003
EN 60950-1:2006+A11:2009
Electromagnetic Compatibility Directive 1999/5/EC
ESTI EN 301 489-1 V1.8.1 (2008)
ESTI EN 301 489-3 V1.4.1 (2002)
ESTI EN 301 489-17 V2.1.1 (2009)
R&TTE Directive 1999/5/EC
ESTI EN 300 328 V1.7.1 (2006-10)
ESTI EN 300 440-1 V1.4.1 (2008-05)
ESTI EN 300 440-2 V1.2.1 (2008-05)
All test reports have been reviewed and approved with a Positive Opinion from the following Notified Bodies:
Bay Area Compliance Laboratories, Corp (Shenzhen)
6/F, the 3rd Phase of WanLi Industrial Building
ShiHua Road, FuTian Free Trade Zone, Shenzhen, Guangdong, China
Tel: +86-755-33320018, Fax: +86-755-33320008, Web: bacIcorp.com
Shenzhen EBO Technology Co., Ltd.
No. 710 Yihua Building, Futian District, Shenzhen, China 518040
Tel: +86-755-29451282 Fax: 86-755-83709189 Web: ebotek.cn
The technical documentation required by this Directive is maintained at the corporate headquarters of Voyetra Turtle Beach, 100 Summit Lake Drive, Suite 100, Valhalla, NY 10595.
Authorized Person:

Printed Name: Frederick Romano
Title: Executive Vice President
Date: 11/17/11
FCC Declaration of Conformity
Product Name: Ear Force X42
Model Number(s): TBS-2270-01
FCC Rules:
FCC CFR Title 47 Part 15 Subpart B: 2009 CLASS B
FCC CFR Title 47 Part 15 Subpart C: 2008
Operating Environment: GENERAL OFFICE AND HOME USE
FCC COMPLIANT STATEMENT
This device complies with part 15 of the FCC rules. Operation is subjected to the following conditions:
(1) This device may not cause harmful interference, and
(2) This device must accept any interference received including interference that may cause undesired operation.
INFORMATION TO USER
This equipment has been tested and found to comply with the limits for a Class B digital device, pursuant to Part 15 of FCC rules. These limits are designed to provide reasonable protection against harmful interference in a residential installation. This equipment generates, uses and can radiate radio frequency energy and, if not installed and used in accordance with the instructions, may cause harmful interference to radio communications. However, there is no guarantee that interference will not occur in a particular installation. If this equipment does cause harmful interference to radio or television reception, which can be determined by turning the equipment off and on, the user is encouraged to try to correct the interference by one or more of the following measures:
1) Reorient or relocate the receiving antenna.
2) Increase the separation between the equipment and receiver.
3) Connect the equipment into an outlet on a circuit different from that to which the receiver is connected.
4) Consult the dealer or an experienced radio/TV technician for help.
The user's manual or instruction manual for an intention or unintentional radiator shall caution the user that the changes or modifications not expressly approved by the party responsible for compliance could void the user's authority to operate the equipment.
WARNING: Changes or modifications made to this equipment not expressly approved by VOYETRA TURTLE BEACH, INC. may void user's authority to operate this equipment.
Limited Warranty for Turtle Beach Products
Voyetra Turtle Beach, Inc. ("VTB") warrants to the original end-user purchaser ("Purchaser") that the retail Turtle Beach hardware product herein ("Product") will be free of defects in materials and workmanship for a period of one year from the date of purchase by the Purchaser ("Warranty Period"). Any Extended Warranty or Service Plans purchased through a Retail store are not honored by VTB. The Warranty refers to the repair/replacement of a defective product during this period and not a refund.
This limited warranty extends only to the Purchaser and is not transferable or assignable to any subsequent purchaser. This limited warranty is applicable only in the country or territory where the Product was purchased from an authorized VTB retailer and does not apply to a Product that has been purchased as used or refurbished (except refurbished by VTB) or was included as part of a non-VTB product.
WARRANTY SERVICE
In the USA and CANADA Warranty Service is provided by our TURTLE BEACH OFFICES and in all other Countries it is provided by our local International Distributors.
VTB does not warrant uninterrupted or error-free operation of the Product and is under no obligation to support the Product for all computer operating systems or future versions of such operating systems.
If a defect should occur during the Warranty Period, Purchaser must contact VTB to obtain a Return Merchandise Authorization ("RMA") number. Purchaser will be responsible for shipping costs incurred in returning the defective Product to an authorized VTB service center, or to the repair facility located at VTB's corporate headquarters. A copy of the dated proof of purchase and a description of the problem must be included with the defective Product. VTB will not be responsible for other products or accessories included with the defective Product sent to VTB. The RMA number must be clearly indicated on the outside of the package. Packages without an RMA number will be refused by VTB or its representatives and returned to sender at the sender's expense.
In the event of a defect, Purchaser's sole and exclusive remedy, and VTB's sole liability, is expressly limited to the correction of the defect by adjustment, repair, or replacement of the Product at VTB's sole option and expense. VTB owns all Products it has replaced and all parts removed from repaired Products. VTB uses new and reconditioned parts made by various manufacturers in performing warranty repairs and building replacement products. If VTB repairs or replaces a product, the original Warranty Period is not extended, however, VTB warrants that repaired or replacement parts will be free from defects in material and workmanship for a period of thirty (30) days from the date of repair or replacement, or for the remainder of the Warranty Period, whichever is greater.
This warranty does not apply to any Product that has had its serial number altered, removed or defaced, or any Product damage caused by shipping, improper storage, accident, problems with electrical power, abuse, misuse, neglect, ordinary wear, acts of God (e.g. flood), failure to follow directions, improper maintenance, use not in accordance with product instructions, unauthorized modification or service of the Product or damage resulting from the use of the Product with hardware, software or other products not provided by or specifically recommended by VTB.
Limited Warranty for Turtle Beach Products
THIS LIMITED WARRANTY IS PURCHASER'S SOLE AND EXCLUSIVE REMEDY AND IS IN LIEU OF ALL OTHER WARRANTIES, EXPRESS OR IMPLIED. TO THE EXTENT PERMITTED BY APPLICABLE LAW, VTB HEREBY DISCLAIMS THE APPLICABILITY OF ANY IMPLIED WARRANTY OF MERCHANTABILITY, FITNESS FOR A PARTICULAR PURPOSE OR USE FOR THE PRODUCT. IF SUCH A DISCLAIMER IS PROHIBITED BY APPLICABLE LAW, THE IMPLIED WARRANTY IS LIMITED TO THE DURATION OF THE FOREGOING LIMITED WRITTEN WARRANTY.
IN NO EVENT SHALL VTB BE LIABLE FOR ANY INDIRECT, INCIDENTAL, SPECIAL, PUNITIVE OR CONSEQUENTIAL DAMAGES, OR DAMAGES, INCLUDING BUT NOT LIMITED TO ANY LOST PROFITS, DATA, OR LOSS OF USE, ANY THIRD PARTY CLAIMS, AND ANY INJURY TO PROPERTY OR BODILY INJURY (INCLUDING DEATH) TO ANY PERSON, ARISING FROM OR RELATING TO THE USE OF THIS PRODUCT OR ARISING FROM BREACH OF THE WARRANTY, BREACH OF CONTRACT, NEGLIGENCE, TORT, OR STRICT LIABILITY, EVEN IF VTB HAS BEEN ADVISED OF THE POSSIBILITY OF SUCH DAMAGES.
This warranty supersedes all prior agreements or understandings, oral or written, relating to the Product, and no representation, promise or condition not contained herein will modify these terms. Some states do not allow the exclusion or limitation of incidental or consequential damages, so the above exclusion or limitation may not apply to you. This warranty gives you specific legal rights. You may also have other rights, which vary from state to state. Any action or lawsuit for breach of warranty must be commenced within eighteen (18) months following the purchase of the Product.
EXCLUSIONS FROM LIMITED WARRANTY:
This Limited Warranty shall not apply and VTB has no liability under this Limited Warranty if the Turtle Beach Product:
- is used for commercial purposes such as "LAN Centers" (including rental or lease);
• is modified or tampered with; - is damaged by Acts of God, power surge, misuse, abuse, negligence, accident, wear and tear, mishandling, misapplication, or other causes unrelated to defective materials or workmanship;
- serial number is defaced, altered or removed;
- is not used in accordance with the documentation and use instructions; or
- is repaired, modified or altered by other than authorized repair centers.
- product is no longer available because it was discarded.
Warranty Service for Purchases in Australia
If a defect should occur during the Warranty Period in Australia, the following procedures apply,
To make a warranty claim, Purchaser should contact VTB's Australian distributor whose contact details are as follows:
Q V SOFTWARE INTERNATIONAL LTD
PO Box 6567
Silverwater
NSW
2128
Australia
Phone: +61 2 9748 2555
E-Mail: tbsupport@qvsoftware.com.au
QV is responsible for servicing of warranty claims for purchases made in Australia. Purchaser will bear the expense of sending the Product back to the Australian distributor to claim the Warranty.
Our goods come with guarantees, additional to this Warranty, that cannot be excluded under the Australian Consumer Law. You are entitled to a replacement or refund for a major failure and for compensation for any other reasonably foreseeable loss or damage. You are also entitled to have the goods repaired or replaced if the goods fail to be of acceptable quality and the failure does not amount to a major failure. To the fullest extent permitted by law VTB's liability under this Warranty and any other statutory guarantees imposed at law is expressly limited to the replacement of the Product or the supply of equivalent Product, the payment of the cost of replacing the Product or of acquiring an equivalent product, or the repair of the Product or payment of the cost of having the Product repaired, at the discretion of VTB.
VTB is the maker of this warranty. VTB's contact details are:
Voyetra Turtle Beach, Inc.
100 Summit Lake Drive, Suite 100
Valhalla, NY 10595
United States
Phone: (914) 345-2255
E-Mail: support@turtlebeach.com
Federal Communications Commission Interference Statement
This equipment has been tested and found to comply with the limits for a Class B digital device, pursuant to part 15 of the FCC Rules. These limits are designed to provide reasonable protection against harmful interference in a residential installation. This equipment generates, uses and can radiate radio frequency energy and, if not installed and used in accordance with the instructions, may cause harmful interference to radio communications. However, there is no guarantee that interference will not occur in a particular installation. If this equipment does cause harmful interference to radio or television reception, which can be determined by turning the equipment off and on, the user is encouraged to try to correct the interference by one or more of the following measures:
• Reorient or relocate the receiving antenna.
- Increase the separation between the equipment and receiver.
- Connect the equipment into an outlet on a circuit different from that to which the receiver is connected.
- Consult the dealer or an experienced radio/ TV technician for help.
FCC Caution:
Any changes or modifications not expressly approved by the grantee of this device could void the user's authority to operate the equipment.
RF Exposure Warning:
Headset:
The equipment complies with FCC RF exposure limits set forth for an uncontrolled environment. The equipment must not be co-located or operating in conjunction with any other antenna or transmitter.
Transmitter Box:
This equipment must be installed and operated in accordance with provided instructions and the antenna(s) used for this transmitter must be installed to provide a separation distance of at least 20 cm from all persons and must not be co-located or operating in conjunction with any other antenna or transmitter. End-users and installers must be provide with antenna installation instructions and transmitter operating conditions for satisfying RF exposure compliance.
CANADA, INDUSTRY CANADA (IC) NOTICES
This Class B digital apparatus complies with Canadian ICES-003 and RSS-210. Operation is subject to the following two conditions: (1) this device may not cause interference, and (2) this device must accept any interference, including interference that may cause undesired operation of the device.
Radio Frequency (RF) Exposure Information:
Headset:
The radiated output power of the Wireless Device is below the Industry Canada (IC) radio frequency exposure limits. The Wireless Device should be used in such a manner such that the potential for human contact during normal operation is minimized. This device has also been evaluated and shown compliant with the IC RF Exposure limits under portable exposure conditions. (antennas are less than 20 cm of a person's body).
Transmitter:
The radiated output power of the Wireless Device is below the Industry Canada (IC) radio frequency exposure limits. The Wireless Device should be used in such a manner such that the potential for human contact during normal operation is minimized. This device has also been evaluated and shown compliant with the IC RF Exposure limits under mobile exposure conditions. (antennas are greater than 20cm from a person's body).
This device has been certified for use in Canada. Status of the listing in the Industry Canada's REL (Radio Equipment List) can be found at the following web address: http://www.ic.gc.ca/app/sitt/reltel/srch/nwRdSrch.do?lang=eng
Additional Canadian information on RF exposure also can be found at the following web address: http://www.ic.gc.ca/eic/site/smt-gst.nsf/eng/sf08792.html
Canada, avis d'Industry Canada (IC)
This product is CE marked according to the provisions of the Low Voltage Directive (2006/95/EC), R&TTE Directive (1999/5/EC) and EMC Directive (1999/5/EC).
Frequency Range: 2.404-2.476GHz / 5.160-5.340GHz
- Grantee Code/Reg Number: XGB/GC229855 • Voyetra Turtle Beach, Inc.

IC: 3879A-2270
IC: 3879A-2271
DESIGNED AND ENGINEERED BY TURTLE BEACH IN NEW YORK, USA
Copyright © 2012 Voyetra Turtle Beach, Inc. (VTB, Inc.) All rights reserved. No part of this guide may be reproduced without permission. Turtle Beach, the Turtle Beach Logo, Voyetra, Ear Force, Chat Boost, Engineered For Gaming and the Dual Band logo are either trademarks or registered trademarks of VTB, Inc. Xbox, Xbox 360 and Xbox LIVE are registered trademarks of Microsoft Corporation. Dolby and the double-D symbol are trademarks of Dolby Laboratories. All other trademarks are properties of their respective companies and are hereby acknowledged. Assembled in China. PATENTS PENDING

TURTLE BEACH®
For more products, accessories and general product information, please visit TurtleBeach.com
For warranty information and product support, please visit TurtleBeach.com/support
Notes

natural_image
Headsets with a central electronic device against a green hexagonal background (no text or symbols visible)ENGINEERED FOR GAMING™
Join The Conversation


TURTLEBEACH.COM


- What's in the Box
- X42 Headset
- X42 Transmitter
- Using the Transmitter
- Transmitter Range
- Dual-Band WiFi
- Pairing the Headset and Transmitter
- Xbox 360® Setup
- Xbox 360 (Newer Models)
- Xbox 360 (Older Models)\*
- Right Ear Cup:
- Ear Force HD Audio Converter Setup
- Xbox 360® Chat Setup
- Configure Xbox 360® Settings
- Home Theater Setup
- Connecting a Digital Music Player
- Dolby® Digital Processing
- Surround Sound Angles
- Chat Boost™
- To properly set the Chat Boost function:
- X42 Headset Technical Specifications
- X42 Transmitter Technical Specifications
- Troubleshooting
- No sound
- Audio Drops, Popping or Clicking Sounds
- Voice Chat Drops
- Safety Notice
- EC Declaration of Conformity
- FCC Declaration of Conformity
- Operating Environment: GENERAL OFFICE AND HOME USE
- FCC COMPLIANT STATEMENT
- INFORMATION TO USER
- Limited Warranty for Turtle Beach Products
- WARRANTY SERVICE
- EXCLUSIONS FROM LIMITED WARRANTY:
- Warranty Service for Purchases in Australia
- Q V SOFTWARE INTERNATIONAL LTD
- QV is responsible for servicing of warranty claims for purchases made in Australia. Purchaser will bear the expense of sending the Product back to the Australian distributor to claim the Warranty.
- Federal Communications Commission Interference Statement
- FCC Caution:
- RF Exposure Warning:
- CANADA, INDUSTRY CANADA (IC) NOTICES
- Radio Frequency (RF) Exposure Information:
- Canada, avis d'Industry Canada (IC)
- DESIGNED AND ENGINEERED BY TURTLE BEACH IN NEW YORK, USA
- TURTLE BEACH®
- Notes
- ENGINEERED FOR GAMING™
Brand : TURTLE BEACH
Model : Ear Force X42
Category : Headset