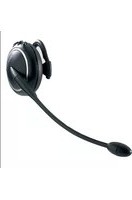
GN Netcom GN 9120 - Headset JABRA - Free user manual and instructions
Find the device manual for free GN Netcom GN 9120 JABRA in PDF.


| Product Type | Cordless headset system (base unit + headset) |
| Battery Charging Time | 1.5 hours for full charge |
| Battery Talk Time | Up to 8 hours |
| Range | Up to 100 m (depending on environment) |
| Wearing Styles | Headband and earhook (interchangeable) |
| Key Controls | Multifunction button, Volume +/-, Mute button |
| Headset Indicators | On-line (flashing), Mute (beep every 15s), Low battery (beep every 20s) |
| Base Unit Indicators | On-line, Link-up, Mute (red), Battery charging (flashing/steady) |
| Conference Mode | Up to 4 headsets (master + 3 slaves) |
| Tone Control | Normal, Bass Lift, Treble Lift |
| Volume Adjustment | Received volume (momentary press), Transmit volume (press +/- for 2 sec) |
| Telephone Termination Switch | A-G range for dial tone adjustment |
| Compatibility | Works with standard telephones with handset socket |
| Box Contents | Base unit, Headset, Headband, Earhook, Earplate, Earcushion, Base foot, Connection cord, Power adapter, User manual |
| Power Requirements | Power adapter included (specific voltage not stated) |
| Regulatory Compliance | CE marked per R&TTE Directive 99/5/EC |
| Cleaning | Earcushion and earplate: water and mild detergent |
| Battery Replacement | User-replaceable; only GN Netcom approved batteries |
| Remote Handset Lifter | Optional accessory (GN 1000 RHL) for hands-free call handling |
Frequently Asked Questions - GN Netcom GN 9120 JABRA
User questions about GN Netcom GN 9120 JABRA
0 question about this device. Answer the ones you know or ask your own.
Ask a new question about this device
Download the instructions for your Headset in PDF format for free! Find your manual GN Netcom GN 9120 - JABRA and take your electronic device back in hand. On this page are published all the documents necessary for the use of your device. GN Netcom GN 9120 by JABRA.
USER MANUAL GN Netcom GN 9120 JABRA
English - GN 9120 user guide
This user guide provides you with information and instructions on assembling, using and maintaining your GN 9120. This guide contains the following sections:
• About the GN 9120
- Assembling
• Battery charging and assembly verification
- Features and customisation
• Answering and making telephone calls
• Frequently asked questions
• Operational and safety information
Box contents:
- Base unit
1a) On-line indicator
1b) Link-up indicator
1c) Mute indicator
1d) Battery re-charge indicator
1e) Telephone Termination
Switch (back)
- Headband
- Earhook
- Earplate
- Fercushion
- Base foot
- Connection cord
-
Power adaptor
-
Headset
2a) On-line indicator
2b) Volume - button
2c) Volume + button
2d) Multifunction button

2
GN9120 contents found in old 2-3 20-11-2002, 12:29:03
Praxxis Black

About the GN 9120
The GN 9120 is a cordless headset solution, made up of a cordless headset and a base unit that is connected to your telephone. The GN 9120 gives you full mobility, hands-free convenience and superior sound quality for your telephone conversations.
Assembling
To integrate the unit to your telephone:
- Disconnect the handset cord from the telephone's handset socket and connect it to the socket marked \ on the base unit (1).
- Connect the connection cord (8) to the telephone's handset socket marked ☐.
- Connect the power adapter (9) to the socket marked Ⓞ→ at the bottom of the base unit and then connect to a power socket.
- Insert the base unit into the foot (7) and turn until secure.
- If your telephone has volume control, set the volume to the middle setting.
- Place the headset into the base unit for battery charging.
Battery charging and assembly verification
Initial battery charging
The battery in the headset is not initially charged and will require a minimum of 20 minutes of charging before use. It takes 1.5 hours before the battery is fully charged, providing up to 8 hours of talk time.
The battery charging indicator (1d) on the base unit will flash continuously during charging and will light when the battery is fully charged.
Note: The headset may become warm during battery charging. This is normal and will not affect the safety or performance of the headset.


3
Battery charging and use
When not in use, place the headset in the base unit, ensuring the link-up indicator (1b) is not lit, to charge the battery. If the link-up indicator is lit after placing the headset, remove the headset from the base unit and place it in the base again. If battery charge is too low, a beep will be heard in the headset every 20 seconds.
Note: The battery charging indicator (1d) on the base unit will flash continuously during charging and be lit when the battery is fully charged.
Assembly verification
Verify that the assembling of the product has been completed correctly. After removing the headset from the base unit, the green link-up indicator (1b) on the front of the base unit will light and the on-line indicator on the headset will fl ash.
If the green link-up indicator does not light, check the wiring connections on the base unit and ensure that the power adapter is connected. If the on-line indicator on the headset does not flash continuously, replace the headset in the base unit and remove it again.

Features and customisation
Multifunction button (2d)
The multifunction button serves several functions, depending on how long the button is pressed for.
| Functions Press momentarily Press for 2 sec Press for 6 sec | |||
| Mute x | |||
| Un-mute x | |||
| Answer/make call x | |||
| End call x | |||
| Tone control adjustment x | |||
4
GN9120 contents final.issd 4-5
Praxxis Black
Functionality of the + and - buttons (2b & 2c)
The + and - buttons serve several functions, depending on how long the button is pressed for.
Functions Press momentarily Press for 2 sec
| Volume + x | ||
| Volume - x | ||
| Transmit volume adjustment | x(+/- simultaneously) | |
| Conference mode | x(+/- simultaneously) |

Clear dial tone adjustment
In order to hear a dial tone, you must set the correct dial tone setting. Complete the following:
- Put on your headset.
- Lift the telephone's handset and listen for a dial tone in your headset.
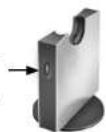
- If there is no dial tone or it is not clear, move the telephone termination switch (1e), at the rear of the base unit, along the A-G range until the dial tone is clear. If the dial tone is just as clear in position A as in position G, leave the switch in position A.
Transmit volume adjustment
Adjust the volume of transmitted sound according to personal preference.
To adjust the volume:
- Make a telephone call and ask the person you are calling to assist you.
- Press the +/- buttons on the headset simultaneously for 2 seconds. A beep will indicate when 2 seconds has passed.
- Adjust the volume level by pressing the + or - button.
- When the person you are speaking with fi nds the volume of your voice appropriate, press the +/- buttons simultaneously for 2 seconds. This setting is now stored in the headset.

5
20-11-2002, 12:29:06
Received sound volume adjustment
Adjust the volume of received sound according to personal preference. To adjust the volume:
-
Make a telephone call and ask the person you are calling to assist you.
-
Adjust the volume of the received sound by pressing the + or - button. This setting is now stored in the headset.
Note: When the volume reaches maximum or minimum, you will hear a beep in your headset. The product will save the set volume in its memory.
Tone control adjustment
Select the tone (Normal, Bass Lift or Treble Lift) according to personal preference. To select the tone:
- Make a telephone call and ask the person you are calling to assist you.
- Press the multifunction button for 6 seconds. A beep will indicate when 6 seconds has passed.
- Press the volume + or - button to toggle between the 3 sound modes.
- When the desired sound mode is reached, exit the sound mode adjustment by pressing the multifunction button momentarily.
Positioning of microphone
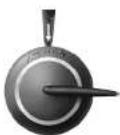
Adjust the boomarm of your headset so that the microphone is positioned in the direction of your mouth, as close as possible to your mouth.
Muting the microphone
To mute and un-mute the microphone, press the multifunction button momentarily. You are still able to hear your caller, but your voice will not be transmitted to the caller.
Note: When the microphone is muted, you will hear a beep every 15 seconds in your headset and the red mute indicator on the base unit will light.


Wearing styles: headband and earhook
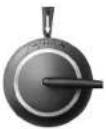
The wearing style of your headset may be changed by attaching a headband (3) or earhook (4).
To remove a wearing style from your headset
- Remove the earcushion (5+6) from the headset receiver (headband version only).
- Hold the headband/earhook with one hand and the headset receiver in the other hand.
- Gently press the headset receiver's speaker with your thumb and pull the headband/earhook ring away.
To attach a headband for headband wearing style:
- Gently press the headband ring to the headset receiver until it clicks. The square knob on the headband ring will match the square hole in the headset receiver.
- Click the earcushion on to the headset receiver.
To attach an earhook for over-the-ear wearing style:
- Gently press the earhook ring to the headset receiver. The square knob on the earhook ring will match the square hole in the headset receiver.
- Attach the earhook to the earhook ring's clutch.
After attaching the earhook, you may now adjust the headset to be worn on your right or left ear, depending on personal preference. See the changing wearing ear section for instructions.
Changing wearing ear
Headband (3) wearing style.
Your headband allows you to wear your headset on your right or left ear, according to personal preference. Simply rotate the boomarm 180 degrees and your headset is ready for wearing on the other ear.
Note: The boomarm cannot be rotated a full 360 degrees. Do not force the boomarm when it cannot be rotated any further.


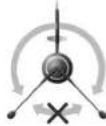
Earhook (4) wearing style.
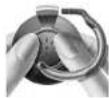
With an earhook, you can wear your headset on your right or left ear, according to personal preference. Complete the following steps:
- Rotate the boomarm 180 degrees.
Note: The boomarm cannot be rotated a full 360 degrees.
Do not force the boomarm when it cannot be rotated any further.
- Detach the earhook from the earhook clutch.
- Rotate the inner earhook ring 180 degrees.
- Insert the earhook into the earhook clutch.



Conference mode
Using the conference mode, more than one headset may be joined to a telephone conversation via the base unit. The headset you use with your base unit is the master headset.
- Lift your master headset out of the base unit.
- Initiate or answer a call. See the answering and making telephone calls section.
- During the telephone call, place an additional headset into the base unit. A beep will be heard in the master headset, after which you have 15 seconds to accept the additional headset.
- Accept the additional headset by simultaneously pressing the +/- buttons momentarily.
- An additional headset leaves the conference call by pressing its multifunction button for 2 seconds.
- The conference mode is terminated when:
- the master headset is placed in the base unit
- or the master headset's multifunction button is pressed for 2 seconds (this will end the call)
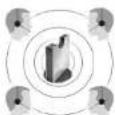

Note: Repeat steps 3-5 to add more headsets to the conference mode. Up to 4 headsets may participate in the conference mode.
Answering and making telephone calls
Answering telephone calls:
To answer a telephone ca
1. Lift the telephone's handset out of its cradle when alerted to an incoming call.
2. Remove the headset from the base unit. The link will be established and the on-line indicator (1a) on the front of the base unit will light. To end the call, place the headset in the base unit and replace the telephone's handset to its cradle.
Making telephone calls:
To make a telephone call:
1. Remove the headset from the base unit. The link will be established and the on-line indicator will light.
2. Lift the telephone's handset and listen for a dial tone in your headset.
3. Dial the desired number.
To end the call, simply lower your telephone's handset to its cradle.


Note: If you connect the telephone connection cord to your telephone's headset socket instead of the handset socket, this will enable the telephone's line button. You can now answer and end calls by pressing the line button instead of using the handset.
Answering telephone calls using the GN 1000 RHL (Remote Handset Lifter):
You may purchase a GN 1000 RHL as an accessory, which lets you answer and end telephone calls while away from your desk. Please contact your vendor or visit www.gnnetcom.com for further information.
8
[NO TEXT]
9
To answer a telephone call using the GN 1000 RHL:
- Remove the headset from the base unit when you receive a call. The link will be established and the on-line indicator (1a) on the front of the base unit will begin to flash.
Note: If you are already wearing the headset, simply press the multifunction button (2d) on the headset for more than 2 seconds to answer the incoming call.

To end the call, press the multifunction button momentarily or place the headset in the base unit.
Making telephone calls using the GN 1000 RHL (Remote Handset Lifter):
To make a telephone call using the GN 1000 RHL
1. Remove the headset from the base unit. The link will be established and the on-line indicator (1a) on the front of the base unit will begin to flash.
2. Dial the desired number
To end the call, press the multifunction button for 2 seconds or place the headset in the base unit.
Note: The connection (8) cord must be connected to your telephone's handset socket in order for the GN 1000 RHL to function.
Frequently Asked Questions
I do not hear a dial tone.
- Check that all the cords and plugs are connected correctly.
- Check that the power adapter is plugged in and has power.
- Check that the on-line indicator is lit. If it is not, place the headset in the base unit and take it out again.
- Check that the battery is fully charged. If the battery is fully charged, the battery charging indicator on the base unit will light when the headset is placed correctly in the base unit.
10 11
I hear beeps in my headset.
- A beep every 15 seconds means that the mute function is on.
- A beep every 10 seconds means that you are out of range (up to 100 m, depending on environment) of the headset's base unit. Move closer to the base unit.
- A beep every 20 seconds means that the battery charge is low and needs to be recharged.
The person I am talking to has diffi culties hearing me.
- Check that the mute function is off.
- Readjust the microphone volume.
- Check the position of the boomarm and make sure that the microphone is placed as close as possible to your mouth.
- You may be out of range (up to 100 m, depending on environment) of the headset's base unit. Move closer to the base unit.
- Static electricity may occur if your base unit is placed too close to your telephone or other electronic devices.
Operational and safety information
Read the operational and safety instructions below. These contain important information about using the product. Keep this user guide for future use.
Replacing the battery
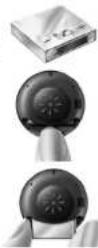
The battery provided with the product will provide you with years of use. If you need to replace the battery, complete the following:
- Remove the wearing style as previously explained.
- In the headset receiver, where the battery is located, press down the plastic tab securing the battery and pull the battery out.
- Insert a new battery into the battery compartment.
Note: Make sure that the battery is placed correctly in the headset with the + of the battery corresponding to the + indicated in the battery slot of the headset. - Re-attach the wearing style as previously explained.
Memory reset
When the battery is removed or the power adapter is unplugged (for at least a few seconds), all customised headset settings (clear dial tone, transmit volume, received sound volume and tone control) are returned to factory-set default settings.
Registering a new master headset
A new master headset may be registered to the product in case of loss or damage to the original headset. To register a new master headset, complete the following:
- Unplug the power adapter for a couple of seconds.
- Plug the power adapter back to the power socket.
- Place the new master headset into the base unit.
Cleaning and replacing parts
The earcushion and earplate may be cleaned or replaced. When cleaning, use water only and a little washing-up liquid if required.
- To clean or replace the earplate (5), fi rst remove the earplate from the headset receiver.
- To clean or replace the headset's earcushion (6), gently peel it off the earplate.
- The headset is equipped with a rechargeable battery. For replacing the battery, please read the instructions in this guide carefully. Only GN Netcom-approved batteries can be used.
No other parts can be replaced by the user.
Safety and declaration
This product is CE marked according to the provisions of the R & TTE Directive (99/5/EC). Hereby, GN Netcom as declares that this product is in compliance with the essential requirements and other relevant provisions of Directive 1999/5/EC.
Please note that this product uses radio frequency bands not harmonised within EU. Within the EU, this product is intended to be used in Austria, Belgium, Denmark, Finland, France, Germany, Greece, Ireland, Italy, Luxembourg, The Netherlands, Portugal, Spain, Sweden, United Kingdom and within EFTA in Iceland, Norway and Switzerland.
- Never try to dismantle the product yourself. None of the internal components can be replaced or repaired by users.
- Avoid exposing the product to rain or other liquids.
- The headset is equipped with a rechargeable battery. For replacement of battery, please read the instructions in this guide carefully. Only GN Netcom-approved batteries can be used.
- The headset may become warm during battery charging. This is normal and will not affect the safety or performance of the headset.
If you have any problems or questions regarding the product, please contact your vendor or go to http://www.gnnetcom.com

- ENGLISH - GN 9120 USER GUIDE
- BOX CONTENTS
- ABOUT THE GN 9120
- ASSEMBLING
- BATTERY CHARGING AND ASSEMBLY VERIFICATION
- INITIAL BATTERY CHARGING
- BATTERY CHARGING AND USE
- ASSEMBLY VERIFICATION
- FEATURES AND CUSTOMISATION
- MULTIFUNCTION BUTTON (2D)
- FUNCTIONALITY OF THE + AND - BUTTONS (2B & 2C)
- CLEAR DIAL TONE ADJUSTMENT
- TRANSMIT VOLUME ADJUSTMENT
- RECEIVED SOUND VOLUME ADJUSTMENT
- TONE CONTROL ADJUSTMENT
- POSITIONING OF MICROPHONE
- MUTING THE MICROPHONE
- WEARING STYLES: HEADBAND AND EARHOOK
- TO REMOVE A WEARING STYLE FROM YOUR HEADSET
- TO ATTACH A HEADBAND FOR HEADBAND WEARING STYLE
- TO ATTACH AN EARHOOK FOR OVER-THE-EAR WEARING STYLE
- CHANGING WEARING EAR
- CONFERENCE MODE
- ANSWERING AND MAKING TELEPHONE CALLS
- FREQUENTLY ASKED QUESTIONS
- OPERATIONAL AND SAFETY INFORMATION
- REPLACING THE BATTERY
- MEMORY RESET
- REGISTERING A NEW MASTER HEADSET
- CLEANING AND REPLACING PARTS
- SAFETY AND DECLARATION
Brand : JABRA
Model : GN Netcom GN 9120
Category : Headset