
SCFF262GRH - Freezer Accucold - Free user manual and instructions
Find the device manual for free SCFF262GRH Accucold in PDF.

| Brand | Accucold |
| Model | SCFF262GRH |
| Product Type | Freezer |
| Controller Type | Dixell XR60CX electronic thermostat |
| Temperature Range | -20.5°C to -15°C (-5°F to 5°F) |
| Default Set Point | -20°C (-4°F) |
| Refrigerant | R290 (hydrocarbon, flammable) |
| Power Supply | 115 V AC, 60 Hz |
| Recommended Fuse/Circuit Breaker | 15 amperes |
| Leveling Legs | Yes, adjustable |
| Caster Wheels | Included with handbrakes (front) |
| Door Reversal | Yes, user reversible |
| Pressure Relief Valve | Yes, included and installable |
| Defrost | Manual via DEF button; automatic drip time |
| Alarms | High temperature (HA), low temperature (LA), door open (DA) |
| Cleaning | Mild soap solution; disconnect power |
| Warranty | 1 year parts and labor; 5 years compressor (labor not included) |
| Safety Features | Child entrapment prevention, grounded plug, R290 handling precautions |
| Repairability | User may replace authorized parts; service by factory authorized personnel |
Frequently Asked Questions - SCFF262GRH Accucold
User questions about SCFF262GRH Accucold
0 question about this device. Answer the ones you know or ask your own.
Ask a new question about this device
Download the instructions for your Freezer in PDF format for free! Find your manual SCFF262GRH - Accucold and take your electronic device back in hand. On this page are published all the documents necessary for the use of your device. SCFF262GRH by Accucold.
USER MANUAL SCFF262GRH Accucold
natural_image
Two stainless steel refrigerators with transparent display cases, one open and one closed (no visible text or labels)Models:
ACR82L
SCR801G
ACR1818
SCR1802G
ACRR432L
SCRR432
ACFF436L
SCFF436
ACR261RH
SCRR261G
AFG26MLLH
SCFF262GLH
User Manual
BEFORE USE, PLEASE READ AND FOLLOW ALL SAFETY RULES AND OPERATING INSTRUCTIONS
Write Model and Serial Numbers here:
Model
Serial No. ____
Felix Storch, Inc.
An ISO 9001:2015 registered company
770 Garrison Ave
Bronx, New York 10474
www.accucold.com
TABLE OF CONTENTS
IMPORTANT SAFEGUARDS....3
INSTALLATION INSTRUCTIONS....5
Before Using Your Appliance....5
Locating your Appliance....5
Installing the Leveling Legs 6
Installing the Shelves....7
Installing the Pressure Valve....7
Connecting the Power Supply ....7
Door Reversal....8
OPERATING YOUR APPLIANCE 11
CARE AND MAINTENANCE.... 14
TROUBLESHOOTING CHART.... 15
CALIFORNIA CARB/SNAP DISCLOSURE
This product uses eco-friendly hydrocarbon refrigerant and fully complies with California CARB regulations.
However, we are required by California Law to provide the following disclosure statement in every product sold in California.
"This equipment is prohibited from use in California with any refrigerants on the 'List of Prohibited Substances' for that specific end-use, in accordance with California Code of Regulations, title 17, section 95374. This disclosure statement has been reviewed and approved by Felix Storch, Inc. and Felix Storch, Inc. attests, under penalty of perjury, that these statements are true and accurate."
"This product does not use any refrigerants on the 'List of Prohibited Substances'"
IMPORTANT SAFEGUARDS
Your safety and the safety of others are very important.
We have attached many important safety messages in this manual and on your appliance. Always read and obey all safety messages.

This is the Safety Alert Symbol. This symbol alerts you to potential hazards that can kill or injure you and others. All safety messages will follow the Safety Alert Symbol and either the words "DANGER" "WARNING" or "CAUTION".
WARNING
DANGER means that failure to heed this safety statement may result in severe personal injury or death.
DANGER
WARNING means that failure to heed this safety statement may result in extensive product damage, serious personal injury, or death.
CAUTION
CAUTION means that failure to heed this safety statement may result in minor or moderate personal injury, or property or equipment damage.
Safety messages will alert you to what the potential hazard is, tell you how to reduce the chance of injury, and let you know what can happen if the user does not follow the instructions.

Before using your refrigerator/freezer, it must be positioned properly and installed as described in this manual, so read the manual carefully. To reduce the risk of fire, electrical shock, or injury when using the refrigerator/freezer, follow basic precautions, including the following:
DANGER
- These appliances are CFC and HFC free and contain a small quantity of liquid propane (R290) which is environmentally friendly, but flammable. It does not damage the ozone layer or increase the greenhouse effect. Care must be taken during transportation and while setting up the appliance so that no cooling system parts are damaged. Leaking refrigerant is combustible and may damage the eyes.
• In case of any damage:
o Avoid open flames and anything that creates a spark
o Disconnect from the power source
o Ventilate the room in which the appliance is in for several minutes and contact the Service Department for advice
- The more refrigerant in an appliance, the larger the room it is being installed in should be. In case of a leakage, if the appliance is in a small room, there is a greater risk of combustible gases building up. The amount of refrigerant in the appliance can be found on the rating label on the appliance. It is hazardous for anyone other than the Authorized Service Person to conduct servicing or repairs to the appliance.
• Take serious care when handling, moving, and using the appliance to avoid damaging the refrigerant tubing and increasing the risk of a leak.
- Parts replacement and servicing shall be done by factory authorized service personnel to minimize the risk of ignition due to incorrect parts or improper service.
- Plug into a grounded 3-prong outlet. Do not remove the grounding prong, do not use an adapter, and do not use an extension cord.
- Replace all panels before using the unit.
- It is recommended that a separate circuit, serving only your refrigerator/freezer, be provided. Use an electrical outlet that cannot be turned off by a switch or pull chain.
- Never clean refrigerator/freezer parts with flammable fluids, these fumes can create a fire hazard or explosion.
- Do not store or use gasoline or other flammable vapors and liquids in the vicinity of this or any other appliance. The fumes can create a fire hazard or explosion.
- Before starting cleaning and maintenance operations, make sure the unit's power line is disconnected.
- Do not connect or disconnect the electric plug when your hands are wet.
- Make sure to disconnect the unit's power supply before starting cleaning and maintenance operations, failure to do so can result in electrical shock or death.
- Do not attempt to repair or replace any part of your refrigerator/freezer unless it is specifically recommended in this material. A qualified technician should complete all other servicing.
WARNING
This unit is not designed to operate in enclosed spaces. When placing your unit, make sure you allow adequate airflow on all sides.
- Use two or more people to move and install the refrigerator/freezer. Failureto do so can result in back or other injuries.
- To ensure proper ventilation for your refrigerator/freezer, the front of the unit must be completely unobstructed. Choose a well-ventilated area with temperatures above 59°F (15°C) and below 86°F (30°C). This unit must be installed in an area protected from the elements, such as wind, rain, water spray, or sunlight.
- The refrigerator/freezer should not be installed next to ovens, grills, or other sources of high heat.
- The refrigerator/freezer must be installed with all electrical connections in accordance with state and local codes. This unit uses the standard electrical supply (115 V AC, 60hz) and must be properly grounded in accordance with national and local codes and ordinances.
- Do not kink or pinch the power supply cord of the refrigerator/freezer.
• The fuse (or circuit breaker) size should be 15 amperes. - It is important for the refrigerator/freezer to be leveled in order for it to function properly. You may need to make several adjustments to level it.
- Never allow children to use, play with or crawl inside the refrigerator/freezer
- Do not use solvent-based cleaning agents or abrasives on the interior, these cleaners may damage or discolor the interior.
- Keep your fingers out of the "pinch point" areas. Clearances between the door and cabinets are necessarily small. Be careful closing the door(s) when children are in the area.
- Do not use this appliance for anything other than its intended purpose.
DANGER
Risk of child entrapment
Child entrapment and suffocation are not problems of the past. Junked or abandoned freezers are still dangerous, even if they will “just sit in the garage a few days.”
- Before you throw away your old freezer: Take off the doors. Leave the shelves in place so that children may not easily climb inside.
• Never allow children to use, play with, or crawl inside the freezer.
INSTALLATION INSTRUCTIONS
Before Using Your Appliance
- Remove the exterior and interior packing.
- Check to be sure you have all the following parts:
- Set of pop-out keys
• 1 instruction manual
- Before connecting the appliance to the power source, let it stand upright for approximately 2 hours or let the compressor complete three on/off cycles to assure that the temperature inside is appropriate for the products before loading them into the appliance. This will reduce the possibility of a malfunction in the cooling system from handling during transportation.
- Clean the interior surface with lukewarm water using a soft cloth.
Locating your Appliance
- Move the appliance as close as possible to its final location, before removing the skid.
- Use a screwdriver to remove the screws that fix the skid to the cooler or metal supports, if applicable.
- Place the cabinet on a surface solid enough to prevent vibration and strong enough to support the combined weight of the cabinet and the product load. Estimate 35 pounds per cubic foot of storage space.
- Cabinets should never be placed in front of windows or glass doors where sunlight will be in direct contact with the units. If a cabinet is located near a window or glass door, provide an adequate shade to block the sun's rays.
- Ambient temperature must be between 59°F (15°C) and 86°F (30°C). Low ambient temperatures below 50°F are as harmful as high ambient temperatures. Extreme temperatures will affect the performance of the cabinet.
NOTE: Failure to properly level the cabinet could hinder proper drainage and door operation. Leveling legs are provided with the cabinets. Level the cabinet by adjusting the leveling legs as needed.
- Leave a space of at least 8in (203mm) between the back, sides, and top of the cabinet to provide adequate air circulation of the unit compartment.
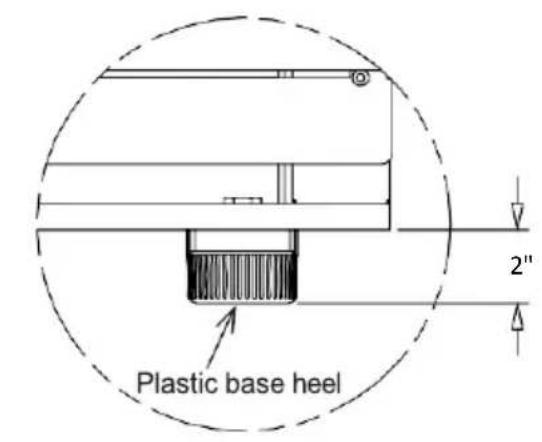
Installing the Leveling Legs
Heavy-duty leveling legs are included so the unit may be leveled accurately and to allow room to clean beneath the cabinet.
CAUTION: DO NOT attempt to install the level legs by yourself. You are far less likely to incur injury to yourself or the appliance if you install the legs with another person.
- Installing caster wheels: caster wheels are included with some models. Only use genuine caster wheels or the base of the unit might suffer damage. When installing the caster wheels, it is important to tighten them against the base rail (see image) The top edge of the caster wheels must make firm contact with the base rail. The top edge of the caster wheels must be in firm contact with the base rail.
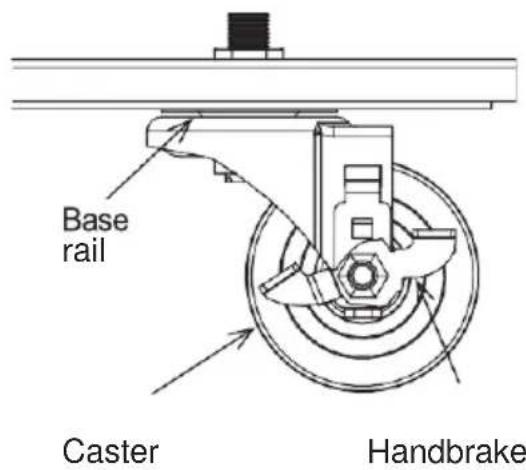
NOTE: The caster wheels with handbrakes must be placed in FRONT of the unit.
- Heavy-duty leveling legs are provided so the unit can be leveled accurately and to allow room to clean beneath the cabinet.
- Tilt the cabinet back just far enough to fit the front legs and place a block of wood or some similar support under it until both front legs are in. Then tilt the cabinet forward enough to install the rear legs.
- After the legs are installed, level the cabinet by using the adjustable part of the legs as needed. This is very important to ensure proper draining and door operation.
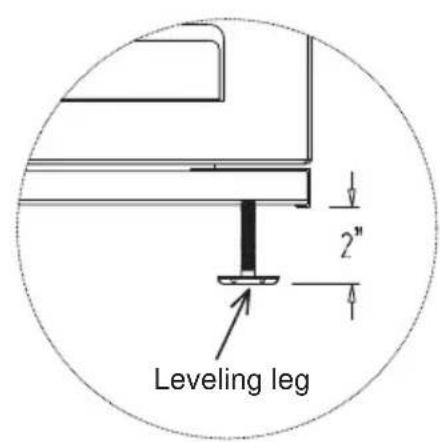
To lower, turn clockwise
To raise, turn counterclockwise
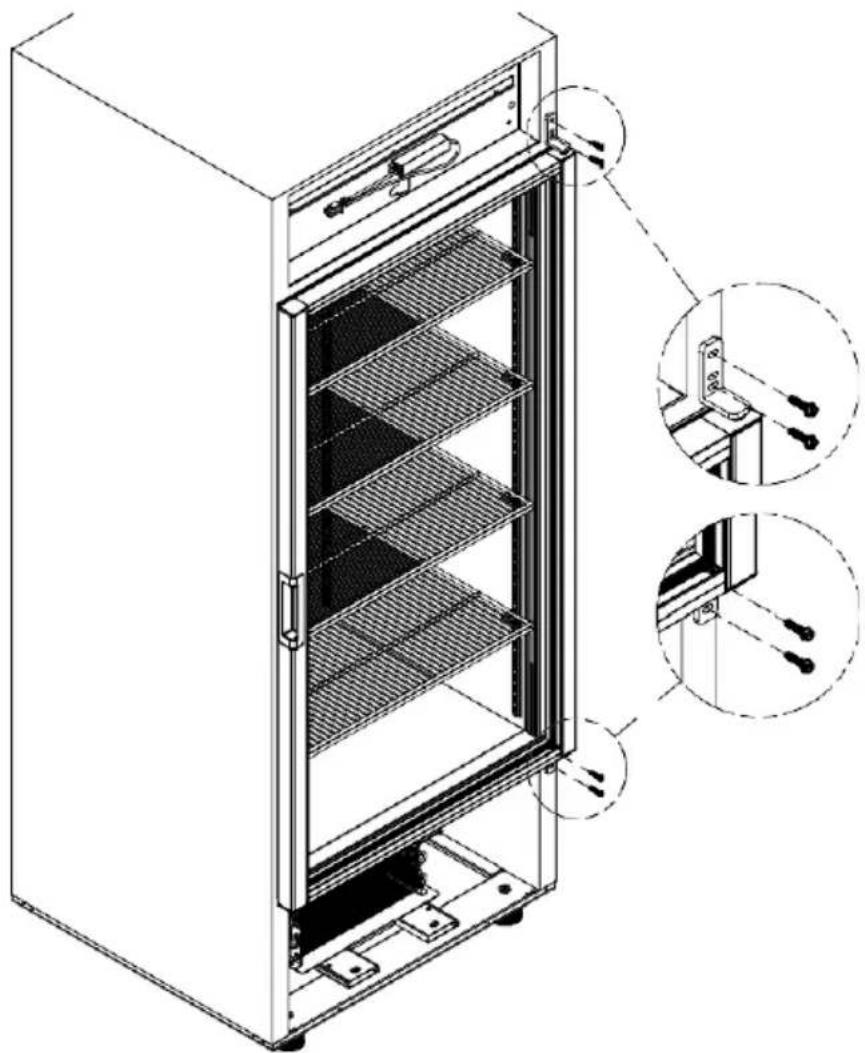
Installing the Shelves
Shelves and shelf clips (4 clips per shelf) are packed inside the cabinet before shipment. After choosing the appropriate spacing inside the cabinet, install shelf clips by inserting the top of the clip inside the pilaster and then press the lower section of the clip while pushing inwards until it snaps into place. Repeat until all clips are in the desired location. Place the shelf on clips, checking that all four corners of the shelf are leveled and supported by all four shelf clips.

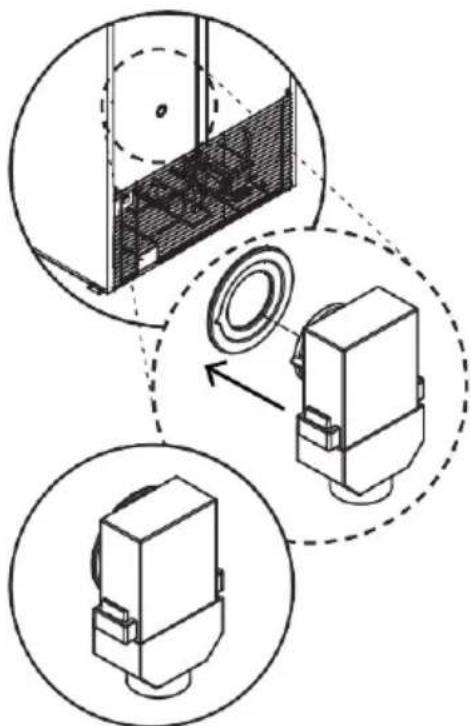
Installing the Pressure Valve
- Locate the pressure relief valve packed inside of your appliance.
- Locate the hole on the backside. (See image, right.)
- Align the pressure relief valve with the hole, using the marking as a guide.
- Push the pressure relief valve until you hear a click, this means the valve was correctly installed.
Connecting the Power Supply
Each unit requires a dedicated circuit to prevent the malfunction of the compressor and the electrical components. Each unit should be connected to its own circuit in accordance with National Electric Codes and local ordinances.
natural_image
Technical diagram showing three views of a mechanical component with internal structure and alignment arrows (no text or symbols)NOTE: DO NOT connect the appliance to a wall outlet with other appliances also plugged in. DO NOT use extension cords to connect the appliance to the power outlet.
Plug-in electrical power cord: Do not under any circumstance cut or remove the grounding pin from the power cord. Removal of grounding pin invalidates product warranty.
Door Reversal
APPLY ONLY FOR SINGLE DOOR MODELS (Except ACR82L/SCR801G)
If you would like to reverse the door swing, follow the steps below.
TOOLS
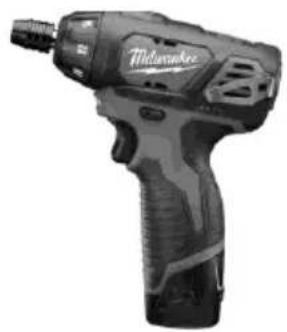
natural_image
Black Milwaukee electric drill putter with visible model and branding (no text or symbols on body)3/8" NUT DRIVER BIT

natural_image
Close-up of a screwdriver with black head and metallic shaft (no text or symbols visible)PHILLIPS # 2 SCREWDRIVER
INSTRUCTIONS
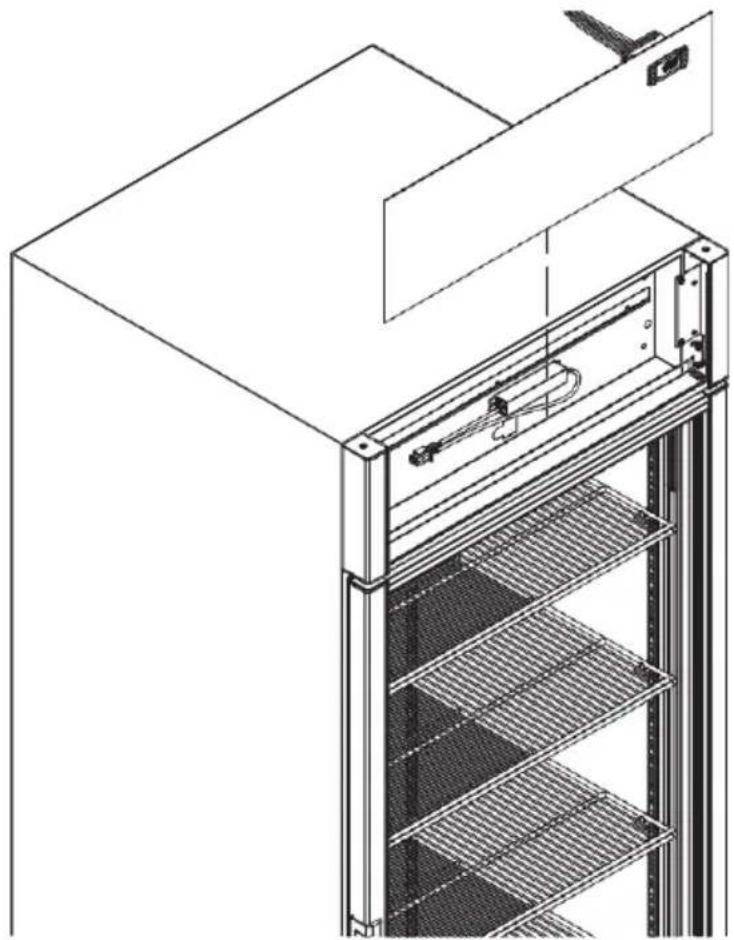
Step 1: Remove the two screws from the top header sign.

natural_image
Technical line drawing of a multi-level rack cabinet with mounting bracket and control panel (no text or symbols)Step 2: Remove the acrylic header sign and place it on the top of the unit.
natural_image
Technical line drawing of an industrial refrigerator with visible internal structure and mounting bracket (no text or symbols)Step 3: Remove the four screws from the header sign frame.

natural_image
Technical line drawing of a multi-level elevator structure with cooling fins and internal components (no text or symbols)Step 4: Remove the four screws from the front grill, then remove the front grill from the cooler.

natural_image
Technical line drawing of a multi-tiered refrigerator with side and front views (no text or symbols)Step 5: Remove the screws of the upper and lower hinge. Hold the door when you are removing the screws.
natural_image
Technical line drawing of a refrigerator with internal shelves and mounting brackets (no text or symbols)Step 6: With the hinges installed on the door, rotate the door 180 degrees.

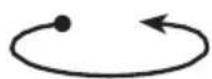
flowchart
graph TD
    A["Step 1: Left"] --> B["Step 2: Downward Arrow"]
    B --> C["Step 3: Upward Arrow"]
    C --> D["Step 4: Rightward Arrow"]
Step 7: Install the door on the cooler, header sign, and front grill according to steps 1 to 5.
OPERATING YOUR APPLIANCE
Control Panel
Your unit is manufactured with a Dixell electronic thermostat to control various functions of your unit, such as temperature, defrost cycles, alarms, etc.

TEMPERATURE SELECTION
| TYPE | TEMPERATURERANGE | DEFAULTSETPOINT | CONTROLLERMODEL |
| REFRIGERATOR | +2°C to +8°C (+36°F to +46°F) | +5°C(+41°F) | DIXELL XR40CX |
| FREEZER | -20.5°C to -15°C (-5°F to +5°F) | -20°C (-4°F) | DIXELL XR60CX |
FRONT PANEL COMMANDS
| KEY/BUTTON | FUNCTION | ||
| SET | To display the target set point.In programming mode, it selects a parameter or confirms an operation | ||
 | DEF | To start a manual defrost | |
| UP | To see the maximum stored temperature.In programming mode, it browses the parameter codes or increases the displayed value | ||
 | DOWN | To see the minimum stored temperature.In programming mode, it browses the parameter codes or decreases the displayed value. | |
 | To turn the unit off | ||
 | Not enabled | ||
DISPLAY INDICATORS
| LED MODE | FUNCTION | ||
 | ON | Compressor enabled | |
 | Flashing | Anti-short cycle delay enabled | |
 | ON | Defrost enabled | |
 | Flashing | * Drip time in progress | |
 | ON | * Fans enabled | |
| Flashing | * Fans delay after defrosting in progress | ||
| ON | * An alarm is occurring | ||
* Freezers only
KEY COMBINATIONS:
| + SET+ SET+ | To lock & unlock the keyboard |
| To enter programming mode | |
| To return to the room temperature display |
HOW TO SEE THE SET POINT:
- The set point parameter is the temperature at which the compressor cuts out
- Push and immediately release the SET key: the display will show the set point value.
- Push and immediately release the SET key or wait for 5 seconds to display the probe value again.
HOW TO CHANGE THE SET POINT:
- Push the SET key for more than 5 seconds to change the SET point value.
- The value of the set point will be displayed and the "C" or "F" LED starts blinking.
- To change the Set value,' push the ▲ or ▼ arrows within 10 seconds.
- To memorize the new set point value, push the SET key again or wait for 10 seconds.
HOW TO SEE THE MAXIMUM TEMPERATURE RECORDING
- Press and release the ▲ (UP) key.
- The "Hi" message will be displayed followed by the maximum temperature recorded.
- By pressing the o key again or by waiting 5s the normal display will be restored.
HOW TO SEE THE MINIMUM TEMPERATURE RECORDING
- Press and release the ▼ (DOWN) key.
- The "Hi" message will be displayed followed by the maximum temperature recorded
- By pressing the o key again or by waiting 5s the normal display will be restored.
HOW TO RESET THE MAX AND MIN TEMPERATURE RECORDED
- Hold and press the SET key for more than 3s, while the max. or min temperature is displayed. (rSt message will be displayed)
- To confirm the operation the "rSt" message starts blinking and the normal temperature will be displayed
HOW TO CHANGE A PARAMETER VALUE
| Freezer | Refrigerator | |||||
| Group | Parameter | Description | °C | °F | °C | °F |
| Regulation | Set | Set point | -20 | -4 | 5 | 41 |
| Regulation | Hy | Differential | 1 | 2 | 0.5 | 1 |
| Regulation | LS | Minimum set point | -20.5 | -5 | 2 | 36 |
| Regulation | US | Maximum set point | -15 | 5 | 8 | 46 |
| Defrost | dtE | Defrost termination temperature first defrost | 13 | 55 | - | - |
| Fan | FSt | Fan stop temperature | 37 | 99 | 37 | 99 |
| Alarm | ALU | Maximum temperature alarm | 0 | 32 | 15 | 59 |
| Alarm | ALL | Minimum temperature alarm | -25 | -13 | 0 | 32 |
| Alarm | AFH | Differencial for temperature alarm recovery | 1 | 2 | 0.5 | 1 |
| Display | CF* | Temperature measurement unit | ||||
The hidden menu includes all the parameters of the instrument.
HOW TO ENTER THE HIDDEN MENU
- Enter the Programming mode by pressing the SET+DOWN keys for 3 seconds (the "°C" or "°F" LED starts blinking).
- Release the keys, then again push the SET+DOWN keys for more than 7 seconds. The Pr2 label will be displayed immediately following the HY parameter.
NOW YOU ARE IN THE HIDDEN MENU.
- Select the required parameter.
- Press the "SET" key to display its value
- Use UP or DOWN to change its value.
- Press "SET" to store the new value and move to the following parameter.
To exit: Press SET+UP or wait for 15 seconds without pressing a key.
NOTE 1: If no parameter is present in Pr1, after 3 seconds the "noP" message is displayed, keep the keys pushed until the Pr2 message is displayed.
NOTE 2: the set value is stored even when the procedure is halted by waiting for the time-out to expire.
* WARNING: When the measurement unit is changed the SET point and the values of the following parameters Hy, LS, US, OT, ALU, and ALL must be checked and modified if necessary.
DIXELL ALARM INDICATORS
| MESSAGE | CAUSE | COMMENTS | |
| HA | Maximum temperature alarm | This alarm is adjustable. To change the values, it is necessary to enter the hidden menu and change the parameters. | DEFAULT VALUES |
| Refrigerator 15 °C (59 °F) | |||
| Freezer 0°C (32 °F) | |||
| LA | Minimum temperature alarm | This alarm is adjustable. To change the values, it is necessary to enter the hidden menu and change the parameters. | DEFAULT VALUES |
| Refrigerator 0°C (32 °F) | |||
| Freezer -25°C (-13 °F) | |||
| DA | Door alarm | If the door stays open for more than 3 minutes, an audible and visual alarm will go off on the thermostat | |
CARE AND MAINTENANCE
Your unit requires little maintenance. However, periodic cleaning can help prolong product life. Remember to disconnect the power source before cleaning. Remove all products and place them in another cooler.
- Clean the inside and the exterior of your cooler, including the shelves, with a mild soap solution. Do not use strong detergents. Wipe dry the inside of the cooler before loading products again.
- Plug in your unit and wait 2 hours for the temperature to reach the appropriate range to store your products in.
TROUBLESHOOTING CHART
You can solve many common freezer problems easily, saving you the cost of a service call. Try the suggestions below to see if you can solve the problem before calling the service agent.
| Problem | Possible Causes | Possible Solutions |
| The compressor does not start or make noise | The power is disconnected.The appliance is turned off.Blown fuse or circuit breakerDefective or broken wiringOverloaded outlet Defective relay | Check the power cord for proper connection.Turn the power ON.Replace the fuse or circuit breaker.Repair or replace wiringReplace the overloaded outletReplace the relay |
| Warm storage temperatures | The appliance is in a location that is too warm.Low voltage, compressor cycling on overload | Relocate the applianceCheck the voltage supply |
| The compressor runs continuously/ stored items are too cold | Defective control feeler tube.The control feeler tube was not installed properly | Call for servicePush the control feeler tube well into the unit. |
| P1 | Ambient probe failure | Call the service |
| P2 | Evaporator probe failure | Call the service |
If you continue to experience issues, contact Accucold's technical support department at 1-888-4-MEDLAB (1-888-463-3522).
NOTES
LIMITED WARRANTY
ONE-YEAR LIMITED WARRANTY
Within the 48 contiguous United States, for one year from the date of purchase, when this appliance is operated and maintained according to instructions attached to or furnished with the product, warrantor will pay for factory-specified parts and repair labor to correct defects in materials or workmanship. Service must be provided by a designated service company. Outside the 48 states, all parts are warranted for one year from manufacturing defects. Plastic parts, shelves and cabinets are warranted to be manufactured to commercially acceptable standards and are not covered from damage during handling or breakage.
5-YEAR COMPRESSOR WARRANTY
- The compressor is covered for 5 years.
- Replacement does not include labor.
ITEMS WARRANTOR WILL NOT PAY FOR:
- Service calls to correct the installation of your appliance, to instruct you how to use your appliance, to replace or repair fuses or to correct wiring or plumbing.
- Service calls to repair or replace appliance light bulbs or broken shelves. Consumable parts (such as filters) are excluded from warranty coverage.
- Damage resulting from accident, alteration, misuse, abuse, fire, flood, acts of God, improper installation, installation not in accordance with electrical or plumbing codes, or use of products not approved by warrantor.
- Replacement parts or repair labor costs for units operated outside the United States.
- Repairs to parts or systems resulting from unauthorized modifications made to the appliance.
- The removal and reinstallation of your appliance if it is installed in an inaccessible location or is not installed in accordance with published installation instructions.
DISCLAIMER OF IMPLIED WARRANTIES – LIMITATION OF REMEDIES
CUSTOMER'S SOLE AND EXCLUSIVE REMEDY UNDER THIS LIMITED WARRANTY SHALL BE PRODUCT REPAIR AS PROVIDED HEREIN. IMPLIED WARRANTIES, INCLUDING WARRANTIES OF MERCHANTABILITY OR FITNESS FOR A PARTICULAR PURPOSE, ARE LIMITED TO ONE YEAR. WARRANTOR SHALL NOT BE LIABLE FOR INCIDENTAL OR CONSEQUENTIAL DAMAGES. SOME STATES DO NOT ALLOW THE EXCLUSION OR LIMITATION OF INCIDENTAL OR CONSEQUENTIAL DAMAGES, OR LIMITATIONS ON THE DURATION OF IMPLIED WARRANTIES OF MERCHANTABILITY OR FITNESS, SO THESE EXCLUSIONS OR LIMITATIONS MAY NOT APPLY TO YOU. THIS WARRANTY GIVES YOU SPECIFIC LEGAL RIGHTS AND YOU MAY ALSO HAVE OTHER RIGHTS, WHICH VARY FROM STATE TO STATE.

WARNING: This product can expose you to chemicals including Nickel (Metallic) which is known to the State of California to cause cancer.
For more information go to www.P65Warnings.ca.gov
Note: Nickel is a component in all stainless steel and some other metallic compositions.


- User Manual
- TABLE OF CONTENTS
- CALIFORNIA CARB/SNAP DISCLOSURE
- IMPORTANT SAFEGUARDS
- WARNING
- DANGER
- CAUTION
- This unit is not designed to operate in enclosed spaces. When placing your unit, make sure you allow adequate airflow on all sides.
- Risk of child entrapment
- INSTALLATION INSTRUCTIONS
- Before Using Your Appliance
- Locating your Appliance
- Installing the Leveling Legs
- Installing the Shelves
- Installing the Pressure Valve
- Connecting the Power Supply
- Door Reversal
- INSTRUCTIONS
- OPERATING YOUR APPLIANCE
- Control Panel
- KEY COMBINATIONS:
- HOW TO SEE THE SET POINT:
- HOW TO CHANGE THE SET POINT:
- HOW TO SEE THE MAXIMUM TEMPERATURE RECORDING
- HOW TO SEE THE MINIMUM TEMPERATURE RECORDING
- HOW TO RESET THE MAX AND MIN TEMPERATURE RECORDED
- HOW TO ENTER THE HIDDEN MENU
- NOW YOU ARE IN THE HIDDEN MENU.
- DIXELL ALARM INDICATORS
- CARE AND MAINTENANCE
- TROUBLESHOOTING CHART
- NOTES
- LIMITED WARRANTY
- ONE-YEAR LIMITED WARRANTY
- 5-YEAR COMPRESSOR WARRANTY
- ITEMS WARRANTOR WILL NOT PAY FOR:
- DISCLAIMER OF IMPLIED WARRANTIES – LIMITATION OF REMEDIES
Brand : Accucold
Model : SCFF262GRH
Category : Freezer