
4-Play - Unspecified Radial Engineering - Free user manual and instructions
Find the device manual for free 4-Play Radial Engineering in PDF.

| Product Type | Multi-Output Direct Box (DI Box) |
| Number of Outputs | 4 balanced XLR outputs (mic-level) |
| Input | 1/4" instrument input |
| Frequency Response | 20 Hz – 20 kHz |
| Total Harmonic Distortion (THD+N) | 0.03% |
| Dynamic Range | 113 dBu |
| Maximum Input Level | +8 dBu |
| Gain | 0 dBu |
| Clip Level (Output) | +13 dBu |
| Noise Floor | -100 dBu |
| Intermodulation Distortion | <0.02% |
| Phase Deviation | -0.12° @ -20 dBu/1 kHz |
| XLR Configuration | AES standard (pin-2 hot) |
| Power Supply | 9V DC, 80 mA, center pin negative (not included) |
| Dimensions (LxWxD) | 5" x 4.9" x 2" (127 x 124 x 51 mm) |
| Weight | 2 lbs (907 g) |
| Construction | 14 gauge steel chassis and outer shell, durable powder coat finish |
| Ground Lift | Per output, disconnects pin-1 ground on XLRs |
| Footswitches | Select (advance through outputs) and Mute (turn off all outputs) |
| LED Indicators | Active output (1-4) and Mute status |
| Tuner Output | 1/4" jack with 3-position assign switch (always on, on with mute, off with mute) |
| Output Enable Switches | Forced enable for outputs 3 and 4 via front corner switches |
| Warranty | Radial 3-year, transferable |
| Country of Manufacture | Canada |
Frequently Asked Questions - 4-Play Radial Engineering
User questions about 4-Play Radial Engineering
0 question about this device. Answer the ones you know or ask your own.
Ask a new question about this device
Download the instructions for your Unspecified in PDF format for free! Find your manual 4-Play - Radial Engineering and take your electronic device back in hand. On this page are published all the documents necessary for the use of your device. 4-Play by Radial Engineering.
USER MANUAL 4-Play Radial Engineering
True to the Music
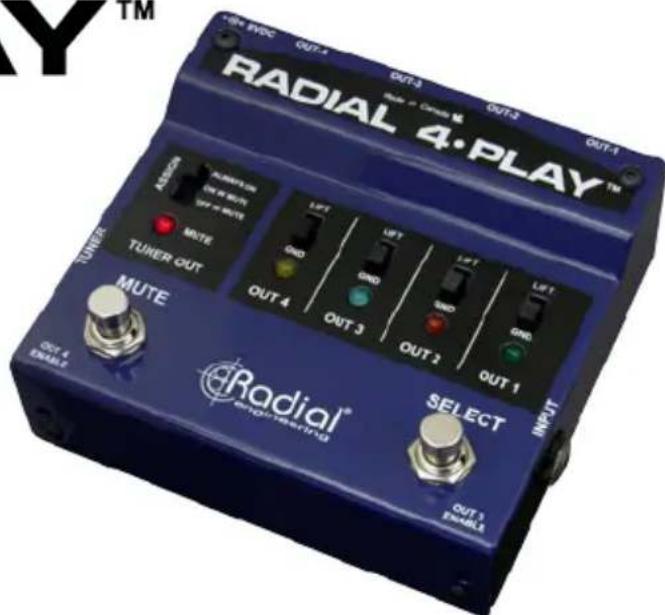
4·PLAY™
MULTI-OUTPUT DIRECT BOX
Radial Engineering Ltd.
1588 Kebet Way, Port Coquitlam BC V3C 5M5
Tel: 604-942-1001 • Fax: 604-942-1010 • Email: info@radialeng.com
RADIAL 4-PLAY MULTI-OUTPUT DIRECT BOX USER GUIDE
Introduction.... 1
Features 2-3
Overview....4
Making Connections....5
Using 6
Ground Lift....7
Tuner Assign....7
Specifications 8
Block Diagram 9
Radial Limited Warranty ....Back Cover
Thank you for purchasing the Radial 4-Play. We are delighted that you have made this purchase and are sure you will find that it will meet and exceed your expectations in every way!
Before you start plugging in, please take a few minutes to read through this short manual. Although the 4-Play has been designed to be easy to use, it is best that you review the setup options so that you are familiar with their operation. If afterwards you still find yourself looking for answers, please check out the FAQ page on our web site. This is where we post questions and answers from users like yourself, along with updates. If you still find yourself in need of answers, feel free to send us an email at info@radialeng.com and we will do our best to reply in short order.
Now get ready to stomp and pick to your hearts content!
FEATURES

FEATURES
- INSTRUMENT INPUT: Standard 14 " input used to connect your instrument to the 4-Play.
- SELECT FOOTSWITCH: Advances through the enabled outputs to select which one is on.
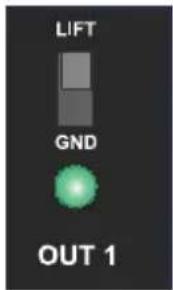
- OUTPUT LED INDICATORS: Indicate which of the 4 outputs is active, superbright to ensure visibility on stage.
- GROUND LIFT: Disconnects the ground on pin-1 at the XLR outputs.
- OUTPUTS 1 \~ 4: Balanced XLR mic-level outputs are used to feed the PA system.
- MUTE FOOTSWITCH: Used to turn off all of the balanced outputs for changeovers and tuning.
-
MUTE LED: Illuminates when the mute footswitch is depressed.
-
TUNER OUT: Connect to a tuner pedal to allow for on-the-fly tuning.
- TUNER ASSIGN: Selects whether the tuner is always on, only on when the mute switch is engaged, or only on when the mute switch is not engaged.
- OUT-3 ENABLE: Allows out-3 to be activated using the select switch.
- OUT-4 ENABLE: Allows out-4 to be activated using the select switch.
- 9VDC: Connection for a standard 9V pedal power supply.
OVERVIEW
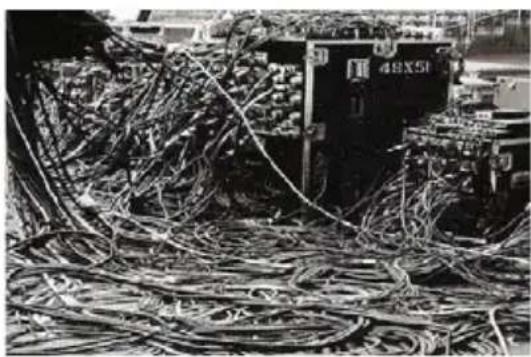
At its most basic form, the 4-Play is a 1-in, 4-out direct box that lets you route the connected instrument to any of four different channels on the PA and in your monitors. This allows each instrument to have its own dedicated channel with individual level, EQ and effects. Only one input is used in order to eliminate cable spaghetti on stage. You simply mute the 4-Play, change the instrument, select the desired output and you are set to go.
natural_image
Black-and-white photo of numerous bundled cables and electronic equipment in a storage or warehouse setting (no visible text or symbols)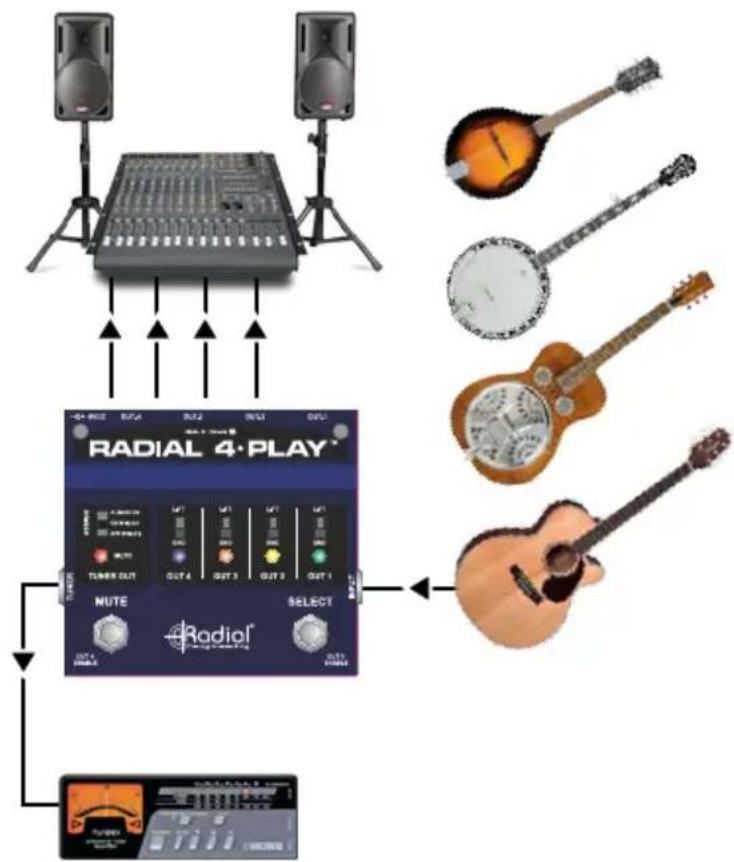
flowchart
graph TD
    A["Speaker with two speakers"] --> B["RADIAL 4-PLAY"]
    B --> C["Select"]
    C --> D["Output of Radial"]
    D --> E["Audio Instrument"]
    style A fill:#f9f,stroke:#333
    style B fill:#ccf,stroke:#333
    style C fill:#cfc,stroke:#333
    style D fill:#fcc,stroke:#333
    style E fill:#ffc,stroke:#333
MAKING CONNECTIONS
Before making connections, it is always best to turn audio system levels down in order to prevent plug-in transients that could damage more sensitive components such as high frequency drivers. It is also a good idea to test at low volumes before turning up. This way, should a cable not be properly seated, making a live connection will be safer.
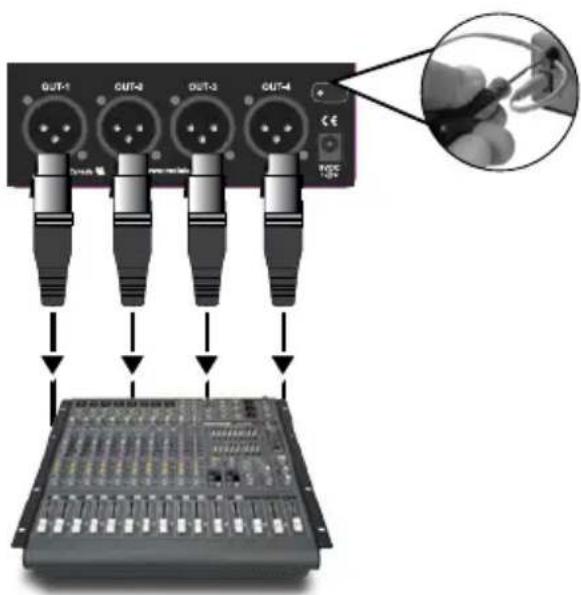
Powering the 4-Play is done using a standard 9V Boss®-type power supply. These are readily available at all music stores. You can also power the 4-Play using a multi-output pedal brick. Be careful to ensure you are using the proper voltage and polarity (center-pin negative). A power supply cable lock is there to protect against accidental disconnection. Merely unscrew the lock using a hex driver, insert the power cable through the cavity and then retighten.
Connections from instruments to the 4-Play input is done using standard 14 coaxial cables. The outputs from the 4-play to the PA system are typical XLR connections wired to AES standard pin-1 (ground), pin-2 (+) and pin-3 (-).
USING
There is no power switch on the 4-Play. As soon as you connect the PSU it will spring to life and OUT-1 will be activated. The OUT-1 LED will illuminate to confirm the active output.
Note: There are two 'set & forget' switches on the two front corners. These are used to enable selection of outputs 3 and 4 respectively. For now, these should be set in the out position.
- Press the MUTE footswitch to turn off the outputs.
- The MUTE LED will illuminate to let you know the outputs are muted.
- Connect your first instrument to the 4-Play using a standard 14 coaxial guitar cable.
- Connect OUT-1 to the first channel on your PA system via XLR cable.
- Depress the MUTE footswitch to reactivate the outputs and slowly increase the level on the PA to test.
If all is good, mute the 4-Play and connect OUT-2 to your second channel. You can test using the same instrument or switch to another if you like. Depressing the SELECT footswitch will now toggle between outputs 1 and 2. If you plan to use OUT-3 and OUT-4, these must be enabled using the two 'set & forget' switches located on the front corners. When pushed in, these switches allow the selector switch to advance to the third and fourth outputs and illuminate the associated LEDs.

FEATURES
Lifting the ground
The 4-Play is equipped with ground lift switches on each of the four outputs. Set all of the ground lift switches in the down or grounded position. As you rotate through the outputs, if you notice any noise, try lifting the ground as this can often help remove buzz and hum caused by ground loops.
Connecting a tuner
The 4-Play is also equipped with a tuner output, along with a 3-position tuner assign switch that allows you to choose when this output is active. When the tuner assign is set to ALWAYS ON, the tuner will still be active even when the mute switch is engaged. When set to ON W MUTE, the tuner output will only be active when the mute switch is engaged, allowing you to mute the instrument output to the PA when you want to tune up. The OFF W MUTE setting will do the opposite, allowing the tuner to remain on until the mute switch is engaged.


flowchart
graph LR
    A["Audio Input"] --> B["4-Play Conversion"]
    B --> C["Acoustic Guitar"]
You can also use the TUNER OUT as an output to an amp. Select OFF W MUTE when switching instruments.
SPECIFICATIONS\*
Frequency response: 20Hz to 20kHz
Total Harmonic Distortion (THD+N): 0.03%
Dynamic range: 113dBu
Maximum input:....+8dB
Gain: 0dBu
Clip level - Output: +13dB
Noise floor: -100dBu
Intermodulation distortion: .... <0.02%
Phase deviation: -0.12deg @ -20dBu/1kHz
XLR configuration:....AES standard (pin-2 hot)
Power: 9V / 80mA Center pin negative (not included)
Construction: 14 gauge steel chassis & outer shell
Finish: Durable powder coat
Size (LxWxD): 5" x 4.9" x 2" (127 x 124 x 51mm)
Weight: 2 lbs (907 grams)
Warranty: Radial 3-year, transferable
* Subject to change without notice.
BLOCK DIAGRAM*
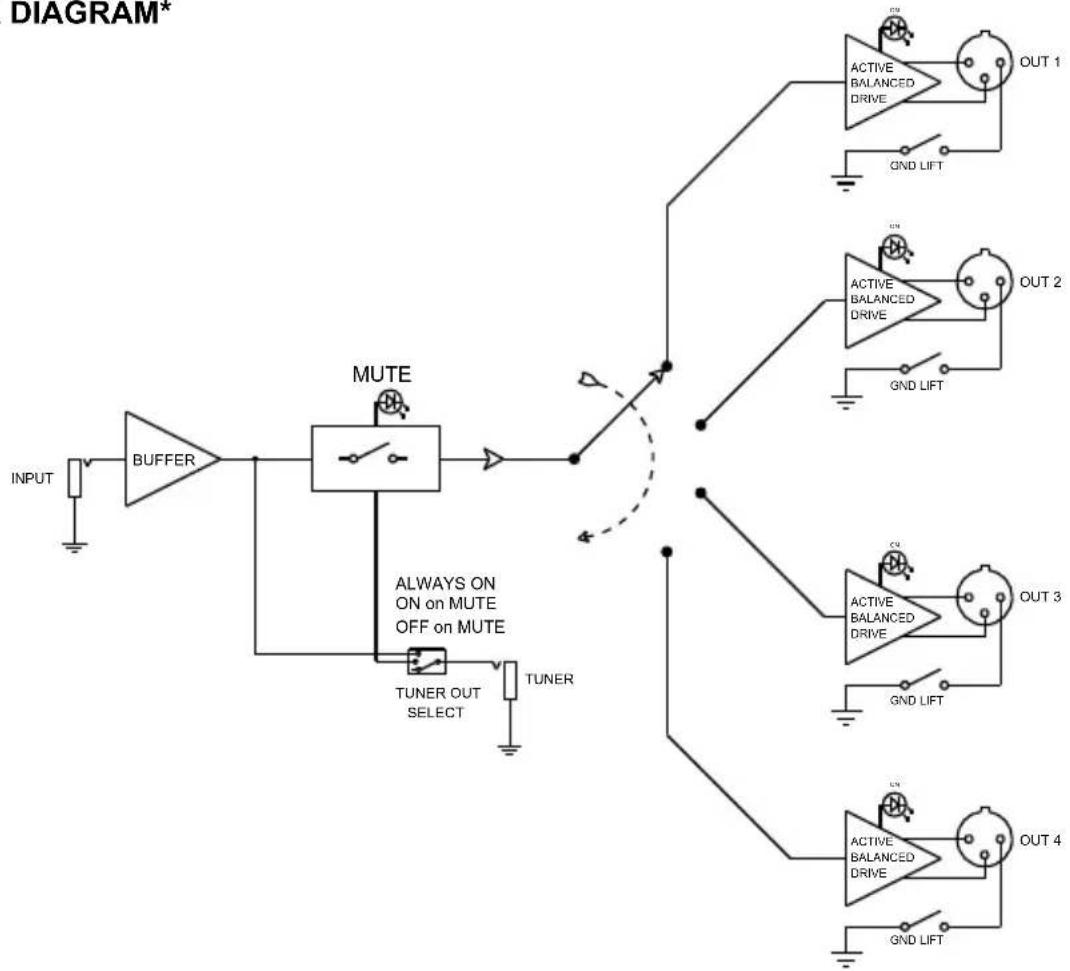
flowchart
graph TD
    A["INPUT"] --> B["BUFFER"]
    B --> C["MUTE"]
    C --> D["TUNER OUT SELECT"]
    C --> E["TUNER"]
    C --> F["OUT 1"]
    C --> G["OUT 2"]
    C --> H["OUT 3"]
    C --> I["OUT 4"]
    style A fill:#f9f,stroke:#333
    style B fill:#ccf,stroke:#333
    style C fill:#cfc,stroke:#333
    style D fill:#fcc,stroke:#333
    style E fill:#cff,stroke:#333
    style F fill:#ffc,stroke:#333
    style G fill:#ffc,stroke:#333
    style H fill:#ffc,stroke:#333
    style I fill:#ffc,stroke:#333
* Subject to change without notice.
RADIAL ENGINEERING 3 YEAR TRANSFERABLE WARRANTY
RADIAL ENGINEERING LTD. ("Radial") warrants this product to be free from defects in material and workmanship and will remedy any such defects free of charge according to the terms of this warranty. Radial will repair or replace (at its option) any defective component(s) of this product (excluding finish and wear and tear on components under normal use) for a period of three (3) years from the original date of purchase. In the event that a particular product is no longer available, Radial reserves the right to replace the product with a similar product of equal or greater value. In the unlikely event that a defect is uncovered, please call 604-942-1001 or email service@radialeng.com to obtain an RA number (Return Authorization number) before the 3 year warranty period expires. The product must be returned prepaid in the original shipping container (or equivalent) to Radial or to an authorized Radial repair center and you must assume the risk of loss or damage. A copy of the original invoice showing date of purchase and the dealer name must accompany any request for work to be performed under this limited and transferable warranty. This warranty shall not apply if the product has been damaged due to abuse, misuse, misapplication, accident or as a result of service or modification by any other than an authorized Radial repair center.
THERE ARE NO EXPRESSED WARRANTIES OTHER THAN THOSE ON THE FACE HEREOF AND DESCRIBED ABOVE. NO WARRANTIES WHETHER EXPRESSED OR IMPLIED, INCLUDING BUT NOT LIMITED TO, ANY IMPLIED WARRANTIES OF MERCHANTABILITY OR FITNESS FOR A PARTICULAR PURPOSE SHALL EXTEND BEYOND THE RESPECTIVE WARRANTY PERIOD DESCRIBED ABOVE OF THREE YEARS. RADIAL SHALL NOT BE RESPONSIBLE OR LIABLE FOR ANY SPECIAL, INCIDENTAL OR CONSEQUENTIAL DAMAGES OR LOSS ARISING FROM THE USE OF THIS PRODUCT. THIS WARRANTY GIVES YOU SPECIFIC LEGAL RIGHTS, AND YOU MAY ALSO HAVE OTHER RIGHTS, WHICH MAY VARY DEPENDING ON WHERE YOU LIVE AND WHERE THE PRODUCT WAS PURCHASED.

www.radialeng.com
Radial Engineering Ltd.
1588 Kebet Way, Port Coquitlam BC V3C 5M5
Tel: 604-942-1001 • Fax: 604-942-1010 • Email: info@radialeng.com


Radial 4-Play™ User Guide - Part #: R870 1026 00 Copyright © 2016, all rights reserved.
Appearance and specifications subject to change without notice.
Made in Canada


Brand : Radial Engineering
Model : 4-Play
Category : Unspecified