SMK F SF 10C Plus - Audio accessory Extron - Free user manual and instructions
Find the device manual for free SMK F SF 10C Plus Extron in PDF.

User questions about SMK F SF 10C Plus Extron
0 question about this device. Answer the ones you know or ask your own.
Ask a new question about this device
Download the instructions for your Audio accessory in PDF format for free! Find your manual SMK F SF 10C Plus - Extron and take your electronic device back in hand. On this page are published all the documents necessary for the use of your device. SMK F SF 10C Plus by Extron.
USER MANUAL SMK F SF 10C Plus Extron
text_image
IMPORTANT: Go to www.extron.com for the complete user guide, installation instructions, and specifications before connecting the product to the power source.This guide provides instructions for an experienced installer to install the Extron SMK F SF 10C Plus floor mount kit for the SF 10C SUB subwoofer. The SMK F SF 10C Plus kit consists of four long legs for mounting the speaker vertically, and four short legs for mounting the speaker horizontally. Each kit includes 12 screws and locking nuts, and 24 washers.
NOTE: See the SF 10C SUB User Guide or SF 10C SUB Setup Guide for detailed instructions regarding the SF 10C SUB subwoofer.
ATTENTION:
- Remember that the sound from the unit is directed out the port. Therefore, the port needs to be pointed into the listening space.
- To ensure that the Extron grille fits fully into any masking wall or other partition, the center of the port tube must be at least 5-3/16 inches (132 mm) from the edge of the wall.
- The grille does not fit if you install the legs on the subwoofer with the port tube down. Consider fabricating a small platform to lift the subwoofer (see figure 2 on the next page), or otherwise design your own way to dress your installation to give it a finished look.
- Steps 3, 4, 5, and 8 are necessary only if you are installing the subwoofer in an adjoining space.
Installing Long Legs for Vertical Installation
The subwoofer can be set vertically on a floor using the included long legs as follows:
- Determine where the subwoofer is to be placed and its orientation (port tube on top or port tube on the bottom).
- Remove the grommets from the holes in the installation bracket.
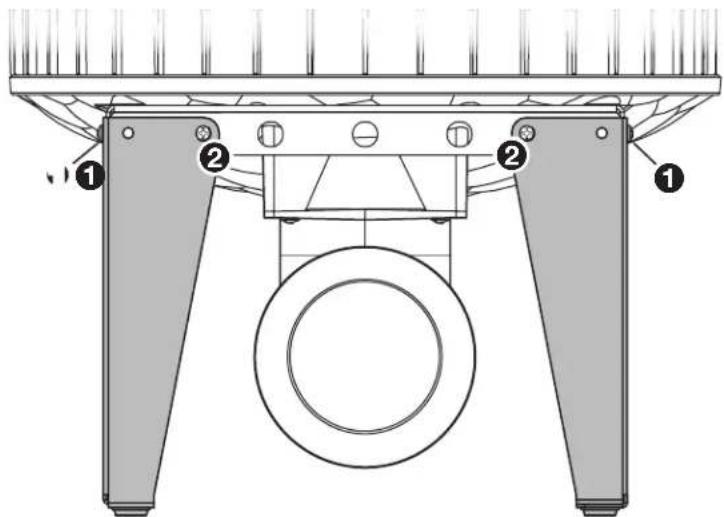
- Fasten two legs to each installation bracket using the three provided screws and locking nuts, two on one side of the foot (see figure 1, ①) and one on the other side (②).
text_image
Technical diagram of a mechanical assembly with numbered components, likely a pump or mounting bracket.Figure 1. Long Leg Installation
SMK F SF 10C Plus Kit • Setup Guide (Continued)
- When installing in an adjoining space — On the far side of the wall (outside the listening space), remove enough wall material so that the subwoofer port tube can be placed as close as possible to the wall (facing the listening space).
- When installing in an adjoining space — On the near side of the wall (inside the listening space), mark where the center of the port tube faces the installation surface. The center mark must be at least 5-3/16 inches (132 mm) from the edge of the installation surface.
- When installing in an adjoining space — On the near side of the wall (inside the listening space), using the included grille cut-out template, mark and cut the hole in the surface.
- Place the subwoofer in the desired location.
- Use the included nylon straps and included accessories, or locally-obtained perforated metal hanger straps, to secure two of the mounting holes on the top bracket to the nearest stud or other stationary surface (see figure 2, ①). Use locally obtained hardware suitable for the material to which the unit is being secured.
- When installing in an adjoining space — Ensure that there are fire breaks above and below the port tube (2) to meet UL requirements. If necessary, fabricate them.

text_image
Listening Space Installation Location (Adjoining Space) ② ① Bracket Nylon Strap Screw Lock Nut Washers (2)Figure 2. Securing the Floor-mounted Subwoofer and Installing Fire Breaks
Installing Short Legs for Horizontal Installation
The subwoofer can be set horizontally on a floor using the included short legs as follows:
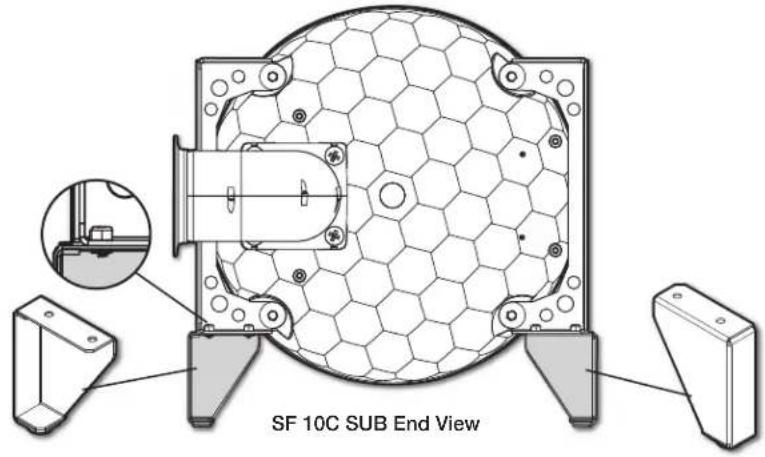
- Fasten a foot to each installation bracket using the provided screws and locking nuts (see figure 3).
text_image
SF 10C SUB End ViewFigure 3. Short Leg Installation
- Place the subwoofer in the desired location.
For information on safety guidelines, regulatory compliances, EMI/EMF compatibility, accessibility, and related topics, see the Extron Safety and Regulatory Compliance Guide on the Extron website.