
AXDSPX-GM33 - DVD player Axxess - Free user manual and instructions
Find the device manual for free AXDSPX-GM33 Axxess in PDF.


| Product Type | GM DSP Interface with Pre-Wired Harness |
| Brand | AXESS |
| Model | AXDSPX-GM33 |
| Compatible Vehicles | Select GM models 2021-up (non-amplified) |
| Input Channels | 6 |
| Output Channels | 10 |
| Equalizer Type | 31-Band Graphic EQ or 5-Band Parametric EQ |
| Equalizer Range | +/- 10dB |
| Frequency Response | 20Hz - 20kHz |
| Sampling Rate | 48kHz |
| S/N Ratio | 105dB @ 5V RMS |
| THD | < 0.03% |
| Crossover Type | Linkwitz-Riley 24dB/octave slope |
| Crossover Modes per Channel | HPF, LPF, BPF, THP (3-way selectable) |
| Channel Delay | Up to 10ms independently per channel |
| Input Options | High-level (speaker) or low-level (RCA) |
| Input Voltage Range (High-level) | 0 - 28V peak-to-peak |
| Input Voltage Range (Low-level) | 0 - 4.9V peak-to-peak |
| Output Voltage | Up to 5V RMS |
| Operating Voltage | 10 - 16V DC |
| Standby Current Draw | 7mA |
| Operation Current Draw | 150mA |
| Remote Output | 12V DC, 1A (signal sense or ignition) |
| Communication | Bluetooth (via AXDSP-XL app) |
| App Compatibility | Android and iOS (iOS 12.1 or higher) |
| USB Update | Micro-B USB updatable |
| Firmware Protection | Password protect feature in app |
| Included Components | Interface, output harness, vehicle T-harness, resistor pad, bass knob |
| Preserves Factory Features | Parking sensor chimes, OnStar® voice prompts, turn signal clicks, door chimes |
| Installation Type | Behind-the-radio, pre-wired harness |
Frequently Asked Questions - AXDSPX-GM33 Axxess
User questions about AXDSPX-GM33 Axxess
0 question about this device. Answer the ones you know or ask your own.
Ask a new question about this device
Download the instructions for your DVD player in PDF format for free! Find your manual AXDSPX-GM33 - Axxess and take your electronic device back in hand. On this page are published all the documents necessary for the use of your device. AXDSPX-GM33 by Axxess.
USER MANUAL AXDSPX-GM33 Axxess
natural_image
Collection of electronic components including a black rectangular device and various colored connectors (no visible text or symbols)APPLICATIONS
Visit axxessinterfaces.com for current application list
GM DSP Interface With Pre-Wired Harness 2021-Up
INTERFACE FEATURES
- Designed for non-amplified models
• Includes a DSP (Digital Signal Processor)
• 31 Band graphic EQ or 5 Band Parametric EQ
• 10 individually assignable outputs
• Independent equalization on each of the 10 outputs
• Independent high pass, low pass, and bandpass filters
• Each channel can be delayed independently up to 10ms - Clipping detection and limiting circuits
• Retains factory parking sensor chimes - Retains OnStar® voice prompts
- Adjustable chime level
- Easy behind the radio installation with pre-wired harness
- Bass knob included for level control of subwoofer amp
- Settings adjusted via Bluetooth in a smart device application (tablet or mobile phone), compatible with both Android and Apple devices
- Read, write, and store configurations for future recall
- Password protect feature available in the mobile app
- Micro-B USB updatable
TABLE OF CONTENTS
Installation Options 2
Installation 2
Connections....3-4
Mobile App 5-6
Specifications....7
INTERFACE COMPONENTS
- AXDSPX-GM33 interface
- AXDSPX-GM33 output harness (LD-AX-DSP-OUT2)
- AXDSPX-GM33 vehicle T-harness (LD-DSP-GM33)
- Resistor Pad (LD-DSP-RPAD2)
• Bass knob (LD-BASSKNOB)
TOOLS & INSTALLATION ACCESSORIES REQUIRED
- Crimping tool and connectors, or solder gun, solder, and heat shrink • Tape • Wire cutter
- Zip ties • Multimeter
www.MetraOnline.com

MetraOnline.com may be used to assist with dash assembly instructions. Simply enter your Year, Make, Model vehicle into the vehicle fit guide and look for the Dash Kit Installation Instructions.
INSTALLATION OPTIONS INSTALL AT
Adding a sub to a factory system:
This feature offers the ability to add a subwoofer to a factory system. (refer to page 3)
Adding a full-range amp & sub to a factory system:
This feature offers the ability to add a full-range amp and sub to a factory system. (refer to page 4)
Note: The interface provides a 12-volt 1-amp output to turn on aftermarket amp(s). If installing multiple amps, an SPDT automotive relay will be required if the amp turn-on current of all amps combined exceeds 1-amp. Use Metra part number E-123 (sold separately) for best results.
N
- Remove the factory radio , then unplug all connectors.
- Install the AXDSPX-GM33 vehicle T-harness to the vehicle and make all necessary connections, but leave the amp turn-on wire disconnected.
- Plug the AXDSPX-GM33 vehicle T-harness to the AXDSPX-GM33 interface.
- Plug the AXDSPX-GM33 interface harness to the AXDSPX-GM33 interface.
- Download and install the AXDSP-X app from the Google Play Store or Apple App Store.
- Open the app then select the Bluetooth Connection tab. Follow the instructions to pair the mobile device to the interface. Refer to page 5 for more information.
- Scroll to the Configuration tab then select the vehicle type. Press the Lock Down button to save the configuration. Refer to page 6 for more information.
- Connect the amp turn-on wire.
- Adjust the settings in the app as desired. Press the Lock Down + button to save any new configurations.
^ Refer to Metra online for dash disassembly. If Metra makes a dash kit for the vehicle, disassembly will be within those instructions.
Anytime the interface is locked down the key must be cycled off then back on
ADDING A SUB TO A FACTORY SYSTEM

REV. 2/12/24 INSTAXDSPX-GM33
ADDING A FULL-RANGE AMP & SUB TO A FACTORY SYSTEM

flowchart
graph TD
    A["Factory Radio"] --> B["Bass Knob"]
    A --> C["Black - Ground Orange - Control"]
    A --> D["Any remaining wires tape off and disregard"]
    A --> E["Vehicle T-Harness"]
    A --> F["Interface"]
    A --> G["Unplug connector"]
    A --> H["Interface Harness"]
    A --> I["Blue/White - Amp Turn-On Wire"]
    A --> J["Red Arrow to Interface"]
    K["RCA Jacks (sold separately)"] --> L["An SPDT relay, Metra part number E-123, is required if the amp turn-on current of all amps exceeds 1-amp."]
    L --> M["Cut the male connector off and connect speaker wires to amp"]
    L --> N["White / Front Left + White/Black / Front Left - Gray / Front Right + Gray/Black Front Right - Green / Rear Left + Green/Black / Rear Left - Purple / Rear Right + Purple/Black / Rear Right -"]
    L --> O["Red Arrow to Interface Harness"]
    P["Plug in the LD-DSP-RPAD2"] --> Q["NOTE: Plug the LD-DSP-RPAD2 (RETENTION OF THE FOLLOWING FEATURES ARE KEPT WITH THE LD-DSP-RPAD2 CONNECTED. EX: TURN SIGNAL CLICKS AND DOOR CHIMES)"]
    P --> R["Blue/White - Amp Turn-On Wire"]
QUICK SETUP STEPS THROUGH AXDSP-XL APP
Google Play Store
Apple App Store
iOS 12.1 or higher

- Download and install the AXDSP-XL app from the Google Play Store or Apple App Store.
- Turn Vehicle Ignition on. Make sure the Remote Turn on lead is disconnected.
- Open the app: Select Bluetooth Connections page.
- Select Scan, all available AXDSP devices within range will be displayed. Select your AXDSP and hit connect. (Figure A)
-
Select the Configuration page.
-
Select Vehicle Type Icon
- Select the Vehicle Make: ____ (Example: GMC)
- Select the Vehicle's model: ____ (Example: Sierra 1500)
- Select With OE Amp
-
Hit Apply (Figure B)
-
Make sure radio volume is all the way down.
- Connect the amp turn-on wire from the AXDSPX-GM33 T-harness to the aftermarket amplifiers.
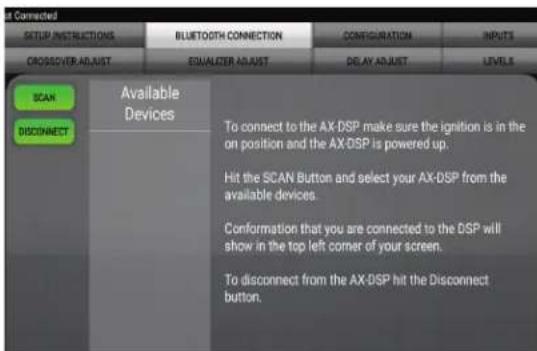
(Figure A)

(Figure B)
QUICK SETUP STEPS THROUGH AXDSP-XL APP (CONT.)
- From the Configuration page click the Identify button to confirm that the AXDSPX-GM33 is connected properly. If so, a chime will be heard from the front left speaker.
- Press the Lock Down button to save the configuration. (Do not turn ignition off until this process is completed) (Figure C)
- Select the Bluetooth Configurations page and disconnect the DSPX.
- Turn ignition off, close all door then lock vehicle using the key fob. The vehicle will need to sit uninterrupted for 10 minutes while the vehicle goes to sleep. (Make sure Key fob is 15 feet away from the vehicle)
- Unlock Vehicle, turn ignition on and test radio's functions.
- Adjust the DSP settings in the app as desired. Refer to the instructions under the Setup Instructions tab, or online at Axxessinterfaces.com for an explanation of each tab in the app.
Locking Down Data

(Figure C)
Last and the most important:
You MUST lock down your
configuration and cycle the key!!!
SPECIFICATIONS
Input Impedance 1M Ohm
Input Channels 6
Input Options High Level or Low Level
Input Type Differential balanced
Input Voltage 0 - 28-volts (peak-to-peak)
(high level range)
Input Voltage 0 - 4.9-volts (peak-to-peak)
(low level range)
Ouput Channels 10
Output Voltage Up to 5-volts RMS
Output Impedance 50 Ohms
Equalizer Type 31 Band Graphic EQ, +/- 10dB
THD <0.03%
Frequency Response 20Hz - 20kHz
Crossover 3-Way LPF, BPF, HPF THP per channel
Crossover Type Linkwitz-Riley 24db slope
Sampling 48kHz
S/N Ratio 105dB @ 5-volts RMS
Operating Voltage 10-16 volts DC
Standby Current Draw 7mA
Operation Current Draw 150mA
Adjustments/Controls Application via Bluetooth
Remote Output 12 volts DC (signal sense or with ignition

AXDSPX-GM33
INSTALLATION INSTRUCTIONS
Having difficulties? We're here to help.

act our Tech Support line at:
357-1187

mail at:
techsupport@metra-autosound.com
Tech Support Hours (Eastern Standard Time)
Monday - Friday: 9:00 AM - 7:00 PM
Saturday: 10:00 AM - 5:00 PM
Sunday: 10:00 AM - 4:00 PM

Metra recommends MECP certified technicians


- APPLICATIONS
- GM DSP Interface With Pre-Wired Harness 2021-Up
- INTERFACE FEATURES
- TABLE OF CONTENTS
- INTERFACE COMPONENTS
- TOOLS & INSTALLATION ACCESSORIES REQUIRED
- INSTALLATION OPTIONS INSTALL AT
- Adding a sub to a factory system:
- Adding a full-range amp & sub to a factory system:
- N
- QUICK SETUP STEPS THROUGH AXDSP-XL APP
- QUICK SETUP STEPS THROUGH AXDSP-XL APP (CONT.)
- SPECIFICATIONS
- AXDSPX-GM33
- INSTALLATION INSTRUCTIONS
- Tech Support Hours (Eastern Standard Time)
Brand : Axxess
Model : AXDSPX-GM33
Category : DVD player