
XOOTR30W - Microwave XO - Free user manual and instructions
Find the device manual for free XOOTR30W XO in PDF.

| Product Type | Over-the-Range Microwave Oven |
| Brand | XO |
| Model | XOOTR30W |
| Rated Voltage | 120V / 60Hz |
| Rated Input Power | 1550 W |
| Rated Output Power | 1000 W |
| Microwave Capacity | 1.6 cu ft |
| Turntable Diameter | 13.5" (345 mm) |
| External Dimensions (W x H x D) | 29 7/8" x 16 7/16" x 15" (795 mm x 417 mm x 382 mm) |
| Internal Dimensions (W x H x D) | 20 1/4" x 9 1/4" x 14 13/32" (514 mm x 235 mm x 366 mm) |
| Net Weight | 56 lbs (25.4 kg) |
| Power Cord Length | 3.3 ft (1 m) |
| Certifications | UL approved |
| Control Type | Electronic touchpad with LED display |
| Power Levels | 10 (including 100%) |
| Sensor Cooking | Yes (automatic humidity detection) |
| Express Cooking | Add 30 sec. and number pad quick start |
| Defrost | By weight (meat, poultry, fish) |
| Preset Programs | Popcorn, Beverage, Vegetable, Reheat, Pizza, Potato, Frozen Dinner, Dinner Plate, Rice |
| Vent Fan | 2 speeds (High/Low), automatic temperature-activated |
| Lighting | Task light (2 brightness levels), replaceable 1.2W LED |
| Child Lock | Yes (hold STOP/CLEAR 3 seconds) |
| Turntable | On/off function, glass tray, dishwasher safe |
| Filters | Grease filters (washable monthly), charcoal filter (replace every 6-12 months) |
| Installation | Over range, requires top cabinet and wall mounting, 30" wide space |
| Exhaust Options | Outside top, outside back, or recirculating (charcoal filter included) |
Frequently Asked Questions - XOOTR30W XO
User questions about XOOTR30W XO
0 question about this device. Answer the ones you know or ask your own.
Ask a new question about this device
Download the instructions for your Microwave in PDF format for free! Find your manual XOOTR30W - XO and take your electronic device back in hand. On this page are published all the documents necessary for the use of your device. XOOTR30W by XO.
USER MANUAL XOOTR30W XO
EVERY THING YOU NEED TO KNOW ABOUT YOUR

User Manual
MODELS XOOTR30BS | XOOTR30W

APPLIANCE
When buying any XO appliance, you can be confident you have chosen a high quality, innovative and stylish product from a company that cares about you!
If you require service or have questions, there are 2 ways to contact our appliance experts;
Online @ https://xoappliance.com/priority-service-for-your-xo-product/
Or by phone 973-403-8900

CONGRATULATIONS
on purchasing your XO. Before you proceed, take just a moment to register your XO at:
www.xoappliance.com/register-your-product/
Or simply scan here to be taken to the registration page...

Ensuring warranty coverage should you need service Providing ownership verification for insurance purposes XO can notify you in the event of product changes or recalls.
Contents
SAFETY INFORMATION 4
Precautions to avoid possible exposure to excessive microwave energy: 4
IMPORTANT SAFETY INSTRUCTIONS 4
Cookware and cooking materials 7
Materials you can use 8
Materials to be avoided 8
Features 9
Package contents 9
Microwave oven 9
Control panel 10
Setting up your microwave oven 10
Installing the turntable 11
Using your microwave 11
Tips for the best results 11
Cooking in your microwave 12
Setting the clock 13
Using the kitchen timer 13
Cooking quickly 13
Defrosting in your microwave 14
Cooking with the sensor 14
Using the stop/clear button 16
Using the light 16
Using the turntable 16
Using the child lock 16
Cleaning and maintaining your microwave 17
Cleaning the outside of your microwave 17
Cleaning the inside of your microwave 17
Cleaning and replacing the filters 18
Replacing the lights 19
Troubleshooting 21
Specifications 22
Warranty 23
SAFETY INFORMATION
For your safety, the information in this manual must be followed to minimize the risk of fire or explosion or to prevent property damage, personal injury, or loss of life.
Precautions to avoid possible exposure to excessive microwave energy:
1 Do not attempt to operate this microwave with the door open because this can result in harmful exposure to microwave energy. It is important not to defeat or tamper with the safety interlocks.
2 Do not place any object between the microwave front face and the door or allow soil or cleaner residue to accumulate on sealing surfaces.
3 Do not operate the micro wave if it is damaged. It is particularly important that the microwave door closes properly and that there is no damage to the:
(a) door (bent)
(b) hinges and latches (broken or loosened)
(c) door seals and sealing surfaces
4 The microwave should not be adjusted or repaired by anyone except properly qualified service personnel.
IMPORTANT SAFETY INSTRUCTIONS
Warning: WARNING indicates a potentially hazardous situation which, if not avoided, could result in death or serious injury.
CAUTION : CAUTION indicates a potentially hazardous situation which, if not avoided, may result in minor or moderate injury.
READ ALL INFORMATION BEFORE USING
Warning: To reduce the risk of fire, burns, electric shock, injury to persons, or exposure to excessive microwave energy when using your appliance, follow the basic precautions included in the following sections.
- Read all instructions before using the appliance.
- Read and follow the specific "Precautions to avoid possible exposure to excessive microwave energy:" on page 4.
- This appliance must be grounded. Connect only to a properly grounded outlet. See "Grounding instructions" on page 5.
• Install or locate this appliance only in accordance with the provided installation instructions. - Some products such as whole eggs and sealed containers —for example, closed glass jars—are able to explode and should not be heated in this microwave oven.
- Use this appliance only for its intended use as described in this manual. Do not use corrosive chemicals or vapors in this appliance. This type of microwave oven is specifically designed to heat, cook, or dry food. It is not designed for industrial or laboratory use.
- As with any appliance, close supervision is necessary when used by children.
- Do not operate this appliance if it has a damaged cord or plug, if it is not working properly, or if it has been damaged or dropped.
- This appliance should be serviced only by qualified service personnel. Contact nearest Authorized Servicer for examination, repair, or adjustment.
- Do not cover or block any openings on the appliance.
- Do not store or use this appliance outdoors. Do not use this product near water—for example, near a kitchen sink, in a wet basement, or near a swimming pool, or similar locations.
• Do not immerse the cord or plug in water.
- Keep the cord away from heated surfaces.
- Do not let the cord hang over the edge of the table or counter.
• See doo r surface cleaning instructions on page 17.
• To reduce the risk of fire in the microwave oven cavity:
- Do not overcook food. Carefully attend the appliance when paper, plastic, or other combustible materials are placed inside the microwave oven to facilitate cooking.
- Remove wire twist-ties from paper or plastic bags before placing the bag in the microwave oven.
- If materials inside the microwave oven ignite, keep the microwave oven door closed, turn the microwave oven off, and disconnect the power cord or shut off power at the fuse or circuit breaker panel.
- Do not use the cavity for storage purposes. Do not leave paper products, cooking utensils, or food in the microwave when not in use.
- Liquids, such as water, coffee, or tea are able to be overheated beyond the boiling point without appearing to be boiling. Visible bubbling or boiling when the container is removed from the microwave oven is not always present. THIS COULD RESULT IN VERY HOT LIQUIDS SUDDENLY BOILING OVER WHEN A SPOON OR OTHER UTENSIL IS INSERTED INTO THE LIQUID.
To reduce the risk of injury to persons:
- Do not overheat the liquid.
- Stir the liquid both before and halfway through heating it.
- Do not use straight-sided containers with narrow necks. Use a wide-mouthed container.
• After heating, allow the container to stand in the microwave oven for at least for 20 seconds before removing the container. - Use extreme care when inserting a spoon or other utensil into the container.
- Clean the ventilation openings and grease filters frequently. Grease should not be allowed to accumulate on ventilation openings, louver, or grease filters.
- Use care when cleaning the louver and the grease filters. Corrosive cleaning agents, such as lye-based oven cleaners, may damage the louver and the grease filters.
- When cooking food under the hood, turn the fan on.
- This appliance is suitable for use above both gas and electric cooking equipment 30" wide or less.
SAVE THESE INSTRUCTIONS
Unpacking and examining your microwave
Open the bottom of the carton, bend the carton flaps back, and tilt the microwave oven over to rest on the plastic foam pad. Lift the carton off the microwave oven and remove all packing materials, including the User Guide, Installation Guide, templates (2), charcoal filter, and turntable (with ring). SAVE THE CARTON AS IT MAY MAKE INSTALLATION EASIER.
- Remove the feature sticker from the outside of the door, if there is one.
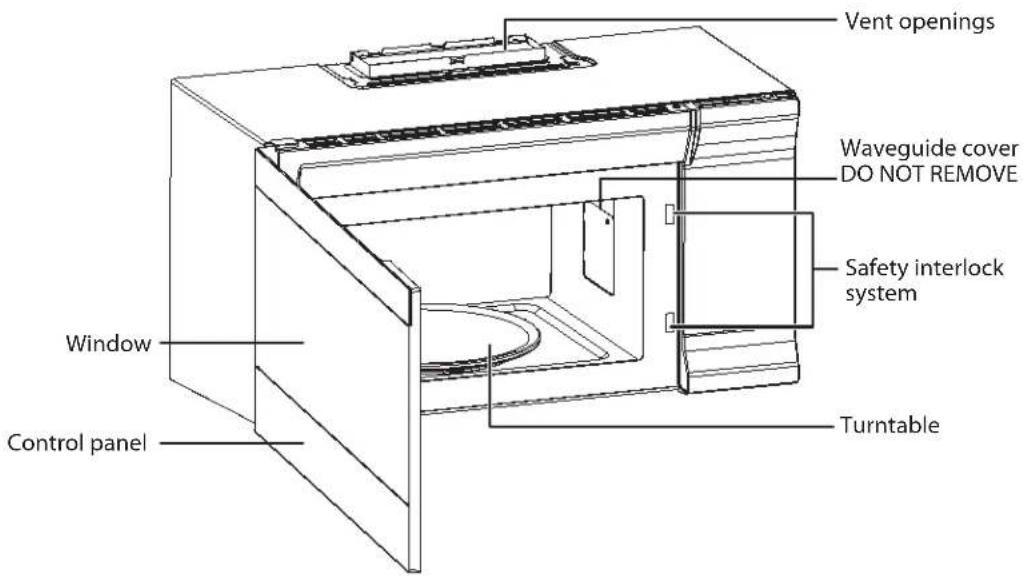
• DO NOT REMOVE THE WAVEGUIDE COVER. - Read and SAVE the User Guide and Installation Guide.
Check the microwave oven for any damage, such as misaligned or bent door, damaged door seals and sealing surfaces, broken or loose door hinges and latches, and dents inside the cavity or on the door. If there is any damage, do not operate the microwave oven and contact your dealer or repair center. See Installation Instructions for more details.
Grounding instructions
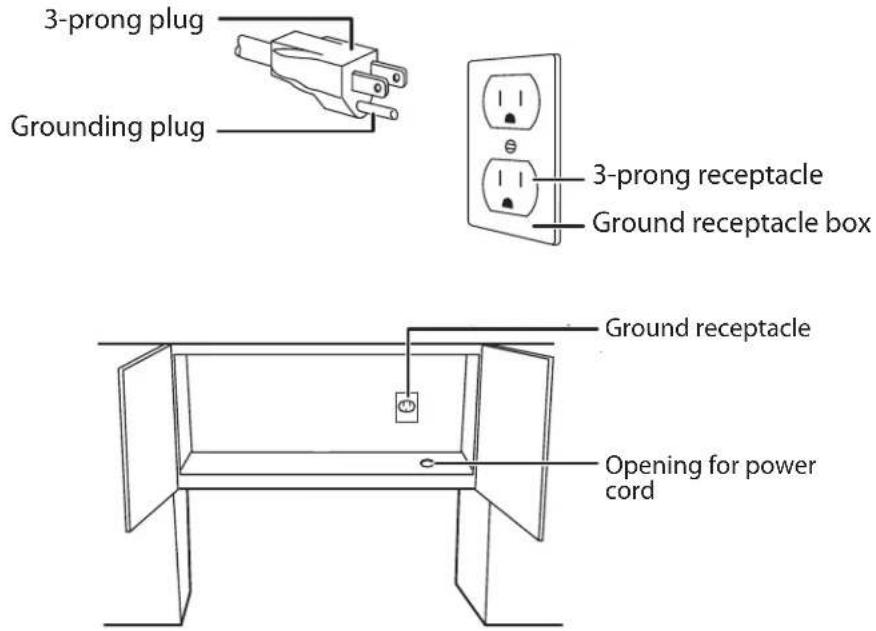
This appliance must be grounded. This microwave oven is equipped with a cord having a grounding wire with a grounding plug. It must be plugged into a wall receptacle that is properly installed and grounded in accordance with the National Electrical Code and local codes and ordinances. In the event of an electrical short circuit, grounding reduces the risk of electric shock by providing an escape wire for the electric current.
Warning: Improper use of the grounding plug can result in a risk of electric shock.
Electrical requirements
Check the Installation Instructions for proper location for the power supply.
The electrical requirements are a 120 volt AC, 60 Hz, 15 amp. or more protected electrical supply. It is recommended that a separate circuit serving only the microwave oven be provided.
The microwave oven is equipped with a 3-prong grounding plug. It must be plugged into a wall receptacle that is properly installed and grounded. DO NOT UNDER ANY CIRCUMSTANCES CUT OR REMOVE THE GROUNDING PIN FROM THE PLUG. DO NOT USE AN EXTENSION CORD.
If the power supply cord is too short, have a qualified electrician or serviceman install an outlet near the appliance.
The power supply cord and plug must be connected to a separate 120 Volt AC, 60 Hz, 15 Amp, or more branch circuit, single grounded receptacle. The receptacle should be located inside the cabinet directly above the microwave oven mounting location as shown above.
Notes: • If you have any questions about the grounding or electrical instructions, consult a qualified electrician or service person.
- does not accept any liability for damage to the microwave oven or personal injury resulting from failure to observe the correct electrical connection procedures.
- Read this User Guide and always save it for reference.
- A good microwave cookbook is a valuable asset. Check it for microwave cooking principles, techniques, hints, and recipes.
- NEVER use the microwave oven without the turntable and support nor turn the turntable over so that a large dish could be placed in the microwave oven. The turntable will turn both clockwise and counterclockwise.
• ALWAYS have food in the microwave oven when it is on to absorb the microwave energy. - When using the microwave oven at power levels below 100%, you may hear the magnetron cycling on and off.
• It is normal for the exterior of the microwave oven to be warm to the touch when cooking or reheating. - Condensation is a normal part of microwave cooking. Room humidity and the moisture in food will influence the amount of moisture that condenses in the microwave oven. Generally, covered foods will not cause as much condensation as uncovered ones. Ventilation openings must not be blocked.
• The microwave oven is for food preparation only. It should not be used to dry clothes or newspapers. - Your microwave oven is rated at 1000 watts by using the IEC Test Procedure. In using recipes or package directions, check food a minute or two before the minimum time and add time accordingly.
ABOUT MICROWAVE COOKING
- Arrange food carefully. Place thickest areas towards outside of the dish.
- Watch the cooking time. Cook for the shortest amount of time indicated and add more as needed. Food severely overcooked can smoke or ignite.
- Cover foods while cooking. Check the recipe or cookbook for suggestions, such as paper towels, wax paper, microwave plastic wrap, or a lid. Covers prevent spattering and help foods to cook evenly.
- Shield with small flat pieces of aluminum foil any thin areas of meat or poultry to prevent overcooking before dense, thick areas are cooked thoroughly.
• Stir foods from outside to center of dish once or twice during cooking, if possible. - Turn foods over once during microwaving to speed cooking of such foods as chicken and hamburgers. Large items like roasts must be turned over at least once.
- Rearrange foods such as meatballs halfway through cooking both from top to bottom and from the center of the dish to the outside.
- Add standing time. Remove the food from the microwave oven and stir, if possible. Cover for the standing time which allows the food to finish cooking without overcooking.
- Check for doneness. Look for signs indicating that cooking temperatures have been reached. Doneness signs include:
• Food steams throughout, not just at edge.
• Center bottom of dish is very hot to the touch.
- Poultry thigh joints move easily.
- Meat and poultry show no pinkness.
• Fish is opaque and flakes easily with a fork.
Cookware and cooking materials
Warning: Personal Injury Hazard
Tightly-closed containers could explode. Closed containers should be opened and plastic pouches should be pierced before cooking.
Cookware and other materials must fit on the turntable. Always use oven mitts or pot holders because cookware may become hot.
Refer to "Materials you can use" on page 7 and "Materials to be avoided" on page 7 as a guide, then test before using.
Cookware and Materials Test:
1 Fill a microwave-safe container with 1 cup (250 ml) of cold water, along with the cookware or materials in question.
2 Cook on maximum power for one minute. Do not exceed one minute cooking time.
3 Carefully feel the cookware or material. If the empty cookware or material is warm, do not use it for microwave cooking.
This device complies with part 18 of the FCC Rules.
Materials you can use
| MATERIAL REMARKS | |
| Browning dish | Follow the manufacturer's instructions. The bottom of the browning dish must be at least 3/16-in. (5mm) above the turntable. Incorrect usage may cause the turntable to break. |
| Dinnerware | Use microwave-safe only. Follow the manufacturer's instructions. Do not use cracked or chipped dishes. |
| Glass jars | Always remove the lid. Use only to heat food until just warm. Most glass jars are not heat resistant and may break. |
| Glassware | Use heat-resistant oven glassware only. Make sure there is no metallic trim. Do not use cracked or chipped dishes. |
| Oven cooking bags | Follow the manufacturer's instructions. Do not close with a metal tie. Make slits to allow steam to escape. |
| Paper plates and cups | Use for short-term cooking/warming only. Do not leave the oven unattended while cooking. |
| Paper towels | Use to cover food for reheating and absorbing fat. Use with supervision for short-term cooking only. |
| Parchment paper Use | as a cover to prevent splattering or a wrap for steaming. |
| Plastic | Use only if labeled “Microwave Safe.” Follow the manufacturer's instructions. Some plastic containers soften as the food inside gets hot. “Boiling bags” and tightly closed plastic bags should be slit, pierced, or vented, as indicated on the package. |
| Plastic wrap | Use microwave-safe only. Use to cover food during cooking to retain moisture. Do not allow plastic wrap to touch food. |
| Thermometers Use microwave-safe only (such as meat and candy thermometers). | |
| Wax paper Use as a cover to prevent splattering and retain moisture. | |
Materials to be avoided
| MATERIAL REMARKS | |
| Aluminum tray | May cause arcing. Use a microwave-safe dish instead. |
| Food carton with metal handle | May cause arcing. Use a microwave-safe dish instead. |
| Metal or metal trimmed utensils | Metal shields the food from microwave energy. The metal trim may cause arcing. |
| Metal twist ties | May cause arcing and could cause a fire in the oven. |
| Paper bags May cause a fire in the oven. | |
| Plastic foam | Plastic foam may melt or contaminate the liquid inside when exposed to high temperature. |
| Wood Wood will dry out when used in the microwave oven and may split or crack. | |
BOTTOM VIEW
Features
- Sensor cooking
• 10 variable power levels - Add 30 seconds and express cooking
- 1000W of power
• Exhaust fan with two speeds - Task lighting
- Child lock
- Turntable
- Hidden vent
Package contents
• 1.6 cu. ft. over-the-range microwave oven
- Turntable (with ring)
• Installation hardware
- Grease filters (2)
• Installation Guide
- User Guide
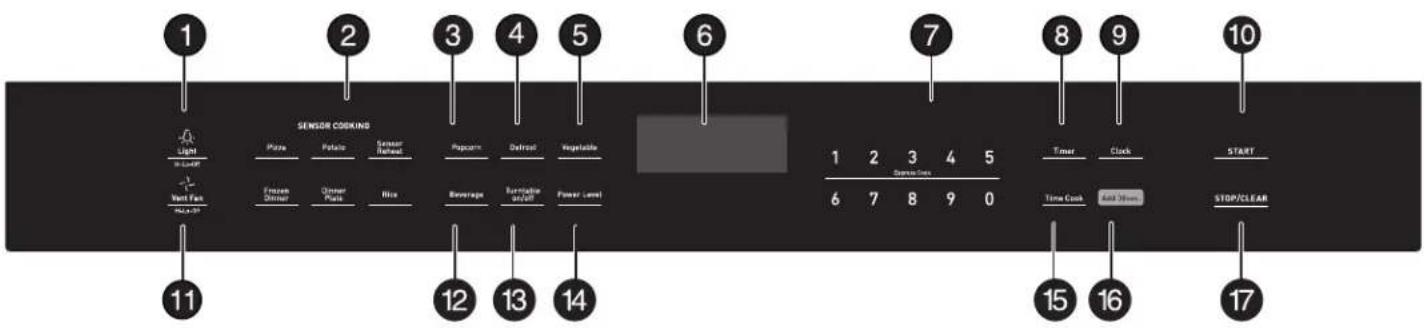
Control panel
| # ITEM DESCRIPTION | ||
| 1 Light | Press to turn on/off the light underneath your microwave. See "Using the light" on page 16. | |
| 2 SENSOR COOKING | Detects the humidity released by your cooking food and adjusts the cooking time based on the type and amount of food cooking. | |
| 3 | Popcorn | Press to cook popcorn. See "Popcorn" on page 16. |
| 4 | Defrost | Press to defrost frozen food. See "Defrosting in your microwave" on page 14. |
| 5 | Vegetable | Press to cook vegetables. See "Vegetable" on page 15. |
| 6 Display | In standby mode, displays the time. In cooking mode, displays cooking time, weight, and other information. | |
| 7 | Number pad | Press to enter cook time, defrost time, clock time, and other information. |
| 8 Timer | Press this button, then enter the time you want to count down. See "Using the kitchen timer" on page 13. | |
| 9 Clock | Press to set or check the clock. See "Setting the clock]" on page 13 | |
| 10 START In standby mode, press this button to begin cooking. | ||
| 11 Vent Fan | Press to turn on/off your vent fan and remove odors from cooking. See "Using the vent fan" on page 16. | |
| 12 | Beverage | Press to heat a beverage. See "Beverage" on page 16. |
| 13 | Turntable on/off | Press to turn your turntable on or off. See "Using the turntable" on page 16. |
| 14 Power Level | Press to change your microwave's power level (1-10). See "Cooking in your microwave" on page 12. | |
| 15 | Time Cook | Press to enter a cooking time. |
| 16 Add 30 sec. | While cooking, press this button to add 30 seconds to your cooking time. | |
| 17 STOP/CLEAR | Press to stop the cooking process. Press again to cancel the cooking operation. | |
Installing the turntable

Notes: • Never place the glass tray upside down. The glass tray should never be restricted.
- Both the glass tray and turntable ring must always be used during cooking.
• Always place all food and containers of food on the glass tray for cooking.
- If the glass tray or turntable ring cracks or breaks, contact your nearest authorized service center.
1 Place the turntable ring in the round depression in the bottom of the microwave oven so that it turns freely.
2 Place the glass turntable (flat side up) on the turntable ring so that the hub engages the turntable shaft in the bottom of the oven. The glass turntable should not turn freely when it is correctly installed.
Tips for the best results using your Microwave
Storage temperature
Foods taken from the freezer or refrigerator take longer to cook than the same foods would at room temperature.
Size
Small pieces of food cook faster than large ones. Pieces similar in size and shape will cook more evenly when cooked together. For more even results, reduce the power levels when cooking large pieces of food.
Natural moisture
Very moist foods cook more evenly because microwave energy heats water molecules very efficiently.
Stirring
Stir foods such as casseroles and vegetables from the outside to the center to distribute the heat more evenly. This will allow the food to cook faster. Constant stirring is not necessary.
Turn over items
Turn over foods such as pork chops, roasts, or whole cauliflower halfway through the cook time. This will help to expose all sides equally to microwave energy.
Food placement
Place delicate areas of food items, such as asparagus tips, toward the center of the turntable tray.
Food arrangement
Arrange unevenly shaped foods, such as chicken pieces or salmon, with the thicker or meatier parts toward the outside of the turntable tray.
Let the food stand
After removing the food from the microwave, cover the food with foil or a casserole lid and let it stand to finish cooking. This will help the food finish in the center and avoids overcooking the outer edges. The length of stand time depends on the density and surface area of the food items.
Wrapping in paper towels or waxed paper
Sandwiches and many other food types containing pre baked bread should be wrapped prior to placing in the microwave to help prevent the food items from drying out while heating.
Cooking in your microwave
1 Press Time Cook, then use the number pad to enter the cooking time that you want.
Note: For example, to enter 3 minutes and 15 seconds, press 3, 1, and then 5.
2 (Optional) Press Power Level, then enter the power level that you want (1-10).
Note: • By default, your microwave cooks at 100% power.
- Press Power Level while cooking to check the power level.
| POWER LEVEL | OUTPUT RECOMMENDED WHEN... | |
| 10 100% | ·Boiling water.·Cooking ground beef.·Making candy.·Cooking fresh fruits and vegetables.·Cooking fish and poultry.·Preheating browning dish.·Reheating beverages.·Cooking bacon slices. | |
| 9 90% | ·Reheating meat slices quickly.·Sautéing onions, celery, and green peppers. | |
| 8 80% | ·All reheating.·Cooking scrambled eggs. | |
| 7 70% | ·Cooking breads and cereal products.·Cooking cheese dishes and veal .·Cooking cakes, muffins, brownies and cupcakes. | |
| 6 60% · Cooking pasta. | ||
| 5 50% | ·Cooking meats and whole poultry.·Cooking custard.·Cooking spare ribs, rib roast, and sirloin roast. | |
| 4 40% | ·Cooking less tender cuts of meat.·Reheating frozen packaged foods. | |
| 3 30% | ·Thawing meat, poultry, and seafood.·Cooking small quantities of food.·Finish cooking casseroles, stew, and some sauces. | |
| 2 20% | ·Softening butter and cream cheese.·Heating small amounts of food. | |
| 1 10% | ·Softening ice cream.·Raising yeast dough. | |
3 Press Start to begin heating.
Cooking with multiple cooking stages
For best results, some microwave recipes call for different power levels or different lengths of time for cooking. Your microwave may be set to change from one stage to another automatically (two stages maximum).
1 Press Time Cook, then use the number pad to enter the cooking time that you want for the first stage.
Note: For example, to enter 3 minutes and 15 seconds, press
2 Press Power Level, then enter the power level that you want (1-10) for the first stage. The power level (PL) is shown on the display.
3 Press Time Cook, then use the number pad to enter th
4 Press Power Level, then enter the power level that you want (1-10) for the second stage. The power level (PL) is shown on the display.
5 Press Start to begin heating. When the microwave is done, it beeps and shows "END" on the display.
Note: Press Clock to check the time while cooking.
Setting the clock
1 Press Clock.
2 Use the number pad to enter the current time (1:00–12:59), then press Start to confirm the setting.
Note: You can use the timer while the microwave is cooking.
Using the Timer
1 In standby mode, press Timer.
2 Use the number pad to enter the time, then press Start. When the time reaches 0, your microwave beeps.
Cooking quickly
- Press a number on the number pad to instantly start cooking. For example, to cook for two minutes, press 2.
• From standby, press Add 30 sec. to instantly cook for 30 seconds.
• To increase the time in 30 second increments (except auto cook and defrost), press Add 30 sec. repeatedly.
Note: You can not quick start when using the defrost feature.
Defrosting in your microwave
1 Press Defrost repeatedly to select "MEAT," "POULTRY," or "FISH."
2 Press START.
3 Use the number pad to enter the weight of the item to be defrosted (in pounds). For example, 10 = 1.0 lbs.
Note: You may enter any weight from 0.1 to 6.0 lbs.
4 Press START to start defrosting. The remaining cooking time is displayed. Your microwave may beep periodically remind you to turn the food. Press START to continue.
Tips
For best results:
- Use defrost only for raw food items.
- Defrosting gives best results when your food is taken directly from the freezer. If the food has been stored in a refrigerator-freezer that does not maintain a temperature of 5^ (-15°C) or below, always program a lower food weight or lower cook time to prevent cooking the food.
- Enter a reduced weight if the frozen food has been outside the freezer for more than 20 minutes.
- The shape of the food package alters the defrosting time. For example, a shallow, rectangular food package will defrost more quickly than a deep block of food.
- Separate pieces as they begin to defrost.
Tips for defrosting meat
For the best results, use these suggestions when defrosting meat:
| MEAT | NORMAL WEIGHT | COOK TIME |
| Roast beef or pork | 2.5 to 6 lbs.(40 to 96 oz.) | Placed fat-side down.After each stage, turn the food over and shield any warm portions with narrow strips of aluminum foil.Let stand, covered for 15-30 minutes. |
| Steaks, chops, or fish | 0.5 to 3 lbs.(8 to 48 oz.) | After each stage, rearrange the food. If there are any warm or thawed portions of food, shield them with narrow flat pieces of aluminum foil.Remove any pieces of food that are nearly defrosted.Let stand, covered for about 5 to 10 minutes. |
| Ground meat | 0.5 to 3 lbs.(8 to 48 oz.) | After each stage, remove any pieces of food that are nearly defrosted.Let stand, covered with foil for 5 to 10 minutes. |
| Whole chicken | 2.5 to 6 lbs.(40 to 96 oz.) | Remove giblets before freezing poultry.Start defrosting with the breast side down.After the first stage, turn the chicken over and shield any warm portions with narrow strips of aluminum foil. After the second stage, again shield any warm portions with narrow strips of aluminum foil.Let stand, covered, for 30 to 60 minutes in the refrigerator. |
| Chicken pieces | 0.5 to 3 lbs.(8 to 48 oz.) | After each stage, rearrange or remove any pieces of food that are nearly defrosted.Let stand for 10-20 minutes. |
Cooking with the sensor
Sensor cooking detects the humidity released by your cooking food and adjusts the cooking time based on the type and amount of food cooking.
- Press Reheat, then press START. Your microwave automatically sets the cook time.
When using sensor cooking:
- Casseroles: Add 2-3 tablespoons of liquid, cover with a lid or vented plastic wrap. Stir when instructed from the display.
- Canned foods: Place the contents into a microwave-safe dish and cover with a loose-fitting lid or vented plastic wrap. Let it stand a few minutes before serving.
- Plates of food: Arrange food on the plate. Cover with a loose-fitting lid or vented plastic wrap. Let it stand a few minutes before serving.
Note: If additional time is needed, continue to cook manually.
Pizza
The pizza setting cooks from one to two slices (6-8 oz.) of pizza automatically.
- Press Pizza, then press START.
Potato
The potato setting cooks from two to four potatoes automatically.
1 Poke holes in your potatoes skin 5-6 times with a fork. Do not cover your potatoes.
2 Press Potato, then press START.
3 Let the potatoes stand for about five minutes after the microwave has finished to complete cooking.
Frozen dinner
The frozen dinner setting is designed for one frozen entree or frozen convenience foods (such as frozen dinners) from 10-20 oz.
- Press Frozen Dinner, then press START.
When cooking frozen dinners:
- Read the instructions on your frozen food for best results, if available.
- Make sure that moisture can escape from the packaging. All frozen dinner instructions should specify that you poke holes in the plastic covering before cooking.
- Be careful when removing the plastic covering. Remove the side facing away from you to avoid steam burns.
Dinner plate
The dinner plate setting is designed for one to two plates.
- Press Dinner Plate, then press START.
Rice
The rice setting cooks one to two cups of rice automatically (starting from room temperature).
- Press Rice, then press START.
Vegetables
The vegetable sensor feature cooks from one to four cups of fresh vegetables (when starting at room temperature).
1 Press Vegetable repeatedly to select the number of cups:
| SERVINGS | PRESS VEGETABLE BUTTON... |
| 1 cup | Once |
| 2 cups | 2 times |
| 3 cups | 3 times |
| 4 cups | 4 times |
2 Press START.
CAUTION: DO NOT leave the microwave unattended while popping popcorn.
Popcorn
1 Press Popcorn repeatedly to select your popcorn bag's weight:
| WEIGHT | PRESS POPCORN BUTTON... |
| 3.3 oz. Once | |
| 3.0 oz. 2 times | |
| 1.75 oz. 3 times |
2 Press START.
Beverage
The beverage setting heats one two three cups of a beverage. Use the table below to determine the setting to use. 1 Press Beverage repeatedly to select the number of servings:
| SERVINGS PRESS BEVERAGE BUTTON... | |
| ecnOpIuc | |
| 2 cups 2 times | |
| 3 cups 3 times | |
2 Press START.
Using the stop/clear button
Press STOP/CLEAR to:
- Erase information that you entered incorrectly
- Cancel the timer
- Pause the microwave during cooking (press START to resume)
- Display the clock after cooking is completed
- Cancel a programing during cooking (press twice)
Using the light
- To use the light underneath your microwave, press Light repeatedly to cycle between high brightness, low brightness, or off..
Note: To change a light bulb, see "Replacing the lights" on page 19.
Using the vent fan
Your microwave's vent fan works as a range hood to filter out smoke and other odors from cooking.
- Press Vent Fan repeatedly to cycle between high speed, low speed, or off.
Note : You can use the vent fan while cooking in the microwave.
- The fan automatically starts when heat rises from range surface units or burners and stays on until the temperature decreases. It cannot be turned off manually during this time. This protects the microwave from excessive temperatures.
Using the turntable
For the best results, leave the turntable on. However, you can turn it off for large dishes.
- Press Turntable on/off to turn your turntable on or off.
Using the child lock
- To lock the microwave, press and hold STOP/CLEAR for three seconds. The microwave beeps and a lock indicator appears on the display.
• To unlock the microwave, press and hold STOP/CLEAR until the lock indicator disappears (about three seconds).
Cleaning and maintaining your microwave
Cleaning the outside of your microwave
Exterior
The outside surface is pre-coated steel and plastic. Clean the outside with mild soap and water, then rinse and dry with a soft cloth. Do not use any type of household or abrasive cleaner.
Door
Wipe the window on both sides with a damp cloth to remove any spills or spatters. Metal parts will be easier to maintain if wiped frequently with a damp cloth. Avoid the use of spray and other harsh cleaners as they may stain, streak, or dull the door surface.
Control panel
If the control panel is dirty, open the microwave door before cleaning. Wipe the panel with a cloth dampened slightly with water only. Dry with a soft cloth. Do not scrub or use any sort of chemical cleaners. Close the door and press STOP/CLEAR to clear any buttons you may have pressed.
Cleaning the inside of your microwave
Interior
Wipe with a soft cloth and warm water. Do not use abrasive or harsh cleaners or scouring pads. For baked-on food, use baking soda or a mild soap, then rinse thoroughly with hot water.
To help loosen baked-on food particles or liquids, heat two cups of water (add lemon juice if you want to keep your microwave fresh smelling) in a four-cup measuring cup at high power for five minutes or until boiling. Let it cool in the microwave, then wipe the interior with a soft cloth.
Waveguide cover
The waveguide cover is located on the right wall inside your microwave. Keep the waveguide cover clean to assure good microwave performance. Carefully wipe with a damp cloth any food spatters from the surface of the cover immediately after they occur. Built-up splashes may overheat and cause smoke or possibly catch fire. DO NOT REMOVE THE WAVEGUIDE COVER.
Removing odors
Occasionally, a cooking odor may remain in the microwave. To remove, combine one cup water, lemon juice, and several whole cloves in a two-cup glass measuring cup. Boil for several minutes at high power, then let it cool in the microwave. Wipe the interior with a soft cloth.
Turntable and turntable support
Remove the turntable and turntable support and wash them in mild, sudsy water. For stubborn stains, use a mild cleanser and non-abrasive scouring sponge. You can also wash them in the top rack of a dishwasher.
The turntable motor shaft is not sealed, so excess water or spills should be wiped up immediately.
Cleaning and replacing the filters
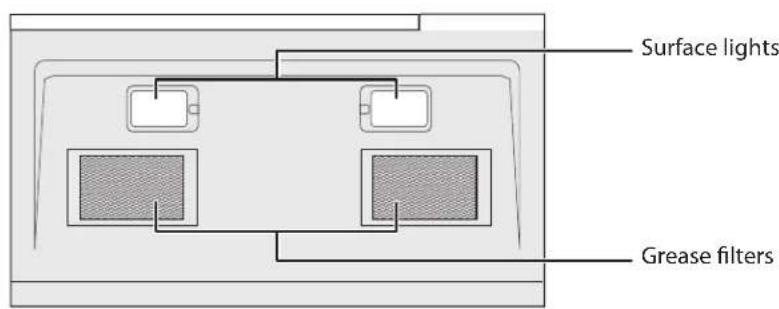
Cleaning the exhaust filters
The exhaust filters should be removed and cleaned about once a month.
CAUTION: Do not operate the oven hood without the filters properly in place.
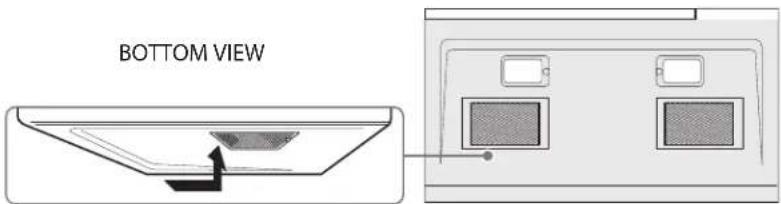
1 To remove the exhaust filters, slide the filter toward the back of the microwave, then pull it downward while sliding it out of the side slot. Repeat for the second filter.

2 Soak the ventilation filters in hot water using a mild detergent or wash in a dishwasher. Rinse well and shake to dry.
CAUTION
Do not use ammonia. The aluminum on the filter will corrode and darken.

natural_image
Illustration of hands pouring liquid from a container onto a textured surface (no text or symbols)3 To reinstall the exhaust filter, slide it into the side slot, then push up and toward the front of the microwave to secure it. Repeat for the second filter.
Replacing the charcoal filter
The charcoal filter is used in non-vented, recirculated installations. The filter should be changed every 6 to 12 months depending on use.
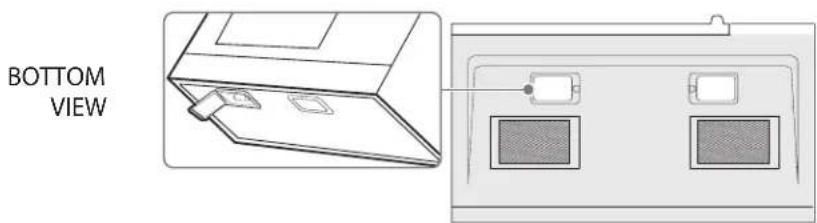
1 Unplug the microwave oven or turn off power at the main circuit breaker.
2 Remove the vent grill screws.
3 Pull the vent grill away from the unit.

natural_image
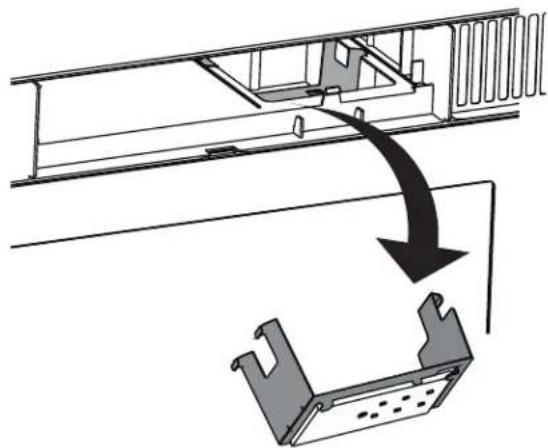
Line drawing of a microwave oven with open door and side panel, showing internal structure and mounting points (no text or symbols)4 Remove the charcoal filter by pushing it inwards, then lift up and pull it out of the microwave.

natural_image
Technical diagram showing two views of a mechanical or structural component with directional arrows indicating movement (no text or symbols present)5 Insert the new charcoal filter, close the vent grill, and secure with the vent grill screws. 6 Plug the microwave back in or turn the power back on at the main circuit breaker.
Replacing the lights
Surface light (external)
1 Unplug the microwave oven or turn off power at the main circuit breaker. 2 Remove the light cover screws under the microwave.
3 Remove the old light bulbs and replace with new 1.2W LED lights. 4 Reinstall the light cover screws to secure the covers. 5 Plug the microwave back in or turn the power back on at the main circuit breaker.
Microwave light (internal)
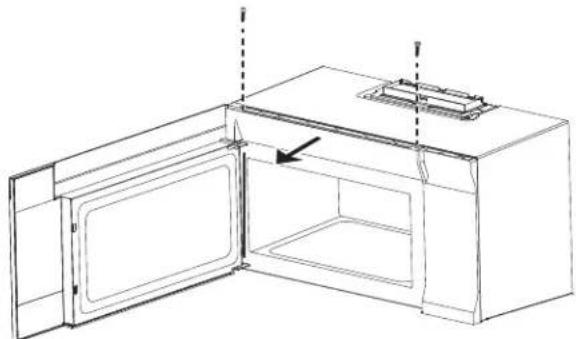
1 Unplug the microwave oven or turn off power at the main circuit breaker.
2 Remove the vent grill screws.
3 Pull the vent grill away from the unit.
natural_image
Line drawing of a microwave oven with open door and side panel, showing internal structure and ventilation duct (no text or symbols)4 Remove the charcoal filter by pushing it inwards, then lift up and pull it out of the microwave.

natural_image
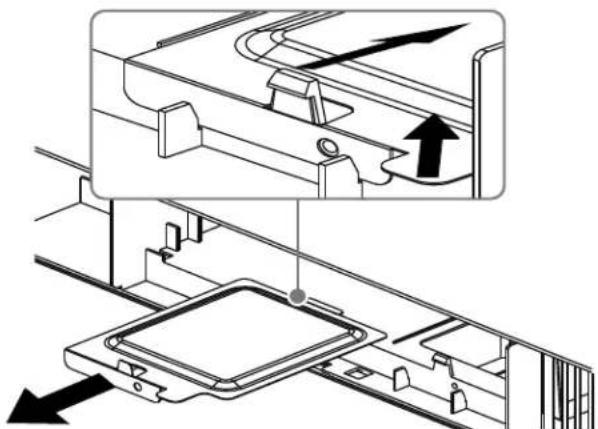
Technical diagram showing airflow or ventilation system between two air ducts (no text or symbols)5 Push the tab to release the light cover and carefully pull it up from the front edge.
natural_image
Technical diagram showing a mechanical assembly with directional arrows and a component (no text or symbols)6 Remove the LED module and replace only with an approved 1.2 watt LED bulb.
natural_image
Diagram showing a mechanical assembly with an arrow indicating a process or transformation, no text or symbols present.7 Carefully push the light cover back into place.
8 Replace the charcoal filter. Push the vent grill back into place (engaging both the bottom and top tabs) and replace the vent grill mounting screws.
Troubleshooting
If you have a problem with your microwave, review the following chart for a possible solution. If the microwave still does not work properly, contact the nearest authorized service center.
| PROBLEM | POSSIBLE CAUSE | POSSIBLE SOLUTION |
| Microwave will not start | The electrical cord is not plugged in. | Plug in the electrical cord. |
| The door is open. | Close the door and try again. | |
| The wrong operation is set. | Check the instructions and try again. | |
| Arcing or sparking in the microwave | You are attempting to use incorrect materials in the microwave. | Use only microwave-safe materials. |
| You are attempting to use the microwave when it's empty. | Do not operate the microwave when it's empty. | |
| Spilled food remains in the microwave. | Clean the microwave with a wet towel. | |
| Unevenly cooked foods | You are attempting to use incorrect materials in the microwave. | Use only microwave-safe materials. |
| The food is not defrosted completely. | Defrost the food completely before attempting to cook it. | |
| The cooking time or power level is not adequate to cook the food. | Use the correct cooking time and power level. | |
| The food is not turned or stirred. | Turn or stir the food. | |
| Overcooked foods | The cooking time or power level is not adequate to cook the food. | Use the correct cooking time and power level. |
| Undercooked foods | You are attempting to use incorrect materials in the microwave. | Use only microwave-safe materials. |
| The food is not defrosted completely. | Defrost the food completely before attempting to cook it. | |
| The cooking time or power level is not adequate to cook the food. | Use the correct cooking time and power level. | |
| The microwave ventilation ports are blocked or restricted. | Make sure that the ventilation ports are not blocked or restricted. | |
| Improper defrosting | You are attempting to use incorrect materials in the microwave. | Use only microwave-safe materials. |
| The cooking time or power level is not adequate to cook the food. | Use the correct cooking time and power level. | |
| The food is not turned or stirred. | Turn or stir the food. | |
| The vent fan turns on by itself | The fan automatically starts when heat rises from range surface units or burners and stays on until the temperature decreases. This protects the microwave from excessive temperatures. | Your microwave is operating normally. The fan cannot be turned off manually during this time. |
| The turntable will not move | The turntable is misaligned. | Make sure that the turntable is properly aligned on the ring and shaft. |
| The turntable is turned off. | Press Turntable on/off to turn your turntable back on. |
Spatías
| Model | XOOTR30BS | XOOTR30W |
| 120V / 60Hz Rated voltage | |
| Rated input power | 1550 W |
| Rated output power | 1000 W |
| Microwave capacity | 1.6 cu ft |
| Turntable diameter | 13.5" (345mm) |
| External dimensions (WxHxD) | 29 7/8" x 16 7/16" x 15" (795mm x 417mm x 382mm) |
| Internal dimensions (WxHxD) | 20 1/4" x 9 1/4" x 14 13/32" (514mm x 235mm x 366mm) |
| snoitacifice | UL approved |
| Power cord length | 3.3 ft (1m) |
| Net weight | 56lbs (25.4kg) |
WHY CHOOSE XO
INNOVATION • TOP DESIGN • ADVANCED TECHNOLOGY CREATIVE THINKING • EXTRAORDINARY CUSTOMER SERVICE
More than a brand - XO is a customer experience
We decided to develop a new company with a goal of 100% customer satisfaction. From beginning to end, XO will deliver more. We will be here to help specify and design the right ventilation for your home. We are ventilation experts.
All XO quality products are backed by an unmatched, comprehensive warranty program.
Problems happen, they always do. It could be a dent while handling, a defective part or an improper installation.
- Don't worry XO will be there to help resolve the issue. Your total satisfaction is our main concern.
Be believe in extraordinary customer service with a personal touch. We are putting into practice our vision of becoming the most innovative, customer oriented appliance company in the world.
Your New XOOTR24BS is backed by One Year Parts and Labor Warranty on our Performance Collection

For 90 days, our products are backed by our unique Love It or Leave It Guarantee
and our unmatched, 90 Day Love It or Leave It Guarantee on all XO Ventilation
STILL HAVE QUESTIONS - OR - NEED WORLD CLASS SERVICE JUST CALL 973-403-8900 AND PUT DECADES OF EXPERIENCE TO WORK FOR YOU...

Take just a minute to record you model number and serial number here, just in case
M#
S#
EVERY THING YOU NEED TO KNOW
TO INSTALL YOUR

OVER-THE-RANGE MICROWAVE OVEN MODELS: XOOTR30BS | XOOTR30W

IMPORTANT SAFETY INSTRUCTIONS Carefully read the following Important information regarding installation safety and maintenance. Keep these instruction for future reference.

APPLIANCE
When buying any XO appliance, you can be confident you have chosen a high quality, innovative and stylish product from a company that cares about you!
If you require service or have questions, there are 2 ways to contact our appliance experts;
Online @ https://xoappliance.com/priority-service-for-your-xo-product/
Or by phone 973-403-8900

CONGRATULATIONS
on purchasing your XO. Before you proceed, take just a moment to register your XO at:
www.xoappliance.com/register-your-product/
Or simply scan here to be taken to the registration page...

Ensuring warranty coverage should you need service Providing ownership verification for insurance purposes XO can notify you in the event of product changes or recalls.
Contents
Introduction....4
BEFORE YOU BEGIN 4
IMPORTANT SAFETY INSTRUCTIONS 4
ELECTRICAL REQUIREMENTS....4
Package contents....5
Parts....5
Hardware 5
Before you install....6
Tools and materials needed....6
Mounting requirements....7
Exhaust requirements....8
Removing your microwave....10
Installing your microwave....11
Step 1: Find the wall studs....11
Step 2: Align the rear wall template....12
Step 3: Select a ventilation type....14
Option A: Step 4 - Attach the mounting plate to the wall....15
Option A: Step 5 - Preparing the top cabinet....17
Option A: Step 6 - Adapt microwave blower for outside top exhaust....19
Option A: Step 7 - Mount the microwave....21
Option A: Step 8 - Connecting duct work....23
Option B: Step 4 - Cutting a vent opening ....24
Option B: Step 5 - Attach the mounting plate to the wall....25
Option B: Step 6 - Preparing the top cabinet ....27
Option B: Step 7 - Adapt microwave blower for outside back exhaust....29
Option B: Step 8 - Mount the microwave....32
Option C: Step 4 - Attach the mounting plate to the wall ....34
Option C: Step 5 - Preparing the top cabinet....36
Option C: Step 6 - Mount the microwave....38
Before using your microwave....40
Obtaining replacement parts....40
Specifications....40
Template dimensions....41
Rear wall template dimensions 41
Top cabinet template dimensions....42
Introduction
Congratulations on your purchase of a high-quality product. Your represents the state of the art in microwave design and is designed for reliable and trouble-free performance.
This installation guide will show you how to install your new over-the-range microwave.
BEFORE YOU BEGIN
Read these instructions completely and carefully.
• IMPORTANT – Save these instructions for local inspector's use.
• IMPORTANT – Observe all governing codes and ordinances.
• Note to Installer – Be sure to leave these instructions with the consumer.
• Note to Consumer – Keep these instructions for future reference.
• Skill level – Installation of this appliance requires basic mechanical and electrical skills.
• Proper installation is the responsibility of the installer.
• Product failure due to improper installation is not covered under the Warranty.
IMPORTANT SAFETY INSTRUCTIONS
IMPORTANT- PLEASE READ CAREFULLY. FOR PERSONAL SAFETY, THIS APPLIANCE MUST BE PROPERLY GROUNDED TO AVOID SEVERE OR FATAL SHOCK.
This product requires a three-prong, properly grounded outlet for safe operation. If not properly grounded, or if the outlet box does not meet electrical requirements noted (under ELECTRICAL REQUIREMENTS), a qualified electrician should be employed to correct any deficiencies.
The power cord of this appliance is equipped with a three-prong (grounding) plug which mates with a standard three-prong (grounding) wall receptacle to minimize the possibility of electric shock hazard from this appliance.

Ensure proper ground before use
You should have the wall receptacle and circuit checked by a qualified electrician to make sure that the receptacle is properly grounded.
Where a standard two-prong wall receptacle is encountered, it is very important to have it replaced with a properly grounded three-prong wall receptacle installed by a qualified electrician.
DO NOT, UNDER ANY CIRCUMSTANCES, CUT, DEFORM, OR REMOVE ANY OF THE PRONGS FROM THE POWER CORD. DO NOT USE WITH AN EXTENSION CORD.
Note
For easier installation and personal safety, it is recommended that two people install this product.
Caution
For personal safety, remove the house fuse or open the circuit breaker before beginning installation to avoid severe or fatal shock injury.
For personal safety, the mounting surface must be capable of supporting the cabinet load, in addition to the added weight of this 56-lb. (25.4 kg) product, plus additional oven loads of up to 50 pounds (22 kilograms) for a total weight of 106 lbs. (46.4 kg).
For personal safety, this product cannot be installed in cabinet arrangements such as an island or a peninsula. It must be mounted to BOTH a top cabinet AND a wall.

natural_image
Hand placing a component into an electrical box with wires (no text or symbols visible)ELECTRICAL REQUIREMENTS
The product rating of your microwave is 120 volts AC, 60 Hertz, 15 amps, and 1.6 kilowatts. This product must be connected to a supply circuit of the proper voltage and frequency. Wire size must conform to the requirements of the National Electrical Code or the prevailing local code for this kilowatt rating. The power supply cord and plug should be brought to a separate 20 ampere branch circuit single grounded outlet. The outlet box should be located in the cabinet above the microwave oven. The outlet box and supply circuit should be installed by a qualified electrician and conform to the National Electrical Code or the prevailing local code.
DAMAGE—SHIPMENT/ INSTALLATION
- If the unit is damaged in shipment, return the unit to the store in which it was bought for repair or replacement.
- If the unit is damaged by the customer, repair or replacement is the responsibility of the customer
- If the unit is damaged by the installer (if other than the customer), repair or replacement must be made by arrangement between customer and installer.
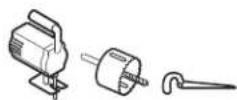
PARTS INCLUDED
HARDWARE PACKET
| PART | QUANTITY | |
| [WH72] | Wood Screws ( 1/4'' × 2'' ) | 2 |
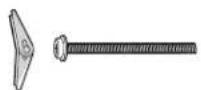
 | Toggle Bolts and wing nuts 3116'' × 3'' | 2 |
 | Self-Aligning Machine Screws 1/4'' - 28 × 314'' | 3 |
 | Nylon Grommet (for metal cabinets) | 1 |
You will find the installation hardware contained in a packet with the unit. Check to make sure you have all these parts.
NOTE: Some extra parts are included.
PARTS INCLUDED (CONT.) ADDITIONAL PARTS
| PART | QUANTITY | |
 | Top Cabinet Template | 1 |
 | RearWall Template | 1 |
 | Installation Instructions | 1 |
| Use & Care Manual | 1 | |
 | Separately Packed Grease Filters | 2 |
 | Exhaust adaptor | 1 |
 | Glass Tray | 1 |
 | Tumtable Ring | 1 |
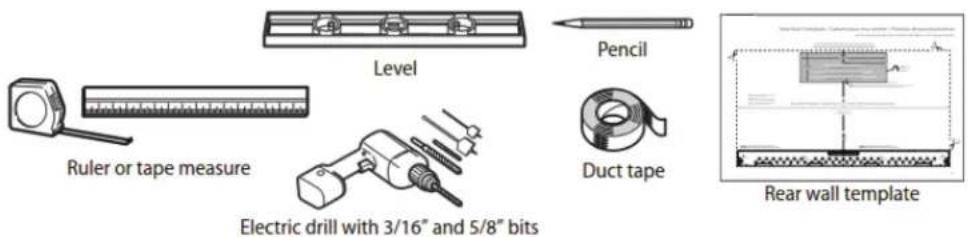
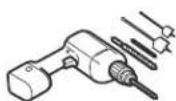
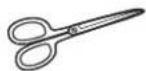
TOOLS YOU WILL NEED

1 Phillips screwdriver

Pencil

Tin snips (for cutting damper, if required)

Scissors
(to cut template, if necessary)

Electric drill with 316 , 12 and 58 drill bits
Filler blocks or scrap wood pieces, if needed for top cabinet spacing (used on recessed bottom cabinet installations only)

Gloves
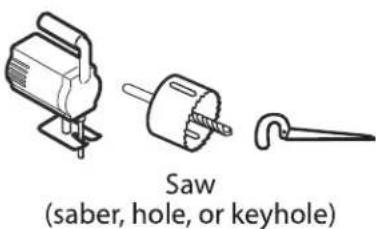
Saw (saber, hole or keyhole)

Stud finder
Hammer (optional)

Safety goggles

Level
Duct and masking tape
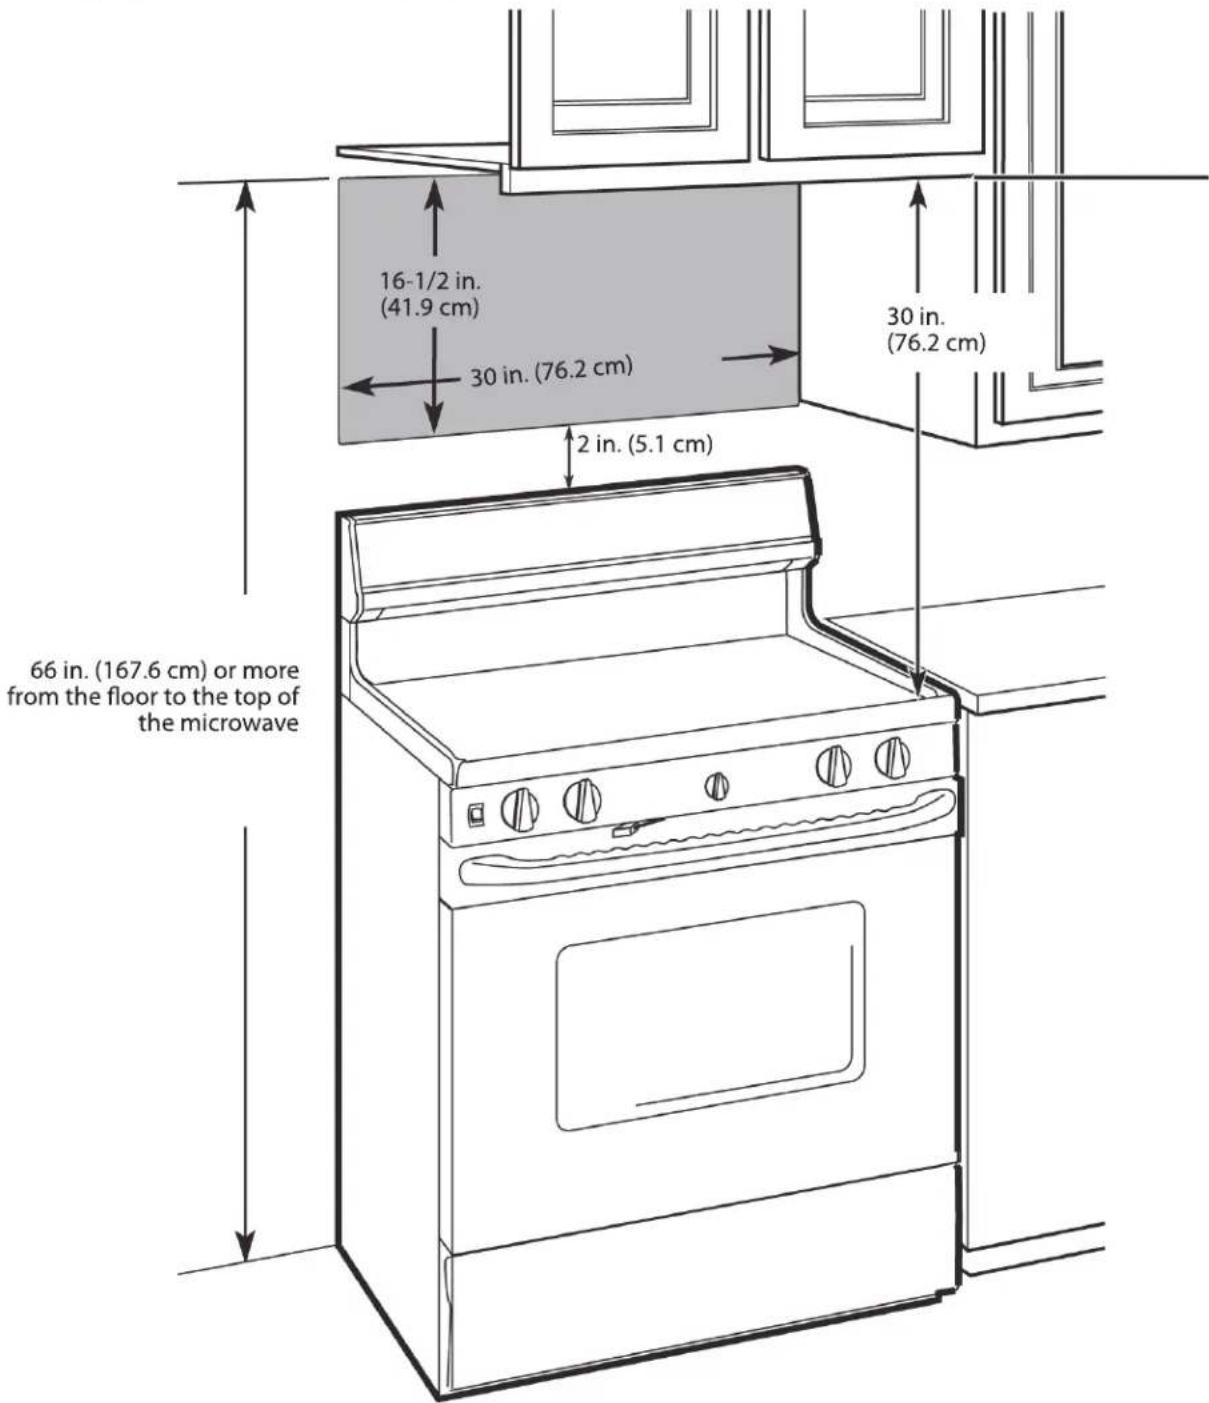
Mounting requirements
- The space between the cabinets must be 30 in. (76.2 cm) wide. If the space between the cabinets is more than 30 in. (76.2 cm), you'll need filler material to fill the gap between the microwave and cabinets.
- This microwave is for installation over ranges up to 36 in. (91.4 cm) wide.
- If installing the microwave beneath smooth, flat cabinets, make sure that you leave enough space for the power cord clearance.
- If you are going to vent your exhaust to the outside, see "Exhaust requirements" on page 8 for exhaust duct preparation.
Exhaust requirements
Use this section if you plan to vent your microwave outside (top or back exhaust). If you plan to recirculate the air back into the room, skip to "Removing your microwave" on page 9.
When installing exhaust vents:
- Use the most direct route with as few elbows/transitions as possible. This helps prevent blockages and ensures that the exhaust is being vented correctly.
- Your microwave is designed to mate with a standard 3-1/4" × 10" rectangular duct. If a round duct is required a rectangular-to-round transition adapter must be used. Do not use a duct with a diameter less than 6".
Note
If a rectangular-to-round transition adapter is used, you must cut the bottom corners of the damper with tin snips to let the damper have free movement.
- Elbows, transitions, and wall/roof caps add resistance to airflow. Each of these pieces are equivalent to a section of straight duct that is longer than their actual physical size. When calculating your duct length, add the equivalent lengths of all the pieces together. For proper airflow, the equivalent airflow should not exceed 120 ft. For example:
| Duct Pieces | Equivalent Length | × | Number Used | = | Total Equivalent Length |
| Roof cap | 40 ft. | × | (1) | = | 40 ft. |
| 90° elbow | 10 ft. | × | (2) | = | 20 ft. |
| Straight duct 6" round OR 3-1/4" × 10" rectangular | 3 ft. | × | (1) | = | 3 ft. |
| Total ductwork = 63 ft. For proper airflow, this number should not exceed 120 ft. |
Use the "Equivalent duct length table" on page 9 to calculate the equivalent duct-work length for your setup.
Note
Equivalent lengths of duct pieces are based on actual tests and reflect requirements for good venting performance with any vent hood.
Equivalent duct length table
To calculate your equivalent duct length:
1 Write the number of sections used for each of the duct pieces.
2 Multiply the number used by the equivalent length for each duct piece.
3 Add the total equivalent lengths together. This number must be less than 120 ft.
| Duct Pieces | Equivalent Length | × | Number Used | = | Total Equivalent Length | |
 | Rectangular-to-round transition adapter | 5 ft. | × | ( ) | = | ft. |
 | Wall cap | 40 ft. | × | ( ) | = | ft. |
 | 90° elbow | 10 ft. | × | ( ) | = | ft. |
 | 45° elbow | 5 ft. | × | ( ) | = | ft. |
 | 90° elbow | 25 ft. | × | ( ) | = | ft. |
 | 45° elbow | 5 ft. | × | ( ) | = | ft. |
 | Roof cap | 24 ft. | × | ( ) | = | ft. |
| [SZW6S] | Straight duct 6" round OR 3-1/4" × 10" rectangular | 1 ft. | × | ( ) | = | ft. |
| Total ductwork = | ft.(For proper airflow, this number should not exceed 120 ft.) | |||||
Removing your microwave
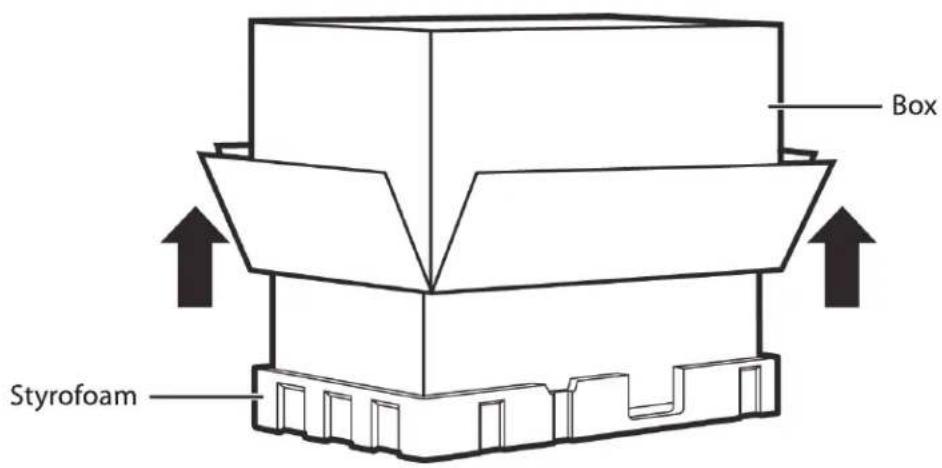
1 Remove the documentation, filters, glass tray, and hardware bag from the box. Do not remove the Styrofoam protecting the front of your microwave.
2 Fold back all four box flaps, then carefully roll the microwave and box over onto the top side. The microwave should be resting in the Styrofoam.
3 Pull the box up and off the microwave.
4 Remove and throw away the plastic bags.
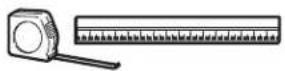
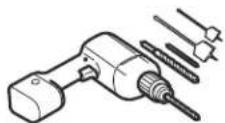
You'll need:

natural_image
Illustration of three basic tools: a voltmeter, a measuring tape, and a pencil (no text or symbols present)Edge-to-edge stud finder
Ruler or tape measure
Pencil
Installing your microwave
Step 1: Find the wall studs
Warning
Your microwave must be connected to at least one wall stud.
1 Using an edge-to-edge stud finder, locate the edges of the wall stud(s) within the opening.
Warning
The center of any adjacent wall studs should be 16" or 24" from this mark.
2 Mark the center of each stud, and then draw a vertical line down the center of each stud.

Step 2: Align the rear wall template
NOTE:
If the rear wall template is damaged or unusable, see "Rear wall template dimensions" on page 40 for dimensions.
1 Use a level to make sure that the bottom of the cabinet is level.
2 Draw a vertical line down the center of the wall in the mounting space.
This is where the center of your template will be.

natural_image
Pure architectural line drawing of a symmetrical structure with no text, numbers, or symbols3 Draw a horizontal line at the height of the front of your cabinet. This is where the top of your template will be. If the bottom of your cabinet is flat, make sure that you leave space for the power cord.

flowchart
graph TD
    A["Flat bottom: WALL"] --> B["Cabinet"]
    B --> C["Cabinet"]
    C --> D["Power cord"]
    D --> E["Rear wall template"]
    F["Front overhang: WALL"] --> G["Cabinet"]
    G --> H["Recessed back: WALL"]
Notes
- If installing the microwave beneath smooth, flat cabinets, make sure that you leave enough space for the power cord clearance.
- If cabinets have decorative trim that interferes with the microwave installation, remove the trim to install the microwave properly and to make sure that it is level.
4 Trim the rear wall template along the dotted line.
5 Tape the template in place so that it is centered on the vertical line and the top edge is aligned with the horizontal line.
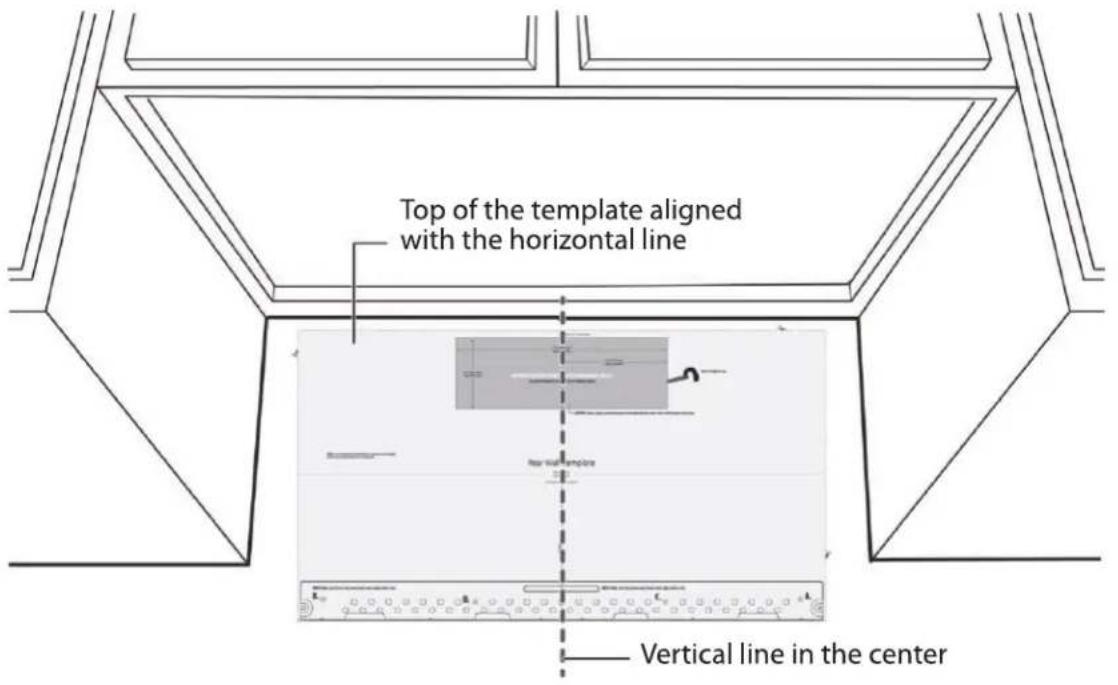
6 Find a hole that aligns with a stud (this is C or D).
CAUTION
You must mount to at least one stud.
7 Drill holes through the template at points A, B, and C or D. If the hole lines up with a stud, drill a 3/16" hole. Otherwise, drill a 5/8" hole for the toggle bolts. You must use at least three holes for mounting.

Note: Depending on your stud locations, your installation may look different. You should mount to at least one stud.
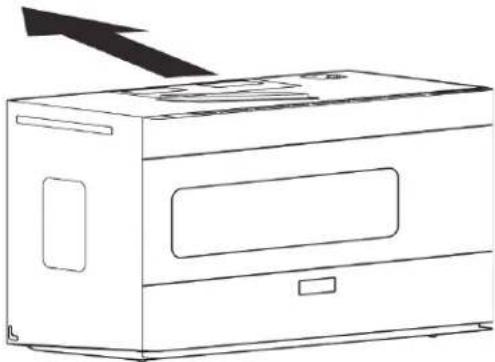
Step 3: Select a ventilation type
This microwave is designed for three types of ventilation. Select the type of ventilation you want to use, then go to the corresponding page.
Note
This microwave is shipped assembled for recirculating ventilation.
Option A - Outside top exhaust (vertical duct): See page 15

Option B - Outside back exhaust (horizontal duct): See page 24
natural_image
Line drawing of a microwave oven with a black arrow pointing to the top panel (no text or symbols)Option C - Recirculating (non-vented/ductless): See page 34

natural_image
Line drawing of a microwave oven with an upward arrow indicating airflow or movement (no text or symbols)*Requires a charcoal filter (included)
Step 4: Option A - Attach the mounting plate to the wall
Note: Depending on your stud locations, your installation may look different. You should insert toggle bolts into drywall and wood screws into studs.

natural_image
Technical line drawing of a mechanical assembly with dashed alignment lines and no visible text or symbols1 Remove the rear wall template.
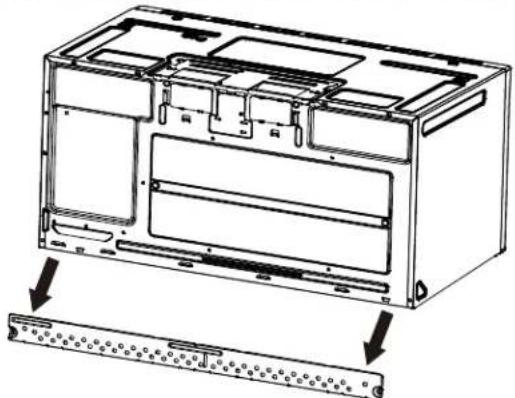
2 Remove the mounting plate from the back of your microwave using a Phillips screwdriver.
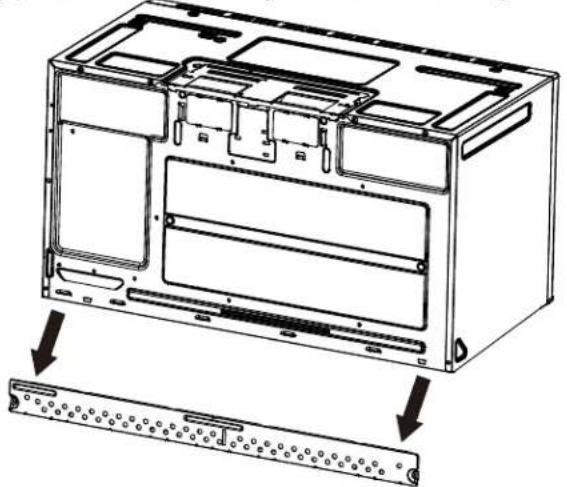
natural_image
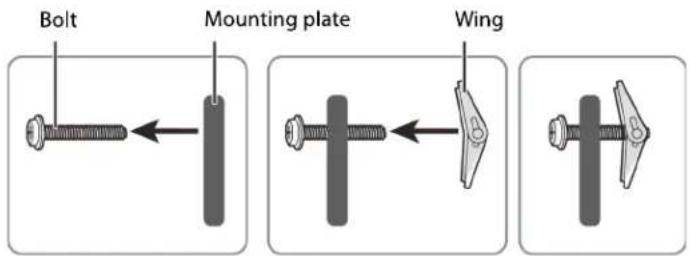
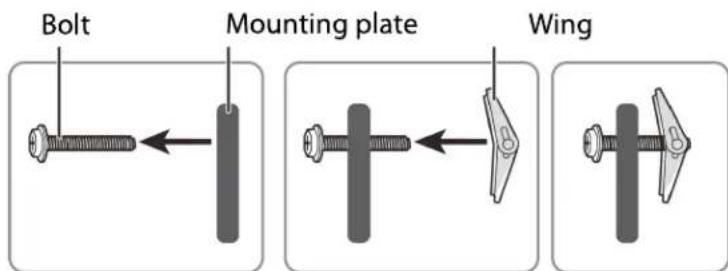
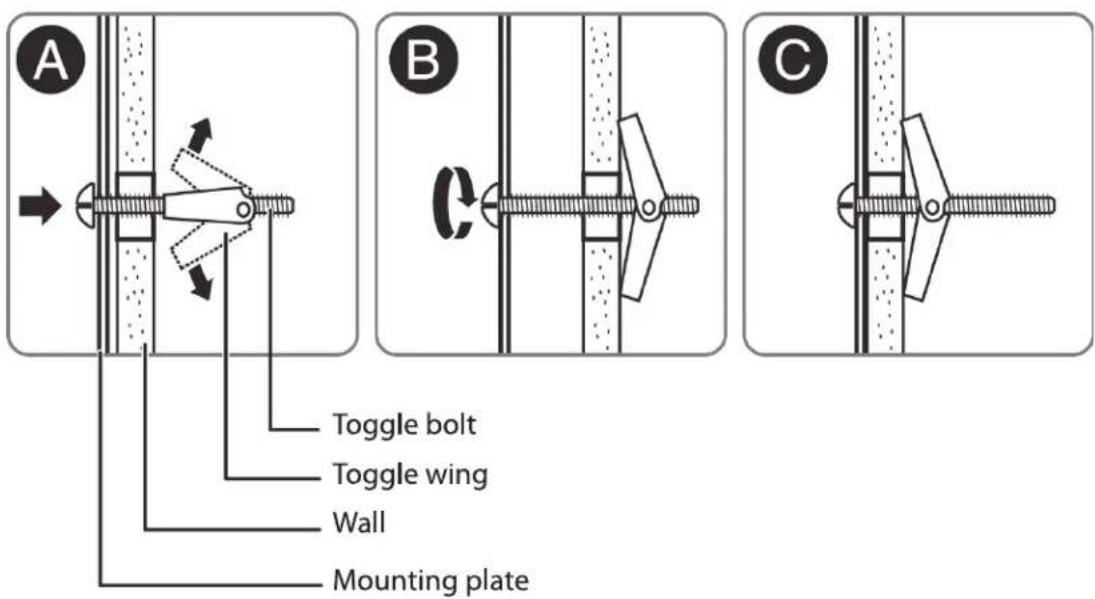
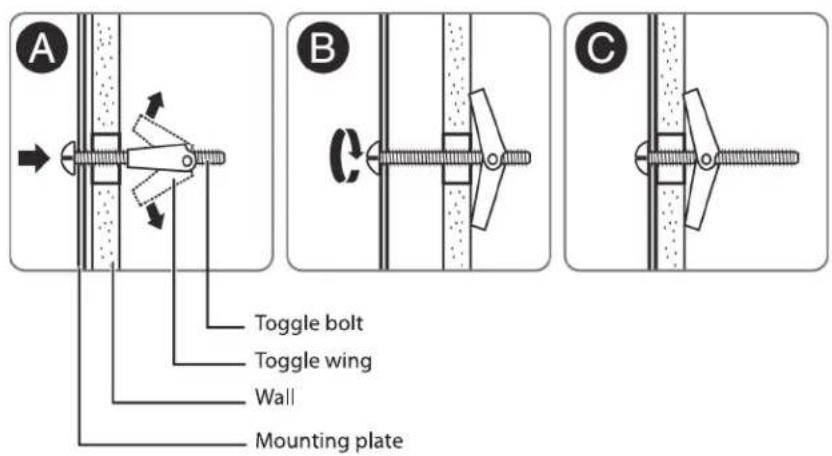
Technical line drawing of an internal device casing with mounting holes and a separate panel base (no text or symbols)3 Insert the toggle bolt(s) through the front of the mounting plate into the hole(s) that are not going into a stud, and then attach the toggle wings 34 " onto each bolt. Hold your mounting plate up to holes in your wall to identify the correct position.
Note
The top of the mounting plate is indicated with an arrow. The mounting plate's hooks are on the front.
4 Place the mounting plate against the wall and insert the toggle wings into the holes you drilled in the drywall. Pull the mounting plate away from the wall to help tighten the toggle wings.
5 Insert wood screw(s) through the mounting plate and into the hole(s) drilled in the stud(s), then tighten both the wood screw(s) and toggle bolt(s) with a Phillips screwdriver to mount the plate. Make sure that the plate is centered before tightening fully.
Caution
Be careful to avoid pinching your fingers between the back of the mounting plate and the wall.

You'll need:

Toggle bolts

Wood screws

Phillips screwdrivers

Mounting plate (Qty. 1) (ships attached to microwave)
Step 5: Option A - Preparing the top cabinet
Notes
If the top cabinet template is damaged or unusable, see "Top cabinet template dimensions" on page 41 for dimensions.
You need to drill holes for the top support screws, a hole large enough for the power cord to fit through, and a cutout large enough for the exhaust adapter.
1 Turn off the power to the outlet in the cabinet.
2 Remove everything from the cabinet.
3 Trim the Top Cabinet Template along the dotted line.
4 If the bottom of your cabinet is recessed and the template is too large, trim the edges to fit. Your template should
fit snugly inside the space with no overhang.
Note
- Make sure that you keep the left and right sides even. For example, if you need to trim the sides by 1", cut 1/2" from the left side and 1/2" from the right side.
- Some cabinets have a small bracket or glue block between the overhang and the underside of the cabinet bottom. Cut the template to fit around these so it lies flat on the bottom of the cabinet.
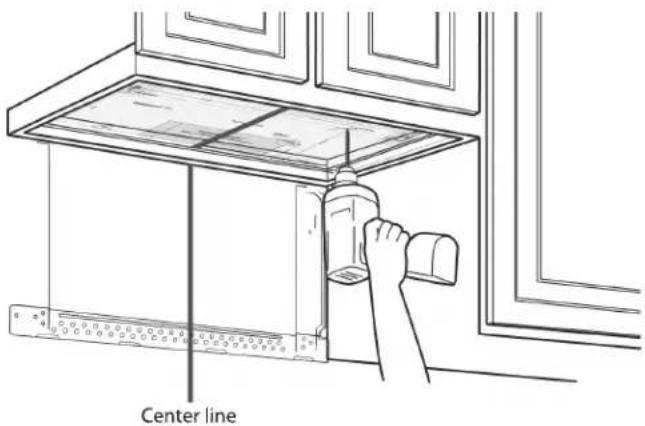
5 To position the Top Cabinet Template:
- Align the center line on the template with the center line that you drew on the wall.
- Align the back edge of the template to the rear wall (smooth or flat bottom cabinets) or to the back of the recess (recessed cabinets) to make sure that the holes cut into the upper cabinet align with the holes in the top of the microwave.
natural_image
Line drawing of a kitchen appliance with a hand holding a spray bottle, no text or symbols presentCenter line
CAUTION
Wear safety goggles when drilling holes in the cabinet bottom.
6 Tape the template to the bottom of the cabinet.
7 Drill 12 " holes through the template at points A, B, and C.
8 Cut a 2" diameter hole at point D for the power cord.
9 Cut out the shaded area G through the cabinet bottom.
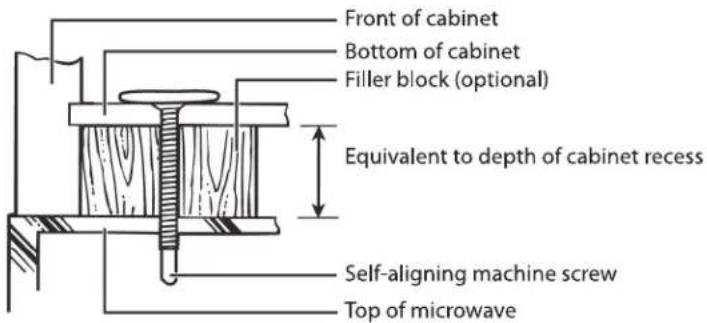
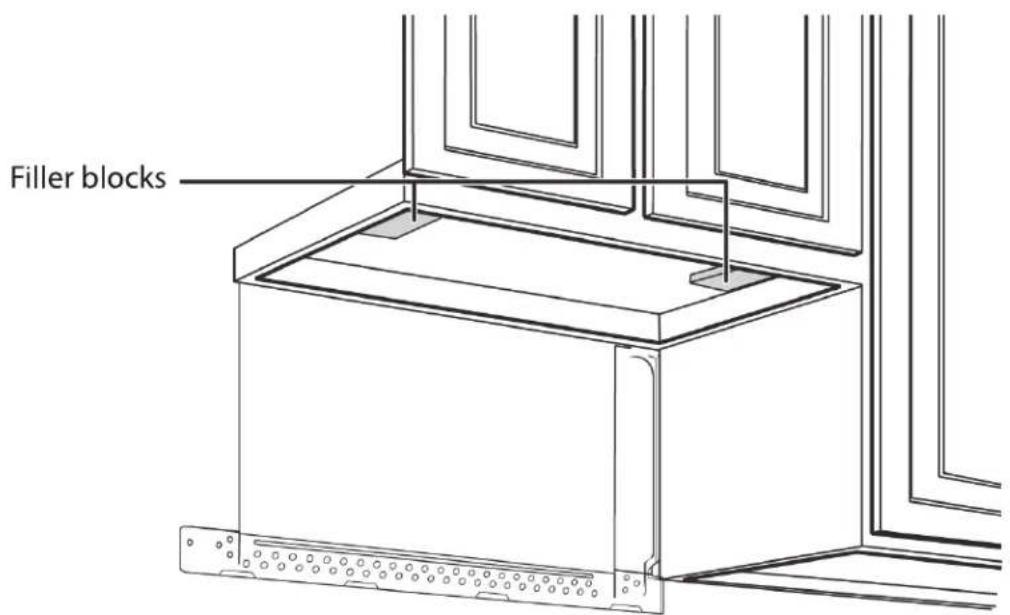
10 If you have recessed cabinets:
• Make two filler blocks out of scrap wood pieces the size of shaded areas H. They must be as thick as the depth of the cabinet recess.
- Drill 5/8" holes in the filler blocks to align with points A and B.
Filler blocks
natural_image
Technical line drawing of a microwave oven with mounting brackets and ventilation slots (no text or symbols)- Align the blocks with the corresponding holes in the cabinet. They should be at the same level as the bottom edge of the cabinet frame.
11 Remove the template.
You'll need:
Electric drill with 1/2" and 5/8" bits

Duct tape
Scissors
(recessed cabinets only)

Safety goggles
Ruler or tape measure
Saw
(saber, hole, or keyhole)
Filler blocks or scrap wood pieces (for recessed cabinets only)

Top Cabinet Template
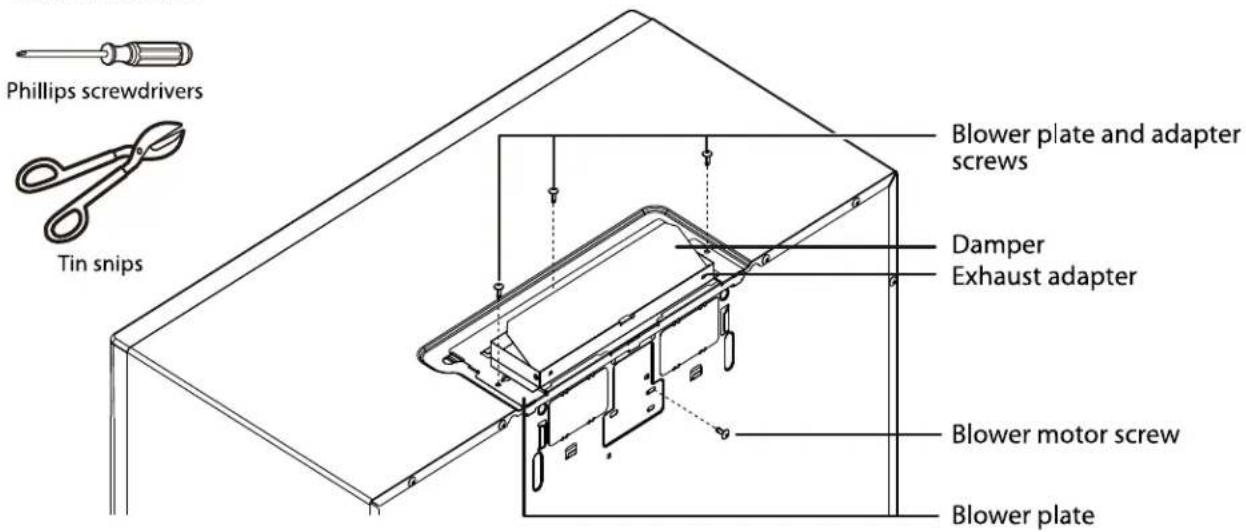
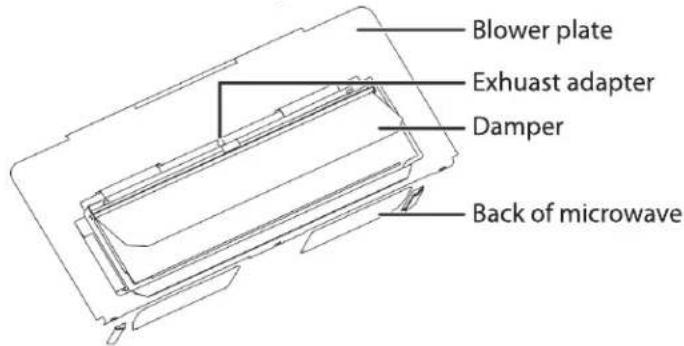
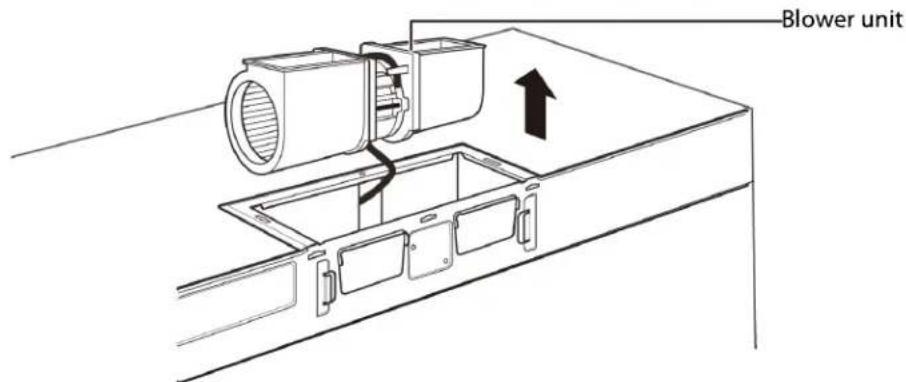
Step 6: Option A - Adapt the microwave blower for outside top exhaust
1 Remove and save the screws that hold the blower unit in the microwave. Blower plate and adapter
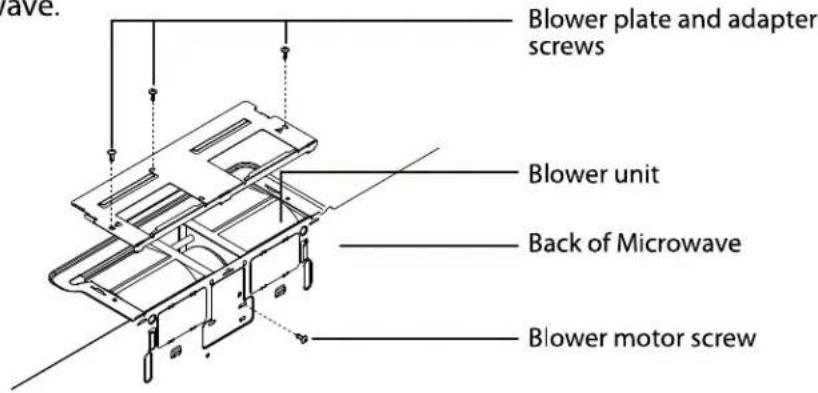
2 Carefully pull out the blower unit. The wires will extend far enough to let you adjust the blower unit. Do not disconnect the wires.
Warning
Do not pull or stretch the blower unit wiring. Make sure that the wires are not pinched.
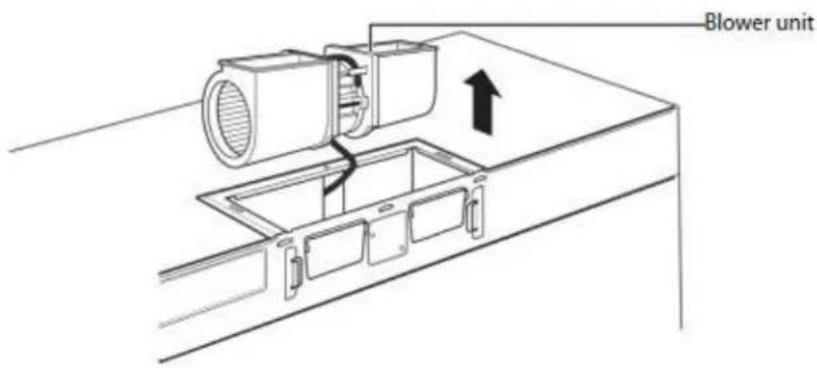
3 Turn the blower unit 90° so that the fan blade openings are facing out the top of the microwave.
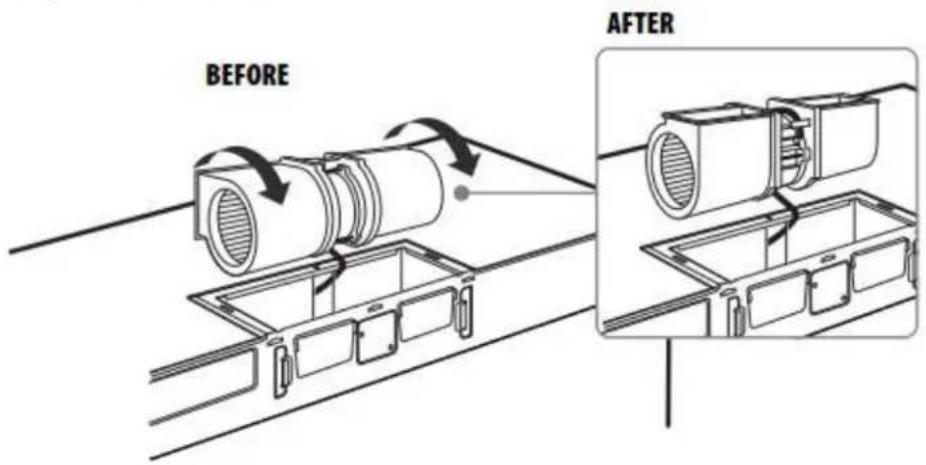
4 Place the blower unit back into the opening. The blower unit exhaust openings should face upwards.

5 Slide the exhaust adapter into the guides on the top of the microwave until it is in the locking tabs.

6 Secure the blower unit in the microwave with the screws you previously removed.
Note
Make sure that the damper hinge is at the top and that it can swing freely.
You'll need:
Step 7: Option A - Mount the microwave
CAUTION
- For easier installation and personal safety, we recommend that two people install this microwave oven.
- Do not grip or use the handle during installation.
- To keep the power cord tight while mounting the microwave oven, thread the power cord through the hole in the bottom of the cabinet.
1 If your cabinet is metal, insert the nylon grommet into the power cord hole to prevent cutting the cord.
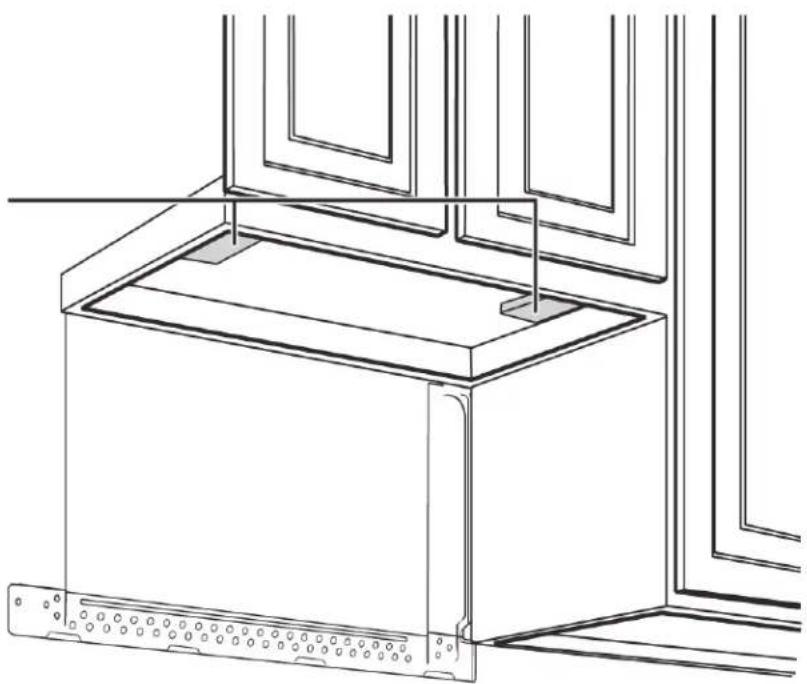
2 Lift the microwave, tilt it forward, and hook the slots on the back bottom edge onto the four lower tabs of the mounting plate. Rotate the front of the microwave up against the bottom of the cabinet.
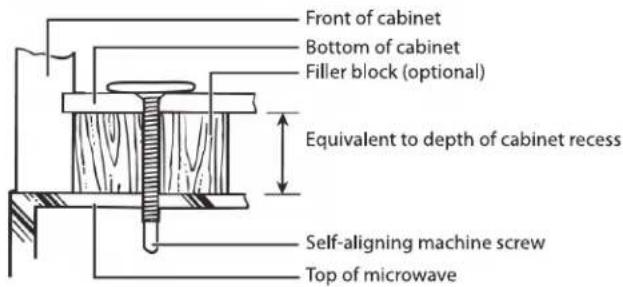
Note
- We recommend using filler blocks if the front of the cabinet hangs below the cabinet's bottom shelf.
- If filler blocks are not used, damage may occur from over-tightening the screws.

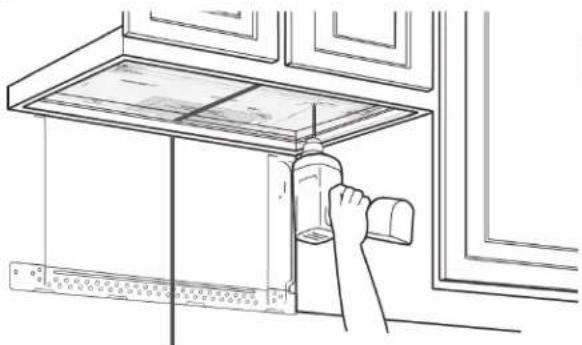
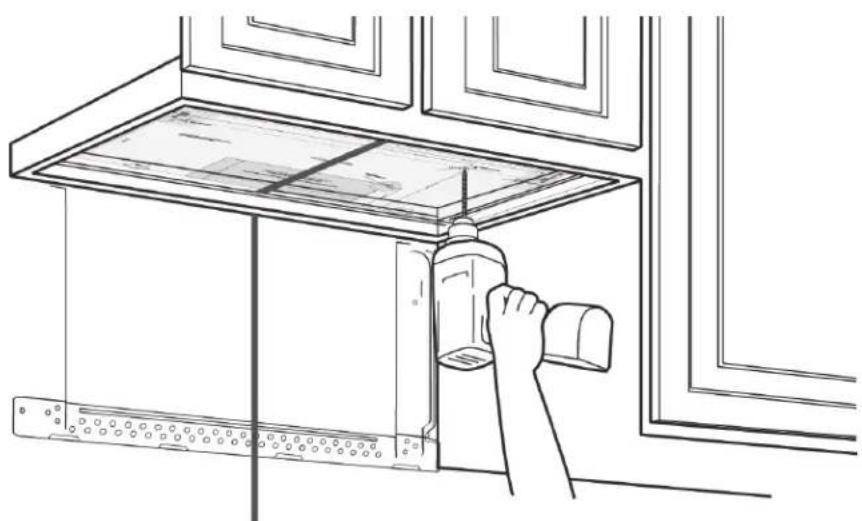
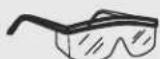
3 To temporarily hold the microwave in place, insert a self-aligning machine screw through the top-center cabinet hole and rotate the screw at least two full turns (it will be fully tightened later).
CAUTION
Be sure to keep the power cord tight. Do not pinch the cord, especially when mounting flush to the bottom of the cabinet.
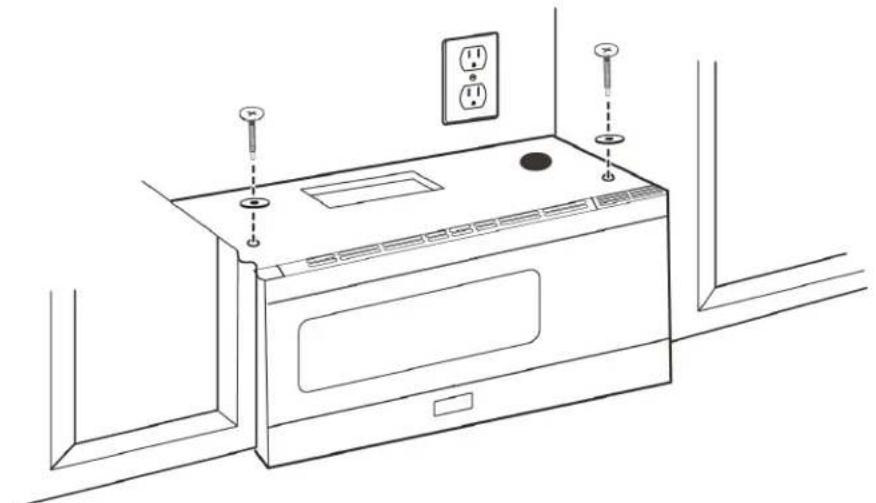
4 To attach the microwave oven to the top cabinet, insert two self-aligning machine screws through the holes you drilled in the bottom of the cabinet. Turn each screw at least two full turns (they will be fully tightened later).
5 While holding the microwave up against the wall and cabinet, fully tighten the top-center machine screw, then fully tighten the outer two screws.
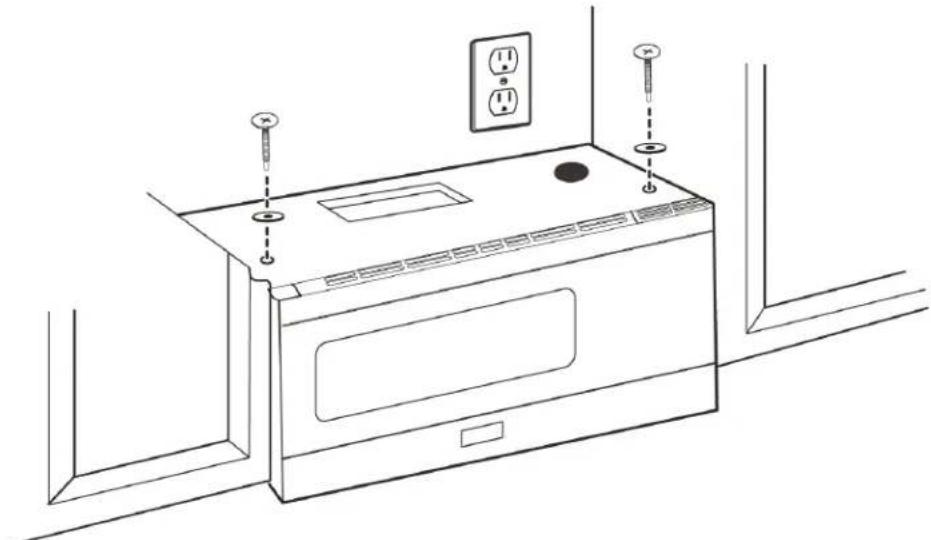
natural_image
Line drawing of a microwave oven with two screw holes and an electrical outlet (no text or symbols)6 Fit the two grease filters into the openings underneath your microwave.
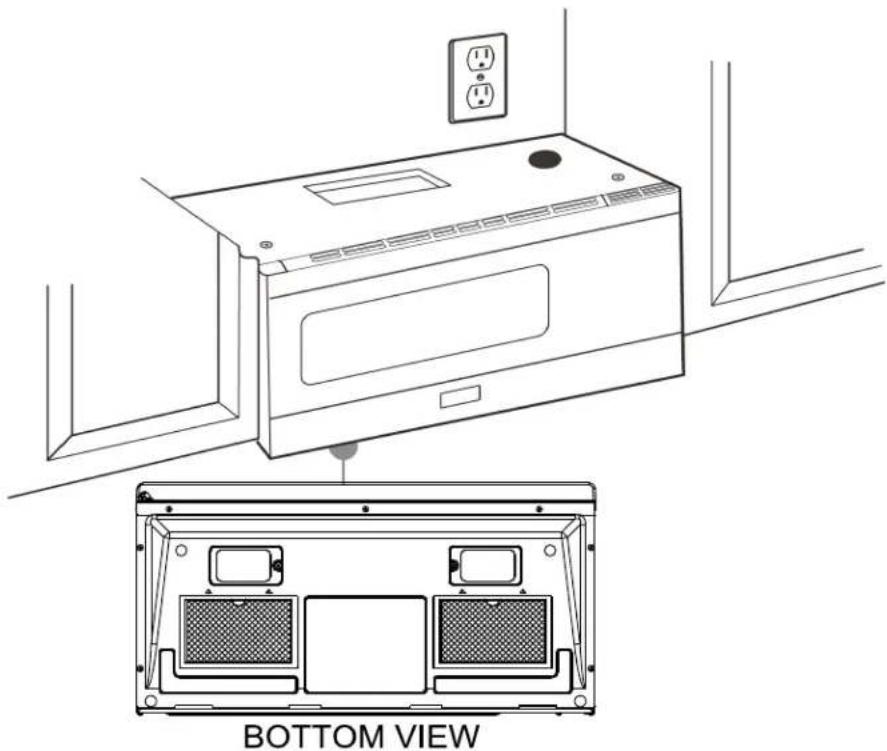
natural_image
Line drawing of a microwave oven with an inset view showing the bottom view (no text or symbols on the diagram itself)You'll need:

Step 8: Option A - Connecting ductwork
1 Open the cabinet and slide the exhaust adapter front-to-back or side-to-side to adjust.
2 Extend the house duct down to connect to the exhaust adapter.
3 Seal the exhaust duct joints with duct tape.

4 You're finished! Skip to "Before using your microwave" on page 40.
You'll need:

Duct tape
Step 4: Option B - Cutting a vent opening
1 Use a saber or keyhole saw to cut out the shaded area through the rear wall.
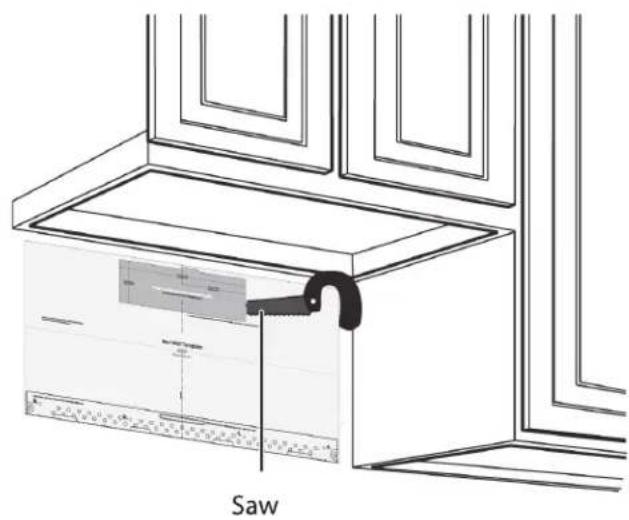
2 Remove the rear wall template.

natural_image
Line drawing of a window frame structure with no text or symbolsYou'll need:
Step 5: Option B - Attach the mounting plate to the wall

natural_image
Architectural cross-section diagram of a building facade with structural elements and lighting fixtures (no text or labels)Note: Depending on your stud locations, your installation may look different. You should insert toggle bolts into drywall and wood screws into studs.
1 Remove the rear wall template.
2 Remove the mounting plate from the back of your microwave using a Phillips screwdriver.

natural_image
Technical line drawing of an internal device casing with mounting holes and a separate panel assembly (no text or symbols)3 Insert the toggle bolt(s) through the front of the mounting plate into the hole(s) that are not going into a stud, and then attach the toggle wings 34 " onto each bolt. Hold your mounting plate up to holes in your wall to identify the correct position.
Note
The top of the mounting plate is indicated with an arrow. The mounting plate's hooks are on the front.
4 Place the mounting plate against the wall and insert the toggle wings into the holes you drilled in the drywall. Pull the mounting plate away from the wall to help tighten the toggle wings.
5 Insert wood screw(s) through the mounting plate and into the hole(s) drilled in the stud(s), then tighten both the wood screw(s) and toggle bolt(s) with a Phillips screwdriver to mount the plate. Make sure that the plate is centered before tightening fully.
Caution
Be careful to avoid pinching your fingers between the back of the mounting plate and the wall.
You'll need:

Mounting plate (Qty. 1) (ships attached to microwave)
Step 6: Option B - Preparing the top cabinet
You need to drill holes for the top support screws and a hole large enough for the power cord to fit through.
1 Turn off the power to the outlet in the cabinet.
2 Remove everything from the cabinet.
3 Trim the Top Cabinet Template along the dotted line.
4 If the bottom of your cabinet is recessed and the template is too large, trim the edges to fit. Your template should fit snugly inside the space with no overhang.
Note
- Make sure that you keep the left and right sides even. For example, if you need to trim the sides by 1", cut 1/2" from the left side and 1/2" from the right side.
- Some cabinets have a small bracket or glue block between the overhang and the underside of the cabinet bottom. Cut the template to fit around these so it lies flat on the bottom of the cabinet.
5 To position the Top Cabinet Template:
- Align the center line on the template with the center line that you drew on the wall.
- Align the back edge of the template to the rear wall (smooth or flat bottom cabinets) or to the back of the recess (recessed cabinets) to make sure that the holes cut into the upper cabinet align with the holes in the top of the microwave.
6 Tape the template to the bottom of the cabinet.
7 Drill 1/2" holes through the template at points A, B, and C.
CAUTION
Wear safety goggles when drilling holes in the cabinet bottom.
8 Cut a 2" diameter hole at point D for the power cord.
9 If you have recessed cabinets:
• Make two filler blocks out of scrap wood pieces the size of shaded areas H. They must be as thick as the depth of the cabinet recess.
- Drill 5/8" holes in the filler blocks to align with points A and B.
Filler blocks

natural_image
Technical line drawing of a cabinet or enclosure with structural supports and window frame (no text or symbols)- Align the blocks with the corresponding holes in the cabinet. They should be at the same level as the bottom edge of the cabinet frame.
10 Remove the template.
You'll need:
Electric drill with 1/2" and 5/8" bits
Duct tape
Scissors (recessed cabinets only)
Safety goggles
Ruler or tape measure
Saw (saber, hole, or keyhole)

Filler blocks or scrap wood pieces (for recessed cabinets only)

flowchart
graph TD
    A["Production"] --> B["Quality Control"]
    B --> C["Quality Inspection"]
    C --> D["Quality Inspection"]
    D --> E["Quality Inspection"]
    E --> F["Quality Inspection"]
    F --> G["Quality Inspection"]
    G --> H["Quality Inspection"]
    H --> I["Quality Inspection"]
    I --> J["Quality Inspection"]
    J --> K["Quality Inspection"]
    K --> L["Quality Inspection"]
    L --> M["Quality Inspection"]
    M --> N["Quality Inspection"]
    N --> O["Quality Inspection"]
    O --> P["Quality Inspection"]
    P --> Q["Quality Inspection"]
    Q --> R["Quality Inspection"]
    R --> S["Quality Inspection"]
    S --> T["Quality Inspection"]
    T --> U["Quality Inspection"]
    U --> V["Quality Inspection"]
    V --> W["Quality Inspection"]
    W --> X["Quality Inspection"]
    X --> Y["Quality Inspection"]
    Y --> Z["Quality Inspection"]
Top Cabinet Template
Step 7: Option B - Adapt the microwave blower for outside back exhaust
1 Remove and save the screws that hold the blower unit in the microwave.

2 Carefully pull out the blower unit. The wires will extend far enough to let you adjust the blower unit. Do not disconnect the wires.
Warning
Do not pull or stretch the blower unit wiring. Make sure that the wires are not pinched.
3 Cut out the vent holes with tin snips.
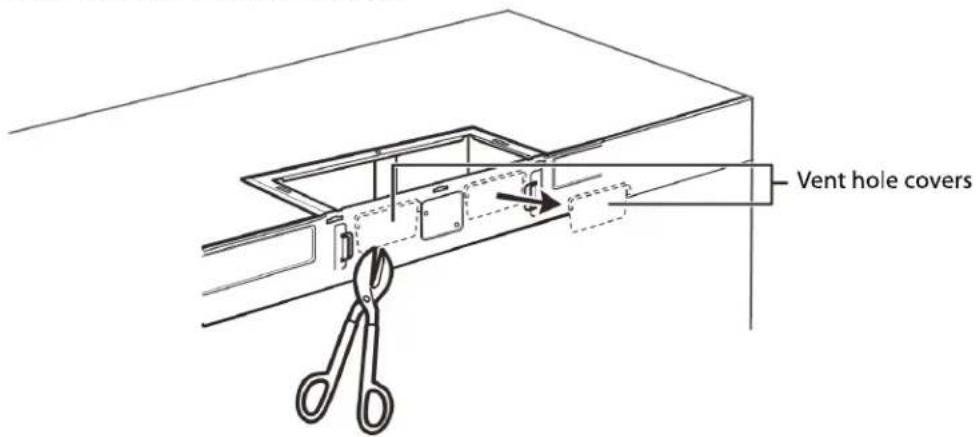
4 Turn the blower unit 180° so that the fan blade openings are facing out the back of the microwave.

5 Place the blower unit back into the opening. The blower unit exhaust openings should match the exhaust openings on back of the microwave.

6 Slide the exhaust adapter into the guides on the back of the microwave and push in until it is aligned with the blower motor screw holes, then secure with the blower motor screws.

7 Secure the blower unit in the microwave with the screw you previously removed.
Note
Make sure that the damper hinge is at the top and that it can swing freely.

8 Secure the blower plate and exhaust adapter with the remaining screws you removed previously.

You'll need:


Tin snips
Step 8: Option B - Mount the microwave
CAUTION
- For easier installation and personal safety, we recommend that two people install this microwave oven.
- Do not grip or use the handle during installation.
- To keep the power cord tight while mounting the microwave oven, thread the power cord through the hole in the bottom of the top cabinet.
1 If your cabinet is metal, insert the nylon grommet into the power cord hole to prevent cutting the cord.
2 Lift the microwave, tilt it forward, and hook the slots on the back bottom edge onto the four lower tabs of the mounting plate. Rotate the front of the microwave up against the bottom of the cabinet.
Note
- We recommend using filler blocks if the front of the cabinet hangs below the cabinet's bottom shelf.
- If filler blocks are not used, damage may occur from over-tightening the screws.

3 To temporarily hold the microwave in place, insert a self-aligning machine screw through the top-center cabinet hole and rotate the screw at least two full turns (it will be fully tightened later).
CAUTION
Be sure to keep the power cord tight. Do not pinch the cord, especially when mounting flush to the bottom of the cabinet.
4 To attach the microwave oven to the top cabinet, insert two self-aligning machine screws through the holes you drilled in the bottom of the cabinet. Turn each screw at least two full turns (they will be fully tightened later).
5 While holding the microwave up against the wall and cabinet, fully tighten the top-center machine screw, then fully tighten the outer two screws.
natural_image
Line drawing of a microwave oven with attached electrical outlets and a door, no text or symbols present6 Fit the two grease filters into the openings underneath your microwave.

natural_image
Line drawing of a microwave oven with top view showing internal compartments (no text or symbols)7 You're finished! See "Before using your microwave" on page 40
You'll need:

Step 4: Option C - Attach the mounting plate to the wall

1 Remove the rear wall template.
2 Remove the mounting plate from the back of your microwave using a Phillips screwdriver.
natural_image
Technical line drawing of an internal device housing with a separate panel base (no text or symbols)3 Insert the toggle bolt(s) through the front of the mounting plate into the hole(s) that are not going into a stud, and then attach the toggle wings 34 " onto each bolt. Hold your mounting plate up to holes in your wall to identify the correct position.
Note
The top of the mounting plate is indicated with an arrow. The mounting plate's hooks are on the front.

4 Place the mounting plate against the wall and insert the toggle wings into the holes you drilled in the drywall. Pull the mounting plate away from the wall to help tighten the toggle wings.
5 Insert wood screw(s) through the mounting plate and into the hole(s) drilled in the stud(s), then tighten both the wood screw(s) and toggle bolt(s) with a Phillips screwdriver to mount the plate. Make sure that the plate is centered before tightening fully.
Caution
Be careful to avoid pinching your fingers between the back of the mounting plate and the wall.
You'll need:
Toggle bolts

Wood screws

Phillips screwdrivers

Mounting plate (Qty. 1)
(ships attached to microwave)
Step 5: Option C - Preparing the top cabinet
You need to drill holes for the top support screws and a hole large enough for the power cord to fit through.
1 Turn off the power to the outlet in the cabinet.
2 Remove everything from the cabinet.
3 Trim the Top Cabinet Template along the dotted line.
4 If the bottom of your cabinet is recessed and the template is too large, trim the edges to fit. Your template should fit snugly inside the space with no overhang.
Note
- Make sure that you keep the left and right sides even. For example, if you need to trim the sides by 1", cut 1/2" from the left side and 1/2" from the right side.
- Some cabinets have a small bracket or glue block between the overhang and the underside of the cabinet bottom. Cut the template to fit around these so it lies flat on the bottom of the cabinet.
5 To position the Top Cabinet Template:
- Align the center line on the template with the center line that you drew on the wall.
- Align the back edge of the template to the rear wall (smooth or flat bottom cabinets) or to the back of the recess (recessed cabinets) to make sure that the holes cut into the upper cabinet align with the holes in the top of the microwave.
natural_image
Line drawing of a hand using a tool to clean or install a window frame (no text or symbols)Center line
6 Tape the template to the bottom of the cabinet.
7 Drill 1/2" holes through the template at points A, B, and C.
CAUTION
Wear safety goggles when drilling holes in the cabinet bottom.
8 Cut a 2" diameter hole at point D for the power cord.
9 If you have recessed cabinets:
• Make two filler blocks out of scrap wood pieces the size of shaded areas
H. They must be as thick as the depth of the cabinet recess.
- Drill 5/8" holes in the filler blocks to align with points A and B.
- Align the blocks with the corresponding holes in the cabinet. They should be at the same level as the bottom edge of the cabinet frame.
10 Remove the template.
You'll need:

Electric drill with 1/2" and 5/8" bits

Duct tape

Scissors
(recessed cabinets only)
Safety goggles
Ruler or tape measure

Saw
(saber, hole, or keyhole)

Filler blocks or scrap wood pieces (for recessed cabinets only)

Top Cabinet Template
Step 6: Option C - Mount the microwave
CAUTION
- For easier installation and personal safety, we recommend that two people install this microwave oven.
- Do not grip or use the handle during installation.
- To keep the power cord tight while mounting the microwave oven, thread the power cord through the hole in bottom of the top cabinet.
1 If your cabinet is metal, insert the nylon grommet into the power cord hole to prevent cutting the cord.
2 Lift the microwave, tilt it forward, and hook the slots on the back bottom edge onto the four lower tabs of the mounting plate. Rotate the front of the microwave up against the bottom of the cabinet.
Note
- We recommend using filler blocks if the front of the cabinet hangs below the cabinet's bottom shelf.
- If filler blocks are not used, damage may occur from over-tightening the screws.

3 To temporarily hold the microwave in place, insert a self-aligning machine screw through the top-center cabinet hole and rotate the screw at least two full turns (it will be fully tightened later).
CAUTION
Be sure to keep the power cord tight. Do not pinch the cord, especially when mounting flush to the bottom of the cabinet.

4 To attach the microwave oven to the top cabinet, insert two self-aligning machine screws through the holes you drilled in the bottom of the cabinet. Turn each screw at least two full turns (they will be fully tightened later).
5 While holding the microwave up against the wall and cabinet, fully tighten the top-center machine screw, then fully tighten the outer two screws.
natural_image
Line drawing of a microwave oven with two outlets and screwdrivers (no text or symbols)6 Fit the two grease filters into the openings underneath your microwave.
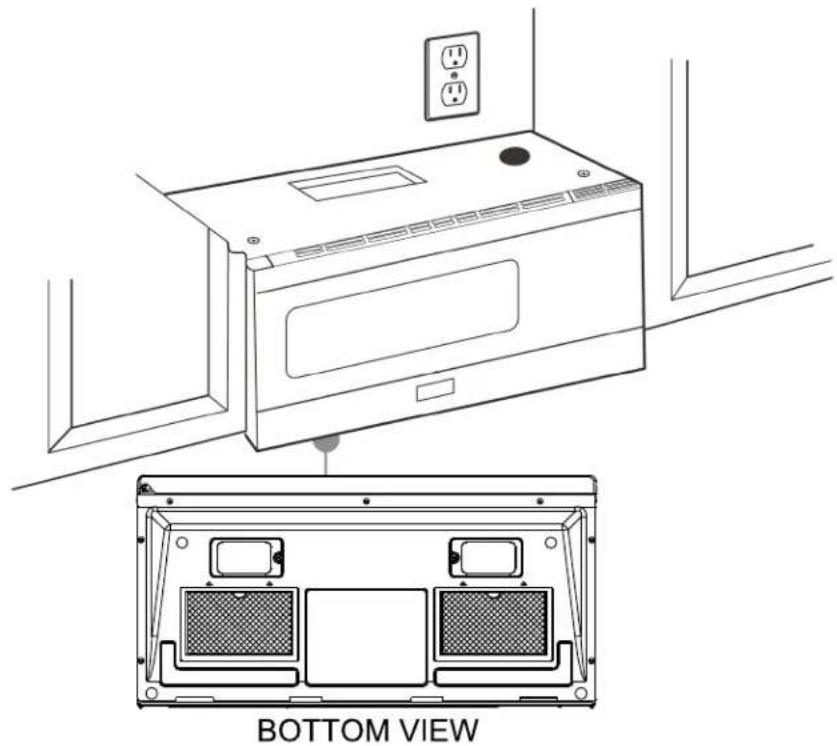
natural_image
Line drawing of a microwave oven with labeled top and bottom views, showing internal compartments and electrical outlets (no text or symbols beyond basic diagram)7 You're finished! Skip to "Before using your microwave" on page 40.
You'll need:

Before using your microwave
Note
Keep these installation instructions for the local inspector's use.
1 Make sure that all packing material has been removed from the microwave.
2 Install the turntable and ring inside your microwave. See your User Guide for more information.
3 Plug the power cord into a dedicated 20 amp electrical outlet.
4 Turn your circuit breaker back on.
Specifications
| Model | XOOTR30BS | XOOTR30W |
| Rated voltage | 120V / 60Hz |
| Rated input power | 1550 W |
| Rated output power | 1000 W |
| Microwave capacity | 1.6 cu ft |
| Turntable diameter | 13.5” (345mm) |
| External dim (WxHxD) | 29 7/8” x 16 7/16” x 15” (795mm x 417mm x 382mm) |
| Internal dim (WxHxD) | 20 1/4” x 9 1/4” x 14 13/32” (514mm x 235mm x 366mm) |
| Certifications | UL approved |
| Power cord length | 3.3 ft (1m) |
| Net weight | 56lbs (25.4kg) |
Template dimensions
Rear wall template dimensions
If your rear wall template is unusable, drill using the dimensions below.

Top cabinet template dimensions
If your top cabinet template is unusable, drill/cut using the dimensions below.
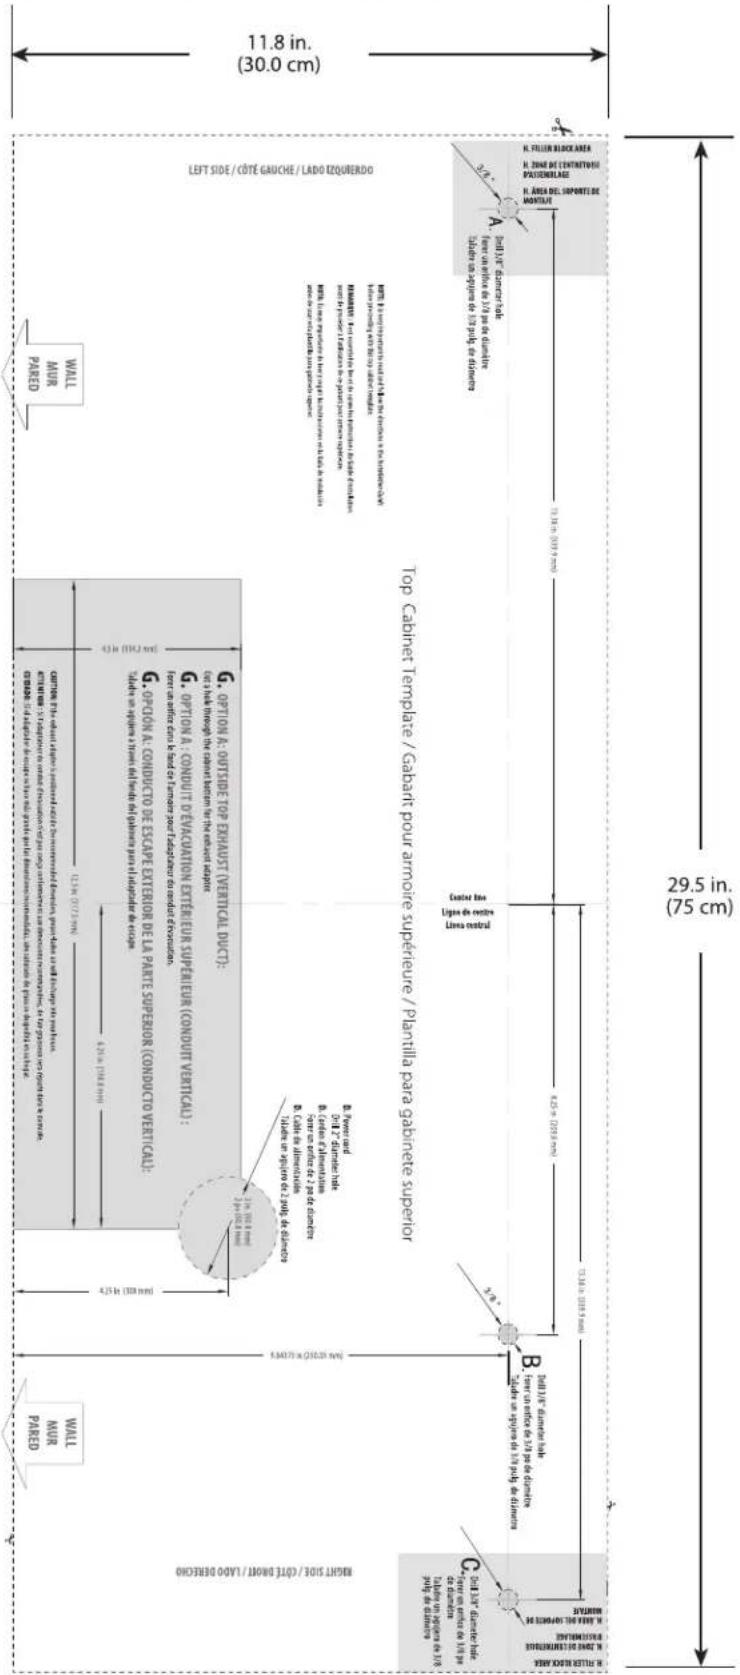

- EVERY THING YOU NEED TO KNOW ABOUT YOUR
- CONGRATULATIONS
- Contents
- SAFETY INFORMATION
- Precautions to avoid possible exposure to excessive microwave energy:
- IMPORTANT SAFETY INSTRUCTIONS
- READ ALL INFORMATION BEFORE USING
- SAVE THESE INSTRUCTIONS
- Unpacking and examining your microwave
- Grounding instructions
- Electrical requirements
- ABOUT MICROWAVE COOKING
- Cookware and cooking materials
- Cookware and Materials Test:
- Features
- Package contents
- Installing the turntable
- Tips for the best results using your Microwave
- Storage temperature
- Size
- Natural moisture
- Stirring
- Turn over items
- Food placement
- Food arrangement
- Let the food stand
- Wrapping in paper towels or waxed paper
- Cooking in your microwave
- Cooking with multiple cooking stages
- Setting the clock
- Using the Timer
- Cooking quickly
- Defrosting in your microwave
- Tips
- Tips for defrosting meat
- Cooking with the sensor
- Pizza
- Potato
- Frozen dinner
- Dinner plate
- Rice
- Vegetables
- Press START.
- Popcorn
- Beverage
- Using the stop/clear button
- Using the light
- Using the vent fan
- Using the turntable
- Using the child lock
- Cleaning and maintaining your microwave
- Cleaning the outside of your microwave
- Exterior
- Door
- Control panel
- Cleaning the inside of your microwave
- Interior
- Waveguide cover
- Removing odors
- Turntable and turntable support
- Cleaning and replacing the filters
- Cleaning the exhaust filters
- CAUTION
- Replacing the charcoal filter
- Replacing the lights
- Surface light (external)
- Microwave light (internal)
- Troubleshooting
- WHY CHOOSE XO
- EVERY THING YOU NEED TO KNOW
- TO INSTALL YOUR
- Introduction
- BEFORE YOU BEGIN
- Note
- DAMAGE—SHIPMENT/ INSTALLATION
- PARTS INCLUDED
- TOOLS YOU WILL NEED
- Phillips screwdriver
- Mounting requirements
- Exhaust requirements
- Equivalent duct length table
- Removing your microwave
- Installing your microwave
- Step 1: Find the wall studs
- Warning
- Step 2: Align the rear wall template
- NOTE:
- Notes
- You must mount to at least one stud.
- Step 3: Select a ventilation type
- Option A - Outside top exhaust (vertical duct): See page 15
- Option B - Outside back exhaust (horizontal duct): See page 24
- Option C - Recirculating (non-vented/ductless): See page 34
- Step 4: Option A - Attach the mounting plate to the wall
- You'll need:
- Step 5: Option A - Preparing the top cabinet
- Step 6: Option A - Adapt the microwave blower for outside top exhaust
- Step 7: Option A - Mount the microwave
- Step 8: Option A - Connecting ductwork
- Step 4: Option B - Cutting a vent opening
- Step 5: Option B - Attach the mounting plate to the wall
- Step 6: Option B - Preparing the top cabinet
- To position the Top Cabinet Template:
- If you have recessed cabinets:
- Remove the template.
- Step 7: Option B - Adapt the microwave blower for outside back exhaust
- Step 8: Option B - Mount the microwave
- Step 4: Option C - Attach the mounting plate to the wall
- Step 5: Option C - Preparing the top cabinet
- Step 6: Option C - Mount the microwave
- Before using your microwave
- Template dimensions
- Rear wall template dimensions
- Top cabinet template dimensions
Brand : XO
Model : XOOTR30W
Category : Microwave