
XOPIZZACART1 - Barbecue XO - Free user manual and instructions
Find the device manual for free XOPIZZACART1 XO in PDF.

| Product Type | Wood-Fired Pizza Oven with Cart |
| Brand | XO |
| Model | XOPIZZACART1 (Oven: XOPIZZA4) |
| Fuel Type | Dry seasoned hardwood only (no charcoal, coal, artificial logs, or accelerants) |
| Cooking Surface Material | Ceramic refractory hearth stone |
| Maximum Temperature | Up to 850°F (oven floor), up to 750°F (chamber) |
| Cooking Capacity | 4 personal size pizzas simultaneously |
| Total Weight (Oven + Cart) | 462 lbs (210 kg) |
| Door Type | Stainless steel door (optional glass door XOPIZZA4GD) |
| Chimney | Removable with interlocking tabs; includes chimney cap |
| Assembly Required | Yes, cart assembly required (see manual) |
| Safety Features | Wheel blocks to prevent movement; must use outdoors; keep 4 ft away from combustibles |
| Cleaning | Self-cleaning interior (high heat carbonizes spills); exterior with mild soap and water |
| Warranty | 2 Years Parts and Labor |
| Optional Accessories | Tool set XOPIZZATOOL3 (large peel, small peel, brush, tool holder); glass door; all-weather covers |
| Country of Origin | Designed and built in Italy |
| Usage Location | Outdoor only, well-ventilated area |
| Preheating Time | 15-20 minutes to reach cooking temperature |
| Cooking Methods | Convection, radiant, and conductive cooking |
| Wood Efficiency | Uses about 1/5 of wood required by traditional ovens |
Frequently Asked Questions - XOPIZZACART1 XO
User questions about XOPIZZACART1 XO
0 question about this device. Answer the ones you know or ask your own.
Ask a new question about this device
Download the instructions for your Barbecue in PDF format for free! Find your manual XOPIZZACART1 - XO and take your electronic device back in hand. On this page are published all the documents necessary for the use of your device. XOPIZZACART1 by XO.
USER MANUAL XOPIZZACART1 XO
EVERY THING YOU NEED TO KNOW ABOUT YOUR
Xo
XOPIZZA4
I worked really hard on this manual - so please read it.
XO

UNDERCOUNTER
When buying any XO appliance you can be confident you have chosen a high quality, innovative and stylish product from a company that cares about you! If you require service or have questions, Help is only a phone call away -
call: 973-403-8900
Talk to one of our undercounter experts.

CONGRATULATIONS
on purchasing your XO. Before you proceed, take just a moment to register your XO at:
www.xoappliance.com/register-your-product/
Ensuring warranty coverage should you need service Providing ownership verification for insurance purposes Let's XO notify you in the event of product changes or recalls.
WHERE THINGS ARE
Before You Get Started 4 - 7
Record your serial number
Your safety matters
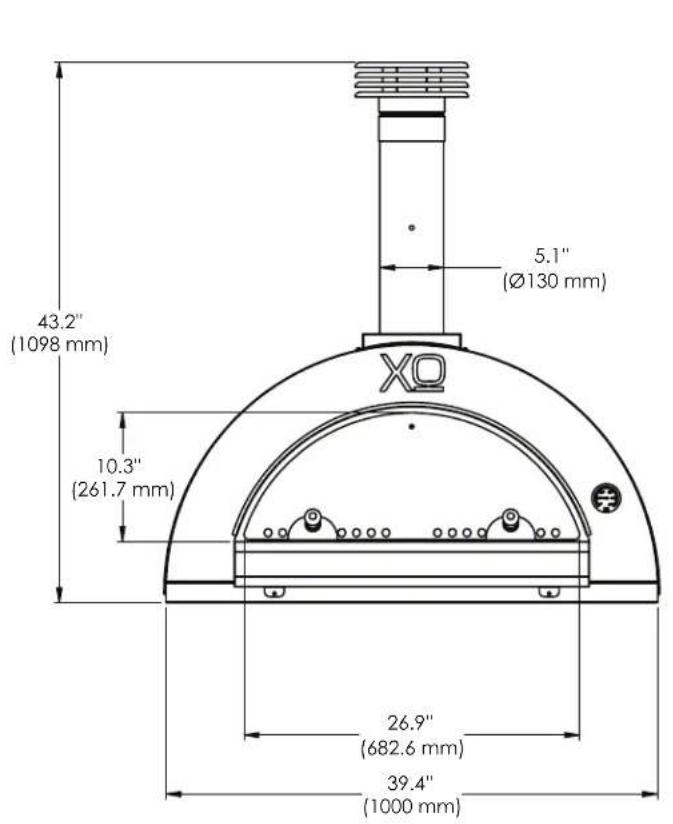
Dimensions
Using Your Wood-Fired Oven 8 - 13
Handy Tips
Lighting and using the oven
Controlling temperature
More Cooking
TLC 14
Cleaning and maintenance
Optional cart assembly 15
Step by step instructions
FAQ's 26 - 27
Frequently asked questions
Optional accessories
All The Rest 28
Warranty
Obtaining service
PLEASE READ AND FOLLOW ALL SAFETY INSTRUCTIONS
It's for your own good... Honest.
THIS IS THE MODEL COVERED IN THIS
BOOK
natural_image
Technical line drawing of a roof-mounted kitchen appliance with a conical roof and cylindrical chimney (no text or symbols)XOPIZZA4
RECORD YOUR SERIAL NUMBER HERE IN CASE YOU NEED IT LATER

YOUR SAFETY MATTERS
THIS APPLIANCE GENERATES EXTREME HIGH TEMPERATURES. Always use caution when lighting or using your oven. FAILURE TO FOLLOW THESE INSTRUCTIONS COULD RESULT IN SERIOUS PROPERTY DAMAGE, BODILY INJURY OR DEATH.
SAVE THESE INSTRUCTIONS FOR REFERENCE.
CAUTION: ONLY USE THIS OVEN OUTDOORS IN A WELL VENTILATED AREA ONLY.
Do not use in a garage, building, breezeway, or any other enclosed area.
Keep the oven on a secure, level surface at all times.
Do not use oven within four feet of any combustible material.
Combustible materials include, but are not limited to, wood or treated wood decks, patios and porches.
Use only cooking materials, containers, utensils, gloves and pot holders etc designed for high temperatures.
KEEP CHILDREN AND PETS OUT OF REACH WHILE THE OVEN IS IN USE.
Please read the entire manual before you install the oven. Contact your local building or fire officials about restrictions and installation inspection in your area.
FOR YOUR SAFETY: Do not store or use gasoline or other flammable vapors or liquids in the vicinity of this or any other appliance. Always keep the area under and around this appliance free and clear of any and all combustible materials.
Outer oven surfaces can reach temperatures above 120^ F.
Keep all combustible materials beyond a four (4) foot minimum radius of the oven.
CAUTION: When being used, place the oven at a safe minimum distance from flammable materials or any other substance that can be damaged by heat.
OVENS MUST BE PLACED ON LEVEL, FIREPROOF SURFACES WITH ENOUGH LOAD-BEARING CAPACITY TO ACCOMODATE 300 lbs.
Never move the oven while in use.
BURN DRY, WELL SEASONED HARDWOOD ONLY AS FUEL - Do not use your oven to burn other materials.
For use beneath any structure, consult your code official as to local regulations and enlist the assistance of a professional skilled in the installation of wood burning stoves. Do not use indoors! This oven is designed for outdoor use in a well-ventilated area and is not intended for and should never be used as a heater. If used indoors, toxic fumes will accumulate and cause serious bodily injury or death.
Position the oven on a flat, level, fireproof surface where it is protected from strong winds. Sparks may be ejected from the oven during operation - make certain to remove any materials which are flammable or may be damaged by hot sparks from the vicinity of the oven.
YOUR SAFETY MATTERS CONT.
NEVER LEAVE THE OVEN UNATTENDED DURING USE
To extinguish the fire, place the oven door in front of the oven mouth to completely seal the opening and allow it to go out. NEVER THROW WATER ONTO THE FIRE
LEAVE THE DOOR CLOSED AT LEAST 30 MINUTES AFTER THE FIRE HAS BEEN EXTINUISHED.. USE CAUTION OPENING THE DOOR AFTERWARD - THE SUDDEN RE-INTRODUCTION OF AIR CAN CAUSE THE FIRE TO BURST BACK INTO FLAMES.
Avoid excessively large fires that can cause flames to come back out the door. If this occurs, close the door and wait for the flames to die down.
Do not throw firewood into the oven, as it can damage the interior of the oven. Gently place firewood into the oven using long, heavy-duty, fire-proof gloves, or long handled tongs designed for that purpose.
Burn only well-seasoned, dry hardwood. Never use pressure treated or laminated wood, never use chipped or wood pellet products, never use softwood.
NEVER BURN CHARCOAL, COAL, ARTIFICIAL LOGS, STARTER/LIGHTER FLUID, KEROSENE, OILS, GASOLINE OR ANY OTHER ACCELERANTS.
When cooking dishes that may contain grease or oils, use caution to avoid spillage which may be ignited by the fire.
Keep a safe distance of at least 24" away from the front of the oven when lighting.
After every use remove the ash using a metal shovel and place in a metal bucket or container and leave outside for 2-3 days to ensure that all embers are completely extinguished and cool - then dispose of in accordance with local requirements.
Never place sealed tins or containers in the hot oven. As the contents heat, pressure will build up creating an explosion hazard.
IN THE EVENT OF A GREASE FIRE - CLOSE THE DOOR AND WAIT FOR IT TO COMPLETELY EXTINGUISH. WARNING - RE-OPENING THE DOOR TOO SOON MAY CAUSE IT TO RE-IGNITE.
DIMENSIONS


HANDY TIPS
Some parts have a plastic film on them that protects them during manufacture. Remove all of this protective film before any assembly or use. This will prevent it from getting trapped between parts during assembly.
Failure to remove the plastic will result in it “Baking” on to the surface making it very difficult to remove.
If you are having trouble removing the plastic film, warm the surface with a hair dryer. Do not use a scraper or knife as this will scratch the surface.
When cleaning your oven, do not use scouring pads or metal scrapers - this can damage the finish of your oven.
To clean your oven, use warm soapy water with a mild, non-abrasive cleaner.
Some parts of the oven may experience discoloration from the high temperatures, such as the chimney. This is normal and does not affect the oven performance.
Your XO Oven can be used throughout the year. However, during cold months when the outside temperature is near or below freezing, build the fire slowly allowing the oven to warm up gradually. Rapid temperature changes can thermally shock parts of the oven resulting in premature stress cracking particularly of the ceramic hearth.
Chips and hairline cracks in the refractory will normally form over time and these will not adversely affect oven performance.
Always close the oven door when not in use - this will help prevent rain and other elements from entering the oven.
USING THE OVEN
LOCATION:
Place the oven on a flat, even, level surface away from any combustible materials. Ideally a stone or concrete surface is preferable. Consult local building and fire regulations regarding recommended safe distancing from buildings, partitions and coverings such as pergolas and roofs. Additional parts may be required.
Check for the wind direction to ensure the wind is not blowing directly into the oven. This will cause ash to blow around inside the oven and reduce temperature.
LIGHTING THE OVEN:
Before lighting the oven, make certain the chimney damper operates freely then set it open at 45 degrees..
PREPARE THE WOOD, KINDLING AND TINDER
Starting a fire is about smaller, easier to light fuel progressively igniting larger and larger fuel. A match lights tinder - which lights kindling - which lights wood.
The best tinder to use is newspaper or kraft paper which has been rolled into balls about 2" in diameter or twisted like a piece of rope.
The thin paper has lots of air between its loose folds allowing it to catch fire quickly and burn off completely.
Too much paper will produce unwanted ash - use just enough to start the kindling.
Next comes Kindling. Kindling is composed of very small diameter wood from the size of a stick of dry spaghetti to that of a pencil.
Then you will need several pieces each of progressively larger dry hardwood.

USING THE OVEN
LIGHTING THE OVEN CONTINUED:
- Place two large diameter pieces of firewood approximately 10 - 12 inches apart in the mouth of the oven pointing outward.
- Place your tinder (i.e. wadded newspaper) between the two logs.
- Lay a level of kindling from side to side so that it bridges the gap between the two logs on the bottom and is suspended above the newspaper tinder. There should be about 1/2" between each piece of kindling.
- Place another layer of kindling on the first, set at 90 degrees so that it resembles a checkerboard.
- Repeat steps 3 and 4 creating two more layers of kindling.
- Add a layer small (3/4" - 1") firewood on top of the kindling.
- Lay a large piece of firewood side to side in front of the stack you have built and use it to push the stack evenly into the center of the oven. Now remove that log.
Your fire is now ready to light using a torch, long wooden matches or long reach lighter. Ideally, you want to light the newspaper/tinder in several places.
As the kindling and then small wood catches fire, you can add additional firewood getting progressively larger.
Once the fire is burning robustly, spread the bed of embers out to heat the floor of the oven evenly.
After the desired cooking temperature is reached (approx. 750°F chamber / 650°F oven floor) rake the fire to the left side of the oven and put the brazier in place to hold it. Sweep the floor with the brush and you are ready to cook.
Add small and medium size wood as needed to maintain temperature.
Always pre-heat your oven prior to using.
(TIP: Use a digital thermometer to check the temperature of the oven floor.)
FIREWOOD + TEMPERATURE
TYPES OF WOOD MATTER
Hardwood comes from deciduous trees that lose their leaves in winter. These include oak, walnut, maple, beech, ash, hickory and many more varieties.
The most important requirement is to use hardwood which is dry and well seasoned. If the wood is wet or green, it will be harder to light, produce more smoke and will not generate as much heat while burning. If you hear a “hissing” sound while burning, it is an indicator that the wood is still green.
Do Not Use Softwood which comes from conifers like pine or spruce. Softwood contains resins and sap that can leave a sticky residue. It burns faster and produces less heat. It also tends to pop and spark scattering ash on the food while it is cooking.
Once the fire is burning well, use wood approximately 3" to 5" in diameter. This makes it easier to control the temperature. Pieces larger than that are hard to ignite and can create hot spots making hard to control temperature.
Different wood varieties can impart different flavors to the food being cooked, fruit woods such as apple or cherry, for example are very aromatic.
Try different types of wood such as oak, maple, chestnut or olive alone or in combination and see the effect they can have on your cooking.
MANAGING TEMPERATURE
The thermometer on your oven is meant as a general guide. The actual temperature in different areas of the oven vary. The temperature of floor of your oven will be different from side to side. The oven chamber will be hotter closer to the top.
Cooking in a wood fired oven requires a small learning curve to manage the fire and interior temperature, similar to a wood stove or charcoal barbeque.
Always completely preheat your oven prior to use. Once the fire has been started and moved to the left side of the oven, maintain the fire for 15 minutes. The temperature inside should read about 750^ - 800^ F. The refractory floor should be about 600^ - 650^ F. If the oven is not up to temperature continue heating for 5 - 10 minutes.
Once the required temperature is reached, maintain the fire by adding small to medium sized wood (3" - 4" diameter) every 10-15 minutes and temperature should remain relatively constant.
On cold or windy days, expect longer heating and cooking times. On hot days, cooking times may be reduced.
TEMPERATURE CONT.
Cooking times can also vary based on the size of and type dishes being prepared.
Generally, cooking in a wood-fired oven is done by cooking the the foods that require the highest temperature and have the shortest cooking times first such as pizza. As the oven cools, other foods would follow such as grilled meats, then roasted vegetables, fish and finally breads or desserts.
OPEN DOOR COOKING
Open door cooking is the most common method where an active flame is present. Fire needs oxygen to burn well. Use this method for dishes that require high heat, such as pizza.
CLOSED DOOR COOKING
Closed door cooking is used for cooking dishes longer at lower temperatures such as baking or roasting. Closing or partially closing the oven door helps to reduce the flame and regulate temperature.
For baking let the fire die down and keep the door open 1" - 2". This will allow the embers to continue to glow and help maintain temperature. Avoid large flames while baking or roasting. Small flames with a good bed of embers is preferred. It is also advisable to place a small container of water in the oven to maintain humidity. The container must be stainless steel, cast iron, terracotta or similar material that is suitable for the high temperatures of the oven.
TO EXTINGUISH THE FIRE - CLOSE THE DOOR TIGHTLY AND ALLOW THE FIRE TO BURN ITSELF OUT. AFTER THE FIRE IS COMPLETELY OUT, REMOVE THE ASH WITH A METAL SHOVEL AND PLACE IT OUTSIDE IN A FIREPROOF CONTAINER. ALLOW THE ASH TO REMAIN THERE 2-3 DAYS BEFORE PROPERLY DISPOSING OF IT.
MORE COOKING
The XOPIZZA4 pizza/hearth oven was designed and built in Italy to cook the perfect, Italian wood-fired pizza in beautiful homes like yours. The ceramic refractory hearth stone floor of the oven can reach temperatures of 750^ F in as little as 15 to 20 minutes, allowing you to create authentic pizza cooked to perfection. Moreover, the XOPIZZA4 does this while using about 1/5 of the wood required by traditional ovens making your oven dramatically more efficient. It can also be easily moved using the optional cart. For Neopolitan style pizza lovers, the insulated refractory floor of the oven allows cooking at temperatures up to 850^ F without burning the bottom of the crust.
The generous size cooking chamber and hearth are capable of cooking 4 personal size pizzas at the same time.
The XOPIZZA4 is engineered and built to perform.
CONVECTION COOKING
The curved dome of the interior oven chamber is designed to have the fire banked to the left side allowing the flames to curl up and over the cooking zone creating a natural convection cooking environment. Like other convection cooking systems, this results in decreased cooking times.
RADIANT COOKING
During the pre-heating process heat is stored in the refractory materials of the oven. During cooking - this heat is radiated back to the food from every direction.
CONDUCTIVE COOKING
Heat stored in the ceramic refractory floor of the oven is directly transferred to the food or dishes placed upon it. Pizza and bread are cooked directly from below sitting on the hot hearth stone. Other dishes prepared in cast iron or terracotta cookware adsorb heat and transfer it directly just as they would on a stove top.
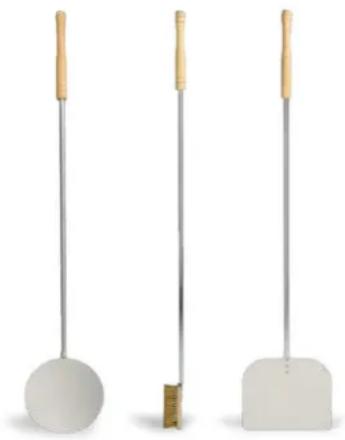
OPTIONAL COOKING TOOLS (XOPIZZATOOL3)
XO has an optional set of tools specifically designed to assist you in cooking with your new oven. The three tool set which includes a large peel for adding or removing pizza from the oven, a small diameter peel for periodically rotating food as it cooks (also handy for moving the fire) and a brush for clearing the hearth. Each set comes with a hanger designed to mount to our XOPIZZACART1.
natural_image
Three identical kitchen utensils with wooden handles, arranged horizontally (no text or symbols visible)A LITTLE TLC
MAINTAINING YOUR XOPIZZA4 OVEN
CLEANING THE EXTERIOR
Clean the exterior of your oven with warm soapy water and a mild non-abrasive cleaner.
Never use scrubbing pads or scrapers which can scratch and mar the finish.
CLEANING THE INTERIOR
Periodically check the chimney for obstructions and remove any ash or soot build up that may have accumulated in the pipe.
Once a fire has been completely extinguished, use a metal shovel to carefully place the ashes in a metal bucket or other fireproof container. Leave this outdoors in a safe location for 2-3 days to ensure that all embers are completely extinguished. Once the ashes are completely out and cold, dispose of them properly in accordance with local regulations.
Never leave ash or burned wood in the oven where it will absorb moisture.
Your XOPIZZA4 is a self-cleaning oven. Any cheese, toppings or spills from a pizza, roasts or other dishes will be carbonized by the high temperatures of the oven and are then easily removed.
Move some of the hot embers directly over the area that requires cleaning and allow the fire to burn for several minutes. Then sweep the fire back into place on the left side of the oven and sweep the hearth clean as before.

natural_image
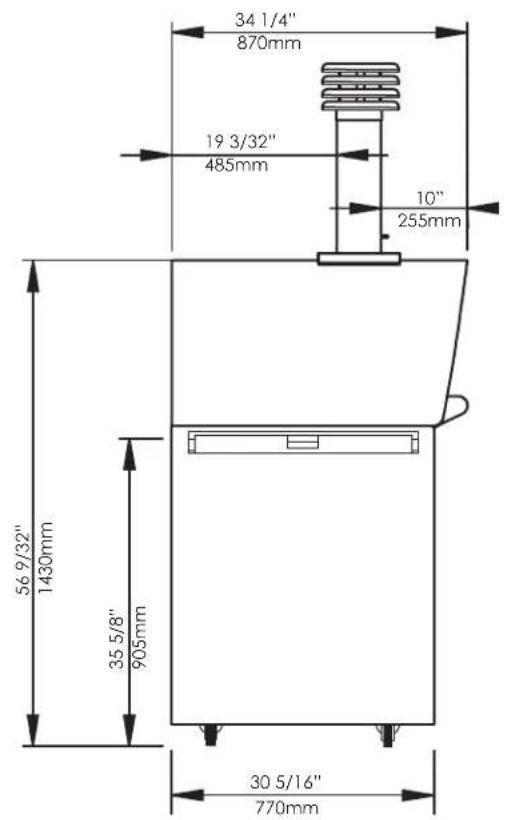
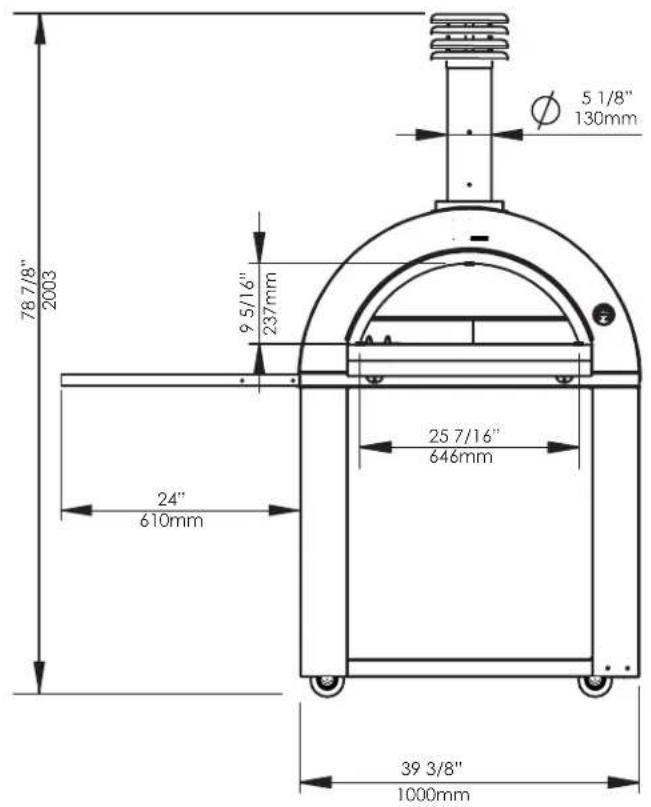
Exterior view of a modern outdoor Xbox 100® cooktop stove with open lid and metal roof (no signage or text visible)XOPIZZACART1
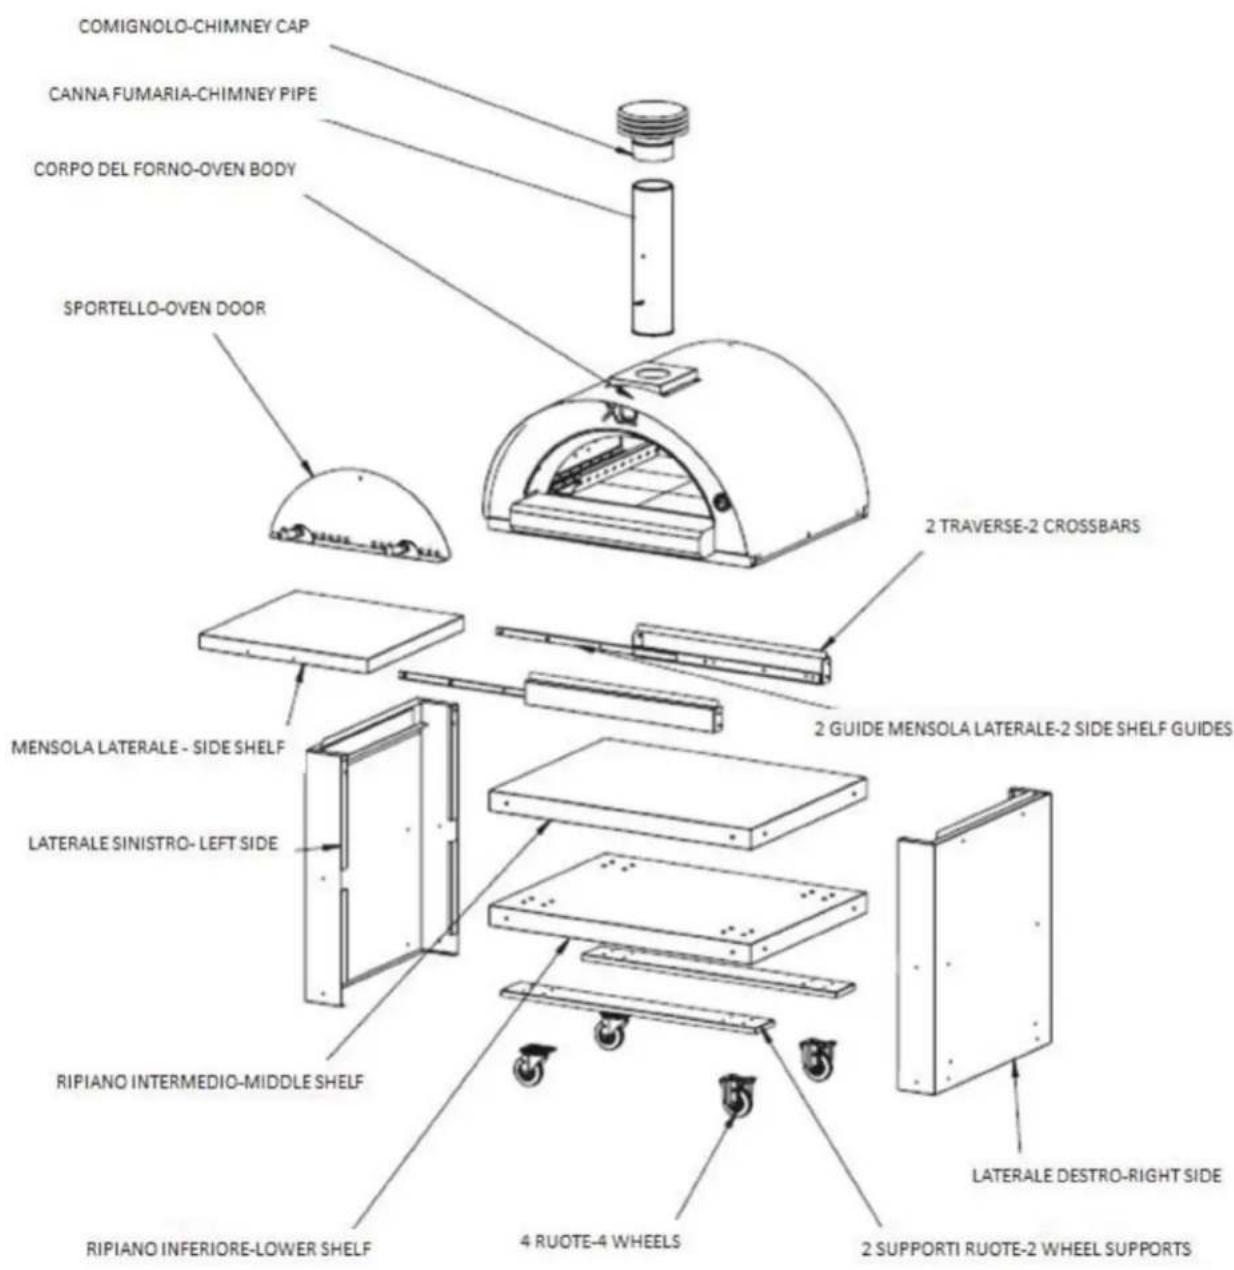
ASSEMBLY INSTRUCTIONS
MANGIARE!

DIMENSIONS
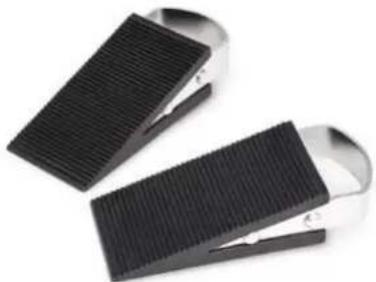
CAUTION
YOUR CART COMES WITH WHEEL BLOCKS FOR THE CASTERS
WHEEL BLOCKS MUST BE USED TO PREVENT ACCIDENTAL MOVEMENT
IMPORTANT:
THE FINAL ASSEMBLED OVEN AND CART HAVE A COMBINED WEIGHT OF 462lbs
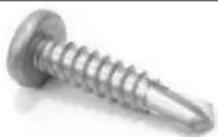
FASTENERS INCLUDED
You will need help to support the cart during assembly and team lift the oven.
(16) M6 x 15 Phillips Head Screws
(16) M6 x 18 Flat Washers
(16) M6 Hex Nuts


(26) M5 x 10 Phillips Head Screws
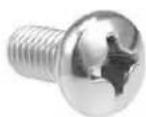
(4) M4 x 10 Phillips Head Counter Sunk Screws

(4) M4.2 x 15 Phillips Head Self Tapping Screws
IMPORTANT:
You will also find two (2) wheel blocks to prevent the cart from accidentally moving.
natural_image
Two metallic objects with ribbed surfaces, possibly a slide or clip, shown against a white background (no text or symbols visible)TIP
USE THE PACKING MATERIAL YOUR XOPIZZACART1 ARRIVED IN TO PAD AND CUSHION THE PARTS DURING ASSEMBLY AND PREVENT SCRATCHES TO THE FINISH!

natural_image
Two adjustable wrenches: a black-handled screwdriver and an adjustable wrench (no text or symbols visible)You Will Need:
A Phillips Head Screwdriver and an Adjustable Wrench (or a 10mm Wrench)
and Large, Strong Friends who will work for pizza to help pick the oven up...
BUILDING THE CART
Use two people to support the cart during assembly.
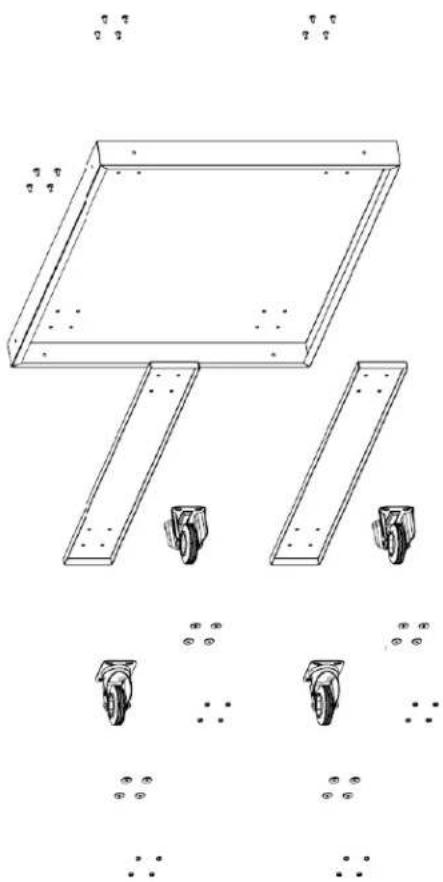
1. ATTACH THE FOUR (4) CASTERS TO THE BASE.
Locate the base and (2) wheel supports.
Align the bolt holes on the wheel supports with the bolt holes on the base.
Using the M6 x 15 Phillips head screws supplied,insert (4) screws in the first corner of the base,through a wheel support - then through one of the casters.
Place a flat washer onto each of the (4) screws andthread one of the M6 x 15 nuts on to hold it in place.
DO NOT TIGHTEN YET.
Repeat this for the remaining casters.
Once all (4) casters are in place - using a Phillips Head Screwdriver and 10mm or adjustable wrench, tighten all of the (16) nuts.
Check to make certain that all are tight before proceeding.
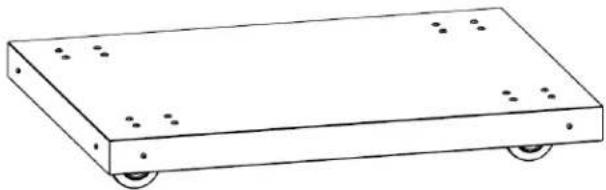
natural_image
Technical line drawing of a structural frame with two horizontal supports and three wheels, no text or symbols presentNOW SET THE WHEELED BASE RIGHT SIDE UP - READY FOR THE NEXT STEP
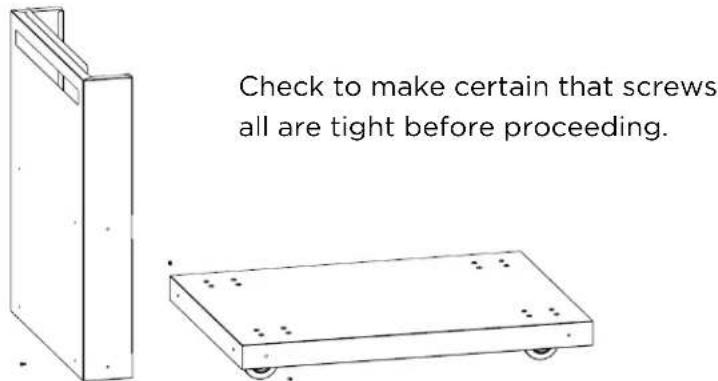
natural_image
Simple line drawing of a rectangular electronic device with wheels and mounting holes (no text or symbols)BUILDING THE CART
Use two people to support the cart during assembly.
2. ATTACH THE LEFT SIDE PANEL. (side with the sliding shelf opening)
Locate the left side panel, it has a rectangular slot for the shelf.
Being careful not to scratch the finish, align the bottom of the left side with the wheeled base.
While one person supports it, attach the side panel to the base using (4) M5 x 10 screws.
Once all (4) screws are in place - using a Phillips Head Screwdriver tighten all of the (4) screws.
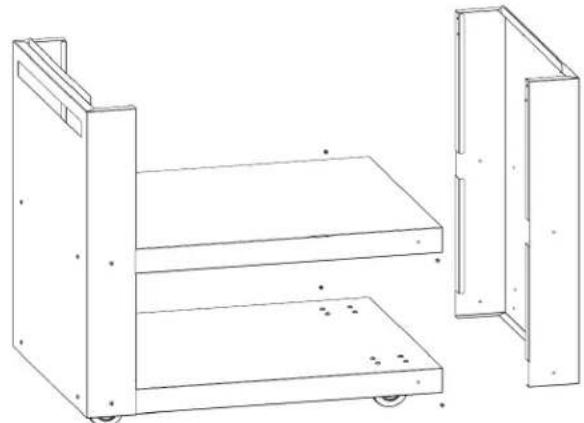
3. ATTACH THE MIDDLE SHELF
Locate the cut outs halfway up on the left side panel.
Being careful not to scratch the finish, align the middle shelf with the cut outs and insert the middle shelf.
While one person supports it, attach the side to the middle shelf using (4) M5 x 10 screws.
Once all (4) screws are in place - using a Phillips Head Screwdriver tighten all of the (4) screws.

BUILDING THE CART
Use two people to support the cart during assembly.
Locate the right hand side, while supporting the middle shelf to avoid scratches - align the cut outs on the right side and attach to the middle shelf and base using (8) M5 x 10 screws.
DO NOT TIGHTEN UNTIL ALL THE SCREWS ARE IN PLACE.
Make certain all the screws are tight before proceeding.
natural_image
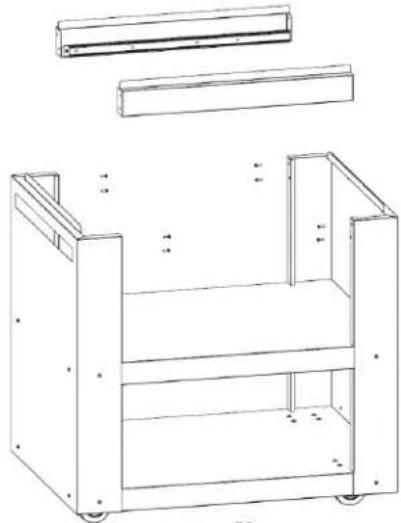
Technical line drawing of a two-tiered mechanical cart with wheels and side panels (no text or symbols)5. ATTACH THE TWO (2) TOP CROSSBARS
Locate the two top crossbars - the shelf glides are already attached.
Align one so the open end of the glide is in line with the square slot in the left side.
Bolt the crossbar in place with (4) M5 x 10 screws. Repeat with the other crossbar.
DO NOT TIGHTEN UNTIL ALL THE SCREWS ARE IN PLACE.
Make certain all the screws are tight before proceeding.
natural_image
Technical line drawing of a modular furniture or storage unit with no visible text, numbers, or symbols.BUILDING THE CART
Use two people to support the cart during assembly.
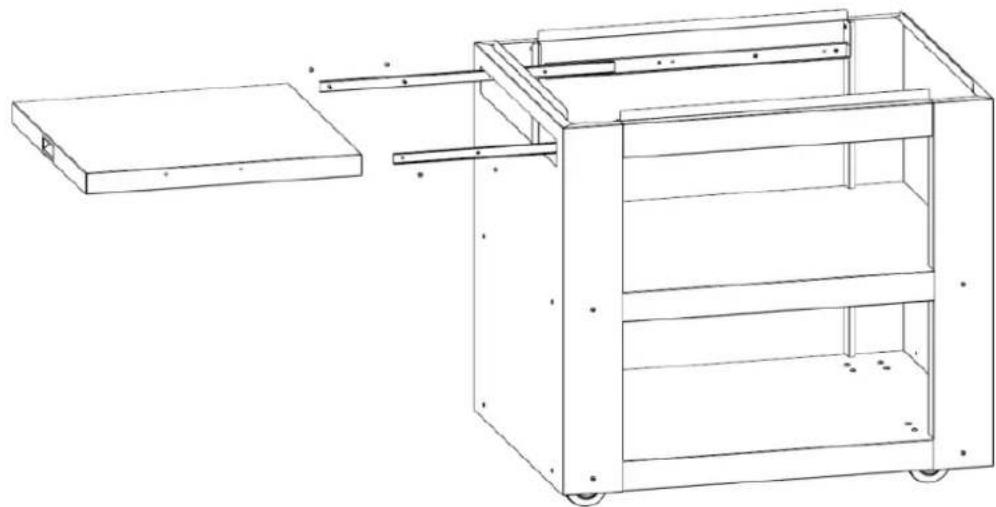
6. INSTALL THE SLIDING SHELF
Extend the telescoping shelf supports attached to the top rails through the square slot to expose the screw holes for attachment.
Remove the protective plastic sheet from the stainless steel shelf.
Align the screw holes in the telescoping shelf supports with the holes in the side of the shelf.
Attach to the shelf to the supports using (4) M4 x 10 countersunk head screws.
DO NOT TIGHTEN UNTIL ALL THE SCREWS ARE IN PLACE.
Make certain all the screws are tight and you are ready for the oven!
natural_image
Technical line drawing of a mechanical device with a handle and frame structure (no text or symbols)SETTING THE OVEN
THE OVEN IS VERY HEAVY! TEAM LIFT TO AVOID INJURY OR DAMAGE!
7. SETTING THE OVEN
WARNING - Be aware of pinch points and make certain you have sufficient help to lift and place the oven safely.
Remove the door and place safely out of the way before lifting.
The cart has centering tabs designed to matchprecisely with the oven - pay close attentionto these tabs during the lift and placement.

natural_image
Line drawing of a dome-shaped electronic device with internal components and a small circular component (no text or symbols)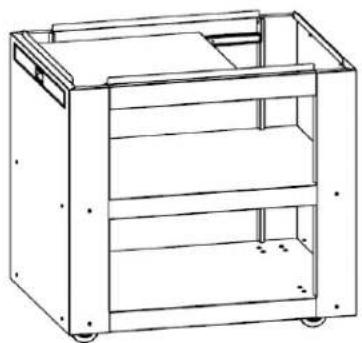
natural_image
Technical line drawing of a multi-level cabinet or rack unit (no text or symbols)8. ATTACH THE CHIMNEY
After the oven is securely in place, fit the chimney to the outlet in the top of the oven.
The chimney has interlocking tabs that will hold it securely in place while allowing it to be removed if you wish.
Alternately - you may choose to attach the chimney using the (4) 4,2 x 16 self-tapping screws supplied.

natural_image
Line drawing of a traditional-style kitchen appliance with a dome-shaped top and side shelves (no text or symbols)SETTING THE OVEN
THE OVEN IS VERY HEAVY! TEAM LIFT TO AVOID INJURY OR DAMAGE!
9. FIT THE CHIMNEY CAP
The Chimney Cap simply slips into place - AND YOU ARE READY TO FIRE UP!

natural_image
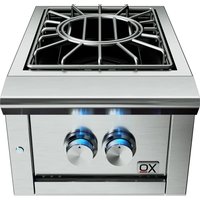
Line drawing of a multi-tiered industrial stove with a dome-shaped top and internal compartments (no text or symbols)THE OPTIONAL TOOL HOLDER
The Optional Tool Holder is supplied with the XOPIZZATOOL3 Set
JUST TWO BRACKETS TO ATTACH
The convenient tool holder is designed to screw directly to your XOPIZZACART1 and keep your large peel, small peel and brush close at hand. It even has a built-in bottle opener.
The Top Bracket and Bottom Bracket each attach with two M5 x10 Phillips Head screws.

natural_image
Line drawing of a traditional-style kitchen stove with arched top and side shelves (no text or symbols)
natural_image
Line drawing of a modern kitchen stove with arched top and side shelves (no text or symbols)FAQS
QUESTION: Why does my oven produce a lot of smoke?
Check to make certain the wood is not wet or green. If you hear a hissing noise while burning - that is an indicator that the wood is not dry.
Do not burn softwood or birch with the bark on.
Make certain that you have robust flames. Smoke is a product of incomplete combustion, build up the fire with small dry wood and see if it clears.
QUESTION: Why does the top of my pizza cook but not the crust?
Pre-heat your oven longer. The chamber is hot but the floor of the oven has not had enough time to heat up to temperature.
If you are using parchment paper, remove it as soon at the pizza can be moved without sticking.
Position your pizza toward the right, rear corner of the oven.
QUESTION: What can I cook besides pizza in my oven?
Virtually anything you might roast or bake in a conventional oven; sausage, poultry, fish, vegetables, bread, cookies, desserts and much more. Remember because of higher temperatures most cooking times will be reduced.
QUESTION: What about tools or cooking utensils?
The three tools you will need are a large pizza peel for adding and removing food, a smaller round peel for rotating dishes while in the oven and a brush used for removing ash and manipulating the fire. You may want additional accessories later based on your cooking preferences.
QUESTION: What kind wood should I use?
Burn dry, seasoned hardwood only, such as; oak, maple, apple, elm, beech, cherry, ash, hickory, chestnet - there are many varieties available. Remember to remove the bark from birch before burning and avoid softwoods such as pine, spruce or fir.
QUESTION: How do I clean by oven?
Refer to page 13 for instructions on cleaning the interior and exterior of your oven.
QUESTION: How long does it take to cook?
Once the oven has been properly pre-heated (650° - 750°F) it only takes about 2-3 minutes to cook a pizza.
Roasting is done once the oven temperature drops to about 450^ F.
Baking is done last after the oven temperature has had an opportunity to drop. This permits bread to rise without burning.
Remember to rotate dishes periodically as they bake or roast to ensure they are cooking and browning evenly.
OPTIONAL ACCESSORIES
A great pizza oven needs the right tool set.
The XOPIZZATOOL3 set of tools is exactly what you need to start cooking like a professional.
Contains:
(1) Large Pizza Peel for adding and removing pizza from the oven
(1) Small Pizza Peel for rotating or moving pizza and other dishes in the oven
(1) Metal Brush for clearing ash and debris from the fire away from the cooking area.
(1) Handy Tool Holder Brackets designed to mount directly to the XOPIZZACART1.

natural_image
Three identical metal kitchen utensils with wooden handles, arranged horizontally (no text or symbols visible)
natural_image
Exterior view of a modern stainless steel pizza stove with arched roof and visible flames inside (no text or symbols)Your XOPIZZA4 comes with a Stainless Steel Door but there is an optional GLASS DOOR (XOPIZZA4GD) which allows you to keep an eye on the fire and food while it cooks while conserving heat.
...and of course, It also allows you to enjoy the ambiance of fire.
And to help protect your investment -
All Weather Covers for your
XOPIZZA4 Oven.
Choose the style to fit either
Counter Top (XOGCOVER40PI)
Freestanding (XOGCOVER40PF)


natural_image
Black textured object with a small white 'XO' mark on its surface (no other text or symbols visible)THE WARRANTY

Your XOPIZZA4 oven is covered by a 2 Year Parts and Labor Warranty. Should your oven require service either within warranty or beyond, call the number below or reach out to us on-line.
Award-Winning Luxury Appliance Service

SERVICE THAT EXCEEDS EXPECTATIONS
Even the best appliances occasionally need the attention and care of a qualified service technician. At EMC Service, we see to it that service representatives and installers have much more than just a cursory glance at a service manual. Our service and installation training, complete with manufacturer representatives working with live appliances, trains and certifies participants so that they may better fully diagnose a service issue.
Complementing their education is access to blow-up diagrams of every product as well as a fully stocked parts warehouse and repair workshop. Rush parts delivery is available We are all committed to ensuring the best experience with our products at every level.
Service Area - Direct and 3rd Party Affiliate
Eastern Marketing Service provides professional, factory trained field service and support in the Northeast / Mid-Atlantic states.

natural_image
Side view of a black semi-truck with visible branding and logo (no readable text or symbols)All other markets are served by our 3rd party affiliates.
This capable team has the full support from Eastern Marketing Service Team. Service Training, Parts, Tech Help Line and quick warranty payments.
CALL 973-403-8900 -or- VIST US ONLINE AT WWW.XOAPPLIANCE.COM

- EVERY THING YOU NEED TO KNOW ABOUT YOUR
- UNDERCOUNTER
- CONGRATULATIONS
- WHERE THINGS ARE
- Before You Get Started 4 - 7
- Using Your Wood-Fired Oven 8 - 13
- TLC 14
- Optional cart assembly 15
- FAQ's 26 - 27
- All The Rest 28
- THIS IS THE MODEL COVERED IN THIS
- BOOK
- YOUR SAFETY MATTERS
- CAUTION: ONLY USE THIS OVEN OUTDOORS IN A WELL VENTILATED AREA ONLY.
- OVENS MUST BE PLACED ON LEVEL, FIREPROOF SURFACES WITH ENOUGH LOAD-BEARING CAPACITY TO ACCOMODATE 300 lbs.
- YOUR SAFETY MATTERS CONT.
- NEVER LEAVE THE OVEN UNATTENDED DURING USE
- NEVER BURN CHARCOAL, COAL, ARTIFICIAL LOGS, STARTER/LIGHTER FLUID, KEROSENE, OILS, GASOLINE OR ANY OTHER ACCELERANTS.
- HANDY TIPS
- USING THE OVEN
- LOCATION:
- LIGHTING THE OVEN:
- PREPARE THE WOOD, KINDLING AND TINDER
- FIREWOOD + TEMPERATURE
- TYPES OF WOOD MATTER
- MANAGING TEMPERATURE
- TEMPERATURE CONT.
- OPEN DOOR COOKING
- CLOSED DOOR COOKING
- MORE COOKING
- CONVECTION COOKING
- RADIANT COOKING
- CONDUCTIVE COOKING
- OPTIONAL COOKING TOOLS (XOPIZZATOOL3)
- A LITTLE TLC
- MAINTAINING YOUR XOPIZZA4 OVEN
- CLEANING THE EXTERIOR
- CLEANING THE INTERIOR
- DIMENSIONS
- CAUTION
- IMPORTANT:
- FASTENERS INCLUDED
- TIP
- BUILDING THE CART
- ATTACH THE FOUR (4) CASTERS TO THE BASE.
- ATTACH THE LEFT SIDE PANEL. (side with the sliding shelf opening)
- ATTACH THE MIDDLE SHELF
- ATTACH THE TWO (2) TOP CROSSBARS
- INSTALL THE SLIDING SHELF
- SETTING THE OVEN
- SETTING THE OVEN
- ATTACH THE CHIMNEY
- FIT THE CHIMNEY CAP
- THE OPTIONAL TOOL HOLDER
- JUST TWO BRACKETS TO ATTACH
- FAQS
- QUESTION: Why does my oven produce a lot of smoke?
- QUESTION: Why does the top of my pizza cook but not the crust?
- QUESTION: What can I cook besides pizza in my oven?
- QUESTION: What about tools or cooking utensils?
- QUESTION: What kind wood should I use?
- QUESTION: How do I clean by oven?
- QUESTION: How long does it take to cook?
- OPTIONAL ACCESSORIES
- THE WARRANTY
- Award-Winning Luxury Appliance Service
- SERVICE THAT EXCEEDS EXPECTATIONS
- Service Area - Direct and 3rd Party Affiliate
Brand : XO
Model : XOPIZZACART1
Category : Barbecue