
ARU90AX-L - Cap Tisira - Free user manual and instructions
Find the device manual for free ARU90AX-L Tisira in PDF.


| Product Type | Slideout Rangehood (Undermount) |
| Model | ARU90AX-L |
| Brand | Tisira |
| Width | 900 mm |
| Minimum Distance from Hob | 600 mm (electric), 650 mm (gas) |
| Fan Speeds | 3 (Low, Medium, High) |
| Lighting | 2 x 3W LED GU10 lamps |
| Filter Type | Aluminium mesh, dishwasher safe |
| Installation Type | Undermount, ducted or recirculating (carbon filter required) |
| Ducting | Top or side ducting options |
| Controls | Mechanical slide switch for fan and light |
| Power Supply | 220-240 V, 50 Hz |
| Material | Stainless steel |
| Cleaning Method | Warm soapy water with soft cloth |
| Filter Cleaning Frequency | Monthly (minimum) |
| Safety Notes | Do not flambé under the hood; ensure adequate ventilation |
| Weight | Approx. 15 kg |
| Warranty | Refer to proof of purchase |
| Country of Origin | Designed for Australia and New Zealand |
Frequently Asked Questions - ARU90AX-L Tisira
User questions about ARU90AX-L Tisira
0 question about this device. Answer the ones you know or ask your own.
Ask a new question about this device
Download the instructions for your Cap in PDF format for free! Find your manual ARU90AX-L - Tisira and take your electronic device back in hand. On this page are published all the documents necessary for the use of your device. ARU90AX-L by Tisira.
USER MANUAL ARU90AX-L Tisira
ARU52AX-L | ARU75AX-L | ARU90AX-L
ARU52BX-L | ARU75BX-L | ARU90BX-L
IMPORTANT // Please ensure that you read through this user manual prior to installation and use. This manual contains important information to ensure optimal performance and keep you safe. Please retain your proof of purchase, as this will be required in the event that you require warranty service. Remember to retain this manual for future reference.
HELLO
CONGRATULATIONS ON THE SELECTION OF THIS SLIDEOUT RANGEHOOD. OUR APPLIANCES HAVE BEEN SPECIFICALLY DESIGNED FOR AUSTRALIAN AND NEW ZEALAND KITCHENS.
Please read through this user manual carefully as it contains information that will ensure that your appliance is installed correctly, important operating & care instructions and also some advice of what you need to do if this appliance is not performing as intended.
CONTENTS
HELLO 2
CONTENTS 3
WARNING & SAFETY INFORMATION 4
INSTALLATION & DUCTING 5
OPERATING INSTRUCTIONS 7
MAINTAINING YOUR RANGEHOOD 8
PROOF OF PURCHASE 9
NOTES 10-11
CONTACT DETAILS 12
WARNING & SAFETY INFORMATION
This appliance is not intended for use by persons (including children) with reduced physical, sensory or mental capabilities, or lack of experience and knowledge, unless they have been given supervision or instruction concerning use of the appliance by a person responsible for their safety.
Young children should be supervised to ensure that they do not play with the appliance.
There shall be adequate ventilation of the room when the rangehood is used at the same time as appliances burning gas or other fuels.
You must read the details concerning the method and frequency of cleaning.
There is a fire risk if cleaning is not carried out in accordance with the instructions.
Do not flambé under the rangehood.
Exhaust air must not be discharged into an existing flue which is used for exhausting fumes from appliances burning gas or other fuels.
The minimum distance between the hob surface and the lowest part of the rangehood is 600mm. This distance shall be at least 650mm, if the rangehood is installed over a gas hob. If the instructions for the gas hob specify a greater distance, this has to be taken into account.
Attention should be given to ensure that any applicable regulations concerning the discharge of exhaust air is fulfilled.
If the supply cord of this equipment is damaged, it must only be replaced by the manufacturer or its service agent or a similarly qualified person in order to avoid a hazard.
This appliance has been designed for indoor domestic use only.
Do not remove or inspect the filters whilst the hood is in operation.
INSTALLATION & DUCTING

IMPORTANT Before handling the rangehood during installation, it is recommended that you remove the filter to prevent damage.
Fig 1.2 illustrates the minimum height from the hob surface to the underside of the rangehood.
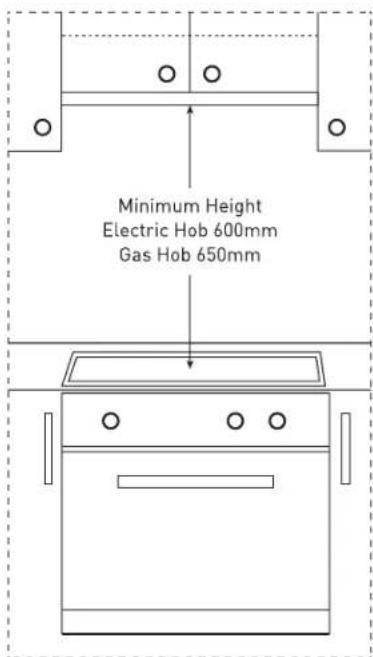
FIG 1.2

Electric hob - 600mm
Gas hob - 650mm
NOTICE: IF THE INSTRUCTIONS FOR THE GAS HOB SPECIFY A GREATER DISTANCE, THIS HAS TO BE OBSERVED. ANY INSTALLATION ABOVE 750MM WILL COMPROMISE PERFORMANCE.

520, 750 & 900 // UNDERMOUNT HOOD
INSTALLATION & DUCTING

TOP DUCTING SIDE DUCTING
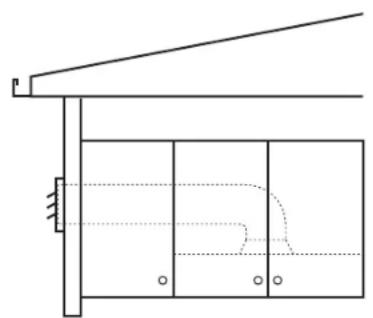

RE-CIRCULATING (Carbon filter required)
DUCTED OPTION
NOTICE // ALL DUCTING MATERIAL MUST BE COMPLIANT WITH THE LOCAL LAWS IN FORCE.
INSTALLATION
- Remove the filter and light globes. (If installed)
- Remove the stainless steel fascia (4 screws) – take care not to damage the fascia.
- Determine the most efficient path for the ductwork, minimise bends and keep the length of the ductwork to a minimum.
- It is important to run and finish (install roof / wall caps) prior to installation of the hood.
- Cut out the cabinetry as per the installation diagram. Ensure that access has been allowed for the power cable.
- Hold the hood up to the underside of the cabinet (2 people required); Screw the hood to the cabinetry.
- Attach the ducting adaptor to the ducting.
- Re-install the stainless steel fascia.
- Re-install filter.
- Plug in the power to the unit, turn on and test.
WARNING // Do not penetrate any screws into the rangehood as this may result in electrical hazards. Failure to install the screws or fixing device in accordance with these instructions may result in electrical hazards.
OPERATING INSTRUCTIONS

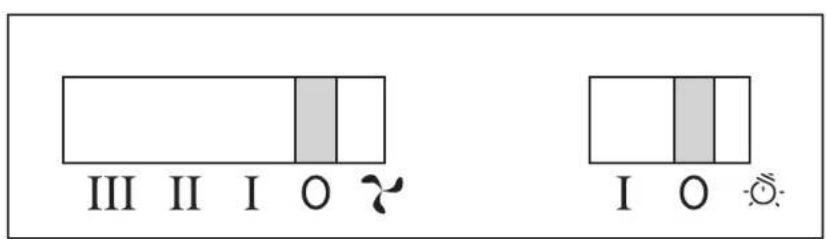
FAN SPEED
OFF/LOW/MEDIUM/HIGH switch - located on the left hand side of the control panel.
This unit features 3 speed settings; single line indicate low speed, double lines indicate the medium speed & triple lines indicate high speed.
To turn the unit off, set the speed switch to the 0 position (off).
LIGHT
On/Off switch - located on the right hand side of the control panel as indicated in the diagram above.
MAINTAINING YOUR RANGEHOOD
GENERAL MAINTENANCE
Ensure that the power to the unit is switched off prior to cleaning the unit. Surface should only be cleaned with warm soapy water and a soft non-abrasive cloth. In coastal environments and humid areas more frequent cleaning is required to maintain the finish.
FILTERS
These filters should be cleaned frequently, dependant on use (minimum monthly).
Aluminium filers are dishwasher safe or can be cleaned with hot soapy water. Ensure that filters are thoroughly dry before re-installing. Slight discolouration may occur when cleaned in the dishwasher.
LAMPS
Your range hood is fitted with GU10 halogen or LED lamps depending on the model (refer to table below). Before replacing, ensure that lamps are completely cool and the power to the unit has been switched off. Replacement lamps can be purchased from your nearest hardware store.
To remove the lamp, twist the lamp in an anti-clockwise direction.
MODEL LAMP TYPE
ARU52X and ARU75X 40W Halogen GU10 (X2)
ARU52X-L and ARU75X-L 3W LED GU10 (X2)
ARU52AX-L, ARU75AX-L & ARU90AX-L 3W LED GU10 (X2)
ARU52BX-L, ARU75BX-L & ARU90BX-L 3W LED GU10 (X2)
PROOF OF PURCHASE
ATTACH YOUR PROOF OF PURCHASE FOR FUTURE REFERENCE
NOTES
NOTES
CONTACT DETAILS
AUSTRALIA
ARISIT PTY LIMITED
40-44 Mark Anthony Drive
Dandenong South, VIC 3175
Australia
Ph 1300 815 589
FX (03) 9768 0838
consumer.care@arisit.com
NEW ZEALAND
ARISIT PTY LIMITED
PO Box 68-140
Newton, Auckland
1145
New Zealand
Ph (09) 306 1020
FX (09) 302 0077
sales@aristonappliances.co.nz
ARISTON IS COMMITTED TO OVGOING RESEARCH AND DEVELOPMENT. EVERY EFFORT HAS BEEN MADE TO ENSURE ALL INFORMATION IN THIS USER MANUAL IS CORRECT AT TIME OF GOING TO PRINT.
DIMENSIONS SHOULD BE USED AS A REFERENCE ONLY AND ACTUAL DIMENSIONS SHOULD BE TAKEN FROM THE PHYSICAL PRODUCT ONLY.
MANUFACTURER RESERVES THE RIGHT TO CHANGE SPECIFICATIONS WITHOUT NOTICE

520, 750 & 900 // UNDERMOUNT HOOD
VERSION 6.0


- HELLO
- CONGRATULATIONS ON THE SELECTION OF THIS SLIDEOUT RANGEHOOD. OUR APPLIANCES HAVE BEEN SPECIFICALLY DESIGNED FOR AUSTRALIAN AND NEW ZEALAND KITCHENS
- CONTENTS
- WARNING & SAFETY INFORMATION
- INSTALLATION & DUCTING
- DUCTED OPTION
- INSTALLATION
- OPERATING INSTRUCTIONS
- FAN SPEED
- LIGHT
- MAINTAINING YOUR RANGEHOOD
- GENERAL MAINTENANCE
- FILTERS
- LAMPS
- MODEL LAMP TYPE
- PROOF OF PURCHASE
- NOTES
- CONTACT DETAILS
- AUSTRALIA
- NEW ZEALAND
Brand : Tisira
Model : ARU90AX-L
Category : Cap