
KASMSVDC13B - Vacuum sealer Kogan - Free user manual and instructions
Find the device manual for free KASMSVDC13B Kogan in PDF.

| Product Type | Sous Vide Precision Cooker |
| Model | KASMSVDC13B |
| Brand | Kogan |
| Power Supply | 220-240V, 50/60Hz, 1200W |
| Temperature Range | 20°C to 90°C |
| Temperature Accuracy | ±0.1°C |
| Timer Range | 1 minute to 99 hours 59 minutes |
| Connectivity | Wi-Fi (2.4GHz) and Bluetooth |
| Smart App | Kogan SmarterHome™ (iOS/Android) |
| Voice Control | Google Home and Amazon Alexa compatible |
| Cooking Capacity | Requires 6-15L heat-resistant container |
| Display | Digital LED display for temperature and timer |
| Controls | Power button, Set button, +/- buttons |
| Safety Features | Low water alarm, auto shut-off, overheating protection |
| Built-in Recipes | 68 recipes available in the app |
| Dishwasher Safe Parts | Stainless-steel skirt and pump cap |
| Cleaning | Skirt and pump cap dishwasher safe; main body wipe clean only, do not immerse |
| Noise Level | Normal operation: humming from motor/fan; occasional gurgling |
| Compliance | Class I insulation, CE marked |
| Warranty | Standard Kogan warranty (refer to help.kogan.com) |
Frequently Asked Questions - KASMSVDC13B Kogan
User questions about KASMSVDC13B Kogan
0 question about this device. Answer the ones you know or ask your own.
Ask a new question about this device
Download the instructions for your Vacuum sealer in PDF format for free! Find your manual KASMSVDC13B - Kogan and take your electronic device back in hand. On this page are published all the documents necessary for the use of your device. KASMSVDC13B by Kogan.
USER MANUAL KASMSVDC13B Kogan
natural_image
Black and silver digital kugon with digital display and control buttons (no readable text or symbols on main body)KOGAN SMARTERHOME™ SOUS VIDE PRECISION COOKER
KASMSVDC13B
Safety & Warnings 3
Overview 5
Assembly 7
Connect to SmarterHome™ App 8
Google Home Control 13
Amazon Alex Control 16
Operation 18
Cleaning & Care 25
Troubleshooting 26
Specifications 27
SAFETY & WARNINGS
Read the operating instructions carefully before putting the appliance into operation and keep the instructions including the warranty, the receipt and, if possible, the box with the internal packing. If you give this device to other people, pass on the operating instructions.
This section explains the potential dangers that may arise when operating the sous vide precision cooker and notes many important safety precautions.
- Place the cooking container in a location which can withstand the heat over 120^ C for preventing damage.
- Never exchange the power cord. Never operate with a damaged cord or plug. Use properly grounded electrical outlets only.
- Do not immerse the system past the top etch mark of stainless-steel skirt. Only the stainless-steel skirt and the pump housing are dishwasher safe. Unplug from outlet when not in use and before the cleaning process.
- Burn Hazard - the cooking container, the stainless-steel portion of cooker and food pouches all get hot when used. Use oven mitts or tongs when handling.
- This product is not suitable for outdoor use.
- Do not disassemble. Observe all warning labels. Do not remove warning labels.
- Do not use this appliance for anything other than intended use.
- Firmly lock the product by clamping it on the side of your container. Place the container on an even surface to prevent spills and tipping over. Do not place unit on a stove or in an oven.
- Do not use deionised water (DI water).
- Before plugging into a socket, check whether your voltage corresponds to the rating label of the appliance.
- Children should be supervised to ensure that they do not play with the appliance. Don't let children touch and use with this appliance. Keep the appliance and its cord out of reach of children.
- Never use a damaged appliance. If it has been damaged, please get it to approved service centre, get it checked or repaired.
- If the supply cord is damaged, it must be replaced by the manufacturer, its service agent or similarly qualified person to avoid a hazard.
- Do not let excess cord hang over the cooking container or touch hot surface.
- If need to clean the accessories, please switch off the appliance and release the power plug and release the accessories to clean.
- This appliance is not intended for use by persons (including children) with reduced physical, sensory or mental capacities or lack of experience and knowledge.
- Sous Vide cooker is designed to be used only with water.
- Switch off the appliance and disconnect from supply before changing accessories or approaching parts that move during use.
- This appliance can be used by children aged from 8 years and above and persons with reduced physical, sensory or mental capabilities or lack of experience and knowledge if they have been given supervision or instruction concerning use of the appliance in a safe way and understand the hazards involved.
- Children shall not play with the appliance. Cleaning and user maintenance shall not be made by children without supervision.
- If the supply cord is damaged, it must be replaced by the manufacturer, its service agent or similarly qualified persons in order to avoid a hazard.
- The appliance is not intended to be operated by means of an external timer or a separate remote-control system.
- Unplug the immersion heater before removing it from the liquid; after unplugging, the heating element will remain hot and should not be touched or placed on combustible surfaces.
OVERVIEW
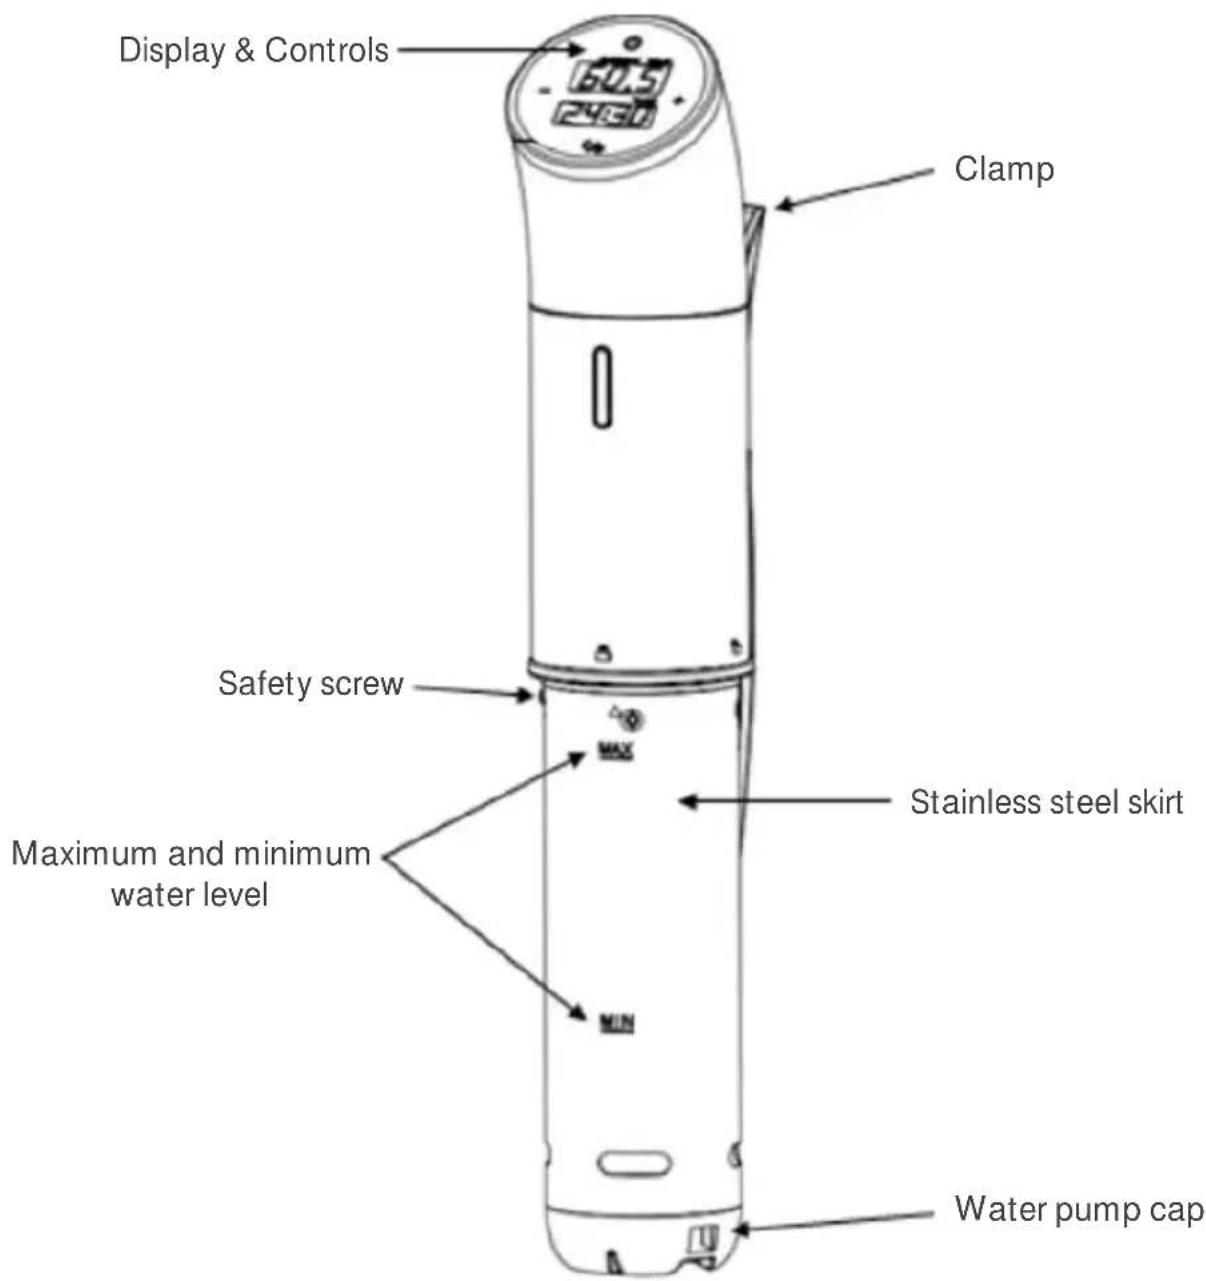
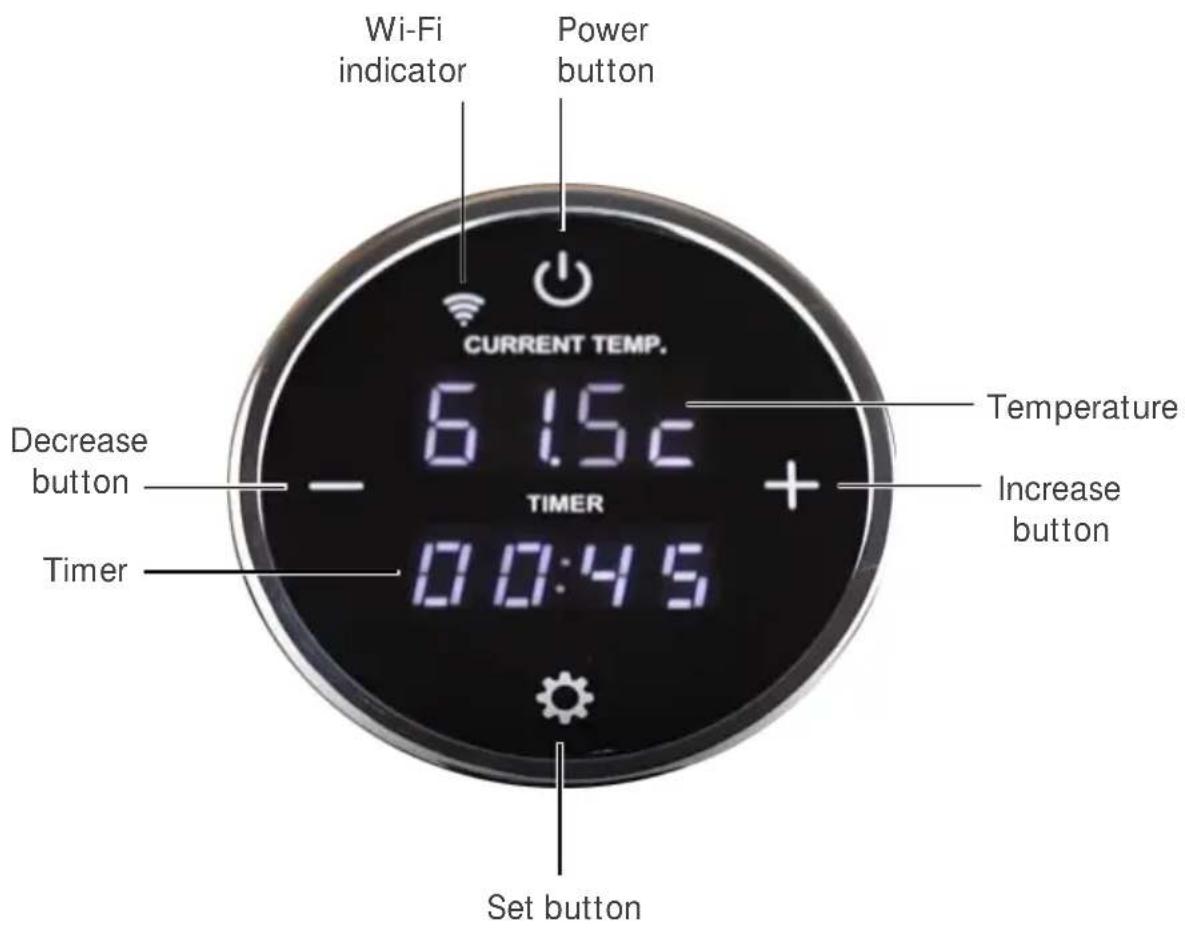
Display
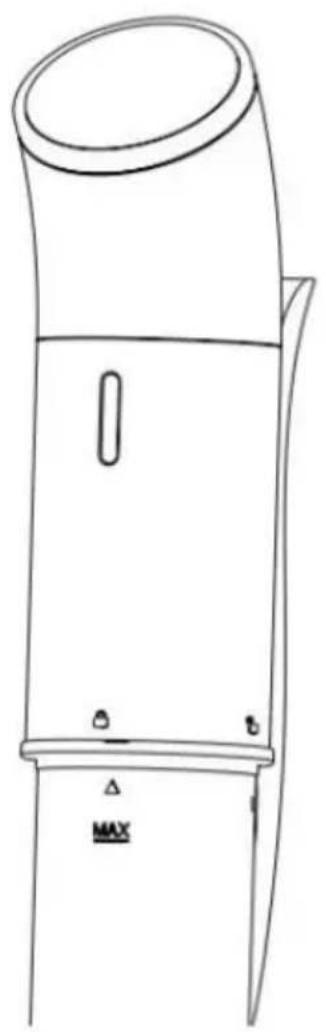
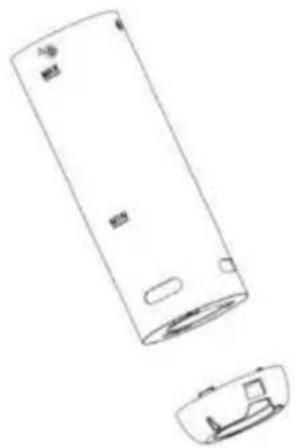
ASSEMBLY
Installing the Skirt
- Hold the unit and align the unlock symbol and the arrow, rotate the skirt in an anticlockwise direction until the arrow and lock symbol are aligned.
- Firmly rotate the safety screw.
natural_image
Line drawing of a cylindrical device with a lid and mounting base (no text or symbols)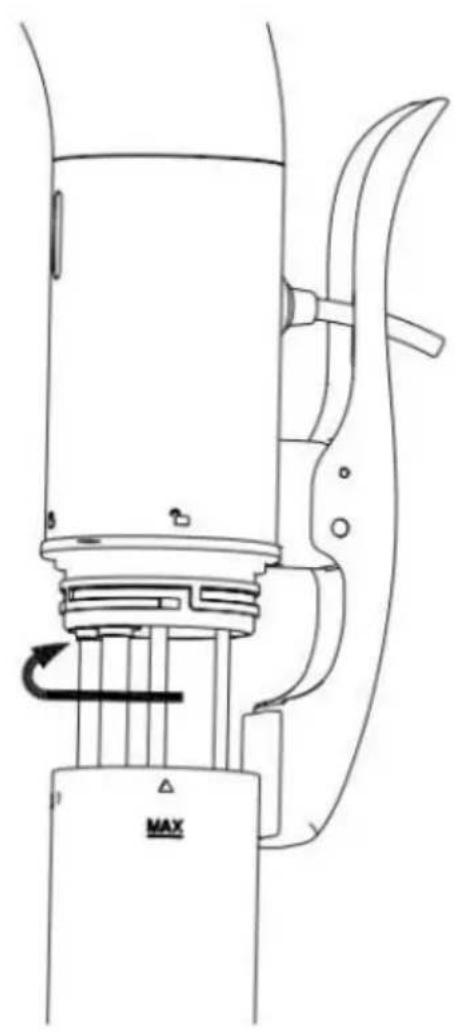
natural_image
Technical line drawing of a mechanical device with no visible text or symbolsCONNECT TO SMARTERHOME™APP
Install App
Download the "Kogan SmarterHome" app from the Play Store (Android) or App Store (iOS).

Play Store (Android)


App Store (iOS)

To register:
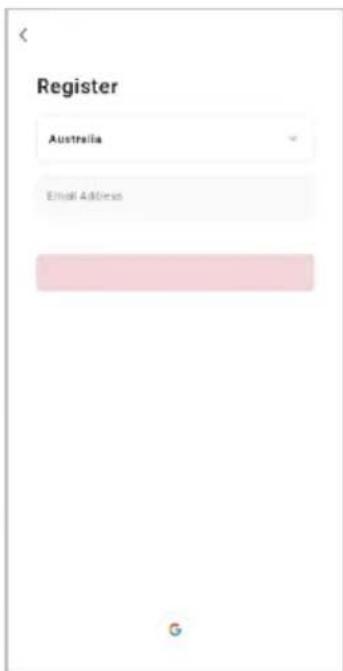
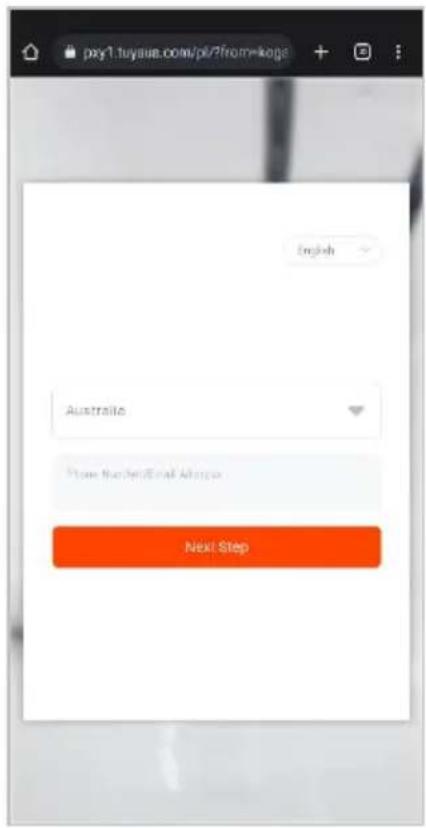
- If you already have a SmarterHome account, select 'Log In'. To register a new account, select 'Sign Up'.
- The system will automatically recognise your country. If needed, you can manually select your country from the drop-down box. Enter your email address and tap 'Get Verification Code' to continue.
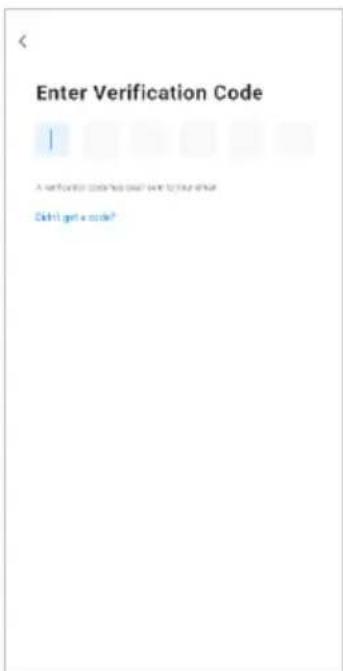
- A 6-digit code will be sent to the submitted email address. Enter this code before the one-minute timer expires.
- Continue to the next page and complete your SmarterHome profile.

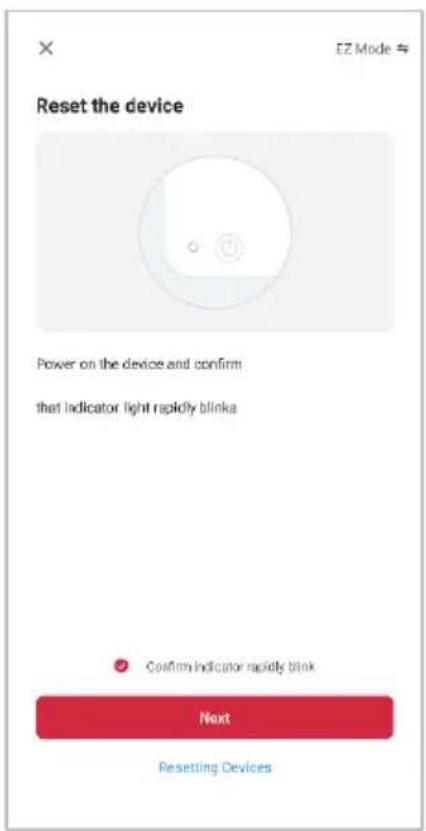
Set device in pairing mode
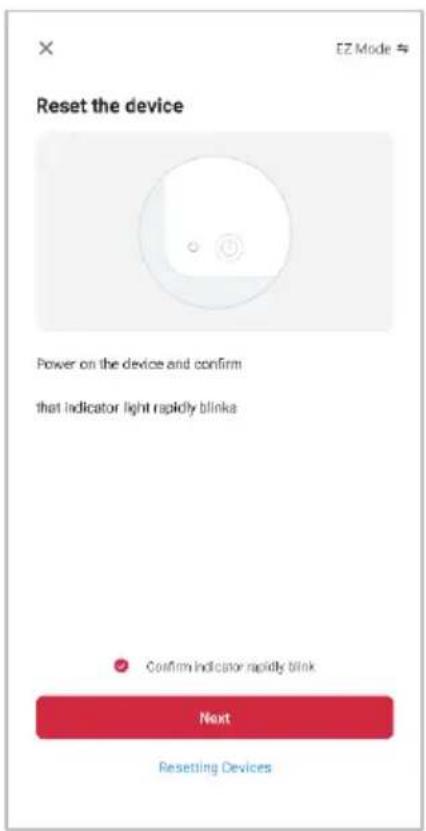
When the device is first turned on, it may automatically enter pairing mode (Wi-Fi indicator will be flashing rapidly).
If not automatically in pairing mode when powered on, you can manually set the device in pairing mode by pressing and holding the power and set buttons until the Wi-Fi indicator is flashing rapidly.
Add device through network
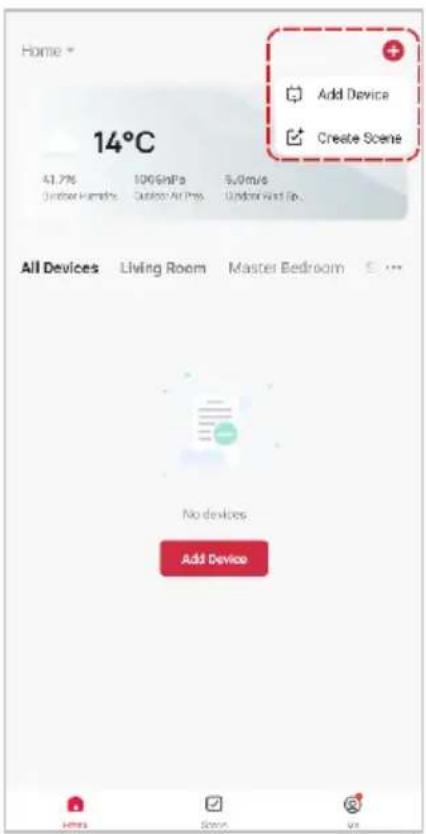
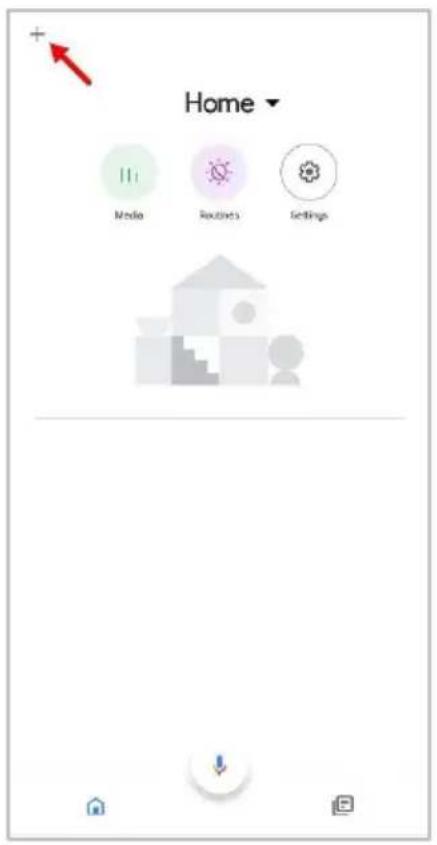
- Once registered, tap "Add Device" on the app's home page, or the "+" in the upper right corner, to add a new device through the network.
- Select the product type from the list of options in the app (Kitchen Appliances → Sous Vide).
- Enter your Wi-Fi details. It is important that your SmarterHome™ device and the app are connected to the same Wi-Fi network during setup.


Notes:
• The device and the app have to use the same Wi-Fi network.
• The device is only compatible with 2.4Ghz networks.
- Depending on the product, Steps 3 and 4 may be in opposite order.
- Ensure that the device is in pairing mode, with the Wi-Fi indicator flashing rapidly, and tap "Confirm light is rapidly flashing".
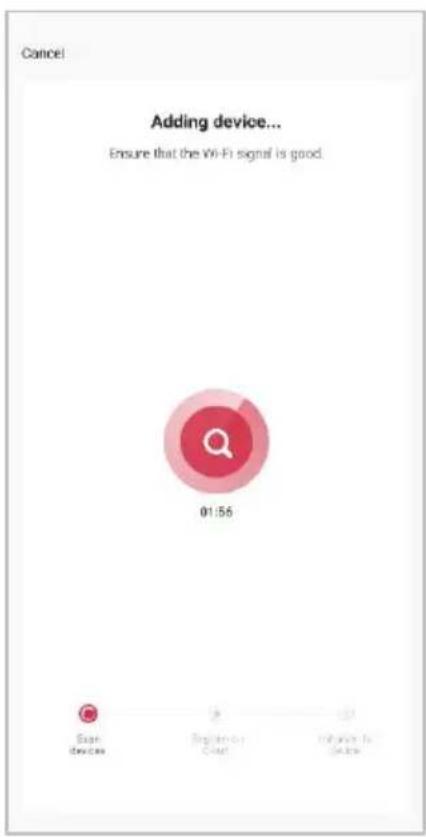
- The device will commence the pairing process and connect to the app. Ensure your Wi-Fi router, mobile phone, and the SmarterHome™ device are kept close until connection is complete.
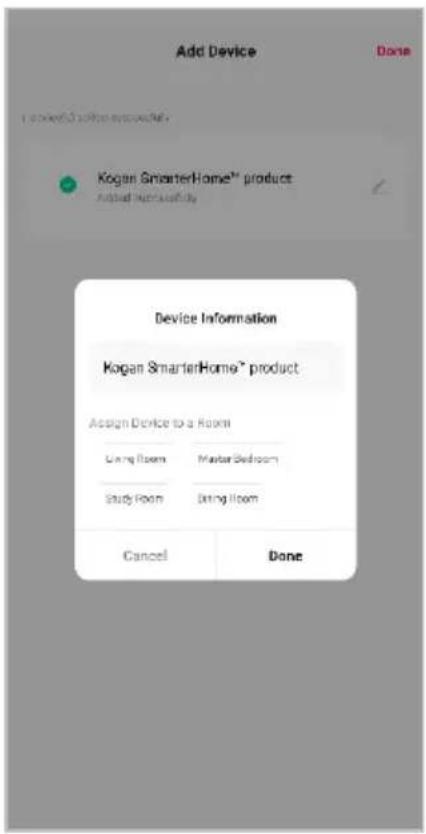
- After successfully being added, you will have the option to rename the device and assign it to a location. It will now be listed on the app's home page. Tap the device listing to enter its control page.


Note:
Once connected, you can select Create Scene from the "+" in the upper right corner (or from the Scene tab) to group connected SmarterHome™ products and automate their functions.
The prior steps detail the process for "EZ Mode" connection. If that does not work for your connection, we suggest trying it again, and if still no success, attempting the following method for connection.
Add Device Through Bluetooth
- If not automatically in pairing mode, you can manually set the device in pairing mode by pressing and holding the power and set buttons until the Wi-Fi indicator is flashing rapidly.
- Ensure Bluetooth is enabled on your mobile phone.
- Once registered, tap "Add Device" on the app's home page, or the "+" in the upper right corner, to add a new device through the network.
- The app will discover nearby Bluetooth devices. Tap 'Add' when the device appears. Alternatively, select the product type from the list of options in the app (Kitchen Appliances → Sous Vide).
- Enter your Wi-Fi details. It is important that your SmarterHome™ device and the app are connected to the same Wi-Fi network during setup.


- Ensure that the device is in pairing mode, with the Wi-Fi indicator rapidly flashing, and tap "Confirm light is rapidly flashing".
- The device will commence the pairing process and connect to the app. Ensure the mobile phone and the SmarterHome™ device are kept close until connection is complete.
- After successfully being added, you will have the option to rename the device and assign it to a location. It will now be listed on the app's home page. Tap the device listing to enter its control page.
Note:
Once connected, you can select Create Scene from the "+" in the upper right corner (or from the Scene tab) to group connected SmarterHome™ products and automate their functions.
GOOGLE HOME CONTROL
Note:
You will need to have set up a Google Home account prior to linking your Kogan SmarterHome™ device.
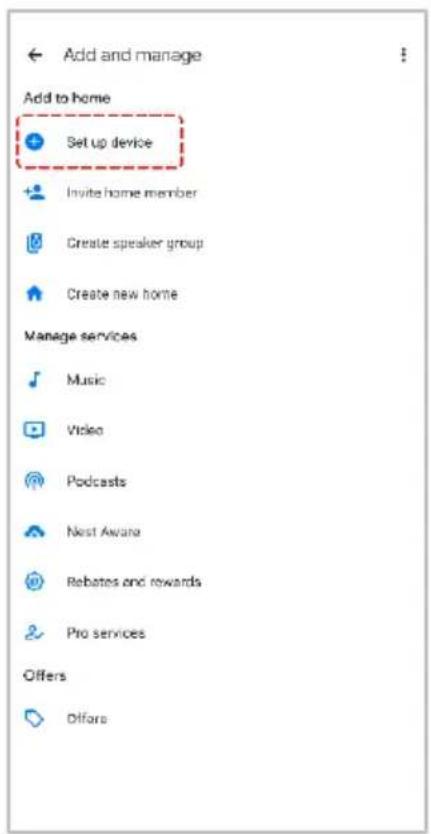
Adding "SmarterHome" to the Google Home app
-
- (Top left corner page of the Google Home app, select the " " icon see arrow in the below screenshot) to access the 'Add and manage' page.
- selectWorks with Googteen the ' option.
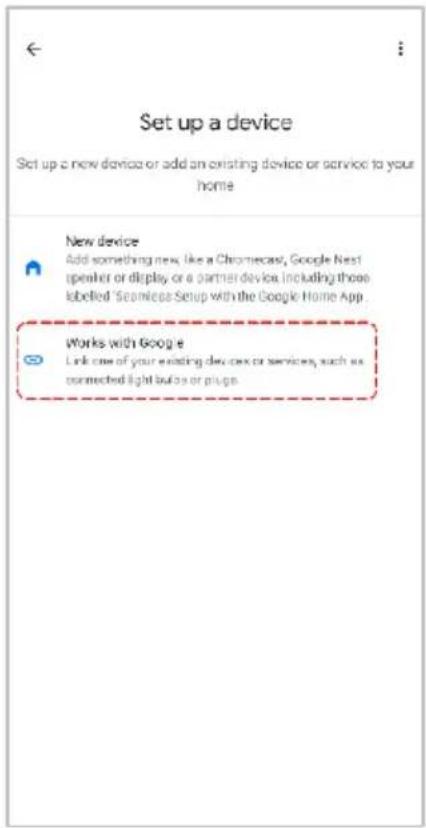
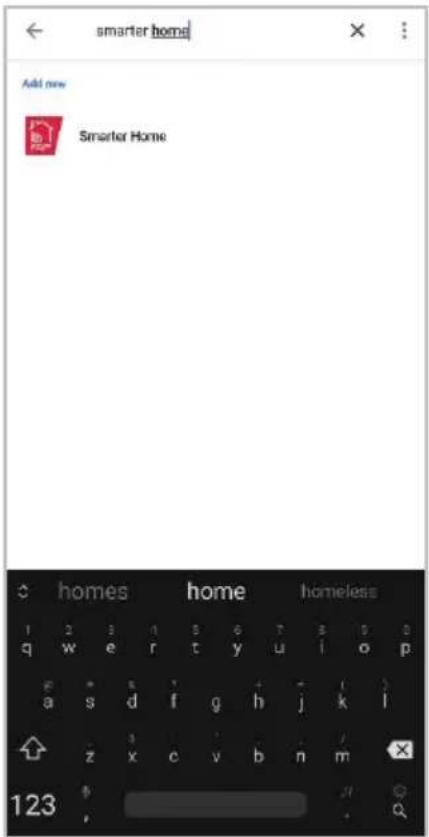
- Select the search bar and type 'Smarter Home' to locate the Kogan SmarterHome™ service.
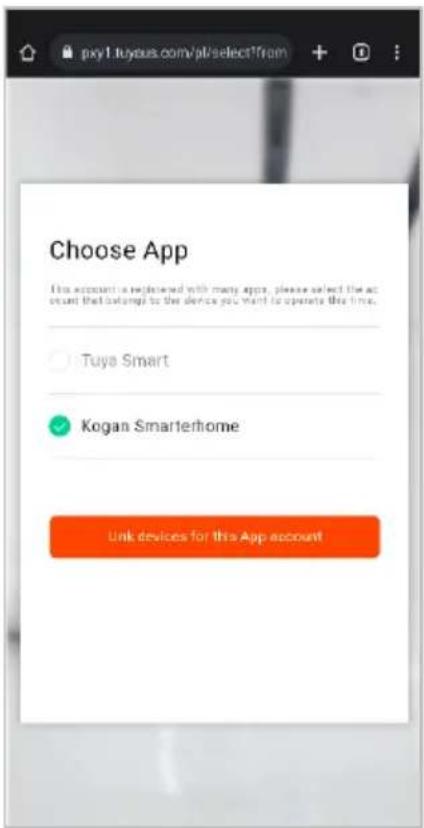
- From here, you will be prompted to sign into your SmarterHome™ account using either your email or mobile phone number, depending on which method you used to register your account.
- Select "Kogan SmarterHome™" from the app options.

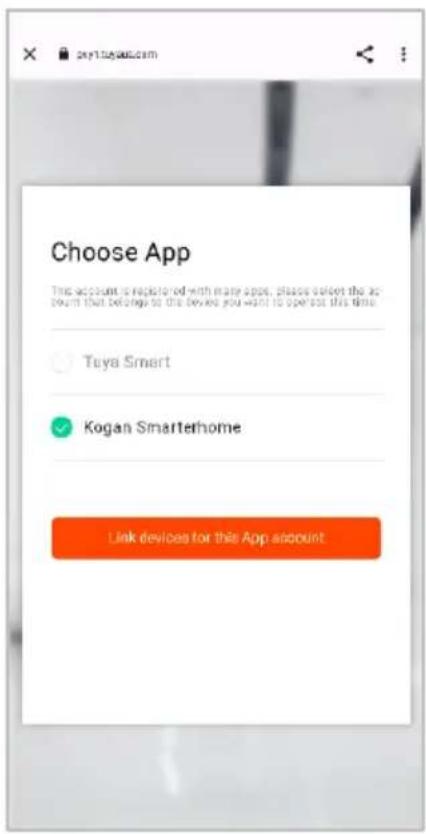
- App and horise' to grant Google permission to access the SmarterHome™ your devices.
- Once connected, the app will display any compatible devices linked to your SmarterHome™ account. From here you can assign them to rooms and set up any routines. Tap on any of the devices to view a list of available commands.

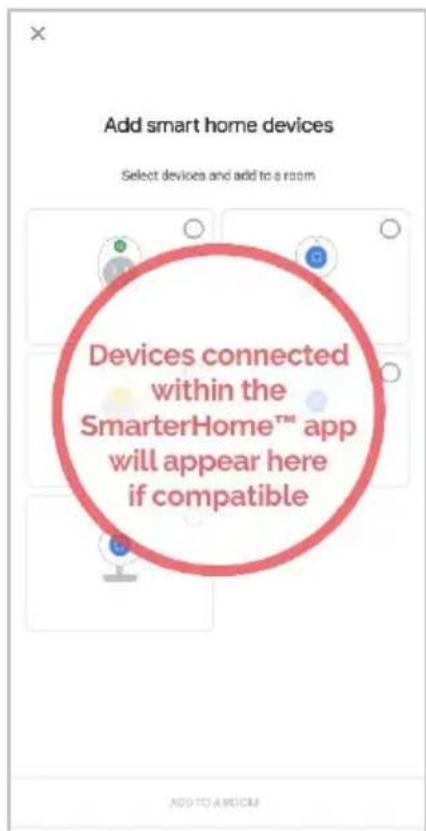
Note:
Please note that Google Home can only control the base/core functions of any compatible SmarterHome™ devices. To make full use of this product's smart functionality, please use the Kogan SmarterHome™ app.
AMAZON ALEXA CONTROL
Note:
You will need to have set up an Alexa account prior to linking your Kogan SmarterHome™ device.
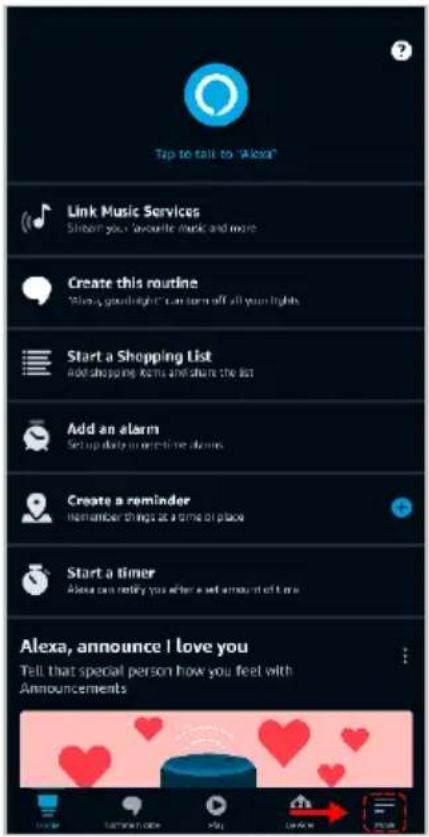
Adding "SmarterHome" to the Alexa app
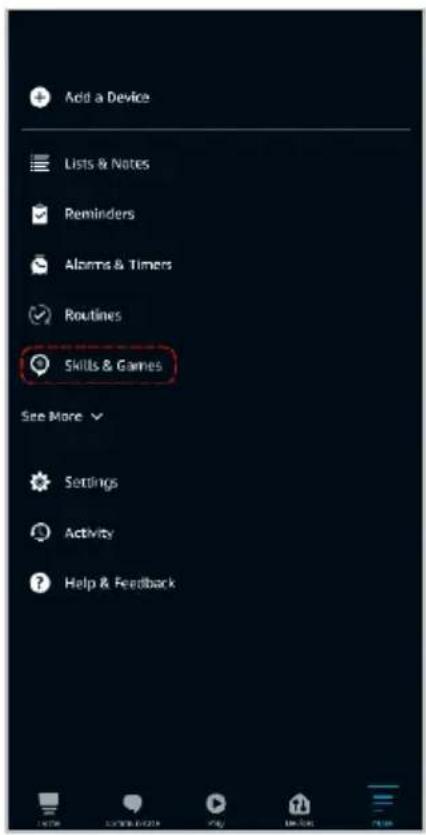
- bottom-right and page of the Alexa app, select the "≡" icon in the select "Skills & Games" from the sidebar.
- Select the search bar and type 'Smarter Home' to locate the Kogan SmarterHome™ skill.
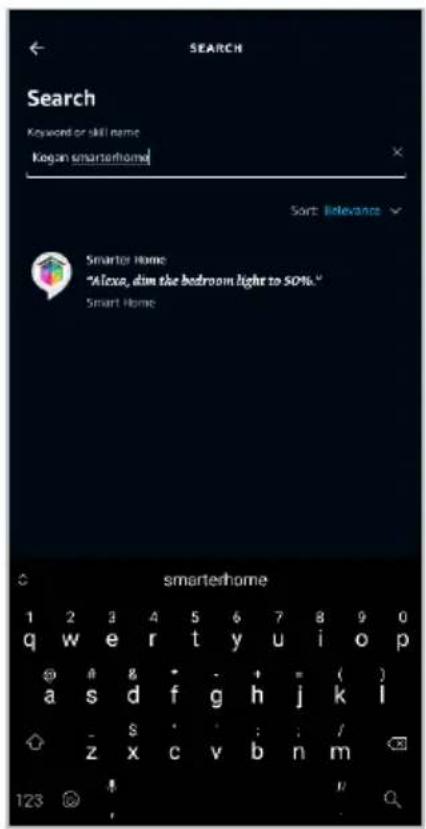
- skidtoAlexte to Use' to add the Kogan SmarterHome™
- From here, you will be prompted to sign into your SmarterHome™ account using either your email or mobile phone number, depending on which method you used to register your account.
- Select "Kogan SmarterHome™" from the app options.

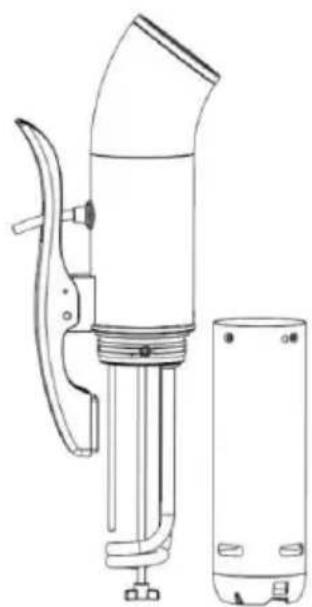
OPERATION
Cooking Container
- The Sous Vide cooker requires a 6-15L round or rectangular heat resistant container.
- Firmly lock the product by clamping it on the side of your container.
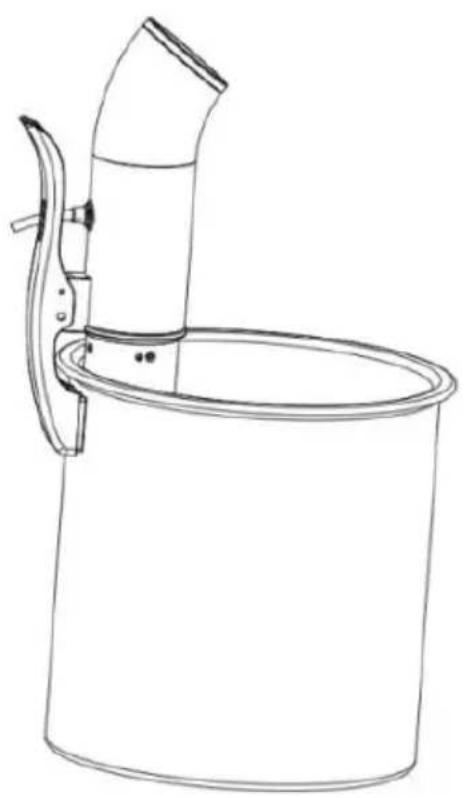
natural_image
Line drawing of a cylindrical container with a curved handle and lid, no text or symbols present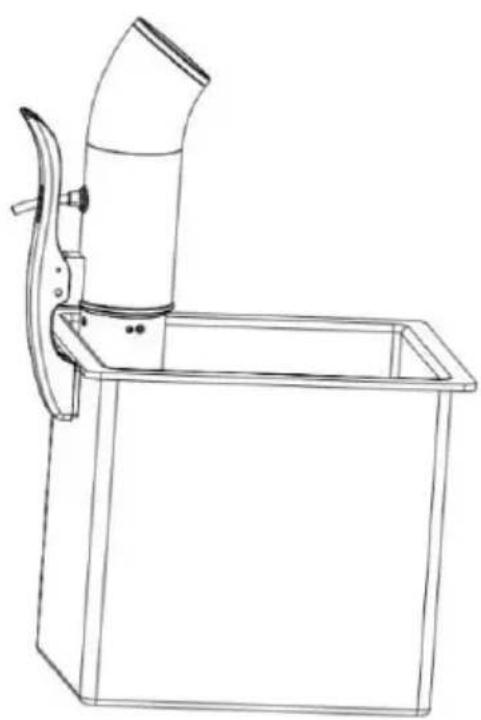
natural_image
Line drawing of a mechanical device with a curved handle and rectangular base (no text or symbols)Turning the Sous Vide On/ Off
- Connect the power cord into an electrical outlet. The number icon "B" will flash and the product will enter standby mode.
- Press the power button, the product will emit a beep. The temperature and the timer LEDs "00:00" will flash together.
- Press and hold the power button for 2 seconds to turn the sous vide off.
Setting the Temperature/Timer
Temperature:
- Press the set button, t he temperature LED will flash "00.0".
- Press “+/-” buttons a time to increase/decrease in 0.5°C increments. Press and hold the “+buttons to increase/decrease by 5°C increments.
- The maximum temperature is 90^ C, the minimum temperature is 20^ C. The default temperature is “25.0”.
Timer:
- Press the set button, the timer minutes LED will flash "00:00".
- Press “+/-” buttons to increase/decrease in 1-minute increments. Press and hold the “-+” buttons to increase/decrease in 5-minutes increments (minute timer range is 0-59).
- Press the set button again, the timer hour digital LED will flash "00:00".
- Press “+/-” buttons to increase/decrease in 1-hour increments. Press and hold the “+/-” buttons to increase/decrease in 10-hour increments (hour timer range is 0-99).
- Press the power button to confirm the settings and unit will starting heating. When the set temperature has been reached, the unit will emit 3 beeps and hold the current temperature.
Note: If you wish to change the settings during operation, press and hold the power button for 2 seconds and then repeat the above procedure.
- When the timer finishes, the unit will display "End" on the temperature display and will emit 6 beeps. Until the End hit is switched off display or restarted.
Low Water
- When the water level is lower than the "Minimum" mark or the unit is raised up during use, the temperature LED will display "and will emit a beep.
- Push the power button to restart the unit or it will automatically turn off after 30 seconds.
Cooking Temperature
The table below indicates how to cook a piece of food to its required core temperature. The core temperature (once reached) does not change even when submerged for longer periods of time.
Notes:
- The core temperature is the temperature in the centre of the food.
- The following is recommended as a guide for cooking your foods.
| Food Type | Core Temp. | Cooking Result |
| Beef, Lamb, Pork | 52-55°C | Rare |
| Beef, Lamb, Pork | 57-60°C | Medium rare |
| Beef, Lamb, Pork | 62-65°C | Medium |
| Beef, Lamb, Pork | 66-69°C | Medium well |
| Beef, Lamb, Pork | 70-72°C | Well Done |
| Poultry (Boneless) | 72-74°C | Cooked through |
| Poultry (Bones) | 85-87°C | Cooked through |
| Fish/ Seafood | 40-42°C | Rare |
| Fish/ Seafood | 42-45°C | Medium |
| Fish/ Seafood | 46-52°C | Well done |
| Vegetables | 80-87°C | Cooked through |
TIP: It is highly recommended that all foods are grilled, fried, seared or baked for a few minutes once they have completed their sous vide process for optimal flavour.
NOTE: The temperature and time guidelines are an indication only. You will need to experiment to achieve results that best suit your pallet.
NOTE: Pork and poultry may only be consumed when thoroughly cooked through to avoid the risk of salmonella or other infection.
TIP: As all sous vide cookers operate by heating a water bath to a set temperature, all recipes you find for sous vide cooking can be used with your KOGAN sous vide cooker.
Recipes
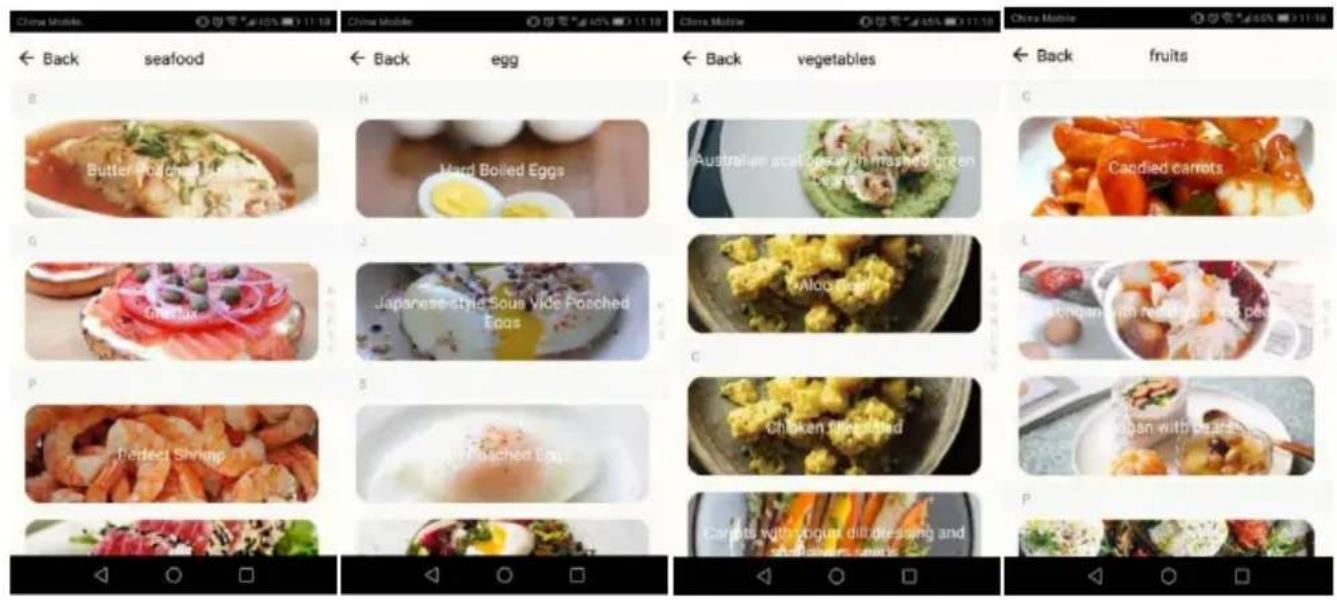
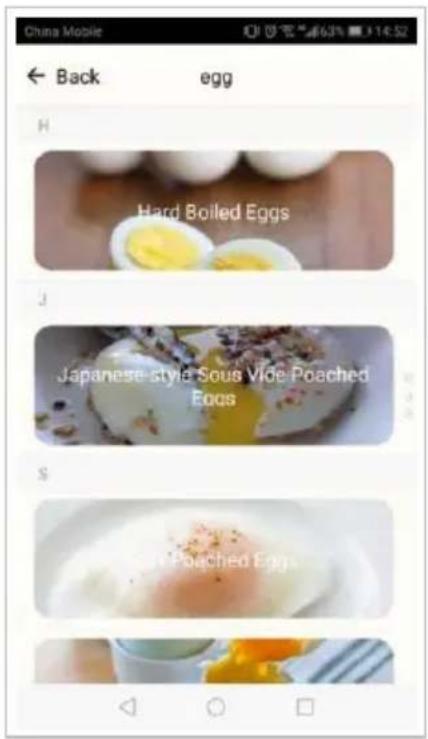
There are 68 recipes in the SmaterHome™ app such as beef, poultry, mutton, pork, seafood, egg, vegetables or fruits.
- When you select the recipes on the app, the selected recipes will automatically select the temperature and cooking time for user.
- . For example, when you select recipe "egg", you'll see below page on your phone
-
- When you select "Japanese style Sous vide poached eggs", you'll see the description, ingredients and directions.
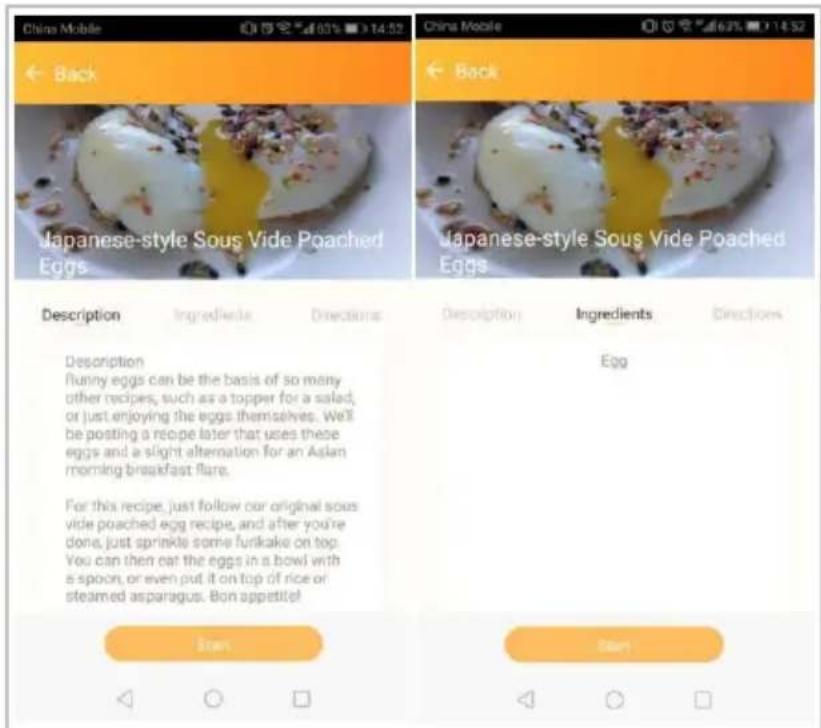
- Press "start", it will go to the homepage and then press power button to start working.

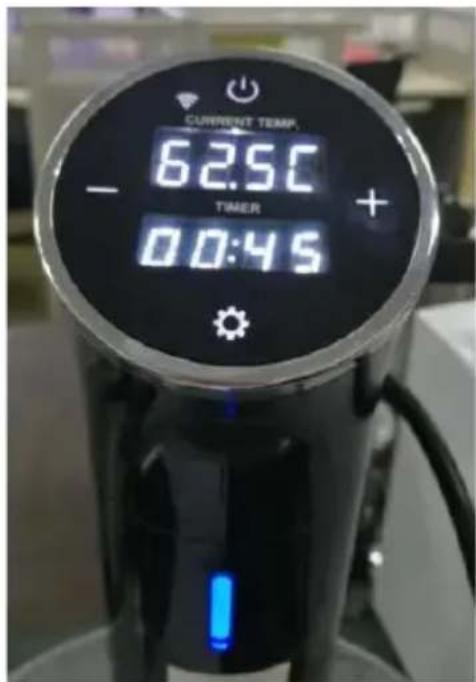
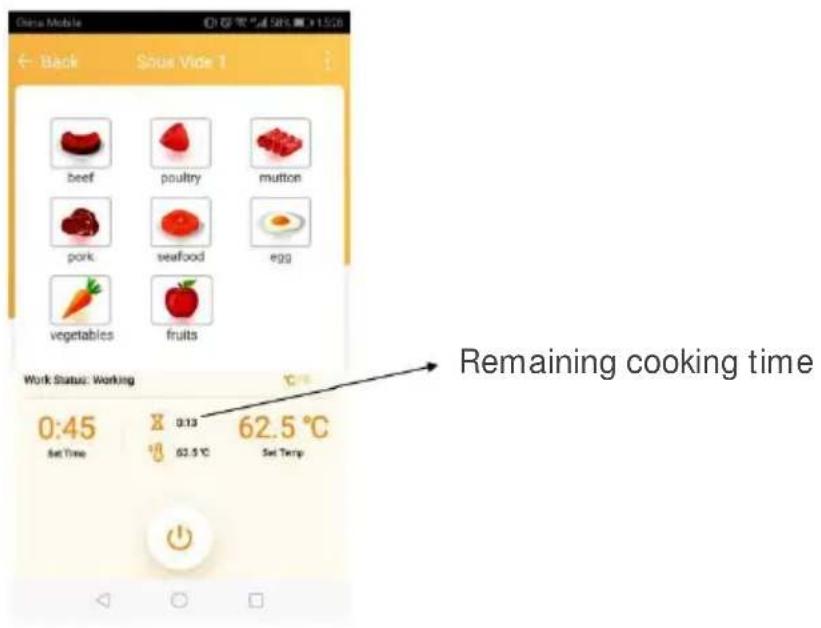
- The homepage will show the time, temperature of the recipes, also the sous vide display will show the time/temperature as well.
- Press the power button in the app, the work status will change to "working" and the sous vide display will show the current temperature and remaining time.

- You can start/pause cooking by pressing the power button on the app.
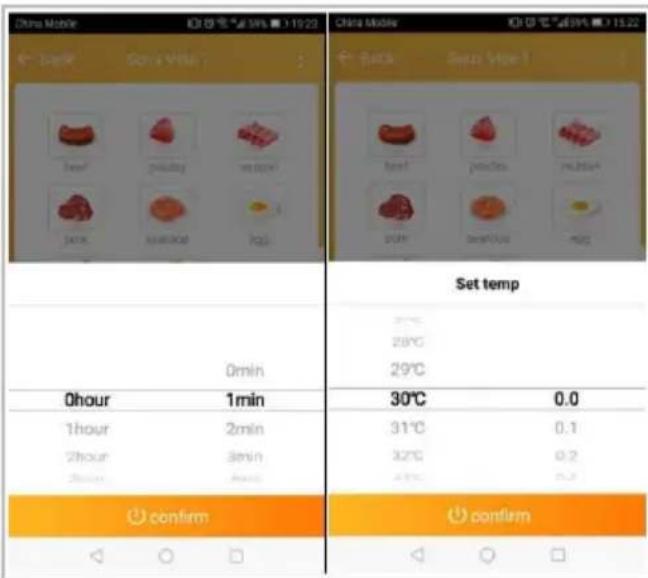
Manually Set the Temperature & Timer
Press to schedule cooking time and temperature, see below image for reference.
Countdown Timer
Countdown timer shows the remaining time in the cooking process.
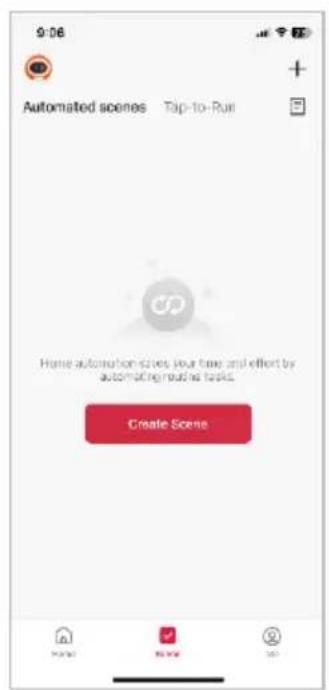
Schedule Cooking Time in Advance
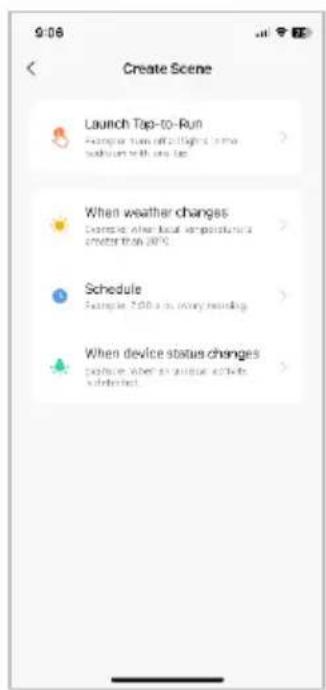
- You can schedule cooking time and temperature in advance, using "Automated Scenes".
- Tap "Create Scene" or the "+" symbol in the upper right corner then set the condition of the automation.
CLEANING & CARE
- Ensure the unit is disconnected from power before performing any cleaning or maintenance.
- Regularly check for signs of damage. If any signs of physical damage are found, cease use immediately and contact help.Kogan.com for support.
Skirt/ Pump
- Remove off the safety screw and rotate the skirt counterclockwise to remove it.
- Rotate the pump cap and pull it away from the unit.
- The skirt and pump cap can be placed into the dishwasher.
natural_image
Technical line drawing of a cylindrical device with two separate views: top view and side view (no text or symbols)Cleaning the Main Unit
- To clean the heating coil, pump shaft and sensors, use dish soap with a soft brush and rinse under water.
- Do not rinse or immerse the main body in water.
natural_image
Technical line drawing of a handheld device with a cylindrical base and handle (no text or symbols)TROUBLESHOOTING
| Problem | Possible Cause | Solution |
| Unit is making a humming noise during operation. | The system will hum due to the motor, impeller and cooling fan during operation. | This is normal. |
| Grinding noise during operation. | The stainless-steel skirt is loose. | Push the stainless skirt up into guide groove and turn to the right until the hole aligns the nut insert inside the body. |
| Stirring shaft is bent. | Unscrew the bottom pump disc and gently push the impeller until it is centred. | |
| Slurping noise during operation | Pump has formed a water vortex. | This is normal. |
| Gurgling and whooshing noise during operation. | The pumps is sucking in air. | Add more water to the cooking container. |
| Food is getting damaged during operation. | The food is hitting the pump during the cooking process. | Turn the pump outlet to face the container wall. |
| “Err” on the display and the unit is beeping. | Low water alarm | Add enough water to cover the minimum the water mark. |
SPECIFICATIONS
Power \~220-240V, 50/60Hz, 1200W
Insulation level Class I
Temperature range 20-90°C
Temperature accurate ±0.1°C
Timer Maximum 99 hours 59 minutes
Disposal
This marking indicates that this appliance should not be disposed with other household wastes. To prevent possible harm to the environment or human health from uncontrolled waste disposal, recycle it responsibly to promote the sustainable reuse of material resources.
Need more information?
We hope that this user guide has given you the assistance needed for a simple set-up.
For the most up-to-date guide for your product, as well as any additional assistance you may require, head online to help.kogan.com
kogan.com
- KOGAN SMARTERHOME™ SOUS VIDE PRECISION COOKER
- SAFETY & WARNINGS
- OVERVIEW
- Display
- ASSEMBLY
- Installing the Skirt
- CONNECT TO SMARTERHOME™APP
- Install App
- To register:
- Set device in pairing mode
- Add device through network
- Notes:
- Note:
- Add Device Through Bluetooth
- GOOGLE HOME CONTROL
- Adding "SmarterHome" to the Google Home app
- AMAZON ALEXA CONTROL
- Adding "SmarterHome" to the Alexa app
- OPERATION
- Cooking Container
- Turning the Sous Vide On/ Off
- Setting the Temperature/Timer
- Temperature:
- Timer:
- Low Water
- Cooking Temperature
- Recipes
- Manually Set the Temperature & Timer
- Countdown Timer
- Schedule Cooking Time in Advance
- CLEANING & CARE
- Skirt/ Pump
- Cleaning the Main Unit
- TROUBLESHOOTING
- SPECIFICATIONS
- Disposal
- Need more information?
Brand : Kogan
Model : KASMSVDC13B
Category : Vacuum sealer