
P-OHLR-01 - Tripod Proaim - Free user manual and instructions
Find the device manual for free P-OHLR-01 Proaim in PDF.

| Product Type | Overhead Camera/Light Modular Studio Rig |
| Brand | Proaim |
| Model | P-OHLR-01 |
| Maximum Track Length | 12 ft (3.66 m) when using all sections |
| Track Section Length | 4 ft (1.22 m) each, total 3 sections |
| Material | Aluminum and steel |
| Included Components | 3 x Accessory Spacers, Ball Head with Quick-Release Plate, 3" Riser, 2 x End Spacers with Stand Post Adapters, Wrench, 1/4"-20 and 3/8"-16 Screws |
| Mounting Threads | 1/4"-20 and 3/8"-16 |
| Compatible Accessories | Cameras, lights, microphones, monitors, and other gear with standard mounting threads |
| Ball Head Type | Quick-release with adjustable angle |
| Power Requirement | None (manual operation) |
| Maintenance | Wipe clean with dry cloth; avoid harsh chemicals |
| Safety Warnings | Ensure all components are securely tightened; do not exceed load capacity; use on stable stands |
| Warranty | 1 year from date of purchase (parts and labor, excludes shipping and misuse) |
| Spare Parts Available | Accessory Spacers, Ball Head, 3" Riser, End Spacers, Stand Post Adapters |
| Repairability | Modular design; individual components can be replaced |
Frequently Asked Questions - P-OHLR-01 Proaim
User questions about P-OHLR-01 Proaim
0 question about this device. Answer the ones you know or ask your own.
Ask a new question about this device
Download the instructions for your Tripod in PDF format for free! Find your manual P-OHLR-01 - Proaim and take your electronic device back in hand. On this page are published all the documents necessary for the use of your device. P-OHLR-01 by Proaim.
USER MANUAL P-OHLR-01 Proaim
PROAIM Overhead Camera / Light Modular Studio Rig (P-OHLR-01)
Assembly Manual

natural_image
Metal laboratory apparatus with vertical supports and mounting brackets (no text or symbols visible)What's In The Box
Please inspect the contents of your shipped package to ensure you have received everything that is listed below.


3 x Accessory Spacers

Ball Head

3" Riser

End Spacers with Stand Post Adapters

Wrench 1/4"-20 and 3/8"-16 Screws


All rights reserved.
No part of this document may be reproduced, stored in a retrieval system, or transmitted by any form or by any means, electronic, mechanical, photo-copying, recording, or otherwise, except as may be expressly permitted by the applicable copyright statutes or in writing by the Publisher.
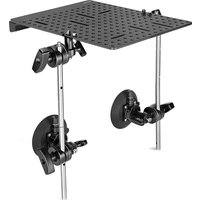
Proaim Overhead Rig Setup
Attaching Rail Section
- Attach track sections as shown and secure them using the provided bolts. The Track comes in a pair of 3 x 4ft sections, so the maximum length for the Track is 12ft.

natural_image
Close-up of hands holding a metallic cylindrical tool with a pen, against a plain white background (no text or symbols visible)
natural_image
Hand holding a white cylindrical device with a small inset showing a dark object (no text or symbols visible)The Track includes two types of Spacers:
2x End Spacers
- The End Spacers have 1/4" and 3/8" mounting threads. Mount the 2 Stand adapters at the bottom of the End spacers. Then mount it on the stand and secure it by tightening the knob.

natural_image
Close-up of hands holding a black electronic device with a handle (no visible text or symbols)
natural_image
Hand holding a black T-shaped object with a handle, against a white background (no text or symbols visible)- Press in the Track into the end caps until you hear a click.

natural_image
Close-up of a hand holding a white cylindrical object mounted on a black tripod stand (no text or symbols visible)
natural_image
Close-up of a white metal frame with black clamps and a metallic rod (no text or symbols visible)- The Accessory Spacers also include 1/4" and 3/8" threads for mounting accessories. Place the Accessory Spacers at the desired location along the Track. The Spacer's end caps must be facing down. Make sure the Accessory Spacer clicks on the track rails.

natural_image
Hand holding a black mechanical component with a metallic knob and mounting brackets (no visible text or symbols)
natural_image
Hand holding a black mechanical component on a white surface (no text or symbols visible)NOTE: You can mount multiple camera gears on Accessory Spacers, e.g. cameras, lights, mics, monitors, etc.

natural_image
Close-up of a hand holding a black clip attached to a white metal rack (no text or symbols visible)
natural_image
Studio lighting setup with octagonal frame and overhead cable (no text or symbols visible)Attaching 3" Riser for Camera Setup
- Screw-in your riser with Accessory Spacer, as shown in the image.

natural_image
Close-up of hands holding a black plastic mechanical component (no text or symbols visible)
natural_image
Two hands holding black plastic mechanical parts, one with a handle and the other a circular base (no text or symbols visible)- The Overhead comes with the ball head that features a quick-release camera plate. Attach ball head with 3" Riser and secure properly.

natural_image
Two hands holding a black mechanical clamp device, no visible text or symbols
natural_image
Close-up of hands adjusting a small mechanical clamp or fixture mounted on a white rail bar (no text or symbols visible)- Mount your camera into the Quick release plate and secure it properly. You can adjust the camera angle according to your needs.

natural_image
Hand adjusting a DSLR camera frame with a lens, against a plain white background (no text or symbols visible)YOUR PROAIM OVERHEAD CAMERA / LIGHT MODULAR STUDIO RIG ALL DRESSED UP AND READY TO GO!

natural_image
Professional camera setup with dual metal frames and a central camera module (no visible text or symbols)(SHOWN WITH OPTIONAL ACCESSORIES)
Warranty: We offer one year warranty for our products from date of purchase. Within this period of time, we will repair it without charge for labor or parts. Warranty doesn't cover transportation costs nor does it cover a product subjected to misuse or accidental damage. Warranty repairs are subjected to inspection and evaluation by us.
Liability: We are not liable for damage caused by products that we do not supply or from mishandling in transit, accident, misuse, neglect, lack of care of the product, or service by anyone other than our company.
Contact Us: In case of any kind of dissatisfaction, please contact us immediately and we promise our utmost support and care until you use our product.
- PROAIM Overhead Camera / Light Modular Studio Rig (P-OHLR-01)
- What's In The Box
- Proaim Overhead Rig Setup
- Attaching Rail Section
- The Track includes two types of Spacers:
- 2x End Spacers
- Attaching 3" Riser for Camera Setup
- YOUR PROAIM OVERHEAD CAMERA / LIGHT MODULAR STUDIO RIG ALL DRESSED UP AND READY TO GO!
Brand : Proaim
Model : P-OHLR-01
Category : Tripod