
PRGHRZN01 - Tripod Proaim - Free user manual and instructions
Find the device manual for free PRGHRZN01 Proaim in PDF.

| Product Type | Suction Camera Mount for Car |
| Brand | Proaim |
| Model | PRGHRZN01 (G-HRZN-01) |
| Mounting Method | Robust suction cup gripper on smooth, non-porous metal surfaces |
| Maximum Load (Steady) | 40 kg (88 lb) |
| Maximum Load (Running) | 15 kg (33 lb) |
| Camera Screw Size | 3/8"-16 |
| Telescopic Legs | Height adjustable with ratchet knobs |
| Ball Joint | Movable, secured with ratchet knob |
| Included Accessories | 2 x Ratchet belts, 3 x Dust covers |
| Warranty | 1 year (labor and parts, excludes transport costs, misuse, accident) |
| Recommended Use | Car roof, hood, trunk, or side; for steady and running shots |
| Setup Time | Just a few minutes |
| Safety Belts | Must be used for additional protection during driving shots |
| Suction Cup Maintenance | Keep surfaces clean, dry, dust-free for proper adhesion |
| Ball Head Compatibility | Ball head not included; attaches to top platform |
| Liability | Not liable for damage from non-supplied products or misuse |
Frequently Asked Questions - PRGHRZN01 Proaim
User questions about PRGHRZN01 Proaim
0 question about this device. Answer the ones you know or ask your own.
Ask a new question about this device
Download the instructions for your Tripod in PDF format for free! Find your manual PRGHRZN01 - Proaim and take your electronic device back in hand. On this page are published all the documents necessary for the use of your device. PRGHRZN01 by Proaim.
USER MANUAL PRGHRZN01 Proaim
PROAIM Horizon Suction Camera Mount for Car (G-HRZN-01)
Assembly Manua I

natural_image
Black tripod-mounted camera mount with adjustable arms and base (no text or symbols visible)What's In The Box
Please inspect the contents of your shipped package to ensure you have received everything that is listed below.

natural_image
Black tripod-mounted camera mount with adjustable arms and base plates (no text or symbols visible)Proaim Horizon Car Mount

natural_image
Two black-and-white striped rope clips with hooks attached, no text or symbols visible2 x Ratchet Belts


3 x Dust Covers
All rights reserved.
No part of this document may be reproduced, stored in a retrieval system, or transmitted by any form or by any means, electronic, mechanical, photo-copying, recording, or otherwise, except as may be expressly permitted by the applicable copyright statutes or in writing by the Publisher.
Horizon Suction Camera Mount Setup
NOTE: To guarantee proper adhesion of suction cups, check that the surfaces of both suction cup and mounting surface are clean, dry & dust-free. Please mount the device on smooth, even, non-porous and metal surfaces.
- Mount the Robust suction cup gripper on a flat surface, as shown in the image.
- Press the lever of the Robust Suction Cup Gripper and lock it properly.
- Secure the movement of the ball joint with the help of the Ratchet knob of the Telescopic legs. NOTE: Three Ratchet knobs are provided in Horizon car mount. With the help of the bottom knob, you can change the ball joint movement of the telescopic legs.
- Loosen the center Ratchet knob of the telescopic legs.
- Adjust the height of the telescopic legs according to your requirement and Tighten the Ratchet knob properly as shown in the image.
- Properly mount the Ball head (not included) at the top platform of the Horizon car mount, which has a 3/8"-16 camera screw, and secure it.
NOTE: You can set up the system in just a few minutes. The top of the Horizon car mount has a 3/8"-16 screw to mount your camera.

natural_image
Close-up of a hand adjusting a black robotic arm on a white vehicle (no visible text or symbols)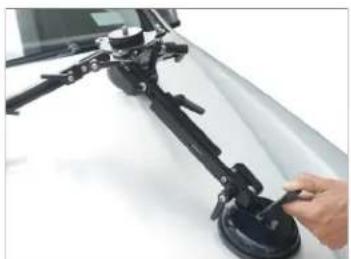
natural_image
Close-up of a hand adjusting a black bicycle-mounted device on a white surface (no visible text or symbols)
natural_image
Close-up of a white car with mounted sensors and a hand adjusting the lever (no visible text or symbols)
natural_image
Hand adjusting a mounted tripod-mounted camera frame with a screen showing the image (no text or symbols visible)
natural_image
Hand interacting with a mounted tripod-mounted device on a white surface, next to a screen (no visible text or symbols)
natural_image
Close-up of a hand holding a bipod-mounted camera on a tripod, with no visible text or symbols.
natural_image
Close-up of a hand adjusting a tripod-mounted device with black clamps and a red circle highlighting the handle (no visible text or symbols)
natural_image
Hand operating a camera setup with a mounted tripod and stand (no visible text or symbols)
natural_image
Close-up of a hand holding a camera on a tripod-mounted tripod (no visible text or symbols)
natural_image
Close-up of a hand adjusting a camera mounted on a tripod, with a blurred background showing a map or window (no visible text or symbols)- Hook the Ratchet belt with the horizon suction mount.
NOTE: Although the horizon car mount holding force is sufficient for regular driving shots, safety belts must be used for additional protection.
- You can loosen or tighten the Ratchet belt accordingly, as shown in the picture.
- Hook the second side of the ratchet belt to the car so that the setup is properly secured with double security.
NOTE: We always recommend using ratchet belts while using the equipment for double safety.
- Unlock the lever of the ball head (Not-Included)
- Remove the camera mounting plate and mount the camera (Not-Included) on the Ball Head.
- Your setup is ready to use.
NOTE: Test all fixtures before driving.
NOTE: Horizon car mount it anywhere, whether it's on the roof, hood, trunk, or side of a moving vehicle. The sturdy device safely holds 40kg/88lb for steady shots and 15kg/33lb for running shots.

natural_image
Close-up of a black tripod-mounted camera with a hand adjusting the cable (no visible text or symbols)
natural_image
Hand holding a cable attached to a tripod-mounted camera (no visible text or symbols)
natural_image
Close-up of a handheld electronic device with a black cable and connector, held by a hand (no visible text or symbols)
natural_image
Close-up of hands connecting a cable to a small electronic component (no text or symbols visible)
natural_image
Close-up of a person applying adhesive to a car tire (no visible text or symbols)
natural_image
Close-up of a hand holding a cable near a car's side panel (no visible text or symbols)
natural_image
Close-up of a hand adjusting a camera lens on a vehicle (no visible text or symbols)
natural_image
Close-up of a hand giving a thumbs-up gesture to a car windshield (no visible text or symbols)
natural_image
Close-up of hands installing or adjusting a car door panel, no visible text or symbols
natural_image
Person holding a DSLR camera mounted on a tripod, driving a car (no visible text or symbols)
natural_image
Side view of a white car with a mounted camera and driver inside, showing no visible text or symbols.
natural_image
Photograph of a camera mounted on a tripod-mounted tripod, displayed on a white surface (no text or symbols visible)YOUR PROAIM HORIZON SUCTION CAMERA MOUNT FOR CAR ALL DRESSED UP AND READY TO GO!

natural_image
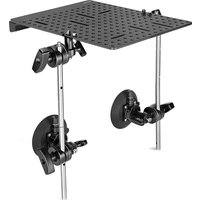
Close-up of a camera setup mounted on a tripod-mounted sensor array, mounted on a car (no visible text or symbols)(SHOWN WITH OPTIONAL ACCESSORIES)
Warranty: We offer one year warranty for our products from date of purchase. Within this period of time, we will repair it without charge for labor or parts. Warranty doesn't cover transportation costs nor does it cover a product subjected to misuse or accidental damage. Warranty repairs are subjected to inspection and evaluation by us.
Liability: We are not liable for damage caused by products that we do not supply or from mishandling in transit, accident, misuse, neglect, lack of care of the product, or service by anyone other than our company.
Contact Us: In case of any kind of dissatisfaction, please Contact us immediately and we promise our utmost support and care until you use our product.
Brand : Proaim
Model : PRGHRZN01
Category : Tripod