
LCS230VN2Z1D - Wine cellar LeCavist - Free user manual and instructions
Find the device manual for free LCS230VN2Z1D LeCavist in PDF.

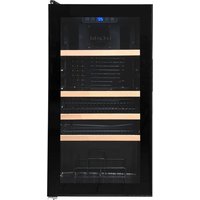
| Product Type | Wine Cellar |
| Model | LCS230VN2Z1D |
| Capacity | 231 bottles (standard 75cl Bordeaux) |
| Effective Volume | 442 L |
| Dimensions (W x D x H) | 595 x 680 x 1870 mm |
| Net Weight | 80 kg |
| Power Supply | 220-240 V, 50 Hz |
| Refrigerant | R600a (isobutane), 60g |
| Climate Class | SN (10-32°C), N (16-32°C), ST (16-38°C), T (16-43°C) |
| Temperature Zones | Dual zone: Upper 5-12°C, Lower 12-20°C |
| Lighting | LED lights on each side |
| Door | Glass door with anti-UV treatment |
| Defrost | Automatic defrost cycle |
| Shelves | Wire shelves, each holds up to 9 bottles |
| Special Functions | Vacation mode, Eco-demo mode, Winter function |
| Anti-Vibration | Compressor dampers and polyurethane foam insulation |
| Air Filtration | Carbon filter |
| Leveling | Adjustable front feet |
| Installation | Free-standing, allow 30 mm rear gap for ventilation |
| Warranty | 2 years manufacturer warranty |
Frequently Asked Questions - LCS230VN2Z1D LeCavist
User questions about LCS230VN2Z1D LeCavist
0 question about this device. Answer the ones you know or ask your own.
Ask a new question about this device
Download the instructions for your Wine cellar in PDF format for free! Find your manual LCS230VN2Z1D - LeCavist and take your electronic device back in hand. On this page are published all the documents necessary for the use of your device. LCS230VN2Z1D by LeCavist.
USER MANUAL LCS230VN2Z1D LeCavist
natural_image
Front view diagram of a server rack cabinet with ventilation fans and indicator lights (no text or symbols)CONGRATULATIONS
Congratulations and thank you for choosing LeCavist for your wine storage solution.
This appliance complies with all relevant safety requirements in Australia. Inappropriate use can, however, lead to personal injury and damage to property.
In order to operate the unit correctly and safely, please read this instruction manual carefully before installation and use. This user manual which provides you with all required instructions related to safety, installation, use and maintenance of the appliance.
For future reference, please store this booklet in a safe place and ensure that all users are familiar with the contents. Pass them on to any future owner of the appliance.
Record Model & Serial Number
Model:
Serial Number
Register your product at www.lecavist.com

IMPORTANT
Adherence to the directions for use in this manual is extremely important for health and safety. Failure to strictly adhere to the requirements in this manual may result in personal injury, property damage and affect your ability to make a claim under the LeCavist manufacturer's warranty provided with your product. Products must be used, installed and operated in accordance with this manual. You may not be able to claim on the LeCavist manufacturer's warranty in the event that your product fault is due to failure to adhere this manual.
Correct Conditions of Use
- The appliance is intended for use in the home and similar environments only. It is not intended for commercial use.
- The appliance is not suitable for outdoor use, non-stationary installation.
- This wine cooler can be only used to store various types of wines

Installation must comply with the valid standards, regulations and laws. All safety and warning information and the operating and installation instructions must be complied with.
TABLE OF CONTENTS
- General Information 03
1.1 Appliance information
- General Safety Instructions 03
2.1 General safety information
2.2 Safety instruction - Installation
2.3 Correction use & Operation 04
2.4 Disassembling and Disposal of the Appliance
2.5 Accessories and Spare parts
-
Technical data sheet .....04
-
Installation instruction .....05
-
Use instruction 05
5.1 Lighting control 06
5.2 Vacation mode 1,2,3
5.3 Eco-demo mode 1,2,3
- Equipment 06
6.1 The climate control system
6.2 The anti-vibration system
6.3 The anti-UV system
6.4 Defrosting 07
6.5 Shelves
6.6 The winter function
-
Loading 07
-
Care and maintenance 07
8.1 In case of a power cut
8.2 Moving your wine cooler
-
In the event of a breakdown 08.....
-
Troubleshooting guide 08
Replacing the light
- Environmental tips 09
11.1 Disposal considerations
11.2 Disposing your old appliance
- Warranty and After sales 09
12.1 Warranty
12.2 After sales service
12.3 Replacement of spare parts
Additional information on products, accessories, warranty, replacement parts and services can be found at www.lecavist.com
1. GENERAL INFORMATION
1.1 Appliance Information
- A damaged appliance can be dangerous. If you find the appliance is damaged or marked, you must report it within 7 days if you wish to claim for damage/marks under the manufacturer's warranty. This does not affect your statutory rights. Do not use a damaged appliance.
-
The manufacturer's warranty will be invalidated if the appliance is not repaired by a LeCavist approved service technician.
-
Faulty components must only be replaced by genuine LeCavist spare parts. The manufacturer can only guarantee the safety of the appliance when LeCavist replacement parts are used.
- If the power cord is damaged, it must only be replaced by a LeCavist authorised service technician or suitably qualified electrician in order to avoid a hazard.
- LeCavist ac not be held liable for non-compliance with these instructions, resulting from incorrect or improper use or operation.
2. GENERAL SAFETY INSTRUCTIONS
The appliance complies with the stipulated safety requirements in Australia. The user is responsible for appliance cleaning and maintenance as well as its safe use. Improper use can lead to personal injury and damage to property.
2.1 General Safety Instructions
Children and People with Special Needs

WARNING
This appliance is not intended for use by persons (including children) with reduced physical, sensory or mental capabilities, or lack of experience and knowledge, unless they have been given supervision or instruction concerning use of the appliance by a person responsible for their safety.
- The appliance is NOT suitable for use by children without supervision.
- Young children should be supervised near the appliance to ensure they do not play with this appliance.
- Children may be able to wrap themselves in packing material or pull it over their heads with the risk of suffocation. Keep children away from any packing material.
Unauthorised Modifications
Unauthorised modifications can cause the appliance to pose risks. Do not conduct any modifications to the appliance.
Cleaning & Maintenance
The device must be cleaned regularly. Dirt can lead to damage or the build up of odours.
• Always clean the appliance exactly as indicated in the operating instructions.
- Always ensure the appliance is switched off before cleaning or replacing parts.
- There is a risk of fire if cleaning is not carried out as described in these operating instructions.
- Make sure no water penetrates inside the device when cleaning. Do not use a steam cleaning appliance to clean this appliance. The steam could reach electrical components and cause a short circuit.
- In areas which may be subject to infestation by cockroaches or other vermin, pay particular attention to keeping the machine and its surroundings in a clean condition at all times. Any damage which may be caused by cockroaches or other vermin will not be covered by the machine warranty.
2.2 Safety Instructions - Installation
- In order to avoid any potential hazard, the installation instructions must be followed.
- Observe all regional regulations for the installation of ventilation systems.
- During installation, maintenance and repair work, the appliance must be disconnected from the mains electricity supply. It is only completely isolated from the electricity supply when:
- the mains circuit breaker is switched off, or
- it is switched off at the wall socket and the plug is withdrawn from the socket.
• Do not damage the refrigerant circuit.
- After the wine cooler is installed in place, the plug shall be easily accessible to facilitate the removal of the cooler plug in case of any accident.
- THIS APPLIANCE MUST BE PROPERLY EARTHED. It is most important that this basic safety requirement is present and tested regularly and, where there is any doubt, the household wiring system should be inspected
- Do not pull the mains connection cable but the mains plug to disconnect your appliance from the mains electricity supply.
- Do not connect the appliance to the mains electricity supply by a multi-socket unit or an extension lead.
- Extension leads are a fire hazard and do not guarantee the required safety of the appliance.
- Tampering with electrical connections or components and mechanical parts is highly dangerous to the user and can cause operational faults. Only open the housing as described in the instructions given in "Installation" section of this booklet. Under no circumstances should any other parts of the housing be opened.
- Do not use mechanical devices or other means to accelerate the defrosting process, other than those recommended by the manufacturer.
by a qualified electrician.
LeCavist cannot be held liable for noncompliance with these instructions, resulting from incorrect or improper use or operation.
2.3 Correct use and Operation
- For safety reasons, this appliance may only be used after it has been installed.
- Reliable and safe operation of this appliance can only be assured if it has been connected to the main electricity supply.
- Before using the appliance, ensure that all packaging materials are removed from the appliance and make sure that the connection data on the data plate [voltage (V) and frequency (Hz)] indicated on the appliance corresponds to the voltage and frequency of the power supply in your household. Consult a qualified electrician if in doubt.
- DO NOT store or spray flammable materials in the appliance or near this appliance while it is in operation (e.g. aerosols).
-
Prevent water ingress. Never sprinkle or flush the cooler using water, place the cooler in an area exposed to moisture water sprinkling, or fill the cooler with water, so as to avoid impairment of the electric insulation of the cooler. Furthermore, failing to follow such requirements may lead to electric shock and fire, or other accidents.
-
After the cooler is put into operation, never touch its inner surface, especially when your hand is wet; otherwise the skin may stick onto the inner surface to get injured.
- Regularly clean surfaces that can come in contact with food and accessible drainage systems. If the refrigerating appliance is left empty for long periods, switch off, clean, dry, and leave the door open to prevent mould developing within the appliance.
- Opening the door for long periods can cause a significant increase of the temperature in the compartments of the appliance.
- Cracks, fissures or fractures in the panels can damage the underlying electronics. Switch off and disconnect the appliance immediately.

WARNING
The refrigerant isobutane (R600a) is contained within the refrigerant circuit of the appliance, a natural gas with a high level of environmental compatibility, which is nevertheless flammable. During transportation and installation of the appliance, ensure that none of the components of the refrigerant circuit becomes damaged.
2.4 Disassembling and Disposal of the Appliance
(see the "Environmental Tips" section for best practices on disposing of this appliance).
The device must only be disassembled by trained specialists who are familiar with and comply with the standard national regulations and supplementary regulations of the local utility companies.
Work on electrical components must only be conducted by trained electrical personnel.
2.5 Accessories and Spare parts
Incorrect components can lead to personal injury or damage to the appliance. Only use original Lecavist spare parts for repairs.
Modifications, additions or alterations to the appliance can lead to safety risks. If spare parts or accessories from other manufacturers are used, the warranty will be invalidated, and last year accept liability.
Please check www.lecavist.com for more information.
- TECHNICAL DATA SHEET
| Product model | LCS230VN2Z1D |
| Voltage/ frequency | 220-240VAC, 50Hz |
| Refrigerant/ weight | R600a/60g |
| Effective volume | 442 L |
| Loading capacity | 231 bottles |
| Net weight | 80kg |
| Unit dimension (WxDxH) | 595×680×1870mm |
| Packing dimension (WxDxH) | 630×740×1920mm |
Announced capacity
The advertised capacity is the maximum capacity calculated with a defined number of shelves which varies depending on the model. This standard is calculated with 75cl traditional Bordeaux type bottles. Any other type of bottle format as well as the addition of shelves will considerably reduce the storage capacity.
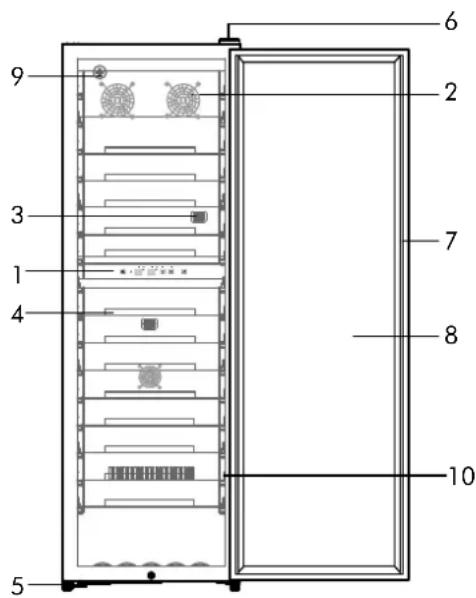
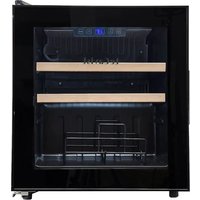
①Control board
②Inside fan
③Sensor
④Wire shelf
⑤Adjustable feet
⑥Hinge
⑦Door seal
⑧Glass door with anti-UV treatment
⑨Carbon filter
⑩ Light LED on each side
4. INSTALLATION INSTRUCTIONS
When selecting a location for your appliance you should make sure the floor is flat and firm, and the room is well ventilated. An average ambient temperature must be observed. This temperature is specific according to the climatic class of the device:
Note : This refrigerating appliance is intended to be used at ambient temperatures ranging from 16 °C to 32 °C.
Before using this appliance
- Remove the exterior and interior packing.
- Before connecting the appliance to the power source, let it stand upright for approximately 24 hours.
This will reduce the possibility of a malfunction in the cooling system from handling during transportation. - Clean the interior surface with lukewarm water using a soft cloth.
- When disposing your appliance, please choose an authorized disposal site.
- Place your wine cooler on a floor that is strong enough to support it when it is fully loaded. To level your Wine cooler, adjust the front leveling leg at the bottom of the wine cooler.
- Adequate ventilation is required, do not block the front air outlet.
• This wine cellar is designed for free-standing. - Connect the cellar to a single socket, leaving a 30-mm gap between the back of the cellar and the wall. Be careful to support it, so that your wine cellar is perfectly level (use of a spirit level is recommended). This will prevent any movement due to instability, causing noise and vibration, and will ensure that the door seals perfectly.
- This appliance is intended to be used exclusively for the storage of wine.
- This appliance is using flammability refrigerant. So never damage the cooling pipe work during the transportation.
CAUTION
• Store wine in sealed bottles.
- Do not overload the cabinet.
- Do not open the door unless necessary.
- Do not cover shelves with aluminum foil or any other shelf material which may prevent air circulation.
- Should the wine cooler be left empty for long periods it is suggested that the appliance is unplugged, and after careful cleaning, leave the door ajar to allow air to circulate inside the cabinet in order to avoid possible condensation, mold or odors forming.
Ambient room temperature limits
- This appliance is designed to operate in ambient temperatures specified by its temperature class marked on the rating plate.
- The ambient temperature affects the interior temperature and humidity of your cellar. For optimal operation, the settings of your cellar are carried out for ambient temperatures of 23^ C to 25^ C.
| CLASS | SYMBOL | AMBIENT TEMPERATURES RANGE (°C) |
| Extended temperate | SN | From +10 to +32 |
| Temperate | N | From +16 to +32 |
| Subtropical | ST | From +16 to +38 |
| Tropical | T | From +16 to +43 |
5. USE INSTRUCTIONS
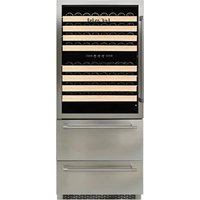
Display board for double temperature zone model: LCS230VN2Z1D

| 1 | Button to activate / deactivate the light. |
| 2 | Indicates whether the winter function is on by an illuminated indicator light. |
| 3 | Display of the set temperature in the upper zone of the cellar. To display the actual temperature, simultaneously press the temperature adjustment buttons (5) and (6). The actual temperature is displayed. After 10 seconds the cellar returns to the initial mode and automatically indicates the programmed temperature. |
| 4 | Display of the set temperature in the lower area of the cellar. To display the actual temperature, simultaneously press the temperature adjustment buttons (5) and (6). The actual temperature is displayed. After 10 seconds the cellar returns to the initial mode and automatically indicates the programmed temperature. |
| 5 | Lower compartment temperature adjustment knob (between 12-20 °C). Press this button to decrease the Temperature by one degree Celsius or Fahrenheit until the desired temperature is obtained. Once the minimum temperature is reached, the temperature returns to the maximum temperature again. Lowering or raising the temperature of the cellar is done with the same command. |
| 6 | Upper compartment temperature adjustment knob (between 5-12 °C). Press this button to decrease the Temperature by one degree Celsius or Fahrenheit until the desired temperature is obtained. Once the minimum temperature is reached, the temperature returns to the maximum temperature again. Lowering or raising the temperature of the cellar is done with the same command. |
| 7 | Button to turn the device on or off without unplugging it. |
cont. use instruction
When you plug the device into a power outlet, it automatically displays the set temperature.
To display the actual temperature, simultaneously press the temperature adjustment buttons (7) and (8). The actual temperature is displayed. After 10 seconds the cellar returns to the initial mode and automatically indicates the programmed temperature.
5.1 VACATION MODE
Vacation mode is available for observing certain religious holidays. This mode turns off the displays, interior lighting and audible alarms and prevents them from turning back on. Normal cooling operations will still take place.
To start holiday mode, press the power (7) and light (1) buttons simultaneously for at least 3 seconds. The indicator light will flash four times and confirm that vacation mode is activated. Vacation mode can be stopped by repeating the above process. Vacation mode will automatically end after 96 hours.
5.2 ECO-DEMO MODE
The eco demo mode can be activated by presenting the device at exhibitions, trade fairs or in sales rooms. In eco demo mode, the compressor and all fan motors are off. By pressing and holding at the same time for at least three seconds (1), (5) and (6), the indicator light will flash five times to confirm the entry and the device will operate in eco-demo mode. The demo-eco mode can be abandoned by repeating the above process, note that the compressor and fan will activate 5 seconds later (for compressor protection reasons).
6. EQUIPMENT
6.1 The climate control system
According to advice from specialists, the ideal temperature for storing wine is around 12^ C, within a bracket of 10 to 14^ C. Do not confuse this with service temperature, which varies between 5 and 18^ C, depending on the specific nature of the wine.
It is especially important to avoid sudden changes in temperature. Designed by specialists for oenophiles, this appliance, unlike a simple refrigerator, takes into account the sensitivity of grand cru wines to sudden variations in temperature by ensuring the close control of a constant average temperature.
6.2 The anti-vibration system
The refrigeration compressor is equipped with special dampers (silent-blocks) and the inner space is insulated from the body by a thick layer of polyurethane foam. These characteristics prevent the transmission of vibration to your wines.
6.3 The anti-UV system
Light accelerates the ageing of wine. In our solid door cellars, your wines are naturally protected, on condition, of course, that the door is not opened too often. This glass-door model has been specially treated and filters out harmful ultraviolet rays, thus ensuring your wines are perfectly shielded.
6.4 Defrosting
Your appliance is equipped with an automatic defrost cycle. When a cooling cycle finishes, the appliance's refrigerated surfaces are defrosted automatically. The defrost water is channeled into a condensates evaporation tray which is located in the back of the appliance near the compressor. The heat produced by the compressor then evaporates the condensates collected in the tray.
6.6 The winter function
The winter function is a frost protection system which enables the cellar to operate in an environment where the temperature is between 5 and 38°C. A sensor located outside the appliance triggers a low power electrical element when the ambient temperature in the room falls to around 8°C in case. This is a low power element to avoid sudden rises in the temperature of the wine and so avoid thermal shocks that are damaging to the preservation of the wine. The kit is intended to raise the cellar's internal temperature even before there is a thermal exchange with the bottles.
6.5 Shelves
To prevent damage to the door seal, ensure that the door is fully open before pulling out the shelves to add or remove bottles.
For easier access to the contents of the shelves, slide the shelf out approximately one third of the way. The shelves are, however, fitted with a stop to prevent the bottles falling out.
7. LOADING
The maximum recommended loading quantities for bottles are given as guidelines and are indicative only; they provide a quick estimate of the size of the appliance (similar to the capacity of a refrigerator expressed in liters).
Back of the shelf

natural_image
Pure diagram of six identical abstract shapes arranged in a grid, no text or symbols present.They correspond to tests conducted with a standard bottle: the standard "75 cl light Bordeaux" bottle -standards apply the geographical origin of each bottle shape (Bordeaux, Burgundy, Provence, etc.) and a type (traditional, heavy, light, flute, etc.), each with its own diameter and height. > These caves present bottles of wine, thanks to the highlighting of the labels of each wine. You will find below the plan of loading of your bottles on a clay, knowing that it is possible to put up to 9 bottles on a shelf.
Front of the shelf
Opinions vary, and the ambient temperature too, but many people agree on the following:
Prestigious Bordeaux wines – Reds 16 – 17°C
Prestigious Burgundy wines – Reds 15 – 16°C
Prestigious dry white vintages 14 - 16°C
Light, young, fruity reds 11 – 12°C
Provence rosés, primeur wines 10 – 12°C
Dry whites and vin de pays reds 10 - 12°C
Vin de pays whites 8 - 10°C
Champagnes 7 - 8°C
Sweet wines 6°C
8. CARE AND MAINTENANCE
Before cleaning your appliance (something that should be done regularly), disconnect it by removing the plug or by pulling the fuse on the circuit.
Before using your appliance for the first time and regularly after that, we recommend that you clean the inside and outside (front, side and top) with warm mixed with a gentle cleaning product. Rinse with clean water and allow drying before reconnecting. Do not use solvents or abrasives. When the appliance is switched on for the first time, there may be a residual odor. In that case, runt the appliance empty for a few hours at the coldest possible temperature. The cold will kill any odors.
8.2 Moving your wine cooler
Remove all items.
Securely tape down all loose items (shelves) inside your appliance.
Turn the adjustable leg up to the base to avoid damage.
Tape the door shut.
Be sure the appliance stays secure in the upright position during transportation. Also protect outside of appliance with a blanket, or similar item.
8.1 In case of a power cut
Most power cuts are resolved within a short time. A power cut of 1 or 2 hours will not affect the temperature in your cabinet. To protect your wines during a power cut, avoid opening the door as much as possible.
During very long power cuts, take the necessary measures to protect your wine. If the appliance is disconnected or if there is a power cut, you must wait three to five minutes before restarting. If you try to re-start before this time, the compressor will only re-start after 3 to 5 minutes (if the temperature requires). When switching on for the first time or following a prolonged shutdown, it is possible that when re-starting, the temperatures selected and those displayed are not the same. This is normal. It will take a few hours before they stabilize.
9. IN THE EVENT OF A BREAKDOWN
Despite the care, we take during production, a breakdown can never be totally ruled out. Before contacting your retailer's after-sales department, please check that:
The appliance is properly plugged in.
There is not a power cut in progress.
The breakdown is not one of those described in the table at the end of this manual.
IMPORTANT: If the power cable supplied is damaged, it must be replaced by the manufacturer, a service centre approved by the brand or the retailer. In all events, it must be replaced by qualified personnel in order to avoid any risk of injury.
10. TROUBLESHOOTING GUIDE
You can solve many common Wine Cooler problems easily, saving you the cost of a possible service call. Try the suggestions below to see if you can solve the problem before calling the servicer.
| PROBLEM POSSIBLE CAUSE POSSIBLE SOLUTION | ||
| Wine Cooler does not operate. | - Not plugged in / Turned OFF.- Tripped circuit breaker/ Blown fuse | - Turn it On, or re-plug the appliance.- Check circuit breaker and fuse if working. |
| Temperature is not cold enough. | - Temperature control not set correctly.- The door is opened too often/ or not properly closed.- Damage or loose door seal. | - Reset temperature, wait a few minutes.Environment and weather may require a higher setting.- Check the door for damages. Replace door seal. |
| Turns On and Off too often. | - Wrong temperature setting.- Large contents added to wine cooler.- The door is opened too often/ or not properly closed.- Damage or loose door seal. | - Reset temperature, wait a few minutes.Environment and weather may require a higher setting.- Check the door for damages. Replace door seal. |
| The light does not work. | - Not plugged in/ Turned OFF.- Tripped circuit breaker/ Blown fuse- The light button is "OFF". | - Turn it On, or re-plugged the appliance.- Check circuit breaker and fuse if working.- Check and press the light button. |
| Vibrations. | - The Wine cooler is not level. | - Check and adjust wine cooler feet. |
| Making too much noise. | - As each cycle ends, you may hear gurgling sounds caused by the flow of refrigerant. Some noise may come from the flow, which is normal.- Contraction and expansion of the inside walls may cause popping and crackling noises.- The Wine Cooler is not level. | |
| - Check and adjust wine cooler feet. | ||
| The door does not close properly. | - The Wine Cooler is not level.- Door is reversed and/ or not installed correctly.- Dirty door seal.- Shelves are not place correctly. | - Check and adjust wine cooler feet.Choose an even/flat surface.- Re-install the door.- Replace the door seal.- Position the seal correctly. |
| The code "HH" is displayed on the control board | - Temperature is too high (>30°C) the code "HH" appears on the display and an audible alarm sound. | - Deactivated audible alarm immediately by pressing the "ON/ OFF" button or by unplugging the cooler.In this case please contact the after-sales service. |
| The code "LL" is displayed on the control board | - Temperature is too high (>30°C) the code "HH" appears on the display and an audible alarm sound. | - Deactivated audible alarm immediately by pressing the "ON/ OFF" button or by unplugging the cooler.In this case please contact the after-sales service. |
Replacing the light
This appliance consists of light-emitting diodes (LEDs). This type of diode cannot be changed by the consumer. The lifetime of these LEDs is normally sufficient for no change to be made. If however, and despite all the care taken during the manufacture of your wine cellar, the LEDs were defective, please contact your after-sales service for any intervention.

flowchart
graph LR
    A["LED"] --> B["Person Icon"]
    B --> C["LED"]
11. ENVIRONMENTAL TIPS
Observe all safety and warning information during operation (see the "General Safety Instructions" section).
11.1 Disposal considerations
The transport and protective packaging has been selected from materials which are environmentally friendly for disposal, and can normally be recycled.
Recycling the packaging reduces the use of raw materials in the manufacturing process and also reduces the amount of waste in landfill sites. Ensure that any plastic wrappings, bags etc. are disposed of safely and kept out of the reach of babies and young children. Danger of suffocation.

11.2 Disposing of your old appliance
Electrical devices marked with this label may not be disposed of in domestic waste at the end of their service life.
Electrical and electronic appliances often contain valuable materials. They also contain specific materials, compounds and components, which were essential for their correct function and safety. These could be hazardous to human health and to the environment if disposed of with your domestic waste or if handled incorrectly. Please do not, therefore, dispose of your old appliance with your household waste.
Please dispose of those materials by contacting your local authorities and ask for the correct method of disposal. Please ensure that your old appliance poses no risk to children while being stored prior to dis posal.
By disposing of this product in accordance with the regulations, you protect the environment and the health of those around you from negative consequences.
12. WARRANTY & AFTER SALES SERVICE
Observe all safety and warning information during operation (see the "General Safety Instructions" section).
In the event of a fault which you cannot remedy yourself, please contact LeCavist.
12.1 Warranty 12.3 Replacement of spare parts
The manufacturer's warranty for this appliance is 2 years.
12.2 After sales service
The contact details for LeCavist are given at the beginning and end of these instructions.
When contacting LeFlervise quote the model and serial number of your appliance. These can be found on the data plate at the back of the Wine Cooler.
Record model & serial number
Model:
Serial Number:......
Register your product www.lecavist.com
Incorrect components can lead to personal injury or damage to the appliance. Use only genuine original Lecavist spare parts.
Modifications, additions or alterations to the appliance can lead to safety risks. If spare parts or accessories from other manufacturers are used, the warranty will be invalidated, and Lecavist cannot accept liability.
Please check www.lecavist.com for more information.
LIKE TO KNOW MORE?
For further information on all LeCavist products, or to obtain detailed dimension and installation information, phone or email our Customer Care team or visit our website: www.lecavist.com
Operating and installation instructions: Original √ Translation
Osass Australia Pty Ltd. ACN 005 635 398 ABN 96 005 635 398
The distribution and duplication of this document, as well as the use and disclosure of its contents are prohibited unless expressly authorised.
These operating and installation instructions have been drawn up with the greatest of care. But it cannot be ruled out that subsequent technical modifications have not yet been incorporated or the relevant content has not yet been adapted. Please accept our apologies in this eventuality. An updated version can be requested from our team. Subject to printing errors and mistakes.
© LeCavist
All rights reserved.
- CONGRATULATIONS
- IMPORTANT
- Correct Conditions of Use
- TABLE OF CONTENTS
- GENERAL INFORMATION
- Appliance Information
- GENERAL SAFETY INSTRUCTIONS
- General Safety Instructions
- Children and People with Special Needs
- WARNING
- Unauthorised Modifications
- Cleaning & Maintenance
- Safety Instructions - Installation
- Correct use and Operation
- Disassembling and Disposal of the Appliance
- Accessories and Spare parts
- Announced capacity
- INSTALLATION INSTRUCTIONS
- Before using this appliance
- CAUTION
- Ambient room temperature limits
- USE INSTRUCTIONS
- cont. use instruction
- VACATION MODE
- ECO-DEMO MODE
- EQUIPMENT
- The climate control system
- The anti-vibration system
- The anti-UV system
- Defrosting
- The winter function
- Shelves
- LOADING
- Front of the shelf
- CARE AND MAINTENANCE
- Moving your wine cooler
- In case of a power cut
- IN THE EVENT OF A BREAKDOWN
- TROUBLESHOOTING GUIDE
- Replacing the light
- ENVIRONMENTAL TIPS
- Disposal considerations
- Disposing of your old appliance
- WARRANTY & AFTER SALES SERVICE
- Warranty 12.3 Replacement of spare parts
- After sales service
- Record model & serial number
- LIKE TO KNOW MORE?
Brand : LeCavist
Model : LCS230VN2Z1D
Category : Wine cellar