TCC-60 - Grill Champion Tuff Grills - Free user manual and instructions
Find the device manual for free TCC-60 Champion Tuff Grills in PDF.

User questions about TCC-60 Champion Tuff Grills
0 question about this device. Answer the ones you know or ask your own.
Ask a new question about this device
Download the instructions for your Grill in PDF format for free! Find your manual TCC-60 - Champion Tuff Grills and take your electronic device back in hand. On this page are published all the documents necessary for the use of your device. TCC-60 by Champion Tuff Grills.
USER MANUAL TCC-60 Champion Tuff Grills
text_image
CHAMPION TUFF GRILLSINSTALLATION AND OPERATING INSTRUCTIONS
TUFF CHARBROILER
INTENDED FOR OTHER THAN HOUSEHOLD USE RETAIN THIS MANUAL FOR FUTURE REFERENCE BROILER MUST BE KEPT CLEAR OF COMBUSTIBLES AT ALL TIMES
IMPORTANT INSTRUCTIONS
After the gas supply has been connected to your unit, it is extremely important to check piping for possible leaks. To do this, use soap and water solution or solutions which are expressly made for this purpose. DO NOT USE matches, candles, flames, or other sources of ignition since these methods are extremely dangerous. Post in a prominent location instructions to be followed in the event you smell gas. Obtain these instructions from your local gas supplier.

FORYOUR SAFETY
Do not store or use gasoline or other flammable vapors and liquids in the vicinity of this or any other appliance.


WARNING
Improper installation, adjustment, alteration, service or maintenance can cause property damage, injury or death. Read the Installation, Operating and Maintenance Instructionsthoroughlybeforeinstallingorservicingthisequipment.

This equipment has been engineered to provide you with year round dependable service when used according to the instructions in this manual and standard commercial kitchen practices.

CHAMPION TUFF GRILLS
Fort Worth, Texas
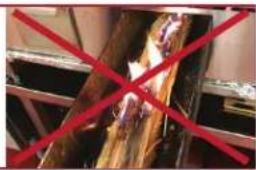
SMOKER BOX USER'S GUIDE SUMMARY & IMPORTANT WARNING INFORMATION
WARNING: The intent of the smoker box is to allow wood pieces to smolder. Do Not allow the wood pieces to ignite.
natural_image
Exterior view of a wooden structure with red diagonal lines indicating construction or inspection (no signage)IMPORTANT: Always wear protective clothing when working with the smoker box unit. Metal surfaces become very hot and may cause severe burns.
WARNING: DO NOT overload the smoker box, overloading the smoker box will void the warranty and cause serious injury.
WARNING: ONLY USE wood pieces that are two (2) inches in diameter or smaller, DO NOT stack wood pieces higher than the sides of the smoker box.
WARNING: Keep the wood pieces moist at all times.
In the event of problems with, or questions about your equipment, please contact the Champion Tuff Grills authorized Service & Part Support Team:
Phone: (254) 728-3101
Email: tuffgrill1@att.net
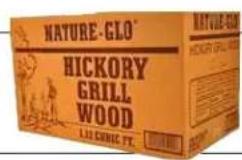
Looking for a supplier of high-quality wood products to grill, smoke or charbroil with? Check out our top three recommended companys and their selection of food-quality woods to take your menu to the next level:
Gourmet Wood Products: www.gourmetwood.com | Nature-Glo: www.royaloak.com | Mojobricks: www.mojobricks.com
TABLE OF CONTENTS
I. INSTALLATION INSTRUCTIONS
| SECTION ITEM | ||
| 1 Installation | 2 | |
| 2 | Clearances 3 | |
| 3 | Gas Connection 3 | |
| 4 | Burners 3 | |
| 5 | Radiants 4 | |
| 6 | Top Grates 4 | |
| 7 | Lighting Instructions | 4 |
| 8 | Drip Pan | 4 |
| 9 | Plancha Plate | 4 |
| 10 | Additional Installation Instructions | 4 |
| 11 | Installation with Casters | 5 |
II. OPERATING INSTRUCTIONS
| SECTION ITEM | ||
| 1 | Lighting Procedure | 5 |
| 2 Broiling | 5 | |
III. MAINTENANCE
| SECTION | ITEM | |
| 1 | Service | 5 |
| 2 | Care & Cleaning | 5 |
| 3 | Cleaning Tools | 6 |
| 4 | Troubleshooting Chart | 6 |
IV. ILLUSTRATIONS
| ITEM | PAGE |
| Parts List | 7 |
| Exterior/Grates/Burner Assembly | 8 |
V. WARRANTY
| ITEM | PAGE |
| Champion Tuff Grills Limited Warranty | 10 |
I. INSTALLATION INSTRUCTIONS
1. INSTALLATION:
(A) INSTALLATION of this broiler must conform with the latest edition of National Fuel Gas Code and/or local codes, (the American National Standard 2-223.1 in USA and CAN/CGA-B149.1 or 2 Installation Code in Canada). In Europe, this appliance must be installed in conformity with current regulations and used only in a well ventilated space.
(B) In MASSACHUSETTS, All gas products must be installed by a "Massachusetts" licensed plumber or gas fitter. Ventilation hoods must be installed in accordance with NFPA-96, current edition, with interlocks as described in that standard.
2. ACCEPTABLE CLEARANCES:
(A) USA and Canada.
Due to intense heat generated by radiation, in USA and Canada these broilers should be installed in noncombustible locations only, including the areas above the grate level.
MINIMUM CLEARANCE FROM NON-COMBUSTIBLE CONSTRUCTION:
Right Side Left Side Back
50mm(2") 50mm (2") 50mm (2")
(B) European Community Countries
Minimum clearance from: Right Side Left Side Back Floor
Combustible construction 250mm 250mm 250mm 150mm
Non-combustible construction 50mm 50mm 50mm 100mm
3. GAS CONNECTION:
The gas pressure regulator supplied must be installed at the gas inlet of each broiler unless required otherwise by local codes. Each regulator is adjusted to yield a manifold pressure of 3.5" water column (9 mbar) for natural gas or 10" water column (25 m bar) for propane gas. Units for propane gas are available for use in USA and Canada only.
Recommended minimum gas supply lines are listed below:
All Tuff Charbroiler Models 3/4" (19 mm)
NOTE: A shut off valve in a readily accessible location must be installed on the gas supply line before connecting it to the unit.
For units using propane gas supply In USA and Canada lines less than '1/2" (12.7 mm) Inside diameter should not be used.
On the Tuff Charbroiler series, the gas connection is located on the right rear of the unit.
BE SURE TO CAPWHICHEVER SIDE IS NOT CONNECTED.
When making gas pipe connections, pipe joint compound resistant to the action of liquefied petroleum gases should be used. The broiler and its individual shutoff valve must be disconnected from the gas supply piping system during any pressure testing of that system at test pressure in excess of 1/2 psig (3.45 kpa).
The broiler must be isolated from the gas supply piping system by closing its individual manual shutoff valve during any pressure testing of the gas supply piping system at test pressures equal to or less than 1/2 psig (3.45 kpa).
4. BURNERS
Check to see that air mixer caps on the front of all burners are adjusted and tightened, allowing half the opening to show.
To install the burners:
(A) Place the front venturi end of the burner into the valve assembly by fitting the center hole of the air mixer cap over the brass orifice.
(B) Drop the two ends of the burners over the burner support pins in the front and back of the chamber.
5. RADIANTS:
Mount the "A" shaped radiants over the burners with each end mounted on special supports on the front and rear of the chamber. A radiant should be mounted over each burner assembly..
6. TOP GRATES
Place a grate over each of the radiants. For normal operation the pointed side of the grate is facing up. For use with foods that require extra, support, the flat side may be used.
7. LIGHTING:
Each burner has a standing pilot burner which must be lit before the burners can be lit. To light the pilot burners:
(A) Turn all broiler valves to off position
(B) Open main gas shut off valve (provided by customer).
(C) Press. turn counterclockwise and hold the burner control knob to the pilot burner ignition position.
(D). Using a lit taper, light the pilot burner
(E) Release the knob after 30 seconds. Pilot burner should stay lit. If the pilot burner does not remain lit, wait for 5 minutes and repeat steps C and D. Hold the knob pressed longer before releasing.
(F) With a screwdriver adjust the pilot burner flame to about 1/2" (12.7 mm). Turn the adjusting screw clockwise to reduce or counterclockwise to increase the pilot burner flame.
(G) Each burner may now be adjusted to the desired flame size by turning the individual burner valve knob.
(H) Turn the knob to the pilot burner ignition position to shut down the main burner.
(I) Turn the knob to off position to shut down the pilot burners.
NOTE: WAIT FIVE MINUTES BEFORE ATTEMPTING TO RELIGHT THE PILOT BURNERS.
8. DRIP PAN
A drip pan is provided below the burners to hold any grease that drips down past the radiants while broiling. An additional drip drawer is provided in the front right corner of the drip pan to collect the grease from the grease drain in the front which in turn drains into the grease collector. Water is usually added to the drip pan to reduce flare-up and flash back. The grease drip will extinguish as it hits the water.
9. PLANCHA PLATE (OPTIONAL)
Plancha plates should not cover more than 50% of the BROILING area. Each Plancha Plate fits on top of two grates. It is not necessary to remove the top grates and radiants before installing the plancha plate.
10. ADDITIONAL INSTALLATION INSTRUCTIONS
(A) Keep the area around the broiler free and clear of combustible materials.
(B) The provision of an adequate air supply to your broiler is essential. Provide for sufficient outside air to enter the broiling area and assure that this air flow is not obstructed.
(C) Air enters the burner area from the front of your broiler. Assure that this area is kept open and unobstructed.
(D) Servicing is accomplished through the front and top of the broiler. Assure that this area is kept unobstructed for proper servicing and operation.
11. INSTALLATION WITH CASTERS:
(A) Install the casters with wheel brakes on the front of the appliance. Casters are mounted at the factory standard and shipped with mounted.
(B) Installation should be made with a connector that complies with the latest edition of the Standard for Connectors for Movable Gas Appliances and a quick disconnect device that complies with the latest edition of the Standard for Quick Disconnect Devices for use with gas fuel. Adequate means must be provided to limit the movement of the appliance without depending on the connector and any quick disconnect device or its associated piping to limit the appliance movement.
(C) The restraint should be attached to the center of the back about 1/2" (12.7mm) from the bottom.
(D) If disconnection of the restraint is necessary, the restraint should be reconnected after the appliance has been returned to its originally installed position.
II. OPERATING INSTRUCTIONS
1. LIGHTING PROCEDURES
See Section 7 of INSTALLATION INSTRUCTIONS.
2. BROILING
BROILER TOP GRATE MUST BE HOT ENOUGH TO MAKE BLACK CHAR-MARKS WHEN STARTING TO BROIL.
Adequate preheating time is necessary for the food to release from the broiler and to cook properly. Allow the unit to preheat for 20-25 minutes before broiling.
(A) Do not press the juice out of the meat because that will cause dry products.
(B) After broiling, allow the meat to sit covered on a heated platter for 2-5 minutes before cutting. This will allow the juices to "settle" and the product will be more moist.
(C) Do not use forks or other sharp objects to poke holes in the meat. Do not cut the meat as it cooks.
(D) Thick pieces of meat require a longer broiling time with less flare-up. Reduce flare up by trimming excess fat for a longer broil time without burning.
(E) Keep the unit clean. Food caught between the grate will not allow hot air to rise around the product. This will result in uneven heating and increase the cooking time.
III. MAINTENANCE
1. SERVICE
Shut off the main gas supply before attempting any maintenance on the unit. If required, contact the factory or a local service company to obtain qualified maintenance and repairs.
2. CARE AND CLEANING
(A) The top grates should be cleaned using a stiff wire brush. If this is done daily, the accumulation of food and fat caught in the grates and work necessary to keep them clean will be reduced. Periodically, they should be turned over and brushed and then put back. In the event that an extra amount of fat is accumulated on the top, due to use of low heat, we recommend turning up the flame of this section for about an hour, which will burn off much of the fat and residue and the brushing operation will be easier. Under no circumstances should the grates be placed in a dishwasher. Soap, water, or any detergents should never be used on the cast Iron grates.
(B) Inner panels - These are made of aluminized steel. Use hot soapy water and soft nylon scrub pads to clean the surfaces.
(C) Drip pan and grease collector - Drip pan and collector should be cleaned daily or more often if necessary.
CAUTION:
(A) Clean the unit only when it is cold.
(B) Always rub with the grains when cleaning.
(C) Do not use abrasive pads for cleaning.
(D) Do not use caustic cleaning compounds on aluminized surfaces.
3. CLEANING TOOLS
Contact Champion Tuff Grills for more information on recommended cleaning tools.
TROUBLESHOOTING CHART
| PROBLEM PROBABLE CAUSE SOLUTION | ||
| Burners & pilots will not turn on | Main gas supply to broiler is not turned on. Turn on main gas supply. | |
| Burners produce excessive carbon deposits | Incorrect gas type Supply correct type gas. | |
| Incorrect gas supply pressure. Call local gas supplier. | ||
| Incorrect orifices. Call Champion Tuff Grills. | ||
| Primary air not adjusted properly. Adjust air shutter. | ||
| Pilot will not remain lit Pilot flame | adjusted incorrectly. Adjust pilot flame. | |
| Draft condition. | Remove draft. | |
| Improper ventilation system. | Call an HVAC specialist. | |
| Debris or grease clogging pilot burner or thermocouple. | Clean debris & grease from pilot burner & thermocouple. | |
| Pilot safety valve or thermocouple has failed. | Replace failed component. | |
| Excessive flare-up | Overload of fatty meat. | Add water to drip pan. |
| Broiler doesn't seem hot enough | Orifices may be dirty/clogged. | When unit cools, check & clean orifices. |
| Low gas pressure. Increase gas pressure to 5' W.C. (Nat) | ||
| Top grates may be dirty/clogged. | When unit cools, check & clean top grates. | |
| If the ventilation is too strong it will suck heat from the cooking/broiling surface. | Call an HVAC specialist. | |
| Too many wood chips restricting heat to top grates. | Reduce the number of wood chips. | |
| Grates &/or radiants &/or burners &/or gas valves warp | Usually improper cleaning methods ie; users cover grate top w/sheet pans & crank up heat to burn-off debris | Do not "Burn-Off" top grates. This causes the firebox area to overheat excessively.*Never cover top grates. |
PARTS LIST
Dante
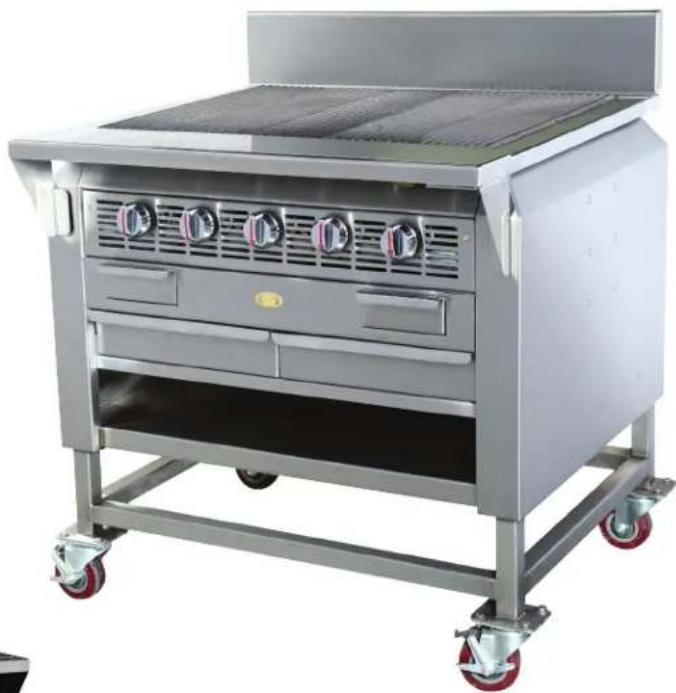
natural_image
Modern stainless steel electric stove with control panel and wheels, no visible text or symbols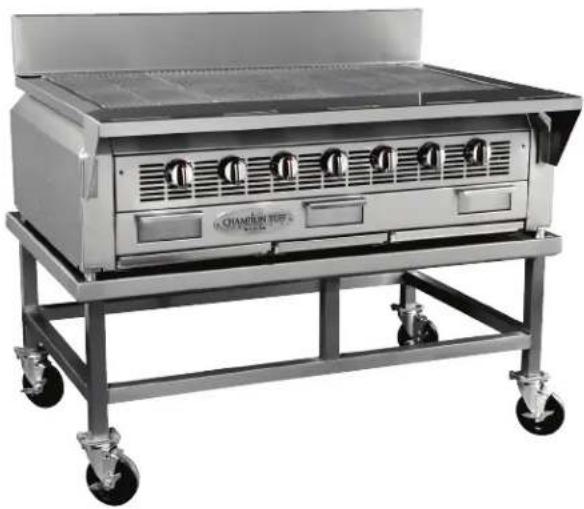
natural_image
Exterior view of a large stainless steel heat exchanger mounted on a wheeled stand with wheels (no visible text or symbols)Tuff Charbroiler Model Number
TCB-30
TCB-36
TCB-48
TCB-60
TCB-72
Tuff Charbroiler Countertop Model Number
TCC-30
TCC-36
TCC-48
TCC-60
TCC-72
Serial Number
Type of Gas
Natural

TUFF CHARBROILER
Gas Char Broiler

Fort Worth, TX
254.728.3101 | 770.977.7770
www.championtuffgrills.com
Exterior/Grates/Burner Assembly

text_image
Dante 2 TOP VIEW 1
text_image
3 4 FRONT VIEW 5 6
text_image
Technical diagram of a mechanical assembly with numbered components, likely illustrating a lathe or piping system.TUFF CHARBROILER
Gas Char Broiler

Fort Worth, TX
254.728.3101 | 770.977.7770
www.championtuffgrills.com
Accessories
Dante
natural_image
Close-up of a black electronic component with metallic leads and textured body (no visible text or symbols)10
natural_image
Exterior view of a modern office building (no signage)11

natural_image
Metal mechanical component with a bent end and stepped base, isolated on white background (no text or symbols)12

natural_image
Exterior view of a dark metal L-shaped object on a plain background (no text or symbols)13

natural_image
Black perforated rectangular object with grid pattern, no visible text or symbols14
natural_image
Metallic electronic component with a serrated edge and mounting holes (no text or symbols visible)15
Item/Description
ITEM DESCRIPTION ITEM DESCRIPTION
| 1 Front Shelf 9 Standing Pilot Light | |||
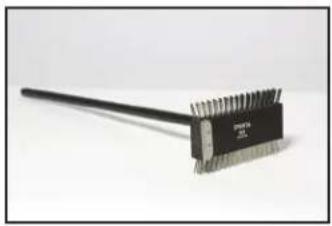
| 2 Top Grates 10 | Wire Brush | ||
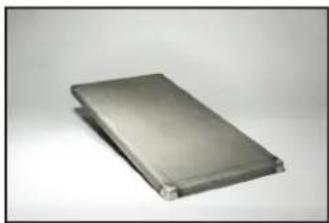
| 3 Backsplash | 11 | Plancha Plate | |
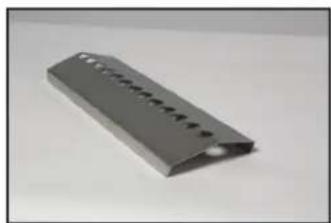
| 4 Chip Drawer | 12 | Grate Lifter | |
| 5 Gas Control Knob | 13 | Burner Radiant | |
| 6 | Adjust air shutter. | 14 | Diamond Grate |
| 7 Burner | 15 | Chip Drawer Cover | |
| 8 Gas Orifice | |||
CHAMPION TUFF G R I L L S
Your appliance is covered by a three year limited warranty from date of purchase. For one year from your original date of purchase, ChampionLuff Grills will pay all costs for repairing or replacing any parts of this appliance that prove to be defective in materials or workmanship when such appliance is installed, used and maintained in accordance with the provided instructions.
Exclusions This warranty does not cover the following:
- Products with original serial numbers that have been removed, altered or cannot be readily determined.
- Product that has been transferred from its original owner to another party or removed outside the United States.
- Food loss due to any product failures
- Service calls which do not involve malfunction or defects in materials or workmanship, or for appliances used other than in accordance with the provided instructions
- Service calls to correct the installation of your appliance or to instruct you how to use your appliance
- Expenses for making the appliance accessible for servicing, such as removal of trim, cabinetry, shelving, etc., which are not a part of the appliance when it is shipped from the factory
- Service calls to repair or replace appliance firebricks, grill grates, other consumables, or knobs, handles, or other cosmetic parts
- Surcharges including, but not limited to, any after hour, weekend, or holiday service calls, tolls, ferry trip charges, or mileage expense for service calls to remote areas, including the state of Alaska.
- Damages to the commercial building during installation, including but not limited to floors, cabinets, walls, etc.
- Damages caused by: services performed by unauthorized service companies; use of parts other than genuine Champion Luff Grills/Falcon Fabricators parts or parts obtained from persons other than authorized service companies; or external causes such as abuse, misuse, inadequate gas connections, accidents, fires, or acts of God.
DISCLAIMER OF IMPLIED WARRANTIES; LIMITATION OF REMEDIES
CUSTOMER'S SOLE AND EXCLUSIVE REMEDY UNDER THIS LIMITED WARRANTY SHALL BE PRODUCT REPAIR OR REPLACEMENT AS PROVIDED HEREIN. CLAIMS BASED ON IMPLIED WARRANTIES, INCLUDING WARRANTIES OF MERCHANTABILITY OR FITNESS FOR A PARTICULAR PURPOSE, ARE LIMITED TO ONE YEAR OR THE SHORTEST PERIOD ALLOWED BY LAW, BUT NOT LESS THAN ONE YEAR. CHAMPION TUFF GRILLS/FALCON FABRICATORS SHALL NOT BE LIABLE FOR CONSEQUENTIAL OR INCIDENTAL DAMAGES SUCH AS PROPERTY DAMAGE AND INCIDENTAL EXPENSES RESULTING FROM ANY BREACH OF THIS WRITTEN LIMITED WARRANTY OR ANY IMPLIED WARRANTY. SOME STATES DO NOT ALLOW THE EXCLUSION OR LIMITATION OF INCIDENTAL OR CONSEQUENTIAL DAMAGES, OR LIMITATIONS ON THE DURATION OF IMPLIED WARRANTIES SO THESE LIMITATIONS OR EXCLUSIONS MAY NOT APPLY TO YOU. THIS WRITTEN WARRANTY GIVES YOU SPECIFIC LEGAL RIGHTS. YOU MAY ALSO HAVE OTHER RIGHTS THAT VARY FROM STATE TO STATE.
If You Need Service
Keep your receipt, delivery slip, or some other appropriate payment record to establish the warranty period should service be required. If service is performed, it is in your best interest to obtain and keep all receipts. Service under this warranty must be obtained by contacting ChampionTuff Grills at the addresses or numbers below.
This warranty only applies in the United States. In the United States, your appliance is warranted by ChampionTuff Grills and Falcon Fabricators. ChampionTuff Grills/Falcon Fabricators authorizes no person to change or add to any obligations under this warranty. Obligations for service and parts under this warranty must be performed by ChampionTuff Grills/Falcon Fabricators or an authorized service company. Product features or specifications as described or illustrated are subject to change without notice.
Champion Tuff Grills
254.728.3101 | 770.977.7770
www.championtuffgrills.com