SLBKBLU62 - Bluetooth speaker SereneLife - Free user manual and instructions
Find the device manual for free SLBKBLU62 SereneLife in PDF.

User questions about SLBKBLU62 SereneLife
0 question about this device. Answer the ones you know or ask your own.
Ask a new question about this device
Download the instructions for your Bluetooth speaker in PDF format for free! Find your manual SLBKBLU62 - SereneLife and take your electronic device back in hand. On this page are published all the documents necessary for the use of your device. SLBKBLU62 by SereneLife.
USER MANUAL SLBKBLU62 SereneLife
text_image
serenelife™ High-End Kid's Bicycle with 2 Hand Brakes, Reflectors, Bell, Tools, Training Wheels and Kickstand USER MANUALHigh-End Kid's Bicycle
with 2 Hand Brakes, Reflectors, Bell, Tools, Training Wheels and Kickstand
USER MANUAL
THIS MANUAL CONTAINS IMPORTANT SAFETY, PERFORMANCE AND MAINTENANCE INFORMATION. READ THE MANUAL BEFORE TAKING YOUR FIRST RIDE ON YOUR NEW BICYCLE, AND KEEP THE MANUAL HANDY OF FUTURE REFERENCE
CONTENTS
Parts List 3-4
Installation Instructions 5-7
Maintenance Instructions 8
Safety Checklist 9-12
Safety Information 13-15

natural_image
Black and red bicycle with blue frame and white wheels, no visible text or symbolsHELMETS SAVE LIVES!
⚠ WARNING: Always wear a properly fitted helmet when you ride your bicycle. Do not ride at night. Avoid riding in wet conditions.

natural_image
Side profile illustration of a person wearing a helmet and harness (no text or symbols)Correct fitting
Make sure your helmet covers your forehead.

natural_image
Prohibition sign showing a person wearing a helmet crossed out, no text or symbols presentIncorrect fitting
Forehead is exposed and vulnerable to serious injury.
PARTS LIST
High-End Kid's Bicycle
Get to know the parts of your bicycle. This will help with assembly, maintenance, and troubleshooting.
Models vary in color and style.
Caution: Over-tightening of stem bolts or other clamping devices may cause injury to the rider
| Part name | Torque (in.-lb) |
| Fork dropout | - |
| Fork | - |
| Pedal | 300-360 |
| Crank arm (1-piece) | 300 |
| Crank arm (3-piece) | 390 |
| Chain | - |
| Chainwheel | - |
| Bottom bracket lockring | 300 |
| Seat post | - |
| Seat post attaching hardware | 130-170 |
| Saddle (seat) | - |
| Seat post clamp | 60-80 |
| Freewheel | - |
| Spoke | - |
| Valve stem | - |
| Rim | - |
| Part name | Torque (in.-lb) |
| Handlebar grip | - |
| Brake cable | - |
| Handlebar | - |
| Handlebar binder bolt(s) | 145 - 200 |
| Stem | - |
| Stem binder bolt | 100 - 120 |
| Headset | 175 - 260 |
| Caliper brake assembly | 50 - 70 |
| Brake cable pinch bolt | 50 - 70 |
| Brake pads | - |
| Brake pads hardware | 50 - 60 |
| Caliper brake attaching nut | 70-85 |
| Wheel axle nut (front) | 180-240 |
| Wheel axle nut (rear) | 240-300 |
| Tire | - |
PRODUCT INFORMATION
Product Color: Black/Bule/Orange
Main Materials: Magnesium alloy, Steel, PP
Applicable Age: 4 years old and above
Execution Standards:
16 CFR Part 1512, CPSIA 101 (Lead), 16 CFR Part 1501, 16 CFR Part 1500.20
PRODUCT FEATURES:
• High strength, lightweight and corrosion resistant
• One-piece formed magnesium alloy, stylish appearance
• Balance training wheels, three points of support, safe and stable
PARTS LIST:
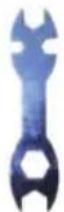
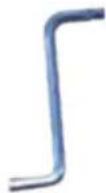
A. Handlebar X1
E. Multi-function tool X1
B. Frame X1
F. Hexagonal Key X1
C. Pedal X2
G. Kickstand X1
D. Training Wheel X2
H. Front/Rear Reflector X1
E
F
G

H


natural_image
Red and white children's bicycles with visible branding and 'INSIKE' text, no readable text or symbols beyond the bicycle design.INSTALLATION INSTRUCTIONS
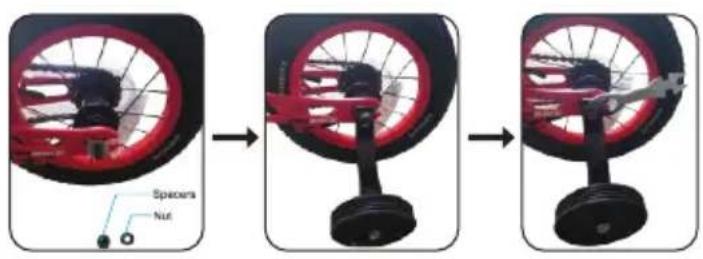
Install Training Wheels
text_image
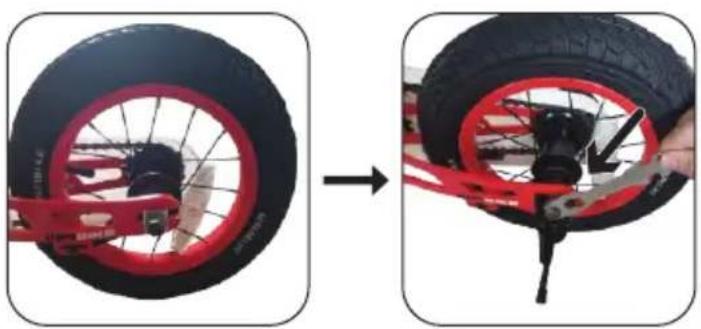
Spacers NutInstall Kickstand
natural_image
Two-step diagram showing a bicycle steering wheel being adjusted to adjust the wheel rim (no text or symbols present)- Use multi-function tool to remove the nuts and spacers from the left and right sides of the rear wheel.
• Install the training wheels, spacers and nuts in order as shown in the diagram and lock them in place with a multifunction tool. (The locking torque is not less than 18N.m) - Training wheel height from the ground between 0.5-1cm is best, before riding must confirm that all screws have been tightened.
- Remove the nut with a wrench and take off both sides of the training wheels.
• Install the kickstand into the corresponding frame screw hole and tighten the nut with a wrench. - Check the kickstand retraction and stand function.
Suggestion:
Install the kickstand after the user has mastered the balance
Install Pedal

natural_image
Two-step illustration showing a person adjusting a bicycle seat with a red frame and black trowel, before and after assembly (no text or symbols)- Put the corresponding L/R pedals into the corresponding left and right cranks, and use a multi-function tool to turn and lock in the direction of the front wheel (the locking torque is not less than 45N.m).
Install Front/Rear Reflector
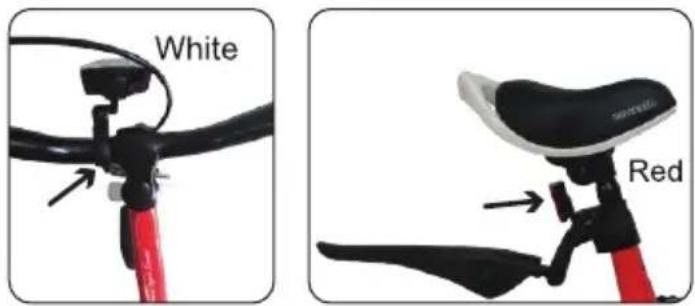
text_image
White Red• Install the front reflector (white) on the handlebar as shown in the picture, lock it with a screwdriver.
• Install the rear reflector (red) on the seat tube as shown in the picture, and lock it with a screwdriver.
Install Handlebar

text_image
Waterproof Plug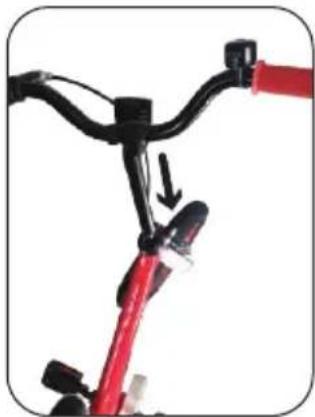
natural_image
Close-up of a bicycle's head and shoulders with red cable, showing a red cable being inserted (no text or symbols visible)
natural_image
Close-up of a bicycle's front wheel and suspension bracket (no text or symbols visible)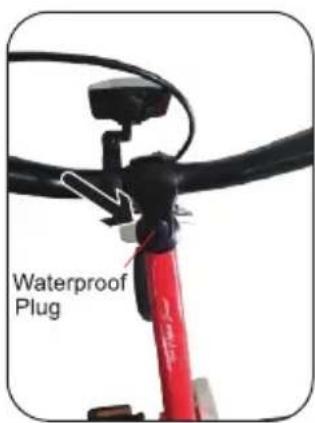
text_image
Waterproof Plug- Remove the waterproof plug from the installed handlebar.
- Pull off the assembled handlebar protector, insert it into the fork hole, adjust the angle (the center point of the handlebar is perpendicular to the front wheel), make sure you can insert the handlebar below the safety line into the head tube of the frame, and lock it tight with hexagonal key.
- Make sure the handlebars are locked tight and do not move from side to side (the locking torque is not less than 12N.m)
- Put the waterproof plug back in its original position.
MAINTENANCE INSTRUCTIONS
Adjusting Calliper Brakes
Throughout the life of your bike, the front calliper brakes may need adjusting if the brake cable has stretched or the brake arms have been knocked during use.
Adjusting the Caliper Cable Tension
1a

text_image
Cable Anchor Nut Brake Cable Loosen Tighten Cable Anchor Nut Brake Cable 3-4mm 3-4mm1a. Adjust the Brake Cable
The brake cable must be adjusted to ensure that the brakes are close as possible to the wheel rim when no pressure is applied to the brake lever but still allowing freedom of wheel to rotate.
Using a suitable spanner or socket, loosen the cable anchor nut until the brake inner wire/or cable is free to move.
Pull the brake cable until the brake pads are approximately 3 to 4 mm from the wheel rim. Retighten the cable anchor nut while holding the brake cable position.
SAFETY CHECKLIST
Before Riding
You should perform the following checks before riding your bike to ensure it is safe to use and operating correctly.
1. Is the saddle Secure?
While standing next to the bike, try and move the saddle from side to side.
If the saddle moves you should retighten the seat post bolt or the saddle clamp bolts.
2. Are the Front and Rear Tires Inflated Correctly?
Squeeze the sides of the front and rear tires. If they are soft they will need inflating.
Re-inflate to the pressure indicated on the sides of the tires using approved bicycle pump.
3. Are the Pedals Tight?
Using the supplied multi-tool, ensure both the left and right pedals are fully tight.
Remember that the threaded shafts of the left and right pedals tighten in different directions.
4. Do the Brakes Work?
Stand next to the bike and apply the front brake and push forwards. If the wheels move, the front brake may not be working correctly. If required, adjust the front brakes as described in the User Manual.
Repeat the above check for the rear brake.
5. Do the Handlebars Move?
Hold the front wheel between your legs and try to move the handlebars. If the handlebars move, the stem bolt may have become loose. Retighten the stem bolt.
6. Is the bike Clean?
The bike should be cleaned and re-oiled regularly to ensure it operates correctly.
Using the Brakes
This bike is fitted with a front clamp brake and a rear coaster brake to stop the bike effectively.
The breaks are operated using one brake lever mounted on the handlebar.
The left-hand brake lever operates the front brake.
Riding In Bad Weather
⚠ WARNING! Wet weather impairs traction, braking and visibility, both for the bicyclist and for other vehicles sharing the road. The risk of an accident is dramatically increased in wet conditions.
When riding in bad weather i.e. wet, foggy, windy or icy, always wear bright, reflective clothing which is warm and waterproof.
You should always give other road users clear signals in plenty of time particularly when approaching junctions.
To make sure that you can slow down and stop safely in wet conditions, ride more slowly and apply your brakes earlier and more gradually than you would under normal, dry conditions.
Be aware that all types of surface become greasy or slippery in bad weather. Do not turn or brake suddenly.
Riding in the Dark
⚠ WARNING! When riding in the dark, always make sure that the bike is fitted with suitable reflectors and a white front light and a red rear light.
It is essential that other road users can clearly see you when riding in the dark. Always wear bright, reflective clothing. Suitable reflectors should be fitted to the front and rear of the bike and if possible the wheels. A white light must be fitted to the front of the bike and a red light at the rear.
Before starting any journey in the dark or even twilight, ensure the lights are working correctly and are turned on.
Clean lights and reflectors regularly and make sure they can be seen from distance.
Riding Using Personal Music Players
Listening to music while biking or running roadside presents danger, as headphones and earbuds impair one of your most important senses -- hearing.
These devices prevent you from hearing approaching vehicles and may prove to be a distraction.
They mask traffic sounds and emergency vehicle sirens, distract you from concentrating on what's going on around you, and their wires can tangle in the moving parts of the bicycle, causing you to lose control.
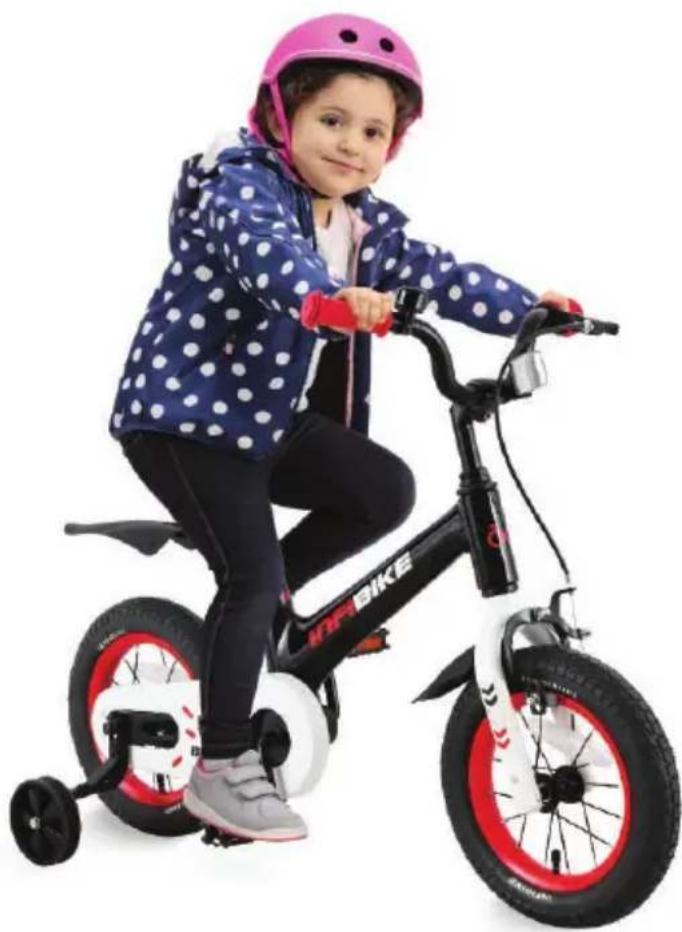
natural_image
Child riding a tricycle with blue polka-dot jacket and pink helmet (no text or symbols visible)SAFETY INFORMATION
IMPORTANT - PLEASE FULLY READ THESE INSTRUCTIONS
WARNING! This Bike has been designed, assembled and tested in accordance with the 16 CFR Part 1512, CPSIA 101 (Lead), 16 CFR Part 1501, 16 CFR Part 1500.20 standard to ensure your safety. To make sure the bike remains safe, it should only be used for recreational use. Under no circumstances should it be used for competitive cycling, stunting, jumping or acrobatic manoeuvres. These types of cycling may result in serious personal injury and damage to the bike.
⚠ WARNING! The bicycle is not suitable for the fitting of a luggage carrier and a child seat. The bicycle is not designed for public roads use.
⚠ WARNING! Always wear a properly fitted helmet when you ride your bicycle.
⚠ WARNING! Wear something that reflects light, such as reflective tape or markings, or flashing lights. All bikes need a bright white front light and a red rear light.
⚠ WARNING! Under wet conditions, the stopping power of your brakes (as well as the brakes of other vehicles sharing the road) is dramatically reduced and your tires don't grip nearly as well. This makes it harder to control speed and easier to lose control. To make sure that you can slow down and stop safely in wet conditions, ride more slowly and apply your brakes earlier and more gradually than you would under normal, dry conditions.
⚠ WARNING! Always wear bright, visible clothing that is not so loose that it can be tangled in the bicycle or snagged by objects at the side of the road.
WARNING! This bike is only suitable for use by riders (including any panniers and/or luggage) with a weight or less than (1) 30kgs (66 lb) for 12in bikes, (2) 40kgs (88 lb) for 14in bikes and (3) 50kgs (110 lb) for 16in bikes.
WARNING! Please follow riding speed: (1) 12in bikes: 12km/hour, (2) 14in bikes: 15km/hour, (3) 16in bikes: 18km/hour.
WARNING! The front and the rear tires must fully inflated before attempting to ride the bike. Under no circumstances should the tires be inflated above the maximum pressure stated on the side of the tires.
⚠ WARNING! If any section of the wheel rim wear grove is no longer visible, the wheel rim should be replaced immediately. Do not attempt to ride the bike until the rim is replaced as the braking performance could be affected.
⚠ WARNING! As with all mechanical components, the bike is subjected to wear and high stresses.
Different materials and components may react to wear, stress or fatigue in different ways. If the design life of a component has been exceeded, it may suddenly fall, possibly causing injuries to the rider. Any form of crack, scratches or change of colouring in highly stressed areas indicate that the life of the component has been reached and it should be replaced.
⚠ WARNING! Ensure only genuine replacement parts are used, especially for safety critical parts.
⚠️ CAUTION! Only use suitable tools to assemble the bike. The use of unsuitable tools may lead to personal injury and damage to the bike.
CAUTION! The safety and smooth running of the bike can only be preserved with regular maintenance. Always ensure the bikes is maintained in accordance with this maintenance manual.
CAUTION! If the gears make a grinding sound while riding the bike, STOP immediately.
The bike may be unsafe and prolonged use may lead to personal injury or damage to the bike.
Inspect and, if required, repair the bike before reusing.
⚠️CAUTION! Do not clean your bike with pressure washers. These high pressure cleaning devices may remove lubricant and/or grease from bearing and internal bike parts. This may lead to poor performance.
⚠️ CAUTION! When lubricating the moving parts of the bike, take care not to get any lubricant on the rims of the wheels or the brake pads.
TOOLS REQUIRED
Flat-head Screwdriver
Phillips-head Screwdriver
Adjustable Wrench (6" - 8" - 12")
Slip Joint Pliers
Hexagon Allen Wrench (4, 5, 6 mm)
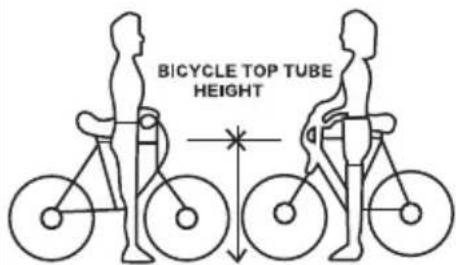
text_image
BICYCLE TOP TUBE HEIGHTSAFE SIZING FOR JUVENILE AND SIDEWALK BICYCLES
It is assumed that the bicycle you have bought is sized correctly for the user. Some parents make the mistake of buying a bicycle too large for the intended rider, planning on the child "growing into" it. There should be a minimum of 1 inch clearance above the highest point of the top tube when the child is straddling the bicycle with both feet on the ground (see drawing).

natural_image
Illustration of a blue and yellow bicycle with wheels and seat (no text or symbols on the bicycle itself)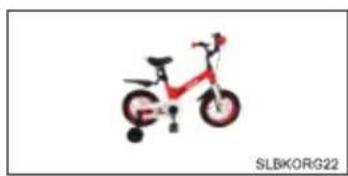
natural_image
Illustration of a red bicycle with black wheels and a red frame, labeled 'SLBKORG22' in the corner (no other text or symbols)
natural_image
Illustration of a bicycle with no visible text or symbols on the diagram itself
natural_image
Illustration of a blue and white bicycle with wheels and a yellow body (no text or symbols)
natural_image
Red and white bicycle illustration (no text or symbols visible)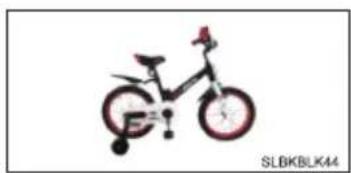
natural_image
Illustration of a children's bicycle with red frame and black body (no text or symbols)
natural_image
Illustration of a blue and yellow bicycle with wheels and seat (no text or symbols)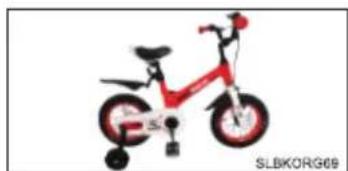
natural_image
Red and black bicycle illustration with wheels and front wheel (no text or symbols)
natural_image
Illustration of a children's bicycle with red wheels and black body (no text or symbols)| Model | Color | Model | Color | Model | Color | Size |
| SLBKBLU28 | Blue | SLBKORG22 | Orange | SLBKBLK24 | Black | 12 Inch |
| SLBKBLU47 | Blue | SLBKORG49 | Orange | SLBKBLK44 | Black | 14 Inch |
| SLBKBLU62 | Blue | SLBKORG69 | Orange | SLBKBLK66 | Black | 16 Inch |


text_image
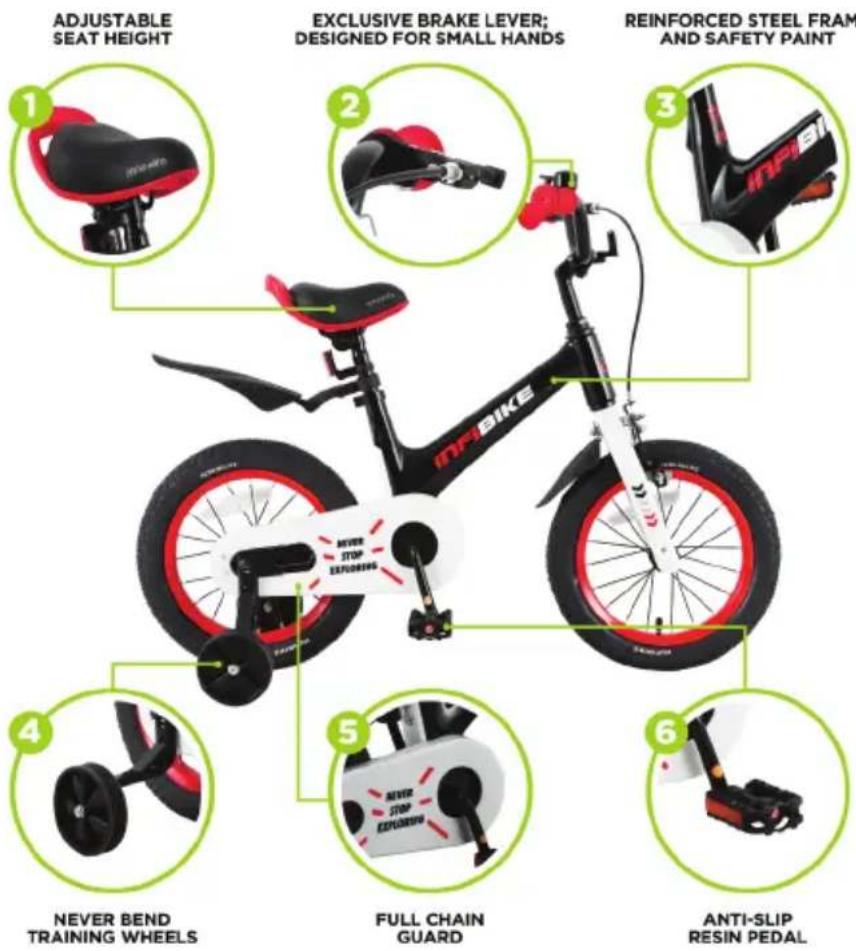
ADJUSTABLE SEAT HEIGHT EXCLUSIVE BRAKE LEVER; DESIGNED FOR SMALL HANDS REINFORCED STEEL FRAM AND SAFETY PAINT 1 2 3 4 5 6 NEVER BEND TRAINING WHEELS FULL CHAIN GUARD ANTI-SLIP RESIN PEDALserenelife™
Questions? Comments?
We are here to help!
Phone: (1) 718-535-1800
Email: support@pyleusa.com