
KL-G2TC - Printer CASIO - Free user manual and instructions
Find the device manual for free KL-G2TC CASIO in PDF.


| Product Type | Label Printer |
| Brand | Casio |
| Model | KL-G2TC |
| Supported Tape Widths | 6 mm, 9 mm, 12 mm, 18 mm, 24 mm |
| Print Method | Thermal transfer |
| Print Resolution | 200 dpi |
| Print Speed | Approx. 20 mm/s (AC adaptor), approx. 10 mm/s (battery) |
| Maximum Print Width | Approx. 16 mm |
| Power Supply | AC adaptor (AD-1832L) or 8 AA alkaline batteries |
| Display | LCD with backlight, 128 × 64 dots (8 characters × 4 lines) |
| Built-in Fonts | 4 Chinese fonts (Heiti, Yuanti, Mingti, Kaiti) + multiple English fonts |
| Character Styles | Normal, bold, outline, shadow, raised |
| Bar Code Support | EAN-13, EAN-8, UPC-A, UPC-E, ITF, CODE39, CODABAR (NW-7) |
| Text Memory | Approx. 2,000 characters |
| Phrase Memory | Up to 49 characters (50 sets) |
| Cut Modes | Normal, Cut, Special Tape, Uncut; includes half cut and full cut |
| Number of Printable Lines | 1–8 depending on tape width (max 8 for 18/24mm) |
| Built-in Logos | Yes (categories: Price, Sign, Work, Attention, etc.) |
| Dimensions (H × W × D) | 67.5 × 202 × 212 mm |
| Weight | Approx. 850 g (without batteries) |
| Operating Temperature | 10°C to 35°C |
| Auto Power Off | After approx. 6 minutes of inactivity (disabled when AC adaptor or PC connected) |
| USB Connection | USB (A-microB) for PC connectivity |
| Accessories Included | AC adaptor (AD-1832L), power cord, tape cartridge, user guide, CD-ROM (Label Printing Software FA-3000) |
Frequently Asked Questions - KL-G2TC CASIO
User questions about KL-G2TC CASIO
0 question about this device. Answer the ones you know or ask your own.
Ask a new question about this device
Download the instructions for your Printer in PDF format for free! Find your manual KL-G2TC - CASIO and take your electronic device back in hand. On this page are published all the documents necessary for the use of your device. KL-G2TC by CASIO.
USER MANUAL KL-G2TC CASIO
Supported Tape Widths
6 mm
9 mm
12 mm
18 mm
24 mm
RJA533744-001V01
CASIO®
Important!
Be sure to keep all user documentation handy for future reference.
Important!
- Microsoft, Windows, and Windows Vista are registered trademarks or trademarks of Microsoft Corporation of the United States in the United States and other countries.
- Other company names and product names used herein are trademarks or registered trademarks of others. Note that TM and ® marks are not used within the text of this manual.
Except as required for proper use or for creating backup copies, any reproduction of this manual and/or the program, either in part or in their entirety, is strictly forbidden without the express written permission of CASIO COMPUTER CO., LTD.
- Be sure to read this manual carefully before attempting to use the product for the first time.
Read This fi rst!
- This manual explains how to use the CASIO KL-G2TC Label Printer.
- The contents of this manual have been checked at each step along the production process. Feel free to contact us if you notice anything that is questionable, erroneous, etc.
- CASIO COMPUTER CO., LTD. shall not be held liable for any loss or claims by you or any other person or entity that may arise through the use of this printer.
- Reproduction of this manual in any form, either in part or its entirety, is forbidden without the express permission of CASIO COMPUTER CO., LTD.
- The contents of the manual are subject to change without notice
- The software is continually being revised and updated. Because of this, the software supplied to you and the contents of the displays it produces may be different from those described in this manual, or some items described in this manual may no longer be available.
- Computer screen shots shown in this manual are based on the English version of Windows 7, and examples assume that “English” was selected as the computer's display language during installation. Screens produced by other operating systems or when another display language is selected may be different from the screen shots shown in this manual.
Contents
Safety Precautions ....4
Precautions during Use ....7
Check to make sure that everything has been included with the printer. 8
Read this before using the printer! 8
About the supplied CD-ROM 9
Installing the Software ....10
Part 1 - Getting Ready ....12
Names of Parts and Their Functions ....12
Power Requirements ....13
Connecting the Printer to a Computer ....14
Initializing Memory ....14
Turning Power On and Off 15
Loading and Removing a Tape Cartridge ....16
Main Key Functions ....17
Display Indicators 18
Part 2 - Performing a Test Print ....18
Printing a Label 18
Printing Precautions ......21
Cut Modes (Auto Cutter) 21
Part 3 - Creating a Label ......23
Label Creation Basics ......23
Creating Labels that Include an Automatically Incremented Number (Numbered Label) 23
Creating an Index Label 24
Creating a Large Label by Combining Smaller Parts (Large Label) 27
Part 4 - Free Design Label ......28
Creating a Free Design Label with Text You Input ....28
Creating a Label with Multiple Lines of Text ....28
Dividing Text Into Blocks ....28
Specifying the Label Print Format ....29
Specifying the Label Length ....31
Specifying Text Alignment 34
Specifying Character Size ....35
Adding a Frame to a Label ....38
Part 5 - Bar Code Labels ......38
Creating a Bar Code Label ....38
Part 6 - Storing and Recalling Label Data ....41
Part 7 - Using a Built-in Logo ....41
Inserting a Built-in Logo into a Label ....41
Part 8 - Inputting and Editing Text ....42
Moving the Cursor 42
Inputting Text 42
Editing and Deleting Text 46
Changing the Font 47
Changing the Character Style ....47
Using Text Effects ....48
Saving and Recalling Frequently Used Expressions
(Phrase Memory) 49
Inserting the Current Date and/or Time into Text ....50
Copying and Pasting Input Text ....51
Creating a User Character ....51
Part 9 - Printer Settings ....54
Confi guring Printer Settings ....54
Setting Items 54
Part 10 - Reference ....55
Power Requirements ....55
User Maintenance ....56
Troubleshooting ....56
Error Messages ....58
Specifications....60
Appendix ...... APP-1
Safety Precautions
Thank you for purchasing this CASIO product. Before using it, be sure to read the following Safety Precautions. Keep the manual in a convenient location for future reference when necessary.

Danger
This symbol indicates information that, if ignored or applied incorrectly, creates the danger of death or serious personal injury.

Warning
This symbol indicates information that, if ignored or applied incorrectly, creates the possibility of death or serious personal injury.

Caution
This symbol indicates information that, if ignored or applied incorrectly, creates the possibility of personal injury or material damage.
Examples of graphic markings

indicates something you should not do. The symbol shown here indicates you should not try to take the unit apart.

indicates something you should do.

Danger
Batteries

Perform the following steps immediately if fluid leaking from batteries ever gets into your eyes.
-
Do not rub your eyes! Rinse them with water.
-
Contact your physician immediately.
Leaving alkaline battery fluid in your eyes can lead to loss of sight.

Warning
Smoke, abnormal odor, overheating, and other abnormalities

Do not continue to use this product while it is emitting smoke or strange odor, or generating heat. Continued use creates the risk of fi re and electric shock. Immediately perform the following steps whenever any of the above symptoms are present.
- Turn off power.
- Disconnect the USB cable.
- Disconnect the AC adaptor plug from the power outlet.
- Contact your original retailer.
AC Adaptor/USB Cable
Misuse of the optional AC adaptor/USB Cable creates the risk of fi re and electric shock. Make sure you observe the following


• Use only the specified AC adaptor.
- Use only a power source that is within the input voltage range indicated by INPUT on the AC adaptor's rating plate.
- Never plug the power cord into a wall outlet that is shared by other devices, or into a shared extension cord.
- Never place heavy objects on the AC adaptor/USB cable or subject it to direct heat.
- Never try to modify the AC adaptor/USB cable or subject it to bending.
- Do not twist or pull on the AC adaptor/USB cable cord.
- Do not wrap the cord around the adaptor.
- Should the AC adaptor/USB cable or its plug ever become damaged, contact your original retailer.
- Never touch the AC adaptor/USB cable or plug while your hands are wet. Doing so creates the risk of electric shock.
- Do not use the AC adapter/USB cable in areas where liquids might spill on it. Water creates the risk of fire and electric shock.
- Do not place a flower vase or any other liquid container on top of the AC adapter/USB cable or power cord. Water creates the risk of fire and electric shock.
- Do not cover the AC adaptor/USB cable with a newspaper, tablecloth, curtain, futon, blanket, or other similar object. Doing so creates the risk of fi re.
Warning
AC Adaptor

Before going out, be sure to unplug the power cord/AC adaptor from the power outlet and put it in a place away from objects used by animals and pets. An animal or pet chewing on the power cord/AC adaptor can cause it short, leading to the risk of fi re and electric shock.
Batteries

Continued use of the printer without removing the batteries after they have leaked creates the risk of fi re and electric shock. Should batteries leak, immediately stop using the printer and contact your original retailer.

Misuse of batteries can cause them to leak, resulting in damage to nearby objects, or to explode, creating the risk of fi re and personal injury. Always make sure you observe the following precautions.
- Never try to take batteries apart or allow them to become shorted.
- Never expose batteries to heat or dispose of them by incineration.
• Never mix old batteries with new ones.
• Never mix batteries of different types.
• Do not charge the batteries. - Make sure the plus (+) and minus (−) ends of the batteries are facing correctly.
Dropping and rough treatment

Continued use of the product after it has been damaged due to dropping or other rough treatment creates the risk of fire and electric shock. Immediately perform the following steps if the product should ever become damaged.
- Turn off power
- Disconnect the USB cable.
- Disconnect the AC adaptor plug from the power outlet.
- Contact your original retailer.
Warning
Disassembly and Modifi cation

Never try to take this product apart or modify it in any way. Doing so creates the risk of electric shock, burn injury, and other personal injury. Leave all internal inspection, maintenance, and repair up to your original retailer.
Liquids and Foreign Matter

Water, sports drinks, seawater, animal or pet urine, or foreign objects (pieces of metal, etc.) getting into this product creates the risk of fi re and electric shock. Immediately perform the steps below whenever any of the above symptoms are present.
- Turn off power.
- Disconnect the USB cable.
- Disconnect the AC adaptor plug from the power outlet.
- Contact your original retailer.
Keep Away From Fire

Never throw this product into fire to dispose of it. Doing so creates the risk of explosion, which can cause fire or personal injury.
Packaging Plastic Bag

Take care never to allow the plastic bag this product comes in to be ingested or placed over anyone's head. Doing so creates the risk of suffocation. Particular care is required in households where small children are present.
Do not affi x labels to a container to be used in a microwave oven.

Do not affi x labels to any container you plan to use in a microwave oven. The label material contains metal, which creates the risk of fi re and burn injury when heated in a microwave oven. It can also cause deformation of the container to which the label is affi xed.
| Caution |
| AC Adaptor/USB CableMisuse of the AC adaptor/USB cable creates the risk of fi re and electric shock. Make sure you observe the points below.Never locate the AC adaptor/USB cable near a stove or other heating device.When unplugging from the wall outlet, grasp the AC adaptor/USB cable plug. Never pull on the AC adaptor/USB cable.Insert the AC adaptor plug into the wall outlet as far as it will go.Insert the USB cable plug into the connector as far as it will go.Unplug the AC adaptor from the power outlet and the USB cable from the connector before leaving this product unattended for long periods, such as when leaving on a trip, etc.After you are fi nished using this product, unplug the AC adaptor from the power outlet and the USB cable from the connector.At least once a year, unplug the power cord from the wall outlet and use a cloth or vacuum cleaner to clean any dust build up on the prongs of the power plug and in the area around the plug.Do not use detergent when cleaning the power cord (especially the plug) or the AC adapter (especially the jack).Plug the AC adaptor into a power outlet that is near this product and easily accessible so you can quickly unplug it in case of problems.Store the AC adaptor in a dry place.Connect the AC adaptor to the printer using the supplied power cord.Do not use the power cord that comes with this product with any other device. Doing so can lead to malfunction. |
| Caution |
| BatteriesMisuse of batteries can cause them to leak, resulting in damage to nearby objects, or to explode, creating the risk of fi re and personal injury. Always make sure you observe the following precautions.Use only batteries that are specifi ed for use with this product.Remove batteries from the product if you do not plan to use it for a long time. |
| ConnectionsPlug only specifi ed devices into the connectors of this product.Non-specifi ed devices create the risk of fi re and electric shock. |
| Keep backup copies of all important data.Be sure to keep separate copies of important data in a notebook or some other location. Malfunction of the product, repairs, and dead batteries can cause data stored memory to be lost. |
| Heavy ObjectsDo not place heavy objects on this product. Doing so can cause this product to tip over or fall, creating the risk of personal injury. |
| Location to be AvoidedNever leave this product in any of the types of locations described below.Doing so creates the risk of fi re and electric shock.Areas subject to large amounts of humidity or dust.Food preparation areas or other locations where oil smoke is present.Near heaters, on a heated carpet, in areas exposed to direct sunlight, in a closed vehicle parked in the sun, or other areas subject to very high temperatures. |
Caution
Unstable Locations

Never place the product on an unstable surface, on a high shelf, etc. Doing so can cause the product to fall, creating the risk of personal injury.
Loading and replacing batteries

The springs inside of the battery compartment have sharp edges. Take care that you do not touch the springs with your fingers when loading or replacing batteries. Doing so creates the risk of personal injury.
High temperature precaution

The print head and the metal parts around it can become very hot. Do not touch them. Doing so creates the risk of burn injury.
Display Screen

- Never push on the display screen's LCD panel or subject it to strong impact. Doing so can cause the LCD panel's glass to crack, creating the risk of personal injury.
- Should the LCD panel ever crack or break, never touch the liquid inside of the panel. LCD panel liquid can cause skin irritation.
- Should LCD panel liquid ever get inside your mouth, immediately wash out your mouth with water and contact your physician.
- Should LCD panel liquid ever get into your eyes or onto your skin, rinse with clear water for at least 15 minutes, and then contact a physician.

Cutter Precautions

Do not insert your fingers into the print head or the cutter at the tape outlet. Doing so creates the risk of finger cuts and personal injury.
Precautions during Use
Observe the following precautions to ensure that the printer provides you with the years of trouble-free operation for which it is designed.
- Avoid using the printer in areas exposed to direct sunlight, and in areas subjected to high humidity, electrostatic charge, sudden temperature changes, and temperature extremes. Operating Temperature Range: 10°C to 35°C
- Battery capacity becomes lower at temperatures of 10^ C and colder. This can cause the message 電池剩餘電量過少 (Low Battery!) to appear sooner than normal. If this happens, move the printer to a location that is within the operating temperature range ( 10^ C to 35^ C).
- Never subject the printer to strong impact or shock.
- Never allow paper clips, pins, or other similar objects to get inside the printer mechanism.
- Do not pull on the tape with undue force or try to push it back into the printer.
- Unclear printing can indicate a dirty print head. If printing becomes unclear, use the procedures on page 56 to clean the print head and rubber roller.
Conventions Used In This Manual
- The conventions described below are used in this manual to describe how to select display items and perform other operations.
Example: Use the arrow keys to select 新增 (New) and then press 執行. ↓ Select 新增 (New) and then press 執行.
Example: Use the >and <arrow keys to change the 列印份數 (Copies) value. ↓ Specify the number of copies to be printed.
Check to make sure that everything has been included with the printer.
Label printer

natural_image
Line drawing of a vintage telephone handset with keypad and front panel (no text or symbols)Tape cartridge
AD-1832L AC adaptor (with power cord)


User's Guide
Label Printing Software FA-3000 CD-ROM
Read this before using the printer!
About the printer
This printer can be used to print labels using either of the two methods below.
① Stand-alone printing with the printer only.
- This method lets you take your printer along anywhere your printing needs take you.
- Software installation and connection to a computer is not required.
② Connecting the printer to a computer to print.
- This method lets you view a print image on your computer screen as you edit the label. The final data is printed on the printer.
- Before connecting the printer to a computer, you need to install the Label Printing Software FA-3000 onto your computer from the CD that comes with the printer.
Preparing the Printer for Operation
You need to perform the steps below before using the printer.
Connect the AC adaptor. (page 13)
1
Initialize printer memory and confi gure current date and time settings. (page 14)
↓
Load a tape cartridge into the printer. (page 16)
Printer User Documentation
This section explains the user documentation required for using this printer.
- KL-G2TC User's Guide (This Manual)
• Label Printing Software FA-3000 User's Guide
The Label Printing Software FA-3000 User's Guide is in a PDF file on the CD-ROM that comes with the printer.
If you are connecting the printer to a computer, view the PDF file on the computer.
■ To view the contents of the Label Printing Software FA-3000 User's Guide
- Places the CD-ROM that comes with the printer into your computer's CD drive.
- When the install screen appears, click Cancel.
- Select the applicable folder on the CD-ROM.
- Open the User's Guide PDF file.
About the supplied CD-ROM
Computer Operating Environment (for included PC Link Software)
Operating System: Microsoft Windows 8, Windows 7, Windows Vista, Windows XP SP3
Computer: Computer that satisfies the conditions below.
• One of the above operating system pre-installed
• CPU recommended for the operating system being used
• USB port built in as standard
• CD-ROM drive, keyboard
Memory: At least 1 GB, as recommended for operating system being used. (At least 512MB in the case of Windows XP)
Hard disk: At least 120MB of free space available
Display: At least 800 × 600 pixels of resolution
Pointing device: Mouse or other pointing device
- Other items should conform to the recommendations for the operating system being used.
- Certain device configurations may make normal operation impossible.
• Operation under Windows XP 64bit versions is not supported. - Operation under an operating system that has been upgraded or modified from its pre-installed state is not guaranteed.
Warning
The provided disk is a CD-ROM disk. Do not play it on a CD player. Doing so will produce sound that creates the risk of hearing damage and damage to speakers.
Installing the Software
Important!
- Be sure to install the software on your computer before connecting the Printer. You may experience problems with operation if you install the software after connecting.
- Exit all other programs currently running on your computer before installing the software. Installation may not be performed correctly if there is another program running.
The examples in this manual assume that D: drive is the CD drive.
- Start up Windows and place the CD-ROM into the computer's CD drive.
- Windows 8, Windows 7, Windows Vista An AutoPlay menu will appear at this time. Select Run setup.exe under "Install or run program from your media" or "Install or run program". When the user account control dialog box appears, click Yes or Continue.

This displays a screen like the one shown nearby.
- Windows XP Normally, placing the CD-ROM into the CD drive should automatically display a screen like the one shown nearby.
-
On some computers, the nearby screen may not appear automatically. If this happens, press Win+R on your computer keyboard. On the Run... dialog box that appears, enter D:\setup.exe and then click OK.
-
Select the installation language and then click OK.
-
This starts the installation process. Follow the instructions that appear on the display.
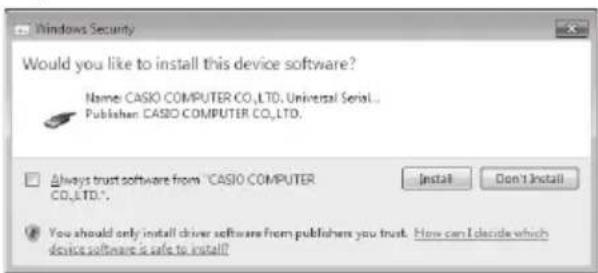
- If your computer is running Windows 8, Windows 7, or Windows Vista, the message shown below will appear during installation. Click Install to proceed with the installation.
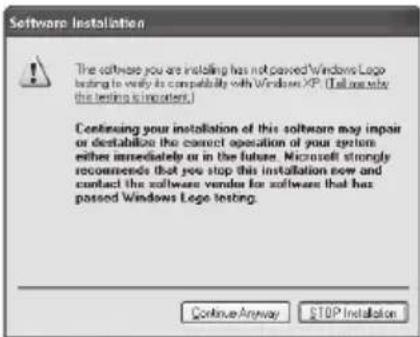
- If your computer is running Windows XP, the message shown below may appear during installation. Click Continue Anyway to proceed with the installation.
-
After all installation is complete, click Finish on the install menu.
-
If a restart message appears, click Yes.
• This restarts your computer
- To cancel installation, click Cancel.
- Attempting installation while an anti-virus program is running may cause the anti-virus program to display an error or warning message on your computer. If this happens, perform the steps below. 1. After installation is complete, uninstall the printer software.
-
Exit the anti-virus program and all other programs that are currently running on your computer.
-
Re-install the printer software.
-
After printer software installation is complete, restart the programs you exited in step 2 of this procedure.
Check to make sure that the printer software is installed correctly.
- FA-3000 Application: Installing this printer software on your computer puts a shortcut icon on your computer's desktop.
- USB driver: On your Windows Start menu, right-click Computer and then select Properties on the menu that appears.
On the left side of the screen, click Device Manager. If the USB driver is installed, you will see CASIO NAMELAND KL16H Device in Universal Serial Bus Controllers.
Uninstalling the software
On the Windows Control Panel—Add or Remove Programs screen, remove FA-3000.
Part 1 - Getting Ready
Names of Parts and Their Functions

* With backlight that can be turned on or off as required (page 54).

Power Requirements
Your printer can be powered using the specified AC adaptor or by commercially available alkaline batteries.
- Before using the printer, be sure to read the information under "Safety Precautions" (pages 4 through 7).
- For information about how to load batteries, see page 55.
Using the AC Adaptor
■ Connecting the AC Adaptor
Important!
- Use only the AC adaptor specified for this printer.

■ Disconnecting the AC Adaptor
Important!
- Do not disconnect the AC adaptor from the printer while printing is in progress. Doing so can lead to malfunction.
- Do not disconnect the AC adaptor from the printer while printer power is turned on. After turning off power, wait until the display goes blank before disconnecting the AC adaptor. Otherwise, temporarily stored text, text stored in printer memory, user characters, copied text, or printer settings may be deleted.
- If you are operating the printer under battery power and wish to connect or disconnect the AC adaptor, be sure to turn off printer power fi rst. Connecting or disconnecting with printer power on can cause it to turn off and delete unsaved text you are working on.

Connecting the Printer to a Computer
Important! Be sure to install the printer software on your computer before connecting the printer to it.
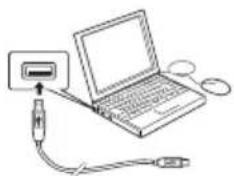
- Start up Windows and then connect a USB cable* to a USB port on the computer.
* Use a commercially available cable (A-microB type) that complies with USB standards.
natural_image
Diagram of a laptop connected to a USB cable via a port (no text or symbols present)- Connect the USB cable to the printer USB port.
Important!
When connecting for the first time, remove the sticker from the printer's USB port.
-
On the printer, press ON.
-
On the printer, press PC连接
- This will display a USB driver install wizard on your computer. A USB driver is required for proper data communication between your computer and printer. Follow the instructions that appear on your computer screen to install.
- If your computer is running Windows XP Service Pack3 (SP3), the message shown nearby will appear sometime during installation. Select No, not this time and then click Next to proceed with the installation.

The messa通訊準備完畢 (Ready to transfer data) will appear on the printer display after USB driver installation is complete.
Important!
To print computer data with the printer, first press P連接 on the printer to display the message 通訊準備完畢 (Ready to transfer data) on the printer display.
- For information about how to use the PC Link software, refer to the Label Printing Software FA-3000 User's Guide.
Initializing Memory
Initialize printer memory before using it for the first time.
Important!
Note that initializing memory will delete all currently stored data. You should only initialize memory before using the printer for the first time.
- Check to make sure that the printer is turned off. • If power is on, press OFF.
- While holding down and 變換 / 空白 press ON. Keep all of the keys depressed until the message 初始化記憶體?執行 / 取消 (Initialize? Set/Esc) appears on the printer display.
- Press 執行
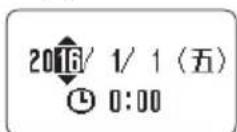
- Configure current date and time settings. • After settings are the way you want, press 執行. • You can change the date and time settings later, if you want (page 54).
- Configure current date and time settings.
- After settings are the way you want, press 執行.
- You can change the date and time settings later, if you want (page 54).
Turning Power On and Off
■ To turn power on
Press ON.
- For information about how to adjust the display contrast and to change the backlight setting, see page 54.

Main menu
■ To turn power off
Press OFF
- Check to make sure the printer display is blank.
Auto Power Off
Auto Power Off turns off printer power if you do not perform any operation for about six minutes. When you need to use the printer again, press ON.
- Auto Power Off is disabled while the printer is being powered by the AC adaptor and when it is connected to a computer.
Creating Text for Printing
There are three ways that you can create text for printing.
- Create new text → Select 新增 (New) and then select the type of label you want to create.

- Recall existing text Select 登錄資料 (Stored Data), select 調出 (Recall), and then select the data you want to recall.

- Recall the text that was being input the last time the printer was turned off (last session's data) → Select 上次資料 (Previous Data).
Important!
Selecting something other than 上次資料 (Previous Data) causes the last session's data to be deleted. To avoid loss of important data, you should save it to printer memory (Storing Label Data, page 41) before selecting something other than 上次資料 (Previous Data).
Loading and Removing a Tape Cartridge
A tape cartridge is required when printing tape labels. You should use only the special tape cartridges that are specified for this printer.
- This printer supports the following tape widths: 6mm, 9mm, 12mm, 18mm, 24mm.
Loading a Tape Cartridge
- Press OFF to turn off the printer.
- Press the tape compartment cover open button and open the cover.

- Remove the stopper attached to the tape cartridge.
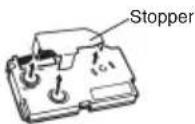
-
Check the condition of the tape and the ink ribbon.
-
Make sure the leading end of the tape is not bent. If it is, use scissors to trim off the bent part.
- Make sure the leading end of the tape is passing through the tape guide.
• Make sure there is no slack in the ink ribbon.

Important!
- Tape once pulled out of the cartridge cannot be pushed back in.
- Do not apply excessive force when pulling on the tape. Doing so can break or otherwise damage the ink ribbon.
- Loading the tape cartridge into the printer while the ink ribbon is slack can cause the ink ribbon to break, creating the risk of malfunction.
Take up any slack in the ink ribbon.
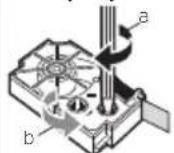
If there is slack in the ink ribbon, insert a pencil or similar object into the upper right spindle (a in the nearby illustration) and rotate in the direction indicated by the arrow. Rotate until the lower left spindle (b in the illustration) starts to rotate. Note that the tape will not move along with the ink ribbon at this time.
- Set the tape cartridge in place.
- Taking care not to pull on the ink ribbon, pass the tape and ink ribbon between the print head and the rubber roller (illustration below). Press down on the tape cartridge until it clicks securely into place.
Important!
An improperly loaded tape cartridge can cause the ribbon to break.
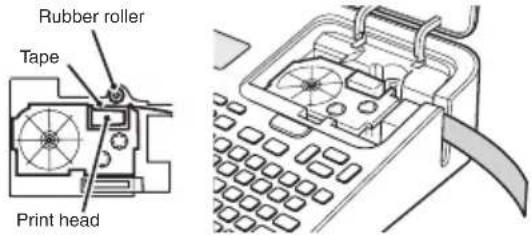
-
Close the tape compartment cover.
-
Press down on the cover until it clicks securely into place.
- Do not pull with excessive force on the tape or try to force tape back in while the tape cartridge is loaded in the printer.
Removing a Tape Cartridge
- Press OFF to turn off the printer.
- Press the tape compartment cover open button and open the cover.
- Grasp the left and right sides of the tape cartridge with your fingers and lift straight up.
- The print head is hot immediately after printing, so wait until it is cooled down before removing the tape cartridge.
Main Key Functions

① ON
② OFF
③ One-touch length setting keys
④ PC 連接 (PC Link)
⑤ 圖示標識 (Built-in Logo)
⑥ 模板編輯 (Edit Phrase)
⑦ 預設模板 (Recall Phrase)
⑧ 時間戳 ( Date)
⑨ 图文框 (Frame)
⑩ =(Cut)
⑪ Q (Preview)
⑫ (Feed)
⑬ (Print)
⑭ (Arrow keys)
⑮ 選字 (Select Character)
⑯ (All Text Clear)
⑰ (Back space)
⑱ (Delete)
⑲ 區段 (Block)
⑳ (Line break)
② 執行 (Set)
② 設定 (Set up)
②3 17@ (Symbol)
②4 △(Illustrations)
②5 變換 / 空白 (Convert/Space)
② 注/倉/北 (Chinese Input Method)
⑳ a/A (Caps)
② 取消 (Esc)
⑲ 功能 (Function)
③0 (Shift)
③1 Character keys
③ 字型 (Font)
- For information about how to adjust the display contrast and to change the backlight setting, see page 54.

Part 2 - Performing a Test Print
Printing a Label
Sample Print
⑤
⑥
銷售報告
- Press ON to turn on power.
• This displays the main menu. - A screen including a上次資料(Previous Data) (last session's data) option may appear in place in the screen shown here. (page 15)
- Select 新增 (New) and then press 執行.


- Select the type of label you want to create and then press 執行.
- Here we will select 自由標籤 (Free Design).
- Input text.
• Here, we will input "銷售報告".
- For information about how to input text, see page 42.
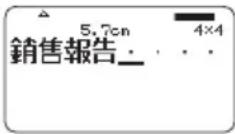
■ Confi guring Print Format Settings
While inputting text, pressing 功能 and then 格式 displays a menu for configuring print format settings (page 29).
- Tape length(帶長)
- Text direction (vertical, horizontal) (方向)
- Mirror printing (enable/disable) (鏡射)
■ Displaying a Print Preview Image
You can display a print preview image to get an idea of what your label will look like before actually printing it. Note that the print preview image will not appear unless there is a tape cartridge loaded in the printer.
- Press
A preview image of what will be printed will scroll across the printer's display.
銷
- When the scrolling image reaches a location you want to check more closely, press 執行.
• This will pause the scrolling image. - Press 執行 again to resume scrolling.
- To cancel the scrolling, press取消.
■ Printing a Label
A simple operation prints a label you have created. You can specify the number of copies and print multiple labels with a single operation. You also can select from among a variety of different tape cutting options.
- Before using the tape cutter, be sure to read the information under "Cutter Precautions" in the "Safety Precautions" (page 7).
- Note that the tape length displayed by the printer is only a rough approximation. Certain usage conditions and print contents may result in a printed label that does not exactly match the displayed length value.
Important!
Before printing, note the important points below.
- Be sure to read "Printing Precautions" (page 21) before printing.
-
Check to make sure the printer has a tape cartridge loaded, and that there is nothing blocking or interfering with the tape outlet (page 12).
-
After inputting the text you want, press 執行.
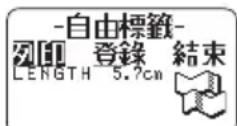
- After confi rming that 列印 (Print) is selected, press 執行.

- Specify the number of copies to be printed.
• Here we will specify one copy.
- Press the
- Direct input of values is also supported. You can specify up to 100 copies for a single print operation.
-
Press the arrow key.
-
Specify a cut mode.
- Cut modes are explained in the table below.
| Select this mode: To do this: | |
| 通常 (Normal) | Print without cutting the backing paper between labels. |
| 切斷 (Cut) Cut between labels. | |
| 特殊 (Special Tape) Print on iron-on transfer tape. | |
| 不裁切 (Uncut) | Print on refl ective tape, magnetic tape or iron-on fabric tape. |
Here, we will specify 通常 (Normal).
- Press 執行
• This starts printing
- The backlight will be unlit while printing is in progress.
- To interrupt printing part way through, press 取消.
Affi xing a Label to a Surface
- If required, use scissors or some other implement to trim the label to the desired size or shape.
- Peel off the backing of the label and affi x the label to the desired surface.
- Peeling off the backing of a half cut label Carefully twist at the half cut point and then peel the backing from the label.

- Peeling off the backing of a full cut label Bending a corner of the label makes the backing easier to peel off.

- Removing a label from a surface where it was affixed may cause adhesive residue to remain on the surface.
Important!
Do not try to affi x a label to the objects or in the locations described below.
- On a surface exposed to direct sunlight or rain
• On the body of a person or animal - On a utility pole, on a fence or structure not owned by you, etc.
- On a container used for heating in a microwave oven
Incompatible Surfaces
• Rough or grainy surfaces
- Wet, oily, dusty, or otherwise soiled surfaces
• Special plastic (silicon, polypropylene, etc.) surfaces
Feeding Tape
You can perform a tape feed operation either before or after printing.
- Press 功能 and then
• This feeds the tape approximately 21mm.
Finalizing a Print Operation when 不留 (None) is Selected for the Margin Setting
When 不留 (None) is specified for the margin setting (page 30), the printer does not cut the tape automatically at the end of a print operation. In this case, perform the operation below to cut the tape.
- Press 功能 and then
• This cuts the tape.
Exiting Text Creation and Tape Printing

- When the screen shown above is on the display, select 結束 (Exit) and then press 執行 twice.
• This returns to the screen shown below.

Printing Precautions
Important!
- Never turn off printer power while printing is in progress.
- Never open the tape compartment cover while printing is in progress. (page 12)
- Do not touch the tape coming out of the printer until it is automatically cut or until printing is complete.
- Avoid allowing tape cuttings to pile up around the printer tape outlet. Tape cuttings around the tape outlet creates the risk of tap jamming and malfunction.
Cut Modes (Auto Cutter)
When printing multiple labels during a single print operation, you can confi gure printer settings that control whether or not there should be an automatic cut between each of them. Depending on the type of tape you are printing, use of the cutter can cause cutter wear and malfunction.
- The tape types in the table below are special tape. Make sure you use 特殊 (Special Tape) or 不裁切 (Uncut) whenever printing on special tape.
| • Iron-on transfer tape | 特殊 (Special Tape) |
| • Magnetic tape• Refl ective tape• Iron-on fabric tape• Heat shrink tube | 不裁切 (Uncut) |
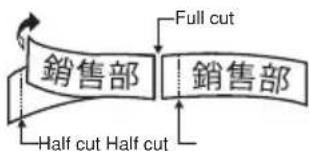
■ Cutting Types
The printer can perform two types of cutting.
- Half Cut
Half Cut cuts only the sticker part of the tape without cutting the backing paper. This means you can peel labels from the backing paper as you need them.
• Full Cut
Full Cut cuts both the backing paper and the sticker parts.
flowchart
graph TD
    A["銷售部"] --> B["Full cut"]
    A --> C["銷售部"]
    A --> D["Half cut Half cut"]
■ Four cut modes
The printer has four cut modes.
• To specify a cut mode, perform step 5 under "Printing a Label" (page 20).
- Note that the cut method and margin length depends on the margin settings.
- Regardless of the currently selected cut mode, full cutting and half cutting are never performed while 邊距不留 (Margins None) is specified for the print format (page 30).
- Tape cutting is not performed when the tape length is one of those shown in the table below. In this case, you can use scissors or some other implement to cut the tape after printing is complete.
| 邊距小(Margins Narrow) | 邊距中(Margins Medium) | 邊距大(Margins Wide) |
| Approximately 28mm or less | Approximately 35mm or less | Approximately 44mm or less |
■ 通常 (Normal)
- 通常 (Normal) performs a half cut between labels, and a full cut when the end of the printing is reached.
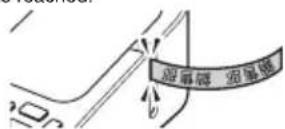
■ 切斷(Cut)
- 切断 (Cut) perform a full cut at the end of each label, and a half cut near the beginning of each label to make the backing paper easier to remove.
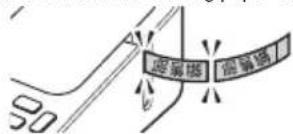
■ 特殊 (Special Tape)
- 特殊 (Special Tape) performs a full cut at the end of each label.
- When using the 小 (Narrow) and 中 (Medium) margin settings, this setting automatically performs a full cut to trim off excess tape.

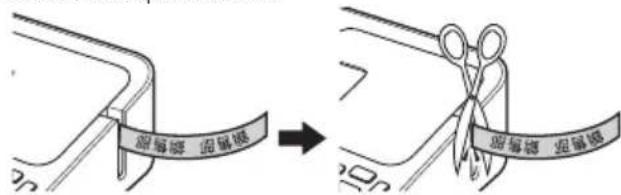
- When 不裁切 (Uncut) is selected, the printer does not perform any cut operation between labels.
- This setting is best when you want to print labels without spaces between them, which saves label tape.
- After printing is complete, press 功能 and then □to feed the tape, and then cut it with a pair of scissors.
Part 3 - Creating a Label
Label Creation Basics
You can use your printer to create the types of labels described below.
• Free design label (page 28)
Enter any text you want to include in your label.
• Numbered label (page 23)
Create labels that include an automatically incremented number.
- Index label (page 24)
These labels come in handy when managing fi les, etc.
• Bar code label (page 38)
Bar codes based on input data can be printed in labels.
• Built-in logo label (page 41)
The printer has a number of built-in labels that include logos and text for retail and offi ce use that you can print.
• Large label (page 27)
You can print multiple labels and then assemble them into a large, multi-label sign, etc.
Important!
- You can change the font (page 47) and character style (page 47) as you like.
- You can also save data you create in printer memory (page 41).
Creating Labels that Include an Automatically Incremented Number (Numbered Label)
You can use the procedure in this section to create labels with an automatically incremented number as a page number, etc.
Numbering Formats
- Format 1

Number
- Format 2

Text (up to 99 characters)
Number
- Format 3
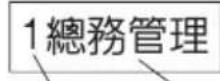
Number Text (up to 99 characters)
- Format 4

Text 1 (up to 99 characters)
Number Text 2 (up to 99 characters)
- Format 5
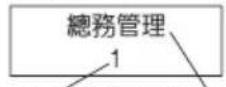
Number Text (up to 99 characters)
- Format 6

Number
Text (up to 99 characters)
- The number is incremented each time a label is printed.
Important!
Numbered label printing continues for the specified number of copies. To avoid running out of tape during a print operation, check before hand to ensure that the tape cartridge being used has sufficient tape remaining.
- On the main menu (page 15), select 新增 (New) and then press 執行.
- Select 列印編號 (Numbering) and then press 執行.
- Select a print format and then press 執行.
• Here we will select 4.
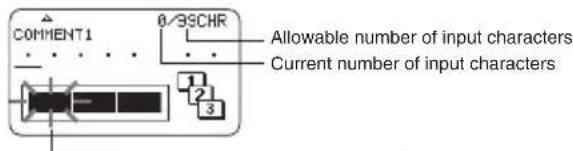
Flashes (Indicates area where input is enabled.)
- Input COMMENT1 text and then press 執行.

- Change the start number if you want, and then press 執行.
- To change the start number, delete the current number and then re-input. You can input up to fi ve digits.
- Input COMMENT2 text and then press 執行
- Select the numbering style and then press 執行.
- Select 列印 (Print) and then press 執行
- Specify the number of copies to be printed with consecutive numbers, confirm that the start(開始) and end(結束) numbers are what you want, and then press執行.
- You can input a number of copies value from 1 to 100.
-
Direct input of values is also supported.
-
Specify a cut mode (page 21) and then press 執行.
• The number following 99999 is 00000.
Important!
- Avoid allowing tape cuttings to pile up around the printer tape outlet. Tape cuttings around the tape outlet create the risk of tape jamming and malfunction.
Confi guring Print Format Settings
You can configure the print format settings below as you input text.
- Tape length (3.0 to 30.0 cm) (帶長)
• Vertical or horizontal text direction (方向) - Mirror printing enable/disable(鏡射)
While inputting text, press 功能 and then 格式 to display the print format setting screen. Use the screen to confi gure the settings you want.
Creating an Index Label
Index labels come in handy when managing files, etc. You can also use any of the canned phrases that are built-into printer memory.
Index Label Formats
You can choose from among the four index label formats below, depending on your fi ling system and desired text orientation.

- The same content is printed on the front and back of the index label.
Important!
- Index label creation is supported for 24mm wide tape only. Make sure that a 24mm wide tape cartridge is loaded in the printer.
- To avoid detachment of an index label when it is attached directly to the edge of a document, make sure that the part of the label that attaches to the document is at least 4mm wide.
- When affixing index labels to the tabs of commercially available index cards, use of 24mm wide transparent tape, without framing, is recommended.
Creating an Index Label with Text You Input
Enter any text you want to include in your index label. You can create and print up to six different index labels at one time.
- On the main menu (page 15), select 新增 (New) and then press 執行.
- Select 檔案目錄 (Index) and then press 執行.
- Select the desired print orientation and then press 執行.
- Select 用户作成 (User Created) and then press 執行.

- Input text and then press 執行
- This displays the input screen for the next index label. If you want to create another index label, repeat step 5.
- After you are fi nished creating all of the index labels you want, press 執行 as many time as necessary to navigate to the screen for confi guring size and frame settings.
- Specify the size (index label length) and whether or not to include a frame, and then press 執行.
- Select 列印 (Print) and then press 執行.
- Select the first index label to be printed and then press執行.
- You can use the number keys to input the number next to an index label to select it for printing.
- Select the last index label to be printed and then press 執行.
- Specify a cut mode (page 21) and then press 執行.
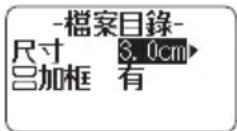

Creating an Index Label Using Canned Phrases
You can use the canned phrases built into printer memory to create an index label.
- Perform steps 1 through 3 under "Creating an Index Label with Text Your Input" on page 25.

- Select the desired canned phrase type and then press 執行.
- Select the desired canned phrase and then press 執行.
- Specify the size (index label length) and whether or not to include a frame, and then press 執行.

- For the remainder of this procedure, perform steps 8 through 11 under "Creating an Index Label with Text Your Input" on page 25.
- Canned phrases are printed using the initial power on default font (page 54).
Index Label Canned Phrase List
Creating a Large Label by Combining Smaller Parts (Large Label)
You can print multiple parts and then assemble them into a large, multi-part label.
Example: To create a sign consisting of two parts

Important!
• Make sure that a 12mm wide or wider tape cartridge is loaded in the printer.
- Printing on an 18mm wide tape or 24mm wide tape will result in margins above and below the printing. Trim away the margins before assembling the parts into a fi nal label. When using 18mm or 24mm wide tape, printing on transparent tape and overlapping of the pieces is recommended.
- On the main menu (page 15), select 新增 (New) and then press 執行.
- Select 放大列印 (Enlarged) and then press 執行.
- Input text and then press 執行

- Specify the size of the final (combined label) text and then press執行.
| Tape width | Text Size | ||
| 2段(2 pieces)3 | 段(3 pieces)4 | 段(4 pieces) | |
| 12mm 24mm | 36mm 48mm | ||
| 18mm | 30mm | 45mm | 60mm |
| 24mm 30mm | 45mm 60mm | ||
"2 段 (2 pieces)" means "printing is divided between two parts". Printing can be divided among up to four parts.
- Select 列印 (Print) and then press 執行. • A preview image (page 19) of the parts that make up a large label cannot be displayed.

- Specify which of the parts of the label you want to print and then press the ▼ arrow key.
- Normally select 全部 (All) here.
- Specify a cut mode (page 21) and then press 執行.
- When printing multiple parts that contain a large amount of text, you may not be able to print all of the parts with a single tape cartridge. In this case, printing one part of a time while keeping an eye on how much tape remains in the cartridge you are using is recommended. If a tape cartridge runs out of tape during printing, press 取消 to stop printing, replace the cartridge, and then restart printing.
- Printing text that has a lot of black or performing continuous printing can cause the printer to overheat. If this happens, printing will pause and the message 正在準備列印 (Please Wait) will appear on the printer display. Printing will resume automatically when the printer returns to normal temperature.
- If printing starts to pause with the message 正在準備列印 (Please Wait) on the display too frequently, try lowering the print density setting.
Confi guring Print Format Settings
You can configure the print format settings below as you input text.
• Vertical or horizontal text direction (方向)
Part 4 - Free Design Label
Creating a Free Design Label with Text You Input
- On the main menu (page 15), select 新增 (New) and then press 執行.
- Select 自由標籤 (Free Design) and then press 執行.
- Input the text you want.
• Refer to page 19 for information about the printing operation.
Creating a Label with Multiple Lines of Text
The number of lines you can include in a label depends on the width of the tape you are using.
| Tape Width | Maximum Number of Lines |
| 6mm 2 18mm 8 | |
| 9mm 3 24mm 8 | |
| 12mm | 5 |
| Tape Width | Maximum Number of Lines |
- The character size changes automatically in accordance with the tape width and the number of lines (Just Fit Print).
-
Even if you specified character size manually (page 35), characters will be re-sized automatically in accordance with the number of lines.
-
Input the first line of text and then press
-
Input the second line of text.

- To delete a line break, press ✗ to delete the line break symbol. You can not delete a line break symbol by pressing ✗
- The Imager shows something like 5/8 when printing with 微小 (Small Font). 5/8 means there are eight lines and the cursor is in line 5. Printing with 微小 (Small Font) → page 37
- The message 行數超限 (Too Many Lines) appears on the display and printing becomes impossible when the number of lines is greater than those allowed for the width of the loaded tape cartridge. If this happens, reduce the number of lines or load a tape cartridge of the appropriate width.
Dividing Text Into Blocks
You can assign label text to individual blocks and then specify a print format and number of lines for each block.
Sample Print

- Input the text for the first block.
- Press 功能 and then press • This makes the input text a block.

Block indicator (not printed)
- Input line 1 of the next block's text, press ↙, and then input line 2.
Indicates in which block the cursor is currently located.

- To delete a block indicator, move the cursor to the indicator you want to delete and then press. You can not delete a block indicator by pressing
• A label can have up to 16 blocks. - For information about a two-line label, see page 28.
- For information about the vertical text setting, see page 29.

Specifying the Label Print Format
You should change the print format in accordance with the label length, character spacing, text alignment, etc. You can change the format of each block and for the overall label.
Specifying the Print Format of Each Block
You can specify text direction, text alignment, and other settings for each block (page 28).
- Input text and divide it into blocks.
- Move the cursor to the block whose print format you want to change.
- The cursor can be located anywhere within the block.
- Press 功能 and then 格式.
- If there is only one block in the label, advance to step 6. In this case, you can configure either block print format or overall print format settings.
- Select 區段格式 (Block Form) and then press 執行.
- Select 僅此區段 (One Block) and then press 執行.
-
To apply the same print format to all of the blocks, select 全部區段 (All Blocks).
-
Configure the settings of each item.
- Use the ^ and arrow keys to select a setting item and then use > and < to change its setting.
-區段格式1/4- 方向 横排
LENGTH 9.3cn
ABC
| Setting Item Description | |
| 方向 (Direction) | Specifi es either 直排 (Vertical) or 橫排 (Horizontal). |
| 文字排版(Text Alignment) | Specifi es alignment (靠左 (Left), 等距 (Equal), 置中 (Center), 靠右 (Right)) of the text within a block.→ page 34 |
| 文字間隔(Text Pitch) | Specifi es the space between characters in the range of 0 to 31.9mm.The tape length is also adjusted in accordance with the character pitch setting.Specifi cation of character spacing is not supported when 等距 (Equal) is specifi ed for 文字排版 (Text Alignment) or when 固定 (Fix) is specifi ed for區段長度 (Block-Length). |
| 區段長度(Block-Length) | 自動 (Auto): Automatically adjusts the block length in accordance with the number of characters in the block.If you want to specify the block length manually, select 固定 (Fix) for this setting.→ page 31 |
- After all of the settings are the way you want, press 執行.
Specifying the Print Format of All Text
Settings you confi gure with the procedure in this section is applied to all of the text in a label, even if there are multiple blocks.
- If there is only one block in the label, advance to step 4. In this case, you can confi gure either block print format or overall print format settings.
- Select 全文格式 (All Form) and then press 執行.
- Configure the settings of each item.
- Use the ^ and arrow keys to select a setting item and then use > and < to change its setting.
| Setting Item Description | |
| 鏡射 (Mirror) | Enables/disables mirror image printing. Select 否 (Normal) to print normal (not mirror image) text. Select mirror image text when printing with an iron-on transfer cartridge (sold separately) for transfer to a handkerchief, T-shirt, etc. 錫射 (Mirror) setting is not required when printing to iron-on fabric tape (sold separately). Mirror image text can also be printed with a transparent tape cartridges (sold separately) and affi xed to the back of glass or some other transparent surface. |
| 傾斜 (Slanted) Enables/disables slanted printing. | |
| 均衡 (Proportional) | 是 (On): Adjusts the character pitch in accordance with differences in the width of each alphanumeric character.否 (Off): Adjusts the alphanumeric character pitch in accordance with differences in the width of each Chinese character. |
| 平滑 (Smoothing) Enables/disables character line smoothing. | |
| 區段間隔(Block-Space) | Specifi es the spacing between blocks. |
| 邊距 (Margins) | Specifi es the size of leading and trailing margins. You can select one of the margin settings below, or不留 (None) (page 20).小 (Narrow): Approximately 3mm wide leading and trailing label margins中 (Medium): Approximately 10mm wide leading and trailing label margins大 (Wide): Approximately 19mm wide leading and trailing label marginsImportant!Margin cut may not be performed when the tape is short as defi ned by the following: approximately 28mm or less with 小 (Narrow) margins; approximately 35mm or less with 中 (Medium) margins; approximately 44mm or less with 大 (Wide) margins. After printing, use scissors or some other implement to trim the margins. |
| 帶長 (Tape Length) | • 自動 (Auto): Automatically adjusts the label length in accordance with the number of characters.• If you want to specify the label length manually, select 固定 (Fix) for this setting.→ page 32 |
| 區段排版(Block Alignment) | Specifi es the label overall block alignment.→ page 34• This setting is valid only when 固定 (Fix) is selected for the 帶長 (Tape Length) setting.Available settings are: 靠左 (Left), 等距 (Equal), 置中 (Center), 靠右 (Right). |
- After all of the settings are the way you want, press 執行.
Specifying the Label Length
Use the procedure in this section to specify the label length manually.
You can set the label length using any one of the three methods below.
Fixed Block Length: Specifices the overall label length by specifying the length of each block.
Fixed Tape Length: Specifices the overall label length.
With the one-touch length setting keys: Use this method to specify the lengths of commonly used labels for CD or DVD cases, files, etc.
- Note that the label length displayed by the printer is only a rough approximation. Certain usage conditions and print contents may result in a printed label that does not exactly match the displayed length value.
Specifying the Length of Each Block (Fixed Block Length)
- Input text and divide it into blocks (page 28).
- Move the cursor to the block whose length you want to specify.
- Press 功能 and then 格式.
- If there is only one block in the label, advance to step 6.
- Select 區段格式 (Block Form) and then press 執行.
- Select 僅此區段 (One Block) and then press 執行
- To apply the same print format to all of the blocks, select 全部區段 (All Blocks).
- Use the and arrow keys to display the setting screen.
- Select 固定 (Fix) and then press the √arrow key.
區段長度(Block-Length)
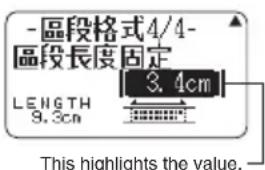
- Specify the length of the block and then press 執行.
- Direct input of values is also supported.
- The length of each block and the number of input characters affects how the label is printed. You can check the status of the printout by looking at whether the displayed block length is enclosed in brackets as described below.
[6.0cm]: Print will be the specified length.
(6.0cm): Print will be the specified length, but text will be compressed horizontally.
6.0cm]: Print will be longer than that specified length. (Text will be compressed 50% in the text direction.)
- You can also check the printout with the Imager in the upper side of the display.
Specifying the Overall Label Length (Fixed Tape Length)
- If there is only one block in the label, advance to step 4.
-
Select 全文格式 (All Form) and then press 執行.
-
Use the and arrow keys to display the 帶長 (Tape Length) setting screen.
-
Select 固定 (Fix) and then press the √arrow key.
This highlights the value.

- Specify the length of the label and then press 執行
- Direct input of values is also supported.
The message 長度錯誤 (Length Error) will appear on the display if the text you input is incompatible with the length setting. You can check the status of the printout by looking at whether the displayed tape length is enclosed in brackets as described below.
[10.5cm]: Print will be the specified length.
10.5cm]: Print will be longer than that specifi ed length.
Simple Length Setting for CD or DVD Case Labels (One-touch Length Setting Keys)
You can use the one-touch length setting keys for quick and easy specification of the lengths of commonly used labels for CD or DVD cases, files, etc. One-touch setting simplifi es the task of printing multiple labels of the same length.
Important!
- Use the 帶長 (Tape Length) or 區段長度 (Block-Length) settings to specify the label length when using blocks to lay out the label. Using the one-touch length setting keys to specify the tape length in this case may produce a label that is longer than the specified value.
- A length specified with the one-touch length setting keys will also become the Fixed Tape Length setting value.
- Specifying a tape length with the one-touch length setting keys automatically confi gures following settings區段長度 (Block-Length): 固定 (Fix), 文字排版 (Text Alignment): 等距 (Equal), 區段排版 (Block Alignment): 等距 (Equal). Note that the block length can be fixed when there is one block only.
- The one-touch length setting keys can be used for a free design label only.
■ Supported Tape Lengths
| One-touch length setting keys Label Application | |
| 15.0cm Paper fi le, binder, etc. | |
| 10.0cm CD/DVD case, etc. | |
| 5.0cm Name sticker, etc. | |
- You can adjust the label length in 1mm units.

■ To specify a label length
Example: To specify the length of a CD/DVD case label
1. Press 10.0cm.
You can make the label longer by pressing +0.1cm or shorter by pressing -0.1cm.
- You can input text either before or after specifying the label length.
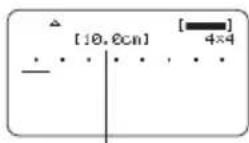
Length indicator changes to 10.0cm.
Specifying Text Alignment
Specifying Text Alignment within a Block
Use the procedure below to specify text alignment within a block.

- Input text and divide it into blocks (page 28).
- Move the cursor to the block whose text alignment you want to change, press 功能 and then press 格式.
- If there is only one block in the label, advance to step 5.
- Select 區段格式 (Block Form) and then press 執行.
- Select 僅此區段 (One Block) and then press 執行.
-
Use the and arrow keys to display the 文字排版 (Text Alignment) setting screen.
-
Select the desired alignment.
-
Use the and arrow keys to display the setting screen.

區段長度(Block-Length)
- Select 固定 (Fix) and then press the √arrow key.
This highlights the value.
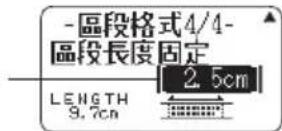
- Specify a value that is greater than the original value and then press 執行.
- Direct input of values is also supported.
When there is more than one line of text, you can specify alignment even when 自動 (Auto) is selected for the 區段長度 (Block-Length) setting. Doing so affects the line of text with fewest characters, as shown below.
Align left EqualAlign center Align right

Specifying Label Block Alignment
You can use the procedure below to specify the overall alignment of blocks within a label.

Note that the block alignment specification is valid only when固定(Fix) is selected for the 帶長(Tape Length) setting.
- Input text and divide it into blocks (page 28).
- Press 功能 and then 格式.
- If there is only one block in the label, advance to step 4.
- Select 全文格式 (All Form) and then press 執行
-
Use the and arrow keys to display the 帶長 (Tape Length) setting screen.
-
Select 固定 (Fix) and then press the √arrow key.
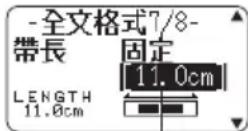
The value is highlighted.
- Specify a value that is greater than the original label length value.
-
Direct input of values is also supported.
-
Press the arrow key to display the 區段排版 (Block Alignment) setting screen.
-
Select the desired alignment and then press 執行.
Specifying Character Size
You can use the procedures in this section to manually specify character size.
- If you don't specify character size manually, the size is adjusted automatically (Just Fit Print).
Specifying the Size of Specific Characters
You can specify the size of specific characters within the range of 1x1 to 5x8. The maximum character size (vertical) that can be printed depends on the tape width. For more information, see "Tape Width, Number of Lines, Size Factor List" (page 60).
1×1
5×6
禁煙
禁煙
- Printing results may differ depending on whether text is vertical or horizontal. For example, when 1 × 2 is specified, horizontal text is elongated horizontally while vertical text is elongated vertically.
- Input text.
- Press 功能 and then 印字倍数
-
Select 文字單位 (Character Unit) and then press 執行.
-
Specify the 高 (Height) and 寬 (Width) factors and then press 執行.
- Direct input of values is also supported.
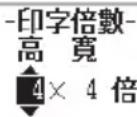
- Move the cursor to the first character of the text whose size you want to change and then press 執行.
- Move the cursor to the last character of the text whose size you want to change and then press 執行.
Character size factors
Size of character at
current cursor position

Just Fit Indicator
Any text following this indicator is printed at a
size determined by the Just Fit feature.
- The size factor indicator and Just Fit indicator appear on the display but are not printed on the label.
- To delete a size factor specification, use ✗ to delete the size factor indicator.
- Deleting a size factor indicator causes the character size to change automatically in accordance with the tape width and the number of lines. Note, however that if there is a size factor indicator to the left of the one that is deleted, the text will change to the size specified by the remaining size factor indicator.
- A character size factor specification affects only the block where it is located.
Specifying the Character Size for a Specific Line of Text
You can use the formats in the table below to specify the character size for a specific line of text.
- Depending on the number of text lines and the type of tape cartridge loaded in the printer, printing may not change even if you select a different format.
| Number of Lines | Format | 24mm, 18mm wide | 12mm wide 9 | mm wide | |
| 1 | A | 1 × 1 1 × 1 1 × 1 | 1 | ||
| B | 2 × 2 2 × 2 2 × 2^* | 2* | |||
| C | 3 × 3 3 × 3^* - | ||||
| D | 4 × 4 -- | ||||
| E | 5 × 5^* -- | ||||
| 2 | A | 1 × 1 1 × 1 | - | - | |
| B | 1 × 1 2 × 2 | - | - | ||
| C | 2 × 2 1 × 1 | - | - | ||
| D | 2 × 2^* 2 × 2^* | - | - | ||
| E | 1 × 1 3 × 3^* | - | - | ||
| F | 3 × 3^* 1 × 1 | - | - | ||
| Number of Lines | Format | 24mm, 18mm wide | 12mm wide 9mm wide | ||
| 3 | A | 1×11×11×1 | - | ||
| B | 1×11×12×2* | - | |||
| C | 1×12×2*1×1 | - | |||
| D | 2×2*1×11×1 | - | |||
* Smaller printing with a frame.
Important!
You cannot specify the character size for a line of text when any one of the conditions below exists.
- When 6mm wide tape is loaded in the printer
- When there are more than three lines of text
-
When a character size is specified for specific characters (page 35)
-
Input text.
- Press 功能 and then 印字倍數.
- Select 行單位 (Line Unit) and then press 執行.
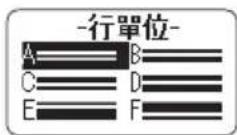
- Select the format you want to use and then press 執行.
Selected format

Important!
Either of the events below will cause a line character size setting to be cancelled automatically.
• Changing the number of lines
- Specifying the size of specific characters (page 35)
■ Small Font
Certain number of line (number of input lines or the number of lines in a selected format) and tape width combinations may cause 微小 (Small Font) to become selected.
- A pointer will appear next to 微小 (Small Font) on the right side of the display when this happens.
• In the case of a free design label, the Imager will show a fractional value.

- Font and proportional settings become invalid while 微小 (Small Font) is selected.
- Text that has a character style or effect applied, as well as illustrations and user characters may not print correctly while 微小 (Small Font) is selected.
Adding a Frame to a Label
You can add one of a variety of different frames (page APP-4) to a free design label.
- Input text.
- Press 圖文框.
- Select the frame you want to use and then press 執行.
- Select 列印 (Print) and then press 執行.
Important!
If you print with a frame when a tape length is specified (page 31), the printed label may be longer than the specified length.
- Specify the number of copies to be printed and then press the arrow key.
- Direct input of values is also supported.
- You can specify from 1 to 100 copies.
-
Specify a cut mode (page 21) and then press 執行. This starts printing.
-
If framed printing is performed while 傾斜是(Italic On) is selected for the format, normal printing (without italics) will be performed.
- The 文字修飾 (Effect) 加框 (Box) text effect cannot be used in a framed label.
- The number of lines you can include in a framed label depends on the width of the tape you are using.
| 24mm, 18mm wide | 12 mm wide 9 | mm wide 6mm | wide | |
| Number of framed label lines | Up to 6 Up | to 3 Up to 2 1 |
Part 5 - Bar Code Labels
Creating a Bar Code Label
Bar Code Types
You can use your printer and the Label Printing Software FA-3000 to create a variety of different bar codes.
- For details about how to use the Label Printing Software FA-3000, refer to the "Label Printing Software FA-3000 User's Guide".
Important!
- Be sure to use a 12mm wide or wider tape cartridge for bar code label printing.
- You can input comment text above a bar code (up to 60 characters).
- You should confirm that a printed bar code can be read correctly before actually using it. If a bar code cannot be read correctly, make the adjustments below.
Lighten the print density (page 54).
Increase the size of the print (step 6, page 39).
Use 特殊 (Special Tape) or 不裁切 (Uncut) as the cut mode (page 22).
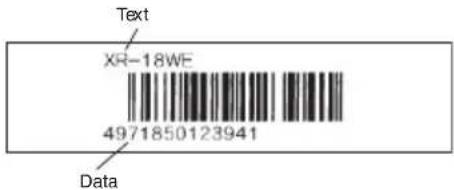
- The tapes below are suitable for bar code label printing.
- Black lettering on white tape (WE)
• Blue lettering on white tape (WEB)
- Black lettering on yellow tape (YW)
The letters in parentheses indicate the tape model number.
Sample Print
- On the main menu (page 15), select 新增 (New) and then press 執行.
- Select 條碼 (Bar Code) and then press 執行.
- Select the type of bar code you want to use and then press 執行.
- If you select ITF, CODE39, or CODABAR as the bar code type, specify whether or not to include a check digit and then press 執行.
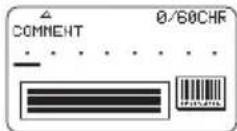
- Input comment text (0 to 60 characters) and then press 執行.
- Without inputting any comment text, press 執行.
- Input data and then press 執行
- Select the size of the bar code label and then press 執行.
- Select 列印 (Print) and then press 執行.

-
Specify the number of copies to be printed and then press the arrow key.
-
Direct input of values is also supported.
-
You can specify from 1 to 100 copies.
-
Specify a cut mode (page 21) and then press 執行.
Bar Code Specifications
| Bar Code | Check digit*1 | Number of print digits*3 | Number of input digits*4 | Number of auto appended digits*1 | Input characters*8 | |
| Check digit *1 | ||||||
| EAN-13 | 有 (Yes) | 13 12 - 1 | Numbers(0 to 9) | |||
| EAN-8 | 有 (Yes) | 8 7 - 1 | Numbers(0 to 9) | |||
| UPC-A | 有 (Yes) | 12 11 - 1 | Numbers(0 to 9) | |||
| UPC-E | (有(Yes))*2 | 6 | 6 | - | - Numbers(0 to 9) | |
| ITF | 無 (No) | 4 to 22 digits | 4 to 22 digits, even numbers only*5 | - | - | Numbers(0 to 9) |
| 有 (Yes) | 4 to 22 digits | 3 to 21 digits, odd numbers only*6 | - | 1 | ||
| CODE39 | 無 (No) | 4 to 22 digits | 2 to 20 digits | 2 digits*7 | - | Numbers(0 to 9), alpha characters(A to Z), symbols(-,., space, ,/,+, %) |
| 有 (Yes) | 4 to 22 digits | 1 to 19 digits | 2 digits*7 | 1 | ||
| CODABAR(NW-7) | 無 (No) | 4 to 22 digits | 4 to 22 digits | - | - | Numbers (0 to 9), symbols (-,, :, /, , +), alpha characters (first and last only) A to D*9 |
| 有 (Yes) | 4 to 22 digits | 3 to 21 digits | - | 1 | ||
*1 The check digit is automatically calculated in accordance with input data. For EAN-13, EAN-8, and UPC-A, and when using a check digit with ITF, the check digit is appended at the end of the printed digits. When using a check digit with CODE39 or CODABAR, the check digit is appended one digit before the fi nal digit.
^2 UPC-E includes a check digit, but it is not printed as a numeral below the bar code.
*3 The number of digits printed below a bar code equals the input characters plus automatically appended characters.
*4 An error message is displayed whenever there are insufficient digits. The printer will not allow input of too many digits.
*5 An error message appears and printing is impossible if an odd number of digits are input when an ITF check digit is not being used. Append a zero to the beginning of the digits and re-input.
* An error message appears and printing is impossible if an even number of digits are input when an ITF check digit is being used. Append a zero to the beginning of the digits and re-input.
^7 Both the start code and end stop code of CODE39 must be asterisks.
*8 An error message appears and printing is impossible if any characters other than those specified here are used.
With CODABAR, A, B, C, or D can be used as the start code and stop code. An error message appears and printing is impossible if any other character is used.
Part 6 - Storing and Recalling Label Data
Storing Label Data
You can use the screen that appears after text input is complete to assign a name to the data and save it in printer memory.
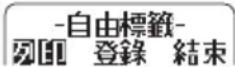
-
After you finish inputting text, select登錄 (Store) and then press 執行.
-
Input a label data name and then press 執行.
- You can input up to seven characters for the label data name.

Memory capacity
- Press 執行
- The message 登錄完畢 (Complete) will appear and then the screen that was displayed in step 1 will re-appear.
Recalling Stored Data
You can recall stored data from the main menu screen (page 15).
- Select 登錄資料 (Stored Data) and then press 執行.
- Select 調出 (Recall) and then press 執行.
- Select the name of the data you want to recall and then press 執行.
Deleting Stored Data
You can delete stored data from the main menu screen (page 15).
- Select 登録資料 (Stored Data) and then press 執行.
- Select 删除 (Delete) and then press 執行.
- Select the name of the data you want to delete and then press執行.
- Press 執行
- To cancel the data delete operation, press 取消.
Part 7 - Using a Built-in Logo
Inserting a Built-in Logo into a Label
The printer has a number of built-in labels that include logos and text for retail and offi ce use that you can print.
Sample Print

- For information about the printer's built-in logos, see the Built-in Logo List (page APP-5).
- A built-in logo can be printed on a label only when 12mm, 18mm, or 24mm wide tape is being used.
Printing a Label with a Built-in Logo
- On the main menu (page 15), select 圖示標識 (Built-in Logo) and then press 執行.
-
Instead of the above operation, you could also simply press the 圖示標識 key.
-
Select a built-in logo category and then press 執行.
-
Select the logo you want to use and then press 執行.
-
You can also select a logo by looking up its number on the built-in logo list (page APP-5) and then inputting the number with the number keys.
- Pressing will cause a preview image of what the selected design looks like when printed to scroll across the display. To pause preview image scrolling, press 執行.
- While text scrolling is stopped, you can use the > and <arrow keys to scroll through item by item.
-
To exit the preview image, press取消
-
Select the print size, enable or disable mirror image printing, and then press 執行.
-
You can also print multiple tapes and later assemble them into a large label. For information about print sizes, see page 42.
-
When printing a large label, select 放大 2 段 (2 pieces) (two tapes), 放大 3 段 (3 pieces) (three tapes), or 放大 4 段 (4 pieces) (four tapes).
-
Select 列印 (Print) and then press 執行.
-
Specify the number of copies to be printed, select the cut mode (page 21), and then press 執行.
- Note that you will not be able to specify the number of copies if you are printing a large label. In this case, you can select 全部 (All) or one of the tapes (1, 2, etc.) that make up the fi nal label. Normally select 全部 (All) here.
Print sizes of built-in logos
(All sizes indicated as Vertical x Horizontal.)
| 24mm,18mm wide | 12mm wide | |
| Data Size Data Size | ||
| 1段 | 15mm × 67.5mm 10mm × 45mm | |
| 放大2段 | 30mm × 135mm 20mm × 90mm | |
| 放大3段 | 45mm × 202.5mm 30mm × 135mm | |
| 放大4段 | 60mm × 270mm 40mm × 180mm |
- Printing a large label on an 18mm or 24mm wide tape will result in margins above and below the printing. Trim away the margins before assembling the parts into a fi nal label. Or you can print on transparent tape and overlap the margins of the different tapes without trimming them.

Part 8 - Inputting and Editing Text
This section explains basic text input and editing operations. It also includes information about how to apply text styles and effects, and how to create user characters.
Moving the Cursor
You can use the arrow keys to move the cursor (input position) around the display.
- Press 功能 and then press the <arrow key.
→ Moves the cursor to the beginning of the current line. - Press 功能 and then press the >arrow key.
→ Moves the cursor to the end of the current line. - Press 功能 and then press the arrow key.
→ Moves the cursor to the beginning of the text. - Press 功能 and then press the arrow key.
→ Moves the cursor to the end of the text.
Inputting Text
You can use the operations in this section to input Chinese characters, English alpha characters, numerals, and symbols.
Chinese Input Mode and English Input Mode
Chinese Input Mode: Use this mode to input Chinese characters. You can use any one of three different input methods: Zhuyin, Cangjie, or Pinyin. English Input Mode: Use this mode to input upper-case and lower-case English alpha characters, numerals and symbols.
Display Screen and Input Mode
Chinese Input Mode English Input Mode
- Zhuyin (注)
- English lower-case (英)
• Cangjie (倉)
- English upper-case (英)
- Pinyin (北)
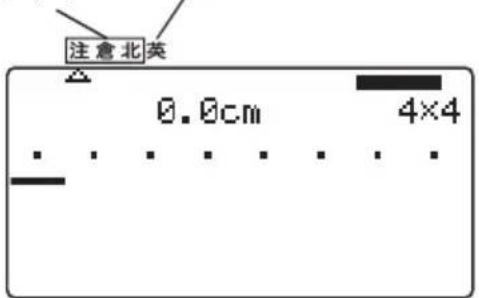
The input mode pointer (in the insert mode, in the overwrite mode) points to the currently selected input mode. During upper-case English character input, the pointer shape changes from (or) to (or).
- For information about how to toggle between the insert mode and overwrite mode, see page 54.
■ To enter the Chinese input mode
-
Press 注/倉/北
-
If you are currently in the English input mode, the above operation will return to the input method that was selected when you were last in the Chinese input mode.
- While in the Chinese input mode, each press of 注 / 倉 / 北 cycles through input methods in sequence: Zhuyin → Cangjie → Pinyin → Zhuyin, etc.
■ To enter the English input mode
-
Press a/A.
-
If you are currently in the Chinese input mode, the above operation will return to the input mode (upper-case (△) or lower-case (▲) that was selected when you were last in the English input mode.
- While in the English input mode, each press of the a/A button toggles between lower-case and upper-case input.
Inputting Chinese Using the Zhuyin Input Method
With the Zhuyin input method, phonetic symbols input by you are converted to Chinese characters.
Keys Use for Zhuyin Input

Example: 你好
- Press 注/倉/北 and then move the input mode pointer (or) to 注.
- Press 3-1.

-
Press √
-
This displays 你.
- You can select a different character by pressing 選字. After selecting the character you want, press 執行.


43 EN
-
Press 厂幺.
-
Press √ .
- This displays 好.
- You can select a different character by pressing選字. After selecting the character you want, press 執行.
Inputting Chinese Using the Cangjie Input Method
With the Cangjie input method, combinations of radicals input by you are converted to Chinese characters.
Keys Use for Cangjie Input
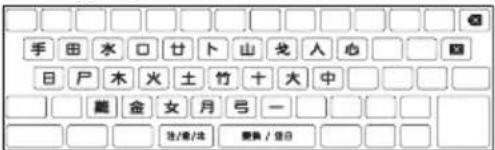
- If there is more than one candidate displayed at the bottom of the screen, select the one you want and then press 執行.
- If there is more than one candidate displayed at the bottom of the screen, select the one you want and then press 執行.
Inputting Chinese Using the Pinyin Input Method
The Pinyin input method uses the pinyin method of Romanization and tones (rising or falling) to input Chinese. Each syllable can have one of four tones or a light voice, which is specified following the alpha character input of the symbol.
| Tone/Light Voice | - | √ | √ | \ | • |
| Number key | 1 | 2 | 3 | 4 | 5 |
Keys Used for Pinyin Input
![1 2 3 4 5 [ ] [ ] [ ] [ ] [ ] [ ] Q W E R T Y U I O P [ ] A S D F G H J K L [ ] Z X C V B N M [ ] [ ] [ ] [ ] [ ] [ ] [ ] [ ] [ ] [ ] [ ] [ ] [ ] [ ] [ ] [ ] [ ] [ ] [ ] [ ] [ ] [ ] [ ] [ ] [ ] [ ] [ ] [ ] [ ] [ ] [ ] [ ] [ ] [ ] [ ] [ ] [ ] [ ] [ ] [ ] [ ] [ ] [ ] [ ] [ ] [ ] [ ] [ ] [ ] [ ] [ ] [ ] [ ] [ ] [ ] [ ] [ ]](/content/2026/06/1219976/images/f601f9c60e0ec540d4cd2235015841a9bcd9fd6b0b2ff33227ff09eaa83891ce.jpg)
Example: 你好 (ni3hao3)
-
Press 注 / 倉 / 北 and then move the input mode pointer (or) to 北.
-
Press N I.
-
Press 3.
- This displays 你
- You can select a different character by pressing選字. After selecting the character you want, press 執行.
-
Press HAO.
-
Press 3.
- This displays 好
- You can select a different character by pressing選字. After selecting the character you want, press 執行.
Inputting English Characters
Keys Used for English Input

-
Press the key that corresponds to the character you want to input.
-
Press a/A to toggle between upper case (△) and lower case (△input.
- Pressing will toggle input of the next character only from upper case to lower case, or from lower case to upper case.
Inputting a Symbol Marked On a Key
- Press and then press the key for the symbol you want to input.
Inputting Other Symbols
The printer has a collection of built-in symbols divided among 13 groups. For information about available symbols and their groups, see the symbol table (page APP-1).
- Press!?@
Symbol group name

- Select the group that contains the symbol you want to use and then press 執行.
- Select the symbol you want to use and then press執行。
Inputting Illustrations
The printer has a collection of built-in illustrations divided between two groups. For information about available illustrations and their groups, see the illustrations table (page APP-2).
• Character styles are not applied to illustrations.
- Press ⚠️
Illustration group name
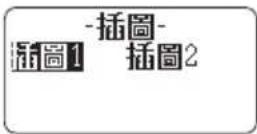
- Select the group that contains the illustration you want to use and then press 執行.
- Select the illustration you want to use and then press 執行.
Editing and Deleting Text
Deleting a Single Character
■ Deleting the Character to the Left of the Current Cursor Position
- Move the cursor to the character to the right of the character you want to delete and then press ✗
■ Deleting the Character at the Current Cursor Position
- Move the cursor to the character you want to delete and then press ✗
Clearing All Characters (All Text Clear)
-
Press 功能 and then press • If you were creating a free design label, select 全文删除 (Clear All) here and then press 執行. • To cancel the operation, press 取消.
-
Press 執行
■ Deleting a Range of Characters (Free Design Label Only)
- Press 功能 and then press
- Select 部分删除 (Delete Part) and then press 執行.
- To cancel the operation, press取消.
- Move the cursor to the first character of the part you want to delete and then press執行.
- Move the cursor to the last character of the part you want to delete and then press執行.
Editing Input Text
The method for editing text depends on whether you are using the 插入 (Insert) mode or 覆寫 (Overwrite) mode. For information about switching between 插入 (Insert) and 覆寫 (Overwrite), see "Configuring Printer Settings" (page 54).
■ Editing Input Text Using 插入 (Insert)
-
Move the cursor to the wrong character and then press ✗
-
Input the correct character.
■ Editing Input Text Using 覆寫 (Overwrite)
- Move the cursor to the wrong character.
- Input the correct character.
Changing the Font
Your printer supports the fonts below.
Chinese Fonts
Changing the Font of Previously Input Text
- Press 功能 and then 字型.
- Select the Chinese font you want to use and then press執行.
- Select the English font you want to use and then press執行.
- You can also select (與中文字型相同) (Same as Chinese font) for the English font.
- Select the range of text where you want to apply the font setting and then press執行.
- If you selected全文 (All) for a free design label, simply press 執行
- If you selected something else for a free design label, use steps 5 and 6 to specify a range of text.
- Move the cursor to the first character of the text whose font you want to change and then press 執行.

-
Move the cursor to the last character of the text whose font you want to change and then press 執行.
-
The pointer (✗) on the right side of the display indicates the currently selected font.
- You can use設定 (page 54) to specify the printer's initial power on default font. When using 登錄資料 (Stored Data) or 上次資料 (Previous Data) for text, the font setting will be the font specified when the data was created.


Changing the Character Style
You can use the following character styles to emphasize text: 標準 (Normal), 粗體 (Bold), 中空 (Outline), 陰影 (Shadow), 立體 (Raised).
- Character styles cannot be used with illustrations or user characters.
-
Applying a character style to a Chinese character that has a large number of strokes may make the character difficult to read.
-
Input text.
- Press 功能 and then 字型様式
-
Select the character style you want to change and then press執行。
-
Select the range of text where you want to apply the character style setting and then press 執行.
-
If 全文 (All) is selected for the Free Design Label setting of the selected range of text, simply press 執行.
-
If you selected something else for a free design label, use steps 5 and 6 to specify a range of text.
-
Move the cursor to the first character of the text you want to change and then press 執行.
- Move the cursor to the last character of the text you want to change and then press 執行.
Using Text Effects
Use the procedures in this section with a free design label to shade or underline text, or to enclose text in a box.
- Selecting取消 (Cancel) removes the currently applied text effect.
-
Select the range of text where you want to apply the text effect and then press 執行.
-
區段(Block): Specific es all the text in a particular block.
- 行(Line): Specifices all the text in a particular line.
- 文字(Character): Specific is a particular character.
-
詳細(Text): Specifics a desired range of text.
-
Move the cursor to the first character of the text to which you want to apply the text effect and then press 執行.
- Move the cursor to the last character of the text to which you want to apply the text effect and then press 執行.
• Multiple text effects can be applied at the same time.
- Depending on the character size, specifying box and underline for the same text can cause the bottom line of the box and the underlining to overlap each other.
Removing a Text Effect
- Press 功能 and then 文字修飾.
- Select 取消 (Cancel) and then press 執行.
- If you want to remove a single text effect from text where multiple text effects are applied, select the text effect to be removed and then press 執行.
- Select 文字 (Character) and then press 執行.
- Move the cursor to the first character of the text whose text effect you want to remove and then press 執行.
- Move the cursor to the last character of the text whose text effect you want to remove and then press 執行.
- If you are removing a single text effect from text where multiple text effects are applied, press ✗ here instead of執行.
Saving and Recalling Frequently Used Expressions (Phrase Memory)
You can save frequently used terms and expressions in printer memory for later recall when you need them.
- You can store up to 50 entries, each with up to 49 characters.
-
The printer comes with 20 expressions preset. You can edit or overwrite the preset expressions, if you want.
-
生產年月日 (Date Produced) 11. 交換期限 (Replacement Period)
- 作成日 (Date Created) 12. 品嚐期限 (Best Before:)
- 拍攝日 (Date Recorded) 13. 品質保持期限 (Quality Assurance
- 更新日期和時間 (Date Updated) Period)
- 交換日 (Date Replaced) 14. 消費期限 (Best Consumed Before:)
- 購買日 (Date Purchased) 15. 含稅 (Tax Included)
- 儲存期間 (Retention Period) 16. 本體價格 (Main Unit Price)
- 有效期間 (Validity Period) 17. BACKUP_DATA
- 保管到 (Store until:) 18. BEST_ALBUM
-
有效至 (Valid until: ) 19. http://
-
E-mail:
All other items have the text 未登錄 (No Data) assigned to them.
Recalling a Phrase
- Press 預設模板.

- Select the expression you want to insert and then press 執行
- You can also select a phrase by inputting its number (1 to 50) with the number keys.
Creating, Editing, or Deleting a Phrase Memory Record
- Press 功能 and then 模板編輯.
-
Select 作成 (Make) and then press 執行
-
If there is no text in the text input area, go to step 4.
- Here, we will select 修正 (Edit) and then press 執行 to edit an existing expression. Select the expression you want to edit, press 執行, and then advance to step 4.
-
Here, you can select删除 (Delete) and then press 執行 to delete an existing expression. Select the expression you want to delete and then press 執行. If a confirmation message appears on the display, press 執行 again.
-
Select expression creation operation you want to use and then press執行.
-
新增(New): Select to input new text from scratch.
-
參考作成(Use Input): Select to use text you were inputting before you pressed 功能 and then 模板編輯 in step 1 of this procedure.
-
Input text and then press 執行
-
If you selected 參考作成 (Use Input) in the previous step, the text that you were inputting before you pressed 功能 and then 模板編輯 in step 1 of this procedure will be displayed. Edit the text as required and then press 執行.
-
You cannot confi gure font, character style, or print format settings for expressions.
-
Select the location where you want to save the expression and then press 執行.
-
Press 執行
- To cancel the save operation, press 取消.
Precautions when Using Existing Text to Create a New Phrase
- Any size factor indicators, line break symbols, and block indicators in the existing text will be replaced by a space.
- If the text you were inputting before starting the phrase memory text creation operation has more than 49 characters, only the first 49 characters of the text will appear on the text input screen.
50 EN

Inserting the Current Date and/or Time into Text
- Press 時間戳
- This displays the current date and time (page 54), and then displays a screen for specifying the date and time input format.
- Select the date/time input format and then press 執行.
• There are 11 input formats from which to choose.
50 EN
Copying and Pasting Input Text
Copying Text
- While inputting text, press 功能 and then 複製.
- Move the cursor to the first character of the text you want to copy and then press 執行.
- Move the cursor to the last character of the text you want to copy and then press 執行.
- You can copy up to 49 characters.
- The printer retains up to nine of the last items copied. Performing a copy operation while nine items are already saved will cause the oldest copy to be deleted to make room for the new one.
- Any size factor indicators, line break symbols, and block indicators in the copied text will be replaced by a space.
Pasting Copied Text
- Press 功能 and then 貼上.
- Select the text you want to paste and then press 執行.
Creating a User Character
You can create user characters that are not included with the printer's normal character and symbol set.
- You can have up to four user characters stored in printer memory.
- You cannot configure character style settings for a user character.
- You can use either of the two methods below to create a user character.
- From scratch: Use this method when you want to create a user character from scratch.
- Modifying an existing character: With this method, you modify an existing character to create a user character.
Creating a User Character from Scratch
- If there is no character at the position the cursor was located in step 1, a user character creation screen (as shown in step 4 below) will appear. Go directly to step 4.
-
Select 新增 (New) and then press 執行.
-
Create a user character.
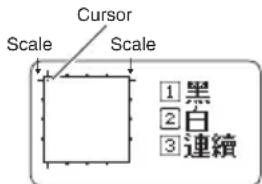
| Function Operation | |
| Move the cursor. Use arrow keys. | |
| Make the dot at the current cursor position black. | Press 1 (black).• This will cause 1 黑(1 Black) to be highlighted on the display. |
| Make the dot at the current cursor position white. | Press 2 (white).• This will cause 2 白(2 White) to be highlighted on the display. |
| Draw a black line. | Press 1 (black) and then 3 (continuous), and then move the cursor. |
| Draw a white line. | Press 2 (white) and then 3 (continuous), and then move the cursor. |
- Drawing of diagonal lines is not supported.
- After pressing 1 (black) or 2 (white), each press of 3 (continuous) enables or disables continuous line drawing. While continuous line drawing is enabled, 3 連續 (3 Continue) is highlighted on the display.
- While continuous line drawing is disabled (3 連續 (3 Continue) not highlighted), you can perform the following operations to make the cursor jump to one of the edges of the input area: 功能 + < (left edge), 功能 + >(right edge), 功能 + ^(top edge), 功能 + √(bottom edge).
-
After creating a user character, press 執行.
-
Select the location where you want to save the user character and then press 執行.
- If the location already contains a user character, the above step will delete the existing character and replace it with the new one.
- To cancel the user character save operation, press取消.
- Press執行.
Using an Existing Printer Character to Create a User Character
You can create a user character based on an existing printer character.
- You can also use a symbol (page APP-1) or a illustration (page APP-2) to create a user character.
-
Input the existing character you want to use and then align the cursor with it.
-
Press功能 and then造字.
-
Select 作成 (Make) and then press 執行.
-
Select 參考作成 (Use Input) and then press 執行.
-
Perform the steps from step 4 of the procedure under "Creating a User Character from Scratch" on page 52.
Editing an Existing User Character
- Press 功能 and then 造字.
- Select 修正 (Edit) and then press 執行.
- Select the user character you want to edit and then press 執行.
- Perform the steps from step 4 of the procedure under "Creating a User Character from Scratch" on page 52.
Using a User Character in a Label
- Move the cursor to the location where you want to input the user character.
- Press 功能 and then 造字.
- Select 調出 (Recall) and then press 執行.
- Select the user character you want to use and then press 執行.
- You can delete an input user character using the same procedure as that for a standard character.

User character indicator
Displayed during user character input.
Deleting a User Character from Memory
- Press 功能 and then 造字.
- Select 删除 (Delete) and then press 執行.
- Select the user character you want to delete and then press 執行.
- Press 執行
- Deleting a user character from memory will cause a space to be input in all locations where it is input in label data.
Part 9 - Printer Settings
This section explains how to configure text input mode, screen brightness, and other printer settings.
Configuring Printer Settings
Use the procedure in this section to configure text input mode, screen brightness, and other printer settings to suit your particular needs.
The procedure below shows an example of how to specify the text input mode (insert or overwrite).
- Use the same procedure to configure other settings as well.
- Turn on the printer and then press設定
- If you press 設定 after performing some other printer operation, some setting items may not appear. Press 設定 immediately after turning on printer power.
-
Select 插入 / 覆寫 (Insert / Overwrite) and then press 執行.
-
Select 插入 (Insert) or 覆寫 (Overwrite) and then press 執行.

Setting Items
| Setting Item Description | |
| 插入 / 覆寫 (Insert / Overwrite) | Specifi es the text input mode (插入 (Insert) or 覆寫 (Overwrite)). |
| 蜂鳴音 (Sound) Enables or disables the operation beeper. | |
| 背光 (Backlight) Enables or disables the screen backlight. | |
| 液晶對比度 (Contrast) | Adjusts display contrast.Pressing the <arrow key makes screen fi gures lighter, while pressing >makes them darker. |
| 列印濃度 (Density) | Adjusts the printed text density.1 is lightest, while 5 is darkest.Depending on the environment where you are printing, you may not be able to notice any change in printing density even if you change this setting. |
| 初始字型 (Default Font) | Specifi es the initial default font setting for input. |
| 日期和時間 (Date/Time) | For setting the current date and time.Use the <and>arrow keys to select a setting item, and then use and to change the setting.Direct input of values is also supported. |
Part 10 - Reference
Power Requirements
Your printer can be powered using the specified AC adaptor or by commercially available alkaline batteries.
- Before using the printer, be sure to read the information under "Safety Precautions" (pages 4 through 7).
Powering the Printer with Batteries
Use eight commercially available AA-size alkaline batteries to power the printer.
- Use a full set of eight new alkaline batteries. Use of mixing old batteries with new ones can result in a mismatch between the battery characteristics and printer specifications, making batteries go dead before their normal service life and causing malfunction of the printer.
- Remove the battery cover on the back of the printer.
Do not try to force the battery cover too far open or otherwise apply undue force. Doing so can lead to malfunction.
- Load the batteries.
Make sure the plus (+) and minus (-) ends of each battery are facing in the proper directions.

natural_image
Technical line drawing of a mechanical component with internal parts and an arrow indicating direction (no text or symbols)
natural_image
Diagram of a connector panel with multiple pins and a black arrow pointing to a specific component (no text or symbols present)- Close the battery cover.

natural_image
Line drawing of a hand holding a small electronic device with a black arrow pointing to the component (no text or symbols)Important!
- Batteries lose capacity at temperatures below 10°C, which can tend to cause the message 電池剩餘電量過少 (Low Battery!) to appear on the printer display. Use the printer in a location within the operating temperature range of 10°C to 35°C.
- Do not disconnect the AC adaptor or remove batteries from the printer while printer power is turned on. After turning off power, wait until the display goes blank before disconnecting the AC adaptor or removing batteries. Otherwise, temporarily stored text, text stored in printer memory, user characters, copied text, or printer settings may be deleted.
- If you are operating the printer under battery power and wish to connect or disconnect the AC adaptor, be sure to fi rst turn off printer power. Connecting or disconnecting with printer power on can cause it to turn off and delete unsaved text you are working on.
Battery Life
Under normal conditions, a set of new batteries can supply enough power to print labels for approximately two 18mm tape cartridges.
- Battery life can be extended by disabling the display backlight (page 54).
- Printing labels with large amounts of black text or images, low ambient temperatures, and storing the printer for a long time with batteries loaded can all shorten battery life.
- Even if you do not use the printer, you should replace the batteries at least once every two years.
User Maintenance
A dirty print head or rubber roller will make proper label printing impossible. Perform the procedure below to clean the print head and the rubber roller as required.
Important!
Use a cotton swab or some other soft object to clean the print head and the rubber roller. Use of a thin cotton swab is recommended.
- Press the tape compartment cover open button and open the cover. • If a tape cartridge is loaded in the printer, remove it.
Important!
- The print head is hot immediately after printing, so wait until it is cooled down before removing the tape cartridge.
- Use a cotton swab moistened with alcohol to wipe the surfaces of the print head and rubber roller.
Take particular care when wiping the points where the print head and rubber roller come into contact.

- Pressing 功能 and then will cause the rubber roller to rotate.
- You can also use a commercially available cassette tape recorder head cleaning set for cleaning.
Troubleshooting
This section explains reference information that comes in handy when you experience problems with printer operation. If, for any reason, you cannot find the solution to your problem here, contact your original retailer or authorized CASIO service center.
| Nothing appears on the display when I press ON. |
| Display contrast needs to be adjusted.→ Adjust display contrast. (page 54) |
| The AC adaptor is not connected securely.→ Correctly connect the AC adaptor. (page 13) |
| Batteries are dead or you are using the wrong type of batteries.You are using the wrong type of AC adaptor.→ Use the specifi ed AC adaptor or replace the batteries with new ones (sold separately). |
| Batteries are not loaded correctly.→ Remove the batteries and correctly reload them. (page 55) |
| Printing is unclear.Printout is dirty.Printing is light. |
| Dirt, dust, or other foreign matter is on the print head and/or the rubber roller.→ Clean the printer. (page 56) |
| There is slack in the ink ribbon.→ Take up ink ribbon slack and correctly re-load the tape cartridge. (page 16) |
| Batteries are dead or you are using the wrong type of batteries.You are using the wrong type of AC adaptor.→ Use the specifi ed AC adaptor or replace the batteries with new ones (sold separately). |
| Print density is not correct.→ Adjust print density. (page 54) |
| The printer doesn't print.Power turned off during printing. |
| Batteries are dead or you are using the wrong type of batteries.You are using the wrong type of AC adaptor.→ Use the specifi ed AC adaptor or replace the batteries with new ones (sold separately). |
| The print head is very hot.→ Wait for some time and then try performing the operation again. |
| The printer won't connect with a computer. |
| The printer is not in the communication mode.→ Press PC 連接 to enable connection with a computer. |
| The USB cable is not connected correctly.→ Make sure that the USB cable is connected correctly. |
| Printer power is turned off.→ Press ON to turn on power. |
| The USB driver is not installed on the computer.→ Install the USB driver on your computer from the CD-ROM that comes with the printer.If the above steps don't solve the problem, try connecting the USB cable to a different USB port on the computer or try using a different USB cable. |
| No tape comes out when I press |
| The tape compartment cover is not closed securely.→ Close the cover securely. (page 17) |
| The cartridge is out of tape.→ Replace the tape cartridge with a new one (sold separately). (page 17) |
| Tape is jammed.→ Remove the tape cartridge from the printer and pull out the jammed tape with your fi ngers. Use scissors to trim off the tape you pulled out. Next, correctly load the cartridge back into the printer. (page 17) |
| • Ink ribbon is coming out of the tape outlet along with the tape. |
| • The tape cartridge was loaded while there was slack in the ink ribbon.→ Remove the tape cartridge from the printer. After checking to make sure the ink ribbon is not broken, take up any slack in it. After taking up ink ribbon slack, load the tape cartridge back into the printer. (page 16) Important!• Be sure to always take up any slack in the ink ribbon before loading a tape cartridge.• If the ink ribbon is broken, replace the tape cartridge with a new one (sold separately). |
| • The printer does not cut the tape. |
| • Tape is jammed in the tape outlet.→ Turn off power, remove the tape cartridge, and clear the jammed tape. |
| • The print format margin setting is 不留 (None).→ Specify 小 (Narrow), 中 (Medium), or 大 (Wide) for the margins. (page 30) |
| • The label is short as defi ned by the following: approximately 28mm or less with 小 (Narrow) margins; approximately 35mm or less with 中 (Medium) margins; approximately 44mm or less with 大 (Wide) margins.→ After printing, use scissors or some other implement to cut the tape. |
| • The printer does not half cut the tape. |
| • The label is short as defi ned by the following: approximately 28mm or less with 小 (Narrow) margins; approximately 35mm or less with 中 (Medium) margins; approximately 44mm or less with 大 (Wide) margins.→ After printing, use scissors or some other implement to cut the tape. |
| • The label does not stick to the intended surface. |
| • The surface or object is inappropriate.→ A label cannot be affi xed to a surface that is rough, wet, oily, dirty, etc. (page 20) |
Error Messages
| 有無效的文字(Illegal characters!) |
| You are attempting to input and print characters that are not allowed for the bar code you are printing.→ Re-input using proper characters. (page 40) |
| 請確認與電腦的連接狀態(Link error! Check all connections!) |
| The USB cable is not connected securely.→ Secure and fully insert the USB cable into the connector.The computer is turned off.→ Turn on your computer and then perform the operation. |
| 色帶錯誤 請安裝色帶墨盒(Tape error! Load a tape cartridge) |
| There is no tape cartridge loaded in the printer or the current tape cartridge was loaded improperly.→ Correctly load the tape cartridge. (page 16) |
| 電池剩餘電量過少(Low battery!) |
| Battery power is low.→ Replace the batteries with new ones (sold separately) or use the specifi ed AC adaptor. (pages 13, 55)Ambient temperature is below 10°C.→ Use in the printer in a location within the operating temperature range (10°C to 35°C). |
| 記憶體已滿 無法登錄(Not enough memory! Data cannot be saved.)執行/取消 |
| There is not enough memory for the data you are trying to save.→ If you want to print without saving data, press 執行 and then continue with the operation. To save the data, you fi rst need to delete unneeded text data currently stored in memory. (page 41) |
| · 正在準備列印 (Getting ready to print (Appears when a print operation stops.)) |
| · The printer has become overheated due to successive print operations.→ Please wait without doing anything.Printing will resume when the printer returns to normal temperature. |
| · 位數是奇數 (Odd number of digits!) |
| · There is an odd number of input digits when printing an ITF bar code with 無 (No) specifi ed for the check digit.→ Re-input with a leading zero. (page 40)· There is an even number of input digits when printing an ITF bar code with 有(Yes) specifi ed for the check digit.→ Re-input with a leading zero. (page 40) |
| · 列印錯誤 請檢查色帶墨盒 (Print error! Check the tape cartridge!) |
| · Tape became jammed during printing.→ Turn off power, remove the tape cartridge, and clear the jammed tape. (page 17)· The tape auto cutter is jammed with foreign matter.→ Turn off power, remove the tape cartridge, and clear whatever is jammed in the auto cutter. (page 17) |
| · Dirt, tape cuttings, or other foreign matter adhering to the rubber roller.→ Remove anything adhering to the rubber roller and clean the roller. (page 56)· Tape cuttings or other foreign matter is adhering to the sensor in the tape compartment.→ Clear the foreign matter from inside in the tape compartment. (page 56) |
| · 上次可能沒有正常結束 (Printer not shut down properly last time) |
| · The last time the printer was used, the AC adaptor was disconnected or power to the printer was otherwise abnormally cut off.→ Press any key to initialize the data that was partially deleted the last time the printer powered down. (page 13) |
| • 色帶錯誤 色帶墨盒不適合 (Tape error! This is the wrong type of tape cartridge!) |
| • The tape compartment cover is not closed securely.→ Close the cover securely. (page 17)• The data you are trying to print or recall is not compatible with the type of tape cartridge loaded in the printer.→ Turn off power and replace the tape cartridge. (pages 16, 17)• The tape cartridge was replaced while printer power was turned on.→ Turn off power and replace the tape cartridge. (pages 16, 17) |
| • 長度超限 無法列印 (Too long! Cannot print) |
| • The label you are trying to print is longer than the printable length.→ Shorten the label or reduce the number of copies. (pages 19, 31) |
| • 字數超限 有未能引用的文字 (Too many characters! Some were lost.) |
| • You attempted to create a phrase memory text based on an expression that contains more than 49 characters.→ Only the first 49 characters of the expression will be used. Edit the expression as required. (page 49) |
| • 字數超限 有未能複製的文字 (Too many characters! Some were not copied.) |
| • You attempted to copy more than 49 characters.→ Reduce the number of characters. (page 51) |
| • 行數超限 無法加框列印 (Too many lines to frame!) |
| • You are trying to print a label with more lines than allowed for frame printing on the width of tape you are using.→ Decrease the number of label lines or change to a wider tape. |
| ·行數超限 無法列印 (Too many lines! Cannot print) |
| ·The label you are trying to print contains more than the allowable number of lines for the tape width you are using.→ Reduce the number of lines or change to a wider tape. (pages 28, 38, 60) |
| ·長度太短了 無法裁切可以嗎 ? (Too short to cut!)執行 / 取消 |
| The tape being printed is so short that unneeded part cannot be trimmed or a cut cannot be performed between labels.·To print→ Press 執行 . Use scissors or some other implement to cut the tape after printing is complete. (page 21)·To print with auto tape cutting (excluding numbered label printing)→ Increase the margins (from 小 (Narrow) to 中 (Medium) or from 中 (Medium) to 大 (Wide)). You can specify 特殊 (Special Tape) for the cut mode and 大 (Wide) for the margin setting to make leading and trailing margins equal. (page 30)·To print with auto tape cutting (numbered label printing)→ Use the print format settings to change the tape length setting to 固定 (Fix). (page 24) |
Tape Width, Number of Lines, Size Factor List
The maximum number of printable lines and maximum vertical size factor depend on the tape width and format being used.
| 6mm 9 | 12mm | 18mm | 24mm | User's Guide Page | ||
| Maximum Number of Printable Lines | Normal font 1 1 | 2 4 | Page 28 Page 37 | |||
| Small Font 2 3 | 5 8 | |||||
| Maximum vertical size factor | Normal font 1X | 2X 3X 5X | Page 35 | |||
| Total vertical size factor for multiple lines | Normal font - - | Up to 2 | Up to 4 | Page 28 Page 35 Page 37 | ||
| Small Font | Up to 2 | Up to 3 | Up to 5 | Up to 8 | ||
List of Supported Tape Widths for Each Function
Keyboard Layout: Chinese/QWERTY
Dictionary
Chinese characters conversion Approximately 17,500 entries
Character Types
Chinese characters
BIG5: 13,060
HKSCS: 4.536
Alpha: 52 (A to Z, a to z)
Numbers: 10
Symbols: 783
Illustrations: 245
Display
Type: Liquid crystal display
LCD: 128 × 64 dots + symbols (8 characters x 4 lines)
With backlight
Input area: 8 characters × 1 line (During input of a label type that is not 自由標籤 (Free Design).)
8 characters × 3 lines (During input of a 自由標籤 (Free Design) label.)
Screen configuration: 16 × 16 dots
Printing
Printing resolution: 200 dpi
Printing method: Thermal transfer
Printing speed: Approximately 20mm/seconds (AC adaptor power)
Approximately 10mm/seconds (battery power)
- Printing speed depends on the printing environment, printing conditions, etc.
Maximum print width: Approximately 16mm
a) 4mm; Tape width: 6mm
b) 7mm; Tape width: 9mm
c) 10mm; Tape width: 12mm, normal printing d) Tape width: 12m range label printing
e) 16mm; Tape width: 18mm, 24mm
Character formation: Bit map fonts
Fonts:4 Chinese (黑體, 圓體, 明體, 楷體)
Text orientation: Horizontal, vertical, mirror image printing
Character styles: Normal, bold, outline, shadow, raised
Number of printable lines: 1 to 2 for 6mm wide tape
1 to 3 for 9mm wide tape
1 to 5 for 12mm wide tape
1 to 8 for 18mm and 24mm
wide tape
Built-in Memory
Text memory: Approximately 2,000 characters
Phrase Memory: Up to 49 characters (50 sets)
Copy/paste: Up to 49 characters (9 sets)
Power Supply, Other
Operation power supply: Specifi ed AC adaptor (AD-1832L)
8 AA-size alkaline batteries (commercially available)
Built-in clock battery life: Approximately 8 years
If the date and time inserted into labels are wrong, it could mean that the built-in clock battery is low. If this happens, request servicing from your original retailer. (Charges borne by you.)
Rated voltage: 18.8V DC
Power consumption: 800mA (15W)
Auto Power Off: Approximately 6 minutes
- Auto Power Off is disabled while the printer is being powered by the AC adaptor and connected to a computer.
Clock accuracy: ±3 seconds per day at normal temperature of 15°C to 35°C (59°F to 95°F)
Dimensions: 67.5 (H) × 202 (W) × 212 (D) mm ( 2^7/16 "H × 7^15/16 "W × 8^3/_8 "D)
Weight: Approximately 850 g (1.87 lb) excluding batteries
Operating temperature: 10°C to 35°C (50°F to 95°F)
Appendix
符號 (Symbols)
● 記述括弧 (Punctuation)

● 單位縮寫 (Units, Abbreviations)
\$ ¥ ¢ £ € % @ °C °F ° ①% 〒(株) No. Tel mil mm cm km m² mg kg cc 克艷艷艷艷薊圧粦
● 数字 (Numbers)

● 2位數字 (Paired Numbers)
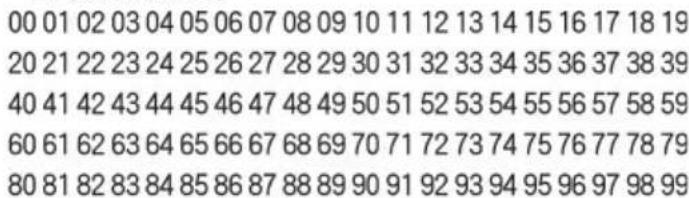
● 注音 (Phonetics)
natural_image
Grid of black-and-white icon set with various objects and symbols (no text or labels)● 插圖2 (Illustration 2)

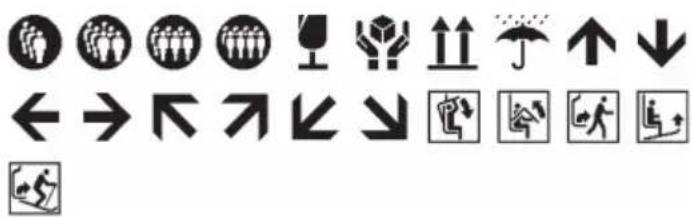
natural_image
Collection of black-and-white pictograms and symbols, including human figures, arrows, and walking figures (no text or labels)圖文框 (Frames)
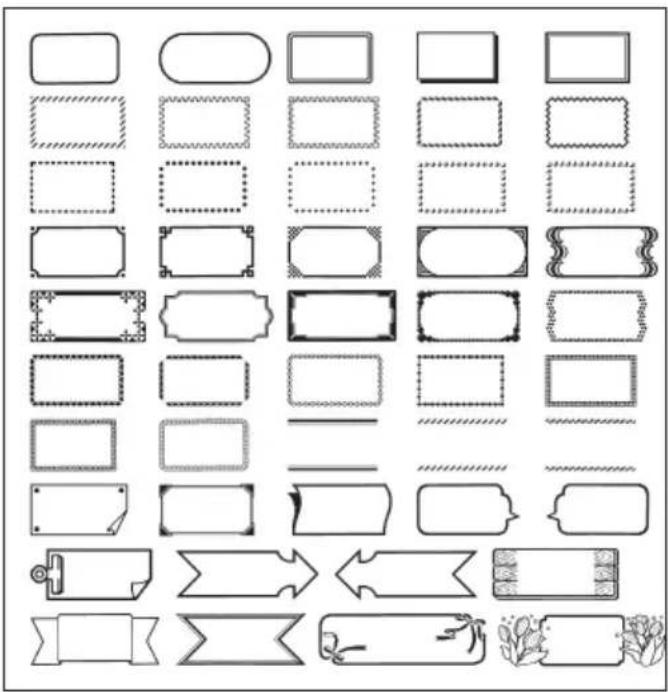
natural_image
Grid of decorative rectangular and ribbon-like shapes with varying border styles (no text or symbols)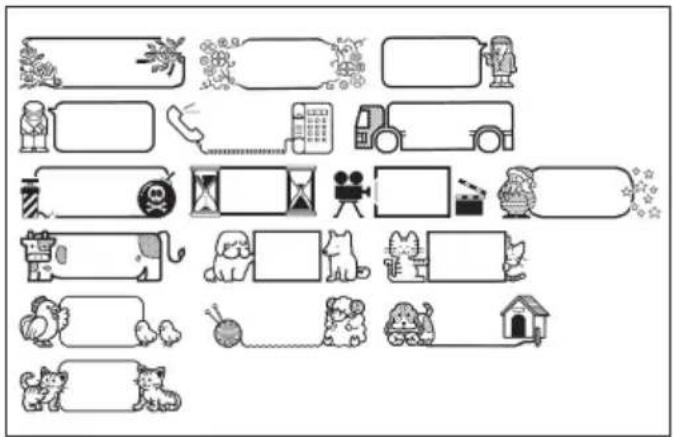
圖示標識 (Built-in logo)
- 價格 (Price)


• 標識 (Sign)






- 工作 (Work)

緊急

此面朝上

不要彎曲

保留

機密
- 注意 (Attention)

不要進入

嚴禁煙火

禁止使用手機

輕拿輕放

易碎品

重要

不要掉落

進度報告

禁止通行

禁止拍照

不要觸摸

注意頭上

吸煙區

請 洗 手

安全第一

注意!

開關注意

故障

注意腳下

保持乾淨

急救箱

警告!

危險!

滅火器

禁止使用
• PRICE





• SIGN











• WORK

Urgent

This Side Up

Do Not Bend

Pending

Confidential
- ATTENTION

Do Not Enter

Flammable

No Mobile Phones

Handle With Care

Fragile

Important

Do Not Drop

Progress Reports

No Passage

No Photography

Do Not Touch

Watch Your Head

Smoking Area

Wash Your Hands

Safety First

Caution!

Open With Care

Out Of Order

Watch Your Step

Keep Clean

First Aid Kit

Warning!

Danger!

Fire Extinguisher

Do Not Use

Manufacturer:
CASIO COMPUTER CO., LTD.
6-2, Hon-machi 1-chome, Shibuya-ku, Tokyo 151-8543, Japan
Responsible within the European Union:
Casio Europe GmbH
MO1507-A Printed in China
© 2015 CASIO COMPUTER CO., LTD.
- Important!
- Read This fi rst!
- Contents
- Safety Precautions
- Danger
- Warning
- Caution
- Examples of graphic markings
- Batteries
- Smoke, abnormal odor, overheating, and other abnormalities
- AC Adaptor/USB Cable
- AC Adaptor
- Dropping and rough treatment
- Disassembly and Modifi cation
- Liquids and Foreign Matter
- Keep Away From Fire
- Packaging Plastic Bag
- Do not affi x labels to a container to be used in a microwave oven.
- Unstable Locations
- Loading and replacing batteries
- High temperature precaution
- Display Screen
- Cutter Precautions
- Precautions during Use
- Conventions Used In This Manual
- Check to make sure that everything has been included with the printer.
- Read this before using the printer!
- About the printer
- Preparing the Printer for Operation
- Printer User Documentation
- ■ To view the contents of the Label Printing Software FA-3000 User's Guide
- About the supplied CD-ROM
- Computer Operating Environment (for included PC Link Software)
- Installing the Software
- Uninstalling the software
- Part 1 - Getting Ready
- Power Requirements
- Using the AC Adaptor
- ■ Connecting the AC Adaptor
- ■ Disconnecting the AC Adaptor
- Connecting the Printer to a Computer
- Initializing Memory
- Turning Power On and Off
- ■ To turn power on
- ■ To turn power off
- Auto Power Off
- Creating Text for Printing
- Loading and Removing a Tape Cartridge
- Loading a Tape Cartridge
- Removing a Tape Cartridge
- Part 2 - Performing a Test Print
- Printing a Label
- 銷售報告
- ■ Confi guring Print Format Settings
- ■ Displaying a Print Preview Image
- ■ Printing a Label
- Affi xing a Label to a Surface
- Incompatible Surfaces
- Feeding Tape
- Finalizing a Print Operation when 不留 (None) is Selected for the Margin Setting
- Exiting Text Creation and Tape Printing
- Printing Precautions
- Cut Modes (Auto Cutter)
- ■ Cutting Types
- - Half Cut
- • Full Cut
- ■ Four cut modes
- ■ 通常 (Normal)
- ■ 切斷(Cut)
- ■ 特殊 (Special Tape)
- Part 3 - Creating a Label
- Label Creation Basics
- Creating Labels that Include an Automatically Incremented Number (Numbered Label)
- Numbering Formats
- Confi guring Print Format Settings
- Creating an Index Label
- Index Label Formats
- Creating an Index Label with Text You Input
- Creating an Index Label Using Canned Phrases
- Creating a Large Label by Combining Smaller Parts (Large Label)
- Part 4 - Free Design Label
- Creating a Free Design Label with Text You Input
- Creating a Label with Multiple Lines of Text
- Dividing Text Into Blocks
- Specifying the Label Print Format
- Specifying the Print Format of Each Block
- Specifying the Print Format of All Text
- Specifying the Label Length
- Specifying the Length of Each Block (Fixed Block Length)
- Specifying the Overall Label Length (Fixed Tape Length)
- Simple Length Setting for CD or DVD Case Labels (One-touch Length Setting Keys)
- ■ To specify a label length
- Press 10.0cm.
- Specifying Text Alignment
- Specifying Text Alignment within a Block
- Specifying Label Block Alignment
- Specifying Character Size
- Specifying the Size of Specific Characters
- Specifying the Character Size for a Specific Line of Text
- ■ Small Font
- Adding a Frame to a Label
- Part 5 - Bar Code Labels
- Creating a Bar Code Label
- Bar Code Types
- Sample Print
- Part 6 - Storing and Recalling Label Data
- Storing Label Data
- Recalling Stored Data
- Deleting Stored Data
- Part 7 - Using a Built-in Logo
- Inserting a Built-in Logo into a Label
- Printing a Label with a Built-in Logo
- Part 8 - Inputting and Editing Text
- Moving the Cursor
- Inputting Text
- Chinese Input Mode and English Input Mode
- Chinese Input Mode English Input Mode
- ■ To enter the Chinese input mode
- ■ To enter the English input mode
- Inputting Chinese Using the Zhuyin Input Method
- Inputting Chinese Using the Cangjie Input Method
- Inputting Chinese Using the Pinyin Input Method
- Inputting English Characters
- Keys Used for English Input
- Inputting a Symbol Marked On a Key
- Inputting Other Symbols
- Inputting Illustrations
- Editing and Deleting Text
- Deleting a Single Character
- ■ Deleting the Character to the Left of the Current Cursor Position
- ■ Deleting the Character at the Current Cursor Position
- Clearing All Characters (All Text Clear)
- ■ Deleting a Range of Characters (Free Design Label Only)
- Editing Input Text
- ■ Editing Input Text Using 插入 (Insert)
- ■ Editing Input Text Using 覆寫 (Overwrite)
- Changing the Font
- Changing the Font of Previously Input Text
- Changing the Character Style
- Using Text Effects
- Removing a Text Effect
- Saving and Recalling Frequently Used Expressions (Phrase Memory)
- Recalling a Phrase
- Creating, Editing, or Deleting a Phrase Memory Record
- Precautions when Using Existing Text to Create a New Phrase
- Inserting the Current Date and/or Time into Text
- Copying and Pasting Input Text
- Copying Text
- Pasting Copied Text
- Creating a User Character
- Creating a User Character from Scratch
- Using an Existing Printer Character to Create a User Character
- Editing an Existing User Character
- Using a User Character in a Label
- Deleting a User Character from Memory
- Part 9 - Printer Settings
- Configuring Printer Settings
- Part 10 - Reference
- Powering the Printer with Batteries
- Battery Life
- User Maintenance
- Troubleshooting
- Tape Width, Number of Lines, Size Factor List
- Dictionary
- Character Types
- Display
- Printing
- Built-in Memory
- Power Supply, Other
- Appendix
- 符號 (Symbols)
- 圖示標識 (Built-in logo)
- • PRICE
- • SIGN
- • WORK
- - ATTENTION
Brand : CASIO
Model : KL-G2TC
Category : Printer