
PJG3-1016 - Toilets PolyJohn - Free user manual and instructions
Find the device manual for free PJG3-1016 PolyJohn in PDF.


| Product Type | Portable Toilet with Hand Wash Station |
| Brand | PolyJohn |
| Model | PJG3-1016 |
| Sink Model | PS02-1000 Hand Wash Stand |
| Sink Activation | Foot pump |
| Soap Dispenser Model | LS04-0001 |
| Soap Dispenser Capacity | 30 fl oz (887 ml) |
| Paper Towel Dispenser Model | TD04-1000 |
| Towel Type Accepted | Single fold, multi-fold, or roll towels up to 9.5" (24 cm) wide |
| Recommended Towels | Georgia Pacific #23504 (single fold) or Baywest Ecosoft #46200 (roll) |
| Installation Requirements | TU01-1000 PJ Single Trailer Chassis (sold separately) |
| Tools Required | Marker, 1-1/8" hole saw, drill with 13/64" bit, slotted screwdriver, 7/16" socket wrench, rivet gun with 3/16" tip |
| Fasteners Included | 7x washer PC-000106, 6x washer PC-000123, 2x nylon lock nut PC-000140, 7x rivet PC-000102, 2x hex head bolt PC-000142, 2x self-tapping screw PC-000156, 2x screw PC-000175 |
| Cleaning Instructions | Use mild soap; for scratches use mild abrasive cleaner (e.g., Soft Scrub with calcium carbonate, hypochlorite bleach, detergents); rinse and wax |
| Maintenance | Add Fresh Sink Tablet each time sink is filled with water; for minor scratches, use industrial hot air gun |
| Contact (USA) | PolyJohn Enterprises Corp, 2500 Gaspar Ave., Whiting, IN 46394, Phone: 800-292-1305 |
| Contact (UK) | PolyJohn (UK) Ltd., Equinox 1 Audby Lane, Wetherby, England LS22 7RD |
| Contact (Canada) | PolyJohn Canada, P.O. Box 2300, 199 Forest Plain Rd., Orillia, Ontario LV3 6S2 |
| Cleaning Products Source | RID IT, 2500 Gaspar Ave., Whiting, IN 46394, www.rid-it.com |
| Compliance | GAP (Good Agricultural Practices) compliant unit |
Frequently Asked Questions - PJG3-1016 PolyJohn
User questions about PJG3-1016 PolyJohn
0 question about this device. Answer the ones you know or ask your own.
Ask a new question about this device
Download the instructions for your Toilets in PDF format for free! Find your manual PJG3-1016 - PolyJohn and take your electronic device back in hand. On this page are published all the documents necessary for the use of your device. PJG3-1016 by PolyJohn.
USER MANUAL PJG3-1016 PolyJohn
PJG3 Exterior Components Installation Instructions
*GAP Compliant Unit * Good Agricultural Practices
\~\~Tools Required\~\~
• Marker
• 1-1/8" Hole Saw
- Drill w/13/64" bit
• Slotted Screw Driver
• 7/16" Socket Wrench
• Rivet Gun w/3/16" tip
Full Size Scale Fasteners

(7) PC-000106 Washer

(6) PC-000123 Washer

(2) PC-000140 Nylon Lock Nuts

(7) PC-000102 Rivet
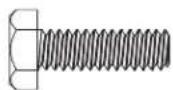
(2) PC-000142 Hex Head Bolt

(2) PC-000156 - Self-Tapping Screw

(2) PC-000175 Screws
POLYJOHN
USA
PolyJohn Enterprises Corp
2500 Gaspar Ave.
Whiting, IN 46394
Phone: 800-292-1305
Fax: 219-659-0625
www.polyjohn.com
info@polyjohn.com
POLYJOHN
WORLDWIDE
PolyJohn (UK) Ltd.
Equinox 1 Audby Lane
Wetherby, England LS22 7RD
Phone: 44 (0) 1937-583333
Fax: 44 (0) 1937-583322
www.polyjohn.co.uk
sales@polyjohn.co.uk
POLYJOHN
CANADA
PolyJohn Canada
P.O. Box 2300
199 Forest Plain Rd.
Orillia, Ontario LV3 6S2
Phone: 800-465-9590
Fax: 705-325-8250
www.polyjohncanada.ca
info@polyjohncanada.ca
PJG3 - Exterior Assembly
July - 2009
Page 1 of 4
Assembly Instructions
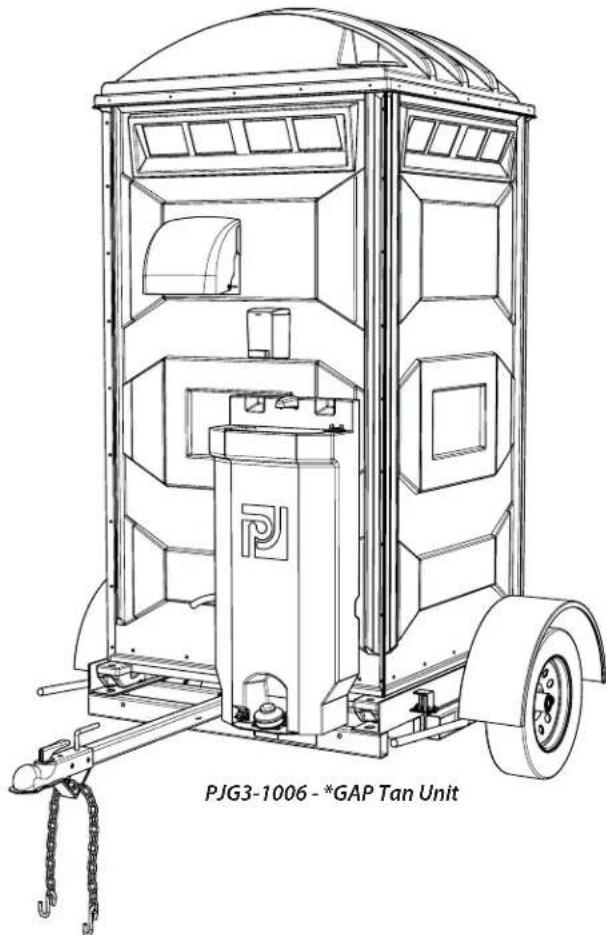
NOTE: The PJG3-1006 Unit must already be mounted on the TU01-1000 - PJ Single Trailer Chassis In order to install the exterior components.
STEP 1: MOUNT PJG3-0020 BRACKET
Remove the (2) PC-000135 - Screws from the PS02-0003 - Foot Pump Plate located on the bottom of the PS02-1000 - Hand Wash Stand. Line up the slotted holes on the bottom of the PJG3-0020 - PJG3 Gap Sink Bracket with those in the foot pump plate. Fasten the sink bracket to the foot pump plate loosely until positioned in the mounting location using (2) PC-000142 - Hex Head Bolts with (2) PC-000123 - Washers.
STEP 2: SINK DRAIN HOLE LOCATION
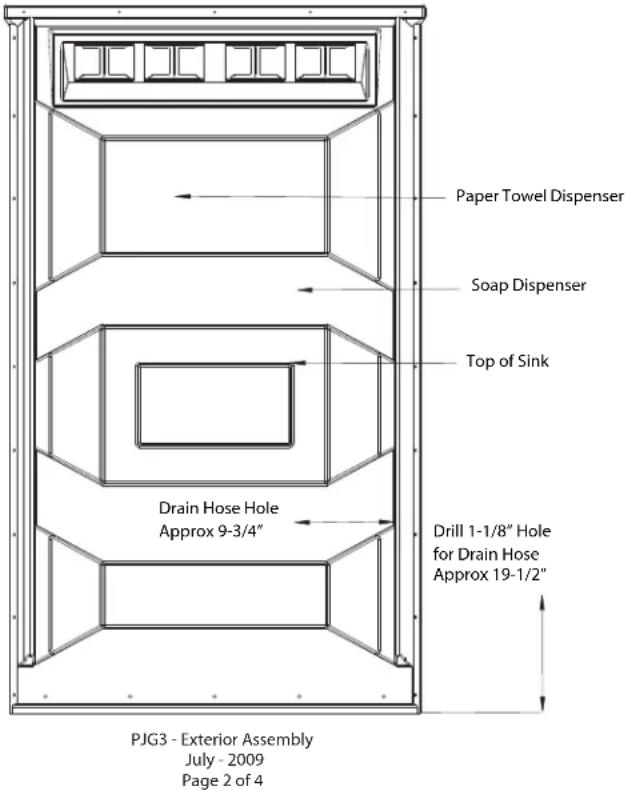
With a marker, mark the drain hole location for the sink drain hose approximately 9-3/4" in from the right side vertical rib and up 19-1/2" from the bottom edge of the rear wall panel. Using a 1-1/8" hole saw cut through the panel and into the tank. Push the end of the CH063-036 - 5/8" x 36" Drain Hose through the drain hole (make sure the drain hose is routed through one of the molded-in channels along the sink back).
STEP3: PS02-1000 SINK INSTALLATION
Place the sink into position against the rear wall panel with the left side of the sink flush against the chassis tongue receiver and the right side resting on top of the TU01-9160G - Left Skid Bracket on the TU01-0001GC - Trailer Chassis. Drive (2) PC-000156 - Self-Tapping Screws through the holes in the side of the bracket into the frame of the trailer chassis. Tighten the hex head bolts on the bottom of the sink (from Step 1 - the bracket to the foot pump plate). Using a 13/64" bit, drill into the two square recesses located near the top of the sink (to the left and right of the spigot, making sure to drill into the wall panel). Fasten the top of the sink to the wall by placing (2) PC-000175 - Screws with (2) PC-000123 - Washers into the holes just drilled from the outside with (2) PC-000123 - Washers and (2) PC-000140 - Nylon Lock Nuts on the inside.
STEP 4: LS04-0001 SOAP DISPENSER INSTALLATION
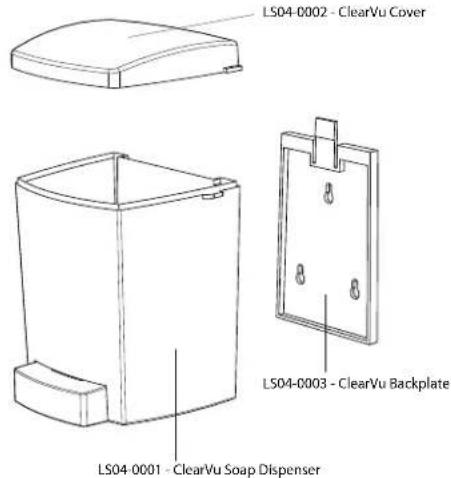
Remove the top of the LS04-0001 - Soap Dispenser by placing your hands on both sides of the dispenser and pressing up on the tabs of the lid. Remove the backing plate from the dispenser by pushing back on the tab at the top, and sliding the backing plate down. Place the backing plate up against the rear wall panel (centered in the rib just above the sink and to the left of the spigot). Using the top of the three mounting holes as a guide, drill three 13/64" holes into the wall panel. Rivet in place from the outside using (3) PC-000102 - Rivets with (3) PC-000106 - Washers on the inside. Place the body of the soap dispenser on the backing plate and snap the lid back on.
STEP 5: TD04-1000 PJ PAPER TOWEL INSTALLATION
Open up the TD04-1000 - Paper Towel Dispenser (for instructions see page 3). Place the dispenser up against the raised panel of the rear wall just below the fly screens (centering as far left as possible). Using the mounting holes as a drill guide, drill four 13/64" holes into the wall panel. Rivet in place using (4) PC-000102 - Rivets from the outside with (4) PC-000106 - Washers on the inside.
General Information
NOTE: These dispensers are designed to accept towels that are no wider than 9-1/2" wide, whether using single, multi-fold, or a roll towel. The recommended towels are the Georgia Pacific #23504 - single fold towel or the Baywest Ecosoft #46200 - roll towel. NOTE: The use of a roll towel complies with ADA requirements.

natural_image
Hand holding a cylindrical object with dashed lines indicating texture or alignment (no text or symbols)Opening the Paper Towel Dispenser
Position your hands on both sides of the dispenser cover (as shown). While pulling out on both sides lift up the cover and pull down towards yourself.
Filling the Dispenser
Filling with Fold Towels: Place the package of towels on the towel tray with the fold of the towel facing downward. Pull the first towel through the middle opening of the paper towel tray. Close the cover.

natural_image
Line drawing of a hand holding a rectangular object (no text or symbols)Filling with a Roll of Towels: Place the roll of towels on the spindle with the roll of towels coming off towards you with the arrow end of the spindle facing towards the right. Place the spindle into the right side of the dispenser first. Place the left side of the spindle into the groove on the left side of the dispenser and push down in place. Feed the roll of towels over the front of the paper towel tray. Close the cover.
TD04-1000 PJ Paper Towel Dispenser
Exploded View


LS04-0001 - Soap Dispenser
Exploded View
Filling the Soap Dispenser
Open the soap dispenser by placing your hands on both sides of the dispenser and pressing up on the tabs of the lid. Locate the tab on the mounting plate at the rear of the dispenser, push in on it and slide the dispenser up and off. Fill with 30 fluid ounces of liquid soap. Refasten it to the mounting plate and snap the lid back on.
PJG3 - Exterior Assembly
July - 2009
Page 3 of 4
PS02-1000 Hand Wash Stand - Exploded View

CLEANING AND MAINTENANCE
Use a mild soap to clean all surfaces and component parts.
Minor scratches and abrasions can be lightly sanded or scrubbed with a mild abrasive cleaner (such as "Soft Scrub") that contains calcium carbonate, hypochlorate bleach and detergents. Be sure to follow the cleaning product directions since these ingredients may cause hazardous gases when mixed with other chemicals. Rinse the cleaned area and buff with a conventional wax.
Some light scratches may also be hidden by using an industrial hot air gun.
If sink is installed add a "Fresh Sink Tablet" (chlorinated tablet) each time the sink is filled with water to keep the water fresh.
For a source of cleaning, deodorizing and paper products contact:
RID IT
2500 GASPAR AVE.
WHITING, IN 46394-2175
800-292-1305 EXTENSION 514
www.rid-it.com
OUR MISSION STATEMENT
"PolyJohn is a family owned, state of the art, plastics manufacturing company dedicated to providing its employees with a work environment committed to excellence, and its customers with innovative products, services and technology that meet or exceed their requirements."
THANK YOU FOR PURCHASING POLYJOHN PRODUCTS!
Look for us on the Web @ www.PolyJohn.com
PJG3 - Exterior Assembly
July - 2009
Page 4 of 4
- PJG3 Exterior Components Installation Instructions
- \~\~Tools Required\~\~
- Full Size Scale Fasteners
- POLYJOHN
- USA
- WORLDWIDE
- CANADA
- Assembly Instructions
- STEP 1: MOUNT PJG3-0020 BRACKET
- STEP 2: SINK DRAIN HOLE LOCATION
- STEP3: PS02-1000 SINK INSTALLATION
- STEP 4: LS04-0001 SOAP DISPENSER INSTALLATION
- STEP 5: TD04-1000 PJ PAPER TOWEL INSTALLATION
- General Information
- Opening the Paper Towel Dispenser
- Filling the Dispenser
- Filling the Soap Dispenser
- CLEANING AND MAINTENANCE
- OUR MISSION STATEMENT
- THANK YOU FOR PURCHASING POLYJOHN PRODUCTS!
Brand : PolyJohn
Model : PJG3-1016
Category : Toilets