Celeb 401Q LED - Lighting Kino Flo - Free user manual and instructions
Find the device manual for free Celeb 401Q LED Kino Flo in PDF.

User questions about Celeb 401Q LED Kino Flo
0 question about this device. Answer the ones you know or ask your own.
Ask a new question about this device
Download the instructions for your Lighting in PDF format for free! Find your manual Celeb 401Q LED - Kino Flo and take your electronic device back in hand. On this page are published all the documents necessary for the use of your device. Celeb 401Q LED by Kino Flo.
USER MANUAL Celeb 401Q LED Kino Flo
natural_image
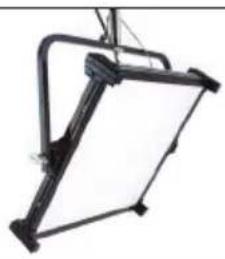
Black studio lighting fixture with adjustable frame against orange background (no text or symbols)
natural_image
Logo featuring stylized letter 'L' and yellow 'O' on black background (no readable text or symbols)KINO FLO®
Lighting Systems
Celeb 401Q DMX LED Fixtures

natural_image
Black metal frame with adjustable support structure (no text or symbols visible)CEL-401Q-120U
Celeb 401Q DMX Yoke Mount, Univ 120U
CEL-401Q-230U
Celeb 401Q DMX Yoke Mount, Univ 230U

CEL-401QP-120U
Celeb 401Q DMX Pole-Op, Univ 120U
CEL-401QP-230U
Celeb 401Q DMX Pole-Op, Univ 230U
Included w/ all Celeb 401Q Models
natural_image
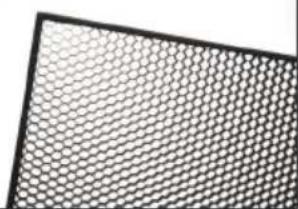
Close-up of a hexagonal lattice structure with uniform dark lines on a light background (no text or symbols)LVR-CE490-Q
Celeb 401Q Louver-Honeycomb, 90° (Included)
natural_image
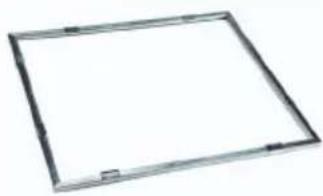
Simple rectangular frame with no text, numbers, or symbolsGFR-CE4-Q
Celeb 401Q Gel Frame (Included)
natural_image
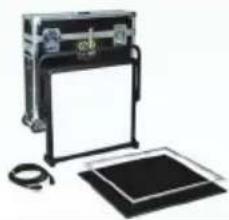
Exterior view of a black hardcover device with open lid and printed circuit board (no visible text or symbols)KIT-C401Q-120U
Celeb 401Q DMX Yoke Mount Kit, Univ 120U
KIT-C401Q-230U
Celeb 401Q DMX Yoke Mount Kit, Univ 230U
Kit Contents:
1 Celeb 401Q DMX Yoke Mount
1 Jr. Pin
1 Ship Case
Dimensions:
34.5×33×8"
(88 × 84 × 22cm)
Weight:
52 lb
(24kg)
Celeb 401Q DMX Control Panel
text_image
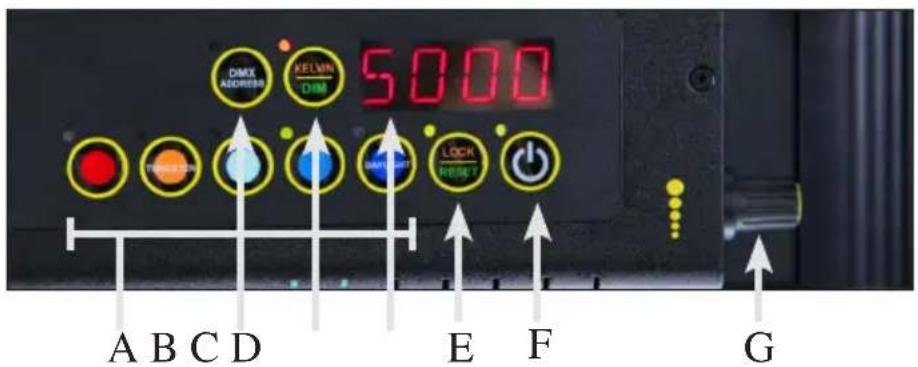
DMX ADDRESS KELVIN DMX 5000 TRANSFORM MOUNT LOCK FIRE A B C D E F GA) Kelvin Preset Buttons: Kelvin buttons come preset at the factory. Factory defaults left to right are: 2700K, 3200K, 4500K, 5500K, 6500K. User can also use these preset buttons to store custom Kelvin settings.
B) DMX ADDRESS – Use to set DMX address. The Celeb 401Q automatically assigns 2 channels. First Channel controls Dimming; Second Channel controls Kelvin.
C) KELVIN / DIM: In KELVIN mode, an amber light appears to the left of the button and Kelvin is displayed. Press the button again to change to DIM mode. In DIM mode, a green light will appear to the left of the button and Dim level is displayed.
D) Display: Provides Kelvin, Dim level and software revision data.
E) LOCK / RESET: In LOCK mode, an amber light is displayed to the left of the button. In RESET mode, the indicator light is green. To reset to factory presets, hold the LOCK / RESET button for 5 seconds.
F) On / Off: On = Green light displayed. Off = Amber light displayed.
G) Kelvin / Dimmer Knob: Manually adjusts Kelvin or Dim levels. Press the knob to toggle between fine and coarse adjustments.
Note: Each Celeb 401Q DMX fixture has an "AUTO TERMINATE" feature. The last fixture that does not have an XLR cable attached to the DMX "Out" port will automatically terminate.
IMPORTANT!
The dimmer board/light console should have its channel set to LINEAR light output response. (LINEAR response is the default setting on most dimmer boards.)
Fixture Power
natural_image
Close-up of a black electronic device with attached cables and ports, no visible text or symbols on the main subject.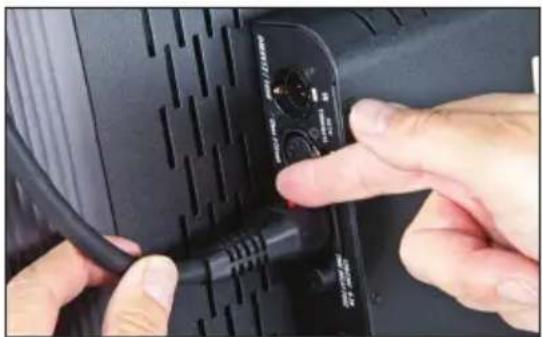
natural_image
Close-up of hands installing a black cable with a power connector (no visible text or symbols)AC Input
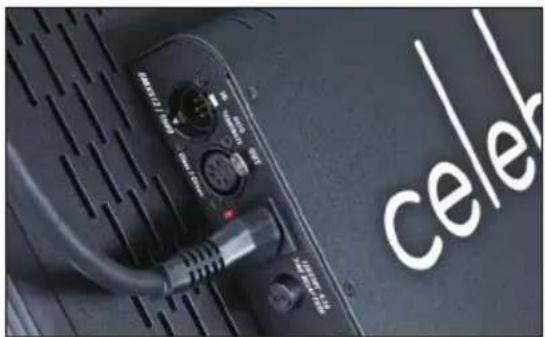
The Celeb is powered AC and includes an IEC connection. A locking power cord is included with the fixture. To remove the plug, move the red tab to release. The ballast has a built-in power supply with universal input from 100-240VAC.

natural_image
Close-up of a black handheld device with a dial and control knob, mounted on a dark surface (no visible text or symbols)DC Input
The Celeb can also be operated on 24VDC (input range 18-28VDC) through a 3-Pin XLR. A low voltage warning will display "LPWR" when the battery is running low.
The pin polarity is:
Pin #1 – Ground
Pin #2 + 18-28VDC
Pin #3 not used
Ambient Operating Temperature
The Celeb is designed to operate at temperatures from 14^ F to 104^ F ( -10^ C to 40^ C).
Start Up

text_image
DMX RESET DMX 1:002 RESET RESETWhen power is first applied to the fixture, the alphanumeric display shows the current software version.
text_image
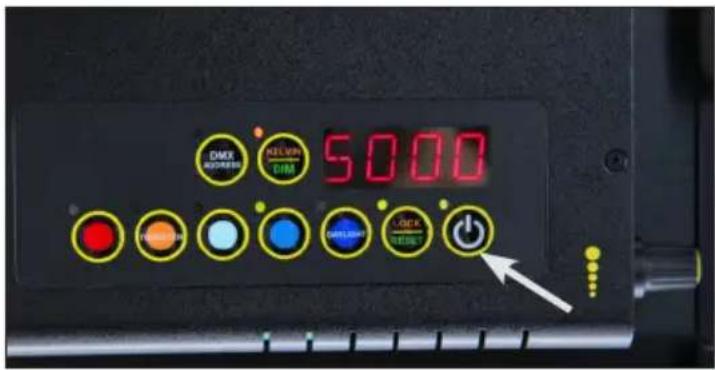
DMX AGENS KELVIN DIM 5000 OK RESET PowerPress the On/Off button to turn on the fixture. The display will show its last setting.
Kelvin Selection
text_image
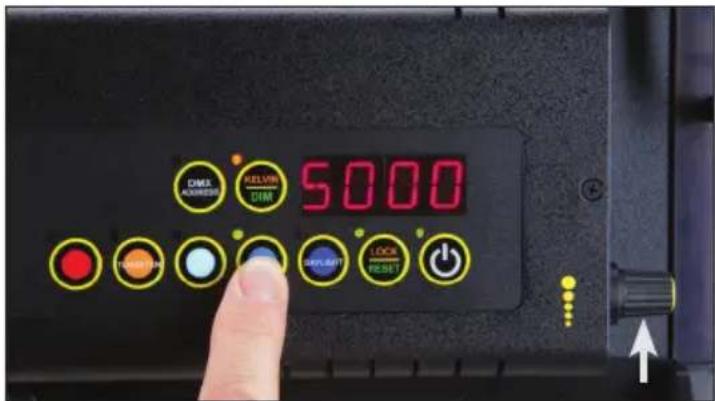
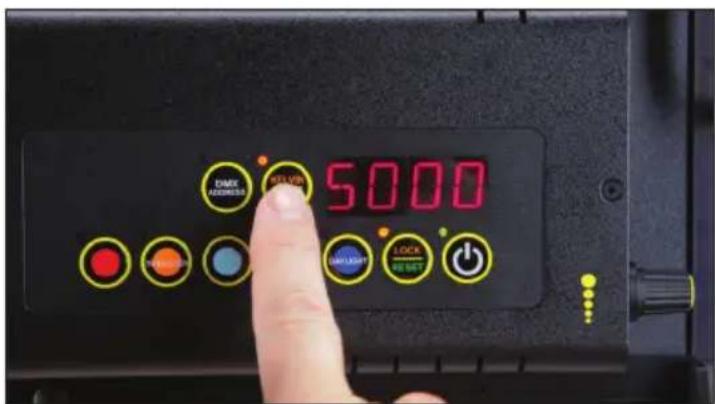
DMX ADDRESS KELVIN DIM 5000 RESET UPLENT LOCK RESET ↑There are 5 Kelvin factory preset buttons. Left to right they display 2700K, 3200K, 4500K, 5500K and 6500K.
A green indicator will light to the left of the active button.
Rotating the adjustment knob will change the Kelvin.
text_image
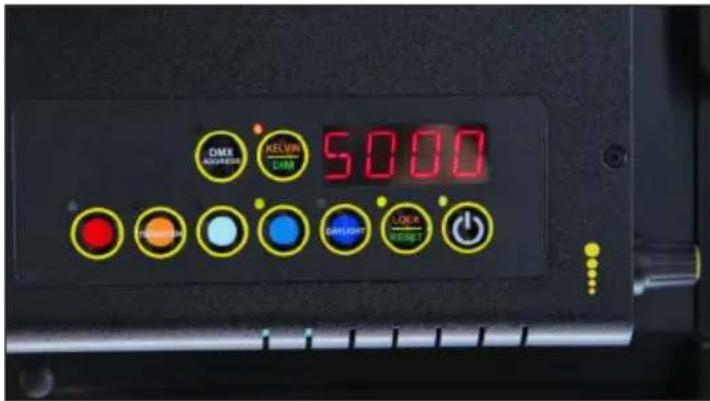
DMX KELVIN 5000 NAVLIGHT LOCK RESETPress the rotating knob once to shift the Kelvin profile from Coarse to Fine increments.
In the Coarse mode, the fixture can be adjusted in one rotation of the knob. In Fine mode, it will require 8 rotations for full range of adjustment.
Kelvin Custom Settings
text_image
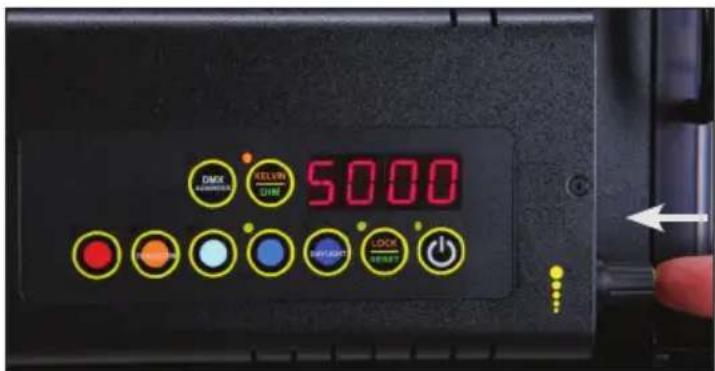
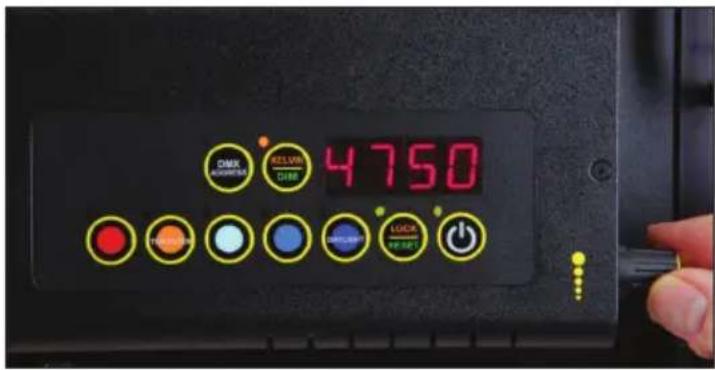
DMK ADAMS RELVM CHNG 4750 LUCK WHIP PowerIn KELVIN mode, the Kelvin can be fine tuned with the adjustment knob to custom settings between 2700K to 6500K.

text_image
DINX SELLIN LIVE 4750 OK RESETThe setting can be assigned to any preset button by holding down the desired button for 5 seconds.
The Kelvin display will flash once the setting is registered.
Note: When the power is turned off or removed, the fixture will remember its last setting.
Dimming

text_image
DIMCO ALUMERS KELVIN 100.0 FLIGHT LOCK RESET PowerPress the KELVIN / DIM button. The indicator light to the left of the button will turn green.
Rotating the adjustment knob will dim the light of the fixture.

text_image
DARK ADDRESS FILTER GHM 936 OK RESET PowerPress the rotating knob once to shift the Dim profile from Coarse to Fine increments.
In the Coarse mode, the fixture can be adjusted in one rotation of the knob. In Fine mode, it will require 8 rotations for full range of adjustment.
Reset Factory Settings

text_image
CMM ADDRESS KELVIN GMM 5000To reset factory settings, press and hold the LOCK / RESET button for 5 seconds.
The indicator light will turn green and the settings will reset to factory settings.
Lock Mode

text_image
DIMI RELIM DIMI 936Press the LOCK / RESET button to lock the Kelvin and Dim settings. An amber indicator will display in LOCK mode.

text_image
DMX SODDER RELVIN DIM LOCK HOLDEN CAP/RESET LOCK RESET ↑In LOCK mode, controls are disabled and LOCK will appear in the display.
To unlock, press the LOCK / RESET button again. The indicator light will turn green.
text_image
5000 DIME ADDRESS STATION CAN/CACT CAN/ BE SET OFFIn LOCK mode, you can toggle back and forth on the KELVIN / DIM button and review your Kelvin and Dim settings.
Note: When the power is removed, the fixture will reset to unlock.
DMX Operation
text_image
DIMR ADDRESS KELVIN DIM 5000 OFFICE LIGHT LOCK WIRET PowerThe Celeb 401Q DMX operates on two DMX channels using DMX512.
The first channel operates dimming; the 2nd channel operates Kelvin color temperature control.
Once an address is selected, the fixture automatically assigns 2 channels.
text_image
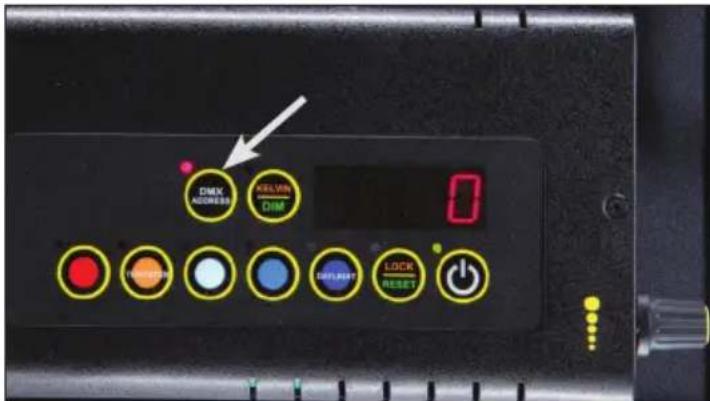
DMIX ADDRESS KELVIN DIM 0 SHIFT LOCK RESET +Press and hold the DMX ADDRESS button to select a DMX address. The displayed number will flash while in edit mode.

text_image
CMX ADAM SELVM DIM 1 2 3 4 5 6 7 8 9 LOCK RENEUR 10 ...Turn the dimming knob to select a valid address from 1-512. (Note: 0 or 513-999 are invalid addresses.)
Press the rotating knob once to shift between Fine (single digits) and Coarse (in 10th's) address selection.
text_image
SELECT ON OK SEND RENTTo save the DMX channel, press the DMX ADDRESS button again. When set, the displayed number will stop flashing.
Note: All Kelvin indicator lights will turn green if a valid DMX signal is present.
If a fixture loses its DMX signal, it will hold its last DMX command.
For this reason, it is important to turn a fixture off using the DMX commands.
For example, if you try to turn off the lights by turning off the dimmer board, the lights will remember their last DMX command and stay on. The fixtures require a DMX "Off" or "Black-Out" command in order to turn off.

text_image
TIME 0 0 LOCK PowerAll manual controls are disabled once the DMX cable is applied and DMX is turned on.
Note: To regain manual control with the DMX cable plugged in, set the DMX address to "0".

text_image
celeAUTO TERMINATE FEATURE
The Celeb 401Q DMX fixtures have an AUTO TERMINATE feature. The last fixture that does not have an XLR cable attached to the DMX "Out" port will automatically terminate.
Note: When operating fixtures at great distances from the dimmer board, it is recommended to use Opto-Isolators to provide DMX signal amplification.
Any theatrical lighting board with DMX512 protocol can be used to control the Celeb 401Q DMX fixture. The fixtures can be jumpered using the IN and OUT ports. As many as 100 fixtures can be jumpered on one chain as long as the DMX cable run remains under 1000 feet or 40 x 25ft DMX cables.
DMX Kelvin Dimmer Control
Kelvin Color Temperature – Dimmer level
When DMX is applied, the DMX signal will override the manual settings and the Celeb Kelvin temperature will default to 6500K and dim setting will be at 100%. Sliding the fader on the 1st channel will lower the light level. Sliding the fader on the 2nd channel will lower the Kelvin from 6500K to 2700K. (See chart on the following page for approximate Kelvin dimmer levels.). The fixture may respond ±4 slider channels, depending on the dimmer board.
| Celeb 401Q DMXKelvin Color TemperatureDimmer Level | |
| Kelvin Color Temperature | Dimmer Level |
| 6500K 100% | |
| 5500K 75% | |
| 4500K 50% | |
| 3200K 15% | |
| 2700K 0% | |
Note: The detailed DMX mapping for the Celeb 401Q DMX fixture can be downloaded from our website at www.kinoflo.com.
IMPORTANT!
The dimmer board/light console should have its channel set to LINEAR light output response. (LINEAR response is the default setting on most dimmer boards.)
DMX Cables

natural_image
Coiled black cable with connectors, no visible text or symbolsDMX Cables
The Celeb 401Q DMX fixtures use five-pin XLR male and female connectors to receive DMX signals from the Dimmer Board and jumper the fixtures in a series. DMX pin-out wiring follows the USITT DMX512 standard:
Pin 1: Shield
Pin 2: Data -
Pin 3: Date +
Pin 4: Spare –
Pin 5: Spare +
Note: Pin four and five in the fixture are connected internally as Pin four to four and Pin five to five. Connecting Pin four and five as the pass-thru allows secondary data to be passed through other equipment.
Do not use Microphone Cables and other general purpose, two-core cables designed for audio or signaling use. They are not suitable for DMX512. Problems due to incorrect cabling may not be immediately apparent. Microphone Cables may appear to work fine, but systems built with such cables may fail or be prone to random errors. Cable must comply with EIA-485 (RS485).
Celeb 401Q Wireless Operation
The Celeb 401Q includes a built-in Lumen Radio receiver and can be operated wirelessly with a Lumen Radio transmitter (sold separately). Wireless is an option to using DMX cables. Set DMX address as previously instructed on p. 8. For more information on Lumen Radio Receiver/Transmitter, see www.LumenRadio.com.
text_image
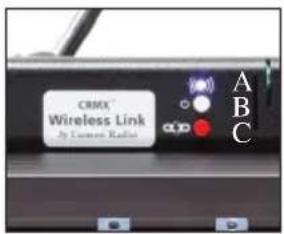
CRISX® Wireless Link by Canadian Radiator A B CA) Signal Strength Indicator:
| Blue On - Wireless Enabled/Unlinked | |
| Green 100% - 60% | |
| Orange 59% - 20% | |
| Red Less than 10% |
B) Power/Wireless (white): On/Off
C) Unlink (red): Hold for 3 seconds to unlink
Note: Fixture must be powered on and Power/Wireless must be in "On" position. In addition, transmitter must be connected to a DMX controller with a valid DMX output.

natural_image
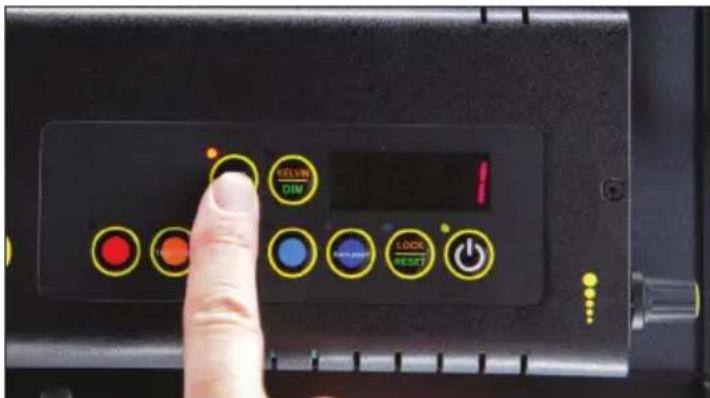
Close-up of a black electronic device with indicator lights and control buttons (no readable text or symbols)Press the white Power/Wireless button. A blue light indicates fixture is ready to link to transmitter.
Note: The transmitter will not link to the fixture if the Power/Wireless button is not on.

text_image
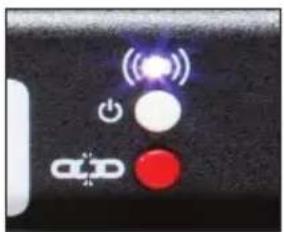
Camera control panel with radio buttons and indicator lightsPress the link/unlink button on the transmitter to link to the Celeb 401Q. A fast red blinking light is displayed while searching for signal. A slow green blinking light* displays when linked.
A solid green light* is displayed when linked and DMX data is present with a strong signal.
Note: Fixture should only receive DMX wirelessly or through DMX cables, not both. Otherwise, the fixture will not respond properly.
*Green, Orange or Red light indicates signal strength.
natural_image
Close-up of a black electronic device with indicator lights and control buttons (no readable text or symbols)To unlink from the fixture: Press and hold the red unlink button for 3 seconds. A blue light is displayed when unlinked.
To unlink from the transmitter: Press and hold the link/unlink button for 3 seconds. This will unlink all powered fixtures linked to the transmitter.
Note: When power is removed from fixture, it will remember its linked/unlinked state.
Tips:
DMX fixtures without wireless capability can be daisy chained with DMX cables to the wireless "linked" fixture.
Keep antenna upright. Maintain line of sight. Elevate unit above crowds. Elevation above ground increases range. Keep away from large metal objects.
Yoke Mount
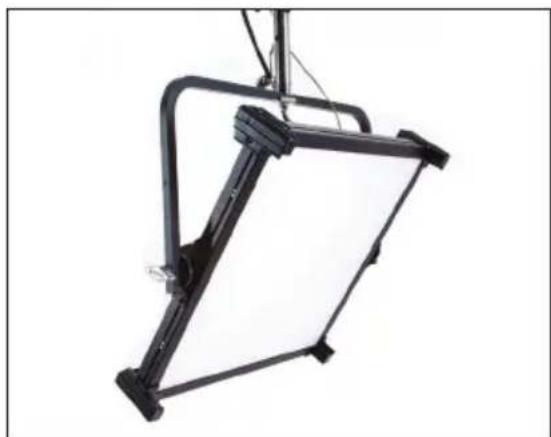
natural_image
Black studio lighting fixture with adjustable frame and stand (no text or symbols visible)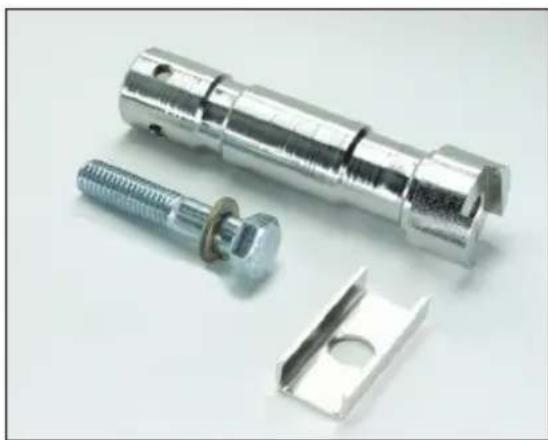
natural_image
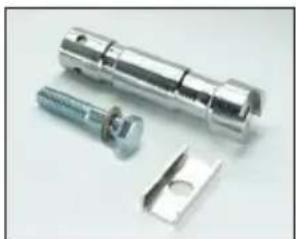
Three metallic mechanical components: a threaded bolt, a hexagonal nut, and a flat bracket (no text or symbols visible)MTP-180
The yoke has a 12 " hole to accept industry standard mounting hardware.
The Celeb 401Q Yoke Mount fixture can hang from a grid by a junior pipe hanger using a Junior Pin Assembly for Yoke (MTP-I80), sold separately.
Note: The yoke also provides an attachment point for a safety chain.
Pole-Op

natural_image
Black and white photo of a floating device labeled 'celeb 4010' suspended from a vertical pole, with no visible text or symbols on the device itself.The Celeb 401Q Pole-Op fixture includes a yoke with an attached junior pin. It can be hung from a grid with a Junior pipe hanger.
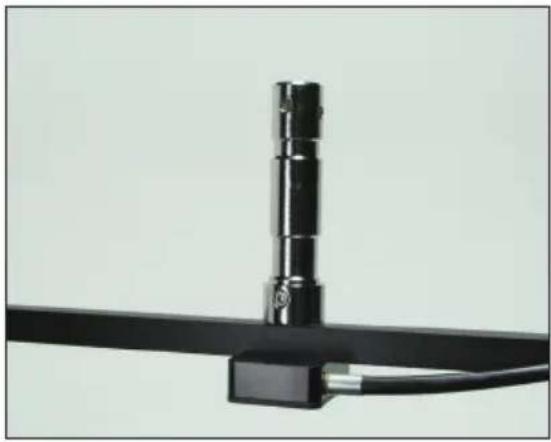
natural_image
Close-up of a black cable with a metallic connector and cable, no visible text or symbolsJunior pin attached to Pole-Op Yoke
Operating Pole-Op
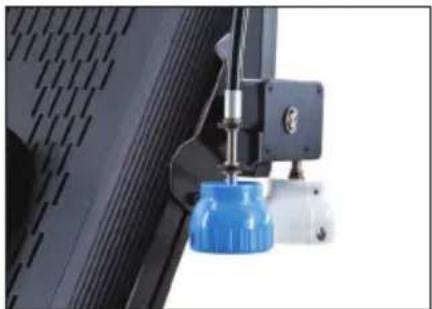
natural_image
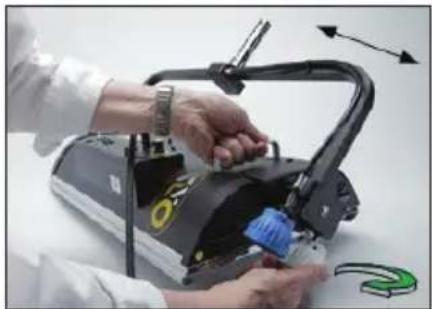
Close-up of a blue plastic bottle mounted on a black industrial machine (no visible text or symbols)The Blue cup alters the Pan (left or right). The White cup alters the Tilt (up or down).
natural_image
Person assembling a mechanical device with a blue plastic component, showing motion arrows (no text or symbols visible)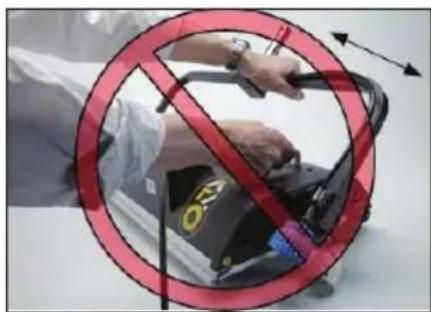
text_image
Prohibition sign with red prohibition symbol over a device, indicating no protection or anti-protectionWarning!
Do not pull yoke to adjust tilt.
Turn the white knob counter clockwise to angle the yoke 90^ . (ParaBeam shown for illustration purposes only.)
Mount Option/Rope Hang

natural_image
Close-up of a black mechanical device with attached suspension rings against an orange background (no visible text or symbols)Accessory holders are also designed to enable 4-point rope hangs for specialty rigging applications.
Applying Gel to Frame
natural_image
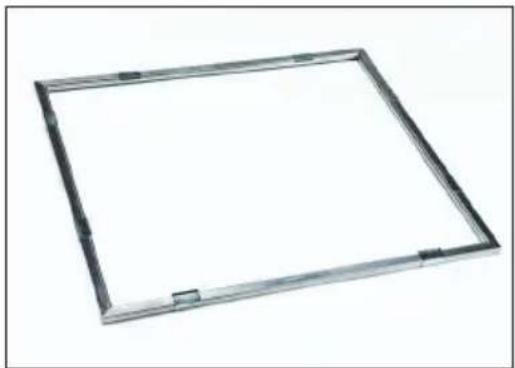
Simple rectangular frame with metallic edges and small corner marks, no text or symbols present.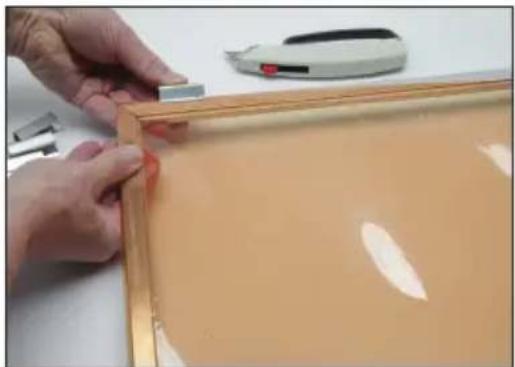
natural_image
Close-up of hands installing or adjusting a wooden panel with a tool, no visible text or symbols
natural_image
Hand using a blue tool to cut or mark a transparent sheet, with other buttons visible (no text or symbols)Option 1 - The Gel Frame comes with gel clips. Cut the gel to size and use the clips to fasten the gel to the frame.
Option 2 – Apply transfer tape directly to the Gel Frame. The clips are not necessary when taping the gel.
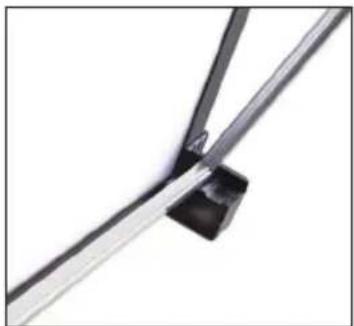
Inserting Gel Frame and Louver
natural_image
Close-up of a metal bracket with diagonal bracing and a small black clip (no text or symbols visible)
natural_image
Person in protective suit handling a mechanical device with a curved bracket (no visible text or symbols)
natural_image
Person installing or adjusting a large purple mesh panel outdoors (no text or symbols visible)The Celeb includes spring loaded accessory holders and two channels to hold the Gel Frame and Honeycomb Louver.
Place the long edge of the Gel Frame or Honeycomb Louver into the lower channel. Press down on the left and right corners of the Gel Frame or Louver and slip the upper edge into the upper channel of the fixture. To remove, reverse the procedure.
Note: Do not press down along the top center portion of the Gel Frame or Louver. Doing so may deform the Gel Frame or Louver over repeated usage.
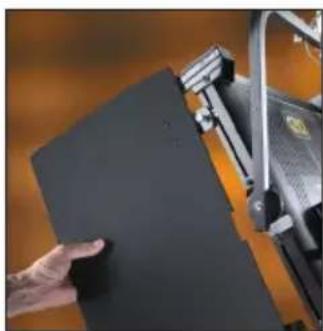
Inserting Barndoors
natural_image
Close-up of a hand interacting with a black rectangular object, possibly a printer or mechanical device (no visible text or symbols)
natural_image
Close-up of a mechanical assembly with black components and mounting holes (no visible text or symbols)
natural_image
Close-up of a hand holding a small object next to a black electronic device (no visible text or symbols)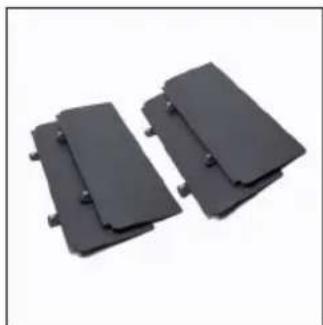
natural_image
Two black plastic clip components with mounting holes, shown against a white background (no text or symbols)BRD-CE4-Q
Position the barndoors alongside the extruded edge of the fixture. Align the thumbscrews with the adjustable receptacle holes in the fixture and insert into place. Lock the barndoors by turning the silver thumbscrew.
To remove, reverse the procedure.
For replacement screws, use M5 Metric size screws.
Note: To adjust the placement of the receptacle holes, use a pointed tool (such as a pen) to slide the holes within the extruded edge.
Troubleshooting
| Display | Protection Condition Description | Normal Condition Cause/Solution | |
| OCP Over | Current Protection Shut down current 2.52A in excess of 20% | 2.1A @ 100% dim Repair Service Center | |
| OVP Over | Voltage Protection Shut down voltage @ excess 30V | Below 28V Wrong Battery or 24V Battery w/ too high Open Voltage | |
| UVP Under Voltage Protection Shut down voltage @ below 17V | Excess 18V Dead Battery | ||
| OTP Over | Temperature Protection Shut down temp @ 120°C (LDM board side) | Below 120°C @ LED array | Cool Down |
| OPP Open | Protection Open circuit No open Repair Service | Center | |
| SCP | Short Circuit Protection Short circuit | No short | Repair Service Center |
Troubleshooting continued
Can't set the DMX address.
You must Press and Hold the DMX Address button for 3 seconds in order to select an address. The display will flash while in edit mode. Select a valid address from 1-512. (Note: 0 or 513 and higher are invalid addresses.)
Can't operate the fixture manually with the DMX cable plugged in.
Two Options:
Set DMX address to "0" or disconnect cable and turn power off and on.
Can't link to wireless transmitter.
Fixture must be receiving power. Power/Wireless button must be in the "On" position and blue light must be displayed.
Accessories

natural_image
Two dark plastic clip components with mounting holes, shown against a plain white background (no text or symbols visible)BRD-CE4-Q Celeb 401Q Barndoors (Set of 4)
natural_image
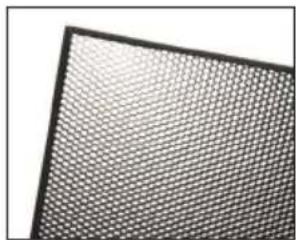
Close-up of a textured grid-patterned surface with no visible text or symbolsLVR-CE460-Q Celeb 401Q Louver-Honeycomb, 60°
natural_image
Two metallic mechanical components with threaded fasteners, one being cut and one partially assembled (no text or symbols visible)MTP-I80 Junior Pin Assembly for Yoke (28mm)
natural_image
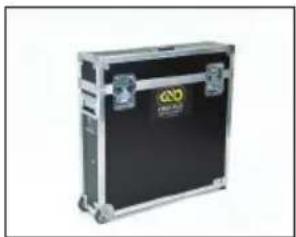
Exterior view of a black and silver metal automotive clutch case with visible mounting brackets (no text or symbols)KAS-CE4-Q Celeb 401Q Yoke Ship Case
natural_image
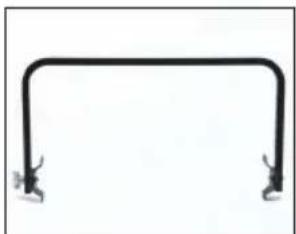
Simple black line drawing of a U-shaped pipe or channel with two side connectors (no text or symbols)7010048 Celeb 401Q Yoke Assembly
natural_image
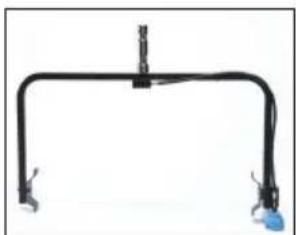
Simple black pipe with two blue connectors at ends, no text or symbols visible7010049 Celeb 401Q Pole-Op Assembly
Fixture Specifications
natural_image
Black metal frame with adjustable support structure (no text or symbols visible)Celeb 401Q DMX Yoke Mount
CEL-401Q-120U
Celeb 401Q DMX Yoke Mount, Univ 120U
AC Input Voltage: 100\~240VAC 50/60Hz, 210W
Amperage VAC: 1.8A at 120VAC
DC Input Voltage: 18\~28VDC, 198W
Amperage VDC: 8.25A at 24VDC
Kelvin Range: 2700K\~6500K
Dimming Range: 100% \~ 1%
Weight: 24 lb (11kg)
Dimensions: 30 x 26 x 5"
(72 × 66 × 13cm)
CEL-401Q-230U
Celeb 401Q DMX Yoke Mount, Univ 230U
AC Input Voltage: 240\~100VAC 50/60Hz, 207W
Amperage VAC: 1.0A at 230VAC
DC Input Voltage: 18\~28VDC, 198W
Amperage VDC: 8.25A at 24VDC
Kelvin Range: 2700K\~6500K
Dimming Range: 100% \~ 1%
Weight: 24 lb (11kg)
Dimensions: 30 x 26 x 5"
(72 × 66 × 13cm)

natural_image
Black electronic device with visible ports and connectors (no readable text or symbols)Celeb 401Q DMX Pole-Op
CEL-401QP-120U
Celeb 401Q DMX Pole-Op, Univ 120U
AC Input Voltage: 100\~240VAC 50/60Hz, 210W
Amperage VAC: 1.8A at 120VAC
DC Input Voltage: 18\~28VDC, 198W
Amperage VDC: 8.25A at 24VDC
Kelvin Range: 2700K\~6500K
Dimming Range: 100% \~ 1%
Weight: 26 lb (12kg)
Dimensions: 30 x 30.5 x 5"
(76 × 77.5 × 13cm)
CEL-401QP-230U
Celeb 401Q DMX Pole-Op, Univ 230U
AC Input Voltage: 240\~100VAC 50/60Hz, 207W
Amperage VAC: 1.0A at 230VAC
DC Input Voltage: 18\~28VDC, 198W
Amperage VDC: 8.25A at 24VDC
Kelvin Range: 2700K\~6500K
Dimming Range: 100% \~ 1%
Weight: 26 lb (12kg)
Dimensions: 30 x 30.5 x 5"
(76 × 77.5 × 13cm)
FCC Part 15 Verification:
This device complies with Part 15 of the FCC Rules. Operation is subject to the condition that this device does not cause harmful interference.
FCC Part 15 Declaration of Conformity:
This device complies with Part 15 of the FCC Rules. Operation is subject to the following two conditions: (1) this device may not cause harmful interference, and (2) this device must accept any interference received, including interference that may cause undesired operation.

KINO FLO, INC
Celeb 201, Celeb 401
ID: XRSCRMXTIMO101
IC: 8879A-CRMXT101
For latest Warranty information and Certifications, see Kino Flo website at www.kinoflo.com.
Environmental: Disposal of Old Electrical & Electronic Equipment.

This symbol on the product or on its packaging indicates that this product shall not be treated as household waste. This product is made of recyclable materials and should be disposed of in accordance with governmental regulations.