
PLCMTRDVR41 - Rear Camera Pyle - Free user manual and instructions
Find the device manual for free PLCMTRDVR41 Pyle in PDF.

| Product Type | Rear View Monitor with DVR |
| Brand | Pyle |
| Model | PLCMTRDVR41 |
| Display | 7" Digital LCD, 16:9 aspect ratio |
| Display Resolution | 800 x RGB x 480 pixels |
| Video Standard | PAL & NTFS |
| Video Compression | MOTION JPEG |
| Recording Channels | 4 channels (CH1-CH4) |
| Recording Speed | 30 FPS |
| DVR Image Resolution | 640 x 480 pixels |
| Storage Media | SD card (max 32 GB) |
| Power Supply | DC 12V - 24V |
| Working Temperature | 0°C to 60°C |
| Storage Temperature | -10°C to 70°C |
| Dimensions | 180 x 121 x 24 mm |
| Weight | 0.63 kg |
| Audio Input | 1 channel, 4-pin or RCA connector |
| Trigger Input | 4 triggers (CH1-CH4) |
| Built-in Battery | Yes, on PCB board |
| Remote Control | Included |
| Sunshade | Included |
| Bracket | U-shape iron bracket or stand bracket |
| Included Accessories | Cables, remote controller, manual, 15m extension cable |
Frequently Asked Questions - PLCMTRDVR41 Pyle
User questions about PLCMTRDVR41 Pyle
0 question about this device. Answer the ones you know or ask your own.
Ask a new question about this device
Download the instructions for your Rear Camera in PDF format for free! Find your manual PLCMTRDVR41 - Pyle and take your electronic device back in hand. On this page are published all the documents necessary for the use of your device. PLCMTRDVR41 by Pyle.
USER MANUAL PLCMTRDVR41 Pyle
natural_image
Two black rectangular electronic devices displaying a landscape photo with navigation buttons and control buttons, alongside a small inset image of a blue 'BASF' card.Content
(manual)......Error! Bookmark not defined.
Notice....2
product function and Application......Error! Bookmark not defined.
product function 3
Product Application......Error! Bookmark not defined.
Product description....4
panel operational specification....4
Backboard function......Error! Bookmark not defined.
Connection 6
Remote control function....7
Operating instructions....8
Main interface instructions....8
Menu operation....8
Playback interface....11
Accessories....12
Product maintenance......Error! Bookmark not defined.
Product maintenance......Error! Bookmark not defined.
Notice......Error! Bookmark not defined.
Notice
For your safety, don't watch video or operate monitor when driving. Non-professionals don't dismantle the product without permission. Please consult after service agency or send it to the local service department when product in failure.
Caution: Please install the product in legal position; we disclaim any legal liability due to incorrect installation.
Attention: When in cold weather, there appears dark screen during starting up. The display screen will slowly resume to normal with the increasing temperature after power on.
Product function and Application
• 7" Digital LCD panel, 16:9 display
• Resolution:800*R.G.B*480
- Panel key : touch button
- Remote control
- System language: English, Simplify Chinese, Traditional Chinese
• System resource:4 ways real time record
• Video standard: PAL & NTSC
• Image compression: MOTION JPEG
• Video compression: AD PCM
• AV format :AV record the real time
• video record: Automatic
• Searching by: file name .time
• 4 channel with 4 pin connector or RCA connector (optional)
• Audio input 1 channel with 4 pin connector or RCA connector
• Display Single. Quad picture
• DVR image: 640*480
• recording Speed: 30 FPS
• Video Save: SD card support 32G
- Local playback : support
- Trigger input :4 triggers
• one battery built in PCB board
• Power supply: DC-12V -24V
• Working temperate: 0°C\~60°C
- Bracket: U shape iron bracket or stand bracket
- sunshade
• Storage temperate: -10°C \~ 70°C
- 180mm*121mm*24mm Dimension: 180mm*121mm*24mm
- weight:0.63KGS
Product Application
This product adopts digital TFT panel display real-time monitoring of high definition, the SD card storage medium. The monitor built in DVR single image recording or quad image recording function. Support one audio recording, with speaker and remote control, easy to be installed in different kinds of vehicles. With on radiation, low consumption, beautiful and vivid image, nice panel, adjustable pole distance etc features.
Product description
panel operational specification
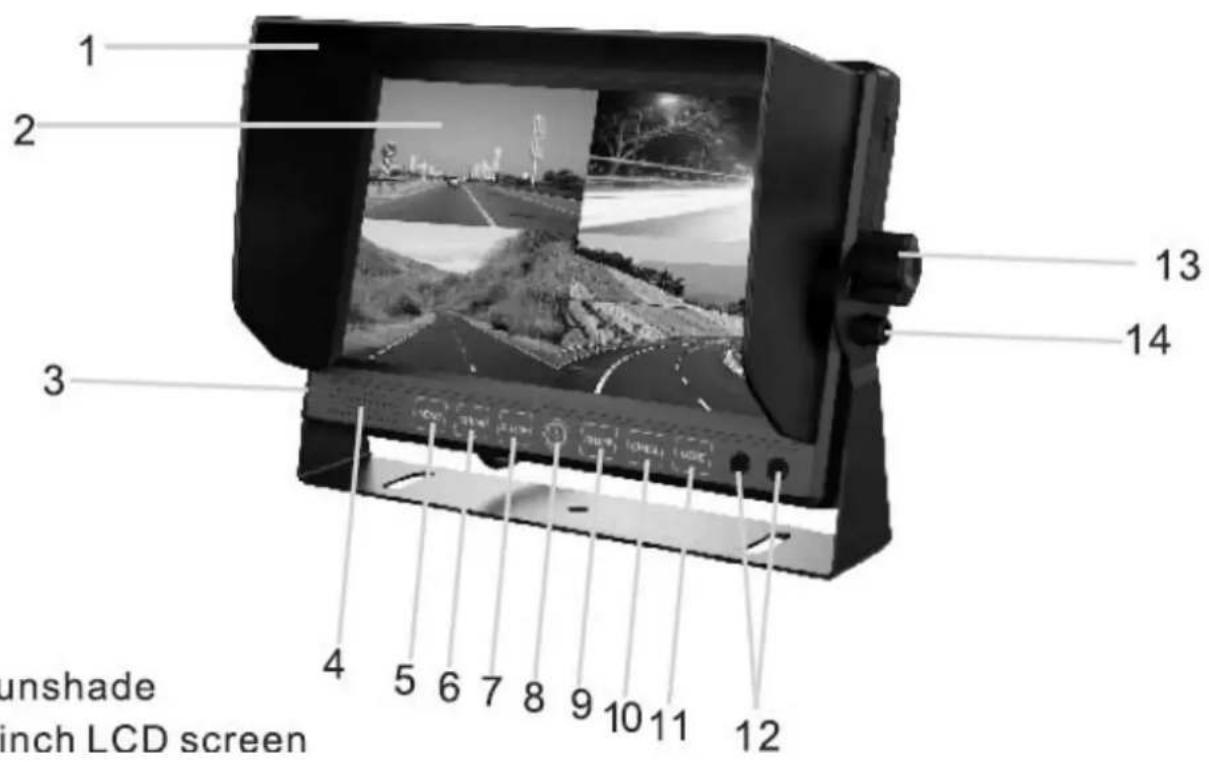
. Sunshade
. 7 inch LCD screen
1) sunshade
2) 7 inch LCD screen
3) DVR indicator light: Blue is power on, flash red is recording
4) Loud speaker
5)

Menu key:pasue recording . return back in menu and playback status
6)

CH1 Key: Enter CH-1, select left in menu, Select last song in playback
7)

CH2 : Enter CH-2, select right in menu. Select next song in playback

POWER: when power on, recording /stop recording switch. Long press power key to three seconds can turn off monitor. Short press power key can turn on monitor. To choose play /pause in menu status. Long press power key to ten seconds can reset system
8)

CH3: Enter CH3, Select down direction in menu status. It's volume decrease in status
9)

CH4: Enter CH4, select up direction in menu status. It's Volume increase in status
10)

Mode: quad images button To choose the volume decrease/ play /pause in status
11) Remote window
12) Plastic screw
13) screw
14) screw
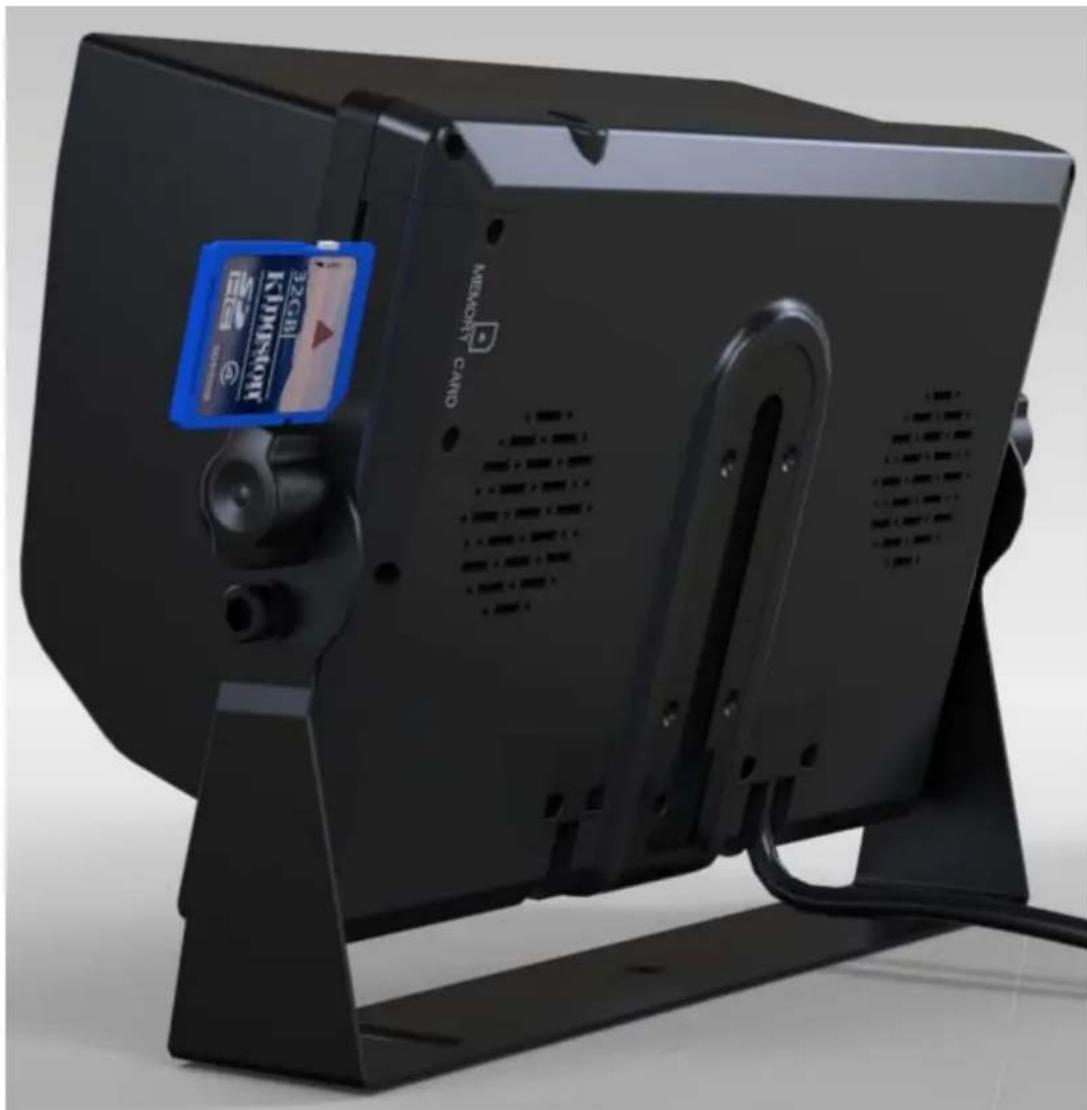
□ SD card slot
3、Connection
4 PIN
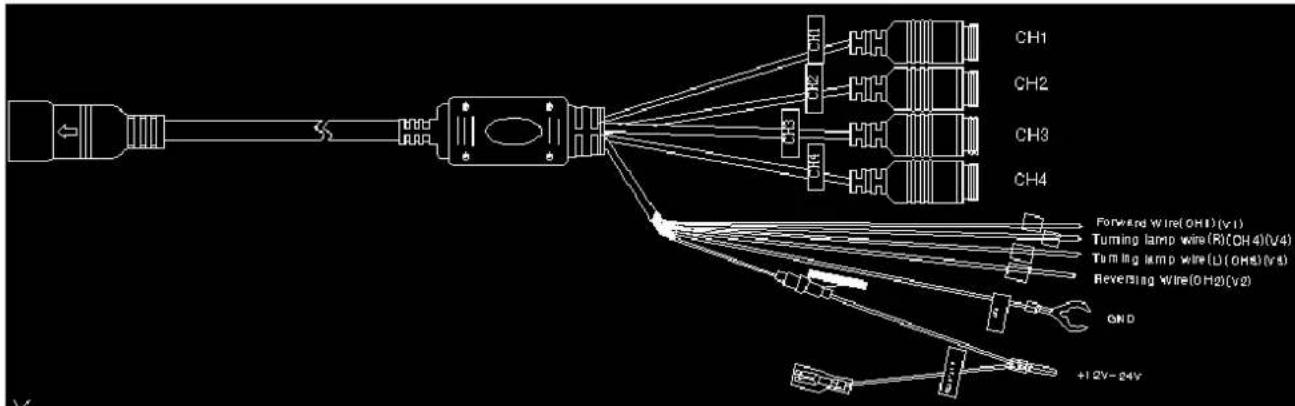
Red: DC 12V /24V power supply
Black wire: ground
Brown wire: CH1 trigger
Green wire: CH2 trigger
Blue wire: CH3 trigger
Grey wire: CH4 trigger
1、CH1:V1 signal input
2、CH2: V2 signal input
3、CH3: V3 signal input
4、CH4: V4 signal input
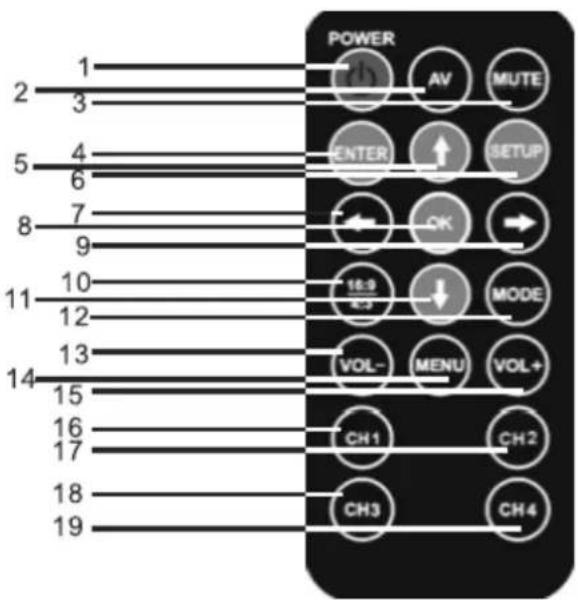
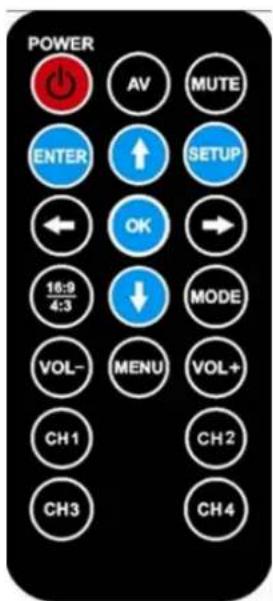
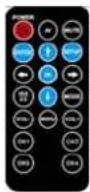
Remote control function
-
Turn on/off power
-
Switch at CH1/CH2/CH3/CH4
-
Sounds off
-
Enter: when DVR operating, switch at record & playback
-
UP: When DVR operating, select up
-
When DVR operating, can select menu set. To exit in menu status. Return video file list in playback.
-
Left direction key: select left .last song in playback status
-
OK key: recording / stop recording switch in recording status. Confirm in menu status. Play / pause in playback status
-
Right key: Select right in menu status. Next song in playback status
-
16:9 / 4:3 key, Switch aspect ratio
-
Down direction key: Select down direct i o n
-
MODE Key: Switch image effect mode
-
VOL - Key: decrease the sound, decrease analogy quantity
-
MENU key: To enter menu
-
VOL+ key: Increase the sound, increase analogy quantity
-
CH1 key: Enter CH1
-
CH2 key: Enter CH2
-
CH3 key: Enter CH3
-
CH4 key: Enter CH4
Operating instructions
1.Main interface instructions
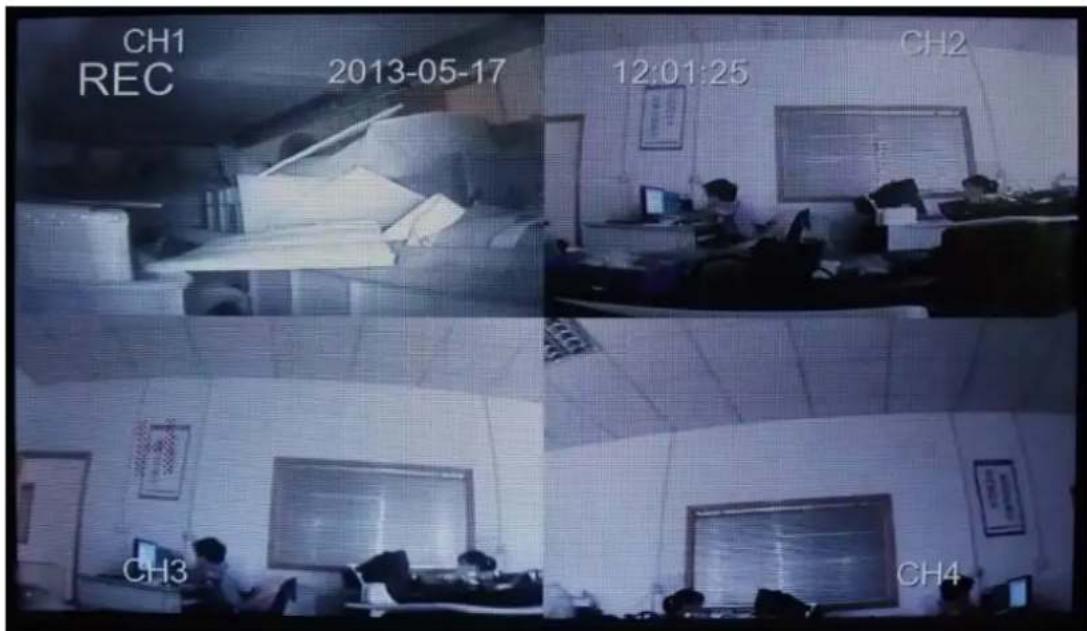
1) CH1/CH2/CH3/CH4: CH1/CH2/CH3/CH4 channel display
2) 2013-05-17 12:01:25 : Real data and time display
3) REC instruction: recording when "REC" in red word. Recording stopped when "REC" in white word
4) A single video amplification

2、Menu operation
1) Press the “MENU”key on remote control to set “Contrast”
“Brightness” “Saturation” menu, then press “◀” and “◀” to set the parameter
2) Press the “VOL+” key on remote control to set the volume. Press the “MUTE” key on remote control to set mute
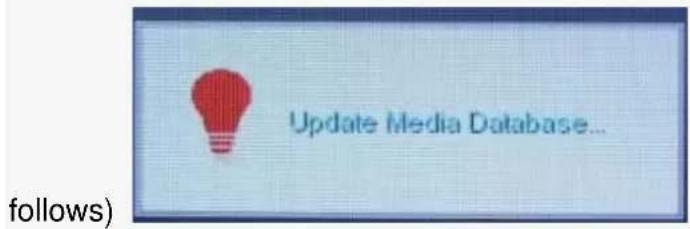
3)Setting :Press the“SETUP”key on remote control to enter the main menu, Before entering the main menu will have a waiting process, ( see figure as
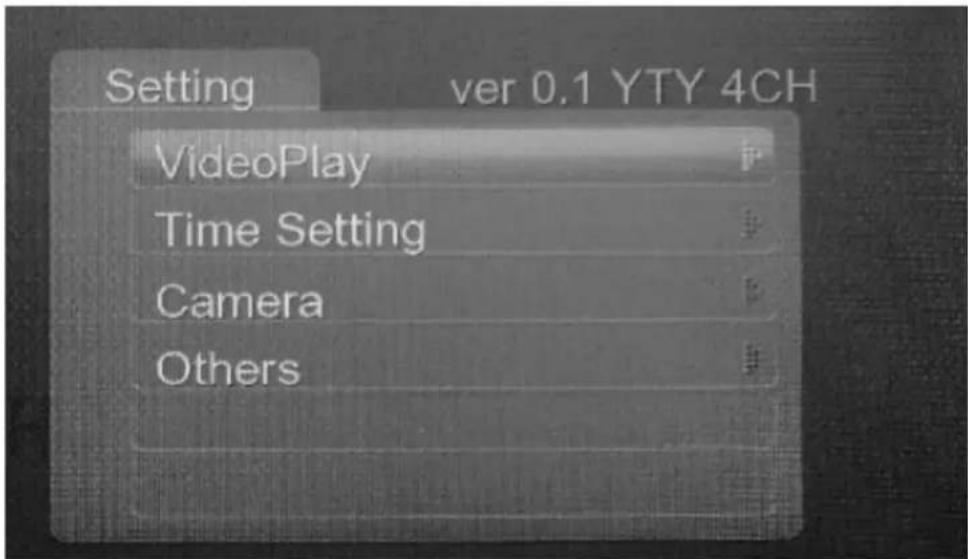
- Video play: Enter videoplay menu( see figure as follows), select the video and play video by remote controller to playback
- Time Setting: Enter the menu of Time setting (see figure as follows).user can set the date and time then save the setting.
| Year | 1900 |
| Month | 08 |
| Date | 04 |
| Hour | 00 |
| Minute | 15 |
| Exit |
- Camera: Enter the menu of the camera set (see figure as follows), to select the target channel (current view or all channels). (Notice: change the set of the recording channel will occupy memory large space; the system will be reset after exit the camera set. Recording Time min(s): Enter the menu of REC Time min(s); select the recording time from 3 minutes to 10 minutes to set for
every recording video.

- Others: Enter the menu of the others (see figure as follows), select the language "English" "Simplify Chinese" "Traditional Chinese" to set your desire Revise delay: Enter the menu of the revise delay, select the revise delay "off" "2 Second" "3 Second" to set your desire

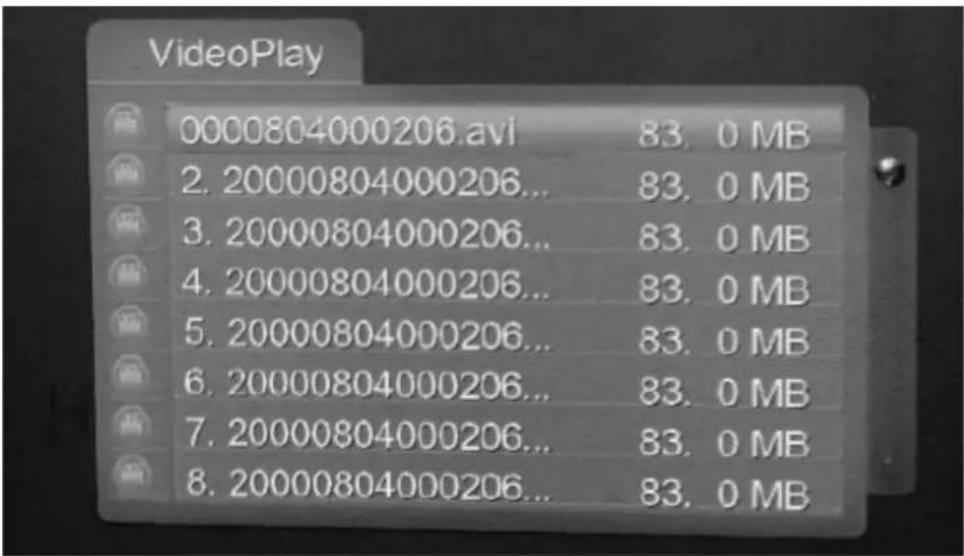
3、Play Back:

Enter the main menu ,to select your desire video to play in video play list
1) CH1/CH2/CH3/CH4 channel
2) 2013-05-17 11:49:23: REC real time and date
3) 00:00:01 : The current video file playback time display
4) 20130517114519: Playback file name
5) 00:06:40: The total time of current playback of video files
6): System volume display
The user can do some setting such as play/puause, last song, the next song and return etc operation on panel keys or remote controller. Operation details please above Product description
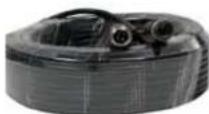
六、Accessories
1、cable

natural_image
Coiled black cable and wire connectors on a plain surface (no text or symbols visible)2、remote controller
3、manual
4 Extension cable 1 pcs 15 meter cable
Brand : Pyle
Model : PLCMTRDVR41
Category : Rear Camera