
PLCMTR7250 - Rear Camera Pyle - Free user manual and instructions
Find the device manual for free PLCMTR7250 Pyle in PDF.

| Product Type | Waterproof Rearview Backup Camera & Video Monitor System Kit |
| Brand | Pyle |
| Model | PLCMTR7250 |
| Category | Rear View Camera System |
| Display Size | 7 Inches |
| Camera Type | Angle Adjustable Night Vision Cam |
| Night Vision | Yes (Infrared) |
| Waterproof Rating | IP68 (Estimated, based on description "Waterproof") |
| Viewing Angle | 170° (Typical for such cameras, not specified) |
| Mounting Type | Front and Rear Vehicle Mounting |
| Monitor Resolution | 800x480 (Typical for 7" monitors, not specified) |
| Video Input Channels | 2 (CH1 and CH2) |
| Reverse Trigger | Yes, CH1 camera priority when reverse gear engaged |
| Image Adjustment | Color, Brightness, Contrast via Menu button; Left/Right flip via dedicated button |
| Power Supply | 12V DC from vehicle battery via wiring harness |
| Cable Length | Approx. 16 ft (Extension cables included, not specified) |
| Stand Material | Metal buckle and plastic mount stand |
| Color | Black (Typical for such system) |
| Weight | Approx. 2.2 lbs (estimated) |
| Dimensions (Monitor) | 7.5 x 5.0 x 1.5 inches (estimated) |
| Safety Warnings | Professional installation required; do not watch while driving; do not disassemble |
| Maintenance | Clean camera lens with soft cloth; avoid abrasive materials |
| Package Contents | Camera, monitor, mount stand, extension cables, wiring harness, hardware |
| Warranty | Limited warranty (contact support for details) |
Frequently Asked Questions - PLCMTR7250 Pyle
User questions about PLCMTR7250 Pyle
0 question about this device. Answer the ones you know or ask your own.
Ask a new question about this device
Download the instructions for your Rear Camera in PDF format for free! Find your manual PLCMTR7250 - Pyle and take your electronic device back in hand. On this page are published all the documents necessary for the use of your device. PLCMTR7250 by Pyle.
USER MANUAL PLCMTR7250 Pyle
Waterproof Rearview Backup Camera & Video Monitor System Kit, Angle Adjustable Night Vision Cam, 7" Display, Front and Rear Vehicle Mounting
Please read instructions carefully before installation and use. Installation should be performed by a professional installer. To ensure your safety, the driver should not watch videos or operate features on the monitor while driving. There are no serviceable parts in this unit, do not disassemble or try to repair this unit. If the unit malfunctions please return to your vendor or send to a Pyle repair facility. Please observe and obey the local laws and regulations when installing the unit.
Upon Installation, please make sure as to not to interfere with any of the vehicle's safety features, wiring, components, etc. We are not responsible for any damages, injury, malfunctions or otherwise noted due to faulty or non-professional installation.
Connection
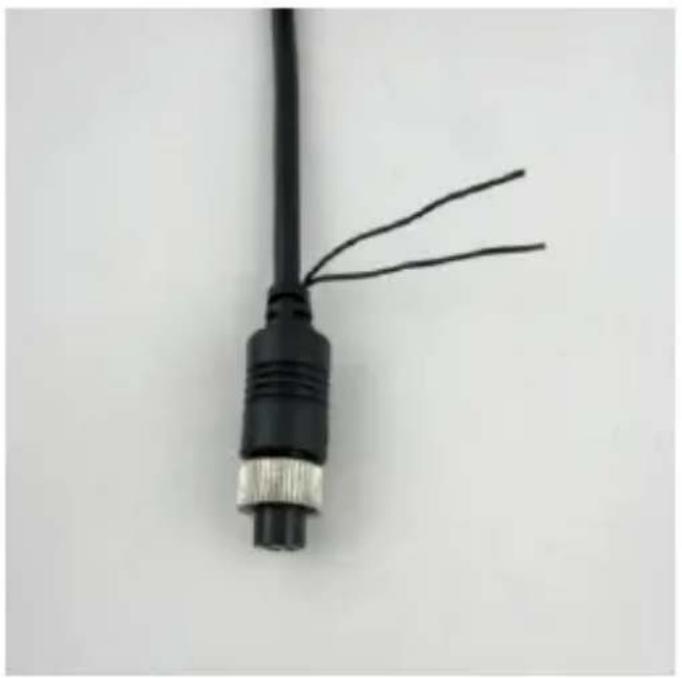
Connect the camera's threaded locking 4-pin cable connectors into the female receiving connection of the included 4-pin extension cables. The extension cables then connect to your compatible video monitors with 4-pin receiving connectors. The threaded locking cable connectors of the camera serve to provide power and video for all cameras.
Please remember to disconnect your vehicle's battery prior to any connection / installation. Use the included wiring harness to provide power and video signals to your monitor. There are colored wires to assist in the video camera system setup. See the wiring diagram for connections between cameras, monitor and your vehicle.
Versatile Mounting Installation
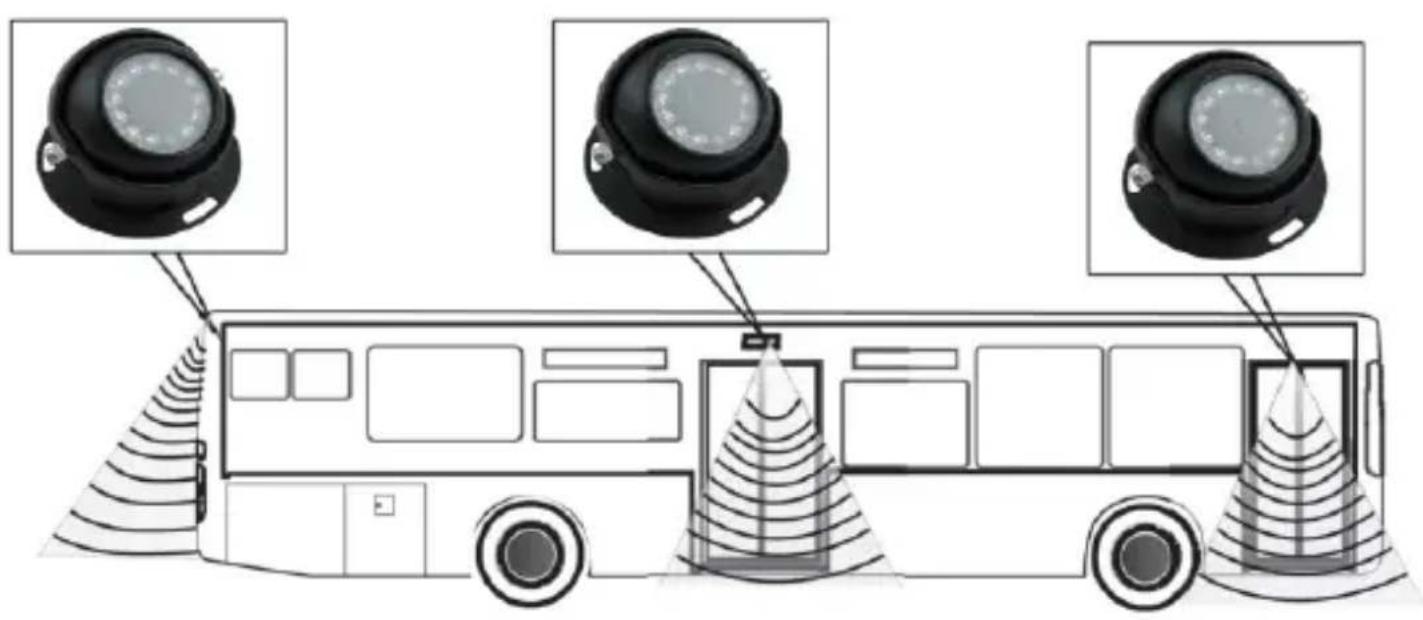
Wiring & Connection

The Reverse trigger cable is for the Ch1 and Ch2, connect the front view camera to the Ch2, connect the reverse backup camera to the Ch1, when the truck in reverse status, the reverse camera would be priority.
Cut for Reverse View: Connect for Front View:
natural_image
Close-up of a black cable with two wires extending from it, no text or symbols visible
natural_image
Close-up of a black cable with a metallic strap and connector, isolated on white background (no text or symbols)Monitor Buttons:

- V1/V2: change the mode, 1 ch, 2ch display
- This button for reverse the picture image left and right
- Menu: Adjust the color, brightness, etc.
- Power button
- Increase/Decrease
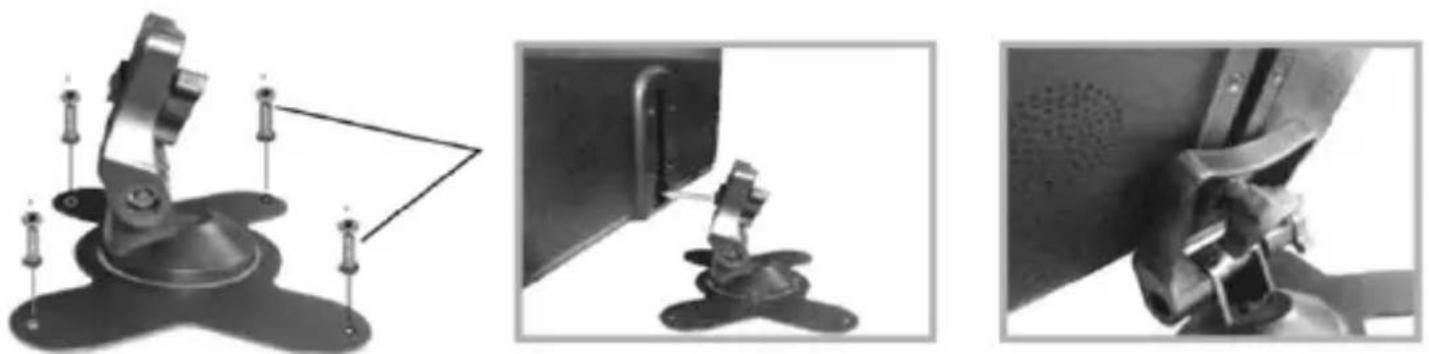
Monitor Stand Mounting:

natural_image
Illustration of a desktop computer with an inset showing a circular diagram of a mechanical or robotic system (no text or symbols present)- Set the mount stand in the desired location, then use screws to secure the mount stand into location. Please make sure as to set a location free from vehicle obstruction including any wiring, or location where it may obstruct the driver's view, driving conditions, etc.
- Attach the metal buckle piece on top of the fan shaped mount stand, and slide it into the receiving slot in back of the display monitor assembly. This metal buckle should slide in and up to the monitor assembly.
- Set the desired position/height of the buckle into the monitor assembly.
- Tighten the clamp-style knob in the back of the stand mount to secure the monitor in the desired position.
- The angle / tilt position of the stand mount is also adjustable. Located toward the base of the stand mount is another clamp-style knob.
If you are experiencing any problems with your camera and monitor system please contact:
support@PyleUSA.com
PYLE®
Pyle Service Center
1600 63rd St.
Brooklyn, NY I 1204
www.PyleUSA.com
Brand : Pyle
Model : PLCMTR7250
Category : Rear Camera