
DRW150SASBK - Unknown StarTech.com - Free user manual and instructions
Find the device manual for free DRW150SASBK StarTech.com in PDF.

| Product Type | Removable SAS/SATA Hard Drive Drawer |
| Brand | StarTech.com |
| Model | DRW150SASBK |
| Form Factor | 5.25" drive bay (fits 3.5" hard drive) |
| Dimensions (L x W x H) | 180 mm x 146 mm x 42 mm |
| Weight | 850 g |
| Enclosure Material | Aluminum frame and tray |
| Hard Drive Compatibility | 3.5" SAS or SATA hard drives |
| Data Transfer Rate | Up to 300 MB/s (SATA), 150 MB/s (SAS) |
| Interface | Serial Attached SCSI (internal) / SATA (via 29-pin connector) |
| Power Connector | 29-pin power and signal connector (SATA power compatible) |
| Cooling | Built-in 8 cm x 8 cm adjustable-speed fan |
| Locking Mechanism | Key lock with power interlock to prevent removal during operation |
| Hot Swap Support | Yes (Plug and Play, hot swappable) |
| Installation | Requires available 5.25" drive bay and SATA/SAS host connection |
| Included Accessories | 1 drive caddy, 1 drive bay, bag of assorted screws, manual |
| Safety Certifications | FCC Class B, CE, WEEE, RoHS |
| Warranty | 1 year |
| Electrostatic Discharge (ESD) Protection | Handle with anti-static precautions; wear grounding strap |
| Maintenance | Clean with dry cloth; keep vents and fan free of dust |
| Regulatory Compliance | WEEE, CE, RoHS, FCC Class B |
Frequently Asked Questions - DRW150SASBK StarTech.com
User questions about DRW150SASBK StarTech.com
0 question about this device. Answer the ones you know or ask your own.
Ask a new question about this device
Download the instructions for your Unknown in PDF format for free! Find your manual DRW150SASBK - StarTech.com and take your electronic device back in hand. On this page are published all the documents necessary for the use of your device. DRW150SASBK by StarTech.com.
USER MANUAL DRW150SASBK StarTech.com
Removable SAS/SATA Hard Drive Drawer
Serial Attached SCSI Removable Drive Drawer
DRW150SASBK
Instruction Manual
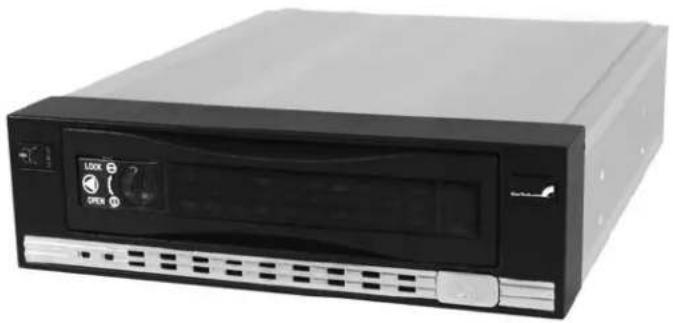
natural_image
Exterior view of a black and white electronic device with drive slots and control buttons (no visible text or symbols)Actual product may vary from photo
StarTech.com
The Professionals' Source for Hard-to-Find Computer Parts
FCC Compliance Statement
This equipment has been tested and found to comply with the limits for a Class B digital device, pursuant to part 15 of the FCC Rules. These limits are designed to provide reasonable protection against harmful interference in a residential installation. This equipment generates, uses and can radiate radio frequency energy and, if not installed and used in accordance with the instructions, may cause harmful interference to radio communications. However, there is no guarantee that interference will not occur in a particular installation. If this equipment does cause harmful interference to radio or television reception, which can be determined by turning the equipment off and on, the user is encouraged to try to correct the interference by one or more of the following measures:
- Reorient or relocate the receiving antenna.
- Increase the separation between the equipment and receiver.
- Connect the equipment into an outlet on a circuit different from that to which the receiver is connected.
- Consult the dealer or an experienced radio/TV technician for help.
Use of Trademarks, Registered Trademarks, and other Protected Names and Symbols
This manual may make reference to trademarks, registered trademarks, and other protected names and/or symbols of third-party companies not related in any way to StarTech.com. Where they occur these references are for illustrative purposes only and do not represent an endorsement of a product or service by StarTech.com, or an endorsement of the product(s) to which this manual applies by the third-party company in question. Regardless of any direct acknowledgement elsewhere in the body of this document, StarTech.com hereby acknowledges that all trademarks, registered trademarks, service marks, and other protected names and/or symbols contained in this manual and related documents are the property of their respective holders.
Instruction Manual
Table of Contents
Introduction ....1
Features ....1
Before You Begin....1
Installation 2
Installing the hard drive 2
Installing the Drive Bay in the PC 4
Removing the Drive Drawer 4
Replacing the Drive Drawer 5
Specifications 5
Technical Support....6
Warranty Information ....6
Instruction Manual
Introduction
Thank you for purchasing a StarTech.com 5.25" Serial attached SCSI/Serial ATA hard drive drawer. Now, you can quickly add and remove hard drives from your system without having to open your computer, while utilizing the impressive data transfer speeds of either Serial attached SCSI (SAS) or SATA. Each unit consists of a bay portion that fits into your 5.25" drive bay and a removable caddy that holds your hard disk. Whether for using multiple operating systems, making high speed, high capacity backups, or minimizing downtime on mission-critical computers, StarTech.com's removable drive drawers provide the ultimate in reliability and convenience.
Features
- Serial-attached-SCSI or SATA connection
• Maximum data transfer rates: 150MB/s (SAS), 300MB/s (SATA) - Point to point - free from master/slave setting
- Locking mechanism controls power to the drive so that the disk cannot be accidentally removed while in operation
• 29-pin power and signal connectors
• Built-in, adjustable-speed, 8cm x 8cm fan
• Supports Plug and Play installation and hot swapping
• Rugged aluminum frame and hard drive tray
Before You Begin
System Requirements
- An IBM-PC or Mac computer with available 5.25" drive bay
- An available SAS or SATA hard drive connection
- An available 15-pin SATA power connection
Contents
- 1 x drive caddy
- 1 x drive bay
- 1 x Bag of assorted screws
Instruction Manual
Installation
To ensure a quick and easy installation, please read through this section before attempting to install this device.
WARNING: Hard drives require careful handling, especially when being transported. If you are not careful with your hard disk, it may result in lost data. Always handle your hard drive and storage device with caution. Hard drives, like all computer equipment can also be severely damaged by static electricity. Be sure that you are properly grounded before opening your computer case or touching any components. StarTech.com recommends that you wear an anti-static strap when installing any computer equipment. If an anti-static strap is unavailable, discharge yourself of any static electricity build-up by touching a large grounded metal surface (such as the computer case) for several seconds. Do not bump, jar, or drop the device. Do not disconnect any cables or power sources while the hard drive is active. This can result in data loss and possible damage to the hard drive. Always make sure that your hard drive is fully spun down before removing the device.
Installing the Hard Drive
NOTE: Before installing the hard disk in the case, make sure that you have properly configured your hard disk according to your hard disk manufacturer's specifications.
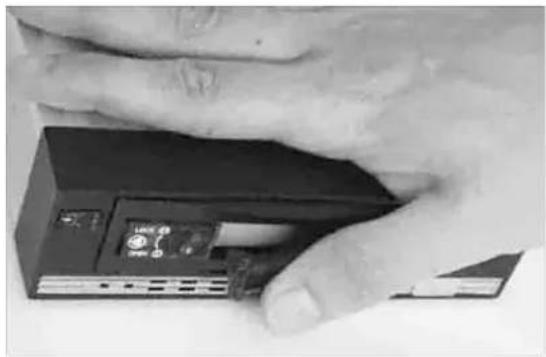
- Remove the caddy from the bay by turning the locking dial to the OPEN position as marked on the caddy. The locking arm should swing open, releasing the caddy from the enclosure. If the locking arm does not swing open, gently press the left half of the locking mechanism, which will release the caddy.

natural_image
Close-up of hands holding a compact drive chassis with arrows indicating motion (no text or symbols visible)- Remove the caddy by pulling the locking arm out of the enclosure.
Instruction Manual
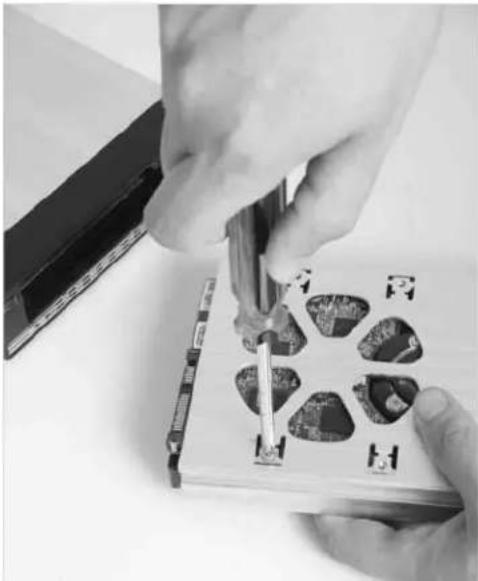
natural_image
Close-up of hands using a screwdriver to cut into a slot on a computer keyboard (no visible text or symbols)- Place the 3.5" Serial Attached SCSI drive into the caddy, making sure that the holes provided at the bottom of the caddy are properly aligned with the holes on the bottom of the hard drive. Secure the hard drive in the caddy, by inserting and tightening the screws provided into the holes located on the bottom of the hard drive.
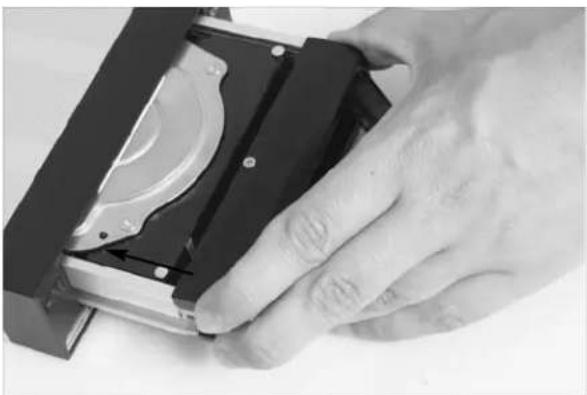
natural_image
Close-up of a hand holding a hard disk drive (no visible text or symbols)- Once the hard drive is properly secured onto the caddy, gently slide the caddy into the enclosure, ensuring that the hard drive power/data ports connect with the power/data connection at the back of the enclosure.
Instruction Manual
natural_image
Close-up of a hand inserting a device into a black box (no visible text or symbols)- Close the locking arm. To completely secure the hard drive caddy in the enclosure, please turn the locking dial to the lock position (clockwise).
Installing the Drive Bay in the PC
- Make sure that your system is unplugged and you are grounded.
- Remove the side covers from your PC and remove the front cover from an available 5.25" drive bay (see your computer's user manual for details, if necessary).
- Insert the bay into the 5 1/4" bay slot, making sure that the screw holes on the side of the bay line up with the holes in the bay slot.
- Connect an available SAS cable to the connector on the back of the enclosure. Please note: DRW150SASBK can be connected to the computer using a standard SATA connection, in place of the SAS connection. If this is the case, please be sure to attach the necessary power connector.
- Using the supplied screws, mount the enclosure into the PC bay.
Your Serial Attached SCSI Drive drawer is now connected, and ready to be used. Please restore power to the PC.
Removing the Drive Drawer
NOTE: Do not unlock the drawer when the hard drive is in use. Only power down the drive when the hard drive is idle. Once you have powered down the hard drive, wait about 15 seconds to let the hard drive "spin down" before removing the caddy from the bay.
- Turn the locking dial in a counter-clockwise direction, to unlock the drive drawer.
- Gently pull the caddy out of the enclosure.
Instruction Manual
Replacing the Drive Drawer
To replace the drive drawer following removal, slide the tray back into the slot. When the tray is all the way back into the slot, press the arm back in until you hear a "click" sound. This indicates that the tray and hard drive are securely installed.
Specifications
| Enclosure Dimensions / Weight | 180mm x 146mm x 42mm (L x W x H) / 850g |
| Enclosure Construction Aluminum | |
| Hard Drive Compatibility 3.5" SAS or SCSI | |
| Data Transfer Rate 300MB/S | |
| Power 29-pin adapter | |
| Safety Certifications | WEEE, CE, ROHS |
| Interface | Serial Attached SCSI (internal) Serial ATA / Serial Attached SCSI (external) |
| Bottom cooling fan dimensions | 8 x 8cm |
Instruction Manual
Technical Support
StarTech.com's lifetime technical support is an integral part of our commitment to provide industry-leading solutions. If you ever need help with your product, visit www.startech.com/support and access our comprehensive selection of online tools, documentation, and downloads.
Warranty Information
This product is backed by a one-year warranty. In addition, StarTech.com warrants its products against defects in materials and workmanship for the periods noted, following the initial date of purchase. During this period, the products may be returned for repair, or replacement with equivalent products at our discretion. The warranty covers parts and labor costs only. StarTech.com does not warrant its products from defects or damages arising from misuse, abuse, alteration, or normal wear and tear.
Limitation of Liability
In no event shall the liability of StarTech.com Ltd. and StarTech.com USA LLP (or their officers, directors, employees or agents) for any damages (whether direct or indirect, special, punitive, incidental, consequential, or otherwise), loss of profits, loss of business, or any pecuniary loss, arising out of or related to the use of the product exceed the actual price paid for the product.
Some states do not allow the exclusion or limitation of incidental or consequential damages. If such laws apply, the limitations or exclusions contained in this statement may not apply to you.
About StarTech.com
StarTech.com is “The Professionals’ Source for Hard-to-Find Computer Parts”. Since 1985, we have been providing IT professionals with the quality products they need to complete their solutions. We offer an unmatched selection of computer parts, cables, server management solutions and A/V products and serve a worldwide market through our locations in the United States, Canada, the United Kingdom and Taiwan.
Visit www.startech.com for complete information about all our products and to access exclusive interactive tools such as the Parts Finder and the KVM Reference Guide. StarTech.com makes it easy to complete almost any IT solution. Find out for yourself why our products lead the industry in performance, support, and value.
- Removable SAS/SATA Hard Drive Drawer
- FCC Compliance Statement
- Use of Trademarks, Registered Trademarks, and other Protected Names and Symbols
- Instruction Manual
- Table of Contents
- Introduction
- Features
- Before You Begin
- System Requirements
- Contents
- Installation
- Installing the Hard Drive
- Installing the Drive Bay in the PC
- Removing the Drive Drawer
- Replacing the Drive Drawer
- Technical Support
- Warranty Information
- Limitation of Liability
- About StarTech.com
Brand : StarTech.com
Model : DRW150SASBK
Category : Unknown