SW-4X1KVMMV - Switch KanexPro - Free user manual and instructions
Find the device manual for free SW-4X1KVMMV KanexPro in PDF.

User questions about SW-4X1KVMMV KanexPro
0 question about this device. Answer the ones you know or ask your own.
Ask a new question about this device
Download the instructions for your Switch in PDF format for free! Find your manual SW-4X1KVMMV - KanexPro and take your electronic device back in hand. On this page are published all the documents necessary for the use of your device. SW-4X1KVMMV by KanexPro.
USER MANUAL SW-4X1KVMMV KanexPro
4.1 Product Appearance .... 4
4.2 Front Panel....5
4.3 Rear Panel 6
4.4 IR Remote Control....7
- Installation 9
5.1 Wiring Diagram 9
5.2 Rack Mount Installation 10
- Configurations....11
6.1 Front Panel Buttons 11
6.2 Front Panel Buttons 11
6.3 KVM function 11
6.4 Web UI 12
6.4.1 Directly Connect to PC via Ethernet Cable 12
6.4.2 Ethernet Hub or Router....13
6.4.3 System Setting Page in Web UI 14
6.4.4 Multiview Page in Web UI 15
6.4.5 Load Default in Web UI....18
6.5 RS232/TELNET 18
6.5.1 Serial Port Settings....18
6.5.2 Commands....19
6.6 Hotkey......22
6.6.1 Layout A full screen....22
6.6.2 Layout B quad-view 22
6.6.3 Mouse hotkey 23
- Package Contents ......23
A. Appendix 1: Function NA list ......24
- After-sales Service....24
1. Overview
The Multiview KVM Processor is the excellent machine for monitoring and controlling host devices. It not only displays 4 host devices in 4K60 resolution through one HDMI output, but also provides real-time control of 4 host devices by one set of keyboard and mouse.
2. Features
● Supports quadview and full screen modes
● Supports seamlessly move your mouse from monitor to monitor across computers in quad view mode
● Supports 4K@60Hz full screen and quadview layout configuration
● Supports input resolution up to 4K@60Hz, 4:4:4 color sampling
● Supports output resolution up to 4K@60Hz, 4:4:4 color sampling
● Supports upscaling up to 4K@60Hz, 4:4:4 color sampling
● Supports Deep Color and HDCP 1.4 / 2.2
● Supports cascading up to 5 units to create max. 16 host devices controlled by 1 set of keyboard and mouse
- Fast switching between the input channels or the screen layout modes
- Receive Dolby Digital® 5.1, DTS® 5.1 and uncompressed 7.1 linear PCM audio
● Supports stereo audio output
● Supports keyboard/ mouse, front panel button, IR remote control, RS232/TELNET and Web UI control
● Supports USB port firmware upgrade
3. Specifications
| MODEL NO. | Multiview KVM Processor |
| INPUT | 4 x HDMI 2.0 with locking |
| OUTPUT | 1 x HDMI 2.0 with locking |
| KEYBOARD/MOUSE | 4 x USB type B for host devices2 x USB type A for keyboard and mouse |
| CONTROL | Front panel buttonsIR remote controlRS232/TELNETWeb UI |
| FIRMWAREUPGRADE | 1 x USB 2.0 |
| VIDEO OUTPUTRESOLUTION | 3840 x 2160@60Hz, 4:4:4 color sampling |
| ETHERNET PORT | 1 x RJ45 |
| LED INDICATOR | INPUT, blue backlightOUTPUT, blue backlightPANEL LOCK, blue backlightSTANDBY on, red backlightSTANDBY off, green backlight |
| POWER SUPPLY | DC 12V/2A, locking barrel connector |
| POWERCONSUMPTION | 15W |
| ENVIRONMENT | Operating temperature 0 °C ~ 45 °COperating humidity 20~90% RHStorage temperature -20 °C ~ 60 °C |
| DIMENSION | 440.4 x 230 x 45 mm(L x W x H, standard1U) |
| WEIGHT | 2.8 KG |
4. Hardware Descriptions
4.1 Product Appearance

flowchart
graph TD
    1["File Folder"] --> 2["Server Rack"]
    2 --> 3["Monitor"]
    3 --> 4["Tower Tower"]
    4 --> 5["Folder"]
    3 --> 3
    3 --> 4
    3 --> 5
| No. | Feature | Description |
| 1 | Rack Mount Bracket * | Attach the bracket to the left side of the system chassis for rack mount installation |
| 2 | Front Panel | Push buttons control Multiview KVM Processor |
| 3 | Rear Panel | Connect Video and Audio signal via rear panel input connectors |
| 4 | System Chassis | Black metal housing and the size is 1 rack unit |
| 5 | Rack Mount Bracket * | Attach the bracket to the right side of the system chassis for rack mount installation |
* Rack Mount Bracket: Spare screws are included in the package for rack mount installation.
4.2 Front Panel

text_image
Multiview KVM Processor 4K/60Hz HOM1 HOM2 HOM3 HOM4 INPUT OUTPUT PANEL LOCK STANDEY 1 2 3 4 5 6 7 8 9| No. | Feature | Description | |
| 1 | IR Receiver | Receives signals from the remote-control transmitter | |
| 2 | INPUT* | HDMI1 | Press to select HDMI 1 input in full screenPress to select HDMI 1 audio in quad-view screen |
| 3 | HDMI2 | Press to select HDMI 2 input in full screenPress to select HDMI 2 audio in quad-view screen | |
| 4 | HDMI3 | Press to select HDMI 3 input in full screenPress to select HDMI 3 audio in quad-view screen | |
| 5 | HDMI4 | Press to select HDMI 4 input in full screenPress to select HDMI 4 audio in quad-view screen | |
| 6 | OUTPUT* | Press to select layout A (full screen) mode | |
| 7 | Press to select layout B (quadview) mode | ||
| 8 | PANEL LOCK | Press to lock or unlock the front panel buttons | |
| 9 | STANDBY | Press to put the system into standby mode or wake up the system | |
* Please find Appendix 1 on the last page
4.3 Rear Panel

text_image
KEYBOARD MOUSE USB1 USB2 USB3 USB4 RESET OUTPUT INPUT HDMI1 HDMI2 HDMI3 HDMI4 AUDIO OUT ETHERNET RS232 USB/FW UPGRADE 12VDC POWER ON/OFF 6 7 8 9 10 11 1 2 3 4 5| No. | Feature | Description | |
| 1 | OUTPUT | Connect to the HDMI display device, connector on rear panel with locking | |
| 2 | INPUT | HDMI1 | Connect to the HDMI source, connector on rear panel with locking |
| 3 | HDMI2 | Connect to the HDMI source, connector on rear panel with locking | |
| 4 | HDMI3 | Connect to the HDMI source, connector on rear panel with locking | |
| 5 | HDMI4 | Connect to the HDMI source, connector on rear panel with locking | |
| 6 | AUDIO OUT | Connect to the audio amplifier | |
| 7 | ETHERNET | Connect to PC, NB or other Controllers through IP network | |
| 8 | RS232/TELNET | Connect to PC, NB or other Controllers | |
| 9 | USB | Attach a USB flash drive for firmware upgrade | |
| 10 | 12V DC | Connect to the 12V/2A power supply, connector on rear panel with locking | |
| 11 | POWER ON/OFF | Power switch for turn ON or OFF the Multiview KVM Processor | |
4.4 IR Remote Control

text_image
1 2 3 4 5 Resolution Auto Loop 6 Input LAY OUT H-1 H-2 7 8 Audio Src. Video B 9| No. | Feature | Description | |
| 1 | Standby | [0W2Z] | Put the system into standby mode or wake up the system |
| 2 | Mute | Mute or unmute the audio output | |
| 3 | Lock |  | Lock or unlock the front panel buttons |
| 4 | Info. | System information | |
| 5 | Resolution | Auto | Set output resolution to Auto |
| Loop* | Loop switching output resolution among the supported timings | ||
| 6 | Layout | Switch between full screen and quadview | |
| 7 | Input* | H-1 | Select HDMI 1 in full screen modeSelect HDMI 1 audio in quadview mode |
| H-2 | Select HDMI 2 in full screen modeSelect HDMI 2 audio in quadview mode. | ||
| H-3 | Select HDMI 3 in full screen modeSelect HDMI 3 audio in quadview mode | ||
| H-4 | Select HDMI 4 in full screen modeSelect HDMI 4 audio in quadview mode | ||
| 8 | Audio Src. | Loop selecting HDMI audio source | |
| 9 | Video B | Reserved | |
* Please find Appendix 1 on the last page
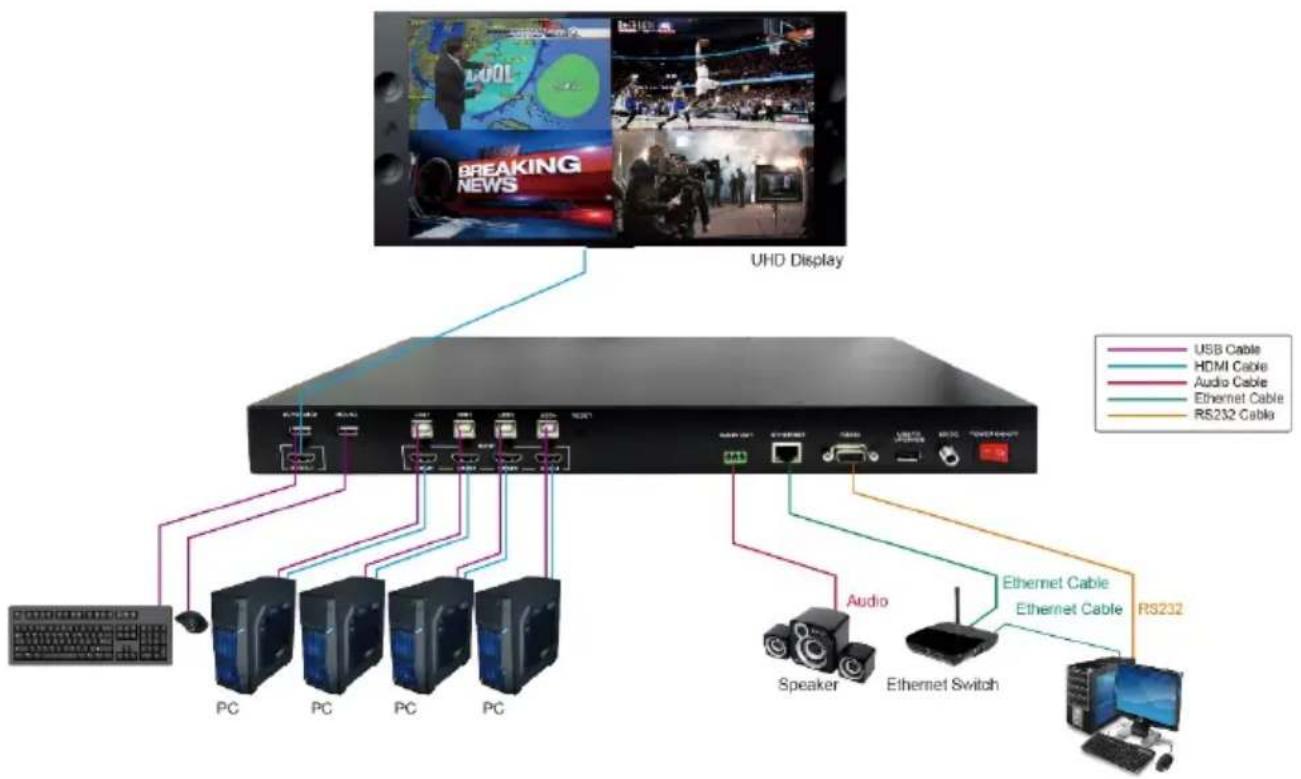
5. Installation
5.1 Wiring Diagram
flowchart
graph TD
    A["PC"] -->|USB Cable| B["Switch"]
    C["PC"] -->|HDMI Cable| B
    D["PC"] -->|Audio Cable| B
    E["PC"] -->|Ethernet Cable| B
    F["Speaker"] -->|RS232 Cable| B
    G["Ethernet Switch"] -->|Ethernet Cable| B
    H["RS232"] -->|RS232 Cable| B
    I["UHD Display"] --> J["Computer"]
    K["BREAKING NEWS"] --> L["Screen capture image"]
    style A fill:#f9f,stroke:#333
    style C fill:#f9f,stroke:#333
    style D fill:#f9f,stroke:#333
    style E fill:#f9f,stroke:#333
    style F fill:#f9f,stroke:#333
    style G fill:#f9f,stroke:#333
    style H fill:#f9f,stroke:#333
    style I fill:#ccf,stroke:#333
Do the following steps for device connections.
a. If the source is a computer, turn off the power and disconnect the keyboard and mouse. (optional)
b. Connect a source/computer to HDMI 1 input connector via a HDMI cable and USB1 connector via a USB A-B cable.
c. Connect a source/computer to HDMI 2 input connector via a HDMI cable and USB2 connector via a USB A-B cable.
d. Connect a source/computer to HDMI 3 input connector via a HDMI cable and USB3 connector via a USB A-B cable.
e. Connect a source/computer to HDMI 4 input connector via a HDMI cable and USB4 connector via a USB A-B cable.
f. Connect the OUTPUT connector to a HDMI display device
g. Connect the audio output connector to the audio amplifier, as required.
h. Connect the keyboard and mouse to the corresponding USB connectors above the HDMI output connectors.
i. Connect the 12V/2A adapter to 12V DC connector.
5.2 Rack Mount Installation
Take the following steps to attach the two brackets to the system chassis and install into rack.
a. Remove all cables and power supply before mount the Multiview KVM Processor in the rack
b. Place the system chassis on a sturdy surface
c. Attach bracket to the left side of the system chassis by using the screw driver and four screws
d. Attach the other bracket to the right side of the system chassis by using the screw driver and four screws
e. Use your tape to measure and ensure that the supporting shelf and the chassis are installed straight and level
f. Make sure that your path to the rack is unobstructed.
g. Slide the unit into the rack and position using the attached L brackets so that the slots in the brackets are positioned over the appropriate mounting holes in the side rails of the rack
h. Securely fasten the unit into the rack by using the four screws provided in the kit. Install two of the screws on each side of the unit and tighten them with a screw driver.
6. Configurations
6.1 Front Panel Buttons
Please see the section 4.2.
6.2 Front Panel Buttons
Please see the section 4.4
6.3 KVM function
The Multiview KVM Processor can be used with a mouse and keyboard with no configuration. A mouse with scroll wheel is recommended when using the KVM function.
Connect the keyboard and mouse and hover to enable the screen you wish to work on. The top-left window, HDMI 1, is the active window in default. In quadview mode, moving the cursor to* the border of the active window propels Multiview KVM Processor to switch the active window automatically**. Multiview KVM Processor intercepts the following mouse actions.
- Scroll wheel: scrolling actions sync the coordinates between the source/computer and Multiview KVM processor.
● Middle button/Wheel double click:
A. When the current layout is in quadview mode, the middle button/wheel double click can bring the active window to full screen mode.
B. When the current layout is in full screen mode, middle button/wheel double click switch the layout to quadview mode.
* Depend on the setting of mouse speed and accelerations in OS on your system, you may find the active window switched before the cursor reaches the border.
**Same as other KVMs, the mouse cursors on inactive windows will remain on the screen.
6.4 Web UI
You can connect the Ethernet directly from PC to Multiview KVM Processor.
Please follow below steps to configure your PC Ethernet setting.
6.4.1 Directly Connect to PC via Ethernet Cable
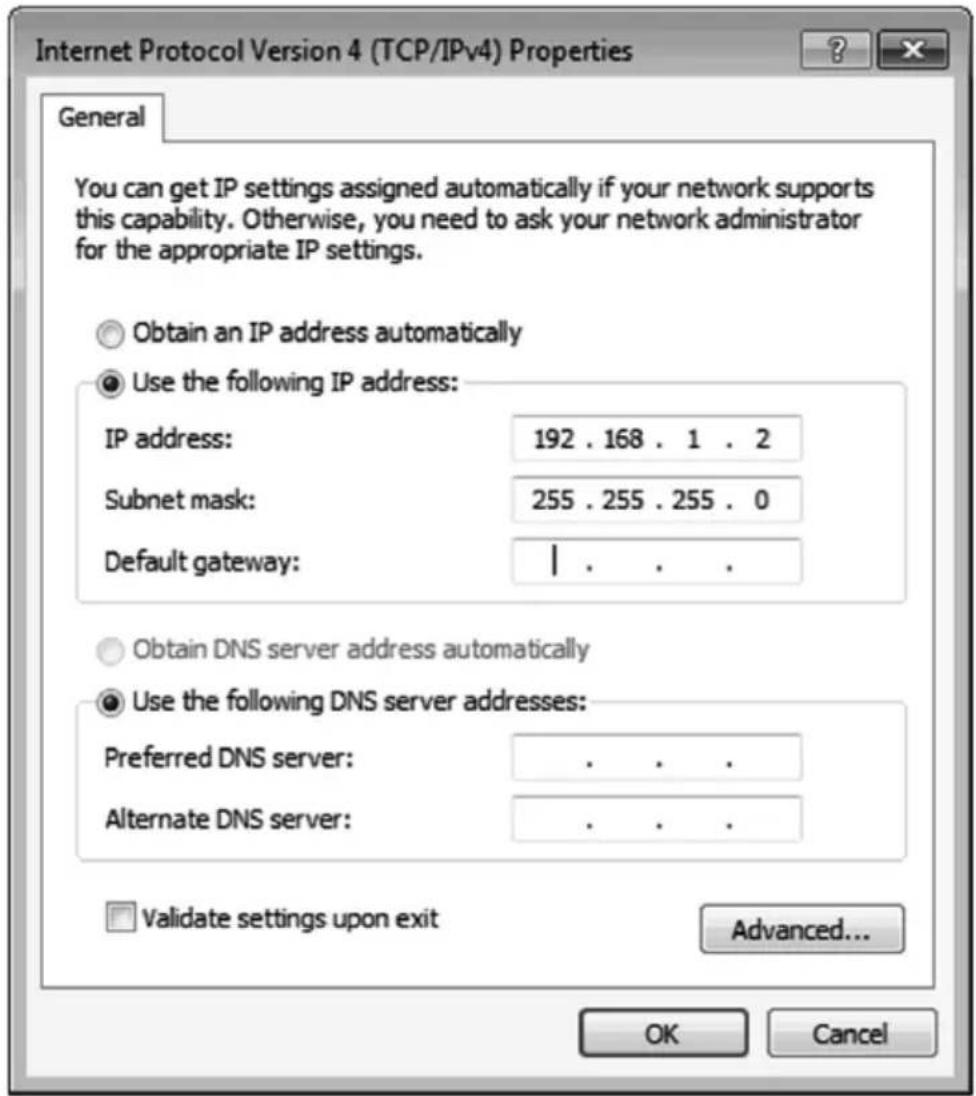
a. Click Start > Control Panel > Network and Sharing Center
b. Click "Change Adapter Settings"
c. Highlight the network adapter you want to use to connect to the device and click "Change Settings" of this connection. The "Local Area Connection Properties" window for the selected network adapter.
d. Highlight the Internet Protocol Version 4 (TCP/IPv4)
e. Click Properties. The Internet Protocol Properties window is relevant to your IT system.
f. Select "Use the following IP Address for static IP address" and fill in the details. For TCP/IPv4 you can use any IP address in the range 192.168.1.1 to 192.168.1.255 (excluding 192.168.1.202).
g. Subnet mask fills in 255.255.255.0.
h. Click "OK".
text_image
Internet Protocol Version 4 (TCP/IPv4) Properties General You can get IP settings assigned automatically if your network supports this capability. Otherwise, you need to ask your network administrator for the appropriate IP settings. Obtain an IP address automatically Use the following IP address: IP address: 192 . 168 . 1 . 2 Subnet mask: 255 . 255 . 255 . 0 Default gateway: | Obtain DNS server address automatically Use the following DNS server addresses: Preferred DNS server: . Alternate DNS server: . Validate settings upon exit Advanced... OK Canceli. After successfully operating steps a. to h., you can click into Web UI by typing the 192.168.1.202 IP address in IE or Chrome.
6.4.2 Ethernet Hub or Router
At first, please follow section 6.3.1 and open web browser then follow 6.3.3 to set the Ethernet type to DHCP. You can connect the Ethernet port of the Multiview Video Process to the Ethernet port on a network hub or network router, via an Ethernet cable with RJ-45 connector.
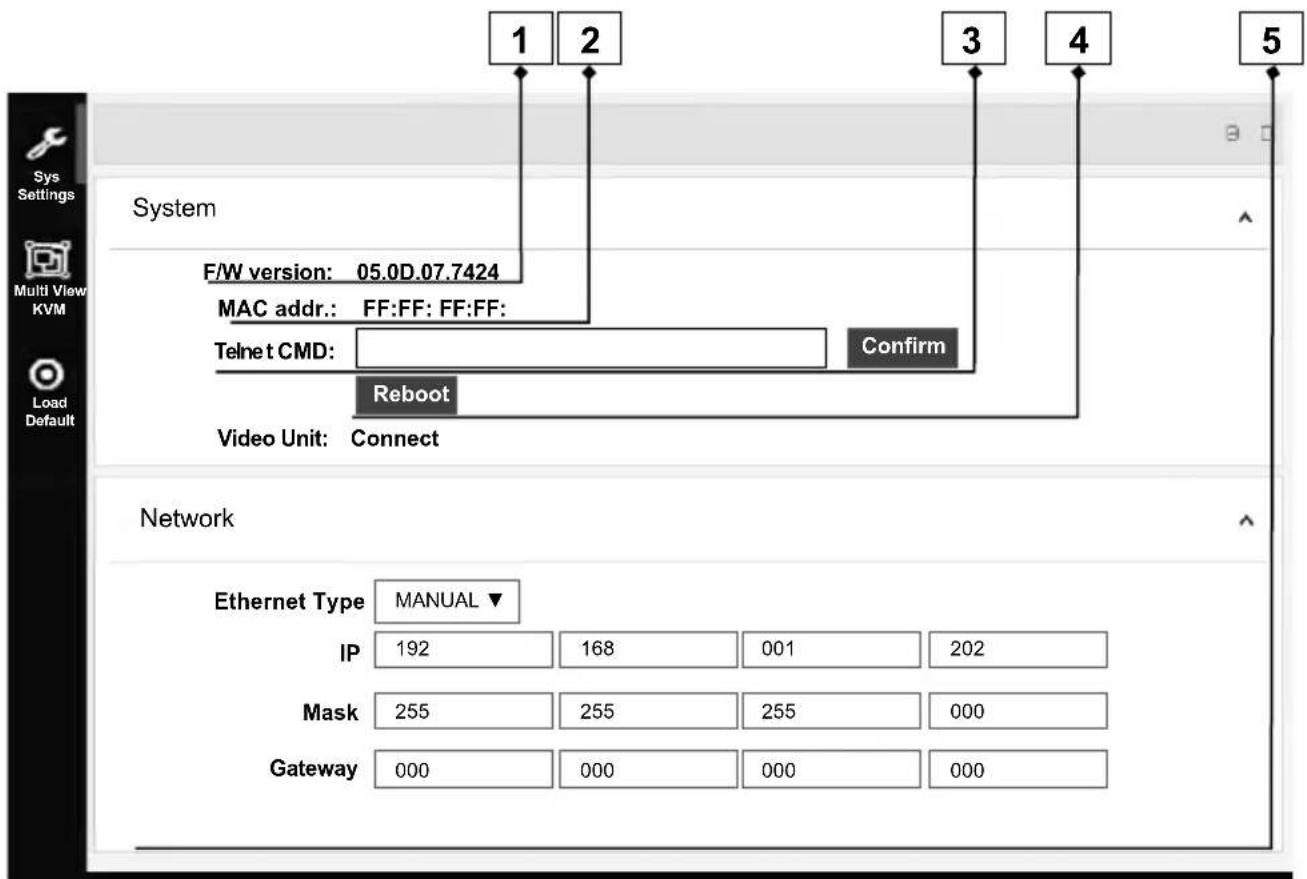
6.4.3 System Setting Page in Web UI
flowchart
graph TD
    A["1"] --> B["2"]
    B --> C["3"]
    C --> D["4"]
    D --> E["5"]
    F["F/W version: 05.0D.07.7424"] --> G["MAC addr.: FF:FF: FF:FF:"]
    G --> H["Telnet CMD:"]
    H --> I["Reboot"]
    I --> J["Video Unit: Connect"]
    K["Confirm"] --> L["Network"]
    M["Ethernet Type MANUAL ▼"] --> N["IP 192 168 001 202"]
    O["Mask 255 255 255 000"] --> P["Gateway 000 000 000 000"]
| No. | Feature | Description | |
| 1 | System | FW version | System firmware version |
| 2 | MAC addr. | MAC address of Multiview KVM Processor | |
| 3 | Telnet CMD | Refer to sec. 6.4 for telnet commands. The response of the commands is not shown on Web UI. | |
| 4 | Reboot | Reboot Multiview KVM Processor | |
| 5 | Network | Ethernet Type | Change the network type to Static IP or DHCPPress “Confirm” after setting has finished or press “Cancel” to ignore the modification. |
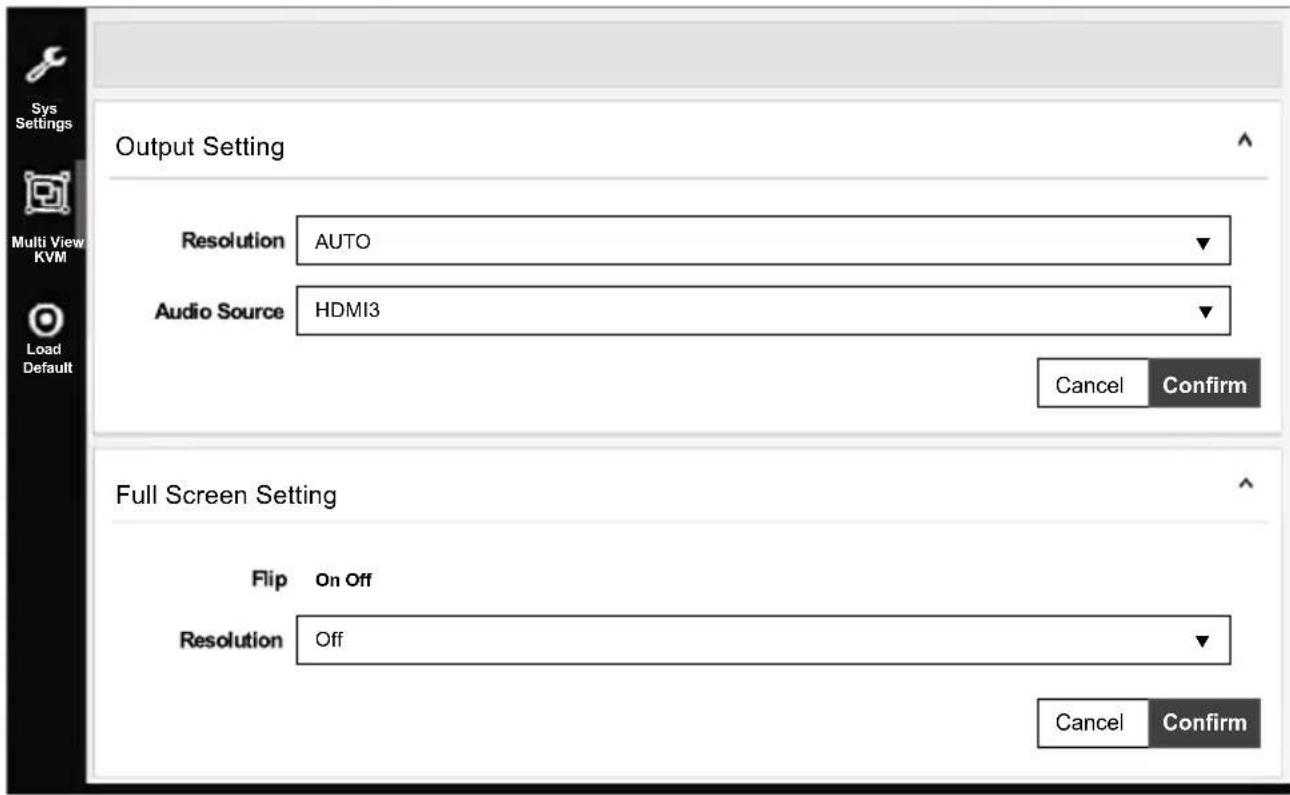
6.4.4 Multiview Page in Web UI

text_image
2 1 3 4 5 Sys Settings Multi View KVM Load Default Output Setting Resolution AUTO Audio Source HDMI3 Cancel Confirm Color Setting Brightness 0 50 100 Contrast 0 50 100 Full Screen Setting Flip On Off Resolution Off Cancel Confirm Hue 0 50 100 Saturation 0 50 100 Cancel Confirm| No. | Feature | Description | |
| 1 | Output Setting | Resolution | Select output resolution1: Auto (default)2: 3840x2160@60Hz3: 3840x2160@50Hz4: 3840x2160@30Hz5: 1920x1080@60Hz6: 1280x720@60Hz7: 480p@60HzPress “Confirm” after setting has finished or press “Cancel” to ignore the modification. |
| 2 | Audio Source | Select audio output source1: HDMI1 (default)2: HDMI23: HDMI34: HDMI4Press “Confirm” after setting has finished or press “Cancel” to ignore the modification. | |
| 3 | Full Screen Setting | Flip* | Flip video display in full screen mode1: On2: Off (default)Press “Confirm” after setting has finished or press “Cancel” to ignore the modification. |
| 4 | Rotate* | Rotate video display in full screen mode1: Off (default)2: L90°3: R90°Press “Confirm” after setting has finished or press “Cancel” to ignore the modification. | |
| 5 | Color Setting | Color Setting | Modify color setting1: 50 (default)2: 0~100Press “Confirm” after setting has finished or press “Cancel” to ignore the modification. |
* Please find Appendix 1 on the last page

flowchart
graph TD
    A["Layout Setting 6"] --> B["Pre-defined Layout A Layout B"]
    B --> C["Window A HDMI1"]
    D["7"] --> E["8"]
    F["8"] --> G["Video B HDMI1"]
    H["Cancel Confirm"] --> I["End"]
| No. | Feature | Description | |
| 6 | Layout Setting | Pre-defined* | Select display layout type on monitor1: Layout A (full screen, default)2: Layout B (quad view)Press “Confirm” after setting has finished or press “Cancel” to ignore the modification. |
| 7 | Window Info. | Main Screen: Window ASub Screen: Window B, Window C, Window DWindow A input source: HDMI1Window B input source: HDMI2Window C input source: HDMI3Window D input source: HDMI4Press “Confirm” after setting has finished or press “Cancel” to ignore the modification. | |
| 8 | Layout A Gear Icon | Select Input Source1: HDMI1 (default)2: HDMI23: HDMI34: HDMI4 | |
* Please find Appendix 1 on the last page
6.4.5 Load Default in Web UI
text_image
Output Setting Resolution AUTO Audio Source HDMI3 Cancel Confirm Full Screen Setting Flip On Off Resolution Off Cancel Confirm Sys Settings Multi View KVM Load DefaultPress to load default setting in Web UI.
6.5 RS232/TELNET
6.5.1 Serial Port Settings
Apply the following settings to set up the serial port communication.
Baud rate: 115200
Data bits: 8
Stop bits: 1
Parity: None
Flow control: None
6.5.2 Commands
| Command | Description | Parameter |
| ?/HELP | LIST ALL AVAILABLE RS-232/TELNET COMMANDS | |
| SPOW 0/1 | SET THE UNIT POWER ON/OFF | 0=OFF,1=ON |
| RPOW | SHOW CURRENT POWER STATE | |
| SRES 0~6 | SET OUTPUT RESOLUTOIN | 0: Auto1: 3840x2160@602: 3840x2160@303: 1920x1080@604: 1280x720@605: 640x480@60*6: 3840x2160@50 |
| RRES | SHOW CURRENT OUTPUT RESOLUTION | |
| SIOSDD 0~2 | ENABLE/DISABLE ONSCREEN INFORMATION DISPLAY | 0: OFF1: ALWAYS ON2: Disappear after 5 sec. (DEFAULT) |
| SBRI N | SET BRIGHTNESS VALUE FOR OUTPUT | N=0~100, DEFAULT 50 |
| RBRI | SHOW CURRENT BRIGHTNESS VALUE | |
| SCON N | SET CONTRAST VALUE FOR OUTPUT | N=0~100, DEFAULT 50 |
| RCON | SHOW CURRENT CONTRAST VALUE | |
| SSAT N | SET SATURTATION VALUE FOR OUTPUT | N=0~100, DEFAULT 50 |
| RSAT | SHOW CURRENT SATURTATION VALUE | |
| SHUE N | SET HUE VALUE FOR OUTPUT | N=0~100, DEFAULT 50 |
| RHUE | SHOW CURRENT HUE VALUE | |
| SIMRE 0~4 | RESET COLOR SETTINGS TO DEFAULT VALUES | 0=ALL1=BRIGHTNESS2=CONTRAST3=SATURATION4=HUE |
| SIN2CH 1 M** | SET INPUT SOURCE | VIDEO N=1,1: OUTPUT |
| INPUT SOURCE M=1~4,1:HDMI1, 2:HDMI2,3:HDMI3, 4:HDMI4 | ||
| SRECALL 1~2 | SET LAYOUT A or B. | 1 = LAYOUT A,2 = LAYOUT B |
| SROTATE 0~4 | SET VIDEO ROTATIONSRECALL 1 MUST BE ENABLE BEFORE SROTATE | 0=ROTATE OFF,1 = L90,2 = R90,3 = Flip on,4 = Flip offDefault 0 |
| RROTATE | SHOW VIDEO ROTATION CURRENT | |
| SIPM 0/1 | SET IP MODE TO DHCP OR STATIC | 0=DHCP, 1=STATIC,Default 1 |
| RIPM | SHOW CURRENT IP MODE | |
| SIPADD N M X Y | SET STATIC IP ADDRESS | N=0~255, M=0~255,X=0~255, Y=0~255 |
| RIPADD | SHOW STATIC CURRENT IP ADDRESS | |
| SMAADD N M X Y | SET STATIC SUBNET ADDRESS | N=0~255, M=0~255,X=0~255, Y=0~255 |
| RMAADD | SHOW STATIC CURRENT SUBNET ADDRESS | |
| SGAADD N M X Y | SET STATIC GATEWAY ADDRESS | N=0~255, M=0~255,X=0~255, Y=0~255 |
| RGAADD | SHOW STATIC CURRENT GATEWAY ADDRESS | |
| IPCONFIG | SHOW ETHERNET ADDRESS | |
| DEFAULT | RESET THE UNIT TO FACTORY DEFAULTS | |
| SMUTE 0/1 | SET AUDIO MUTE | 0=UNMUTE, 1=MUTE |
| RMUTE | SHOW CURRENT MUTE VALUE | |
| SAUDIO N | SET OUTPUT AUDIO TO SPECIFIED SOURCE | AUDIO SELECT N=1~41 = HDMI1,2 = HDMI2,3 = HDMI3,4 = HDMI4 |
| RAUDIO | SHOW OUTPUT AUDIO SOURCE | |
| RFW | SHOW FIRMWARE VERSION | |
| REBOOT | SYSTEM REBOOT | |
| READEDID | READ EDID INFO FROM SINK DEVICE | |
| SASPECT N | SET ASPECT MODE | N=0~20: full (default)1: aspect2: 1by1 |
| RASPECT | SHOW ASPECT MODE AFTER COMMAND | |
| SBF N | SET BORDER | N=0~10: disable (default)1: enable |
| SBFC N | SET BORDER COLOR | N=0~90: white (default)1: grey2: yellow3: blue4: green5: red6: purple7: orange8: pink9: black |
| RBF | SHOW BORDER STATUS |
* Please see Appendix 1 for the condition for this output resolution.
** This command only works on full screen (layout A).
6.6 Hotkey
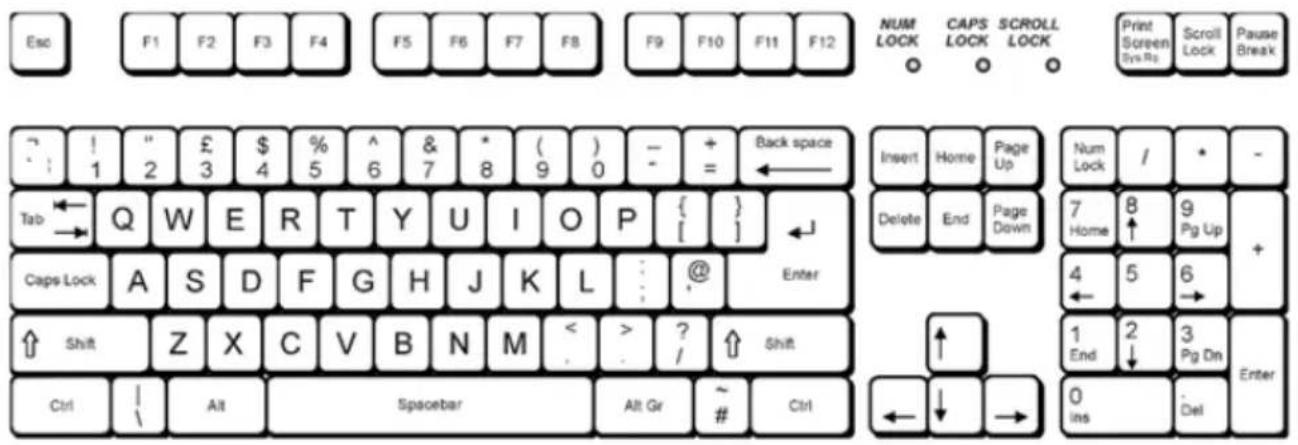
text_image
Esc F1 F2 F3 F4 F5 F6 F7 F8 F9 F10 F11 F12 CAPS LOCK SCROLL LOCK Print Screen Sys.Re Scroll Lock Pause Break ↑ ! " £ $ % ^ & * ( ) - + Back space 1 2 3 4 5 6 7 8 9 0 = ← Tab Q W E R T Y U I O P { } Caps Lock A S D F G H J K L @ Enter Shift Z X C V B N M < ? ↑ Shift Ctrl | Alt Spacebar Alt Gr ~ Ctrl Insert Home Page Up Num Lock / * - Delete End Page Down 7 Home 8 9 Pg Up + 4 5 6 → 1 End 2 3 Pg Din Enter ← ↓ → 0 Ins Del6.6.1 Layout A full screen
scroll + scroll + 1 : Switch to HDMI1 and K/M to USB1
(e.g. Double click scroll lock, then click 1)
scroll + scroll + 2 : Switch to HDMI2 and K/M to USB2 to scroll + scroll + 3 : Switch to HDMI3 and K/M USB3
to scroll + scroll + 4 : Switch to HDMI4 and K/M USB4
scroll + scroll + backspac :
Switch to previous input port
(e.g. if the last selection is HDMI4/USB4 and the current one is HDMI1/USB1, using this hotkey can switch back and forth between HDMI4/USB4 and HDMI1/USB1.)
6.6.2 Layout B quad-view
scroll + scroll + 1 : Switch K/M to USB1
(e.g. Double click scroll lock, then click 1)
scroll + scroll + 2 : Switch K/M to USB2

flowchart
graph LR
    A["scroll"] --> B["scroll"]
    C["scroll"] --> D["scroll"]
    E["scroll"] --> F["scroll"]
    G["scroll"] --> H["scroll"]
    I["3"] --> J[": Switch K/M to USB3"]
    K["4"] --> L[": Switch K/M to USB4"]
    M["backspac"] --> N[":"]
Switch to previous K/M port
6.6.3 Mouse hotkey
Double clip middle button to switch the layout
7. Package Contents
1) 1 x Multiview KVM Processor
2) 1 × Remote Control
3) 1 x DC 12V/2A output power adapter
4) 2 x Rack Mount Bracket
5) 4 x Rubber Pad
6) 1 x Screws bag
7) 1 x User manual
A. Appendix 1: Function NA list
| Input Resolution | Layout A | Layout B | Output Resolution | Layout A | Layout B |
| 4K60 | Rotate NA | Rotate NA Flip NA | 4K60 | ||
| 4K30 | Rotate NA | Rotate NA Flip NA | 4K30 | ||
| 1080p | Rotate NA Flip NA | 1080p | |||
| 720p | Rotate NA Flip NA | 720p | |||
| 480p | Rotate NA Flip NA | 480p | NA |
8. After-sales Service
If problems arise when operating the device, please refer to this user manual. Any transport costs are borne by the users during the warranty.
-
Product Limited Warranty: We warrant that products will be free from defects in materials and workmanship for three years, which starts from the first day the product exits warehouse. (Make note of the serial number on the product) Proof of purchase in the form of a bill of sale or receipted invoice MUST be presented to obtain warranty service.
-
What the warranty does not cover:
-
Warranty expiration.
• Factory applied serial number has been altered or removed from the product.
• Damage, deterioration or malfunction caused by:
• Normal wear and tear
• Use of supplies or parts not meeting our specifications
• No certificate or invoice as the proof of warranty. - The product model showed on the warranty card does not match with the model of the product for repairing or had been altered.
• Damage caused by force majeure.
• Servicing not authorized
• Any other causes which does not relate to a product defect
• Delivery, installation or labor charges for installation or setup of the product
- Technical Support: Email or call our after-sales department if there are any problems or any unanswered questions. Please inform us the following information
about your cases:
• Product version and name.
• Detailed failure situations.
Remarks: For any questions or troubleshooting please contact your local distributor or email support@kanexpro.com /call 888-975-1368
11. Warranty
A. LIMITED WARRANTY
KanexPro™ warrants that (a) its products (the "Product") will perform greatly in agreement with the accompanying written materials for a period of 36 months (3 full years) from the date of receipt and (b) that the product will be free from defects in materials and workmanship under normal use and service for a period of 3 years.
B. CUSTOMER REMEDIES
KanexPro's entire liability and Customer's exclusive remedy shall be, at KanexPro option, either return of the price paid for the product, or repair or replacement of the Product that does not meet this Limited Warranty and which is returned to KanexPro with a copy of customers' receipt. This Limited Warranty is void if failure of the Product has resulted from accident, abuse, or misapplication. Any replacement Product will be warranted for the remainder of the original warranty period of 3 years, whichever is longer.
C. NO OTHER WARRANTIES
To the maximum extent permitted by applicable law, KanexPro disclaims all other warranties, either express or implied, including, but not limited to implied warranties of merchantability and fitness for a purpose, regarding the product and any related written materials. This limited warranty gives customers specific legal rights. Customers may have other rights depending on the jurisdiction.
D. NO LIABILITY FOR DAMAGES
To the maximum extent permitted by applicable law, in no event shall KanexPro be liable for any damages whatsoever (including without limitation, special, incidental, consequential, or indirect damages for personal injury, loss of business profits, business interruption, loss of business information, or any other pecuniary loss) arising out of the use of or inability to use this product, even if KanexPro has been advised of the possibility of such damages
KanexPro™
Brea California,
www.kanexpro.com